Olivetti OLIBOOK S1300 Manuale del proprietario
- Tipo
- Manuale del proprietario

Code: 383328 A

Edited/Published/Produced by:
Realizzato/Pubblicato/Prodotto da:
Olivetti S.p.A.
Gruppo Telecom Italia
Via Jervis, 77
Ivrea (TO)
Italy
www.olivetti.com
Copyright © Olivetti, 2009
Tutti i diritti riservati
The mark affixed to the product certifies that
Code/Codice: 383328 A
the product satisfies the basic quality
Requirements.
I requisiti qualitativi di questo prodotto sono
attestati dall’apposizione della marcatura CE
sul prodotto.
Data di pubblicazione: Dicembre 2009
Marchi registrati: Microsoft e Windows sono marchi
registrati di Microsoft Corporation.
Altri marchi registrati e nomi commerciali possono essere
utilizzati in questo documento come riferimento ai
rispettivi proprietari o ai nomi dei loro prodotti. Olivetti
declina qualsiasi interesse proprietario in marchi registrati
e nomi commerciali di terzi.
All rights reserved
Date of publication: December 2009
Trademarks: Microsoft and Windows are registered
trademarks of Microsoft Corporation.
Other trademarks and trade names
may be used in this document to refer to either the entities
claiming the marks and names or their products.
Olivetti disclaims any proprietary interest in trademarks and
trade names other than its own.
Directive 2002/96/CE - Direttiva 2002/96/CE
DIRECTIVE 2002/96/CE ON THE TREATMENT, COLLECTION,
RECYCLING AND DISPOSAL OF ELECTRIC AND ELECTRONIC
DEVICES AND THEIR COMPONENTS
1. FOR COUNTRIES IN THE EUROPEAN UNION (EU)
The disposal of electric and electronic devices as solid urban waste is
strictly prohibited: it must be collected separately. The dumping of these
devices at unequipped and unauthorized places may have hazardous
effects on health and the environment.
Offenders will be subjected to the penalties and measures laid down by
the law.
The crossed dustbin symbol on the device means that:
- When it to be disposed of, the device is to be taken to
the equipped waste collection centres and is to be
handled separately from urban waste;
- Olivetti guarantees the activation of the treatment,
collection, recycling and disposal procedures in
accordance with Directive 2002/96/CE (and subsequent
amendments).
To dispose of our devices correctly:
a) Contact the Local Authorities, who will give you the practical
information you need and the instructions for handling the waste
correctly, for example: location and times of the waste collection
centres, etc.
b) When you purchase a new device of ours, give a used device similar
to the one purchased to our dealer for disposal.
2. FOR OTHER COUNTRIES (NOT IN THE EU)
The treatment, collection, recycling and disposal of electric and electronic
devices will be carried out in accordance with the laws in force in the
country in question.
DIRETTIVA 2002/96/CE SUL TRATTAMENTO, RACCOLTA,
RICICLAGGIO E SMALTIMENTO DI APPARECCHIATURE ELETTRICHE
ED ELETTRONICHE E LORO COMPONENTI
1. PER I PAESI DELL'UNIONE EUROPEA (UE)
È vietato smaltire qualsiasi apparecchiatura elettrica ed elettronica come
rifiuto solido urbano: è obbligatorio effettuare una sua raccolta separata.
L'abbandono di tali apparecchiature in luoghi non specificatamente
predisposti ed autorizzati, può avere effetti pericolosi sull'ambiente e sulla
salute.
I trasgressori sono soggetti alle sanzioni ed ai provvedimenti a norma di
Legge.
l simbolo del contenitore barrato, riportato
sull'apparecchiatura, significa che:
- L'apparecchiatura, quando sarà giunta a fine vita, deve
essere portata in centri di raccolta attrezzati e deve essere
trattata separatamente dai rifiuti urbani;
- Olivetti garantisce l'attivazione delle procedure in materia di
trattamento, raccolta, riciclaggio e smaltimento della
apparecchiatura in conformità alla Direttiva 2002/96/CE (e
succ.mod.).
Per smaltire correttamente le nostre apparecchiature potete:
a) Rivolgervi alle Autorità Locali che vi forniranno indicazioni e informazioni
pratiche sulla corretta gestione dei rifiuti, ad esempio: luogo e orario delle
stazioni di conferimento, ecc.
b) All'acquisto di una nostra nuova apparecchiatura, riconsegnare al nostro
Rivenditore un'apparecchiatura usata, analoga a quella acquistata.
2. PER GLI ALTRI PAESI (NON UE)
Il trattamento, la raccolta, il riciclaggio e lo smaltimento di apparecchiature
elettriche ed elettroniche dovrà essere effettuato in conformità alle Leggi in
vigore in ciascun Paese.

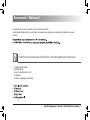
Controllo del contenuto dell’imballo / Checking What You Received
Congratulazioni per aver acquistato questo notebook ultra sottile.
Questa Guida Rapida fornisce le informazioni necessarie per completare correttamente l’installazione di questo
modello.
Il notebook ultra sottile
L’adattatore AC
Il cavo di alimentazione in AC
Le batterie
La base di appoggio (opzionale)
Guida Rapida per l’utente / Quick Reference Guide - 1
Benvenuto! / Welcome!

Verifica del tuo notebook / Examining Your NoteBook
Inserimento della batteria - Insert the Battery Pack
Verifica che il notebook sia spento.
Ribalta il notebook come indicato in figura.
Inserisci la batteria nel notebook come mostrato al
punto 1.
Spingere la batteria nel suo alloggiamento fino alla
posizione di bloccaggio.
1
2 - Guida Rapida per l’utente / Quick Reference Guide

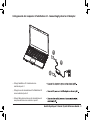
Collegamento del computer all’adattatore AC - Connecting System to AC Adapter
Collega l'adattatore AC al notebook come
mostrato al punto 1.
Collega il cavo di alimentazione AC all'adattatore AC
come mostrato al punto 2.
Collega l'altro estremo del cavo di alimentazione ad
una presa elettrica come mostrato al punto 3.
1
2
3
Guida Rapida per l’utente / Quick Reference Guide - 3

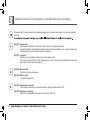
Combinazione dei tasti funzione / Fn Combination Keys (Hot Keys)
Premendo i tasti Fn insieme ad altri tasti è possibile simulare tutte le funzioni della tastiera di un normale computer
da tavolo.
[Fn]+[F1]: Sospensione
Premi questa combinazione di tasti per mettere il sistema in modalità sospensione.
In questa modalità la retroilluminazione dello schermo LCD viene disattivata e vari componenti interni del
computer entrano in una modalità di risparmio energetico.
[Fn]+[F1]: Suspend
Press this key combination to make system enter suspend mode.
In this mode, the back light of the LCD panel would be turned of and a host of internal devices would enter
into a stage of lower power consumption.
[Fn]+[F2]: Wireless LAN
Per attivare la rete locale wireless.
[Fn]+[F3]: Diminuzione luminosità
Premi questa combinazione di tasti per diminuire la luminosità dello schermo LCD.
[Fn]+[F2]: Wireless LAN
To activate Wireless LAN.
[Fn]+[F3]: Brightness decreasing
Press this key combination to decrease the brightness of the LCD.
4 - Guida Rapida per l’utente / Quick Reference Guide

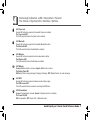
[Fn]+[F4]: Aumento luminosità
Premi questa combinazione di tasti per aumentare la luminosità dello schermo LCD.
[Fn]+[F4]: Brightness increasing
Press this key combination to increasing the brightness of the LCD.
[Fn]+[F5]: Interruttore LCD/video esterno
Premi questa combinazione di tasti per effettuare la commutazione tra le seguenti modalità:
- solo schermo LCD;
- solo video esterno;
- schermo LCD e video esterno contemporaneamente.
Nota: questa funzione è attiva solo con determinate impostazioni del sistema operativo; consulta il
manuale del sistema operativo.
[Fn]+[F5]: LCD/Video -out Switch
Press this key combination to switch between:
- LCD mode only;
- Video-out mode only;
- LCD and Video-out simultaneously mode..
Note: This function works under certain setting of OS, please refer to your instruction of OS.
[Fn]+[F7]: Mute
Premi questa combinazione di tasti per attivare/disattivare l'uscita del segnale audio.
[Fn]+[F7]: Mute
Press this combination to open/close output of audio digital.
Guida Rapida per l’utente / Quick Reference Guide - 5

[Fn]+[F8]: Diminuzione volume
Premi questa combinazione di tasti per diminuire il volume audio.
Nota: questa funzione è attiva solo con determinate impostazioni del sistema operativo; consultare il
manuale del sistema operativo.
[Fn]+[F8]: Voice weakening
Press this key combination to weaken the voice output.
Note: This function works under certain setting of OS, please refer to your instruction of OS.
[Fn]+[F9]: Aumento volume
Premere questa combinazione di tasti per aumentare il volume audio.
Nota: questa funzione è attiva solo con determinate impostazioni del sistema operativo; consulta il
manuale del sistema operativo.
[Fn]+[F9]: Voice strengthening
Press this key combination to strengthen the voice output.
Note: This function works under certain setting of OS, please refer to your instru.ction of OS.
Bluetooth abilitato/disabilitato
Premi questa combinazione di tasti per abilitare/disabilitare la funzione Bluetooth.
Bluetooth Enable/Disable
Press this key combination to enable/disable Bluetooth Function.
Webcam abilitata/disabilitata
Premi questa combinazione di tasti per abilitare/disabilitare le funzionalità della webcam.
Webcam Enable/Disable
Press this key combination to enable/disable Webcam Function.
6 - Guida Rapida per l’utente / Quick Reference Guide

Stato degli indicatori a LED / Interruttori / Pulsanti
The Status of System LEDs / Switches / Buttons
LED Caps Lock
Questo LED si illumina quando la funzionalità Caps Lock è attiva.
The Caps Lock LED
This LED would be lit when the Caps Lock is enabled.
LED Bluetooth
Questo LED si illumina quando la funzionalità Bluetooth è attiva.
The Bluetooth LED
This LED would be lit when the Bluetooth is enabled.
LED Wireless
Questo LED si illumina quando la rete locale wireless è attiva.
The Wireless LED
This LED would be lit when the Wireless is enabled.
LED Batteria
Acceso: Batteria scarica o in carica. Spento: Batteria non in carica.
The Battery Pack LED
ON Battery Pack is being recharged, Charging, Discharge. OFF: Battery Pack is not under recharge.
LED HDD
Questo LED si illumina quando il sistema accede al disco rigido.
The HDD Access LED
This LED would be lit when system is accessing the HDD drive.
LED Alimentazione
Acceso: Funzionamento normale. Spento: Computer spento o in stand-by.
The Power ON LED
ON: Full operation. OFF: Power off or in Hibemate mode.
Guida Rapida per l’utente / Quick Reference Guide - 7

Istruzioni per la sicurezza
Per proteggere te stesso e il tuo notebook, osserva sempre le seguenti precauzioni.
Durante l'uso del notebook
ATTENZIONE: Non utilizzare il notebook per lunghi periodi di tempo con la base appoggiata direttamente al tuo corpo, in quanto col
passare del tempo la base potrebbe surriscaldarsi. Il contatto prolungato con la pelle potrebbe causare disagi o ustioni.
• Non tentare mai di riparare da solo il notebook. Attieniti sempre rigorosamente alle istruzioni per l'installazione.
• Non tenere la batteria in tasca, in borsa o in qualsiasi altro contenitore in cui oggetti metallici (come la chiave di un'automobile)
possano cortocircuitare i terminali della batteria. L'eccessivo flusso di corrente risultante potrebbe generare una temperatura
molto elevata e causare ustioni alla pelle.
Accertati che non ci siano oggetti appoggiati sopra il cavo di alimentazione dell'adattatore AC e che il cavo non possa far
inciampare o essere pestato.
• Durante l'uso del notebook o in fase di ricarica della batteria, colloca l'adattatore AC in un'area ventilata, come su una scrivania o
sul pavimento. Non coprirlo con giornali o altri oggetti che possano impedire una corretta ventilazione. Inoltre non utilizzare
l'adattatore AC conservandolo all'interno della sua custodia.
• Non inserire oggetti nella presa d'aria del computer portatile. Così facendo si potrebbe determinare un cortocircuito che a sua volta
potrebbe causare un incendio o scariche elettriche.
• Utilizza esclusivamente l'adattatore AC e la batteria in dotazione al notebook. L'impiego di altri tipi di batterie o adattatori AC
potrebbero far aumentare il rischio di incendio o esplosione.
• Un'installazione impropria della batteria potrebbe causarne l'esplosione.
• Sostituisci la batteria unicamente con una batteria identica o compatibile consigliata dal costruttore.
• Smaltisci le batterie esauste secondo le modalità indicate dal costruttore.
• Prima di collegare il notebook a una sorgente di alimentazione, assicurati che la tensione nominale dell'adattatore AC corrisponda
a quella della sorgente di alimentazione a disposizione (230V/50Hz in gran parte dell'Europa, del Medio Oriente e dell'Estremo
Oriente).
• Se all'adattatore AC intendi collegare una prolunga, accertati che l'amperaggio totale di tutti i dispositivi collegati alla prolunga non
superi la capacità totale di quest'ultima.
• Prima di rimuovere la batteria dal notebook, spegni il sistema e scollega l'adattatore AC dalla presa elettrica.
8 - Guida Rapida per l’utente / Quick Reference Guide

• Per scongiurare il rischio di scosse elettriche, non collegare o scollegare alcun cavo o eseguire interventi di manutenzione o
riconfigurazione del prodotto durante un temporale.
• Per evitare esplosioni, non gettare le batterie nel fuoco. Smaltire le batterie secondo le normative in vigore.
• Prima di metterti al lavoro, posiziona il notebook su una superficie piana.
• Se viaggi con l'hard disk non inserito nel notebook, imballalo in un materiale isolante come un panno o carta. Se porti l'hard disk
come bagaglio a mano, è possibile che ti venga chiesto di inserirlo nel tuo notebook. Puoi far passare l'hard disk ai raggi X ma non
al metal detector.
• In viaggio, non sistemare il notebook nello scomparto per il bagaglio a mano poiché potrebbe scivolare. Non farlo cadere o subire
urti violenti.
• Proteggi il notebook, la batteria e l'hard disk contro i rischi ambientali, come sporcizia, polvere, alimenti, liquidi, temperature
estreme ed esposizione diretta alla luce solare.
• Se ti trovi in ambienti soggetti a differenze sostanziali di temperatura o umidità, si potrebbe formare della condensa sopra o
all'interno del notebook. Onde evitare danni, lascia evaporare l'umidità prima di riutilizzarlo.
NOTA: Nel passaggio da un ambiente freddo ad uno caldo o viceversa, lasciargli il tempo di adattarsi alla temperatura
ambiente prima di accenderlo.
• Quando scolleghi il cavo di alimentazione, fai attenzione a non tirarlo impugnando il cavo stesso, ma agisci impugnando la spina o
l'anello antistrappo. Mentre sfili la spina, fai attenzione a estrarla in posizione perpendicolare onde evitare di piegare i poli. Inoltre,
prima di collegare il cavo di alimentazione controlla che entrambi i connettori siano correttamente orientati e allineati.
• Prima di pulire il notebook, spegnilo, scollegalo dalla corrente e rimuovi la batteria.
• Presta attenzione ai componenti interni. Durante la rimozione di qualsiasi componente, tienilo dal bordo e non dal lato connettori
(come nel caso del modulo memoria).
• In caso di uso di un'apparecchiatura telefonica, segui le istruzioni per la sicurezza onde evitare incendi, scosse elettriche o altre
lesioni personali. Tali istruzioni consigiano di:
• Non usare mai il notebook vicino all'acqua, come vicino a vasche da bagno, lavabi, lavelli di cucine e lavanderie, cantine umide o
piscine.
• Evitare l’uso durante i temporali poiché i fulmini potrebbero causare scariche elettriche.
• Non usare mai il telefono per notificare l'insorgenza di una fuga di gas direttamente dall'interno dell'area interessata.
Guida Rapida per l’utente / Quick Reference Guide - 9

ATTENZIONE: Decadenza della Garanzia
• In caso di utilizzo errato della batteria, potrebbe insorgere il rischio di un'esplosione della stessa. Controlla che la batteria che stai
utilizzando sia identica o compatibile con quella originale.
• Smaltisci le batterie esauste rispettando le istruzioni fornite dal costruttore.
• Fai attenzione all’uso di dischi danneggiati, gravemente graffiati o di bassa qualità, poiché potrebbero danneggiare il lettore ottico
eperdere i dati memorizzati. I dischi con difetti di questo tipo possono creare danni durante il funzionamento ad alta velocità del
lettore, nel qual caso la garanzia decade.
Esposizione alle radiofrequenze
Questa apparecchiatura deve esse installata e utilizzata in accordo con le istruzioni fornite e non deve essere collocata o funzionare
insieme con un'altra antenna o trasmettitore. Per poter soddisfare appieno i requisiti riguardanti l'esposizione alle radiofrequenze, gli
utenti finali e gli installatori devono disporre delle istruzioni d'installazione dell'antenna e conoscere le condizioni di funzionamento
del trasmettitore.
Questa apparecchiatura deve essere installata e utilizzata ad una distanza di almeno 20 centimetri tra l’antenna e il vostro corpo.
10 - Guida Rapida per l’utente / Quick Reference Guide

Guida Rapida per l’utente / Quick Reference Guide - 11
Use the following safety guidelines to help protect yourself and your Notebook.
When Using Your Ultra Thin Notebook Computer
CAUTION: Do not operate your portable computer for an extended period of time with the base resting directly on your body.
With extended operation, heat can build up in the base. Allowing sustained contact with the skin can cause discomfort or
a burn.
• Do not attempt to service the Netbook yourself. Always follow installation instructions closely.
• Do not carry a battery in your pocket, purse, or other container where metal objects (such as car keys) could short-circuit the
battery terminals. The resulting excessive current flow can generate extremely high temperature and may cause burns to your
skin.
• Be sure that nothing rests on your AC adapter's power cable and that the cable is not located where it can be tripped over or
stepped on.
• While you are using the computer or charging the battery, place the AC adapter in a ventilated area, like on a desktop or on the
floor. Do not cover the AC adapter with papers or other items that may prevent ventilation. Also, do not use the AC adapter while it
is inside a carrying case.
• Do not insert objects into the air vent of your Netbook computer. Doing so can cause short-circuiting and may result in fire or
electrical shock.
• Use only the AC adapter and batteries that are supplied by your Netbook manufacturer. Using other types of battery or AC adapter
may heighten the risk of fire or explosion.
• Incorrectly placed batteries may result in an explosion.
• Replace only with the same or compatible battery recommended by the manufacturer.
• Please discard used batteries according to the manufacturer's instructions.
• Before you connect your Netbook to a power source, ensure that the voltage rating of the AC adapter matches that of the available
power source ( 230 V/50 Hz in most of Europe, the Middle East, and the Far East).
• If you use an extension cord with your AC adapter, ensure that the total ampere rating of all devices plugged into the extension
cord does not exceed its total capacity.
Safety Instruction

12 - Guida Rapida per l’utente / Quick Reference Guide
• When removing battery from your Netbook, first turn off the system, disconnect the AC adapter from the electrical outlet, then
remove the battery.
• To avoid risk of an electrical shock, do not connect or disconnect any cables, or perform maintenance or reconfiguration of this
product during a thunderstorm.
• Do not throw batteries into fire, doing so may cause explosion. Check with local authorities first for battery disposal instructions.
• When setting up your Netbook for work, place it on a level surface.
• When traveling with the hard drive removed from your Netbook, wrap the drive in an insulated material, such as cloth or paper.
If you have the drive checked by hand, you may be asked to install the drive into your Netbook. Your can have the hard drive
checked through an X-ray machine, but never put the drive through a metal detector.
• When traveling, do not place your Netbook in the overhead storage compartment where it could shift around. Do not drop your
Netbook or subject it to other mechanical shocks.
• Protect your Netbook, battery, and hard drive from environmental hazards such as dirt, dust, food, liquids, extreme temperature,
and direct exposure to sunlight.
• When you move your Netbook in environments where there is a substantial difference of temperature or humidity level, condensa-
tion may form on or within your Netbook. To avoid damaging your Netbook, please allow sufficient time for the moisture to
evaporate before continue using.
NOTICE: When taking your Netbook from a colder to a warmer environment or vice versa, allow your Netbook enough time to
adapt to the new environment before turning on power.
• When unplugging the power cord, please make sure that you pull on its connector or on its strain relief loop, and not on the power
cord itself. As you pull out the connector, please ensure that it is pulled out evenly in order not to bend its connecting pins. Also,
before you connect the power cord, make sure that both connectors are correctly oriented and aligned.
• Before you clean your Netbook, turn it off first, unplug it from its power source, and remove the battery.
• Handle interior components with care. When removing a compo¬nent, please hold it by the edge and not on the connecting pins
(such as the memory module).
• When using your telephone equipments, safety instructions should always be followed in order to prevent fire, electrical shock or
injuries, these instructions include:
• Do not use this product near water, for example, near a bathtub, washing basins, kitchen/laundry sinks, wet basements or
swimming pools.
• Avoid using cordless phones during an electrical storm as lightening may cause electrical shocks.
• Do not use the telephone to report a gas leak within the leakage area.

Guida Rapida per l’utente / Quick Reference Guide - 13
WARNING: Void of Warranty
• If the battery is not properly handled, there may be a risk of explosion; make sure you are using the same or compatible battery.
• Please discard used batteries according to the instructions given by the manufacturer.
• Please be aware that use of cracked, severely scratched or poor quality discs may damage the optical drive and corrupt data in
the disc. Such discs may break while drive operates in high-speed, in this case, your product warranty may be voided.
RF exposure
This equipment must be installed and operated in accordance with provided instructions and must not be co-located or operating in
conjunction with any other antenna or transmitter. End-users and installers must be provide with antenna installation instructions
and transmitter operating conditions for satisfying RF exposure compliance.
This equipment should be installed and operated with a minimum distance of 20 centimetres between the antenna and your body.

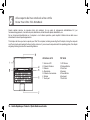
Alla scoperta del tuo notebook ultra sottile
Know Your Ultra Thin NoteBook
Questo capitolo descrive le procedure d'uso del notebook, tra cui quelle di collegamento dell'adattatore AC, per
l’accensione/spegnimento, l’uso del touch-pad, della tastiera, dei tasti di scelta rapida, della batteria, ecc.
Se non hai ancora dimestichezza con il computer o con il sistema operativo, questo capitolo ti illustrerà alcune delle nuove
straordinarie funzioni di questo apparecchio.
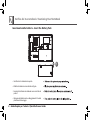
VISTA DALL'ALTO
1. Schermo LCD
2. Pulsante Wireless
3. Webcam
4. Altoparlante
5. Pulsante di accensione
6. Tastiera
7. Touch-pad
TOP VIEW
1. LCD Screen
2. Wireless Botton
3. Web Cam
4. Speaker
5. Power Botton
6. Keyboard
7.Touch Pad
14 - Guida Rapida per l’utente / Quick Reference Guide
This chapter will show you how to operate your Ultra Thin computer, including connecting the AC adaptor, turning the computer
on/off, using touch-pad, keyboard,hot keys, battery, and so on. if you are new to computers and to the operatingsystem, this chapter
will guide you through some of the new exciting features.

LEFT VIEW
1. Kensington Lock
2. D-SUB PORT
3. USB 2.0 PORT
4. Media Card Slot (SD / MMC / MS)
RIGHT VIEW
1. Line Out / MIC Jack
2. USB 2.0 PORT
3. E-SATA PORT
4. HDMI PORT
5. Express Card Slot
6. LAN RJ45 Jack
7. DC-in Jack
FRONT SIDE
1. Battery Lock
VISTA LATERALE SINISTRA
1. Lucchetto Kensington
2. Porta D-SUB VGA
3. Porta USB 2.0
4. Slot per schede (SD/MMC/MS)
VISTA LATERALE DESTRA
1. Line Out / presa microfono
2. Porta USB 2.0
3. Porta E-SATA
4. Porta HDMI
5. Slot per Express Card
6. Connettore RJ45 per LAN
7. Presa ingresso DC
LATO FRONTALE
1. Blocco batteria
Guida Rapida per l’utente / Quick Reference Guide - 15

16 - Guida Rapida per l’utente / Quick Reference Guide
-
 1
1
-
 2
2
-
 3
3
-
 4
4
-
 5
5
-
 6
6
-
 7
7
-
 8
8
-
 9
9
-
 10
10
-
 11
11
-
 12
12
-
 13
13
-
 14
14
-
 15
15
-
 16
16
-
 17
17
-
 18
18


