Philips 20-FAUX FLAT COLOR TV 20PS47S Manuale utente
- Categoria
- Dock station per dispositivi mobili
- Tipo
- Manuale utente


The exclamation point within an equilateral
triangle is intended to alert the user to the
presence of important operating and
maintenance (servicing) instructions in the
literature accompanying the appliance.
The lightning flash with arrowhead symbol,
within an equilateral triangle, is intended to
alert the user to the presence of uninsulated
“dangerous voltage” within the product’s
enclosure that may be of sufficient
magnitude to constitute a risk of electric
shock to persons.
CAUTION:
TO PREVENT THE RISK OF ELECTRIC
SHOCK, DO NOT REMOVE COVER (OR
BACK). NO USER-SERVICEABLE PARTS
INSIDE. REFER SERVICING TO QUALIFIED
SERVICE PERSONNEL.
CAUTION
RISK OF ELECTRIC SHOCK
DO NOT OPEN
IMPORTANT
D3-4-2-1-1_A1_En
CAUTION
The
standby/on button on this unit will not
completely shut off all power from the AC outlet.
Since the power cord serves as the main disconnect
device for the unit, you will need to unplug it from the
AC outlet to shut down all power. Therefore, make
sure the unit has been installed so that the power
cord can be easily unplugged from the AC outlet in
case of an accident. To avoid fire hazard, the power
cord should also be unplugged from the AC outlet
when left unused for a long period of time (for
example, when on vacation).
D3-4-2-2-2a*_A1_En
VENTILATION CAUTION
When installing this unit, make sure to leave space
around the unit for ventilation to improve heat radiation
(at least 10 cm at top, 10 cm at rear, and 10 cm at each
side).
WARNING
Slots and openings in the cabinet are provided for
ventilation to ensure reliable operation of the product,
and to protect it from overheating. To prevent fire
hazard, the openings should never be blocked or
covered with items (such as newspapers, table-cloths,
curtains) or by operating the equipment on thick carpet
or a bed.
D3-4-2-1-7b*_A1_En
on
input
network
If the AC plug of this unit does not match the AC
outlet you want to use, the plug must be removed
and appropriate one fitted. Replacement and
mounting of an AC plug on the power supply cord of
this unit should be performed only by qualified
service personnel. If connected to an AC outlet, the
cut-off plug can cause severe electrical shock. Make
sure it is properly disposed of after removal.
The equipment should be disconnected by removing
the mains plug from the wall socket when left unused
for a long period of time (for example, when on
vacation).
D3-4-2-2-1a_A1_En
WARNING
To prevent a fire hazard, do not place any naked flame
sources (such as a lighted candle) on the equipment.
D3-4-2-1-7a_A1_En
WARNING
Before plugging in for the first time, read the following
section carefully.
The voltage of the available power supply differs
according to country or region. Be sure that the
power supply voltage of the area where this unit
will be used meets the required voltage (e.g., 230 V
or 120 V) written on the AC adapter label.
D3-4-2-1-4*_A1_En
When using this product, confirm the safety
information shown on the bottom of the unit and the
AC adapter label.
D3-4-2-2-4_B1_En
This product is for general household purposes. Any
failure due to use for other than household purposes
(such as long-term use for business purposes in a
restaurant or use in a car or ship) and which requires
repair will be charged for even during the warranty
period.
K041_A1_En
input
volume
standby/on

POWER-CORD CAUTION
Handle the power cord by the plug. Do not pull out the
plug by tugging the cord and never touch the power
cord when your hands are wet as this could cause a
short circuit or electric shock. Do not place the unit, a
piece of furniture, etc., on the power cord, or pinch the
cord. Never make a knot in the cord or tie it with other
cords. The power cords should be routed such that they
are not likely to be stepped on. A damaged power cord
can cause a fire or give you an electrical shock. Check
the power cord once in a while. When you find it
damaged, ask your nearest PIONEER authorized
service center or your dealer for a replacement.
S002*_A1_En
Radio wave caution
This unit uses a 2.4 GHz radio wave frequency, which is
a band used by other wireless systems (Microwave
ovens and Cordless phones, etc.). In this event noise
appears in your television image, there is the possibility
this unit (including products supported by this unit) is
causing signal interference with the antenna input
connector of your television, video, satellite tuner, etc.
In this event, increase the distance between the
antenna input connector and this unit (including
products supported by this unit).
• Pioneer is not responsible for any malfunction of the
compatible Pioneer product due to communication
error/malfunctions associated with your network
connection and/or your connected equipment.
Please contact your Internet service provider or
network device manufacturer.
• A separate contract with/payment to an Internet
service provider is required to use the Internet.
AC adapter CAUTION
• Make sure to grasp the body of the AC adapter when
removing it from the power outlet. If you pull the
power cord, it may become damaged which could
lead to fire and/or electrocution.
• Do not attempt to plug in or remove the AC adapter
with wet hands. This may result in electrocution.
• Do not insert the power cord of AC adapter into a
power outlet where the connection remains loose
despite inserting the prongs all the way into the
outlet. Heat may be generated which could lead to
fire. Consult with the retailer or an electrician
regarding replacement of the power outlet.
This transmitter must not be co-located or operated
in conjunction with any other antenna or transmitter.
This device complies with Industry Canada
licence-exempt RSS standard(s). Operation is subject
to the following two conditions: (1) this device may
not cause interference, and (2) this device must
accept any interference, including interference that
may cause undesired operation of the device.
WARNING
Store small parts out of the reach of children and
infants. If accidentally swallowed, contact a doctor
immediately.
Store the AC adapter out of the reach of
children and infants.
The AC adapter cord may accidentally wind around the
neck and it may cause suffocation.
CAUTION
RISK OF EXPLOSION IF BATTERY IS REPLACED
BY AN INCORRECT TYPE.
DISPOSE OF USED BATTERIES ACCORDING
TO THE INSTRUCTIONS.
“Perchlorate Material special handling may
apply.
See
www.dtsc.ca.gov/hazardouswaste/perchlorate.
(Applicable to California, U.S.A.)”
WARNING
This equipment is not waterproof. To prevent a fire or
shock hazard, do not place any container filled with
liquid near this equipment (such as a vase or flower
pot) or expose it to dripping, splashing, rain or
moisture.
D3-4-2-1-3_A1_En
When disposing of used batteries, please
comply with governmental regulations or
environmental public institution’s rules that
apply in your country/area.
D3-4-2-3-1_B1_En
CAUTION
Danger of explosion if battery is incorrectly
replaced.
Replace only with the same or equivalent type
recommended by the manufacturer.
D3-4-2-3-2_A1_En
WARNING
Do not use or store batteries in direct sunlight or other
excessively hot place, such as inside a car or near a
heater. This can cause batteries to leak, overheat,
explode or catch fire. It can also reduce the life or
performance of batteries.
D3-4-2-3-3_A1_En

FCC Radiation Exposure Statement:
This equipment complies with FCC radiation exposure
limits set forth for an uncontrolled environment. This
equipment should be installed and operated with a
minimum distance of 20 cm between the radiator and
your body.
The Safety of Your Ears is in Your Hands
Get the most out of your equipment by playing it at a
safe level – a level that lets the sound come through
clearly without annoying blaring or distortion and, most
importantly, without affecting your sensitive hearing.
Sound can be deceiving. Over time, your hearing
“comfort level” adapts to higher volumes of sound, so
what sounds “normal” can actually be loud and
harmful to your hearing. Guard against this by setting
your equipment at a safe level BEFORE your hearing
adapts.
ESTABLISH A SAFE LEVEL:
• Set your volume control at a low setting.
• Slowly increase the sound until you can hear it
comfortably and clearly, without distortion.
• Once you have established a comfortable sound
level, set the dial and leave it there.
BE SURE TO OBSERVE THE FOLLOWING
GUIDELINES:
• Do not turn up the volume so high that you can’t
hear what’s around you.
• Use caution or temporarily discontinue use in
potentially hazardous situations.
• Do not use headphones while operating a motorized
vehicle; the use of headphones may create a traffic
hazard and is illegal in many areas.
S001a_A1_En
Information to User
Alterations or modifications carried out without
appropriate authorization may invalidate the user’s
right to operate the equipment.
D8-10-2_A1_En
WARNING: Handling the cord on this product or
cords associated with accessories sold with the
product may expose you to chemicals listed on
proposition 65 known to the State of California and
other governmental entities to cause cancer and
birth defect or other reproductive harm.
Wash hands after handling.
D36-P5_B1_En
NOTE:
This equipment has been tested and found to comply with the limits for a Class B digital device, pursuant to Part 15
of the FCC Rules. These limits are designed to provide reasonable protection against harmful interference in a
residential installation. This equipment generates, uses, and can radiate radio frequency energy and, if not installed
and used in accordance with the instructions, may cause harmful interference to radio communications. However,
there is no guarantee that interference will not occur in a particular installation. If this equipment does cause
harmful interference to radio or television reception, which can be determined by turning the equipment off and on,
the user is encouraged to try to correct the interference by one or more of the following measures:
— Reorient or relocate the receiving antenna.
— Increase the separation between the equipment and receiver.
— Connect the equipment into an outlet on a circuit different from that to which the receiver is connected.
— Consult the dealer or an experienced radio/TV technician for help.
D8-10-1-2_A1_En
FEDERAL COMMUNICATIONS COMMISSION DECLARATION OF CONFORMITY
This device complies with part 15 of the FCC Rules. Operation is subject to the following two conditions: (1) This
device may not cause harmful interference, and (2) this device must accept any interference received, including
interference that may cause undesired operation.
Product Name: Wireless Sound System
Model Number: XW-SMA1-K, XW-SMA3-K, XW-SMA4-K
Responsible Party Name: PIONEER ELECTRONICS (USA) INC.
SERVICE SUPPORT DIVISION
Address: 1925 E. DOMINGUEZ ST. LONG BEACH, CA 90810-1003, U.S.A.
Phone: 1-800-421-1404
URL: http://www.pioneerelectronics.com
D8-10-4*_C1_En
[For American Users]
IMPORTANT NOTICE
THE MODEL NUMBER AND SERIAL NUMBER OF THIS EQUIPMENT ARE ON THE REAR OR BOTTOM.
RECORD THESE NUMBERS ON YOUR ENCLOSED WARRANTY CARD AND KEEP IN A SAFE PLACE FOR FUTURE
REFERENCE.
D36-AP9-1_A1_En

Information for users on collection and disposal of old equipment and used batteries
These symbols on the products, packaging, and/or accompanying documents mean
that used electrical and electronic products and batteries should not be mixed with
general household waste.
For proper treatment, recovery and recycling of old products and used batteries,
please take them to applicable collection points in accordance with your national
legislation.
By disposing of these products and batteries correctly, you will help to save valuable
resources and prevent any potential negative effects on human health and the
environment which could otherwise arise from inappropriate waste handling.
For more information about collection and recycling of old products and batteries,
please contact your local municipality, your waste disposal service or the point of sale
where you purchased the items.
These symbols are only valid in the European Union.
For countries outside the European Union:
If you wish to discard these items, please contact your local authorities or dealer and
ask for the correct method of disposal.
K058a_A1_En
Symbol examples
for batteries
Symbol for
equipment
Pb
[For European Users]
This Class B digital apparatus complies with
Canadian ICES-003.
D8-10-1-3_A1_En
[For Canadian Users]
IC Radiation Exposure Statement:
This equipment complies with IC RSS-102 radiation
exposure limits set forth for an uncontrolled
environment. This equipment should be installed
and operated with a minimum distance of 20 cm
between the radiator and your body.
[For American Users and Canadian Users]
Operating Environment
Operating environment temperature and humidity:
+5 °C to +25 °C (+41 °F to +77 °F); less than 85 %RH (cooling vents not blocked)
Do not install this unit in a poorly ventilated area, or in locations exposed to high humidity or direct sunlight
(or strong artificial light)
D3-4-2-1-7c*_A1_En
[Except American Users and Canadian Users]
Operating Environment
Operating environment temperature and humidity:
+5 °C to +35 °C (+41 °F to +95 °F); less than 85 %RH (cooling vents not blocked)
Do not install this unit in a poorly ventilated area, or in locations exposed to high humidity or direct sunlight
(or strong artificial light)
D3-4-2-1-7c*_A1_En

Before Use (Important)
Safety Precautions
DANGER
About the Device
Please follow the instructions noted. Failure to do so may cause the built-in lithium-ion battery to
leak, overheat, ignite, or rupture.
•Do not dispose of the device in fire or expose it to heat.
•Do not attempt to disassemble the battery or alter it in any way.
•Do not throw the device, strike it with a hammer or other object, or drive nails into it.
•Do not use or leave the device in places where it will be exposed to high temperatures, such as near
a stove, inside a closed automobile or in direct sunlight.
•In the event that the built-in lithium-ion battery leaks fluid and the fluid contacts your eyes, do not
rub them, but rinse with copious amounts of clean water and seek immediate medical treatment.
Your eyes may be seriously harmed by exposure to such battery fluid.
•Do not allow the battery to be immersed in fresh or sea water, or become otherwise wet.
•Do not recharge the battery near a fire or in direct sunlight.
•Do not recharge the battery using any method other than as instructed.
The battery used in this device may present a risk of fire, explosion or chemical burn if
mistreated.
•Never disassemble the unit or attempt to remove battery as that could cause leakage of alkaline
solution or other electrolytic substance.
•Always keep the battery out of the reach of infants and small children.
WARNING
About the Device
•Do not use the device if it emits an unusual odor, heats up, changes color or shape, or if any other
abnormalities occur during use, while recharging or while placed in storage.
•If the battery does not recharge completely, even after exceeding the specified time, stop recharging.
Failure to do so could cause the device to heat up, rupture, or ignite.
•Recharge the battery in an environment with a temperature between 5
ºC (41 ºF) and 35 ºC (95 ºF).
Recharging the battery under different temperatures could cause the device to heat up, rupture, or
ignite, and may also deteriorate the performance and the life of the built-in lithium-ion battery.
•Do not place the device in a microwave oven or expose it to high pressure, since the device may
overheat, rupture, or ignite.
•Do not place a leaking rechargeable lithium-ion battery near a source of heat or fire, since the battery
could overheat, rupture, or ignite.
CAUTION
About the Device
•Do not dispose of the device in fire or water, since the rechargeable lithium-ion battery could rupture
or leak battery fluid, resulting in fire or personal injury.
•If fluid leaking from a rechargeable lithium-ion battery contacts your skin or clothes, wash
immediately with copious amounts of clean water. If left unattended, a skin rash could result.

About water-resistant (XW-SMA3 only)
CAUTION
Observe the following precautions in regard to the device
’
s water-resistant.
• Do not place the unit in water.
• Do not expose the unit to a large amount of water.
• Do not splash the unit with water.
• Do not expose to rain.
• Do not pour or place in warm water or water containing soap or detergent.
• Do not use in a humid environment such as a bathroom.
• Do not use near or on the beach.
This could cause rust. If exposed to seawater, thoroughly wipe off the moisture immediately with a dry cloth.
• Ensure that the terminal cover is closed during use.
The rubber packing on the cover make the device water-resistant. Make sure this packing does not get
soiled or damaged.
If the rubber packing does become soiled, wipe it clean with a dry, clean cloth.
• Do not open the terminal cover in humid environments in which the device could get
exposed to water.
• If the device is exposed to a large amount of water or moisture, immediately wipe it down
with a dry cloth.
Only open or close the terminal cover after having completely wiped off any moisture around them, with dry
hands and in an environment where the unit would not get exposed to water again.
• Make sure to install the unit on a flat and stable surface. Do not use the unit upside down
or in a tilted position.
Since water may reach the interior of the unit, install the unit in a proper position.
• Do not turn the unit upside down or hold it tilted when it has been exposed to water or water
droplets.
Since the water might run into the interior parts of the unit, do not tilt the unit if it is wet.
• If the device does get exposed to water, thoroughly dry all of the crevices on the unit’s body
into which water might have reached.
The water might have reached the interior of the device. Do not carry the unit if it is still wet.
• Do not use the remote control, AC adapter when in proximity to water.
Only the device itself is water-resistant.
This unit has been designed with water-resistance equivalent to standards IPX2(*) as defined by the
International Electrotechnical Commission (IEC).
Malfunctions due to water damage caused by improper use are not covered by product warranty, even if they
occur within the warranty period.
• Depending on conditions of use, the water-resistant features are not necessarily
guaranteed even during the warranty period.
*IPX2: The unit must be protected from water drops that fall vertically onto it when the unit is at an angle of
15 degrees or less.
Use in a wet environment (XW-SMA1 and XW-SMA4 only)
CAUTION
•XW-SMA1 and XW-SMA4 are not drip-proof. When using, prevent exposure to water. Do not use in
the following environments.
• Humid places
• Places where the product is easily exposed to water
• Near the beach or on the beach
This could cause rust.

Internal Rechargeable Lithium-ion Battery (XW-SMA3 only)
This device uses an internal rechargeable lithium-ion battery that should last the lifetime of the
device. If you suspect your battery may be dead, try charging it several times. If the battery does
not recharge, please contact us for repair information.
WARNING/DISPOSAL OF UNIT [For American Users, Canadian Users]
Please do NOT attempt to change the battery yourself. If the battery has died and you do not want
us to replace your battery, you should follow the disposal instructions below:
•Never dispose of used batteries/electronics with ordinary solid wastes, since they contain toxic
substances.
•Always dispose of used batteries/electronics in accordance with the prevailing community
regulations that apply to the disposal of batteries/electronics. If there are no local regulations
concerning battery/electronics disposal, please dispose of the device in a waste bin for electronic
devices.
•Many electronics retailers now recycle batteries and other electronic devices at no charge. Check to
see which ones in your area do so.
Installing the unit
•When installing this unit, make sure to put it on a level and stable surface.
Don’t install it on the following places:
- on a color TV (the screen may distort)
- near a cassette deck (or close to a device that gives off a magnetic field). This may interfere with
the sound.
- in direct sunlight
- in extremely hot or cold areas
- in places where there is vibration or other movement
- in places that are very dusty
- in places that have hot fumes or oils (such as near a kitchen stove)
CAUTION
•When in use, do not stand the device up, prop it up against anything or hang it from anything.
•Do not sit or stand on top of the device.
•When carrying the device, hold the entire device firmly. Do not swing the device around by the frame.
•Do not attach this unit to the wall or ceiling. It may fall off and cause injury.

9
En
Thank you for buying this Pioneer product.
Please read through these operating instructions so that you will know how to operate your model properly. After you have
finished reading the instructions, put them in a safe place for future reference.
Contents
01 Before you start
What’s in the box. . . . . . . . . . . . . . . . . . . . . . . . . . . . 10
Before using the remote control . . . . . . . . . . . . . . . . 10
Replace the battery . . . . . . . . . . . . . . . . . . . . . . . . . . . 10
Using the remote control . . . . . . . . . . . . . . . . . . . . . . . 11
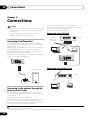
02 Connections
Connecting iPod/iPhone/iPad . . . . . . . . . . . . . . . . . . 12
Connecting to the network through the wired
or wireless LAN . . . . . . . . . . . . . . . . . . . . . . . . . . . . . 12
Connecting using LAN cable . . . . . . . . . . . . . . . . . . . . 12
Connecting using wireless LAN. . . . . . . . . . . . . . . . . . 12
Plugging in . . . . . . . . . . . . . . . . . . . . . . . . . . . . . . . . 13
When turning on this unit for the first time . . . . . . . . 13
03 Part names and functions
Remote Control . . . . . . . . . . . . . . . . . . . . . . . . . . . . . 14
Front panel . . . . . . . . . . . . . . . . . . . . . . . . . . . . . . . . 15
Rear panel. . . . . . . . . . . . . . . . . . . . . . . . . . . . . . . . . 16
04 Connect to network
Network setting . . . . . . . . . . . . . . . . . . . . . . . . . . . . . 18
After completing the network settings . . . . . . . . . . . . 25
Web Control . . . . . . . . . . . . . . . . . . . . . . . . . . . . . . . 26
Initial menu (System Information) . . . . . . . . . . . . . . . 27
Network Configuration . . . . . . . . . . . . . . . . . . . . . . . 27
Friendly Name . . . . . . . . . . . . . . . . . . . . . . . . . . . . . . 28
05 iPod/iPhone/iPad playback
Confirming what iPod/iPhone/iPad models are
supported . . . . . . . . . . . . . . . . . . . . . . . . . . . . . . . . . 29
How to confirm the version of the iPod/iPhone/iPad
software. . . . . . . . . . . . . . . . . . . . . . . . . . . . . . . . . . . . 29
Connecting your iPod/iPhone/iPad . . . . . . . . . . . . . . 30
Playing your iPod/iPhone/iPad . . . . . . . . . . . . . . . . . 30
06 Music server
Introduction. . . . . . . . . . . . . . . . . . . . . . . . . . . . . . . . 31
About playable DLNA network devices . . . . . . . . . . . . 31
Using AirPlay on iPod touch, iPhone, iPad
and iTunes. . . . . . . . . . . . . . . . . . . . . . . . . . . . . . . . . . 31
About the DHCP server function . . . . . . . . . . . . . . . . . 31
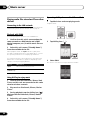
Playing audio files stored on PCs or other devices. . . 32
Connecting to the LAN network . . . . . . . . . . . . . . . . . . 32
Playback with DLNA . . . . . . . . . . . . . . . . . . . . . . . . . . 32
Using AirPlay to enjoy music . . . . . . . . . . . . . . . . . . . . 32
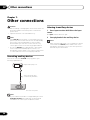
07 Other connections
Connecting auxiliary devices . . . . . . . . . . . . . . . . . . . 34
Listening to auxiliary devices . . . . . . . . . . . . . . . . . . . 34
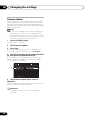
08 Changing the settings
Setting Quick Start Mode . . . . . . . . . . . . . . . . . . . . . 35
Setting Quick Start Mode. . . . . . . . . . . . . . . . . . . . . . . 35
Canceling Quick Start Mode . . . . . . . . . . . . . . . . . . . . 35
Resetting the system . . . . . . . . . . . . . . . . . . . . . . . . . 35
Firmware Update . . . . . . . . . . . . . . . . . . . . . . . . . . . . 36
09 Additional information
Troubleshooting . . . . . . . . . . . . . . . . . . . . . . . . . . . . . 37
Playable file formats. . . . . . . . . . . . . . . . . . . . . . . . . . 41
Cautions on use . . . . . . . . . . . . . . . . . . . . . . . . . . . . . 42
When moving this unit . . . . . . . . . . . . . . . . . . . . . . . . .42
Place of installation . . . . . . . . . . . . . . . . . . . . . . . . . . .42
Cleaning the product . . . . . . . . . . . . . . . . . . . . . . . . . .42
About network playback. . . . . . . . . . . . . . . . . . . . . . . 42
Windows Media Player . . . . . . . . . . . . . . . . . . . . . . . . .42
Playing Windows Media Audio (WMA) files . . . . . . . . .42
Windows Media DRM. . . . . . . . . . . . . . . . . . . . . . . . . .42
DLNA . . . . . . . . . . . . . . . . . . . . . . . . . . . . . . . . . . . . . .43
Content playable over a network . . . . . . . . . . . . . . . . . .43
Disclaimer for Third Party Content . . . . . . . . . . . . . . . .43
About playback behavior over a network . . . . . . . . . . . .43
aacPlus . . . . . . . . . . . . . . . . . . . . . . . . . . . . . . . . . . . .44
FLAC. . . . . . . . . . . . . . . . . . . . . . . . . . . . . . . . . . . . . . .44
About iPod/iPhone/iPad. . . . . . . . . . . . . . . . . . . . . . . 44
About Wi-Fi® . . . . . . . . . . . . . . . . . . . . . . . . . . . . . . . 44
Audio Artistry . . . . . . . . . . . . . . . . . . . . . . . . . . . . . . . 44
Specifications . . . . . . . . . . . . . . . . . . . . . . . . . . . . . . 45
• Illustrations featured in the Operating Instructions may
have been modified or simplified for ease of explanation,
and may therefore differ from the actual product
appearance.

Before you start01
10
En
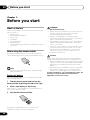
Chapter 1:
Before you start
What’s in the box
Please confirm that the following accessories are in the box
when you open it.
•Remote Control
• Lithium Battery (CR2025)*
•Power Cord
•AC Adapter
• Quick Start Guide
• Warranty Card
*The lithium battery has been factory installed in the remote
control unit.
Before using the remote control
The battery supplied with this unit is stored in the battery
casing. Remove the protective seal from the battery casing.
Note
• When you notice a decrease in the operating range,
replace the battery.
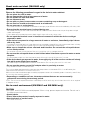
Replace the battery
When replacing the battery, use a commercially available
Lithium CR2025 battery.
1 Flip the remote control and pull out the
battery holder by pushing the tab to the right.
2 Place a new battery in the casing.
Make sure the + side of the battery is facing up when you
place it in the space provided.
3 Push back the battery holder.
The battery included with the unit is to check initial
operations; it may not last over a long period.
WARNING
About lithium battery
• Danger of explosion if battery is incorrectly replaced.
Replace only with the same or equivalent type
recommended by the manufacturer.
• Dispose of used battery cells immediately after
replacement. Keep away from children. If swallowed,
please contact a doctor immediately.
• Lithium batteries may present a fire or chemical burn
hazard if misused. Do not disassemble, heat above
100 ºC, or incinerate.
• Do not use or store batteries in direct sunlight or other
excessively hot place, such as inside a car or near a
heater. This can cause batteries to leak, overheat,
explode or catch fire. It can also reduce the life or
performance of batteries.
Caution
Incorrect use of batteries may result in such hazards as
leakage and bursting. Observe the following precautions:
• Remove the battery if the unit isn’t going to be used for
a month or more. In the event of battery fluid leakage,
wipe up any fluid inside the case and install a new
battery.
• When disposing of used batteries, please comply with
governmental regulations or environmental public
institution’s rules that apply in your country or area.
“Perchlorate Material - special handling may apply. See
www.dtsc.ca.gov/hazardouswaste/perchlorate.
(Applicable to California, U.S.A.) “
1
1
3
2

Before you start 01
11
En
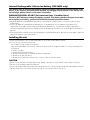
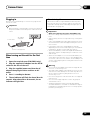
Using the remote control
The remote has a range of about 7 m (23 ft.) at an angle of
about 30º from the remote sensor.
Keep in mind the following when using the remote control:
• Make sure that there are no obstacles between the
remote and the remote sensor on the unit.
• Remote operation may become unreliable if strong
sunlight or fluorescent light is shining on the unit’s
remote sensor.
• Remote controllers for different devices can interfere
with each other. Avoid using remotes for other
equipment located close to this unit.
• Replace the batteries when you notice a fall off in the
operating range of the remote.
on
input
network
input
volume
standby/on
input
vol
30°
7 m (23 ft.)

Connections02
12
En
Chapter 2:
Connections
Caution
• Be sure to turn off the power and unplug the power cord
from the power outlet whenever making or changing
connections.
• Connect the power cord after all the connections
between devices have been completed.
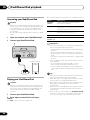
Connecting iPod/iPhone/iPad
It is possible to listen to audio when iPod/iPhone/iPad is
connected to this unit. Open the terminal cover (XW-SMA3
only) (page 16).
Switch the unit into standby then connect your iPod/iPhone/
iPad to the USB terminal on the rear panel of this unit.
When the unit’s power is turned ON, the iPod/iPhone/iPad
connected to the unit will be charged.
When this unit is running by the built-in battery, iPod/iPhone/
iPad is not charged (XW-SMA3 only).
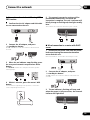
Connecting to the network through the
wired or wireless LAN
By connecting this unit to the network via the wired or
wireless LAN, you can play back audio files stored on devices
on the network.
1
Open the terminal cover (XW-SMA3 only).
Connect the LAN connector on this unit to the LAN connector
on your router (with or without the built-in DHCP server
function) with a straight LAN cable (CAT 5 or higher). Also
wireless connection to the network is possible.
Turn on the DHCP server function of your router.
If your router does not have a built-in DHCP server function,
you have to set up the network manually.
See Connect to network on page 18.
Connecting using LAN cable
Connecting using wireless LAN
Note
1 • Photo or video files cannot be played back.
• With Windows Media Player 11 or 12, you can even play back copyrighted audio files on this unit.
iPod/iPhone/iPadLAN(10/100)
iPod/iPhone/iPad
iPod/iPhone/iPadLAN(10/100)
WAN
321
LAN
PC2PC1
LAN cable
(commercially
available)
Router
WAN
321
LAN
on
input
network
input
volume
standby/on
Router

Connections 02
13
En
Plugging in
After you’ve finished making all connections, plug the unit
into an AC outlet.
Important
• Before making or changing the connections, switch off
the power and disconnect the power cord from the AC
outlet.
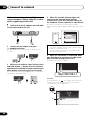
When turning on this unit for the first
time
1 Open the terminal cover (XW-SMA3 only).
2 Plug the supplied AC adapter into the
DC IN
socket on the rear of the unit.
3 Plug the supplied power cord into the AC
adapter then plug the other end into an AC
outlet.
4 Press
standby/on
button.
5The
on
indicator will flash for about 30 to 40
seconds. After about 30 to 40 seconds, the
on
indicator will light blue.
Important
When using the built-in battery (XW-SMA3 only)
• Be sure to charge XW-SMA3 before using for the first
time.
• Approximately 3 hours are required to fully recharge the
battery.
• A fully charged battery provides approximately 4 hours of
use at maximum volume and approximately 6 hours at
50 % volume.
• Playing time with a fully charged battery changes
depending on functions used, frequency of use, ambient
temperature, speaker volume and other factors.
• The furnished battery can be recharged about 300 times,
although it may be less depending on conditions of use
and storage.
• When the AC adapter is not connected, the battery will
slowly drain even when the unit is in the standby mode.
As a result, if the unit is not used for an extended period
of time, recharging may be necessary before the unit can
be used again.
Warning
• Do not use any AC adapter other than the supplied unit,
since fire or shock may occur.
• The supplied AC adapter is designed exclusively for use
with this unit. Never attempt to use it with any device for
which it was not expressly designed, since fires or
shocks may occur.
• Do not use any power cord other than the one supplied
with this unit.
• Do not use the supplied power cord for any purpose
other than this unit.
• Ambient temperature when recharging the battery
should be between 5 ºC and 35 ºC. Outside this range of
temperatures, the battery protection circuit may operate,
preventing recharging.
AUX INDC IN
To AC outlet
AC adapter
(supplied)
Power cord (supplied)
About startup time
About 30 seconds are required between after the power
turns On until the unit is actually ready to use. The time
required for startup can be reduced by setting the Quick
Start Mode to On (page 35).

Part names and functions03
14
En
Chapter 3:
Part names and functions
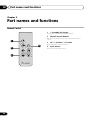
Remote Control
1 (standby/on) button
Switches the unit between Standby and On.
2 Playback control buttons
Use when operating an iPod or AirPlay with this remote
control.
3
vol –/+ (volume –/+)
button
Use to adjust the listening volume.
4
input
button
Press to select the input source.
input
vol
1
3
2
4

Part names and functions 03
15
En
Front panel
1 on (power on) indicator
When the power is on, this indicator lights.
2
input
indicator
When the input source changes, this indicator lights. The
indicator’s color changes as noted below.
Light OFF - AUX IN
Lights blue - AirPlay
Lights red - iPod
Lights green - DLNA (DMR) Digital Media Renderer
3
network
indicator
When the network status changes, this indicator lights. The
indicator’s color changes as noted below.
Lights blue - good connection
Flashes blue - weak signal
Flashes red - connection failure
*In the event that other colors appear, see Network
setting on page 18.
4 Battery indicator (XW-SMA3 only)
Displays the built-in battery charge status, or lights when the
built-in battery is being charged. The indicator changes as
noted below.
• When the unit is connected to AC adapter
Lights blue - Battery charging is completed.
*When battery charging is completed on the standby
mode, the indicator lights off.
Lights purple - Battery is being charged.
*If the battery indicator intermittently lights purple, see
Additional information on page 37.
• When this unit is not connected to AC adapter
Lights blue - Battery charge is usable.
Lights red - Battery has less than one-half charge.
Flashes red - Battery charge is low.
*A fully charged battery provides approximately 4 hours
of use at maximum volume and approximately 6 hours
at 50 % volume.
*The battery indicator is not designed to function as an
accurate measure of remaining battery charging.
*If the battery indicator intermittently lights purple, see
Additional information on page 37.
5
standby/on
button
Switches the unit between Standby and On.
on
input
network
input
volume
standby/on
1
2 3
4 5 6 7

Part names and functions03
16
En
6
input
button
Select the input source.
iPod AUX IN iPod (return to the beginning)
*When AirPlay or DMR play begins, the unit’s input
function automatically switches respectively to AirPlay
or DMR. If the power is then turned OFF and later
turned ON again, the unit will return to the input
function last selected before AirPlay or DMR began.
7
volume –/+
button
Use to adjust the listening volume.
The listening volume has a range from 0 to 50 (however, the
unit is not equipped with a display to visually indicate the
volume level).
Note
• When pressing the input button for 3 seconds while this
unit is power on, this unit switches to the Quick Start
Mode. In the Quick Start Mode, when AirPlay or DMR is
played, this unit automatically turns on (page 35).
• When using the XW-SMA3, the Quick Start Mode can be
set only when the AC adapter is connected.
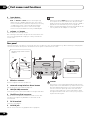
Rear panel
Open the terminal cover before connecting other various devices to the unit (XW-SMA3 only). Before making or changing the
connections, switch off the power and disconnect the power cord from the AC outlet.
1 Wireless antenna
Receives signals from wireless devices.
2
network setup
/
wireless direct
button
Use to set the wireless network (page 18).
3 LAN (10/100) connector
Connect this unit to other network devices using a LAN cable.
4 iPod/iPhone/iPad connector
Use to connect iPod/iPhone/iPad as an audio source. This
unit does not support any USB device other than iPod/
iPhone/iPad.
5 DC IN terminal
Connect to AC adapter.
6
AUX IN
jack
Use to connect an auxiliary playback device (page 34).
Caution
• The terminal cover may be detached if pulled strongly
away from the unit (XW-SMA3 only). If the terminal cover
becomes detached, press the cover’s protruding pins
into the connector openings on the unit, then use a
narrow non-pointed stick or other implement to push
through from above. Take care not to injure your eyes or
fingers when doing this.
network setup
wireless direct
AUX INDC IN 15 V
iPod/iPhone/iPadLAN(10/100)
Chief Speaker Engineer
SOUND TUNED
BY ANDREW JONES
2
3 4
5 6
1
Movable range of the wireless
antenna
160°
100°
XW-SMA3
Terminal Cover

Part names and functions 03
17
En
• Do not lift this device by holding the wireless antenna,
since damage or personal injury may result.
• When using XW-SMA4, do not lift this device by holding
the recessed portion of the rear panel, since damage or
personal injury may result.
on
input
network
input
volume
standby/on
network setup
wireless direct
AUX INDC IN
iPod/iPhone/iPadLAN(10/100)
Chief Speaker Engineer
SOUND TUNED
BY ANDREW JONES
XW-SMA4

Connect to network04
18
En
Chapter 4:
Connect to network
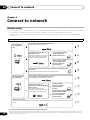
Network setting
By connecting the unit to your home LAN, you can enjoy AirPlay and playback of music stored on your computer or other device.
• For information regarding the format of files supported by this unit, see Playable file formats on page 41.
• Methods of connection may vary depending on the device used. Confirm the type of unit, and follow the appropriate
instructions.
If you select method A, C or E, confirm the LAN cable is not connected to this unit.
A
C
D
E
on
input
network
input
volume
WAN
321
LAN
Connecting this
unit using wireless
LAN
WAN
321
LAN
WPS-PBC
Connecting to a router without
WPS-PBC function
Connect this unit directly to your computer or
tablet PC. Settings must be performed from
the Web browser of the computer or tablet
PC.
WAN
321
LAN
WPS-PBC
Connecting to a router with WPS-PBC function
If your computer or tablet
PC is equipped with
wireless LAN function
If your computer or tablet
PC is not equipped with
wireless LAN function
(wired LAN only)
B
C
D
on
input
network
input
volume
WAN
321
LAN
Connecting this unit
using wired LAN
WAN
321
LAN
DHCP
When fixed IP must be set
(connecting to a router without DHCP
server function)
Your computer or tablet PC must be
connected directly to the unit, and settings
must be performed from a Web browser.
If your computer or
tablet PC is equipped
with wireless LAN
function
WAN
321
LAN
DHCP
Connecting to a router with DHCP server function
(this method should be used under normal conditions)
If your computer or tablet
PC is not equipped with
wireless LAN function
(wired LAN only)
Connecting this unit to the router using an iPhone/iPod touch/iPad (with iOS
5.0 or later)
The same wireless LAN connection settings can be applied to this unit.
F
(use this method under normal conditions)
Wireless Direct Function
The Wireless Direct function allows the use of a direct wireless connection between this unit and a wireless LAN device, without the need for
a router.
standby/on
C
P
standby/on
Precautions when connecting this unit to a wireless LAN router
The SSID only supports use of single-byte alphanumeric characters, together with the underbar and certain other symbols. If using
another character coding, the SSID must be updated before making network settings. For more details regarding SSID, consult your
router’s operating instructions.

Connect to network 04
19
En
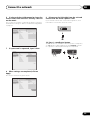
A: Connections for wireless LAN using WPS-
PBC function
1 Confirm that the AC adapter and LAN cable
are not connected to the unit.
2 Connect the AC adapter, and press
standby/on
button.
The on indicator will flash blue. Wait for about 30 to 40
seconds.
3When the
on
indicator stops flashing, press
the rear-panel network setup/wireless direct
button.
The network indicator will change from flashing red to
flashing purple.
4 Within 2 minutes, press the router’s WPS
button.
For information regarding router operation, consult the
router’s Operating Instructions.
5 The network connection settings will be
performed automatically, and when the
connection is complete, the unit's indicator will
briefly change to flashing red, then light steadily
blue.
The indicator will flash blue when the signal is weak.
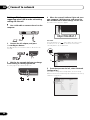
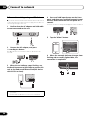
B: Wired connection to a router with DHCP
server
1 Disconnect the power cord from AC power
before performing the connection between
router and this unit.
Use a LAN cable to connect this unit and your router.
2 Connect the AC adapter, and press
standby/on
button.
The on indicator will flash blue. Wait for about 30 to 40
seconds.
3The
on
indicator's flashing will stop, and
when the power is fully turned on, the network
indicator will light blue.
AUX INDC INiPod/iPhone/iPadLAN(10/100)
AUX INDC IN
input
volume
standby/on
6
on
input
network
network setup
wireless direct
AUX INDC IN
WPS
WPS
on
input
network
blue
AUX INDC INiPod/iPhone/iPadLAN(10/100)
WAN
321
LAN
AUX INDC IN
input
volume
standby/on
6
on
input
network
blue

Connect to network04
20
En
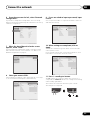
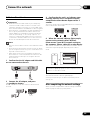
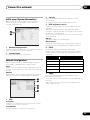
C: Connection settings from a Web browser
using a computer, iPhone, tablet PC or other
device supporting wireless LAN
1 Confirm that the AC adapter and LAN cable
are not connected to the unit.
2 Connect the AC adapter, and press
standby/on
button.
The on indicator will flash blue. Wait for about 30 to 40
seconds.
3When the
on
indicator stops flashing, press
and hold volume “-” button on the front panel,
and then press and hold network setup/wireless
direct button on the rear panel for 3 seconds.
The unit will begin rebooting (the on indicator will flash blue);
wait for about 30 to 40 seconds.
4 When the network indicator lights red,
connect to the network called “Pioneer
Setup:xxxxxx” from Wi-Fi network setting on
the computer, iPhone, tablet PC or other device.
The “xxxxxx” is the device's unique identifier number.
Not all characters may be displayed, depending on the device
used.
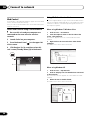
5 When the connection is established, boot
your Web browser and access the URL noted
below to make settings for this unit.
The Web Control menu will appear.
For Safari
Press Bookmark icon ( ) at the upper left of the screen.
Click Bonjour list (a), and then select this unit's name
(“Friendly Name”) (b) in Bookmark.
AUX INDC INiPod/iPhone/iPadLAN(10/100)
AUX INDC IN
input
volume
standby/on
6
input
volume
standby/on
6
network setup
wireless direct
AUX INDC IN
• Consult the appropriate Operating Instructions for
information regarding operation of the computer, iPhone,
tablet PC or other device used.
• Since this kind of connection is not encoded, a minor
security risk may be involved.
Wi-Fi Network
Choose a Network...
iPod
Network
ON
Wi-Fi
Pioneer Setup:xxxxxx
SMA
http://192.168.1.1
a
b
SMA
La pagina si sta caricando...
La pagina si sta caricando...
La pagina si sta caricando...
La pagina si sta caricando...
La pagina si sta caricando...
La pagina si sta caricando...
La pagina si sta caricando...
La pagina si sta caricando...
La pagina si sta caricando...
La pagina si sta caricando...
La pagina si sta caricando...
La pagina si sta caricando...
La pagina si sta caricando...
La pagina si sta caricando...
La pagina si sta caricando...
La pagina si sta caricando...
La pagina si sta caricando...
La pagina si sta caricando...
La pagina si sta caricando...
La pagina si sta caricando...
La pagina si sta caricando...
La pagina si sta caricando...
La pagina si sta caricando...
La pagina si sta caricando...
La pagina si sta caricando...
La pagina si sta caricando...
La pagina si sta caricando...
La pagina si sta caricando...
-
 1
1
-
 2
2
-
 3
3
-
 4
4
-
 5
5
-
 6
6
-
 7
7
-
 8
8
-
 9
9
-
 10
10
-
 11
11
-
 12
12
-
 13
13
-
 14
14
-
 15
15
-
 16
16
-
 17
17
-
 18
18
-
 19
19
-
 20
20
-
 21
21
-
 22
22
-
 23
23
-
 24
24
-
 25
25
-
 26
26
-
 27
27
-
 28
28
-
 29
29
-
 30
30
-
 31
31
-
 32
32
-
 33
33
-
 34
34
-
 35
35
-
 36
36
-
 37
37
-
 38
38
-
 39
39
-
 40
40
-
 41
41
-
 42
42
-
 43
43
-
 44
44
-
 45
45
-
 46
46
-
 47
47
-
 48
48


Philips 20-FAUX FLAT COLOR TV 20PS47S Manuale utente
- Categoria
- Dock station per dispositivi mobili
- Tipo
- Manuale utente
in altre lingue
Altri documenti
-
Pioneer XW-SMA4 Manuale utente
-
TEAC NP-H750 Manuale del proprietario
-
Pioneer SE-DRF41M Manuale del proprietario
-
Klipsch Gallery G-17 AirPlay Manuale utente
-
Pioneer DM-40-W Manuale utente
-
-
Pioneer DDJ-WEGO2-W Guida Rapida
-
Panasonic FZ-G1 Windows 7 Istruzioni per l'uso
-
-