
4-240-070-11 (1)
2002 Sony Corporation
M-crew
Operating Instructions
Mode d’emploi
Bedienungsanleitung
Manual de instrucciones
Gebruiksaanwijzing
Bruksanvisning
Istruzioni per l’uso
Manual de instruções
GB
FR
DE
ES
NL
SE
IT
PT
CT

2
GB
• Duplication of any or all of the contents of
this software and instruction manual or
lending of this software to third parties
without the express permission of the
copyright holder is strictly prohibited by
copyright law.
• Sony cannot be held liable in any way for
monetary losses, lost profits or claims from
third parties arising from the use of this
software.
• Should any manufacturing defects occur,
Sony’s responsibility shall be limited solely
to replacing said defective merchandise.
• This software is approved for use only with
the specified equipment.
• Sony reserves the right to change software
specifications without prior notice. Other
related software and services provided are
also subject to change without prior notice.
Program 1997-2001 Sony Corporation
Documentation 2001 Sony
Corporation
2001 Sony Corporation All rights
reserved.
• M-crew, LabelMaker and are the
registered trademarks of Sony Corporation.
• Microsoft, MS-DOS and Windows are the
registered trademarks of Microsoft
Corporation.
• IBM and PC/AT are the registered
trademarks of International Business
Machines Corporation.
• Macintosh is the registrated trademark of
Apple Computer Inc.
• Gracenote CDDB
or Gracenote CDDB
Music Recognition Service
SM
• Powered by Gracenote CDDB
• Other companies and product names are
the trademarks or the registered
trademarks of each company.

3
GB
Table of contents
GB
About this manual
This manual shows how to install the M-crew
software and how to use the Help.
For the latest information, refer to the
“Readme.txt” file in the Start menu.
The “Readme.txt” file is in the folder which
the M-crew software is installed in.
Table of contents
Getting started
Overview .............................................. 4
System requirements ........................... 6
Preparation
1: Installing M-crew ............................. 7
2: Connections .................................... 11
3: Setup procedure for your
computer system ....................... 11
Setting up for Windows 98/
98SE ..................................... 12
Setting up for Windows 2000/
Windows Me/
Windows XP ...................... 14
When no sound comes out of
the computer ...................... 17
Installing LabelMaker 5.1 ................. 18
Uninstalling the software ................. 19
Basic Operations
Starting up M-crew............................ 20
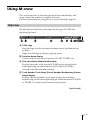
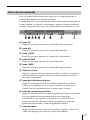
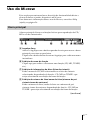
Using M-crew ..................................... 21
Main bar ...................................... 21
Tool bar ....................................... 23
Operation windows .................. 24
Easy Mode window .................. 24
Quitting the software ........................ 25
Additional Information
Using Help .......................................... 26
Troubleshooting ................................. 27

4
GB
Getting started
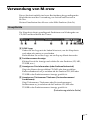
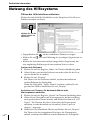
Overview
M-crew (ver. 2.0E) allows you to control Sony system stereo
components. Through M-crew, you can perform the functions listed
below.
Playback
• Use the computer to operate the playback function on CD, MD and
DVD decks.
• Enjoy audio files stored on the computer.
• Tune in radio stations using the computer.
Recording/editing
• Input disc and track names from the computer keyboard.
• Edit MDs on the computer screen.
• Record from a CD to an MD through easy drag-and-drop operations.
• Record easily from a radio to an MD.
• Organize tracks on an MD into groups of your choice.
• Access CDDB2 from your computer to label albums and tracks
automatically (only for the components supporting this feature).
Other operations
• Create virtual media for the management of audio files.
• Keep track of played and recorded tracks through a Disc Library.
• Access related websites while enjoying tracks.
• Register images to attach them to a track and view them while
listening to the track (CLIP function).
• Access related websites while enjoying radio programs.
• Set playback and recording timers.
• Use the Easy Mode window to access easily to the basic functions of
M-crew.
• Print out MD labels.

5
GB
Notes
• In this manual, the term “system stereo component” refers specifically to
component stereo systems (incorporating CD and MD decks) and discrete CD,
MD, and DVD decks.
• The M-crew functions that operate on your computer will depend on the
system stereo component connected to your computer.
• You can use this software to operate only system stereo components
connected directly to the computer.
Music recognition technology and related data are provided by Gracenote and
the Gracenote CDDB
Music Recognition Service
SM
. Gracenote is the industry
standard in music recognition technology and related content delivery. For
more information go to www.gracenote.com.
Gracenote is CDDB, Inc. d/b/a “Gracenote.” CD and music related data from
Gracenote CDDB
Music Recognition Service
SM
2000, 2001 Gracenote.
Gracenote CDDB Client Software 2000, 2001 Gracenote. U.S. Patents Numbers
#5,987,525; #6,061,680; #6,154,773, and other patents issued or pending.
CDDB is a registered trademark of Gracenote. CDDB-Enabled, the Gracenote
logo, the CDDB Logo, and the “Powered by Gracenote CDDB” logo are
trademarks of Gracenote. Music Recognition Service and MRS are service marks
of Gracenote.

6
GB
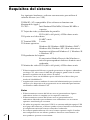
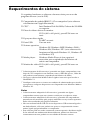
System requirements
The following hardware and software are necessary to use the M-crew
(ver. 2.0E) software.
s IBM PC/AT or compatible (This software does not run on the Apple
Macintosh.)
s CPU*
1
: Intel Pentium II 266 MHz/Celeron 333 MHz or
higher
s Video board and display driver:
SVGA (800 × 600 pixels), 65,536 colors or more.
s Hard disk space: 30 MB*
2
or more
s USB port: 1 or more
s OS: Windows 98/Windows 98SE/Windows 2000*
3
/
Windows Me/Windows XP*
3
(This software does
not run on Microsoft Windows 3.1, Windows 95
or Windows NT.)
s Media player: Windows Media Player 6.4 or higher is required
in order to play music files on the computer.
s Video monitor: SVGA (800 × 600 pixels), 65,536 colors or more.
*
1
The operation of M-crew is not guaranteed on some computers with Pentium-
compatible CPU chips, such as the AMD K6 (e.g., sound skipping may occur
during playing of an audio file).
*
2
Another 20 MB of hard disk space is required to install LabelMaker 5.1.
*
3
Be sure to log on through the administrator’s account to install the software
and setup devices on a computer running Windows 2000 or Windows XP.
Notes
• The proper operation of M-crew is not guaranteed on some computers even if
they meet the requirements above.
• The proper operation of M-crew is not guaranteed on computers that you
constructed yourself or on computers with an operating system that you
upgraded yourself.
• Do not use a USB hub. If multiple USB devices are connected to the hub,
M-crew may not operate the system stereo component connected to the
computer properly.
• This software can be used only with an English-language operating system. If
used in a different language environment, it may not function properly or text
may not be correctly displayed.

7
GB
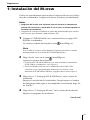
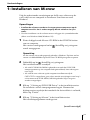
Preparation
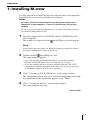
1: Installing M-crew
Use this procedure to install the M-crew software onto your computer’s
hard disk. Be sure to start up Windows in advance.
Notes
• Be sure to install this software before connecting the system stereo
component to your computer. If not, this software may not function
properly.
• Be sure to log on through the administrator’s account to install this software
(for Windows2000/Windows XP).
1 Load the supplied M-crew CD-ROM into the CD-ROM drive of
your computer.
The window will open with the
(InstallDlg.exe) icon displayed.
Note
If the window does not open, use Windows Explorer to open the window
by double-clicking the M-crew CD-ROM icon.
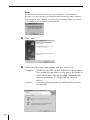
2 Double-click the (InstallDlg.exe) icon.
The setup window appears.
• If you are using the PCLK-MN10/MN10A and you have already
installed PCLK USB driver onto your computer, go to step 4.
• If you are installing M-crew onto the computer with the CMT-C7NT
connected, proceed the procedure from step 3 even if you are using the
PCLK-MN10/MN10A. Be sure not to skip step 3.
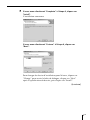
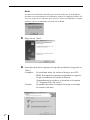
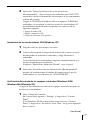
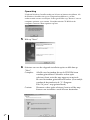
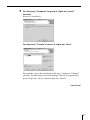
3 Click “1. Setting up PCLK-USB Driver” in the setup window.
The installation of the driver starts. When the dialog box indicating
the completion of the installation appears, click “Finish.”
4 Click “2. Setting up M-crew” in the setup window.
The setup program starts up.
(continued)

8
GB
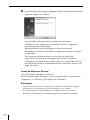
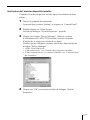
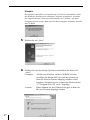
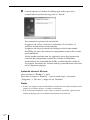
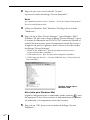
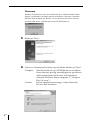
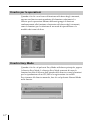
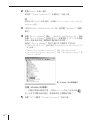
Note
The Windows Installer is necessary to install M-crew. If the Windows
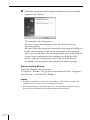
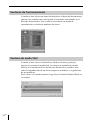
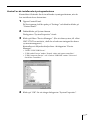
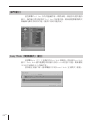
Installer is not installed on your computer, the following window appears.
If this happens, click “Restart” to restart your computer. When you restart
your computer, do not remove the CD-ROM.
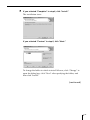
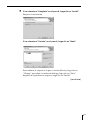
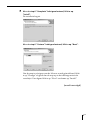
5 Click “Next.”
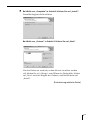
6 Select one of the setup type options, and then click “Next.”
Complete: All the M-crew files on the CD-ROM will be installed.
This option does not allow you to specify the folder to
which the M-crew files are installed. (Normally the
files are installed in “C:\Program Files\M_crew”
folder.)
Custom: You can specify the folder to which the M-crew files
are installed.

9
GB
7 If you selected “Complete” in step 6, click “Install.”
The installation starts.
If you selected “Custom” in step 6, click “Next.”
To change the folder to which to install M-crew, click “Change” to
open the dialog box, click “Next” after specifying the folder, and
then click “Install.”
(continued)

10
GB
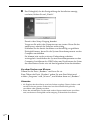
8 When the dialog box indicating the completion of the installation
appears, click “Finish.”
This completes the setup process.
Be sure to restart the computer. If not, the software will not
function properly.
Be sure to close the dialog box activated by executing InstallDlg.exe
before connecting the system stereo component to the computer.
Now, you can proceed to the next preparation steps: connecting the
system stereo component to the computer, installing the USB
drivers, and then verifying the status of the installed devices
according to the procedures described on the following pages.
Before starting M-crew
Open the “Readme” file and read it.
To open the “Readme” file, go to the Start menu and select “Programs”
and “M-crew,” and then click “Readme.”
Notes
• A folder is created as a result of the installation. This folder is used by the
software. Do not erase, move, or change its contents.
• If the required driver and other items have already been installed, a dialog
box for your confirmation will appear during the installation.

11
GB
2: Connections
For information on connecting the system stereo component to the
computer, refer to the operating instructions for the system stereo
component or the PCLK-MN20 PC connecting adaptor.
3: Setup procedure for your computer
system
Be sure to check the status of the installed devices before you start up
M-crew.
The following procedure is for Windows98/98SE. Some parts of the
procedure may differ depending on which operating system you have
installed the software in. See page 14 for Windows 2000/Windows
Me/Windows XP.
Note
Some illustrations included in the following procedures may differ partly
depending on which operating system your computer is running.

12
GB
Setting up for Windows 98/98SE
Installing the USB driver
1 Connect the system stereo component to the computer directly or
via the PC connecting adaptor, and then start up the computer.
“Add New Hardware Wizard” appears.
Quit any applications that are active.
2 Click “Next.”
3 Select “Search for the best driver for your device.
(Recommended).” (For the computer system with the CMT-C7NT
connected to it, refer to the operating instructions for that system
stereo component.)
Load the Windows 98/98SE CD-ROM into the CD-ROM drive of
the computer if the wizard requests it, and then install the drivers.
Installation procedure will be repeated for each of the following
devices.
• USB audio device
• USB composite device
• Generic USB hub

13
GB
Verifying the status of the installed devices
Be sure to check the status of the installed devices after you have
installed thier drivers.
1 Open the Control Panel.
In the Start menu, point to “Settings” and click “Control Panel”.
2 Double-click the System icon.
The “System Properties” dialog box appears.
3 Click the “Device Manager” tab. (For the computer system with the
CMT-C7NT connected to it, refer to the operating instructions for
that system stereo component.)
Make sure that the following items are listed in the “Device
Manager” dialog box.
• “SONY PCLK USB Driver”
• “USB Audio Device” under “Sound, video and game controllers”
• “USB Composite Device” and “Generic USB Hub” under “Universal
Serial Bus controllers”
4 Click “OK” to close the “System Properties” dialog box.

14
GB
Setting up for Windows 2000/Windows Me/Windows XP
Installing the USB driver (Windows 2000)
1 Connect the system stereo component to the computer directly or
via the PC connecting adaptor, and then start up the computer.
“Found New Hardware Wizard” appears.
Quit any applications that are active.
2 Click “Next.”
3 Select “Search for a suitable driver for my device (recommended).”
(For the computer system with the CMT-C7NT connected to it,
refer to the operating instructions for that system stereo
component.)
Load the Windows 2000 CD-ROM into the CD-ROM drive of the
computer if the wizard requests it, and then install the drivers.
Installation procedure will be repeated for each of the following
devices.
• USB audio device
• USB composite device
• Generic USB hub
Installing the USB driver (Windows Me)
1 Connect the system stereo component to the computer directly or
via the PC connecting adaptor, and then start up the computer.
“Add New Hardware Wizard” appears.
Quit any applications that are active.

15
GB
2 Select “Search for the best driver for your device.
(Recommended).” (For the computer system with the CMT-C7NT
connected to it, refer to the operating instructions for that system
stereo component.)
Load the Windows Me CD-ROM into the CD-ROM drive of the
computer if the wizard requests it, and then install the drivers.
Installation procedure will be repeated for each of the following
devices.
• USB audio device
• USB composite device
• Generic USB hub
Installing the USB drivers (Windows XP)
1 Quit any applications that are active.
2 Connect the system stereo component to the computer directly or
via the PC connecting adaptor, and then start up the computer.
Installation of the drivers starts automatically, and will be
terminated after completing installation.
If “Found New Hardware Wizard” should appear, go to step 3.
3 Select “Install the software automatically [Recommended]” after
confirming that the name of the device for which the drivers are to
be installed is “SONY LINK KIT.”
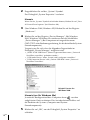
Verifying the status of the installed devices (Windows 2000/
Windows Me/Windows XP)
Be sure to check the status of the installed devices after you have
installed thier drivers.
1 Open the Control Panel.
In the Start menu, point to “Settings” and click “Control Panel”.
(For Windows XP) In the Start menu, click “Control Panel,” and
then click “Switch to Classic View” on the left pane of the window.
(continued)

16
GB
2 Double-click the “System” icon.
The “System Properties” dialog box appears.
Note
If you cannot find the “System” icon, click “View all Control Panel options”
(in the case of Windows Me).
3 (For Windows 2000/Windows XP only) Click the “Hardware” tab.
4 Click the “Device Manager” tab. (For Windows 2000/Windows XP,
click the “Device Manager” button, instead) (For the computer
system with the CMT-C7NT connected to it, refer to the operating
instructions for that system stereo component.)
Make sure that the following items are listed in the “Device
Manager” dialog box.
• “SONY PCLK USB Driver” (This item may be found under “Universal
Serial Bus controllers.”)
• “USB Audio Device” under “Sound, video and game controllers”
• “USB Composite Device” and “Generic USB Hub”under “Universal
Serial Bus controllers”
Note (for Windows Me only)
Depending on the configuration of your computer, may
appear before the listed device. This, however, does not affect the
operation of the system (the computer and system stereo
component).
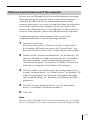
5 Click “OK” to close the “System Properties” dialog box.
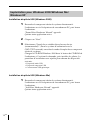
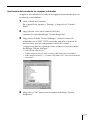
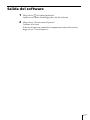
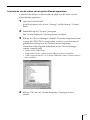
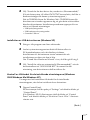
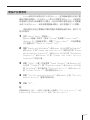
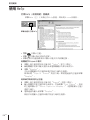
Example: Window for
Windows 2000

17
GB
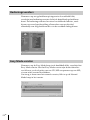
When no sound comes out of the computer
M-crew uses the USB audio device for sound playback and recording.
When you start up the computer with a system stereo component
connected, the USB audio device will be enabled in place of the
standard audio device. As a result, no sound will come out of the built-
in or external speakers of the computer, because all sounds will be
output to the USB audio device via the USB cable. To allow sounds to
come out of the computer, remove the USB cable from the computer.
To enable the speakers of the computer with a system stereo
component connected to it, do the following procedure.
1 Open the Control Panel.
In the Start menu, point to “Setting” and click “Control Panel.”
(For Windows XP) In the start menu, click “Control Panel,” and
then click “Switch to Classic View” on the left pain of the window.
2 Double-click the “Sounds and Multimedia” (or “Multimedia” for
Windows 98/98SE or “Sounds and Audio Devices” for Windows
XP) icon to open the “Sounds and Multimedia Properties” (or
“Multimedia Properties” for Windows 98/98SE or “Sounds and
Audio Devices Properties” for Windows XP) dialog box.
3 Click the “Audio” tab, and then select the standard audio device
for each “Preferred device:” (or “Default Device:” for Windows XP)
of the “Sound Playback” (or “Playback” for Windows 98/98SE)
and “Sound Recording” (or “Recording” for Windows 98/98SE)
group boxes.
4 Click the “Use only preferred devices” (or “Use only default
devices” for Windows XP) option to enable it.
5 Click “OK.”
Note
Be sure to select “USB Audio Device” for each “Preferred device:” (or “Default
Device:” for Windows XP) in step 3 above before you start recording to an MD.

18
GB
Installing LabelMaker 5.1
Please note that if you install LabelMaker 5.1 onto the Windows XP
preinstalled VAIO computer, LabelMaker 5.0 installed on it may be
overwritten by the new version.
Installing LabelMaker 5.1 will not overwrite any version of LabelMaker
older than 5.0 such as included in PictureGear 4.x.
1 Click “Setting up LabelMaker 5.1” in the setup window (see step 2
on page 7).
2 Follow the instructions that appear to install the application.

19
GB
Uninstalling the software
When you no longer require M-crew or LabelMaker 5.1, uninstall the
programs as follows:
1 Open the Control Panel.
In the Start menu, point to “Settings” and click “Control Panel”.
2 Double-click the “Add/Remove Programs” icon.
The “Add/Remove Programs Properties” window appears.
3 Select and click “M-crew” or “LabelMaker 5.1” in the program list.
4 Click “Add/Remove.”
Uninstaller is activated and the software selected in step 3 is
deleted automatically.
Notes
• After uninstalling M-crew, the “Database” and “Jacket” folders created under
the M-crew folder (usually C:\Program Files\M_crew) and their files still
remain on the hard disk. Delete them manually, if there is no more need for
them.
• If you select LabelMaker 5.1 in step 3 above and uninstall it, not only
LabelMaker 5.1 installed through M-crew but also any other copy of
LabelMaker 5.1 that you may have installed separately from M-crew will be
removed.
• Similarly, if you uninstall LabelMaker 5.1 that has been installed separately
from M-crew, the label printing function will be no longer available also in
M-crew.

20
GB
Basic Operations
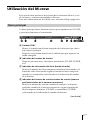
Starting up M-crew
, In the Start menu, point to “Programs” and “M-crew”, and
then click “M-crew.”
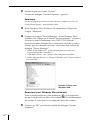
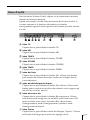
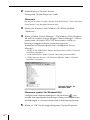
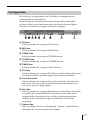
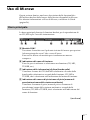
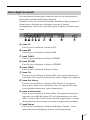
The software starts up and the M-crew Main bar appears.
The bar below is displayed immediately after M-crew is started up.
The following description assumes that M-crew is running on the
computer to which the CMT-C7NT is connected as a system stereo
component.
Notes
• During MD recording, a dialog box appears to prompt you to stop
recording or to start up M-crew.
• M-crew (ver. 2.0E) and Net MD-enabled OpenMG Jukebox cannot be
active simultaneously.
La pagina si sta caricando...
La pagina si sta caricando...
La pagina si sta caricando...
La pagina si sta caricando...
La pagina si sta caricando...
La pagina si sta caricando...
La pagina si sta caricando...
La pagina si sta caricando...
La pagina si sta caricando...
La pagina si sta caricando...
La pagina si sta caricando...
La pagina si sta caricando...
La pagina si sta caricando...
La pagina si sta caricando...
La pagina si sta caricando...
La pagina si sta caricando...
La pagina si sta caricando...
La pagina si sta caricando...
La pagina si sta caricando...
La pagina si sta caricando...
La pagina si sta caricando...
La pagina si sta caricando...
La pagina si sta caricando...
La pagina si sta caricando...
La pagina si sta caricando...
La pagina si sta caricando...
La pagina si sta caricando...
La pagina si sta caricando...
La pagina si sta caricando...
La pagina si sta caricando...
La pagina si sta caricando...
La pagina si sta caricando...
La pagina si sta caricando...
La pagina si sta caricando...
La pagina si sta caricando...
La pagina si sta caricando...
La pagina si sta caricando...
La pagina si sta caricando...
La pagina si sta caricando...
La pagina si sta caricando...
La pagina si sta caricando...
La pagina si sta caricando...
La pagina si sta caricando...
La pagina si sta caricando...
La pagina si sta caricando...
La pagina si sta caricando...
La pagina si sta caricando...
La pagina si sta caricando...
La pagina si sta caricando...
La pagina si sta caricando...
La pagina si sta caricando...
La pagina si sta caricando...
La pagina si sta caricando...
La pagina si sta caricando...
La pagina si sta caricando...
La pagina si sta caricando...
La pagina si sta caricando...
La pagina si sta caricando...
La pagina si sta caricando...
La pagina si sta caricando...
La pagina si sta caricando...
La pagina si sta caricando...
La pagina si sta caricando...
La pagina si sta caricando...
La pagina si sta caricando...
La pagina si sta caricando...
La pagina si sta caricando...
La pagina si sta caricando...
La pagina si sta caricando...
La pagina si sta caricando...
La pagina si sta caricando...
La pagina si sta caricando...
La pagina si sta caricando...
La pagina si sta caricando...
La pagina si sta caricando...
La pagina si sta caricando...
La pagina si sta caricando...
La pagina si sta caricando...
La pagina si sta caricando...
La pagina si sta caricando...
La pagina si sta caricando...
La pagina si sta caricando...
La pagina si sta caricando...
La pagina si sta caricando...
La pagina si sta caricando...
La pagina si sta caricando...
La pagina si sta caricando...
La pagina si sta caricando...
La pagina si sta caricando...
La pagina si sta caricando...
La pagina si sta caricando...
La pagina si sta caricando...
La pagina si sta caricando...
La pagina si sta caricando...
La pagina si sta caricando...
La pagina si sta caricando...
La pagina si sta caricando...
La pagina si sta caricando...
La pagina si sta caricando...
La pagina si sta caricando...
La pagina si sta caricando...
La pagina si sta caricando...
La pagina si sta caricando...
La pagina si sta caricando...
La pagina si sta caricando...
La pagina si sta caricando...
La pagina si sta caricando...
La pagina si sta caricando...
La pagina si sta caricando...
La pagina si sta caricando...
La pagina si sta caricando...
La pagina si sta caricando...
La pagina si sta caricando...
La pagina si sta caricando...
La pagina si sta caricando...
La pagina si sta caricando...
La pagina si sta caricando...
La pagina si sta caricando...
La pagina si sta caricando...
La pagina si sta caricando...
La pagina si sta caricando...
La pagina si sta caricando...
La pagina si sta caricando...
La pagina si sta caricando...
La pagina si sta caricando...
La pagina si sta caricando...
La pagina si sta caricando...
La pagina si sta caricando...
La pagina si sta caricando...
La pagina si sta caricando...
La pagina si sta caricando...
La pagina si sta caricando...
La pagina si sta caricando...
La pagina si sta caricando...
La pagina si sta caricando...
La pagina si sta caricando...
La pagina si sta caricando...
La pagina si sta caricando...
La pagina si sta caricando...
La pagina si sta caricando...
La pagina si sta caricando...
La pagina si sta caricando...
La pagina si sta caricando...
La pagina si sta caricando...
La pagina si sta caricando...
La pagina si sta caricando...
La pagina si sta caricando...
La pagina si sta caricando...
La pagina si sta caricando...
La pagina si sta caricando...
La pagina si sta caricando...
La pagina si sta caricando...
La pagina si sta caricando...
La pagina si sta caricando...
La pagina si sta caricando...
La pagina si sta caricando...
La pagina si sta caricando...
La pagina si sta caricando...
La pagina si sta caricando...
La pagina si sta caricando...
La pagina si sta caricando...
La pagina si sta caricando...
La pagina si sta caricando...
La pagina si sta caricando...
La pagina si sta caricando...
La pagina si sta caricando...
La pagina si sta caricando...
La pagina si sta caricando...
La pagina si sta caricando...
La pagina si sta caricando...
La pagina si sta caricando...
La pagina si sta caricando...
La pagina si sta caricando...
La pagina si sta caricando...
La pagina si sta caricando...
La pagina si sta caricando...
La pagina si sta caricando...
La pagina si sta caricando...
La pagina si sta caricando...
La pagina si sta caricando...
La pagina si sta caricando...
La pagina si sta caricando...
La pagina si sta caricando...
La pagina si sta caricando...
La pagina si sta caricando...
La pagina si sta caricando...
La pagina si sta caricando...
La pagina si sta caricando...
La pagina si sta caricando...
La pagina si sta caricando...
La pagina si sta caricando...
La pagina si sta caricando...
La pagina si sta caricando...
La pagina si sta caricando...
La pagina si sta caricando...
La pagina si sta caricando...
La pagina si sta caricando...
La pagina si sta caricando...
La pagina si sta caricando...
La pagina si sta caricando...
La pagina si sta caricando...
La pagina si sta caricando...
La pagina si sta caricando...
La pagina si sta caricando...
La pagina si sta caricando...
La pagina si sta caricando...
La pagina si sta caricando...
La pagina si sta caricando...
La pagina si sta caricando...
La pagina si sta caricando...
La pagina si sta caricando...
La pagina si sta caricando...
La pagina si sta caricando...
La pagina si sta caricando...
La pagina si sta caricando...
La pagina si sta caricando...
La pagina si sta caricando...
La pagina si sta caricando...
La pagina si sta caricando...
La pagina si sta caricando...
La pagina si sta caricando...
La pagina si sta caricando...
La pagina si sta caricando...
La pagina si sta caricando...
La pagina si sta caricando...
La pagina si sta caricando...
La pagina si sta caricando...
La pagina si sta caricando...
La pagina si sta caricando...
La pagina si sta caricando...
La pagina si sta caricando...
La pagina si sta caricando...
La pagina si sta caricando...
La pagina si sta caricando...
-
 1
1
-
 2
2
-
 3
3
-
 4
4
-
 5
5
-
 6
6
-
 7
7
-
 8
8
-
 9
9
-
 10
10
-
 11
11
-
 12
12
-
 13
13
-
 14
14
-
 15
15
-
 16
16
-
 17
17
-
 18
18
-
 19
19
-
 20
20
-
 21
21
-
 22
22
-
 23
23
-
 24
24
-
 25
25
-
 26
26
-
 27
27
-
 28
28
-
 29
29
-
 30
30
-
 31
31
-
 32
32
-
 33
33
-
 34
34
-
 35
35
-
 36
36
-
 37
37
-
 38
38
-
 39
39
-
 40
40
-
 41
41
-
 42
42
-
 43
43
-
 44
44
-
 45
45
-
 46
46
-
 47
47
-
 48
48
-
 49
49
-
 50
50
-
 51
51
-
 52
52
-
 53
53
-
 54
54
-
 55
55
-
 56
56
-
 57
57
-
 58
58
-
 59
59
-
 60
60
-
 61
61
-
 62
62
-
 63
63
-
 64
64
-
 65
65
-
 66
66
-
 67
67
-
 68
68
-
 69
69
-
 70
70
-
 71
71
-
 72
72
-
 73
73
-
 74
74
-
 75
75
-
 76
76
-
 77
77
-
 78
78
-
 79
79
-
 80
80
-
 81
81
-
 82
82
-
 83
83
-
 84
84
-
 85
85
-
 86
86
-
 87
87
-
 88
88
-
 89
89
-
 90
90
-
 91
91
-
 92
92
-
 93
93
-
 94
94
-
 95
95
-
 96
96
-
 97
97
-
 98
98
-
 99
99
-
 100
100
-
 101
101
-
 102
102
-
 103
103
-
 104
104
-
 105
105
-
 106
106
-
 107
107
-
 108
108
-
 109
109
-
 110
110
-
 111
111
-
 112
112
-
 113
113
-
 114
114
-
 115
115
-
 116
116
-
 117
117
-
 118
118
-
 119
119
-
 120
120
-
 121
121
-
 122
122
-
 123
123
-
 124
124
-
 125
125
-
 126
126
-
 127
127
-
 128
128
-
 129
129
-
 130
130
-
 131
131
-
 132
132
-
 133
133
-
 134
134
-
 135
135
-
 136
136
-
 137
137
-
 138
138
-
 139
139
-
 140
140
-
 141
141
-
 142
142
-
 143
143
-
 144
144
-
 145
145
-
 146
146
-
 147
147
-
 148
148
-
 149
149
-
 150
150
-
 151
151
-
 152
152
-
 153
153
-
 154
154
-
 155
155
-
 156
156
-
 157
157
-
 158
158
-
 159
159
-
 160
160
-
 161
161
-
 162
162
-
 163
163
-
 164
164
-
 165
165
-
 166
166
-
 167
167
-
 168
168
-
 169
169
-
 170
170
-
 171
171
-
 172
172
-
 173
173
-
 174
174
-
 175
175
-
 176
176
-
 177
177
-
 178
178
-
 179
179
-
 180
180
-
 181
181
-
 182
182
-
 183
183
-
 184
184
-
 185
185
-
 186
186
-
 187
187
-
 188
188
-
 189
189
-
 190
190
-
 191
191
-
 192
192
-
 193
193
-
 194
194
-
 195
195
-
 196
196
-
 197
197
-
 198
198
-
 199
199
-
 200
200
-
 201
201
-
 202
202
-
 203
203
-
 204
204
-
 205
205
-
 206
206
-
 207
207
-
 208
208
-
 209
209
-
 210
210
-
 211
211
-
 212
212
-
 213
213
-
 214
214
-
 215
215
-
 216
216
-
 217
217
-
 218
218
-
 219
219
-
 220
220
-
 221
221
-
 222
222
-
 223
223
-
 224
224
-
 225
225
-
 226
226
-
 227
227
-
 228
228
-
 229
229
-
 230
230
-
 231
231
-
 232
232
-
 233
233
-
 234
234
-
 235
235
-
 236
236
-
 237
237
-
 238
238
-
 239
239
-
 240
240
-
 241
241
-
 242
242
-
 243
243
-
 244
244
-
 245
245
-
 246
246
-
 247
247
-
 248
248
-
 249
249
-
 250
250
-
 251
251
-
 252
252
-
 253
253
-
 254
254


Sony MDS-PC3 Istruzioni per l'uso
- Tipo
- Istruzioni per l'uso
- Questo manuale è adatto anche per
in altre lingue
- français: Sony MDS-PC3 Mode d'emploi
- español: Sony MDS-PC3 Instrucciones de operación
- Deutsch: Sony MDS-PC3 Bedienungsanleitung
- Nederlands: Sony MDS-PC3 Handleiding
- português: Sony MDS-PC3 Instruções de operação
Documenti correlati
-
Sony PCLK-MN10A Manuale del proprietario
-
-
Sony NAS-CZ1 Manuale del proprietario
-
-
-
-
-
Sony HAR-D1000 Manuale del proprietario
-
-