
K-FUN Tastiera capacitiva
K-FUN Capacitive Keyboard
K-FUN - Capacitive Keyboard
FEATURES and OPERATION
Power supply voltage: 13.8Vdc
Rated current: 40mA Maximum current: 180mA Compatible with:
C24 gsm control unit with audio support in keyboard
Series S (S412 – S840 – S8128). VOICE option in keyboard NOT supported
Series C (C16 – C40, C288, C72GSM) VOICE option in keyboard NOT supported
Automatic selftest system
Touch-sensitive key enabling system with capacitive system
Adjustable key DELAY AND SENSIBILITY
Automatic keyboard lock (to prevent accidental enabling)
Integrated transponder reader compatible with all the above-mentioned control unit models
Addresses adjustable from the menu without the use of mechanical dip-switches Adjustable
backlighting
Adjustable contrast

Key ID plate replaceable with other types.
Buzzer for sounder input and output time
Jumper to disable switch tamper
Audio EOL (End-of-Line) jumper to reduce noise on the sound line Signaling LED: o Green
LED on: system ready (all areas closed) o Red LED on: new event to be read in event log o Yellow
LED on: control unit activated
o Blue LED: signal of transponder operation enabled
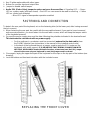
FASTENING AND CONNECTION
To detach the rear part of the keyboard, act on the fastening tabs (in the lower part, after having removed
the lock screws).
When fastening the rear part, be careful with the removable element, if you want to have increased
anti-removal protection, you must fasten it to the wall with a screw, which will keep the tamper switch
of the keyboard pressed.
Connect the power supply wires and the data following the polarities indicated in the terminal board.
This task must be carried out with no power supply.
o For the audio part, a conductor must be connected (external to the data cable) from
the PHONE terminal (see instructions in the manual of the installed control units).
o In the back of the keyboard there is a jumper, used to apply the EOL heater on the
keyboards with audio support. IT IS IMPORTANT THAT DURING CONNECTION WITH
MULTIPLE KEYBOARDS used with Audio function, at least one have the EOL Jumper
closed. In the case only one keyboard is used, the jumper must be closed.
Close again, laying the upper front part of the keyboard on the clips on the top part of the bottom (see
drawing).
Lock the bottom and front part into place with the included screw.
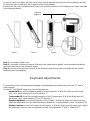
REPLACING THE FRONT COVER

In case you wish to replace the front cover, after having removed the rear part of the keyboard, remove
its electronic part by acting on the 2 fastening tabs (see drawing).
Remove the old cover and assemble the new one and the electronic circuit, following the steps indicated
in the drawings below.
Step 1 = assembly of new cover
Step 2 = assembly of electronic board Caution: the “glass slide in plastic” must be positioned all the
way to its limit stop on the electronic board
Step 3 = locking of the electronic board the electronic board must stay locked tight by the specific
fastening tabs (see drawing).
Keyboard adjustments.
To access the menu of the parameter settings of the Keyboard, simultaneously touch the “X” and “V”
enter symbols.
Use the UP and DOWN arrow keys to scroll through the:
- Keyboard ID (to set the hardware address of the Keyboard) With the Right and Left arrow
keys, set a value between 01 and 16 (default: 1)
- Transponder ID (to set the hardware address of the Transponder) With the Right and Left
arrow keys, set a value between 01 and 16 (default: 1)
- Display Brightness (to set the Brightness of the Display) With the Right and Left arrow keys,
adjust the parameter until you have the desired brightness. Value between 01 and 16 (default: 16).
- Display Contrast (to set the Contrast of the Display) With the Right and Left arrow keys, adjust
the parameter until you have the desired contrast. Value between 01 and 15 (default: 15)
Fase
1
Fase
2
Fase
3
Linguette
aggancio

- Keyboard Delay (to set the response time when you touch the “keys”) With the Right and Left
arrows, adjust the parameter; value between 1 and 4 (default: 2).
- Keyboard Sensibility (to set the sensibility of the “keys” when you touch them) With the Right
and Left arrow keys, adjust the parameter; value between 1 and 4 (default: 2.
- Connected Control Unit Type (to set the type of control unit to which the keyboard connects)
With the Right and Left arrow keys, select the control unit
- Lock Keyboard (to set the automatic keyboard lock) With the Right and Left arrow keys, select
YES or NO (default:. NO). With the lock enabled, after about 2 min. of disuse, the keyboard enters
locked mode. Unlock with the DEL (X) and ENTER (V) keys touched simultaneously for a few
seconds.
- Keyboard Test (to run a test on proper operation of all the “keys”) confirm with ENTER and
then “test” all the keys. At the end of the test, press ENTER again.
L’installazione deve essere eseguita a regola d’arte da personale specializzato.
AMC Elettronica S.r.l. declina ogni responsabilità nel caso in cui il prodotto venga manomesso da persone non autorizzate.
Si raccomanda di verificare il corretto funzionamento del sistema d’allarme almeno una volta al mese, tuttavia un sistema di allarme elettronico
affidabile non evita intrusioni, rapine, incendi o altro, ma si limita a diminuire il rischio che tali situazioni si verifichino. In caso di riscontro
incongruenze su manuali pregasi contattare immediatamente assistenza tecnica AMC Elettronica S.r.l.
Installation must be carried out to state of the art by specialized staff.
AMC Elettronica S.r.l. rejects any responsibility in the case that the product is tampered with by unauthorized persons.
We recommend that you check that the alarm control unit is operating properly at least once a month; however, a reliable electronic alarm
system does not prevent break-ins, thefts, fire, or other, but only limits itself to reducing the risk of such events actually occurring.
In case you notice mismatches in the manuals, you are kindly asked to immediately contact the customer service of AMC Elettronica S.r.l.
-
 1
1
-
 2
2
-
 3
3
-
 4
4


in altre lingue
- English: AMC K-FUN User manual
Documenti correlati
Altri documenti
-
Datalogic Rhino II Manuale utente
-
Datalogic Rhino II™ Manuale utente
-
-
-
Datalogic Joya Manuale utente
-
Lenovo Aptiva 2274 Hardware Maintenance Manual
-
Zenith z-server lt Manuale utente
-
IBM 8688 Manuale utente
-
Gateway E-1600 System Manual
-
Datalogic Joya Touch A6 Manuale utente