
EG EB EP
QUICK SETUP GUIDE
ANLEITUNG FÜR SCHNELLE EINRICHTUNG
GUIDA RAPIDA DI PREPARAZIONE
GUIDE D’INSTALLATION RAPIDE
GIDS VOOR SNEL INSTALLEREN
HURTIG GUIDE TIL KLARGØRING
SNABBINSTÄLLNINGSGUIDE
GUÍA DE PREPARACIÓN RÁPIDA
INSTRUKCJA SZYBKIEJ KONFIGURACJI
NÁVOD K RYCHLÉMU NASTAVENÍ
Recordable DVD Home Theater System
Recordable DVD Heimkino-System
Sistema Home Theater a masterizzatore DVD
Ensemble home cinéma avec enregistreur DVD
Huisbioscoopsysteem met DVD-recorder
DVD-optagbart hjemmebiografsystem
Inspelningsbart DVD hemmabiosystem
Sistema Home Cinema con DVD grabable
Zestaw kina domowego z nagrywarakå DVD
DVD systém domácího kina s rekordérem
Model No. SC-HT37R
SC-HT25R
123
456
789
∗
0
CH
CH
DRIVE SELECT
VOLUME
AV
DVD
TV
DIRECT TV REC
HDD DVD
VIDEO PLus+
MANUAL SKIP
INPUT SELECT
CANCEL
SKIP
STOP
PAUSE
PLAY/x1.3
SLOW/SEARCH
g qh
w
w
w
w
w h
w h
DIRECT NAVIGATOR FUNCTIONS
TOP MENU
SUB MENU
PROG/CHECK
RETURN
DISPLAY STATUS TIME SLIP
RECREC MODEERASETIMER
AUDIO
CREATE
CHAPTER
DUBBINGEXT LINK
z
A B C
iuyt
ENTER
INPUT
MODE
STEREO/
2CH MIX
MUSIC
AV/MOVIE
SFC
SLEEP
TONE/
BALANCE
LEVEL EFFECT
ENTER
DISC
TUNER/BAND
CH
VOLUME
TOP MENU
MENU
DIRECT
NAVIGATOR
DISPLAY
DIMMER
SUBWOOFER
CENTER
FOCUS
TV/AV
RETURN
PLAY
LIST
SLOW
DIRECT TUNING
123
7
0
89
10
456
>
=
TEST
u
/
t
y
/
i
MUTING
q
gh
%PL
TV VOL TV VOL
/L /R
-/--
OFF
^^
AV SYSTEMRECEIVER
VCR CD
DVD
DVD TV
DVD/HDD
DVD RECORDER
RECORDER
ANALOG 6CH
INPUT
MODE
STEREO/
2CH MIX
MUSIC
AV/MOVIE
SFC
LEVEL EFFECT
ENTER
DISC
TUNER/BAND
CH
VOLUME
TOP MENU
MENU
DIRECT
NAVIGATOR
DISPLAY
DIMMER
SUBWOOFER
CENTER
FOCUS
TV/AV
RETURN
PLAY
LIST
DIRECT TUNING
123
7
0
89
10
456
>
=
TEST
u
i
t
y
MUTING
q
gh
%PL
TV VOL TV VOL
-/--
^^
AV SYSTEMRECEIVER
VCR
GAME/AUX
DVD
DVD TV
DVD/HDD
DVD RECORDER
RECORDER
ANALOG 6CH
OFF
123
456
789
∗
0
CH
CH
VOLUME
AV
DVD
TV
DIRECT TV REC
VIDEO PLus+
MANUAL SKIP
INPUT SELECT
CANCEL
SKIP
STOP
PAUSE
PLAY/x1.3
SLOW/SEARCH
g qh
w
w
w
w
w h
w h
DIRECT NAVIGATOR FUNCTIONS
TOP MENU
SUB MENU
PROG/CHECK
RETURN
DISPLAY STATUS TIME SLIP
RECREC MODEERASETIMER
AUDIO
CREATE
CHAPTER
EXT LINK
z
A B C
iuyt
ENTER
SC-HT37R is used in the illustrations unless otherwise mentioned.
Sofern nicht anders angegeben, zeigen die Abbildungen in dieser Bedienungsanleitung grundsätzlich das Modell SC-HT37R.
Le illustrazioni mostrano il modello SC-HT37R, a meno che diversamente specificato.
Sauf indication contraire, le modèle SC-HT37R figure dans les illustrations.
De afbeeldingen tonen het model SC-HT37R, tenzij anders vermeld.
Model SC-HT37R anvendes i illustrationerne, med mindre andet er angivet.
Illustrationerna visar SC-HT37R såvida inte annat anges.
A menos que se indique lo contrario, en las ilustraciones se utiliza el modelo SC-HT37R.
Rysunki przedstawiajå model SC-HT37R, chyba æe zaznaczono inaczej.
Není-li uvedeno jinak, poΩívá se v ilustracích model SC-HT37R.
Refer to the operating instructions for operation and other details regarding each component.
Einzelheiten zur Bedienung und zu den verschiedenen Bausteinen dieser Anlage finden Sie in der separaten Bedienungsanleitung.
Per il funzionamento ed altri dettagli riguardo a ciascun componente, riferirsi alle loro istruzioni per l’uso.
Consultez le mode d’emploi des composants respectifs concernant leur fonctionnement et autres détails.
Raadpleeg de gebruiksaanwijzing voor bedieningsinstructies en andere bijzonderheden betreffende elke component.
Vi henviser til brugsvejledningerne for hvert enkelt apparat angående betjening og andre detaljer.
Se bruksanvisningen för respektive komponent för mer information.
Consulte las instrucciones de funcionamiento para conocer el funcionamiento y otros detalles relacionados con cada componente.
Z obsíugå i innymi szczegóíami dotyczåcymi kaædego komponentu zapoznaj sië w instrukcji obsíugi.
Podrobnëjßí informace o postupech ovládání a jednotlivÿch komponentách viz návod k obsluze.
Direct Sales at Panasonic UK
¡ Order accessory and consumable items for your product with ease
and confidence by phoning our Customer Care Centre
Monday-Friday 9:00am-5:30pm. (Excluding public holidays)
¡ Or go on line through our Internet Accessory ordering application
at www.panasonic.co.uk
¡ Most major credit and debit cards accepted.
¡ All enquiries transactions and distribution facilities are provided
directly by Panasonic UK Ltd.
¡ It couldn’t be simpler!
¡ Also available through our Internet is direct shopping for a wide
range of finished products, take a browse on our website for further
details.
RQT7612-D
SC-HT37R SC-HT25R
Sales and Support Information
Customer Care Centre
¡ For UK customers: 08705 357357
¡ For Republic of Ireland customers: 01 289 8333
¡ Visit our website for product information
¡ E-mall: [email protected]
For the United Kingdom and Republic of Ireland
SC-HT37R-EG/EB/EP (En) 2004.4.8 11:34 y[W 1

5
xxxxxx
xxx
5
xxxxxx
xxx
4
xxxxxx
xxx
4
xxxxxx
xxx
3
xxxxxx
xxx
3
xxxxxx
xxx
2
xxxxxx
xxx
2
xxxxxx
xxx
1
xxxxxx
xxx
1
xxxxxx
xxx
5
xxxxxx
xxx
5
xxxxxx
xxx
4
xxxxxx
xxx
4
xxxxxx
xxx
3
xxxxxx
xxx
3
xxxxxx
xxx
2
xxxxxx
xxx
2
xxxxxx
xxx
1
xxxxxx
xxx
1
xxxxxx
xxx
5
xxxxxx
xxx
5
xxxxxx
xxx
4
xxxxxx
xxx
4
xxxxxx
xxx
3
xxxxxx
xxx
3
xxxxxx
xxx
2
xxxxxx
xxx
2
xxxxxx
xxx
1
xxxxxx
xxx
1
xxxxxx
xxx
5
xxxxxx
xxx
5
xxxxxx
xxx
4
xxxxxx
xxx
4
xxxxxx
xxx
3
xxxxxx
xxx
3
xxxxxx
xxx
2
xxxxxx
xxx
2
xxxxxx
xxx
1
xxxxxx
xxx
1
xxxxxx
xxx
About 10 cm About 10 cm
q, w, te, r
2
2
RQT7612
30˚
30˚
120˚
Step 1
Placement
The front, center, and surround speakers should
be placed at approximately the same distance
from the seating area.
The angles in the diagram are approximate.
TV or monitor
(not included)
Front speaker (L)
Front speaker (R)
Center speaker
Receiver
Surround speaker (R)
Subwoofer
Surround speaker (L)
DVD recorder
SC-HT37R
SC-HT25R
Place on a shelf or rack.
Surround
speakers
Step 2
Attach the stickers to the speaker cables
Sticker sheet Speaker cable(s)
(4 m, Center)
(4 m, Front (L) (R) and Center)
SC-HT25R
SC-HT37R
5
xxxxxx
xxx
5
xxxxxx
xxx
4
xxxxxx
xxx
4
xxxxxx
xxx
3
xxxxxx
xxx
3
xxxxxx
xxx
2
xxxxxx
xxx
2
xxxxxx
xxx
1
xxxxxx
xxx
1
xxxxxx
xxx
5
xxxxxx
xxx
5
xxxxxx
xxx
4
xxxxxx
xxx
4
xxxxxx
xxx
3
xxxxxx
xxx
3
xxxxxx
xxx
2
xxxxxx
xxx
2
xxxxxx
xxx
1
xxxxxx
xxx
1
xxxxxx
xxx
(10 m,
Surround
(L) (R))
SC-HT25R
5
xxxxxx
xxx
5
xxxxxx
xxx
4
xxxxxx
xxx
4
xxxxxx
xxx
3
xxxxxx
xxx
3
xxxxxx
xxx
2
xxxxxx
xxx
2
xxxxxx
xxx
1
xxxxxx
xxx
1
xxxxxx
xxx
5
xxxxxx
xxx
5
xxxxxx
xxx
4
xxxxxx
xxx
4
xxxxxx
xxx
3
xxxxxx
xxx
3
xxxxxx
xxx
2
xxxxxx
xxx
2
xxxxxx
xxx
1
xxxxxx
xxx
1
xxxxxx
xxx
5
xxxxxx
xxx
5
xxxxxx
xxx
4
xxxxxx
xxx
4
xxxxxx
xxx
3
xxxxxx
xxx
3
xxxxxx
xxx
2
xxxxxx
xxx
2
xxxxxx
xxx
1
xxxxxx
xxx
1
xxxxxx
xxx
5
xxxxxx
xxx
5
xxxxxx
xxx
4
xxxxxx
xxx
4
xxxxxx
xxx
3
xxxxxx
xxx
3
xxxxxx
xxx
2
xxxxxx
xxx
2
xxxxxx
xxx
1
xxxxxx
xxx
1
xxxxxx
xxx
About 10 cm About 10 cm
Attach stickers to both ends of all speaker cables to simplify connections.
Model No.
Receiver
Front speakers
Surround speakers
Center speaker
Subwoofer
DVD recorder
SC-HT37R
SA-HT07
SB-FS927
SB-PC927
SB-WA07
DMR-E85H
SC-HT25R
SA-HT05
SB-PF725
SB-PS725
SB-PC725
SB-WA05
DMR-E55
Set the speakers up on an even surface
to prevent them from falling.
Front and surround speakers (The length of cables are same.)
SC-HT37R
q to rt
q
Front
speaker (L)
w Front
speaker (R)
e Surround
speaker (L)
r Surround
speaker (R)
t Center
speaker
Use the long speaker cables for the surround speakers.
SC-HT25R
Speaker cable (4 m)
Speaker cable (10 m)
Speaker assembly (
a
page 4 to 5, SC-HT07/SC-HT05 Operating Instructions)
SC-HT37R only
(1)
Make sure you have all the indicated components before assembly setup, and connection.
(Receiver)
(1)
(3)
(2)
SC-HT37R-EG/EB/EP (En) 2004.4.1 18:13 y[W 2

3
3
RQT7612
ENGLISH
A
C
IN
~
AC
IN
~
2
1
4
3
5
Front
(6Ω)
Surround
(6Ω)
Center
(6Ω)
2
1
3
b
Click!
1
3
2
1
3
b
Click!
1
3
2
1
b
R
L
R
L
2
1
4
3
5
Front
(6Ω)
Surround
(6Ω)
Center
(6Ω)
R
L
R
L
b
2
1
2
1
4
3
5
2
1
4
3
5
Step 3
Connect the speakers
Front
speaker (L)
Front
speaker (R)
Center
speaker
Surround
speaker (R)
Surround
speaker (L)
Red
Copper
Silver
Black
Silver
Front
speaker (L)
Front
speaker (R)
Center
speaker
Surround
speaker (R)
Surround
speaker (L)
Red
Copper
SC-HT37R
Black
When wall mounting speakers, (a page 7 in the Operating
Instructions for SC-HT07/SC-HT05).
Note
When wall mounting speakers, (a page 7 in the Operating
Instructions for SC-HT07/SC-HT05).
Note
SC-HT37R
Center speaker
SC-HT25R All Speakers
Black
Silver
Red
Copper
Preparation
Black
Silver
Red
Copper
Subwoofer
(SB-WA07)
Subwoofer
(SB-WA05)
SC-HT25R
SC-HT37R-EG/EB/EP (En) 2004.4.1 18:13 y[W 3

4
4
RQT7612
Step 4
Connect the receiver, DVD recorder, and TV or monitor
Optical fiber
cable
Audio/video
cable
(DVD recorder)
RF coaxial
lead
Video cable
(not included)
(1) (1) (1) (1)
AC IN
AV4 IN
R-AUDIO-L
VIDEO
S-VIDEO
COMPONENT
VIDEO OUT
(NTSC:480P/480I,
PAL:576P/576I)
Y
P
B
P
R
RF IN
RF OUT
AV1 (TV)
AV2 (DECODER/EXT)
OPTICAL
DIGITAL AUDIO OUT
(PCM/BITSTREAM)
R-AUDIO-L
VIDEO
S-VIDEO
OUT
TAPE
CD
TV
IN
REC(OUT)
PLAY(IN)
IN
SURROUND
SUBWOOFER
DVD
OPT 1
OPT 2
COAXIAL
IN
(TV) IN
(DVR) IN
(DVD) IN
CENTER
L
R
L
R
L
R
L
R
DIGITAL IN
TO SB-WA07
A
FM ANT
AM ANT
75 Ω
LOOP
EXT
LOOP ANT
GND
AV1 (TV OUT)
AV2 (DVD IN)
DVD / DVD 6CH
FRONT
L
R
TV
DVR / VCR1
OUT IN
MONITOR OUT
IN
AV3 (DVR/VCR1 IN)
DVR / VCR1
OUT IN
L
R
VIDEO IN
VHF/UHF
RF IN
AUDIO
VIDEO
TV or monitor
(not included)
Receiver
(SA-HT07)
DVD recorder
(DMR-E85H)
Aerial lead
(not included)
Video cable
(not included)
Audio/video cable
Optical fiber cable
This side up
To the aerial
RF coaxial lead
Choose the connection that suits your system.
Basic
connection to a TV (monitor) with a VIDEO IN RCA terminal
Connection to a TV (monitor) with an AV IN SCART terminal
Connection to a TV (monitor) with COMPONENT VIDEO IN terminal
Actual connections depend on your television.
Refer to the connection explanations in the Operating Instructions for the television, DVD recorder (DMR-E85H or DMR-E55), and receiver
(SC-HT07/SC-HT05).
C
B
A
Do not bend the optical fiber cable.
A
Basic connection to a TV (monitor) with a VIDEO IN RCA terminal
SC-HT37R-EG/EB/EP (En) 2004.4.1 18:13 y[W 4

5
5
RQT7612
ENGLISH
AC IN
AV4 IN
R-AUDIO-L
VIDEO
S-VIDEO
COMPONENT
VIDEO OUT
(NTSC:480P/480I,
PAL:576P/576I)
Y
P
B
P
R
RF IN
RF OUT
AV1 (TV)
AV2 (DECODER/EXT)
OPTICAL
DIG
ITA
L A
UDIO
O
UT
(PCM
/BITSTR
EAM
)
R-AUDIO-L
VIDEO
S-VIDEO
OUT
TA PE
CD
TV
IN
REC(OUT)
PLAY(IN)
IN
SURROUND
SUBWOOFER
DVD
OPT 1
OPT 2
COAXIAL
IN
(TV) IN
(DVR) IN
(DVD) IN
CENTER
L
R
L
R
L
R
L
R
DIGITAL IN
TO SB-WA07
A
FM ANT
AM ANT
75 Ω
LOOP
EXT
LOOP ANT
GND
AV1 (TV OUT)
AV2 (DVD IN)
DVD / DVD 6CH
FRONT
L
R
TV
DVR / VCR1
OUT IN
MONITOR OUT
IN
AV3 (DVR/VCR1 IN)
DVR / VCR1
OUT IN
L
R
VHF/UHF
RF IN
AUDIO
VIDEO
AV IN
TV or monitor
(not included)
Receiver
(SA-HT07)
DVD recorder
(DMR-E85H)
21-pin Scart lead
(not included)
RF coaxial lead
(DVD recorder)
Aerial lead
(not included)
To the aerial
RF coaxial lead
21-pin Scart lead
(not included)
(Continued on next page)
Optical fiber cable
Optical fiber cable
This side up
Do not bend the
optical fiber cable.
(1) (1)
(2)
21-pin Scart lead (not included)
Settings
If you make these connections, change the settings on the
receiver and DVD recorder as follows.
Receiver
Set AV OUTPUT to “VCR” and “SCART” (
a
page 22 in the Operating
Instructions for SC-HT07/SC-HT05).
DVD recorder
To output in RGB select “RGB (without component)” from “AV1 Output” in
the SETUP menu (
a
page 43 in the DMR-E85H Operating Instructions for
the United Kingdom, or page 41 for Continental Europe. Page 41 in the
DMR-E55 Operating Instructions for the United Kingdom or page 39 for
Continental Europe).
B
Connection to a TV (monitor) with an AV IN SCART terminal
SC-HT37R-EG/EB/EP (En) 2004.4.1 18:13 y[W 5

6
6
RQT7612
AC IN
AV4 IN
R-AUDIO-L
VIDEO
S-VIDEO
Y
P
B
P
R
RF IN
RF OUT
AV1 (TV)
AV2 (DECODER/EXT)
OPTICAL
DIG
ITAL A
UDIO
O
UT
(PCM
/BITSTR
EA
M
)
R-AUDIO-L
VIDEO
S-VIDEO
OUT
TA PE
CD
TV
IN
REC(OUT)
PLAY(IN)
IN
SURROUND
SUBWOOFER
DVD
OPT 1
COAXIAL
IN
(TV) IN
(DVD) IN
CENTER
L
R
L
R
L
R
L
R
TO SB-WA07
A
FM ANT
AM ANT
75 Ω
LOOP
EXT
LOOP ANT
GND
AV1 (TV OUT)
AV2 (DVD IN)
DVD / DVD 6CH
FRONT
L
R
AV3 (DVR/VCR1 IN)
DVR / VCR1
OUT IN
L
R
VHF/UHF
RF IN
AUDIO
COMPONENT
VIDEO OUT
(NTSC:480P/480I,
PAL:576P/576I)
OPT 2
(DVR) IN
DIGITAL IN
COMPONENT
VIDEO IN
Y
P
B
P
R
TV
DVR / VCR1
OUT
IN
MONITOR OUT
IN
VIDEO
Step 4
Audio/video cable
(DVD recorder)
RF coaxial lead Video cables
(not included)
TV or monitor
(not included)
Receiver
(SA-HT07)
DVD recorder
(DMR-E85H)
Aerial lead
(not included)
Audio/video
cable
To the aerial
RF coaxial lead
Video cables
(not included)
Optical fiber cable
COMPONENT VIDEO
terminal
These terminals can be used
for either interlace or
progressive output and provide
a purer picture.
Optical fiber
cable
This side up
Do not bend the
optical fiber cable.
Connect the receiver, DVD recorder, and TV or monitor
(1) (1) (1) (3)
C
Connection to a TV (monitor) with COMPONENT VIDEO IN terminal
SC-HT37R-EG/EB/EP (En) 2004.4.1 18:13 y[W 6

7
7
RQT7612
ENGLISH
Step 5
TAPE
CD
TV
IN
REC(OUT)
PLAY(IN)
IN
SURROUN
L
R
L
R
L
R
L
R
TO SB-WA07
A
FM ANT
AM ANT
75 Ω
LOOP
EXT
LOOP ANT
GND
DVD / DVD
FRONT
L
R
DVR / VCR1
OUT
IN
L
R
AUDIO
Connect the antennas
AM loop antenna FM indoor antenna
AM loop antennaFM indoor antenna
Fix the other end of the
antenna where reception
is best.
Adhesive tape
(Receiver)
2
1
Red
White
Black
LOOP ANT
GND
2
1
3
Step 6
AC IN
AV4 IN
R-AUDIO-L
VIDEO
S-VIDEO
AV1 (TV)
AV2 (DECODER/EXT)
OPTICAL
DIGITAL AUDIO OUT
(PCM/BITSTREAM)
R-AUDIO-L
VIDEO
S-VIDEO
OUT
TAPE
CD
TV
IN
REC(OUT)
PLAY(IN)
IN
SURROUND
SUBWOOFER
DVD
OPT 1 OPT 2
COAXIAL
IN
(TV) IN (DVR) IN
(DVD) IN
CENTER
L
R
L
R
L
R
L
R
DIGITAL IN
TO SB-WA07
A
FM ANT
AM ANT
75 Ω
LOOP
EXT
LOOP ANT
GND
AV1 (TV OUT)
DVD / DVD 6CH
FRONT
L
R
TV
DVR / VCR1
OUT IN
M
ON
ITO
R
O
UT
IN
DVR / VCR1
OUT IN
L
R
AUDIO
VIDEO
AC IN ~
Connect the System cable and AC mains leads
To household
mains socket
AC mains leads
Receiver
(SA-HT07)
DVD recorder
(DMR-E85H)
Subwoofer
(SB-WA07)
System cable
(Receiver/DVD recorder)
AC mains leads
Click!
(For the United Kingdom) (For other areas)
(Receiver)
Catch
To disconnect
Press the catch and pull out.
Receiver
(SA-HT07)
The DVD recorder can
interfere with radio
reception.
Turn the DVD recorder off
or move it further away
from the antennas if this
occurs.
System cable
FOR THE UNITED KINGDOM ONLY
READ THE CAUTION FOR THE AC
MAINS LEAD ON PAGE 2 OF THE
OPERATING INSTRUCTIONS
(SC-HT07/SC-HT05, DMR-E85H AND
DMR-E55) BEFORE CONNECTION.
The included AC mains leads are for use with these units only. Do
not use them with other equipment.
Note
(1) (1)
(2) (2) (1)
SC-HT37R-EG/EB/EP (En) 2004.4.1 18:13 y[W 7

8
8
RQT7612
Step 7
Channel reception settings
6
DRIVE SELECT
TV
DIRECT TV REC
VIDEO PLus+
MANUAL SKIP
INPUT SELECT
CANCEL
SKIP
STOP
PAUSE
PLAY/x1.3
SLOW/SEARCH
w
w
w h
w h
DIRECT NAVIGATOR
FUNCTIONS
TOP MENU
SUB MENU
PROG/CHECK
RETURN
DISPLAY
STATUS TIME SLIP
REC
REC MODE
ERASE
TIMER
AUDIO
CREATE
CHAPTER
DUBBINGEXT LINK
AV
VOLUME
CH
CH
DVD
HDD
1
2
3
4
5
6
7
8
9
∗
0
i
u
y
t
g
h
q
w
w
z
A
B
C
DVD
ENTER
When connecting to a television that has the Q Link
function (
a Operating Instructions, page 49 for
DMR-E85H, or page 46 for DMR-E55) with a fully
wired 21-pin Scart lead (
a page 5).
You can download the tuning positions from the television.
DVD recorder’s Auto Clock Setting function synchronizes the
time when the TV channel that is broadcasting time and date
information is tuned.
Preset Download (Setup with Q Link functions)
DMR-E85H Remote control
4 Press [ENTER] twice to store the PIN
number.
The cursor moves to “Name”.
5 Press [q].
6 Press [e, r] to select a letter and then
press [q
].
Repeat this to enter the name.
7 Press [ENTER] to store the name.
8 Press [r] and [q], and then repeat steps
6, 7 to enter and store “House No.” and
“Postcode”.
9 Press [RETURN].
The Owner ID settings screen disappears.
1 Turn on the television and select the
appropriate AV input to suit the DVD
recorder connections.
2 Press [^ DVD] to turn the DVD recorder on.
Downloading from the
television starts.
3 When downloading has completed, the Owner ID settings
screen appears.
Press [q] and press the numbered
buttons to enter a 4-digit PIN number.
Download
Pos 4
Download in progress, please wait.
RETURN: to abort
RETURN
Make a note of the PIN
number (don’t forget), as it is
not possible to return to the
factory preset.
RETURN
Owner ID
RETURN : leave
PIN number
Name
House No.
Postcode
✽✽✽✽
To stop partway
Press [RETURN].
g If the clock setting menu appears
Set the clock manually (a Operating Instructions, page 46 for DMR-E85H, or page 44 for DMR-E55).
g If there is interference or a very poor picture appears on the TV screen
Refer to “Removing Interference” on the page 13 of the DMR-E85H or DMR-E55 Operating Instructions, and perform steps 1, 2 and 4 to stop
the RF output. In step 2, press [0] to select “– –”.
For the United Kingdom only
SC-HT37R-EG/EB/EP (En) 2004.4.1 18:13 y[W 8

9
9
RQT7612
ENGLISH
6
DRIVE SELECT
TV
DIRECT TV REC
VIDEO PLus+
MANUAL SKIP
INPUT SELECT
CANCEL
SKIP
STOP
PAUSE
PLAY/x1.3
SLOW/SEARCH
w
w
w h
w h
DIRECT NAVIGATOR
FUNCTIONS
TOP MENU
SUB MENU
PROG/CHECK
RETURN
DISPLAY
STATUS TIME SLIP
RECREC MODE
ERASE
TIMER
AUDIO
CREATE
CHAPTER
DUBBINGEXT LINK
AV
VOLUME
CH
CH
DVD
HDD
1
2
3
4
5
6
7
8
9
∗
0
iu
y
t
g
h
q
w
w
z
A
B
C
DVD
ENTER
4 Press [ENTER] twice to store the PIN
number.
The cursor moves to “Name”.
5 Press [q].
6 Press [e, r] to select a letter and then
press [q
].
Repeat this to enter the name.
7 Press [ENTER] to store the name.
8 Press [r] and [q], and then repeat steps
6, 7 to enter and store “House No.” and
“Postcode”.
9 Press [RETURN].
The Owner ID settings screen disappears.
1 Turn on the television and select the
appropriate AV input to suit the DVD
recorder connections.
2 Press [^ DVD] to turn the DVD recorder on.
Auto-Setup starts.
This takes about 5 minutes.
3 When Auto-Setup has completed, the Owner ID settings
screen appears.
Press [q] and press the numbered
buttons to enter a 4-digit PIN number.
Auto-Setup
Ch 1
Auto-Setup in progress, please wait.
RETURN: to abort
RETURN
Make a note of the PIN
number (don’t forget), as it
is not possible to return to
the factory preset.
RETURN
Owner ID
RETURN : leave
PIN number
Name
House No.
Postcode
✽✽✽✽
When connecting to a television that does not have
the Q Link function (
a Operating Instructions, page
49 for DMR-E85H, or page 46 for DMR-E55) with the
AUDIO/VIDEO OUT (
aa
page 4) or COMPONENT
VIDEO OUT terminal (
aa
page 6).
The DVD recorder’s Auto-Setup function automatically tunes all
available TV stations and synchronizes the time when the TV
channel that is broadcasting time and date information is tuned.
Auto-Setup (Setup without Q Link functions)
To stop partway
Press [RETURN].
g If the clock setting menu appears
Set the clock manually (a Operating Instructions, page 46 for DMR-E85H, or page 44 for DMR-E55).
DMR-E85H Remote control
(When connecting to a television with RF socket only)
Set the new RF output channel to TV (refer to the instructions
for your TV).
Select an unused channel pre-set on your TV and tune it to
the RF output channel number shown on the unit’s display.
(When the Auto-Setup screen does not appear clearly even
after performing the above operations, re-tune the channel
until the Auto-Setup screen becomes clear.)
SC-HT37R-EG/EB/EP (En) 2004.4.1 18:13 y[W 9

10
10
RQT7612
7
6
HDD
SP
Select the channel with [12CH].
To select with the numbered buttons:
e.g., 5: [0] a [5] 15: [1] a [5]
CH
5
4
Check installation by recording from the TV
Preparation
TV
DIRECT TV REC
DUBBING
EXT LINK
AV
VOLUME
CH
A
B
C
DVD
6
DRIVE SELECT
TV
DIRECT TV REC
VIDEO PLus+
MANUAL SKIP
INPUT SELECT
CANCEL
SKIP
STOP
PAUSE
PLAY/x1.3
SLOW/SEARCH
w
w
w h
w h
DIRECT NAVIGATOR
FUNCTIONS
TOP MENU
SUB MENU
PROG/CHECK
RETURN
DISPLAY
STATUS
TIME SLIP
RECREC MODE
ERASE
TIMER
AUDIO
CREATE
CHAPTER
DUBBING
EXT LINK
AV
VOLUME
CH
CH
DVD
HDD
1
2
3
4
5
6
7
8
9
∗
0
i
u
y
t
g
h
q
w
w
z
A
B
C
DVD
ENTER
1
1
3
5
7
To stop recording
Press [g].
Recorded as 1 title until the position where stopped.
(DMR-E85H only)
When continuously recording for long durations, titles are
automatically divided every 8 hours.
It takes about 30 seconds for the unit to complete recording
management information after recording finished.
When you finish recording
Be sure to reduce the volume and press [8] to switch the DVD
recorder and receiver to standby.
DVD-R
HDD
Switch on.
^
8
DVD
3
Select [HDD] or [DVD] as the
recording drive.
or
The HDD or DVD indicator lights up on the DVD recorder.
DRIVE SELECT
DRIVE SELECT
HDD DVD
Press [; OPEN/CLOSE] again to close the
tray.
OPEN/CLOSE
;
If you selected the DVD drive (DMR-E85H only)
Open the tray and insert a disc.
Insert label-up.
Insert with the
arrow facing in.
Insert fully so it clicks into place.
HDD
XP
Select “REC MODE”.
Remaining time on
the disc
HDD
XP
REC
XP
DVD
R
-
AM
REC
Start recording.
Recording will take place on free space on the HDD
(DMR-E85H only) or on the disc. Existing data will not be
overwritten.
You cannot change the channel or recording mode during recording.
¡Turn on the television and select the appropriate video input on
the television to suit the connections for the receiver and DVD
recorder.
¡First, do the channel reception settings (a pages 10 and 11 in
the Operating Instructions for DMR-E85H or DMR-E55).
For Continental Europe and other areas
or
DMR-E85H Remote control
DVD recorder
(DMR-E85H)
REC
REC MODE
CH
12
1
2
(SC-HT37R only)
¡It is not possible to record continuously from one side of a double sided disc to the other. You will need to eject the disc and turn it over.
¡It is not possible to record CPRM (a page 48 in the DMR-E85H Operating Instructions for the United Kingdom, or page 46 for Continental
Europe. Page 45 in the DMR-E55 Operating Instructions for the United Kingdom or page 43 for Continental Europe) protected material onto
DVD-R or 2.8 GB DVD-RAM discs.
DVD-RRAMHDD
DMR-E85H only
DMR-E85H only
DMR-E85H only
DMR-E85H
DMR-E55
or
REC
or
[g]
[g]
8
4
Receiver
(SA-HT07)
INPUT SELECTOR
Select “DVR/VCR1 (DVR/VCR)”.
SA-HT07
SA-HT05
2
ReceiverDVD recorder
If you put a disc in while the HDD is selected, the DVD
indicator on the DVD recorder will flash while the DVD
recorder reads the disc.
DMR-E85H only
(DMR-E85H only)
DVD-RHDD
RAM
SC-HT37R-EG/EB/EP (En) 2004.4.1 18:13 y[W 10

11
11
RQT7612
ENGLISH
Check installation by playing a DVD
To stop play
Press [g].
When you finish listening
¡Be sure to reduce the volume and press [8] to switch the DVD recorder and receiver to standby.
¡When left unused for long periods of time, the system should be unplugged from the household mains socket.
Press [; OPEN/CLOSE]
again to close the tray.
Preparation
q/×1.3
OPEN/CLOSE
;
DOWN
UP
VOLUME
Switch on.
Start playing.
^
8
8
Open the tray and
insert a disc.
Adjust the volume.
Insert label-up.
Insert with the
arrow facing in.
Insert fully so it clicks into place.
(DMR-E85H only)
Play starts from the most recently recorded title.
DVD-RRAMHDD
Receiver DVD recorder
[g]
Receiver
(SA-HT07)
DVD recorder
(DMR-E85H)
1 2
Select [HDD] or
[DVD] as the
playback drive.
The HDD or DVD indicator lights up
on the DVD recorder.
DRIVE SELECT
DMR-E85H only
3
4
5 6
When playing back a title recorded on the HDD, ensure that you match the “TV System” setting to the title (a page 45 in the DMR-E85H
Operating Instructions for the United Kingdom, or page 43 for Continental Europe).
SC-HT37R only
Turn on the television and select the appropriate video input on the television to suit the connections for the receiver and DVD cecorder.
HDD
SP
PLAY
DVD
R
-
AM
PLAY
SP
DMR-E85H
DMR-E55
If you selected the DVD drive
(DMR-E85H only)
Select “DVR/VCR1
(DVR/VCR)”.
INPUT SELECTOR
SA-HT07
SA-HT05
(DMR-E85H only)
DVD-R
HDD
RAM
If you put a disc in while the HDD is
selected, the DVD indicator flashes while
the disc is read.
DMR-E85H only
SC-HT37R-EG/EB/EP (En) 2004.4.1 18:13 y[W 11

2
12
RQT7612
5
xxxxxx
xxx
5
xxxxxx
xxx
4
xxxxxx
xxx
4
xxxxxx
xxx
3
xxxxxx
xxx
3
xxxxxx
xxx
2
xxxxxx
xxx
2
xxxxxx
xxx
1
xxxxxx
xxx
1
xxxxxx
xxx
5
xxxxxx
xxx
5
xxxxxx
xxx
4
xxxxxx
xxx
4
xxxxxx
xxx
3
xxxxxx
xxx
3
xxxxxx
xxx
2
xxxxxx
xxx
2
xxxxxx
xxx
1
xxxxxx
xxx
1
xxxxxx
xxx
5
xxxxxx
xxx
5
xxxxxx
xxx
4
xxxxxx
xxx
4
xxxxxx
xxx
3
xxxxxx
xxx
3
xxxxxx
xxx
2
xxxxxx
xxx
2
xxxxxx
xxx
1
xxxxxx
xxx
1
xxxxxx
xxx
5
xxxxxx
xxx
5
xxxxxx
xxx
4
xxxxxx
xxx
4
xxxxxx
xxx
3
xxxxxx
xxx
3
xxxxxx
xxx
2
xxxxxx
xxx
2
xxxxxx
xxx
1
xxxxxx
xxx
1
xxxxxx
xxx
ca. 10 cm/10 cm circa
q, w, te, r
30˚
30˚
120˚
Schritt 1
Passo 1
Platzierung/Sistemazione
Fernsehgerät oder
Monitor
(separat erhältlich)
TV o monitor
(non fornito)
Frontlautsprecher (L)
Diffusore anteriore (S)
Frontlautsprecher (R)
Diffusore anteriore (D)
Mittellautsprecher
Diffusore centrale
Receiver
Ricevitore
Surround-Lautsprecher
(R)
Diffusore surround (D)
Subwoofer
Subwoofer
Surround-Lautsprecher
(L)
Diffusore surround (S)
DVD-Recorder
Registratore DVD
SC-HT37R
SC-HT25R
Auf einem Regal oder Hi-Fi-Schrank aufstellen.
Mettere su uno scaffale o rack.
Surround-Lautsprecher
Diffusori surround
Schritt 2
Passo 2
Bringen Sie die Etiketten zur bequemen Identifizierung an den Lautsprecherkabeln an/Attaccare gli autoadesivi ai cavi dei diffusori
Bogen mit Etiketten für
Lautsprecherkabel
Foglio autoadesivi
Lautsprecherkabel/Cavi diffusori
(Länge 4 m, für Mittellautsprecher/4 m, centrale)
(Länge 4 m, für Frontlautsprecher (L), (R) und Mittellautsprecher)
(4 m, anteriore (L) (R) e centrale)
SC-HT25R
SC-HT37R
5
xxxxxx
xxx
5
xxxxxx
xxx
4
xxxxxx
xxx
4
xxxxxx
xxx
3
xxxxxx
xxx
3
xxxxxx
xxx
2
xxxxxx
xxx
2
xxxxxx
xxx
1
xxxxxx
xxx
1
xxxxxx
xxx
5
xxxxxx
xxx
5
xxxxxx
xxx
4
xxxxxx
xxx
4
xxxxxx
xxx
3
xxxxxx
xxx
3
xxxxxx
xxx
2
xxxxxx
xxx
2
xxxxxx
xxx
1
xxxxxx
xxx
1
xxxxxx
xxx
(Länge 10 m, für Surround-
Lautsprecher (L) (R))
(10 m, surround (L) (R))
SC-HT25R
5
xxxxxx
xxx
5
xxxxxx
xxx
4
xxxxxx
xxx
4
xxxxxx
xxx
3
xxxxxx
xxx
3
xxxxxx
xxx
2
xxxxxx
xxx
2
xxxxxx
xxx
1
xxxxxx
xxx
1
xxxxxx
xxx
5
xxxxxx
xxx
5
xxxxxx
xxx
4
xxxxxx
xxx
4
xxxxxx
xxx
3
xxxxxx
xxx
3
xxxxxx
xxx
2
xxxxxx
xxx
2
xxxxxx
xxx
1
xxxxxx
xxx
1
xxxxxx
xxx
5
xxxxxx
xxx
5
xxxxxx
xxx
4
xxxxxx
xxx
4
xxxxxx
xxx
3
xxxxxx
xxx
3
xxxxxx
xxx
2
xxxxxx
xxx
2
xxxxxx
xxx
1
xxxxxx
xxx
1
xxxxxx
xxx
5
xxxxxx
xxx
5
xxxxxx
xxx
4
xxxxxx
xxx
4
xxxxxx
xxx
3
xxxxxx
xxx
3
xxxxxx
xxx
2
xxxxxx
xxx
2
xxxxxx
xxx
1
xxxxxx
xxx
1
xxxxxx
xxx
ca. 10 cm/10 cm circa
Um die Identifizierung der verschiedenen Lautsprecher zu erleichtern, befestigen Sie die Etiketten an beiden Ende der Lautsprecherkabel.
Attaccare gli autoadesivi ad entrambe le estremità dei cavi dei diffusori, per semplificare il collegamento.
Modellbezeichnung/No. modello
Receiver/Ricevitore
Frontlautsprecher/Diffusori anteriori
Surround-Lautsprecher/Diffusori surround
Mittellautsprecher/Diffusore centrale
Subwoofer/Subwoofer
DVD-Recorder/Registratore DVD
SC-HT37R
SA-HT07
SB-FS927
SB-PC927
SB-WA07
DMR-E85H
SC-HT25R
SA-HT05
SB-PF725
SB-PS725
SB-PC725
SB-WA05
DMR-E55
Stellen Sie die Lautsprecherboxen auf einer
ebenen Unterlage auf, damit sie nicht
umkippen können.
Sistemare i diffusori su una superficie
piana, per evitare che cadano.
Front- und Surround-Lautsprecher (Die Kabel besitzen die gleiche Länge.)/Diffusori anteriori e surround (La lunghezza dei cavi è la stessa.)
SC-HT37R
q bis/a rt
q
Frontlautsprecher
(L)
Diffusore
anteriore (S)
w
Frontlautsprecher
(R)
Diffusore
anteriore (D)
e Surround-
Lautsprecher (L)
Diffusore
surround (S)
r Surround-
Lautsprecher (R)
Diffusore
surround (D)
t Mittellautsprecher
Diffusore centrale
Die langen Lautsprecherkabel sind für die Surround-Lautsprecher bestimmt./Per i diffusori surround, usare i cavi lunghi.
SC-HT25R
Lautsprecherkabel (4 m)/Cavo diffusore (4 m)
Lautsprecherkabel (10 m)/Cavo diffusore (10 m)
Zusammenbau der Lautsprecher (
a
Seite 4 und 5 der SC-HT07/SC-HT05 Bedienungsanleitung)
Montaggio dei diffusori (
a
da pag. 4 a pag. 5 delle SC-HT07/SC-HT05 Istruzioni per l’uso)
Die Frontlautsprecher, der Mittellautsprecher und die
Surround-Lautsprecher sollten etwa jeweils im gleichen
Abstand von der Hörposition aufgestellt werden.
Bei den Winkelangaben des Diagramms handelt es sich
um Richtwerte.
I diffusori anteriori, centrale e surround vanno sistemati
approssimativamente alla stessa distanza dalla
posizione di ascolto.
Gli angoli nella illustrazione sono approssimativi.
Nur SC-HT37R/SC-HT37R soltanto
(1)
Vergewissern Sie sich, dass alle angegebenen Teile vorhanden sind, bevor Sie mit der Montage, der Aufstellung und dem Anschluss beginnen.
Prima di montare, installare e collegare i pezzi, controllare di avere tutti i componenti in figura.
(Receiver/Ricevitore)
(3)
(1)
(2)
SC-HT37R-EG/EB/EP (Ge/It) 2004.4.1 18:18 y[W 12

3
13
RQT7612
DEUTSCH
ITALIANO
A
C
IN
~
AC
IN
~
2
1
4
3
5
Front
(6Ω)
Surround
(6Ω)
Center
(6Ω)
R
L
R
L
2
1
4
3
5
Front
(6Ω)
Surround
(6Ω)
Center
(6Ω)
R
L
R
L
2
1
3
b
1
3
2
1
3
b
1
3
b
2
1
2
1
4
3
5
2
1
4
3
5
2
1
b
Schritt 3
Passo 3
Anschließen der Lautsprecher/Collegare i diffusori
Frontlautsprecher
(L)
Diffusore
anteriore (S)
Frontlautsprecher
(R)
Diffusore
anteriore (D)
Mittellautsprecher
Diffusore
centrale
Surround-
Lautsprecher (R)
Diffusore
surround (D)
Surround-
Lautsprecher (L)
Diffusore
surround (S)
Rot/Rosso
Kupfer/Rame
Silber/Argento
Schwarz
Nero
Silber/Argento
Vorbereitung
Preparativi
Mittellautsprecher
Diffusore
centrale
Rot/
Rosso
Kupfer/Rame
Schwarz/Nero Silber/Argento
Rot
Rosso
Kupfer/Rame
Schwarz/Nero
Für Wandmontage der Lautsprecher,
a Seite 7 der
Bedienungsanleitung für SC-HT07/SC-HT05.
Per il montaggio dei diffusori sulle pareti,
a pag. 7 delle SC-HT07/
SC-HT05 Istruzioni per l’uso.
Nota
Hinweis
Für Wandmontage der Lautsprecher, a Seite 7 der
Bedienungsanleitung für SC-HT07/SC-HT05.
Per il montaggio dei diffusori sulle pareti,
a pag. 7 delle SC-HT07/
SC-HT05 Istruzioni per l’uso.
Nota
Hinweis
Mittellautsprecher des Modells SC-HT37R/Diffusore centrale SC-HT37R
Alle Lautsprecher des Modells SC-HT25R
/
Tutti i diffusori SC-HT25R
Frontlautsprecher
(L)
Diffusore
anteriore (S)
Frontlautsprecher
(R)
Diffusore
anteriore (D)
Surround-
Lautsprecher (R)
Diffusore
surround (D)
Surround-
Lautsprecher (L)
Diffusore
surround (S)
Klick!
Clic!
Subwoofer
Subwoofer
(SB-WA07)
SC-HT37R
SC-HT25R
Schwarz/Nero
Silber/Argento
Rot
Rosso
Kupfer/Rame
Klick!
Clic!
Subwoofer
Subwoofer
(SB-WA05)
SC-HT37R-EG/EB/EP (Ge/It) 2004.4.1 18:18 y[W 13

Grundlegender Anschluss an Fernsehgerät (Monitor) mit VIDEO IN-Cinchbuchse
Collegamento di base a un televisore (monitor) con terminale VIDEO IN RCA
4
14
RQT7612
AC IN
AV4 IN
R-AUDIO-L
VIDEO
S-VIDEO
COMPONENT
VIDEO OUT
(NTSC:480P/480I,
PAL:576P/576I)
Y
P
B
P
R
RF IN
RF OUT
AV1 (TV)
AV2 (DECODER/EXT)
OPTICAL
DIGITAL AUDIO OUT
(PCM/BITSTREAM)
R-AUDIO-L
VIDEO
S-VIDEO
OUT
TAPE
CD
TV
IN
REC(OUT)
PLAY(IN)
IN
SURROUND
SUBWOOFER
DVD
OPT 1
OPT 2
COAXIAL
IN
(TV) IN
(DVR) IN
(DVD) IN
CENTER
L
R
L
R
L
R
L
R
DIGITAL IN
TO SB-WA07
A
FM ANT
AM ANT
75 Ω
LOOP
EXT
LOOP ANT
GND
AV1 (TV OUT)
AV2 (DVD IN)
DVD / DVD 6CH
FRONT
L
R
TV
DVR / VCR1
OUT IN
MONITOR OUT
IN
AV3 (DVR/VCR1 IN)
DVR / VCR1
OUT IN
L
R
VIDEO IN
VHF/UHF
RF IN
AUDIO
VIDEO
Schritt 4
Passo 4
Lichtleiterkabel
Cavo a fibra ottica
Audio/Video-Kabel
Cavo audio/video
(DVD-Recorder/Registratore DVD)
Fernsehgerät
oder Monitor
TV o monitor
(separat erhältlich)
(non fornito)
Receiver
Ricevitore
(SA-HT07)
DVD-Recorder
Registratore DVD
(DMR-E85H)
Antennenzuleitung
(separat erhältlich)
Cavo antenna (non fornito)
Videokabel (separat erhältlich)
Cavo video (non fornito)
Audio/Video-Kabel
Cavo audio/video
Lichtleiterkabel
Cavo a fibra ottica
Diese Seite muss nach
oben weisen
Questo lato rivolto in
alto
HF-Koaxialkabel
Cavo coassiale RF
Videokabel
(separat erhältlich)
Cavo video
(non fornito)
an Antenne
All’antenna
HF-Koaxialkabel
Cavo coassiale RF
Das Lichtleiterkabel nicht knicken.
Non piegare il cavo a fibra ottica.
Anschließen des Receivers, DVD-Recorders und Fernsehgerätes oder Monitors
Collegare il ricevitore, registratore DVD e televisore o monitor
Wählen Sie das für Ihre Anlage am besten geeignete der nachstehend gezeigten Anschlussverfahren.
Grundlegender Anschluss an Fernsehgerät (Monitor) mit VIDEO IN-Cinchbuchse
Anschluss an Fernsehgerät (Monitor) mit AV IN SCART-Buchse
Anschluss an Fernsehgerät (Monitor) mit COMPONENT VIDEO IN-Buchsen
Die tatsächlich herzustellenden Anschlüsse richten sich nach dem jeweils verwendeten Fernsehgerät.
Bitte schlagen Sie hierzu auch in den Bedienungsanleitungen Ihres Fernsehgerätes, des DVD-Recorders (DMR-E85H bzw. DMR-E55) und des Receivers (SC-HT07/SC-HT05) nach.
Scegliere un collegamento appropriato al sistema.
Collegamento di base a un televisore (monitor) con terminale VIDEO IN RCA
Collegamento a un televisore (monitor) con terminale AV IN SCART
Collegamento a un televisore (monitor) con terminale COMPONENT VIDEO IN
Il collegamento reale dipende dal televisore.
Riferirsi alle spiegazioni dei collegamenti nelle istruzioni per l’uso per il collegamento del televisore, registratore DVD (DMR-E85H o DMR-E55) e ricevitore (SC-HT07/SC-HT05).
C
B
A
C
B
A
A
(1) (1) (1) (1)
SC-HT37R-EG/EB/EP (Ge/It) 2004.4.1 18:18 y[W 14

5
15
RQT7612
DEUTSCH
ITALIANO
AC IN
AV4 IN
R-AUDIO-L
VIDEO
S-VIDEO
COMPONENT
VIDEO OUT
(NTSC:480P/480I,
PAL:576P/576I)
Y
P
B
P
R
RF IN
RF OUT
AV1 (TV)
AV2 (DECODER/EXT)
OPTICAL
DIG
ITAL AUDIO
O
U
T
(PCM
/BITSTREAM
)
R-AUDIO-L
VIDEO
S-VIDEO
OUT
TA PE
CD
TV
IN
REC(OUT)
PLAY(IN)
IN
SURROUND
SUBWOOFER
DVD
OPT 1
OPT 2
COAXIAL
IN
(TV) IN
(DVR) IN
(DVD) IN
CENTER
L
R
L
R
L
R
L
R
DIGITAL IN
TO SB-WA07
A
FM ANT
AM ANT
75 Ω
LOOP
EXT
LOOP ANT
GND
AV1 (TV OUT)
AV2 (DVD IN)
DVD / DVD 6CH
FRONT
L
R
TV
DVR / VCR1
OUT IN
MONITOR OUT
IN
AV3 (DVR/VCR1 IN)
DVR / VCR1
OUT IN
L
R
VHF/UHF
RF IN
AUDIO
VIDEO
AV IN
Receiver
Ricevitore
(SA-HT07)
DVD-Recorder
Registratore DVD
(DMR-E85H)
21-poliges SCART-Kabel
(separat erhältlich)
Cavo SCART a 21 poli
(non fornito)
HF-Koaxialkabel
Cavo coassiale RF
(DVD-Recorder/Registratore DVD)
Antennenzuleitung
(separat erhältlich)
Cavo antenna (non fornito)
an Antenne
All’antenna
HF-Koaxialkabel
Cavo coassiale RF
21-poliges SCART-Kabel
(separat erhältlich)
Cavo SCART a 21 poli (non fornito)
(Fortsetzung auf der nächsten Seite)
(Continua alla pagina seguente)
Lichtleiterkabel
Cavo a fibra ottica
Lichtleiterkabel
Cavo a fibra ottica
Fernsehgerät
oder Monitor
TV o monitor
(separat erhältlich)
(non fornito)
Anschluss an Fernsehgerät (Monitor) mit AV IN SCART-Buchse
Collegamento a un televisore (monitor) con terminale AV IN SCART
B
21-poliges SCART-Kabel
(separat erhältlich)
Cavo SCART a 21 poli
(non fornito)
(1) (1) (2)
Diese Seite muss nach oben weisen
Questo lato rivolto in alto
Das Lichtleiterkabel nicht knicken.
Non piegare il cavo a fibra ottica.
Einstellungen/Regolazioni
Wenn diese Anschlüsse hergestellt werden, müssen Sie die
Einstellungen am Receiver und DVD-Recorder wie unten erläutert
ändern.
Se si eseguono questi collegamenti, cambiare le regolazioni sul
ricevitore e registratore DVD come segue.
Receiver/Ricevitore
Stellen Sie den AV OUTPUT auf „VCR“ und „SCART“ ein (a Seite 22 der
Bedienungsanleitung für SC-HT07/SC-HT05).
Regolare AV OUTPUT a “VCR” e “SCART” (
a pag. 22 nelle Istruzioni per l’uso per
SC-HT07/SC-HT05).
DVD-Recorder/Registratore DVD
Für RGB-Signalausgabe stellen Sie den Eintrag „AV1 Output“ des SETUP-Menüs auf
„RGB (without component)“ ein. (
a Bedienungsanleitung Seite 41 für DMR-E85H
bzw. Seite 39 für DMR-E55
)
Per l’uscita RGB, selezionare “RGB (without component)” da “AV1 Output” nel menu
SETUP. (
a Istruzioni per l’uso, pag. 41 per DMR-E85H, o pag. 39 per DMR-E55
)
SC-HT37R-EG/EB/EP (Ge/It) 2004.4.1 18:18 y[W 15

6
16
RQT7612
AC IN
AV4 IN
R-AUDIO-L
VIDEO
S-VIDEO
Y
P
B
P
R
RF IN
RF OUT
AV1 (TV)
AV2 (DECODER/EXT)
OPTICAL
D
IG
ITA
L A
UD
IO
O
U
T
(PC
M
/B
ITSTR
EA
M
)
R-AUDIO-L
VIDEO
S-VIDEO
OUT
TA PE
CD
TV
IN
REC(OUT)
PLAY(IN)
IN
SURROUND
SUBWOOFER
DVD
OPT 1
COAXIAL
IN
(TV) IN
(DVD) IN
CENTER
L
R
L
R
L
R
L
R
TO SB-WA07
A
FM ANT
AM ANT
75 Ω
LOOP
EXT
LOOP ANT
GND
AV1 (TV OUT)
AV2 (DVD IN)
DVD / DVD 6CH
FRONT
L
R
TV
DVR / VCR1
OUT IN
MONITOR OUT
IN
AV3 (DVR/VCR1 IN)
DVR / VCR1
OUT IN
L
R
VHF/UHF
RF IN
AUDIO
VIDEO
COMPONENT
VIDEO OUT
(NTSC:480P/480I,
PAL:576P/576I)
OPT 2
(DVR) IN
DIGITAL IN
COMPONENT
VIDEO IN
Y
P
B
P
R
TV
DVR / VCR1
OUT
IN
MONITOR OUT
IN
Schritt 4
Passo 4
Audio/Video-Kabel
Cavo audio/video
(DVD-Recorder/Registratore DVD)
HF-Koaxialkabel
Cavo coassiale RF
Videokabel
(separat erhältlich)
Cavi video
(non fornito)
Antennenzuleitung
(separat erhältlich)
Cavo antenna (non fornito)
Audio/Video-Kabel
Cavo audio/video
an Antenne
All’antenna
HF-Koaxialkabel
Cavo coassiale RF
COMPONENT VIDEO Buchsen
Diese Buchsen können sowohl
Videosignale mit Zwischen-
zeilenabtastung als auch solche mit
Zeilensprungabtastung ausgeben,
wobei eine höhere Bildqualität erzielt
wird.
Terminali COMPONENT
VIDEO
Questi terminali possono essere
usati per l’uscita interlacciata o
progressiva, e producono immagini
più pure.
Videokabel
(separat erhältlich)
Cavi video (non fornito)
Receiver
Ricevitore
(SA-HT07)
DVD-Recorder
Registratore DVD
(DMR-E85H)
Lichtleiterkabel
Cavo a fibra ottica
Lichtleiterkabel
Cavo a fibra ottica
Fernsehgerät
oder Monitor
TV o monitor
(separat erhältlich)
(non fornito)
Anschließen des Receivers, DVD-Recorders und Fernsehgerätes oder Monitors
Collegare il ricevitore, registratore DVD e televisore o monitor
Anschluss an Fernsehgerät (Monitor) mit COMPONENT VIDEO IN-Buchsen
Collegamento a un televisore (monitor) con terminale COMPONENT VIDEO IN
C
(1) (1) (1) (3)
Diese Seite muss nach oben weisen
Questo lato rivolto in alto
Das Lichtleiterkabel nicht knicken.
Non piegare il cavo a fibra ottica.
SC-HT37R-EG/EB/EP (Ge/It) 2004.4.1 18:18 y[W 16

7
17
RQT7612
DEUTSCH
ITALIANO
Schritt 5
Passo 5
TAPE
CD
TV
IN
REC(OUT)
PLAY(IN)
IN
SURROUN
L
R
L
R
L
R
L
R
TO SB-WA07
A
FM ANT
AM ANT
75 Ω
LOOP
EXT
LOOP ANT
GND
DVD / DVD
FRONT
L
R
DVR / VCR1
OUT
IN
L
R
AUDIO
Anschließen der Antennen/Collegare le antenne
MW-Rahmenantenne
Antenna AM a quadro
UKW-Zimmerantenne
Antenna FM interna
MW-Rahmenantenne
Antenna AM a quadro
UKW-Zimmerantenne
Befestigen Sie das andere Ende
des Antennendrahtes an einer
Stelle, die eine optimale
Empfangsqualität liefert.
Antenna FM interna
Fissare l’altra estremità
dell’antenna dove la ricezione è
migliore.
Klebestreifen
Nastro adesivo
(Receiver/Ricevitore)
2
1
Rot
Rosso
Weiß
Bianco
Schwarz
Nero
LOOP ANT
GND
2
1
3
Schritt 6
Passo 6
AC IN
AV4 IN
R-AUDIO-L
VIDEO
S-VIDEO
AV1 (TV)
AV2 (DECODER/EXT)
OPTICAL
DIGITAL AUDIO OUT
(PCM/BITSTREAM)
R-AUDIO-L
VIDEO
S-VIDEO
OUT
TAPE
CD
TV
IN
REC(OUT)
PLAY(IN)
IN
SURROUND
SUBWOOFER
DVD
OPT 1 OPT 2
COAXIAL
IN
(TV) IN (DVR) IN
(DVD) IN
CENTER
L
R
L
R
L
R
L
R
DIGITAL IN
FM ANT
AM ANT
75 Ω
LOOP
EXT
LOOP ANT
GND
AV1 (TV OUT)
DVD / DVD 6CH
FRONT
L
R
TV
DVR / VCR1
OUT IN
M
ON
ITO
R
O
UT
IN
DVR / VCR1
OUT IN
L
R
AUDIO
VIDEO
AC IN ~
TO SB-WA07
A
Anschließen des Systemkabels und der Netzkabel
Collegare il cavo del sistema e i cavi di alimentazione
An Netzsteck-dose
Presa di rete
Netzkabel
Cavi di alimentazione
Receiver
Ricevitore
(SA-HT07)
DVD-Recorder
Registratore DVD
(DMR-E85H)
Subwoofer
Subwoofer
(SB-WA07)
Systemkabel
Cavo del sistema
(Receiver/Ricevitore)/(
DVD-Recorder/Registratore DVD)
Netzkabel
Cavi di alimentazione
Klick!
Clic!
(
Receiver/Ricevitore
)
Arretierung
Gancio
Zum Abtrennen
Die Arretierung durch Eindrücken freigeben
und den Steckverbinder herausziehen.
Per staccare
Premere il gancio e tirar fuori.
Receiver
Ricevitore
(SA-HT07)
Der DVD-Recorder kann Störungen des
Rundfunkempfangs verursachen.
In einem solchen Fall schalten Sie den
DVD-Recorder aus, oder sorgen Sie für einen
größeren Abstand des DVD-Recorders von
den Antennen.
Il registratore DVD può interferire con la
ricezione radio.
In tal caso, spegnere il registratore DVD o
allontanarlo ulteriormente dalle antenne.
Die Netzkabel im Lieferumfang dieser Anlage sind
ausschließlich für diese Geräte bestimmt. Verwenden Sie sie
auf keinen Fall mit irgendwelchen anderen Geräten.
I cavi di alimentazione in dotazione vanno usati
esclusivamente con queste unità. Essi non devono essere
usati con altri componenti.
Nota
Hinweis
Systemkabel
Cavo del sistema
(1) (1)
(2) (1)
SC-HT37R-EG/EB/EP (Ge/It) 2004.4.1 18:18 y[W 17

Vorbereitung/Preparativi
¡Schalten Sie das Fernsehgerät ein, und wählen Sie den Videoeingang
am Fernsehgerät, der den für den Receiver und den DVD-Recorder
hergestellten Anschlüssen entspricht.
¡Nehmen Sie zunächst die Programmplatz-Belegung vor (a Seite 10 und
11 der Bedienungsanleitung für DMR-E85H bzw. DMR-E55).
¡Accendere il televisore e selezionare l’ingresso video appropriato sul
televisore secondo il collegamento del ricevitore e del registratore DVD.
¡Regolare per prima cosa la ricezione dei canali (a pagg. 10 e 11 nelle
Istruzioni per l’uso per DMR-E85H o DMR-E55).
Wählen Sie entweder [HDD] oder [DVD] als
Laufwerk für die Aufzeichnung.
Selezionare [HDD] o [DVD] come unità di registrazione.
Nur DMR-E85H/DMR-E85H soltanto
8
18
RQT7612
6
5
Wenn das DVD-Laufwerk gewählt wurde (nur DMR-E85H)
Se avete selezionato il drive DVD (DMR-E85H soltanto)
Öffnen Sie das Disc-Fach, und legen Sie eine Disc ein.
Aprire il cassetto e inserire un disco.
4
3
Überprüfen der korrekten Installation der Anlage anhand der Aufzeichnung einer Fernsehsendung
Controllare l’installazione registrando un programma TV
TV
DIRECT TV REC
DUBBING
EXT LINK
AV
VOLUME
CH
A
B
C
DVD
6
DRIVE SELECT
TV
DIRECT TV REC
VIDEO PLus+
MANUAL SKIP
INPUT SELECT
CANCEL
SKIP
STOP
PAU SE
PLAY/x1.3
SLOW/SEARCH
w
w
w h
w h
DIRECT NAVIGATOR
FUNCTIONS
TOP MENU
SUB MENU
PROG/CHECK
RETURN
DISPLAY
STATUS
TIME SLIP
RECREC MODE
ERASE
TIMER
AUDIO
CREATE
CHAPTER
DUBBINGEXT LINK
AV
VOLUME
CH
CH
DVD
HDD
1
2
3
4
5
6
7
8
9
∗
0
i
u
y
t
g
h
q
w
w
z
A
B
C
DVD
ENTER
1
1
3
5
7
Beenden der Aufzeichnung/Per terminare la registrazione
[g] drücken. Der Abschnitt bis zum Stoppen der Aufzeichnung wird als ein
zusammenhängender DVD-Video-Titel aufgezeichnet.
Premere [g
]. Registrato come un titolo fino alla posizione di arresto.
(nur DMR-E85H/DMR-E85H soltanto)
Eine ununterbrochen über mehrere Stunden hinweg ausgeführte Aufzeichnung
wird automatisch alle 8 Stunden in separate DVD-Video-Titel unterteilt.
Quando si esegue la registrazione continua di lunga durata, i titoli vengono
automaticamente divisi ogni 8 ore.
Nach Ende einer Aufzeichnung beansprucht das Aufzeichnen der zur
Verwaltung der Daten benötigten Daten ca. 30 Sekunden.
L’unità richiede circa 30 secondi per completare la registrazione delle
informazioni di gestione alla fine della registrazione.
Nach beendeter Wiedergabe/Alla fine della registrazione
Achten Sie darauf, die Lautstärke zu verringern und [^/I] zu drücken, um den
DVD-Recorder und den Receiver in den Bereitschaftszustand umzuschalten.
Ridurre il volume e premere [^/I] per disporre il registratore DVD e ricevitore
in modalità standby.
DVD-R
HDD
Schalten Sie das Gerät ein./Accendere.
Die HDD- bzw. DVD-Anzeige am DVD-Recorder leuchtet auf.
L’indicatore HDD o DVD si accende sul registratore DVD.
Wählen Sie den Programmplatz des Fernsehgerätes mit [12CH].
Selezionare il canale con [12CH].
Wählen Sie „REC MODE“./Selezionare “REC MODE”.
oder
o
Fernbedienung des DMR-E85H
Telecomando DMR-E85H
DVD-Recorder
Registratore DVD
Receiver
Ricevitore
(DMR-E85H)
1
Wählen Sie „DVR/VCR1 (DVR/VCR)“./Selezionare “DVR/VCR1 (DVR/VCR)”.
2
(nur SC-HT37R/SC-HT37R soltanto)
¡Es ist nicht möglich, eine ununterbrochene Aufzeichnung auf beiden Seiten einer doppelseitigen Disc auszuführen. Wenn eine Seite voll ist, muss die Disc aus
dem Laufwerk entfernt und umgedreht werden.
¡Eine Aufzeichnung von CPRM-geschütztem Material (a Bedienungsanleitung Seite 46 für DMR-E85H bzw. Seite 43 für DMR-E55) auf DVD-R-Discs oder
2,8-GB-DVD-RAM-Discs ist nicht möglich.
¡Non è possibile registrare continuamente da un lato di un disco a doppia faccia all’altro. Bisogna prima espellere il disco e capovolgerlo.
¡
Non è possibile registrare sui DVD-R o sui dischi DVD-RAM di 2,8 GB il materiale CPRM protetto (a Istruzioni per l’uso, pag. 46 per DMR-E85H, o pag. 43 per DMR-E55).
DVD-RRAMHDD
oder
o
DRIVE SELECT
HDD DVD
DRIVE SELECT
Drücken Sie [; OPEN/CLOSE] erneut, um das
Disc-Fach zu schließen.
Premere di nuovo [; OPEN/CLOSE] per chiudere il
cassetto.
OPEN/CLOSE
;
Etikettseite nach
oben weisend.
Inserire con l’etichetta
rivolta in alto.
Pfeilmarkierung
nach innen weisend.
Inserire con la freccia
rivolta dentro.
Bis zum Einrasten einschieben.
Inserire completamente in modo che scatti in posizione.
HDD
SP
Wahl über die Zifferntasten,
z.B. „5“: [0]
a
[5] „15“: [1]
a
[5]
Per selezionare con i tasti numerici:
p.es., 5: [0]
a
[5] 15: [1]
a
[5]
CH
CH
12
Nur DMR-E85H/DMR-E85H soltanto
oder/o
HDD
XP
Restaufnahmezeit der Disc
Tempo restante sul disco
REC MODE
Nur DMR-E85H
DMR-E85H soltanto
^
8
DVD
7
HDD
XP
REC
XP
DVD
R
-
AM
REC
Starten Sie die Aufzeichnung./Cominciare la registrazione.
Die Aufzeichnung wird innerhalb des freien Speicherplatzes auf der
Festplatte (nur DMR-E85H) bzw. auf der Disc ausgeführt. Bereits
vorhandene Daten werden nicht überschrieben.
Während der Aufzeichnung kann weder der Programmplatz
gewechselt noch der Aufzeichnungsmodus umgeschaltet werden.
La registrazione avviene sullo spazio libero dell’HDD
(DMR-E85H
soltanto), o sul disco. I dati esistenti non vengono sovrascritti.
Durante la registrazione non si può cambiare il canale o la modalità di registrazione.
REC
DMR-E85H
DMR-E55
REC
oder/o
[g]
[g
]
8
4
INPUT SELECTOR
SA-HT07
SA-HT05
2
(SA-HT07)
DVD-Recorder/Registratore DVD Receiver/Ricevitore
Wenn eine Disc bei Wahl des Festplattenlaufwerks eingelegt wird, blinkt
die DVD-Anzeige am DVD-Recorder, während dieser die Disc liest.
Se si inserisce un disco mentre è selezionato HDD, l’indicatore DVD del
registratore DVD lampeggia mentre il registratore DVD legge il disco.
Nur DMR-E85H/DMR-E85H soltanto
(nur DMR-E85H/DMR-E85H soltanto)
DVD-R
HDD
RAM
SC-HT37R-EG/EB/EP (Ge/It) 2004.4.1 18:18 y[W 18

9
19
RQT7612
DEUTSCH
ITALIANO
Überprüfen der korrekten Installation der Anlage anhand des Abspielens einer DVD
Controllare l’installazione con la lettura di un DVD
Beenden derx Wiedergabe/Per terminare la riproduzione
[g] drücken./Premere [g].
Nach beendeter Wiedergabe/Alla fine dell’ascolto
¡ Achten Sie darauf, die Lautstärke zu verringern und [^/I] zu drücken, um den DVD-Recorder und den Receiver in den Bereitschaftszustand umzuschalten.
¡ Vor einem längeren Nichtgebrauch der Anlage sollte der Netzstecker von der Netzsteckdose getrennt werden.
¡ Ridurre il volume e premere [^/I] per disporre il registratore DVD e ricevitore in modalità standby.
¡ Se non viene usato per lunghi periodi di tempo, il sistema dovrebbe essere staccato dalla presa di corrente.
Vorbereitung/Preparativi
Schalten Sie das Gerät ein.
Accendere.
^
8
8
Receiver
Ricevitore
DVD-Recorder
Registratore DVD
Receiver
Ricevitore
(SA-HT07)
DVD-Recorder
Registratore DVD
(DMR-E85H)
1
2
3
4
Beim Abspielen eines auf der Festplatte aufgezeichneten DVD-Video-Titels muss die Einstellung des Eintrags „TV System“ dem Fernsehsystem des betreffenden
DVD-Video-Titels angepasst werden (aSeite 43 der Bedienungsanleitung des DMR-E85H).
Per la lettura di un titolo registrato sull’unità HDD, regolare “TV System” secondo il titolo (
a
pag. 43 delle Istruzioni per l’uso del DMR-E85H).
Nur SC-HT37R
/
SC-HT37R soltanto
Wählen Sie entweder [HDD]
oder [DVD] als Laufwerk für
die Wiedergabe.
Selezionare [HDD] o [DVD]
come unità di lettura.
Die HDD- bzw. DVD-Anzeige am
DVD-Recorder leuchtet auf.
L’indicatore HDD o DVD si accende sul
registratore DVD.
DRIVE SELECT
Nur DMR-E85H
/
DMR-E85H soltanto
[g]
Drücken Sie [; OPEN/CLOSE]
erneut, um das Disc-Fach zu
schließen.
Premere di nuovo [
;
OPEN/CLOSE]
per chiudere il cassetto.
OPEN/CLOSE
;
Öffnen Sie das Disc-Fach,
und legen Sie eine Disc ein.
Aprire il cassetto e
inserire un disco.
Pfeilmarkierung nach
innen weisend.
Inserire con la freccia
rivolta dentro.
q/×1.3
Starten Sie die Wiedergabe.
Cominciare la lettura.
(nur DMR-E85H/DMR-E85H soltanto)
Die Wiedergabe startet mit dem zuletzt aufgezeichneten
DVD-Video-Titel.
La lettura comincia dal titolo registrato più recentemente.
DVD-R
RAMHDD
5
HDD
SP
PLAY
DVD
R
-
AM
PLAY
SP
DMR-E85H
DMR-E55
DOWN
UP
VOLUME
Stellen Sie die
Lautstärke
wunschgemäß ein.
Regolare il volume.
6
Bis zum Einrasten einschieben.
Inserire completamente in modo che scatti in posizione.
Etikettseite nach
oben weisend.
Inserire con l’etichetta
rivolta in alto.
Wenn das DVD-Laufwerk gewählt wurde
(nur DMR-E85H)
Se avete selezionato il drive DVD
(DMR-E85H soltanto)
Schalten Sie das Fernsehgerät ein, und wählen Sie den Videoeingang am Fernsehgerät, der den für den Receiver und den DVD-Recorder hergestellten Anschlüssen entspricht.
Accendere il televisore e selezionare l’ingresso video appropriato sul televisore secondo il collegamento del ricevitore e del registratore DVD.
Wählen Sie „DVR/VCR1
(DVR/VCR)“.
Selezionare “DVR/VCR1
(DVR/VCR)”.
INPUT SELECTOR
SA-HT07
SA-HT05
Wenn eine Disc bei Wahl des Festplattenlaufwerks
eingelegt wird, blinkt die DVD-Anzeige, während
dieser die Disc liest.
Se si inserisce un disco mentre è selezionato HDD,
l’indicatore DVD lampeggia durante la lettura del disco.
Nur DMR-E85H/DMR-E85H soltanto
(nur DMR-E85H/
DMR-E85H soltanto)
DVD-R
HDD
RAM
SC-HT37R-EG/EB/EP (Ge/It) 2004.4.1 18:18 y[W 19

2
20
RQT7612
5
xxxxxx
xxx
5
xxxxxx
xxx
4
xxxxxx
xxx
4
xxxxxx
xxx
3
xxxxxx
xxx
3
xxxxxx
xxx
2
xxxxxx
xxx
2
xxxxxx
xxx
1
xxxxxx
xxx
1
xxxxxx
xxx
5
xxxxxx
xxx
5
xxxxxx
xxx
4
xxxxxx
xxx
4
xxxxxx
xxx
3
xxxxxx
xxx
3
xxxxxx
xxx
2
xxxxxx
xxx
2
xxxxxx
xxx
1
xxxxxx
xxx
1
xxxxxx
xxx
5
xxxxxx
xxx
5
xxxxxx
xxx
4
xxxxxx
xxx
4
xxxxxx
xxx
3
xxxxxx
xxx
3
xxxxxx
xxx
2
xxxxxx
xxx
2
xxxxxx
xxx
1
xxxxxx
xxx
1
xxxxxx
xxx
5
xxxxxx
xxx
5
xxxxxx
xxx
4
xxxxxx
xxx
4
xxxxxx
xxx
3
xxxxxx
xxx
3
xxxxxx
xxx
2
xxxxxx
xxx
2
xxxxxx
xxx
1
xxxxxx
xxx
1
xxxxxx
xxx
Environ 10 cm/Ongeveer 10 cm
q, w, te, r
30˚
30˚
120˚
Étape
1
Stap
1
Emplacement/Plaatsing
Téléviseur ou
écran de contrôle
(
non fourni)
TV of TV-monitor
(niet bijgeleverd)
Enceinte avant (G)
Voorluidspreker (L)
Enceinte avant (D)
Voorluidspreker (R)
Enceinte centrale
Middenluidspreker
Récepteur
Ontvanger
Enceinte surround
(D)
Surroundluidspreker (R)
Subwoofer
Subwoofer
Enceinte surround
(G)
Surroundluidspreker (L)
Enregistreur DVD
DVD-recorder
SC-HT37R
SC-HT25R
Les placer sur une étagère ou sur une tablette.
Installeer op een plank of rack.
Enceintes surround
Surroundluidsprekers
Étape
2
Stap
2
Fixez les collants aux câbles d’enceinte/Bevestig de stickers aan de luidsprekerkabels
Feuille de collants
Vel stickers
Câble(s) d’enceinte/Luidsprekerkabel(s)
(4 m, centrale/4 m, Midden)
(4 m, avant (G) (D) et centrale)
(4 m, Voor (L) (R) en Midden)
SC-HT25R
SC-HT37R
5
xxxxxx
xxx
5
xxxxxx
xxx
4
xxxxxx
xxx
4
xxxxxx
xxx
3
xxxxxx
xxx
3
xxxxxx
xxx
2
xxxxxx
xxx
2
xxxxxx
xxx
1
xxxxxx
xxx
1
xxxxxx
xxx
5
xxxxxx
xxx
5
xxxxxx
xxx
4
xxxxxx
xxx
4
xxxxxx
xxx
3
xxxxxx
xxx
3
xxxxxx
xxx
2
xxxxxx
xxx
2
xxxxxx
xxx
1
xxxxxx
xxx
1
xxxxxx
xxx
(10 m, surround (G) (D))
(10 m, Surround (L) (R))
SC-HT25R
5
xxxxxx
xxx
5
xxxxxx
xxx
4
xxxxxx
xxx
4
xxxxxx
xxx
3
xxxxxx
xxx
3
xxxxxx
xxx
2
xxxxxx
xxx
2
xxxxxx
xxx
1
xxxxxx
xxx
1
xxxxxx
xxx
5
xxxxxx
xxx
5
xxxxxx
xxx
4
xxxxxx
xxx
4
xxxxxx
xxx
3
xxxxxx
xxx
3
xxxxxx
xxx
2
xxxxxx
xxx
2
xxxxxx
xxx
1
xxxxxx
xxx
1
xxxxxx
xxx
5
xxxxxx
xxx
5
xxxxxx
xxx
4
xxxxxx
xxx
4
xxxxxx
xxx
3
xxxxxx
xxx
3
xxxxxx
xxx
2
xxxxxx
xxx
2
xxxxxx
xxx
1
xxxxxx
xxx
1
xxxxxx
xxx
5
xxxxxx
xxx
5
xxxxxx
xxx
4
xxxxxx
xxx
4
xxxxxx
xxx
3
xxxxxx
xxx
3
xxxxxx
xxx
2
xxxxxx
xxx
2
xxxxxx
xxx
1
xxxxxx
xxx
1
xxxxxx
xxx
Environ 10 cm/Ongeveer 10 cm
Fixez les collants aux deux extrémités de chacun des câbles d’enceinte pour simplifier les raccordements.
Bevestig labels op beide uittinden van alle luidsprekerkabels om het aansluiten ervan te vergemakkelijken.
No de modèle
./
Model Nr.
Récepteur/Ontvanger
Enceintes avant/Voorluidsprekers
Enceintes surround/Surroundluidsprekers
Enceinte centrale/Middenluidspreker
Subwoofer/Subwoofer
Enregistreur DVD/DVD-recorder
SC-HT37R
SA-HT07
SB-FS927
SB-PC927
SB-WA07
DMR-E85H
SC-HT25R
SA-HT05
SB-PF725
SB-PS725
SB-PC725
SB-WA05
DMR-E55
Posez les enceintes sur une surface égale
pour éviter qu’elles ne tombent.
Installeer de luidsprekers op een
horizontaal oppervlak om te voorkomen dat
ze kunnen omvallen.
Enceintes avant et surround (Les câbles sont de longueur identique.)/Voor- en surroundluidsprekers (Alle kabels zijn even lang.)
SC-HT37R
q à/tot rt
q Enceinte avant
(G)
Voorluidspreker
(L)
w Enceinte avant
(D)
Voorluidspreker
(R)
e Enceinte
surround (G)
Surroundluidspreker
(L)
r Enceinte
surround (D)
Surroundluidspreker
(R)
t
Enceinte centrale
Middenluidspreker
Pour les enceintes surround, utilisez les longs câbles d’enceinte./Gebruik de langste luidsprekerkabels voor de surroundluidsprekers.
SC-HT25R
Câble d’enceinte (4 m)/Luidsprekerkabel (4 m)
Câble d’enceinte (10 m)/Luidsprekerkabel (10 m)
Assemblage des enceintes (
a
pages 4 à 5, Mode d’emploi du SC-HT07/SC-HT05)
Ineenzetten van de luidsprekers (
a
blz. 4 en 5 in de Gebruiksaanwijzing van SC-HT07/SC-HT05)
Les enceintes avant, centrale et surround doivent être
placées environ à la même distance de la position
d’écoute.
Les angles indiqués sur le schéma sont approximatifs.
De voorluidsprekers, middenluidspreker en
surroundluidsprekers moeten op ongeveer gelijke
afstand van de luisterpositie worden geplaatst.
De hoeken op het schema zijn bij benadering
opgegeven.
SC-HT37R uniquement/alleen SC-HT37R
(Récepteur/Ontvanger)
(1)
(3)
(1)
(2)
Assurez-vous que vous avez bien toutes les pièces indiquées avant de faire le montage, l’installation et la connecion.
Controleer of alle aangegeven onderdelen aanwezig zijn alvorens u begint met het opbouwen, opstellen en aansluiten.
SC-HT37R-EG/EB/EP (Fr/Du) 2004.4.1 18:22 y[W 20
La pagina si sta caricando...
La pagina si sta caricando...
La pagina si sta caricando...
La pagina si sta caricando...
La pagina si sta caricando...
La pagina si sta caricando...
La pagina si sta caricando...
La pagina si sta caricando...
La pagina si sta caricando...
La pagina si sta caricando...
La pagina si sta caricando...
La pagina si sta caricando...
La pagina si sta caricando...
La pagina si sta caricando...
La pagina si sta caricando...
La pagina si sta caricando...
La pagina si sta caricando...
La pagina si sta caricando...
La pagina si sta caricando...
La pagina si sta caricando...
La pagina si sta caricando...
La pagina si sta caricando...
La pagina si sta caricando...
La pagina si sta caricando...
La pagina si sta caricando...
La pagina si sta caricando...
La pagina si sta caricando...
La pagina si sta caricando...
-
 1
1
-
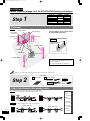 2
2
-
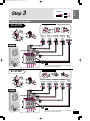 3
3
-
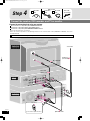 4
4
-
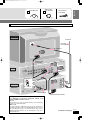 5
5
-
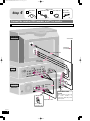 6
6
-
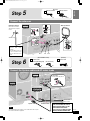 7
7
-
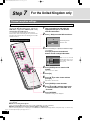 8
8
-
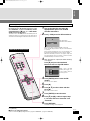 9
9
-
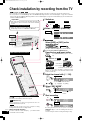 10
10
-
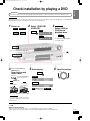 11
11
-
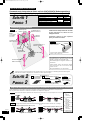 12
12
-
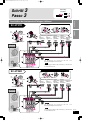 13
13
-
 14
14
-
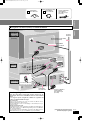 15
15
-
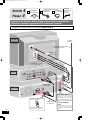 16
16
-
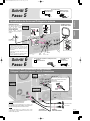 17
17
-
 18
18
-
 19
19
-
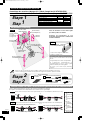 20
20
-
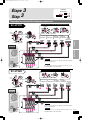 21
21
-
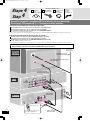 22
22
-
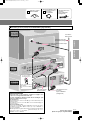 23
23
-
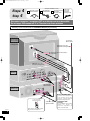 24
24
-
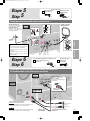 25
25
-
 26
26
-
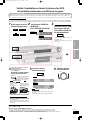 27
27
-
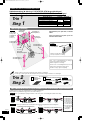 28
28
-
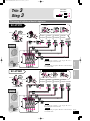 29
29
-
 30
30
-
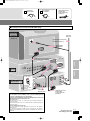 31
31
-
 32
32
-
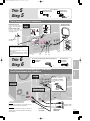 33
33
-
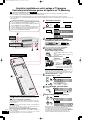 34
34
-
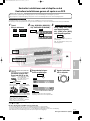 35
35
-
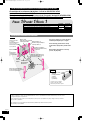 36
36
-
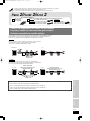 37
37
-
 38
38
-
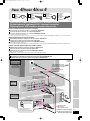 39
39
-
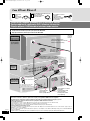 40
40
-
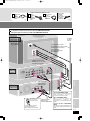 41
41
-
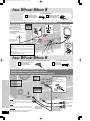 42
42
-
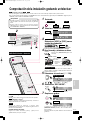 43
43
-
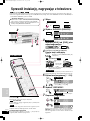 44
44
-
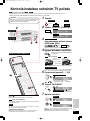 45
45
-
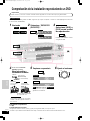 46
46
-
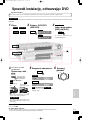 47
47
-
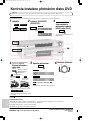 48
48


Panasonic SCHT25REB Manuale del proprietario
- Categoria
- Lettori DVD
- Tipo
- Manuale del proprietario
in altre lingue
- Nederlands: Panasonic SCHT25REB de handleiding
- dansk: Panasonic SCHT25REB Brugervejledning
Documenti correlati
-
Panasonic SCHT05 Istruzioni per l'uso
-
-
-
Panasonic SCHT25REP Istruzioni per l'uso
-
-
-
-
-
Panasonic DMRE55EB Manuale del proprietario
Altri documenti
-
Sony PCM M10 Manuale del proprietario
-
TP-LINK tp-link Deco X80-5G 5G Whole Home Wi-Fi 6 Gateway Guida d'installazione
-
Sony STR-DA5300ES Manuale del proprietario
-
Sony STR-DA3300ES Manuale del proprietario
-
-
Sanyo DC-TS762 Manuale utente
-
Pioneer SBX-B70 Istruzioni per l'uso
-
Sony STR-DA3200ES Manuale del proprietario
-
Philips XW-SMA3-K Manuale utente
-
Monacor DMR-184 Manuale del proprietario