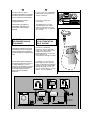
Candy AQUA 1042D1/2-S Manuale utente
- Categoria
- Lavatrici
- Tipo
- Manuale utente
Questo manuale è adatto anche per

àÌÒÚÛ͈ËË Á‡ ÛÔÓÚ·‡ è‡Î̇ χ¯Ë̇
User instructions
BG
EN
AQUA 2D

2
EN
OUR COMPLIMENTS
With the purchase of this Candy
household appliance, you have
shown that you will not accept
compromises: you want only the
best.
Candy is happy to present their
new washing machine, the result of
years of research and market
experience through direct contact
with Consumers.You have chosen
the quality,durability and high
performance that this washing
machine offers.
Candy is also able to offer a vast
range of other household
appliances: washing machines,
dishwashers, washer-dryers,
cookers, microwave ovens.
Traditional ovens and hobs,
refrigerators and freezers.
Ask your local retailer for the
complete catalogue of Candy
products.
This appliances is intended to be
used in household and similar
applications such as:
- staff kitchen areas in shops, offices
and other working environments;
- farm houses;
- by clients in hotels, motels and
other residential type
environments;
- bed and breakfast type
environments.
A different use of this appliance
from household environment or
from typical housekeeping
functions, as commercial use by
expert or trained users, is excluded
even in the above applications.
If the appliance is used in a
manner inconsistent with this it may
reduce the life of the appliance
and may void the manufacturer’s
warranty.
Any damage to the appliance or
other damage or loss arising
through use that is not consistent
with domestic or household use
(even if located in a domestic or
household environment) shall not
be accepted by the manufacturer
to the fullest extent permitted by
law.
Please read this booklet carefully
as it provides important guide lines
for safe installation, use and
maintenance and some useful
advise for best results when using
your washing machine.
Keep this booklet in a safe place
for further consultation.
When contacting Candy
or a Customer Services Centre
always refer to the Model, No., and
G number (if applicable of the
appliance see panel).
BG
èéáÑêÄÇãÖçàü!
ë˙Ò Á‡ÍÛÔÛ‚‡ÌÂÚÓ Ì‡ ÚÓÁË Û‰ ̇
CANDY ÇË ÔÓ͇Á‡ıÚÂ, ˜Â Ì ÒÚÂ
ÒÍÎÓÌÌË Í˙Ï ÍÓÏÔÓÏËÒË. ÇËÂ
ËÒ͇Ú ̇È-‰Ó·ÓÚÓ.
CANDY Ëχ Û‰Ó‚ÓÎÒÚ‚ËÂÚÓ ‰‡ ÇË
Ô‰ÎÓÊË Ú‡ÁË ÌÓ‚‡ Ô‡ÎÌfl,
ÂÁÛÎÚ‡Ú ÓÚ ‰˙΄ӄӉ˯ÌË
ÔÓÛ˜‚‡ÌËfl, Ô‡Á‡ÂÌ ÓÔËÚ Ë
‰ËÂÍÚÌË ÍÓÌÚ‡ÍÚË Ò ÔÓÚ·ËÚÂÎfl.
ÇË ËÁ·‡ıÚ ͇˜ÂÒÚ‚ÓÚÓ,
Ú‡ÈÌÓÒÚÚ‡ Ë ËÍÓÌÓÏ˘ÌÓÒÚÚ‡, ÍÓËÚÓ
ÇË Ô‰·„‡ Ú‡ÁË Ô‡ÎÌfl.
éÒ‚ÂÌ ÚÓ‚‡, CANDY ÇË Ô‰·„‡
‰̇ ¯ËÓ͇ „‡Ï‡ ÓÚ ‰ÓχÍËÌÒÍË
ÂÎÂÍÚÓÛ‰Ë:Ô‡ÎÌË, ÏËflÎÌË
χ¯ËÌË, Ô‡ÎÌË Ò˙Ò ÒÛ¯ËÎÌË,
Ô˜ÍË, ÏËÍÓ‚˙ÎÌÓ‚Ë ÙÛÌË,
ı·‰ËÎÌËˆË Ë ÙËÁÂË.
àÁËÒ͇ÈÚ ÓÚ Ó·ÒÎÛÊ‚‡˘ËflÚ ÇË
‰ËÎ˙ Ô˙ÎÂÌ Í‡Ú‡ÎÓ„ ̇ ‡ÚËÍÛÎËÚÂ
̇ CANDY.
íÓÁË Û‰  Ô‰̇Á̇˜ÂÌ Á‡
ÛÔÓÚ·‡ ‚ ‰Óχ¯ÌË ÛÒÎÓ‚Ëfl,
̇ÔËÏÂ:
- ÍÛıÌË ‚ χ„‡ÁËÌË, ÓÙËÒË Ë ‰.
- ıÓÚÂÎË, ÏÓÚÂÎË Ë ‰.;
- Í˙˘Ë, ‚ËÎË Ë ‰.
쉇 Ì  Ô‰̇Á̇˜ÂÌ Á‡
Ú˙„Ó‚ÒÍË ˆÂÎË. àÁÔÓÎÁ‚‡ÈÚ Û‰‡
ÒÔ‡Á‚‡ÈÍË ËÌÒÚÛ͈ËËÚ ‚ ÚÓ‚‡
˙ÍÓ‚Ó‰ÒÚ‚Ó.
èÓËÁ‚Ó‰ËÚÂÎfl Ì ÌÓÒË ÓÚ„Ó‚ÓÌÓÒÚ
Á‡ ÔÓ‚Â‰Ë Ô‰ËÁ‚Ë͇ÌË ÓÚ
ÌÂÔ‡‚ËÎ̇ڇ ÛÔÓÚ·‡ ̇ Û‰‡.
èÓ˜ÂÚÂÚ ‚ÌËχÚÂÎÌÓ
ËÌÒÚÛ͈ËËÚÂ, Ò˙‰˙ʇ˘Ë Ò ‚
̇ÒÚÓfl˘‡Ú‡ ÍÌËÊ͇, ÍÓËÚÓ ˘Â ÇË
‰‡‰‡Ú ‚‡ÊÌË Ì‡ÒÓÍË ÓÚÌÓÒÌÓ
ÏÓÌڇʇ Ë ÔÓ‰‰˙Ê͇ڇ ̇
ËÁ·‡ÌËfl ÓÚ Ç‡Ò Û‰, ͇ÍÚÓ Ë ÌflÍÓË
ÔÓÎÂÁÌË Ò˙‚ÂÚË Á‡ ÔÓ-‰Ó·ÓÚÓ ÏÛ
ËÁÔÓÎÁ‚‡ÌÂ.
á‡Ô‡ÁÂÚ ÚÂÁË ËÌÒÚÛ͈ËË Á‡
·˙‰Â˘Ó ÔÓÎÁ‚‡ÌÂ.
äÓ„‡ÚÓ ÍÓÌÚ‡ÍÚÛ‚‡Ú Ò
Ô‰ÒÚ‡‚ËÚÂÎË Ë Ò‚ËÁÌË ˆÂÌÚÓ‚Â
̇ CANDY, ‚Ë̇„Ë Ô‰ÒÚ‡‚flÈÚÂ
ÏӉ· Ë ÒÂËÈÌËfl ÌÓÏ ̇
ÔÓ‰ÛÍÚ‡.

ëíêÄçàñÄ
CHAPTER
1
2
3
4
5
6
7
8
9
10
11
12
13
3
EN
INDEX
Introduction
General points on delivery
Guarantee
Safety Measures
Technical Data
Setting up and Installation
Control Description
Table of Programmes
Selection
Detergent drawer
The Product
Washing
Cleaning and routine
maintenance
Faults Search
BG
ë˙‰˙ʇÌËÂ
è‰ÒÚ‡‚flÌÂ
é·˘Ë Ò‚Â‰ÂÌËfl ÓÚÌÓÒÌÓ
‰ÓÒÚ‡‚͇ڇ
ɇ‡ÌˆËfl
àÌÒÚÛ͈ËË Á‡ ·ÂÁÓÔ‡ÒÌÓÒÚ
íÂıÌ˘ÂÒÍË ı‡‡ÍÚÂËÒÚËÍË
åÓÌÚ‡Ê
éÔËÒ‡ÌË ̇ ÍÓÌÚÓÎÌËÚ ·ÛÚÓÌË
퇷Îˈ‡ ̇ ÔÓ„‡ÏËÚ Á‡ Ô‡ÌÂ
èÓ‰·Ó ̇ Ú˙͇ÌË
äÓÌÚÂÈÌ Á‡ ÔÂÔ‡‡Ú
ᇠÚÓÁË ÔÓ‰ÛÍÚ
è‡ÌÂ
èÓ˜ËÒÚ‚‡ÌÂ Ë ÔÓ‰‰˙Ê͇
Ç˙ÁÏÓÊÌË ÌÂËÁÔ‡‚ÌÓÒÚË, Ô˘ËÌË
Ë Ì‡˜ËÌË Ì‡ ÓÚÒÚ‡Ìfl‚‡ÌÂ

4
D
AB
C
EN
CHAPTER 1
GENERAL POINTS
ON DELIVERY
On delivery, check that the
following are included with
the machine:
A) INSTRUCTION MANUAL
B) CUSTOMER SERVICE
ADDRESSES
C) GUARANTEE
CERTIFICATES
D) BEND FOR OUTLET TUBE
KEEP THEM IN A SAFE
PLACE
Check that the machine has
not incurred damage during
transport. If this is the case,
contact your nearest Candy
Centre.
BG
ëíêÄçàñÄ 1
éÅôà ëÇÖÑÖçàü
éíçéëçé
ÑéëíÄÇäÄíÄ
èË ÔÓÍÛÔ͇ڇ ̇ ÚÓÁË Û‰,
ÔÓ‚ÂÂÚ ‰‡ÎË ‚ ÍÓÏÔÎÂÍÚ‡ Ò‡
‚Íβ˜ÂÌË ÒΉÌËÚÂ:
Ä) àçëíêìäñàà áÄ
ÖäëèãéÄíÄñàü
Ç) ÄÑêÖëà çÄ äÇÄãàîàñàêÄçà
ëÖêÇàáçà ñÖçíêéÇÖ
ë). ÉÄêÄçñàéççÄ äÄêíÄ
D) äêàÇÄ áÄ åÄêäìóÄ áÄ
éíêÄÅéíÖçÄíÄ ÇéÑÄ
áÄèÄáÖíÖ Çëàóäà
éèàëÄçà èé-ÉéêÖ
ÄäëÖëéÄêà.
ì‚ÂÂÚ ÒÂ, ˜Â Ô‡Î̇ڇ χ¯Ë̇
Ì  Ôӂ‰Â̇ ÔË
Ú‡ÌÒÔÓÚˇÌÂ.

5
EN
CHAPTER 2
GUARANTEE
The appliance is supplied
with a guarantee certificate
which allows free use of the
Technical Assistance Service.
BG
ëíêÄçàñÄ 2
ÉÄêÄçñàü
ì‰˙Ú Â ÔˉÛÊÂÌ ÓÚ
„‡‡ÌˆËÓÌ̇ ͇ڇ, ÍÓflÚÓ ÇË ‰‡‚‡
‚˙ÁÏÓÊÌÓÒÚ ‰‡ ÔÓÎÁ‚‡ÚÂ
·ÂÁÔ·ÚÌË Ò‚ËÁÌË ÛÒÎÛ„Ë ÔÂÁ
„‡‡ÌˆËÓÌÌËfl ÒÓÍ.

6
EN
CHAPTER 3
SAFETY MEASURES
IMPORTANT:
FOR ALL CLEANING
AND MAINTENANCE
WORK
● Remove the plug
● Turn off the water inlet tap.
● All Candy appliances are
earthed. Ensure that the
main electricity circuit is
earthed. Contact a qualified
electrician if this is not the
case.
Appliance complies
with European Directives
73/23/EEC and 89/336/EEC,
replaced by 2006/95/EC and
2004/108/EC, and
subsequent amendments.
● Do not touch the
appliance with wet or damp
hands or feet.
● Do not use the appliance
when bare-footed.
● Extreme care should be
taken if extension leads are
used in bathrooms or shower
rooms. Avoid this where
possible.
WARNING: DURING THE
WASHING CYCLE, THE
WATER CAN REACH A
TEMPERATURE OF 90°C.
● Before opening the
washing machine door,
ensure that there is no water
in the drum.
BG
ëíêÄçàñÄ 3
àçëíêìäñàà áÄ
ÅÖáéèÄëçéëí
ÇÄÜçé:
èêà ÇëüäÄ éèÖêÄñàü
èé èéóàëíÇÄçÖíé àãà
èéÑÑêöÜäÄíÄ çÄ
èÖêÄãçüíÄ:
● àÁÍβ˜ÂÚ ˘ÂÔÒ·
● á‡Ú‚ÓÂÚ ͇̇ Á‡ ‚Ó‰‡
● ÇÒ˘ÍË ÛÂ‰Ë Ì‡ CANDY Á‡
Á‡ÁÂÏÂÌË.
íÓÁË Û‰ ÓÚ„Ó‚‡fl ̇
Ö‚ÓÔÂÈÒÍËÚ ËÁËÒÍ‚‡ÌËfl –
ÑËÂÍÚË‚‡ 73/23/ÖÖë Ë 89/336/ÖÖë
Ë Á‡ÏÂÌÂÌË Ò 2006/95/Öë Ë
2004/108/Öë Ë ÔÓÒΉ‚‡ÎËÚÂ
ËÁÏÂÌÂÌËfl.
● ç ‰ÓÍÓÒ‚‡ÈÚ Û‰‡ Ò ‚·ÊÌË
ËÎË ÏÓÍË ˙ˆÂ ËÎË Í‡Í‡.
● ç ËÁÔÓÎÁ‚‡ÈÚ Û‰‡ ÍÓ„‡ÚÓ ÒÚÂ
Ò ·ÓÒË Í‡Í‡.
● ç ËÁÔÓÎÁ‚‡ÈÚ ÓÒ‚ÂÌ Ò
ËÁÍβ˜ËÚÂÎÌÓ ‚ÌËχÌËÂ,
Û‰˙ÎÊËÚÂÎË ‚ ÔÓÏ¢ÂÌËfl, ÍÓËÚÓ ÒÂ
ËÁÔÓÎÁ‚‡Ú ͇ÚÓ ·‡Ìfl.
ÇçàåÄçàÖ:
èé ÇêÖåÖ çÄ èêÄçÖíé
íÖåèÖêÄíìêÄíÄ çÄ
ÇéÑÄíÄ åéÜÖ ÑÄ
ÑéëíàÉçÖ 90°ë.
● èÂ‰Ë ‰‡ ÓÚ‚ÓËÚ β͇, Û‚ÂÂÚÂ
ÒÂ, ˜Â Ì  ÓÒڇ̇· ‚Ó‰‡ ‚
·‡‡·‡Ì‡.

7
EN
● Do not use adaptors or
multiple plugs.
● This appliance is not
intended for use by persons
(including children) with
reduced physical, sensory or
mental capabilities, or lack of
experience and knowledge,
unless they have been given
supervision or instruction
concerning use of the
appliance by a person
responsible for their safety.
Children should be
supervised to ensure that
they do not play with the
appliance.
● Do not pull the mains lead
or the appliance itself to
remove the plug from the
socket.
● Do not leave the
appliance exposed to
atmospheric agents (rain, sun
etc.)
● In the case of removal,
never lift the appliance by
the knobs or detersive
drawer.
● During transportation
do not lean the door against
the trolley.
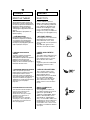
Important!
When the appliance
location is on carpet floors,
attention must be paid so as
to ensure that there is no
obstruction to the bottom
vents.
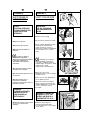
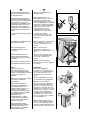
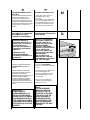
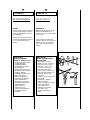
● Lift the appliance in pairs
as illustrated in the diagram.
● In the case of failure
and/or incorrect operation,
turn the washing machine
off, close the water inlet tap
and do not tamper with the
appliance. Contact a Candy
Technical Assistance Centre
for any repairs and ask for
original Candy spare parts.
Avoidance of these norms
may compromise the safety
of the appliance.
● Should the supply cord
(mains cable) be demaged,
this is to be replaced by a
specific cable available from
the after sales service centre.
BG
● ç ËÁÔÓÎÁ‚‡ÈÚ ‡‰‡ÔÚÓË ËÎË
˘ÂÔÒÂÎË, ÔËÒÔÓÒÓ·ÂÌË Á‡ ÌflÍÓÎÍÓ
Û‰‡ ‰ÌÓ‚ÂÏÂÌÌÓ.
● ç ÔÓÁ‚ÓÎfl‚‡ÈÚ Û‰‡ ‰‡ ÒÂ
ËÁÔÓÎÁ‚‡ ÓÚ ‰Âˆ‡ ·ÂÁ ̇·Î˛‰ÂÌËÂ
ËÎË ÓÚ Îˈ‡ ÍÓËÚÓ Ò‡ ÌÂÍÓÏÔÂÚÂÌÚÌË
‰‡ „Ó ËÁÔÓÎÁ‚‡Ú. íÓÁË Û‰ Ì Â
Ô‰̇Á̇˜ÂÌ Á‡ ÛÔÓÚ·‡ ÓÚ Îˈ‡ Ò
̇χÎÂÌË ÙËÁ˘ÂÒÍË, ÛÏÒÚ‚ÂÌË Ë
ÒÂÚË‚ÌË ÒÔÓÒÓ·ÌÓÒÚË ÓÒ‚ÂÌ ÔÓ‰
̇·Î˛‰ÂÌËÂ Ë ÒΉ Ô‰‚‡ËÚÂÎÌÓ
ËÌÒÚÛÍÚˇÌÓ ÓÚÌÓÒÌÓ ÏÂÚÓ‰‡ ̇
‡·ÓÚ‡.
ç ÔÓÁ‚ÓÎfl‚‡ÈÚ ̇ ‰Âˆ‡ ‰‡ Ë„‡flÚ
Ò Û‰‡.
● ç ‰˙Ô‡ÈÚ Á‡ı‡Ì‚‡˘Ëfl ͇·ÂÎ,
Á‡ ‰‡ ËÁ‚‡‰ËÚ ˘ÂÔÒ·.
● ç ÓÒÚ‡‚flÈÚ Û‰‡ ̇
‡ÚÏÓÒÙÂÌË ‚ÎËflÌËfl – ‰˙ʉ,
ÒÎ˙ÌˆÂ Ë Ú.Ì.
● èË ÔÂÏÂÒÚ‚‡Ì ÌËÍÓ„‡ ÌÂ
‚‰Ë„‡ÈÚ Ô‡Î̇ڇ χ¯Ë̇ Á‡
ÍÓχ̉ÌËÚ ·ÛÚÓÌË ËÎË ÍÓÌÚÂÈ̇
Á‡ ÔÂÔ‡‡Ú.
● èÓ ‚ÂÏ ̇ Ú‡ÌÒÔÓÚ‡ ÌËÍÓ„‡
Ì ÔÓ‰ÔˇÈÚ Ô‡ÎÌflÚ‡ ̇ β͇.
LJÊÌÓ
Ç ÒÎÛ˜‡È ˜Â Ô‡ÎÌflÚ‡ Â
ËÌÒڇΡ̇ ‚˙ıÛ ÔÓÍËÚ ÔÓ‰
(ÏÓÍÂÚ, ÍËÎËÏ) Úfl·‚‡ ‰‡ ·˙‰ÂÚÂ
ÒË„ÛÌË, ˜Â ‚ÂÌÚË·ˆËÓÌÌËÚ ÓÚ‚ÓË
‚ ÓÒÌÓ‚‡Ú‡ ̇ Û‰‡ Ì ҇
Á‡ÔÛ¯ÂÌË.
● ì‰˙Ú ‰‡ Ò ÔÂÏÂÒÚ‚‡ ÓÚ ‰‚‡Ï‡
‰Û¯Ë, ͇ÍÚÓ Â ÔÓ͇Á‡ÌÓ Ì‡
ËβÒÚ‡ˆËflÚ‡.
● Ç ÒÎÛ˜‡È ̇ Ôӂ‰‡ ËÎË
ÌÂÔ‡‚ËÎÌÓ ÙÛÌ͈ËÓÌˇÌ ̇
ÂÎÂÍÚÓÛ‰‡, ËÁÍβ˜ÂÚ „Ó,
Á‡Ú‚ÓÂÚ ͇̇ Á‡ ‚Ó‰‡ Ë Ì ÒÂ
ÓÔËÚ‚‡ÈÚ ‰‡ „Ó ÔÓÔ‡‚flÚÂ.
ᇠ‚ÂÌÚÛ‡ÎÂÌ ÂÏÓÌÚ Ò ӷ˙ÌÂÚÂ
Í˙Ï ÓÚÓËÁË‡Ì Ò‚ËÁ ̇ CANDY,
͇ÚÓ ÔÓËÒ͇Ú ÔÓ‰Ïfl̇ Ò
ÓË„Ë̇ÎÌË ˜‡ÒÚË.
çÂÒ˙Ó·‡Áfl‚‡ÌÂÚÓ Ò „ÓÌËÚÂ
ÛÒÎÓ‚Ëfl ÏÓÊ ‰‡ Ëχ ÒÂËÓÁÌË
ÔÓÒΉÒÚ‚Ëfl Á‡ ·ÂÁÓÔ‡ÒÌÓÒÚÚ‡ Ë
ÒË„ÛÌÓÒÚÚ‡ ̇ Û‰‡.
● ÄÍÓ Á‡ı‡Ì‚‡˘ËflÚ Í‡·ÂÎ
(ÓÒÌÓ‚ÌËfl ͇·ÂÎ) ·˙‰Â Ôӂ‰ÂÌ,
Úfl·‚‡ ‰‡ ·˙‰Â Á‡ÏÂÌÂÌ Ò˙Ò
ÒÔˆˇÎÂÌ Í‡·ÂÎ ÓÚ ÓÚÓËÁˇÌ
ÒΉÔÓ‰‡Ê·ÂÌ Ò‚ËÁ.

8
EN
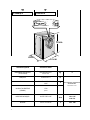
CHAPTER 4
kg
min. 0,05
max. 0,8
220 - 240
W
A
MPa
V
4
70 cm
51 cm
43 cm
MAXIMUM WASH
LOAD DRY
POWER INPUT
POWER CURRENT FUSE
AMP
SPIN
r.p.m.
WATER PRESSURE
SUPPLY VOLTAGE
TECHNICAL DATA
BG
ëíêÄçàñÄ 4
åÄäëàåÄãÖç äÄèÄñàíÖí
(ëìïé èêÄçÖ)
åéôçéëí
Åìòéç
ëäéêéëí çÄ ÇöêíÖçÖ
(éÅ/åàç.)
çÄãüÉÄçÖ çÄ ÇéÑÄíÄ
ÇéãíÄÜ
íÖïçàóÖëäà ÑÄççà
ÇàÜíÖ íÄÅÖãäÄíÄ ë íÖïçàóÖëäàíÖ
ïÄêÄäíÖêàëíàäà
SEE RATING PLATE

9
A
B
C
EN
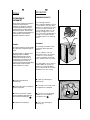
CHAPTER 5
SETTING UP
INSTALLA
TION
Move the machine near its
permanent position without
the packaging base.
Cut tube-holding straps.
Unscrews the two top screws
A and remove the cover,
sliding it off horizontally.
Remove the cardboard
protection.
Unscrews the two tie braces
B on the crosspiece (with an
H. 19 spanner) and remove
the polystyrene spacers C
under it.
Please do not fit the 2 tie
braces B again!
IMPORTANT:
DO NOT REMOVE THE
SPACERS ABOVE THE
CROSSPIECE.
Lean the machine forward
and remove the plastic
bags containing the two
polystyrene blocks at the
sides, pulling downwards.
Replace the cover with the
two screws A.
Please ensure when fitting
the table top the locating
pins are inserted correctly in
their slots, positioned on the
side of the cabinet as shown
in the relevant diagram.
WARNING:
DO NOT LEAVE THE
PACKAGING IN THE
REACH OF CHILDREN AS
IT IS A POTENTIAL
SOURCE OF DANGER.
BG
ëíêÄçàñÄ 5
åéçíÄÜ
èÂÏÂÒÚÂÚ Û‰‡ ·ÎËÁÓ ‰Ó
ÏflÒÚÓÚÓ Ì‡ ËÁÔÓÎÁ‚‡Ì ·ÂÁ
ÓÒÌÓ‚‡Ú‡ ̇ ÓÔ‡Íӂ͇ڇ.
éÚÂÊÂÚ Á‡‰˙ʇ˘ËÚ Ú˙·‡Ú‡
ÎÂÌÚË.
ê‡Á‚ËÈÚ ‰‚‡Ú‡ „ÓÌË ‚ËÌÚ‡ Ä Ë
χıÌÂÚ ͇ԇ͇, ͇ÚÓ „Ó ËÁ‰˙Ô‡ÚÂ
ıÓËÁÓÌÚ‡ÎÌÓ.
å‡ıÌÂÚ Ô‰ԇÁËÚÂÎfl ̇ ÔÎÓÚ‡.
ê‡Á‚ËÈÚ ‰‚ÂÚ ÒÍÓ·Ë B ̇
Ú‡‚ÂÒ‡Ú‡ (Ò „‡Â˜ÂÌ Íβ˜ H 19 ) à
χıÌÂÚ ÒÚÂËÓÔÓÌËflÚ
‡Á‰ÂÎËÚÂÎ C ÔÓ‰ ÌÂfl.
åÓÎfl Ì Á‡ÍÂÔ‚‡ÈÚ ‰‚ÂÚ ÒÍÓ·Ë
B ÓÚÌÓ‚Ó.
ÇçàåÄçàÖ:
çÖ åÄïÄâíÖ
êÄáÑÖãàíÖãü çÄÑ
íêÄÇÖêëÄíÄ.
ç‡ÍÎÓÌÂÚ χ¯Ë̇ڇ ̇Ô‰ Ë
χıÌÂÚ ̇ÈÎÓÌÓ‚ËÚ ÚÓ·Ë Ò
‰‚‡Ú‡ ÒÚÂËÓÔÓÌË ·ÎÓ͇ ÓÚÒÚ‡ÌË
͇ÚÓ „Ë ËÁ‰˙Ô‡Ú ̇‰ÓÎÛ.
èÓÒÚ‡‚ÂÚ ͇ԇ͇ Ò‰‚‡Ú‡ ‚ËÌÚ‡ Ä.
åÓÎfl Û‚ÂÂÚ ÒÂ, ˜Â Á‡ÍÂÔ‚‡˘ËÚÂ
ÔÎÓÚ‡ ˘ËÔÍË Ò‡ ‚ÎÂÁÎË ÚÓ˜ÌÓ Ì‡
ÏÂÒÚ‡Ú‡ ÒË, ÔÓÁˈËÓÌˇÌË
ÓÚÒÚ‡ÌË Ì‡ ÍÓÔÛÒ‡ ͇ÍÚÓ Â
ÔÓ͇Á‡ÌÓ Ì‡ ‰Ë‡„‡Ï‡Ú‡.
ÇçàåÄçàÖ:
çÖ ÑÄÇÄâíÖ çÄ ÑÖñÄ
ÖãÖåÖçíàíÖ éí
éèÄäéÇäÄíÄ, èéêÄÑà
èéíÖçñàÄãçÄ
éèÄëçéëí.

10
min 50 cm
max 85 cm
+2,6 mt max
max 100 cm
min 4 cm
EN
Fix the sheet of corrugated
material on the bottom as
shown in picture.
Connect the fill hose
to the tap.
The appliance must be
connected to the water
mains using new hose-sets.
The old hose-sets should not
be reused.
IMPORTANT:
DO NOT TURN THE TAP
ON AT THIS TIME.
Position the washing
machine next to the wall.
Hook the outlet tube to the
edge of the bath tub,
paying attention that there
are no bends or
contractions along the tube.
It is better to connect the
discharge hose to a fixed
outlet of a diameter greater
than that of the outlet tube
and at a height of min. 50
cm. If is necessary to use the
plastic sleeve supplied.
èÓÒÚ‡‚ÂÚ ÎËÒÚ‡ ÓÚ ÔÓÂÒÚ
χÚ¡Π(Ô‰̇Á̇˜ÂÌ Á‡ ÔÓÂχÌÂ
̇ ‚·„‡Ú‡) ̇ ‰˙ÌÓÚÓ Ì‡ χ¯Ë̇ڇ,
͇ÍÚÓ Â ÔÓ͇Á‡ÌÓ Ì‡ ËβÒÚ‡ˆËflÚ‡.
ë‚˙ÊÂÚ χÍÛ˜‡ Á‡ ‚Ó‰‡ Ò
‚Ó‰ÓÔÓ‚Ó‰ÌËfl ͇Ì.
èË Ò‚˙Á‚‡Ì ̇ Ô‡ÎÌflÚ‡
ËÁÔÓÎÁ‚‡ÈÚ ÌÓ‚Ë Ï‡ÍÛ˜Ë (ÌÂ
ËÁÔÓÎÁ‚‡ÈÚ ÔÓ‚ÚÓ̇ ÒÚ‡Ë
χÍÛ˜Ë).
ÇçàåÄçàÖ:
çÖ éíÇÄêüâíÖ äêÄçÄ Ç
íéáà åéåÖçí.
èË·ÎËÊÂÚ Ô‡ÎÌflÚ‡ ‰Ó ÒÚÂ̇ڇ,
͇ÚÓ ‚ÌËχ‚‡Ú ‰‡ Ì Ò ӷ‡ÁÛ‚‡Ú
˜ÛÔÍË ËÎË ÔËÚËÒ͇ÌËfl ̇ χÍÛ˜‡.
ë‚˙ÊÂÚ χÍÛ˜‡ Á‡ ÓÚ‡·ÓÚÂ̇ڇ
‚Ó‰‡.
àÎË ÔÓ-‰Ó·Â Ò‚˙ÊÂÚ χÍÛ˜‡ Ò
ÔÓÒÚÓflÌÂÌ Óڂ‰ÂÌ Í‡Ì‡Î, ÍÓÈÚÓ Â Ò
ÔÓ-¯ËÓÍ ‰Ë‡ÏÂÚ˙ ÓÚ ÚÓÁË Ì‡
χÍÛ˜‡ Ë Â Ì‡ ‚ËÒÓ˜Ë̇ Ì ÔÓ-χÎÍÓ
ÓÚ 50ÒÏ. Ç ÒÎÛ˜‡È ̇ ÌÂÓ·ıÓ‰ËÏÓÒÚ
ËÁÔÓÎÁ‚‡ÈÚ Í˂͇ڇ ÍÓflÚÓ Â
Ô‰ÓÒÚ‡‚Â̇ ‚ ÍÓÏÔÎÂÍÚ‡ Ò
Ô‡ÎÌflÚ‡.
BG

11
EN
Use front feet to level the
machine with the floor:
a) Turn the nut clockwise to
release the screw adjuster of
the foot.
b) Rotate foot to raise or
lower it until it stands firmly on
the ground.
c) Lock the foot in position
by turning the nut anti-
clockwise until it comes up
against the bottom of the
machine.
Ensure that the knob is on the
“OFF” position and the load
door is closed
Insert the plug.
ATTENTION:
should it be necessary to
replace the supply cord,
connect the wire in
accordance with the
following colours/codes:
BLUE - NEUTRAL (N)
BROWN - LIVE (L)
YELLOW-GREEN - EARTH ( )
After installation, the
appliance must be
positioned so that the plug is
accessible.
A
B
C
BG
àÁÔÓÎÁ‚‡ÈÚ Ô‰ÌËÚ ͇͇ ‰‡
ÌË‚ÂΡڠχ¯Ë̇ڇ.
a) ᇂ˙ÚÂÚ „‡È͇ڇ ÔÓ ÔÓÒÓ͇ ̇
˜‡ÒÓ‚ÌËÍÓ‚‡Ú‡ ÒÚÂÎ͇ Á‡ ‰‡
ÓÚ·ÎÓ͡ڠ‚ËÌÚ‡ ̇ ͇˜ÂÚÓ.
b) ᇂ˙ÚÂÚ ͇˜ÂÚÓ ‰Ó͇ÚÓ ÒÎÂÁÂ
ÔÓ-̇‰ÓÎÛ ËÎË Ò ͇˜Ë ÔÓ-̇„ÓÂ
‰Ó͇ÚÓ Ô‡ÎÌflÚ‡ Á‡Òڇ̠ڂ˙‰Ó
̇ ÔÓ‰‡.
c) ÅÎÓ͡ÈÚ ͇˜ÂÚÓ Í‡ÚÓ
Á‡‚˙ÚËÚ „‡È͇ڇ ‚ ÔÓÒÓ͇,
Ó·‡Ú̇ ̇ ˜‡ÒÓ‚ÌËÍÓ‚‡Ú‡ ÒÚÂÎ͇
‰Ó͇ÚÓ ÔËÎÂÔÌ ‰Ó ‰ÓÎ̇ڇ ÒÚÂ̇
̇ χ¯Ë̇ڇ.
ì‚ÂÂÚ ÒÂ, ˜Â ·ÛÚÓÌ˙Ú Â ‚ ÔÓÁˈËfl
◊OFF“ Ë ‚‡Ú‡Ú‡  Á‡Ú‚ÓÂ̇.
ÇÍβ˜ÂÚ ˘ÂÔÒ·.
ÇçàåÄçàÖ:
èË ÌÂÓ·ıÓ‰ËÏÓÒÚ ‰‡ Ò ÒÏÂÌË
Á‡ı‡Ì‚‡˘Ëfl ͇·ÂÎ, Ò‚˙ÊÂÚÂ
ÊˈËÚ ‚ Ò˙ÓÚ‚ÂÚÒÚ‚Ë Ò˙Ò
ÒΉÌËÚ ˆ‚ÂÚÓ‚Â/ÍÓ‰Ó‚Â:
ëàç – çìãÄ (N)
äÄîüÇ – îÄáÄ (L)
Üöãíé-áÖãÖç – áÖåü ( )
ëΉ ÏÓÌڇʇ, ÔÓÁˈËÓÌˇÈÚÂ
Û‰‡ ڇ͇, ˜Â ˘ÂÔÒ· ‰‡  ÎÂÒÌÓ
‰ÓÒÚ˙ÔÂÌ.

12
A
B
C
D
E
F
G
H
M
N
P
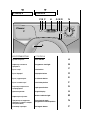
EN
CHAPTER 6
CONTROLS
Door handle
Programme start light
Start button
Aquaplus button
Cold wash button
Start Delay button
Spin Speed button
Digital Display
Buttons indicator light
Timer knob for wash
programmes with OFF position
Detergent drawer
A
P
E
M D N
G
H
F
B
M
C
ëíêÄçàñÄ 6
äéçíêéãçà Åìíéçà
Ñ˙Ê͇ ̇ ‚‡Ú‡Ú‡
à̉Ë͇ÚÓ Á‡ ̇˜‡ÎÓ Ì‡
ÔÓ„‡Ï‡Ú‡
ÅÛÚÓÌ “ÒÚ‡Ú”
ÅÛÚÓÌ “Aquaplus”
ÅÛÚÓÌ ◊ÒÚÛ‰ÂÌÓ Ô‡Ì“
ÅÛÚÓÌ “ÓÚÎÓÊÂÌ ÒÚ‡Ú”
ê„Û·ÚÓ Á‡ ÒÍÓÓÒÚÚ‡ ̇
ˆÂÌÚÓÙۄˇÌÂ
ÑË„ËÚ‡ÎÂÌ ‰ËÒÔÎÂÈ
à̉Ë͇ÚÓË Á‡ ·ÛÚÓÌËÚÂ
èÓ„‡Ï‡ÚÓ Á‡ ÓÔ‰ÂÎflÌÂ
ÔÓ„‡ÏËÚ Á‡ Ô‡ÌÂ Ò ÔÓÁˈËfl
OFF (ËÁÍβ˜‚‡ÌÂ)
äÓÌÚÂÈÌ Á‡ ÔÂÔ‡‡Ú
BG

13
A
2 min.
B
DESCRIPTION OF
CONTROL
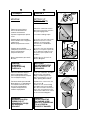
DOOR HANDLE
Press the finger-bar inside
the door handle to open the
door
IMPORTANT:
A SPECIAL SAFETY
DEVICE PREVENTS THE
DOOR FROM OPENING
AT THE END OF THE
WASH/SPIN CYCLE. AT
THE END OF THE SPIN
PHASE WAIT UP TO 2
MINUTES BEFORE
OPENING THE DOOR.
PROGRAMME START LIGHT
This lights up when the START
button has been pressed.
EN
BG
éèàëÄçàÖ çÄ
äéçíêéãçàíÖ Åìíéçà
ÑêöÜäÄ áÄ éíÇÄêüçÖ çÄ
ÇêÄíÄíÄ
ç‡ÚËÒÌÂÚ ÎÓÒÚ‡ ̇Ïˇ˘ Ò ÓÚ
‚˙Ú¯̇ڇ Òڇ̇ Á‡ ‰‡
ÓÚ‚ÓËÚ ‚‡Ú‡Ú‡.
ÇÄÜçé:
ëèÖñàÄãÖç åÖïÄçàáöå
ÇöáèêÖèüíëíÇÄ
éíÇÄêüçÖíé çÄ
ÇêÄíÄíÄ ÇÖÑçÄÉÄ ëãÖÑ
äêÄü çÄ èêÄçÖíé. ëãÖÑ
ñÖçíêéîìÉàêÄçÖíé
íêüÅÇÄ ÑÄ àáóÄäÄíÖ 2
åàçìíà èêÖÑà ÑÄ
åéÜÖíÖ ÑÄ éíÇéêàíÖ
ÇêÄíÄíÄ.
àçÑàäÄíéê áÄ çÄóÄãé çÄ
èêéÉêÄåÄíÄ
à̉Ë͇ÚÓ‡ ˘Â Ò‚ÂÚÌ ÔË
̇ÚËÒ͇ÌÂÚÓ Ì‡ ·ÛÚÓÌ START.

14
C
START BUTTON
Press to start the selected
cycle.
NOTE: WHEN THE START
BUTTON HAS BEEN
PRESSED, THE APPLIANCE
CAN TAKE FEW SECONDS
BEFORE STARTS
WORKING.
CHANGING THE SETTINGS
AFTER THE PROGRAMMES
HAS STARTED (PAUSE)
Press and hold the
“START/PAUSE” button for
about 2 seconds, the
flashing lights on the options
buttons and time remaining
indicator will show that the
machine has been paused,
adjust as required and press
the “START/PAUSE” button
again to cancel the flashing
lights.
If you wish to add or remove
items during washing, wait 2
minutes until the safety
device unlocks the door.
When you have carried out
the manoeuvre,close the
door, press START button and
the appliance will continue
working where it left off.
CANCELLING THE
PROGRAMME
To cancel the programme,
set the selector to the OFF
position.
Select a different
programme.
Re-set the programme
selector to the OFF position.
EN
BG
Åìíéç ëíÄêí
ç‡ÚËÒÌÂÚ ·ÛÚÓ̇ Á‡ ‰‡ ÒÚ‡ÚˇÚÂ
ËÁ·‡Ì‡Ú‡ ÔÓ„‡Ï‡.
ÇçàåÄçàÖ:
äéÉÄíé çÄíàëçÖíÖ
ÅìíéçÄ áÄ èìëäÄçÖ
START èÖêÄãçÄíÄ
åÄòàçÄ çÖ áÄèéóÇÄ ÑÄ
àáèöãçüÇÄ ñàäöãÄ
ÇÖÑçÄÉÄ, Ä ëöë
áÄÅÄÇüçÖ ëãÖÑ çüäéãäé
ëÖäìçÑà.
èÓÏfl̇ ̇ ÔÓ„‡Ï‡Ú‡ ÒΉ ͇ÚÓ
 Á‡ÔӘ̇ΠˆËÍ˙· (Ô‡ÛÁ‡)
Ç˙ÁÏÓÊÌÓ Â ‰‡ Ò ÒÔ Ô‡Î̇ڇ
χ¯Ë̇ ‚ÂÏÂÌÌÓ ÔÓ ‚ÂÏ ̇
ˆËÍ˙· Á‡ ԇ̠͇ÚÓ Á‡‰˙ÊËÚÂ
̇ÚËÒÌ‡Ú ·ÛÚÓ̇ Á‡ ÒÚ‡Ú/Ô‡ÛÁ‡
ÓÍÓÎÓ ‰‚ ÒÂÍÛ̉Ë. äÓ„‡ÚÓ
Ô‡Î̇ڇ χ¯Ë̇  ‚ ÂÊËÏ Ì‡
Ô‡ÛÁ‡ ÚÓ Ò‚ÂÚÎËÌÌËÚ Ë̉Ë͇ÚÓË Ì‡
·ÛÚÓÌËÚ Á‡ ÓÔˆËË, ÓÒÚ‡‚‡˘Ó ‚ÂÏÂ
ÓÚ ˆËÍ˙· ̇ ÔÓ„‡Ï‡Ú‡, Ë Á‡
ÒÍÓÓÒÚÚ‡ ̇ ˆÂÌÚÓÙۄˇÌ ÏË„‡Ú.
ë‚ÂÚÎËÌÌËfl Ë̉Ë͇ÚÓ “Ë̉Ë͇ÚÓ
Á‡ ·ÎÓÍˇÌ ̇ ‚‡Ú‡Ú‡” ÓÒÚ‡‚‡ ‰‡
Ò‚ÂÚË ÓÍÓÎÓ 2 ÏËÌÛÚË. ÇË ˘Â
ÏÓÊÂÚ ‰‡ ÓÚ‚ÓËÚ ‚‡Ú‡ ‰‚‡
ÒΉ ͇ÚÓ Ò‚ÂÚÎËÌÌËfl Ë̉Ë͇ÚÓ
Á‡„‡ÒÌÂ. ᇠ‰‡ ÒÚ‡ÚˇÚÂ
ÔÓ„‡Ï‡Ú‡ ÓÚÌÓ‚Ó Ì‡ÚËÒÌÂÚÂ
ÓÚÌÓ‚Ó ·ÛÚÓ̇ ÒÚ‡Ú/Ô‡ÛÁ‡.
ÄÍÓ Ê·ÂÚ ‰‡ ‰Ó·‡‚ËÚÂ
‰ÓÔ˙ÎÌËÚÂÎÌÓ Ú˙͇ÌË, ËÁ˜‡Í‡ÈÚÂ
‰‚ ÏËÌÛÚË, ‰Ó͇ÚÓ Á‡˘ËÚÌËfl
ÏÂı‡ÌËÁ˙Ï ÓÚÍβ˜Ë ‚‡Ú‡Ú‡.
ÑÓ·‡‚ÂÚ ËÎË ËÁ‚‡‰ÂÚ Ú˙͇ÌËÚÂ,
ÒΉ ÍÓÂÚÓ Á‡Ú‚ÓÂÚ ‚‡Ú‡Ú‡ Ë
̇ÚËÒÌÂÚ ·ÛÚÓÌ START.
èêÖäöëÇÄçÖ çÄ èêéÉêÄåÄíÄ
ᇠ‰‡ ËÁÍβ˜ËÚ ÔÓ„‡Ï‡Ú‡
Á‡‚˙ÚÂÚ ÍÓÔ˜ÂÚÓ Á‡ ËÁ·Ó ̇
ÔÓ„‡Ï‡ ̇ ÔÓÎÓÊÂÌË ËÁÍβ˜ÂÌÓ
(“OFF”). ëΉ ÚÓ‚‡ ËÁ·ÂÂÚ ‰Û„‡
‡Á΢̇ ÔÓ„‡Ï‡ Ë ÔÛÒÌÂÚ ‚
‡·ÓÚ‡ Ô‡Î̇ڇ χ¯Ë̇ ڇ͇ ͇ÚÓ
 ÓÔËÒ‡ÌÓ ÔÓ-„ÓÂ.

15
D
EN
The option buttons should
be selected before pressing
the START button
“AQUAPLUS” BUTTON
By pressing this button you
can activate a special new
wash cycle in the Colourfast
and Mixed Fabrics
programs, thanks to the new
Sensor System.This option
treats with care the fibres of
garments and the delicate
skin of those who wear
them.
The load is washed in a
much larger quantity of
water and this, together with
the new combined action
of the drum rotation cycles,
where water is filled and
emptied, will give you
garments which have been
cleaned and rinsed to
perfection.The amount of
water in the wash is
increased so that the
detergent dissolves
perfectly, ensuring an
efficient cleaning action.The
amount of water is also
increased during the rinse
procedure so as to remove
all traces of detergent from
the fibres.
This function has been
specifically designed for
people with delicate and
sensitive skin, for whom even
a very small amount of
detergent can cause
irritation or allergy.
You are advised to also use
this function for children’s
clothing and for delicate
fabrics in general, or when
washing garments made of
towelling, where the fibres
tend to absorb a greater
quantity of detergent.
To ensure the best
performance for your wash,
this function is always
activated on the Delicates
and Woollens/Handwash
programs.
BG
éÔˆËËÚ Í˙Ï ÓÒÌӂ̇ڇ ÔÓ„‡Ï‡ Á‡
ԇ̠Úfl·‚‡ ‰‡ ·˙‰‡Ú ËÁ·Ë‡ÌË
ÔÂ‰Ë ‰‡ ÒÚ ̇ÚËÒ̇ÎË ·ÛÚÓ̇
ÒÚ‡Ú/Ô‡ÛÁ‡ “START”.
Åìíéç îìçäñàü “AQUAPLUS”
Å·„Ó‰‡ÂÌË ̇ ÌÓ‚‡Ú‡ ÒËÒÚÂχ
Sensor activa  ‚˙ÁÏÓÊÌÓ Í‡ÚÓ ÒÂ
̇ÚËÒÌÂ Ë ‡ÍÚ˂ˇ ·ÛÚÓ̇
“Aquaplus” ‰‡ Ò ËÁÔ˙ÎÌË ˆËÍ˙Î Ò˙Ò
ÒÔˆËÙ˘ÌÓ ËÁÔˇÌ Á‡
ËÁ‰˙ÊÎË‚Ë Ë ÒÏÂÒÂÌË ÔÓ ÚËÔ
Ú˙͇ÌË. àÁÔˇÌÂÚÓ ËÁÔ˙ÎÌÂÌÓ ÔÓ
ÚÓÁË Ì‡˜ËÌ ÔÓÁ‚ÓÎfl‚‡ ‰‡ ÒÂ
ÔÂχıÌ ‚Òfl͇Í˙‚ ÓÒÚ‡Ú˙Í ÓÚ
ÔÂËÎÌËÚ ÔÂÔ‡‡ÚË Ë
ÒΉӂ‡ÚÂÎÌÓ ‰‡ Ò ÔÓ„ËÊËÚ Á‡
˜Û‚ÒÚ‚ËÚÂÎ̇ڇ ÍÓʇ ̇
ÔÓÎÁ‚‡ÚÂÎfl ÍÓflÚÓ ˘Â ·˙‰Â ‚
ÍÓÌÚ‡ÍÚ Ò˙Ò ‚·Í̇ڇ ̇ Ú˙͇ÌËÚÂ.
ÑÓ·‡‚flÌÂÚÓ Ì‡ ÔÓ-„ÓÎflÏÓ
ÍÓ΢ÂÒÚ‚Ó ‚Ó‰‡ ÔË Ô‡ÌÂÚÓ Í‡ÍÚÓ
Ë ÛÒËÎÂÌÓÚÓ ‰ÂÈÒÚ‚Ë ̇
ËÁÔ·͂‡ÌÂÚÓ Ò ÏÂʉËÌÌË
ˆÂÌÚÓÙۄˇÌËfl ÔÓÁ‚ÓÎfl‚‡ ‰‡ ÒÂ
ÔÓÎÛ˜Ë ˜ËÒÚÓ Ô‡Ì ˉ‡ÎÌÓ
ËÁÔ·Í̇ÚÓ. ᇠ‰‡ Ò ÔÓÎÛ˜Ë
ÓÔÚËχÎÂÌ ÂÁÛÎÚ‡Ú ÔË Ô‡ÌÂÚÓ
Û‚Â΢ÂÌÓÚÓ ÍÓ΢ÂÒÚ‚Ó ‚Ó‰‡ ÔÂÁ
Ú‡ÁË Ù‡Á‡ ̇ ˆËÍ˙· „‡‡ÌÚˇ
‰ÌÓ Ë‰Â‡ÎÌÓ ‡ÁÚ‚‡flÌ ̇
ÔÂËÎÌËfl ÔÂÔ‡‡Ú. äÓ΢ÂÒÚ‚ÓÚÓ
‚Ó‰‡ Ò ۂÂ΢‡‚‡ Ë ÔÓ ‚ÂÏ ̇
ËÁÔ·͂‡ÌÂÚÓ ÔÓ Ú‡Í˙‚ ̇˜ËÌ ˜Â ‰‡
Ò ÔÂχıÌ‡Ú ‚ÒflÍ‡Í‚Ë ÒÎÂ‰Ë ÓÚ
ÔÂËÎÌËfl ÔÂÔ‡‡Ú ÓÚ ‚·Í̇ڇ ̇
Ú˙͇ÌÚ‡. í‡ÁË ÙÛÌ͈Ëfl  ÒÔˆˇÎÌÓ
‡Á‡·ÓÚÂ̇ Á‡ ‰ÂÎË͇ÚÌË Ë
˜Û‚ÒÚ‚ËÚÂÎÌË ÍÓÊË ÔË ÍÓËÚÓ ‰‡ÊÂ
Ë ÏËÌËχÎÌÓÚÓ ÍÓ΢ÂÒÚ‚Ó ÓÒÚ‡Ú˙Í
̇ ÔÂËÎÂÌ ÔÂÔ‡‡Ú ÏÓÊ ‰‡
Ô‰ËÁ‚Ë͇ ‚˙ÁÔ‡ÎÂÌË ËÎË
‡Î„ËË. ë˙˘Ó ڇ͇ Ò ÔÂÔÓ˙˜‚‡
‰‡ Ò ËÁÔÓÎÁ‚‡ Ú‡ÁË ÙÛÌ͈Ëfl Á‡
ËÁÔˇÌ ̇ ‰ÂÚÒÍË ‰ÂıË, Ë Á‡
‰ÂÎË͇ÚÌÓ Ô‡Ì ‚ Ú‡È-Ó·˘Ëfl
ÒÎÛ˜‡È ͇ÍÚÓ Ë Á‡ ËÁÔˇÌ ̇
Ú˙͇ÌË ÚËÔ „˙·‡ ˜ËËÚÓ ‚·Í̇ ËχÚ
Ò‚ÓÈÒÚ‚ÓÚÓ ‰‡ Á‡‰˙Ê‡Ú ÔÂËÎÌËfl
ÔÂÔ‡‡Ú. ᇠ‰‡ Ò ÓÒË„ÛË Ì‡È-
‰Ó·ÓÚÓ ËÁÔˇÌ ڇÁË ÙÛÌ͈Ëfl Â
‚Ë̇„Ë ‡ÍÚ˂̇ ÔË ËÁÔÓÎÁ‚‡ÌÂÚÓ
̇ ÔÓ„‡ÏËÚ Á‡ ‰ÂÎË͇ÚÌË Ë
‚˙ÎÌÂÌË Ú˙͇ÌË.

COLD WASH BUTTON
By pressing this button it is
possible to transform every
programme into a cold
washing one,without
modifying other
characteristics (water level,
times, rythmes, etc...).
Curtains, small carpets, man
made delicate fabrics, non
coulor fast garments can be
safely washed thanks to this
new device.
“DELAY START” BUTTON
This button allows you to pre-
programme the wash cycle
to delay the start of the
cycle for up to 24 hours.
To delay the start use the
following procedure:
Set the required programme.
Press the button once to
activate it (h00 appears on
the display) and then press it
again to set a 1 hour delay
(h01 appears on the display);
the pre-set delay increases
by 1 hour each time the
button is pressed, until h24
appears on the display, at
which point pressing the
button again will reset the
delay start to zero.
Confirm by pressing the
“START/PAUSE” button (the
light on the display starts to
flash). The countdown will
begin and when it has
finished the programme will
start automatically.
It is possible to cancel the
delay start by taking the
following action:
Press and hold the button for
5 seconds until the display
will show the settings for the
programme selected.
At this stage it is possible to
start the programme
previously selected by
pressing the “START/PAUSE”
button or to cancel the
process by setting the
selector to the OFF position
and then selecting another
programme.
16
EN
E
F
BG
Åìíéç ◊ëíìÑÖçé èêÄçÖ“
ë ̇ÚËÒ͇ÌÂÚÓ Ì‡ ÚÓÁË ·ÛÚÓÌ ËχÚÂ
‚˙ÁÏÓÊÌÓÒÚ ‰‡ ËÁ·ÂÂÚ ԇÌ Ò˙Ò
ÒÚÛ‰Â̇ ‚Ó‰‡ Á‡ ‚Òfl͇ ÔÓ„‡Ï‡, ·ÂÁ
ÚÓ‚‡ ‰‡ Ó͇Á‚‡ ‚ÎËflÌË ̇ ÓÒڇ̇ÎËÚÂ
ı‡‡ÍÚÂËÒÚËÍË (ÌË‚Ó Ì‡ ‚Ó‰‡Ú‡,
ÔÓ‰˙ÎÊËÚÂÎÌÓÒÚ Ì‡ ÔÓ„‡Ï‡Ú‡ Ë ‰.).
ᇂÂÒË, χÎÍË ÔÓ‰Ó‚Ë Ì‡ÒÚËÎÍË, ˙˜ÌÓ
ËÁ‡·ÓÚÂÌË ËÁ‰ÂÎËfl ÏÓ„‡Ú ‰‡ ·˙‰‡Ú
ËÁÔ‡ÌË ·Î‡„Ó‰‡ÂÌË ̇ Ú‡ÁË ÌÓ‚‡
ÙÛÌ͈Ëfl.
Åìíéç ◊éíãéÜÖç ëíÄêí“
í‡ÁË ÓÔˆËfl ‰‡‚‡ ‚˙ÁÏÓÊÌÓÒÚ ‰‡ ÒÂ
Á‡·‡‚fl ÒÚ‡Ú‡ Á‡ ÔÛÒ͇Ì ‚ ‡·ÓÚ‡
̇ ˆËÍ˙· ̇ Ô‡ÌÂ Ò ‰Ó 24 ˜‡Ò‡.
àÁÔ˙ÎÌÂÚ ÒΉ̇ڇ Ôӈ‰ۇ:
àÁ·ÂÂÚ Ê·̇ڇ ÔÓ„‡Ï‡ Á‡
Ô‡ÌÂ. ç‡ÚËÒÌÂÚ ·ÛÚÓÌ ÓÚÎÓÊÂÌ
ÒÚ‡Ú Â‰ËÌ Ô˙Ú Á‡ ‰‡ ‡ÍÚ˂ˇÚÂ
ÙÛÌ͈ËflÚ‡ (Ë̉Ë͇ÚÓ‡ h00 ˘Â ÒÂ
ÔÓfl‚Ë Ì‡ ‰ËÒÔÎÂfl). ç‡ÚËÒÌÂÚÂ
·ÛÚÓ̇ ÓÚÌÓ‚Ó Á‡ ‰‡ ËÁ·ÂÂÚÂ
ÓÚÎÓÊÂÌ ÒÚ‡Ú Ò Â‰ËÌ ˜‡Ò
(Ë̉Ë͇ÚÓ‡ h01 ˘Â Ò ÔÓfl‚Ë Ì‡
‰ËÒÔÎÂfl). èË ‚ÒflÍÓ ÒΉ‚‡˘Ó
̇ÚËÒ͇Ì ̇ ·ÛÚÓ̇ Û‚Â΢‡‚‡ÚÂ
ÓÚÎÓÊÂÌËfl ÒÚ‡Ú Ò 1 ˜‡Ò. äÓ„‡ÚÓ Ì‡
‰ËÒÔÎÂfl Ò ÔÓfl‚Ë h24 Ë Ì‡ÚËÒÌÂÚÂ
·ÛÚÓ̇ ÓÚÌÓ‚Ó, ÒÚ‡ÚˇÚ ÓÚ̇˜‡ÎÓ.
ëΉ ͇ÚÓ ÒÚ ËÁ·‡ÎË Ê·ÌÓÚÓ
‚ÂÏ Á‡ ÓÚÎÓÊÂÌËfl ÒÚ‡Ú,
̇ÚËÒÌÂÚ ·ÛÚÓÌ START/PAUSE Á‡
‰‡ ÔÓÚ‚˙‰ËÚ ̇ÒÚÓÈ͇ڇ
(Ë̉Ë͇ÚÓ‡ ̇ ·ÛÚÓ̇ Á‡ ÓÚÎÓÊÂÌ
ÒÚ‡Ú ˘Â Á‡ÔӘ̠‰‡ ÏË„‡).
凯Ë̇ڇ ‡‚ÚÓχÚ˘ÌÓ ÒÚ‡Úˇ
ÓÚ·Ófl‚‡Ì ̇ ‚ÂÏÂÚÓ Ë ÔÓ„‡Ï‡Ú‡
ÒÚ‡Úˇ ÒΉ ËÁÚ˘‡Ì ̇
ÓÔ‰ÂÎÂÌÓÚÓ ‚ÂÏÂ.
ÄÍÓ Ê·ÂÚ ‰‡ ‡ÌÛΡÚÂ
ÓÚÎÓÊÂÌËfl ÒÚ‡Ú ËÁ‚˙¯ÂÚÂ
‰ÂÈÒÚ‚ËflÚ‡ ‚ ÒΉÌËfl ‰:
ç‡ÚËÒÌÂÚÂ Ë ‡Á‰˙ÊÚ ·ÛÚÓ̇ Á‡
ÓÚÎÓÊÂÌ ÒÚ‡Ú Á‡ ÓÍÓÎÓ 5 ÒÂÍÛ̉Ë
‰Ó͇ÚÓ Ì‡ ‰ËÒÔÎÂfl Ò ÔÓfl‚flÚ
̇ÒÚÓÈÍËÚ Á‡ ËÁ·‡Ì‡Ú‡ ÔÓ„‡Ï‡.
Ç ÚÓÁË ÏÓÏÂÌÚ Â ‚˙ÁÏÓÊÌÓ ‰‡
ÔÓ‰˙ÎÊËÚÂ Ò ËÁ·‡Ì‡Ú‡ ÔÓ„‡Ï‡,
͇ÚÓ Ì‡ÚËÒÌÂÚ ·ÛÚÓÌ START/PAUSE
ËÎË ‰‡ ‡ÌÛΡڠÔÓ„‡Ï‡Ú‡ ͇ÚÓ
ÔÓÒÚ‡‚ËÚ ÔÓ„‡Ï‡ÚÓ‡ ‚ ÔÓÁˈËfl
OFF. ëΉ ÍÓÂÚÓ ËÁ·ÂÂÚ ÌÓ‚‡
ÔÓ„‡Ï‡.

17
EN
SPIN SPEED BUTTON
The spin cycle is very
important to remove as
much water as possible from
the laundry without
damaging the fabrics.You
can adjust the spin speed of
the machine to suit your
needs.
By pressing this button, it is
possible to reduce the
maximum speed, and if you
wish, the spin cycle can be
cancelled.
To reactivate the spin cycle
is enough to press the
button until you reach the
spin speed you would like to
set.
For not damage the fabrics,
it is not possible to increase
the speed over that
automatically suitable
during the selection of the
program.
It is possible to modify the
spin speed in any moment,
also without to pause the
machine.
NOTE:
THE MACHINE IS FITTED
WITH A SPECIAL
ELECTRONIC DEVICE,
WHICH PREVENTS THE
SPIN CYCLE SHOULD THE
LOAD BE UNBALANCED.
THIS REDUCES THE NOISE
AND VIBRATION IN THE
MACHINE AND SO
PROLONGS THE LIFE OF
YOUR MACHINE.
G
BG
Åìíéç “ñÖçíêéîìÉàêÄçÖ”
î‡Á‡Ú‡ ̇ ˆÂÌÚÓÙۄˇÌÂÚÓ Â
ÏÌÓ„Ó ‚‡Ê̇ Á‡ ÔÓ‰„ÓÚӂ͇ ̇ ‰ÌÓ
‰Ó·Ó ÒÛ¯ÂÌÂ Ë ‚‡¯Ëfl ÏÓ‰ÂÎ
Ô‡Î̇ χ¯Ë̇  Ò̇·‰Â̇ Ò˙Ò
„ÓÎflχ „˙‚͇‚ÓÒÚ Ì‡ Ú‡ÁË ÙÛÌ͈Ëfl
Á‡ Á‡‰Ó‚ÓÎË ‚Ò˘ÍË ËÁËÒÍ‚‡ÌËfl.
ç‡ÚËÒ͇ÈÍË ÚÓÁË ·ÛÚÓÌ ‚Ë ÏÓÊÂÚÂ
‰‡ ̇χÎËÚ χÍÒËχÎ̇ڇ
‚˙ÁÏÓÊ̇ ÒÍÓÓÒÚ Á‡ ËÁ·‡Ì‡Ú‡
ÔÓ„‡Ï‡ ‰Ó ‚Íβ˜ËÚÂÎÌÓ
ËÁÍβ˜‚‡Ì ̇ ˆÂÌÚÓÙۄˇÌÂÚÓ.
ᇠ‰‡ ‚Íβ˜ËÚ ÓÚÌÓ‚Ó
ˆÂÌÚÓÙۄˇÌÂÚÓ Â ‰ÓÒÚ‡Ú˙˜ÌÓ
‰‡ ̇ÚËÒ͇Ú ·ÛÚÓ̇ ‰Ó͇ÚÓ
‰ÓÒÚË„ÌÂÚ ËÁ·‡Ì‡Ú‡ ÔÂ‰Ë ÚÓ‚‡
ÒÍÓÓÒÚ.
ᇠ‰‡ Ò Ô‰ԇÁflÚ Ú˙͇ÌËÚ Ì Â
‚˙ÁÏÓÊÌÓ ‰‡ Ò ۂÂ΢Ë
ÒÍÓÓÒÚÚ‡ ̇‰ Ú‡ÁË ÍÓflÚÓ ÒÂ
ËÁ‚‰ ‡‚ÚÓχÚ˘ÌÓ ‚ ÏÓÏÂÌÚ‡ ̇
ËÁ·Ë‡Ì ̇ Ò˙ÓÚ‚ÂÚ̇ڇ
ÔÓ„‡Ï‡.
Ç˙ÁÏÓÊÌÓ Â ‚Ë̇„Ë ‰‡ Ò ÔÓÏÂÌfl
ÒÍÓÓÒÚÚ‡ ̇ ˆÂÌÚÓÙۄˇÌ ·ÂÁ
‰‡  ÌÂÓ·ıÓ‰ËÏÓ ‰‡ Ò ÒÔˇ
Ô‡Î̇ڇ χ¯Ë̇ ‚ ÂÊËÏ Ì‡
Ô‡ÛÁ‡.
áÄÅÖãÖÜäÄ:
íÄáà åÄòàçÄ Ö
ëçÄÅÑÖçÄ ëöë
ëèÖñàÄãçé ìëíêéâëíÇé,
äéÖíé èêÖÑéíÇêÄíüÇÄ
ñÖçíêéîìÉàêÄçÖíé çÄ
èêÄçÖíé Ääé íé çÖ Ö
ÅÄãÄçëàêÄçé. íéÇÄ
çÄåÄãüÇÄ òìåÄ à
ÇàÅêÄñààíÖ à
ìÑöãÜÄÇÄ ÜàÇéíÄ çÄ
ÇÄòÄíÄ åÄòàçÄ.

18
H
1
2
3
4
EN
“DIGITAL” DISPLAY
The display’s indicator
system allows you to be
constantly informed about
the status of the machine:
1) SPIN SPEED
Once the programme has
been selected, the
maximum spin speed
allowed for that programme
appears on the display.
Pressing the spin button will
reduce the speed by 100
rpm each time the button is
pressed. The minimum
speed allowed is 400 rpm, or
it is possible to omit the spin
by pressing the spin button
repeatedly.
2) DELAY START LIGHT
This flashes when delay start
has been set.
3) DOOR LOCKED
INDICATOR
The “Door Locked” indicator
light is illuminated when the
door is fully closed and the
machine is ON.
When START is pressed on
the machine with the door
closed the indicator will flash
momentarily and then
illuminate.
If the door is not closed the
indicator will continue to
flash.
A special safety device
prevents the door from
being opened immediately
after the end of the cycle.
Wait for 2 minutes after the
wash cycle has finished and
the Door Locked light has
gone out before opening
the door.At the end of cycle
turn the programme
selector to OFF .
BG
ÑàÉàíÄãÖç ÑàëèãÖâ
à̉Ë͇ÚÓËÚ ̇ ‰ËÒÔÎÂfl ÇË ‰‡‚‡Ú
‚˙ÁÏÓÊÌÓÒÚ ÌÂÔÂÍ˙Ò̇ÚÓ ‰‡
ÔÓÒΉfl‚‡Ú ÚÂÍÛ˘Ëfl ÒÚ‡ÚÛÒ Ì‡
χ¯Ë̇ڇ.
1) ëÍÓÓÒÚ Ì‡ ˆÂÌÚÓÙۄˇÌÂ
ëΉ ͇ÚÓ ËÁ·ÂÂÚ Ê·̇ڇ
ÔÓ„‡Ï‡, χÍÒËχÎ̇ڇ ÒÍÓÓÒÚ Ì‡
ˆÂÌÚÓÙۄˇÌ ˘Â Ò ÔÓfl‚Ë Ì‡
‰ËÒÔÎÂfl. ç‡ÚËÒÌÂÚ ·ÛÚÓ̇ Á‡
„ÛÎˇÌ ̇ ˆÂÌÚÓÙÛ„‡Ú‡. èË
‚ÒflÍÓ Ì‡ÚËÒ͇Ì ̇ ·ÛÚÓ̇,
̇χÎfl‚‡Ú 100 Ó·ÓÓÚ‡/ÏËÌ.
åËÌËχÎ̇ڇ ÒÍÓÓÒÚ Ì‡
ˆÂÌÚÓÙۄˇÌ ÍÓflÚÓ ÏÓÊÂÚ ‰‡
ËÁ·ÂÂÚÂ Â 400 Ó·ÓÓÚ‡/ÏËÌ.
2) à̉Ë͇ÚÓ éÚÎÓÊÂÌ ÒÚ‡Ú
à̉Ë͇ÚÓ‡ Ò‚ÂÚË, ÍÓ„‡ÚÓ
ÙÛÌ͈ËflÚ‡  ‡ÍÚ˂ˇ̇.
3) à̉Ë͇ÚÓ˙Ú "á‡Íβ˜Â̇ ‚‡Ú‡"
Ò‚ÂÚ‚‡, ÍÓ„‡ÚÓ ‚‡Ú‡Ú‡  ̇Ô˙ÎÌÓ
Á‡Ú‚ÓÂ̇ Ë ÛÒÚÓÈÒÚ‚ÓÚÓ Â
ÇäãûóÖçé.
äÓ„‡ÚÓ Â Ì‡ÚËÒÌ‡Ú ·ÛÚÓ̇ ëíÄêí ̇
Ô‡Î̇ڇ χ¯Ë̇ ÔË Á‡Ú‚ÓÂ̇
‚‡Ú‡, Ë̉Ë͇ÚÓ˙Ú ˘Â ÏË„‡
ËÏÔÛÎÒÌÓ Ë ÒΉ ÚÓ‚‡ Á‡ÔÓ˜‚‡ ‰‡
Ò‚ÂÚË ÔÓÒÚÓflÌÌÓ.
ÄÍÓ ‚‡Ú‡Ú‡ Ì  Á‡Ú‚ÓÂ̇
Ë̉Ë͇ÚÓ˙Ú ˘Â ÔÓ‰˙ÎÊË ‰‡
ÔÂÒ‚ÂÚ‚‡.
ëÔˆˇÎÌÓ ÛÒÚÓÈÒÚ‚Ó Á‡
·ÂÁÓÔ‡ÒÌÓÒÚ Ô‰ԇÁ‚‡ ‚‡Ú‡Ú‡ ÓÚ
ÓÚ‚‡flÌ ‚‰̇„‡ ÒΉ ͇fl ̇
ˆËÍ˙·.
àÁ˜‡Í‚‡ Ò 2 ÏËÌÛÚË ÒΉ
Á‡‚˙¯‚‡Ì ̇ ˆËÍ˙· ̇ Ô‡ÌÂ
‰Ó͇ÚÓ Ë̉Ë͇ÚÓ‡ Á‡ á‡Íβ˜Â̇
‚‡Ú‡Ú‡ Û„‡Ò‚‡ ÔÂ‰Ë ‰‡ Ò ÓÚ‚ÓË
‚‡Ú‡Ú‡ Ç Í‡fl ̇ ˆËÍ˙· ̇ÚËÒÌÂÚÂ
·ÛÚÓ̇ OFF ÓÚ ÒÂÎÂÍÚÓ‡ ̇
ÔÓ„‡ÏË.

19
H
1
2
3
4
EN
4) CYCLE DURATION
When a programme is
selected the display
automatically shows the cycle
duration, which can vary,
depending on the options
selected.
Once the programme has
started you will be kept
informed constantly of the
time remaining to the end of
the wash.
The appliance calculates the
time to the end of the
selected programme based
upon a standard loading,
during the cycle, the
appliance corrects the time to
that applicable to the
size and composition of the
load.
BG
4) èÓ‰˙ÎÊËÚÂÎÌÓÒÚ Ì‡
ÔÓ„‡Ï‡Ú‡
ëΉ ͇ÚÓ ËÁ·ÂÂÚ ÔÓ„‡Ï‡, ̇
‰ËÒÔÎÂfl ‡‚ÚÓχÚ˘ÌÓ ˘Â Ò ÔÓfl‚Ë
ÔÓ‰˙ÎÊËÚÂÎÌÓÒÚÚ‡ ̇ ËÁ·‡Ì‡Ú‡
ÔÓ„‡Ï‡ ÍÓflÚÓ ÏÓÊ ‰‡ ÒÂ
ÔÓÏÂÌfl ‚ Á‡‚ËÒËÏÓÒÚ ÓÚ
ËÁ·‡ÌËÚ ‰ÓÔ˙ÎÌËÚÂÎÌË ÓÔˆËË.
ëΉ ÒÚ‡ÚˇÌ ̇ ÔÓ„‡Ï‡Ú‡
ÇË ˘Â ·˙‰Â ËÌÙÓÏˇÌË Á‡
ÓÒÚ‡‚‡˘ÓÚÓ ‚ÂÏ ‰Ó ͇fl ̇
ÔÓ„‡Ï‡Ú‡.
ì‰˙Ú ‡‚ÚÓχÚ˘ÌÓ Í‡ÎÍÛΡ
͇ÈÌÓÚÓ ‚ÂÏ ̇ ËÁ·‡Ì‡Ú‡
ÔÓ„‡Ï‡ ̇ ·‡Á‡Ú‡ ̇ ‰ÌÓ
Òڇ̉‡ÚÌÓ Á‡Âʉ‡ÌÂ. èÓ ‚ÂÏÂ
̇ ˆËÍ˙·  ‚˙ÁÏÓÊ̇ ÔÓÏfl̇ ̇
ÔÓ‰˙ÎÊËÚÂÎÌÓÒÚÚ‡ ̇ ÔÓ„‡Ï‡Ú‡
‚ Á‡‚ËÒËÏÓÒÚ ÓÚ ÍÓ΢ÂÒÚ‚ÓÚÓ Ì‡
Ô‡ÌÂÚÓ.

20
M
N
EN
BUTTONS INDICATOR LIGHT
These light up when the
relevant buttons are
pressed.
If an option is selected that
is not compatible with the
selected programme then
the light on the button first
flashes and then goes off.
PROGRAMME SELECTOR WITH
OFF POSITION
WHEN THE PROGRAMME
SELECTOR IS TURNED THE
DISPLAY LIGHTS UP TO
SHOW THE SETTINGS FOR
THE PROGRAMME
SELECTED. FOR ENERGY
SAVING, AT THE END OF THE
CYCLE OR WITH AN
INACTIVITY PERIOD, THE
DISPLAY LEVEL CONTRAST
WILL DECREASE.
N.B. TO SWITCH THE
MACHINE OFF, TURN THE
PROGRAMME SELECTOR TO
THE “OFF” POSITION.
Press the "Start/Pause"
button to start the selected
cycle.
The programme carries out
with the programme
selector stationary on the
selected programme till
cycle ends.
Switch off the washing
machine by turning the
selector to OFF.
NO
TE:
THE PROGRAMME
SELECTOR MUST BE
RETURN TO THE OFF
POSITION AT THE END
OF EACH CYCLE OR
WHEN STARTING A
SUBSEQUENT WASH
CYCLE PRIOR TO THE
NEXT PROGRAMME
BEING SELECTED AND
STARTED.
BG
ëÇÖíãàççà àçÑàäÄíéêà çÄ
ÅìíéçàíÖ
íÂÁË Ò‚ÂÚÎËÌÌË Ë̉Ë͇ÚÓË Ò‚ÂÚflÚ
ÍÓ„‡ÚÓ ÌflÍÓÈ ÓÚ ·ÛÚÓÌËÚ ÒÂ
̇ÚËÒÌÂ. ÄÍÓ ËÁ·ÂÂÚ ÌflÍÓfl ÓÚ
‰ÓÔ˙ÎÌËÚÂÎÌËÚ ÓÔˆËË ÍÓËÚÓ Ì ҇
Ò˙‚ÏÂÒÚËÏË Ò ËÁ·‡Ì‡Ú‡ ÔÓ„‡Ï‡,
Ë̉Ë͇ÚÓ‡ ̇ Ò˙ÓÚ‚ÂÚÌËfl ·ÛÚÓÌ ˘Â
Á‡ÔӘ̠‰‡ ÏË„‡, ÒΉ ÍÓÂÚÓ ˘Â
ËÁ„‡ÒÌÂ.
èêéÉêÄåÄíéê áÄ éèêÖÑÖãüçÖ
èêéÉêÄåàíÖ áÄ èêÄçÖ ë
èéáàñàü OFF (àáäãûóÇÄçÖ)
èÖêÄãçÄíÄ åÄòàçÄ ëÖ
ÇäãûóÇÄ Ç êÄÅéíÄ äÄíé ëÖ
àáÅÖêÖ ÖÑçÄ èêéÉêÄåÄ ëöë
ÅìíéçÄ áÄ àáÅéê çÄ
èêéÉêÄåà. íéáà êÖÜàå ëÖ
èéäÄáÇÄ ëöë ëÇÖíãàççàü
àçÑàäÄíéê.
áÄÅÖãÖÜäÄ: áÄ ÑÄ
àáäãûóàíÖ åÄòàçÄíÄ,
èéëíÄÇÖíÖ èêéÉêÄåÄíéêÄ Ç
èéáàñàü OFF.
ç‡ÚËÒÌÂÚ ·ÛÚÓ̇ ÔÛÒ͇ÌÂ/Ô‡ÛÁ‡
(START/PAUSE) Á‡ ‰‡ Á‡ÔÓ˜ÌÂ
ˆËÍ˙·.
ñËÍ˙· Á‡ ԇ̠ҠËÁÔ˙ÎÌfl‚‡
ÍÓ„‡ÚÓ ÔÓ͇Á‡Îˆ‡ ̇ ·ÛÚÓ̇ ̇
ÔÓ„‡ÏËÚ  ÔÓÒÚ‡‚ÂÌ Ì‡
ËÁ·‡Ì‡Ú‡ ÔÓ„‡Ï‡ ‰Ó͇ÚÓ Úfl Ì ÒÂ
ËÁÔ˙ÎÌË. ç‡ Í‡fl ̇ Ô‡ÌÂÚÓ
ÔÓÒÚ‡‚ÂÚ Ô‡Î̇ڇ χ¯Ë̇ ̇
ÔÓÎÓÊÂÌË ÒÔflÌÓ Á‡‚˙Ú‡ÈÍË
ÔÓ͇Á‡Îˆ‡ ̇ ·ÛÚÓ̇ Á‡ ËÁ·Ó ̇
ÔÓ„‡Ï‡ ̇ ÔÓÎÓÊÂÌË ËÁÍβ˜ÂÌÓ
“OFF”.
áÄÅÖãÖÜäÄ:
áÄ ÑÄ áÄÑÄÑÖíÖ
ëãÖÑÇÄôàü ñàäöã, íé
ÅìíéçÄ çÄ èêéÉêÄåàíÖ
íêüÅÇÄ ÑÄ ëÖ èéëíÄÇü çÄ
èéãéÜÖçàÖ àáäãûóÖçé
“OFF” èêÖÑà ÑÄ ëÖ àáÅÖêÖ
ëãÖÑÇÄôÄíÄ èêéÉêÄåÄ à
èêéÉêÄåÄíÄ ÑÄ ëÖ èìëçÖ
Ç êÄÅéíÄ.
La pagina si sta caricando...
La pagina si sta caricando...
La pagina si sta caricando...
La pagina si sta caricando...
La pagina si sta caricando...
La pagina si sta caricando...
La pagina si sta caricando...
La pagina si sta caricando...
La pagina si sta caricando...
La pagina si sta caricando...
La pagina si sta caricando...
La pagina si sta caricando...
La pagina si sta caricando...
La pagina si sta caricando...
La pagina si sta caricando...
La pagina si sta caricando...
La pagina si sta caricando...
La pagina si sta caricando...
La pagina si sta caricando...
La pagina si sta caricando...
-
 1
1
-
 2
2
-
 3
3
-
 4
4
-
 5
5
-
 6
6
-
 7
7
-
 8
8
-
 9
9
-
 10
10
-
 11
11
-
 12
12
-
 13
13
-
 14
14
-
 15
15
-
 16
16
-
 17
17
-
 18
18
-
 19
19
-
 20
20
-
 21
21
-
 22
22
-
 23
23
-
 24
24
-
 25
25
-
 26
26
-
 27
27
-
 28
28
-
 29
29
-
 30
30
-
 31
31
-
 32
32
-
 33
33
-
 34
34
-
 35
35
-
 36
36
-
 37
37
-
 38
38
-
 39
39
-
 40
40


Candy AQUA 1042D1/2-S Manuale utente
- Categoria
- Lavatrici
- Tipo
- Manuale utente
- Questo manuale è adatto anche per
in altre lingue
- English: Candy AQUA 1042D1/2-S User manual
Documenti correlati
-
Candy GC 1081D2/1-S Manuale utente
-
-
-
-
-
-
-
-
Hoover HDI 3T62DF Manuale utente