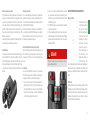
Minox X-range 10x42 Manuale utente
- Categoria
- Misurazione
- Tipo
- Manuale utente

BEDIENUNGSANLEITUNG
|
INSTRUCTION MANUAL
|
MODE D’EMPLOI
MANUAL DE INSTRUCCIONES
|
ISTRUZIONE D’USO
LASER-RANGEFINDER FERNGLAS
|
LASER RANGEFINDER BINOCULARS
|
JUMELLES AVEC TELEMETRE LASER
|
PRISMÁTICOS CON TELÉMETRO LÁSER
|
BINOCOLO CON TELEMETRO LASER
X-range 10x42

Deutsch
2 3
INHALTSVERZEICHNIS
WILLKOMMEN
BEI MINOX!
Mit diesem Fernglas mit integrierten Laser-Entfernungsmesser
aus dem Hause MINOX hast du dich für ein Produkt von höchs-
ter optischer und feinmechanischer Qualität entschieden.
Diese Anleitung soll dir helfen, das Leistungsspektrum deines
X-range 10x42 Fernglases optimal zu nutzen.
Wir wünschen Dir viel Freude und jederzeit eine perfekte Sicht.
Willkommen bei MINOX! .......................................................2
Inhaltsverzeichnis .....................................................................3
Lerne dein Laser-Rangefinder kennen .............................4
Ansicht und Bedienelemente ...............................................5
Lieferumfang ..............................................................................5
Zeichenerklärung & Sicherheitshinweise .......................6
Erste Inbetriebnahme .............................................................8
Einstellungen deines Fernglases........................................8
Die Menüführung deines Rangefinders ...........................11
Pflegetipps...................................................................................15
Seriennummer ...........................................................................15
Technische Daten ......................................................................16
Gewährleistungsbestimmungen .........................................18
Kundendienst .............................................................................19
Impressum ...................................................................................19

Deutsch
4 5
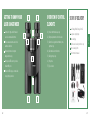
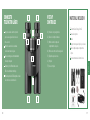
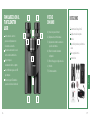
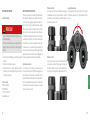
LERNE DEIN LASER-
RANGEFINDER KENNEN
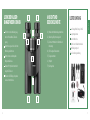
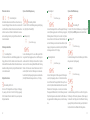
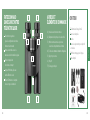
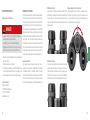
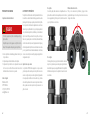
ANSICHT UND
BEDIENELEMENTE
1 | Okulare mit drehbaren Augenmuscheln
2 | Beidseitiger Dioptrien-Ausgleich
3 | Zentraler Mitteltrieb mit Batteriefach-
Abdeckung
4 | Frei belegbare Bedientasten
5 | Trageriemenhalter
6 | Objektiv
7 | Stativgewinde
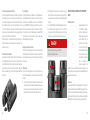
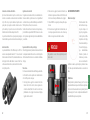
LIEFERUMFANG
Laser-Rangefinder X-range 10x42
Neoprentrageriemen
Bereitschaftstasche
Objektiv- und Okularschutzdeckel
Optik-Reinigungstuch
Diese Bedienungsanleitung
Für Rechts- und Linkshänder geeig-
net durch frei wählbare Tastenbe-
legung
Exakte Messung auch bei schlechten
Witterungsverhältnissen
Enorm robustes und kompaktes
Magnesium Gehäuse
Brillante HD Optik durch mehrfach
vergütete ED-Linsen
Modernes OLED Display - Anpassbar
an alle Lichtverhältnisse
4
7
6 6
1
3
1
5 5
2
2

Deutsch
6 7
ZEICHENERKLÄRUNG & SICHERHEITSHINWEISE
Diese Bedienungsanleitung gehört zu dem MINOX Laser-Ran-
gefinder X-range 10x42 (im Folgenden nur „X-range“ oder
„Fernglas“ genannt). Sie ist Bestandteil des Produkts und enthält
wichtige Informationen zur Inbetriebnahme, Handhabung und
Entsorgung. Bitte lies die Bedienungsanleitung, insbesondere
die Sicherheitshinweise, sorgfältig durch, bevor du das Fernglas
einsetzt. Die Nichtbeachtung dieser Bedienungsanleitung kann
zu Schäden an dem Fernglas führen. Die Bedienungsanleitung
basiert auf den in der Europäischen Union gültigen Normen
und Regeln. Beachte im Ausland auch landesspezifische Richt-
linien und Gesetze! Bewahre die Bedienungsanleitung für die
weitere Nutzung auf. Wenn du das X-range Fernglas an Dritte
weitergibst, gib unbedingt diese Bedienungsanleitung mit.
Verwende das Fernglas nur wie in dieser Bedienungsanleitung
beschrieben. Jede andere Verwendung gilt als nicht bestim-
mungsgemäß und kann zu Sachschäden führen. Der Hersteller
oder Händler übernimmt keine Haftung für Schäden, die durch
nicht bestimmungsgemäßen oder falschen Gebrauch entstan-
den sind, und für unerlaubte Veränderungen.
Wir haben uns in jeder Hinsicht bemüht, diese Bedienungsan-
leitung so vollständig und akkurat wie möglich zu verfassen.
Dennoch kann nicht garantiert werden, dass während des
Druckprozesses keine Fehler oder Auslassungen entstehen.
Das Zubehör, das du erhalten hast, kann leicht vom beschriebe-
nen abweichen. Dieses Paket kann ohne eine vorherige Ankün-
digung verändert werden.
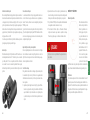
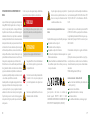
Die folgenden Symbole und Signalworte werden in dieser
Bedienungsanleitung, auf dem Gerät oder auf der Verpackung
verwendet.
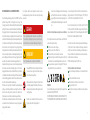
GEFAHR!
Dieses Signalsymbol/-wort bezeichnet eine Gefährdung
mit einem hohen Risikograd, die, wenn sie nicht vermieden
wird, den Tod oder eine schwere Verletzung zur Folge hat.
VORSICHT!
Dieses Signalwort warnt vor möglichen Sachschäden.
Schaue NIEMALS mit deinem Fernglas direkt in die
Sonne oder in Laser Quellen. Dies kann zu irrepara-
blen Schäden am Auge führen.
Achte darauf, dass dein Fernglas nicht in die Hände
von Kindern gelangt. Hier besteht Gefahr duch ver-
schlucken von Kleinteilen und Strangulation durch
den Trageriemen.
Berühre keine metallischen Flächen, wenn das
Fernglas stark erhitzt oder abgekühlt ist.
Setze stets die Schutzkappen nach der Benutzung
auf. Dadurch bleiben die Linsen vor Beschädigun-
gen geschützt und von deinem Fernglas geht kei-
ne Brandgefahr durch Bündelung des Sonnenlichts
aus.
Zusätzliche Sicherheitshinweise bezüglich Laser und Batterien
Das Produkt verwendet einen unsichtbaren Laser-Strahl. Bitte
achte auf die folgenden Dinge:
Richte den Laser nicht auf Augen
Richte den Laser nicht auf Menschen
Schau nicht mit optischen Geräten in den Laser
Nimm deinen Finger von der Messtaste, wenn du nicht misst.
Das verhindert ein unbeabsichtigtes Aktivieren des Lasers
Zerlege, verändere, repariere das Fernglas NICHT. Der Laser
kann gefährlich für deine Gesundheit sein.
WARNUNG
Dieses Produkt wurde getestet entspricht den folgenden Stan-
dards: KLASSE 1 LASER PRODUKT.
UNSICHTBARE LASER STRAHLUNG. SCHAUE NIEMALS MIT OP-
TISCHEN GERÄTEN IN DEN LASER. (FERNGLÄSER, TELESKOPE)
Dieses Gerät entspricht den Vorschriften der Laserklasse 1 der
gültigen Normen IEC 60825-1:2007 Ausgabe 2 (TÜV SÜD), EN
60825-1:2007 und CE gemäß EN 61326-1:2013.
Dieses Produkt enspricht den Vorschriften der FDA 21 CFR
1040.10 und 1040.11 und erfüllt die Vorgaben der FDA perfor-
mance standards und FCC Rules and Regulations Abschnitt 15
B:2018 mit der Testmethode ANSIC63.4-2014
Der Betrieb des Geräts unterliegt folgenden Beschränkungen:
(1) Das Gerät darf keine schädlichen Störungen verursachen,
und (2) dieses Gerät muss den Empfang von Interferenzen zu-
lassen, einschließlich von Interferenzen, die einen unerwünsch-
ten Betrieb verursachen können.
MINOX GmbH, Ziegelstadel 20, 88316 Isny
CR2 Lithium Batterie Sicherheitshinweise
Achte beim Einlegen der Batterie auf die korrekte Polarität
(+/-)
Versuche nicht die Batterie zu laden
Wirf die Batterie nicht ins Feuer oder ins Wasser
Zerlege die Batterie nicht
Achte bitte beim Entsorgen der Batterie auf die geltenden
Gesetze

Deutsch
8 9
ERSTE INBETRIEBNAHME
Lieferumfang prüfen
GEFAHR!
Es besteht Erstickungsgefahr für Kinder, die mit der Verpa-
ckungsfolie spielen.
Lass Kinder nicht mit der Verpackungsfolie spielen. Sie
können sich beim Spielen darin verfangen und ersticken.
1. Nimm das Fernglas aus der Verpackung und entferne sämt-
liche Schutzfolien.
2. Prüfe, ob die Lieferung vollständig ist.
3. Kontrolliere, ob das Fernglas oder die Einzelteile Schäden
aufweisen. Ist dies der Fall, benutze es nicht. Wende dich
über die Service-Adresse an uns.
Service & Support
Wilhelm-Loh-Straße 1
D-35578 Wetzlar
+49 (0) 7562 / 98135 01
service@minox.com
EINSTELLUNGEN DEINES FERNGLASES
Dein Fernglas nutzt einen unsichtbaren Laser zum Entfer-
nungsmessen. Die Messung wird durch die Zeit erzeugt, die
der Laser benötigt, um das anvisierte Objekt zu erreichen und
zum Fernglas zurückzukehren. Die Genauigkeit deiner Messung
hängt von klimatischen Bedingungen und den Umweltbedin-
gungen ab. So zum Beispiel von der Farbe, der Oberflächenbe-
schaenheit, der Größe und Struktur des zu messenden Objek-
tes. Folgende Punkte sind für eine optimale Messung wichtig:
klare Sicht, mittlere Helligkeit, kräftige Farbe des gemessenen
Objektes, flache Messwinkel, und eine ebene Struktur des
Objektes. Die Messreichweite wird durch folgende Dinge redu-
ziert: hohe Luftfeuchtigkeit, starkes Sonnenlicht, dunkle Farben
des zu messenden Objektes, große Winkel und unebene Ober-
flächen des Objektes.
Einstellungen deines Augenmuscheln
Um auch Brillenträgern ein optimales Sehfeld zu ermöglichen,
sind MINOX Ferngläser mit Drehaugenmuscheln ausgestattet.
Die drehbaren und rastbaren Augenmuscheln dienen der Ein-
stellung des richtigen Abstandes zwischen deinem Auge und
der Okularlinse. Je nach deinem persönlichem Komfortemp-
finden kann so die richtige Einstellung für Brillenträger und
Nichtbrillenträger gewählt werden.
Benutzung ohne Brille
Beobachter, die keine Brille tragen, drehen an beiden Okularen
die Augenmuscheln vollständig nach links heraus (gegen den
Uhrzeigersinn). In dieser Position ist der richtige Abstand des
Fernglases zum Auge gegeben.
Benutzung mit Brille
Trägst du eine Brille, dann lasse die drehbaren Augenmuscheln
an beiden Okularen in der Ursprungsstellung des Lieferzu-
stands, bzw. drehe sie nach rechts, bis sie spürbar einrasten. So
kannst du das gesamte Sehfeld ohne störende Beschneidung
am Rand überblicken.
Der richtige Augenabstand
Bitte schaue in die Okulare deines Fernglases und winkle die
zusammenfaltbaren Rohre so lange an, bis sich aus beiden Seh-
feldern ein gemeinsames kreisrundes Bild ergibt.

Deutsch
10 11
2. Visiere nun das selbe Beobachtungsobjekt an und drehe
bei geschlossenem rechten Auge den Einstellring am lin-
ken Okular so lange, bis Du für das linke Auge die optimale
Scharfstellung erreichst.
3. Dein MINOX Fernglas ist nun individuell auf die Sehleistung
deiner Augen abgestimmt.
4. Für die Beobachtung verschiedener Objekte in unterschied-
lichen Entfernungen wirst Du immer auch die Scharfstellung
regulieren müssen. Benutze dafür bitte jetzt nur noch den
zentralen Mitteltrieb.
GEFAHR!
Mit einem Fernglas nicht in die Sonne blicken, es könnte zu
Augenverletzungen führen.
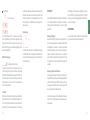
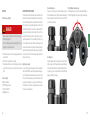
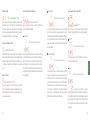
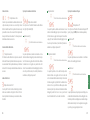
DIE MENÜFÜHRUNG DEINES RANGEFINDERS
Display einschalten
Drücke kurz die rechte Tas-
te des Fernglases. Das Dis-
play wird nun sichtbar.
Nach dem Abschalten des
Geräts bleibt die letzte
Einstellung des Displays
gespeichert. Das Display
schaltet sich nach 10 Se-
kunden selbstständig ab.
Eine Auswahl in den
Menüpunkten kannst Du
durch drücken der Mes-
staste (Voreinstellung: rechts) vornehmen. Zum Bestätigen der
Auswahl drücke immer die Menütaste (Voreinstellung: links).
Danach springt das Menü automatisch in den nächsten Menü-
punkt.
Menü Modus
Wird die Menütaste länger als 3 Sekunden gedrückt erscheint
der Menümodus. Hier kannst du deine Einstellungen verändern.
Du kannst das Menü verlassen indem du wieder länger als 3
Sekunden die Menütaste drückst, oder einfach 10 Sekunden
nach dem letzten Tastendruck wartest.
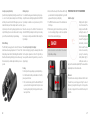
Batterie einsetzen oder wechseln
Öne das Batteriefach, indem du den Deckel mit einem Werk-
zeug oder einer Münze nach links drehst, entgegen des Uhr-
zeigersinns. Lege eine Batterie vom Typ CR2 mit dem Pluspol
voran in den Schacht ein. Der Minuspol ist nun Richtung Deckel
gerichtet. Schraube dann den Deckel im Uhrzeigersinn ein.
Drehe hierbei bis zum Anschlag zu. Achte darauf immer CR2
Batterien zu verwenden.
Wenn du das Fernglas für längere Zeit nicht verwendest, entfer-
ne die Batterie, um ein Auslaufen zu vermeiden.
Batterie Warnung
Die Leistung der Batterie CR2 reicht für etwa 4000 Messungen
bei durchschnittlich 20° Celsius. Wenn die Batterie unter 20%
ihrer Leistungsfähigkeit sinkt, leuchtet beim Einschalten des
Displays das Batteriesymbol 3 mal auf. Du kannst das Fernglas
noch weiter nutzen, solltest aber möglichst bald die Batterie
wechseln.
Anbringung eines Stativ
Um eine verwacklungsfreie Beobachtung zu gewährleisten,
empfiehlt es sich, gerade bei höheren Vergrößerungen, ein Sta-
tiv einzusetzen. Dafür verwendest du den im Zubehör optional
erhältlichen MINOX-Stativadapter.
Entferne auf der Unterseite des Fernglases die Abdeckschrau-
be und bringe dort den MINOX Stativadapter an. Die Abdeck-
schraube bewahrst du bitte gut auf und bringst diese nach
Entfernung des Stativadapters wieder an.
Die richtige Dioptrien-Einstellungen für das Display
Aktiviere das Display durch Druck auf die Messtaste. Stelle nun
durch drehen des Dioptrienausgleichs nach links oder rechts
die gewünschte Dioptrien ein, bis du das Display scharf sehen
kannst.
Scharfstellen
Um eine optimale Bildschärfe zu erreichen, ist es notwendig,
die Optik des Fernglases auf die individuelle Sehleistung dei-
ner Augen ab zu stimmen. Gehe dazu bitte wie folgt vor:
1. Visiere als erstes ein weit entferntes, feststehendes Beob-
achtungsobjekt an. Drehe bei geschlossenem linken Auge
den zentralen Mitteltrieb so lange, bis das Beobachtungs-
objekt für dein rechtes Auge die optimale Scharfstellung
erreicht. Display und Objekt sind nun scharf.

Deutsch
12 13
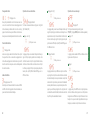
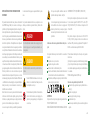
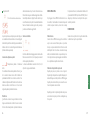
Wechseln des Absehens
Voreinstellung: Kreis
Als Absehen zum Anvisieren beim Messen stehen dir zwei Op-
tionen zur Verfügung. Ein Kreuz oder ein Kreis. Gehe zunächst
in den Menü Modus. Drücke die Messtaste um zwischen Kreuz
und Kreis zu wechseln. Drücke die Menütaste um deine Aus-
wahl zu bestätigen. Danach springt das Menü automatisch in
die nächste Auswahl.
Entfernungseinheit wählen
Voreinstellung: Meter
Dir stehen zwei Einheiten bei der Entfernungsangabe zur Ver-
fügung: Meter und Yards. Du kannst zwischen beiden durch
drücken der Messtaste wählen. Drücke die Menütaste um deine
Auswahl zu bestätigen. Danach springt das Menü automatisch
in die nächste Auswahl.
Helligkeit des Absehens
Voreinstellung: Stufe 3 von 5
Es stehen dir 5 Helligkeitsstufen des Displays zur Verfügung.
Die jeweilige Stufe wird dir als Zahl im Display angezeigt.
Durch Drücken der Messtaste kannst Du die jeweils passende
Helligkeit auswählen.
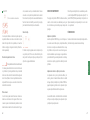
Optionen für die Entferungsmessung
Voreinstellung: Standard
Dir stehen 3 Modi für die Entfernungsmessung zur Verfügung.
Last (L) Best (B) und Standard (Std).
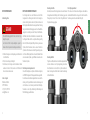
Einstellung Last (L):
Ansicht Messvorgang
In dieser Einstellung wird dir bei einer Messung die Entfer-
nung zu dem Objekt angegeben, welches in der Erfassung am
weitesten entfernt ist. Ein Beispiel: Du versuchst ein Objekt zu
messen, das sich sehr weit weg befindet. Während der Messung
befinden sich Bäume oder andere Hindernisse zwischen Dir
und dem Objekt. Dir wird die Entfernung zu dem am weites-
ten entfernten Objekt angezeigt, das gemessen werden konnte
(Dein Ziel). Während der Anzeige erscheint ein „L“ im Display.
Einstellung Best:
Ansicht Messvorgang
In dieser Einstellung wird dir bei einer Messung die Entfernung
zu dem Objekt angegeben, das in der Erfassung die geringste
Entfernung aufweist. Ein Beispiel: Du versuchst ein Objekt zu
messen, hinter dem sich Bäume und Sträucher befinden. Dir
wird die Entfernung zu dem am nächsten entfernten Objekt
angezeigt, das gemessen werden konnte (dein Ziel). Während
der Anzeige erscheint ein “B“ im Display.
Einstellung Standard:
Ansicht Messvorgang
In dieser Einstellung wird dir immer genau die Entfernung zu
einem Objekt angezeigt, welches sich im Zentrum des Abse-
hens im Moment der Messung befindet. Ein Beispiel: Du ver-
suchst ein Objekt zwischen Bäumen hindurch zu messen. Durch
Wackeln bei der Messung kann es nun sein, dass du mehrere
Messungen durchführen musst, bis die Entfernung zu deinem
Objekt korrekt gemessen werden konnte. Durch Wackeln wur-
den gegebenenfalls die Bäume gemessen, die dein Ziel umge-
ben.
Optionen für die Winkelmessung
Voreinstellung: O
Dir stehen 3 Modi für die Winkelmessung zur Verfügung. O
(AUS),< (Winkel) und EHD (equivalente horizontale Distanz)
Einstellung O:
Ansicht Messvorgang
In dieser Einstellung wird dir nur die Entfernung der Sichtlinie
zum gemessenen Objekt angezeigt.
Einstellung <:
Ansicht Messvorgang
In dieser Einstellung wird dir im oberen Teil des Displays die
Entfernung der Sichtlinie zum gemessenen Objekt angezeigt.
Im unteren Teil des Displays wird dir der Winkel der Messung
angezeigt. Ein Beispiel: Wenn du im Gebirge ein Objekt über dir
misst, kannst Du hier den Winkel der Erhöhung ablesen.

Deutsch
14 15
Einstellung EHD:
Ansicht Messvorgang
In dieser Einstellung wird dir im oberen Teil des Displays
wieder die Entfernung der Sichtlinie zum gemessenen Objekt
angezeigt. Im unteren Teil des Displays wird dir die um den
Winkel der Messung korrigierte Entfernung angezeigt. (equiva-
lente horizontale Distanz)
Wahl der Tastenbelegung
Voreinstellung: Messtaste rechts
Die Funktion der beiden Tasten am Fernglas kannst du tau-
schen. Das ermöglicht dir, egal ob du Links-oder Rechtshänder
bist den selben Bedienkomfort. Die Belegung der Tasten kannst
Du tauschen, indem Du den Kreis in der Anzeige auf rechts oder
links festlegst. Die Seite, auf der sich der Kreis befindet stellt
die Seite der Messtaste dar.
Scan Modus
Mit dieser Funktion kannst du Dauermessungen durchführen.
Es werden Messungen im ¼ Sekunden Takt ausgelöst. Du ak-
tivierst den Scan Modus indem du die Messtaste beim Messen
gedrückt hältst. Nach 3 Sekunden aktiviert sich das Scannen
und alle Funktionen werden gemäß Displayeinstellung ständig
aktualisiert. Nach dem Loslassen der Messtaste geht das Gerät
automatisch wieder in die normale Messfunktion. Das ist zum
Beispiel hilfreich, um die Entfernung zu sich bewegenden Ob-
jekten zu messen.
Batterieanzeige
Die Batterieanzeige blinkt, wenn die Batteriespannung unter
2,4 Volt fällt. Nun solltest du möglichst bald die Batterie wech-
seln. Sinkt die Batteriespannung unter 2,3 Volt schaltet sich das
Gerät automatisch ab.
PFLEGETIPPS
Um dein MINOX Fernglas bei Nichtgebrauch vor Fremdeinflüs-
sen zu schützen, empfehlen wir, das Fernglas in der mitgelie-
ferten Neopren-Tasche aufzubewahren, so dass dieses immer
geschützt ist.
Reinigung des Fernglases
Bewahre Dein MINOX Fernglas sauber und trocken auf. Vermei-
de es, das Fernglas größerer Hitze auszusetzen. Entferne Staub
und Fremdkörper am Gehäuse mit einem weichen feuchten
Tuch. Wenn dein Fernglas an der See oder in der Umgebung von
Salzwasser benetzt wird, empfehlen wir dir, es nach Gebrauch
mit frischem Wasser abzuspülen. Meeressalz kann mit der Zeit
die Objektivlinsen und optische Qualität Ihres Fernglases be-
schädigen.
Reinigung des Objektiv- und Okularlinsen
Verunreinigungen wie Staub, Fremdkörper und Fettspuren von
Fingerabdrücken beeinträchtigen die Abbildungsqualität (Bild-
schärfe und Kontrast) deines MINOX Fernglases. Leichte Ver-
unreinigungen und Partikel auf den Optiken können mit Hilfe
eines weichen Haarpinsels entfernt werden.
Stärkere Verunreinigungen oder Fingerabdrücke auf den Linsen
lassen sich mit einem Optikputztuch und speziellem Linsenrei-
niger entfernen.
Wir empfehlen zur Reinigung deines Fernglases die Verwen-
dung des MINOX Optik Reinigungskits (Best.-Nr. 80405463).
Weitere geeignete Optik-Reinigungsmittel erhältst du ansons-
ten auch im Fachhandel.
SERIENNUMMER
Die Seriennummer findest du unterhalb des Batteriefachde-
ckels, nachdem du den Deckel herausgedreht hast.

Deutsch
16 17
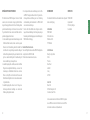
MODELL X-range 10x42
Vergrößerung 10x
Eintrittspupille (mm) 42
Austrittspupille (mm) 4,2
Interpupillarer Abstand (mm) 58 - 78
Sehfeld auf 1.000 m (m) 106 / 6.1°
Nahbereich (m) 4
Dioptrien - Ausgleich (dpt.) ± 3
Funktionstemperatur °C -10° bis +50°
Maximal messbare Entfernung (m)
"2800 (große Objekte)
1600 (Mensch&Wild)"
Messeinheit Meter und Yards
Messgenauigkeit bis 1000 m (m) ±1
Messgenauigkeit bis 2800 m (m) ±2
Display OLED
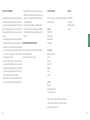
TECHNISCHE DATEN
MODELL X-range 10x42
Helligkeitsstufen Display 5
Anzeigemöglichkeiten
"Entfernung & Winkel,
Entfernung & Horizontale Entfernung"
Batterielebensdauer ca. 4000 Messungen
Stromversorgung 1x CR2 Lithium (3V)
Gehäusematerial Magnesium
Sticksto Füllung Ja
Wasserdicht nach IPX7 Ja
Abmessungen (mm | HxBxT) 152x132x52
Gewicht (g) 990
Bestell-Nr. 80408390
MINOX Comfort Service Ja

Deutsch
18 19
GEWÄHRLEISTUNGSBESTIMMUNGEN
Mit dem Kauf dieses MINOX Fernglases hast du ein Produkt
erworben, das nach besonders strengen Qualitätsrichtlinien
hergestellt und geprüft wurde. Die für dieses Produkt geltende
gesetzliche Gewährleistung von 2 Jahren wird von uns ab dem
Tag des Verkaufs durch einen autorisierten Händler unter fol-
genden Bedingungen übernommen:
1. In der Gewährleistungszeit werden Beanstandungen, die auf
Fabrikationsfehlern beruhen, kostenlos und nach eigenem
Ermessen durch Instandsetzung, Austausch defekter Teile
oder Umtausch in ein gleichartiges einwandfreies Erzeugnis
behoben. Weitergehende Ansprüche, gleich welcher Art und
gleich aus welchem Rechtsgrund im Zusammenhang mit
dieser Gewährleistung, sind ausgeschlossen.
2. Gewährleistungsansprüche entfallen, wenn der betreende
Mangel auf unsachgemäße Behandlung – wozu auch die
Verwendung von Fremdzubehör zählen kann – zurückzu-
führen ist, ein Eingri von nicht autorisierten Personen und
Werkstätten durchgeführt oder die Seriennummer unkennt-
lich gemacht wurde.
3. Gewährleistungsansprüche können nur bei Vorlage eines
maschinengeschriebenen Kaufbelegs eines autorisierten
Händlers geltend gemacht werden.
4. Bei Inanspruchnahme der Gewährleistung leitest du bitte
das MINOX Fernglas, zusammen mit dem Original des ma-
schinengeschriebenen Kaufbelegs und einer Schilderung
der Beanstandung dem Kundendienst der MINOX GmbH
oder einer Landesvertretung zu.
5. Touristen steht im Bedarfsfalle unter Vorlage des maschi-
nengeschriebenen Kaufbelegs die Vertretung des jeweiligen
Reiselandes gemäß den Regelungen zur Gewährleistung der
MINOX GmbH zur Verfügung.
Erweiteter Minox Garantieservice
Nutze die Möglichkeit der erweiterten MINOX Produktgarantie
und registriere Dein MINOX Produkt.
Erfahre mehr unter www.minox.com/service.
KUNDENDIENST
Im Schadensfall steht dir unser Kundendienst unter folgender
Adresse zur Verfügung:
In Deutschland
MINOX GmbH
Technischer Service
Wilhelm-Loh-Str. 1
35578 Wetzlar
In Großbritannien
Blaser Sporting Limited
Unit 12
The Pines
Broad Street
Guildford
Surrey
GU3 3BH
In den USA
Blaser USA
403 East Ramsey, Suite 301
San Antonio, Texas 78216
In allen anderen Ländern schickst du dein MINOX Fernglas an
den von MINOX autorisierten Distributor. Dessen Anschrift fin-
dest du unter: www.minox.com/haendlersuche
IMPRESSUM
MINOX GMBH
Ziegelstadel 20
88316 Isny im Allgäu
Deutschland

20 2120 21
English
CONTENTS
Welcome to MINOX! ................................................................20
Contents........................................................................................21
Getting to know your laser rangefinder ...........................22
Overview of control elements .............................................23
Scope of delivery .......................................................................23
Explanation of symbols & safety instructions ..............24
First use ........................................................................................26
Adjusting your binoculars......................................................26
The menu navigation of your rangefinder ......................29
Maintenance and care .............................................................33
Serial number .............................................................................33
Technical data ............................................................................34
Conditions of warranty ...........................................................36
Customer service .......................................................................37
Imprint...........................................................................................37
WELCOME
TO MINOX!
With these binoculars featuring an integrated laser rangefind-
er from MINOX, you have chosen a product of highest optical
quality and mechanical precision. These instructions
are to help you benefit from the full performance spectrum of
your X-range 10x42 binoculars.
We wish you lots of enjoyment and a perfect view at all times.

SCOPE OF DELIVERY
Laser Rangefinder X-range 10x42
Neoprene carrying strap
Ever-ready bag
Objective and ocular protection caps
Optics cleaning cloth
This instruction manual
22 2322 23
English
4
7
6 6
1
3
1
5 5
2
2
1 | Oculars with turnable eyecups
2 | Diopter adjustments on both oculars
3 | Central focusing knob with battery com-
partment cap
4 | Customisable control buttons
5 | Carrying strap loops
6 | Objectives
7 | Tripod socket
OVERVIEW OF CONTROL
ELEMENTS
GETTING TO KNOW YOUR
LASER RANGEFINDER
Suitable for right- and left-handed
users via customisable buttons
Precise measurements even in bad
weather conditions
Extremely robust and compact
magnesium housing
Multi-layered ED lenses to produce
brilliant HD optics
Modern OLED display - customisable
to any lighting situation

24 2524 25
English
EXPLANATION OF SYMBOLS & SAFETY INSTRUCTIONS
This instruction manual is part of the MINOX Laser Rangefinder
X-range 10x42 (hereinafter named only “X-range” or “binocu-
lars”). It is part of the product and contains important informa-
tion on commissioning, handling and disposal. Please carefully
read the operating instructions, especially the safety instruc-
tions, before using the binoculars for the first time. Non-com-
pliance with these operating instructions can cause damage
to the binoculars. The operating instructions are based on the
standards and rules applicable within the European Union. Ob-
serve also country-specific guidelines and laws if used outside
the EU! Keep the operating instructions for the further use. If
you pass the X-range binoculars on to a third party, be sure to
include this user manual. Use the binoculars only as described
in this manual. Any other use is considered improper and can
lead to material damage. The manufacturer or dealer assumes
no liability for damage caused by improper or incorrect use, and
for unauthorised modifications.
We have made every eort to ensure that these operating in-
structions are as complete and accurate as possible. Neverthe-
less, it cannot be guaranteed that errors or omissions will not
have occurred during the printing process. The accessories in-
cluded in the delivery may dier slightly from those described.
This package can be changed without prior notice.
The following symbols and signal words are used in these op-
erating instructions, on the device or on the packaging.
DANGER!
This symbol/signal word indicates a hazard with a high
degree of risk, which if not avoided, will result in death or
serious injury.
WARNING!
This signal word warns of possible damage to property.
NEVER look directly at the sun or into laser sources
with your binoculars. This can cause irreparable
damage to the eyes.
Be sure not to allow your binoculars to get into the
hands of children. There is a danger of swallowing
small parts or strangulation caused by the carrying
strap.
Do not touch metallic surfaces if the binoculars
have become very hot or very cold.
Always replace the protective caps after use. This
protects the lenses from damage and can avoid fire
hazard caused by the bundling of sunlight through
your binoculars.
Additional safety instructions regarding the laser and batteries
The product implements an invisible laser beam. Please pay
attention to the following:
Do not point the laser at eyes
Do not point the laser at people
Do not look into the laser with optical devices
Remove your finger from the measuring button when you
are not measuring. This will prevent accidental activation of
the laser.
DO NOT disassemble, alter or repair the binoculars yourself.
The laser can be hazardous to your health.
WARNING
This product has been tested to meet the following standards:
CLASS 1 LASER PRODUCT.
INVISIBLE LASER RADIATION. NEVER LOOK WITH OPTICAL DE-
VICES INTO THE LASER. (BINOCULARS, TELESCOPES)
This device complies with the regulations for laser class 1 in
accordance with applicable standards IEC 60825-1:2007 Edi-
tion 2 (TÜV SÜD), EN 60825-1:2007 and CE according to EN
61326-1:2013.
This product complies with the regulations according to the
FDA 21 CFR 1040.10 and 1040.11, and meets the requirements
of FDA performance standards and the FCC Rules and Regula-
tions section 15 B:2018 using the test method ANSIC63.4-2014.
The operation of the device is subject to the following restric-
tions:
(1) This device may not cause harmful interferences, and (2) this
device must allow the reception of any interferences, including
those that may cause undesirable operation.
MINOX GmbH, Ziegelstadel 20, 88316 Isny, Germany
CR2 lithium battery safety instructions
Make sure that the polarity is correct when inserting the
battery (+/-)
Do not attempt to charge the battery
Do not throw the battery into fire or water
Do not disassemble the battery
When discarding the battery, please observe applicable laws

26 2726 27
English
FIRST USE
Check the scope of delivery
DANGER!
There is a danger of suocation for children who may play
with the packaging film.
Do not let children play with the packaging film. They can
get caught in it and choke to death.
1. Remove the binoculars out of the packaging and remove all
protective foils.
2. Check if the scope of delivery is complete.
3. Check whether the binoculars or individual parts are dam-
aged. If this is the case, do not use it and contact our service
team.
Service & Support
Wilhelm-Loh-Straße 1
D-35578 Wetzlar, Germany
+49 (0) 7562 / 98135 01
service@minox.com
ADJUSTING YOUR BINOCULARS
Your binoculars use an invisible laser to measure distances. The
measurement is made by calculating the time needed for the
laser to reach the targeted object and return to the binoculars.
The accuracy of your measurement depends on climatic and
environmental conditions and can also be influenced by the
colour, surface texture, size and structure of the object to be
measured. The following points are important to ensure an
optimal measurement: clear view, medium brightness, strong
colour of the measured object, flat measurement angles, and
an even surface structure on the object. The measuring range is
reduced by the following: high humidity, strong sunlight, dark
colours of the object to be measured, large angles and uneven
surfaces on the object.
Adjusting your eyecups
To ensure that people wearing glasses also have an optimal
field of view, MINOX binoculars are equipped with rotating eye-
cups. The turnable and lockable eyecups are used for setting
the correct distance between your eye and the surface of the
eyepiece lens. Depending on your personal comfort, the pre-
ferred setting can be made to suit eyeglass wearers and even
those who do not wear glasses.
For use without glasses
Those who do not wear glasses should turn the eyecups on
both oculars all the way out to the left (counterclockwise) until
they are locked into position. The binoculars are now set at the
correct distance to the eyes.
Use with glasses
If you wear glasses, leave the rotating eyecups on both oculars
at the original position as they were when you purchased them,
or turn the oculars all the way to the right until they stop turn-
ing. Like this, you can see the entire field of view without the
annoying vignetting on the edge.
The right distance between the eyes
Look through the oculars of your binoculars and adjust the an-
gle of the hinged tubes until you have a single circular image.

28 2928 29
English
2. Next, look at the same object in the distance with the right
eye closed and turn the diopter adjustment ring on the left
eyepiece until the object is perfectly sharp.
3. Your MINOX binoculars are now set to the individual vision
for both eyes.
4. When observing objects at various distances, you will have
to refocus accordingly. Simply use the focus adjustment
knob to obtain a clear and sharp image.
DANGER!
Do not use binoculars to look into the sun. This could lead
to irreparable eye damage.
THE MENU NAVIGATION OF YOUR RANGEFINDER
Activate the display
Briefly press the right but-
ton on the binoculars. The
display is now visible. After
switching the device o,
the last display setting will
be saved. The display will
automatically deactivate
after 10 seconds. The menu
items can be selected by
pressing the measuring
button (default: right). To
confirm your selection, al-
ways press the menu button (default: left). The menu will then
automatically move to the next menu item.
Menu mode
To activate the menu mode, press the menu button for about
3 seconds. Here you can change your settings. You can exit
the menu by pressing the button again for a bit longer than
3 seconds, or simply wait for 10 seconds after the last push of
any button.
Inserting or replacing the battery
Open the battery compartment by turning the cover with a tool
or a coin to the left (counterclockwise). Insert a CR2 battery
with the positive end into the shaft. The negative pole is now
towards the battery cover. Then carefully screw the cover back
on (clockwise) as far as it will go. Always pay attention to use
only a CR2 battery. If you do not use the binoculars for a longer
period of time, remove the battery to prevent leakage.
Batterie Warnung
The CR2 battery has enough power for about 4,000 measure-
ments made at an average temperature of 20° Celsius. If the
battery charge is lower than 20%, the battery symbol will blink
three times after activating the display. You can continue using
the binoculars, but you should replace the battery as soon as
possible.
Attaching a tripod
For a shudder-free image, we recommend using a tripod, espe-
cially with binoculars with higher magnifications. The MINOX
tripod adapter is available as an optional accessory for this
purpose.
Remove the screw cap on the bottom of the binoculars and
attach the MINOX tripod adapter into the tripod socket. Keep
the screw cap in a safe place and reattach it after removing the
tripod adapter.
The correct diopter settings for the display
Activate the display by pressing the measuring button. Now
turn the diopter compensation to the left or right until you
have acquired the desired setting and until you can see the
display sharply.
Focusing
For the best possible image sharpness, you must adjust the op-
tics of the binoculars to match your individual vision. To do this,
please proceed as follows:
1. First, look at a stationary object in the distance. With the left
eye closed, turn the focusing knob until the object in view
has become perfectly sharp. The display and the object are
now in perfect focus.

30 3130 31
English
Changing the reticle
Default setting: Circle
Two reticles are available to aim with while measuring - a cross
or a circle. First enter the menu mode. Press the measuring but-
ton to switch alternatingly between the cross and circle. Press
the menu button to confirm your selection. The menu will then
automatically jump to the next menu item.
Select measuring unit
Default setting: Meter
Two distance measuring units are available - meters and yards.
You can select one or the other by pressing the measuring but-
ton. Press the menu button to confirm your selection. The menu
will then automatically jump to the next menu item.
Reticle brightness
Default setting: Level 3 of 5
The display can be adjusted in 5 brightness levels. The respec-
tive level is shown as a number in the display. Press the meas-
uring button to select the desired brightness.
Distance measuring options
Default setting: Standard
You have 3 modes for measuring distances - Last (L) Best (B)
and Standard (Std).
Last (L) setting:
Measurement reading
In this setting, the distance to the object that is furthest from
your location is displayed. An example: You are trying to meas-
ure the distance to an object that is very far away. While you
are measuring, there are trees or other obstacles between you
and the object. You will see the distance to the furthest object
that could be measured (your target). An “L“ will appear in the
display.
Setting Best:
Measurement reading
In this setting, the distance to the object that is closest to your
location is displayed. An example: You are trying to measure
an object which is in front of trees and shrubs. You will see
the distance to the closest object that could be measured (your
target). An “B“ will appear in the display.
Standard setting:
Measurement reading
In this setting, you will always be given the exact distance to
the object that is in the centre of the reticle at the moment in
which the measurement is being made. For example: You try to
measure the distance to an object that is between some trees.
Due to some shaking of the binoculars while you are meas-
uring, you may have to take several measurements until the
distance to your object has been correctly determined. Due to
your shaking, it is possible that you might have inadvertently
measured the distance to trees surrounding your target.
Options for measuring angles:
Default setting: O
There are 3 modes available for measuring angles. O (OFF),<
(angle) and EHD (equivalent horizontal distance).
Setting O:
Measurement reading
In this setting, only the distance in the direct line of sight to the
object is displayed.
Setting <:
Measurement reading
In this setting, the distance in the direct line of sight to the
object is indicated in the upper part of the display. The angle
of the measurement is indicated in the lower part of the dis-
play. An example: If you are in the mountains and measure the
distance to an object that is above you, you can read the incli-
nation angle here.

32 3332 33
English
Setting EHD:
Measurement reading
In this setting, the distance in the direct line of sight to the
object is indicated in the upper part of the display. The angle
in relation to the corrected distance measurement (equivalent
horizontal distance) is indicated in the lower part of the display.
Button configuration
Default setting: Measurement button right
The function of the two control buttons on your binoculars can
be swapped. This increases your operating convenience if you
are left or right handed. The assignment of the buttons can be
changed by moving the circle in the display to the right or left.
The side on which the circle is located, represents the side of
the measuring button.
Scan mode
With this function you can perform continuous measurements.
Measurements are triggered every ¼ of a second. You can ac-
tivate the scan mode by continuously pressing the measuring
button while measuring the distance. After 3 seconds, scanning
is activated and all functions are constantly updated according
to the display settings. Upon releasing the measuring button,
the device will automatically return to the normal measuring
functions. This can be helpful in determining the distance to
moving objects.
Battery indicator
The battery indicator will flash if the battery voltage drops be-
low 2.4 Volts. This is an indication that you should change the
battery soon. If the battery voltage drops below 2.3 Volts, the
device will automatically switch o.
MAINTENANCE AND CARE
To provide as much protection as possible for your MINOX
binoculars, it is recommended to use the carrying case when
storing your binoculars.
Cleaning the binoculars
Keep your MINOX binoculars clean and dry. Avoid exposing the
binoculars to extreme heat. Remove dust and foreign particles
on the housing with a soft moist cloth. If your binoculars have
been used at a lake or have been exposed to salt water, we
recommend that you rinse them with fresh water. Over a period
of time, sea salt can damage the objective lenses and optical
quality of your binoculars.
Cleaning the objective and ocular lenses
Contamination of the lenses by foreign bodies like sand, dust,
grease, drops of water or fingerprints reduce the image quality
of your MINOX binoculars (image sharpness and contrast). For-
eign bodies should be carefully removed using a very soft brush
before cleaning the lenses.
Heavier contamination or fingerprints on the lenses can be re-
moved with an optical cleaning cloth and special lens cleaner.
We recommend using the MINOX optical cleaning set (order no.
80405463). You can also obtain other suitable optical cleaning
agents from specialist retailers.
SERIAL NUMBER
The serial number can be found on the underside of the battery
compartment cover, after you have removed it.

34 3534 35
English
MODEL X-range 10x42
Magnification 10x
Entry pupil (mm) 42
Exit pupil (mm) 4,2
Interpupillary distance (mm) 58 - 78
Field of view at 1,000 m (m) 106 / 6.1°
Close focus (m) 4
Diopter adjustment (dpt.) ± 3
Operating temperature °C -10° to +50°
Maximum measurable distance (m)
"2800 (large objects)
1600 (humans & wildlife)"
Measuring unit Meter and Yards
Measurement accuracy up to 1,000 m (m) ±1
Measurement accuracy up to 2,800 m (m) ±2
Display OLED
TECHNICAL DATA
MODEL X-range 10x42
Display brightness levels 5
Display options
„Distance & angle,
Distance & horizontal distance“
Battery life approx. 4,000 measurements
Power supply 1x CR2 Lithium (3V)
Housing Magnesium
Nitrogen purged Yes
Waterproof according to IPX7 Yes
Measurements (mm | HxWxD) 152x132x52
Weight (g) 990
Order no. 80408390
MINOX Comfort Service Yes

36 3736 37
English
CONDITIONS OF WARRANTY
With the purchase of this MINOX binocular, you have acquired
a product that has been manufactured and inspected in accord-
ance with especially high quality standards. For this product,
we provide a legal warranty of 2 years in accordance with the
following regulations from the day of purchase at an author-
ised dealer:
1. During the warranty period we shall compensate complaints
based on faulty manufacture with repair, replacement of de-
fective parts or by replacement with an identical flawless
product at our own discretion. Consequential claims, regard-
less of manner or legal argument in connection with this
warranty, will not be accepted.
2. Claims under warranty are null and void if the defect has
been caused by improper handling – which also can include
the combined use of non MINOX accessories – if the MINOX
product is serviced by unauthorised persons or workshops, or
if the serial number has been made unreadable.
3. Warranty claims can only be made by submission of the print-
ed receipt as proof of purchase from an authorised dealer.
4. When submitting claims under warranty, please return the
MINOX binocular together with the proof of purchase and a
description of the complaint to MINOX GmbH in Germany, or
the nearest MINOX dealer.
5. Tourists may, if necessary, make use of the MINOX dealer in
the country in which they are travelling (within the warranty
terms of MINOX GmbH) by presenting the printed proof of
purchase.
EXTENDED MINOX WARRANTY SERVICE
Take advantage of the extended MINOX product warranty and
register your MINOX product.
Find out more at www.minox.com/service.
CUSTOMER SERVICE
In the case of a claim, our customer service can be contacted at
the following address:
In Germany
MINOX GmbH
Technical Service
Wilhelm-Loh-Str. 1
35578 Wetzlar
In Great Britain
Blaser Sporting Limited
Unit 12
The Pines
Broad Street
Guildford
Surrey
GU3 3BH
In the USA
Blaser USA
403 East Ramsey, Suite 301
San Antonio, Texas 78216
In all other countries, send your MINOX binoculars to the dis-
tributor authorised by MINOX. You can find their address at:
www.minox.com/en/dealer-locator
IMPRINT
MINOX GMBH
Ziegelstadel 20
88316 Isny im Allgäu
Germany

38 3938 39
Français
BIENVENUE CHEZ
MINOX !
Avec ces jumelles signées MINOX équipées d’un télémètre
laser intégré, vous avez choisi un produit de qualité optique
et de précision mécanique optimales.
Les présentes consignes ont pour but de vous aider à ex-
ploiter parfaitement l’ensemble des fonctionnalités de vos
jumelles X-range 10x42.
Nous espérons que vous apprécierez vos jumelles et qu’elles
vous oriront des vues parfaites.
TABLE DES MATIÈRES
Bienvenue chez Minox ! .........................................................38
Table des matières ...................................................................39
Faites connaissance avec votre
télémètre laser ...........................................................................40
Aperçu et éléments de commande ....................................41
Contenu.........................................................................................41
Légende et consignes de sécurité ......................................42
Première mise en service .......................................................44
Réglages de vos jumelles ......................................................44
Navigation dans le menu de
votre télémètre ..........................................................................47
Conseils d’entretien ..................................................................51
Numéro de série ........................................................................51
Données techniques ................................................................52
Conditions de garantie ...........................................................54
Mentions légales .......................................................................55
Service après-vente..................................................................55
La pagina sta caricando ...
La pagina sta caricando ...
La pagina sta caricando ...
La pagina sta caricando ...
La pagina sta caricando ...
La pagina sta caricando ...
La pagina sta caricando ...
La pagina sta caricando ...
La pagina sta caricando ...
La pagina sta caricando ...
La pagina sta caricando ...
La pagina sta caricando ...
La pagina sta caricando ...
La pagina sta caricando ...
La pagina sta caricando ...
La pagina sta caricando ...
La pagina sta caricando ...
La pagina sta caricando ...
La pagina sta caricando ...
La pagina sta caricando ...
La pagina sta caricando ...
La pagina sta caricando ...
La pagina sta caricando ...
La pagina sta caricando ...
La pagina sta caricando ...
La pagina sta caricando ...
La pagina sta caricando ...
-
 1
1
-
 2
2
-
 3
3
-
 4
4
-
 5
5
-
 6
6
-
 7
7
-
 8
8
-
 9
9
-
 10
10
-
 11
11
-
 12
12
-
 13
13
-
 14
14
-
 15
15
-
 16
16
-
 17
17
-
 18
18
-
 19
19
-
 20
20
-
 21
21
-
 22
22
-
 23
23
-
 24
24
-
 25
25
-
 26
26
-
 27
27
-
 28
28
-
 29
29
-
 30
30
-
 31
31
-
 32
32
-
 33
33
-
 34
34
-
 35
35
-
 36
36
-
 37
37
-
 38
38
-
 39
39
-
 40
40
-
 41
41
-
 42
42
-
 43
43
-
 44
44
-
 45
45
-
 46
46
-
 47
47


Minox X-range 10x42 Manuale utente
- Categoria
- Misurazione
- Tipo
- Manuale utente
in altre lingue
- English: Minox X-range 10x42 User manual
- français: Minox X-range 10x42 Manuel utilisateur
- español: Minox X-range 10x42 Manual de usuario
- Deutsch: Minox X-range 10x42 Benutzerhandbuch
Documenti correlati
-
Minox X-HD Series Manuale utente
-
-
-
-
-
-
-
-
Minox DTC 460 Manuale utente
-
Altri documenti
-
Canon 12x32 IS Manuale utente
-
Pulsar LRF 8x40 Instructions Manual
-
Swarovski EL Range 10x42 W B Scheda dati
-
Zeiss Victory RF Istruzioni per l'uso
-
Hilti PD-I Istruzioni per l'uso
-
Leica DUOVID 10+15X50 Manuale del proprietario
-
Hilti PD-E Istruzioni per l'uso
-
Fairphone 4 Smartphone Manuale utente
-
Zebra AP-7562 Guida d'installazione
-
NOCH Train Stop “Amtzell” Istruzioni per l'uso