HQ Power VDPL300D Manuale utente
- Categoria
- Stroboscopi
- Tipo
- Manuale utente

VD
ASTA
R
USER
M
VDPL300D
DP
R - LE
D
F
E
D
MANUAL
H
A
PL
3
D DER
B
BYEF
ET DE
ECTO
D
DER
B
L
300
BY - DM
FECT
-
RBY -
DERBY
BY - DM
0D
M
X-C
O
- DMX
-
T
CON
L
M
X-G
E
D
ONTRO
U
TAGE
D
LEDs -
STEU
E
LLED
U
URD
DMX
CONTR
ERT
R
OL DMX
VDPL300DVDPL300D

V
D
1
T
o
I
m
e
n
If
T
h
Pl
e
in
W
2
•
•
•
•
•
•
•
•
•
•
•
3
•
•
•
•
•
•
•
D
PL300D
. Int
r
o
all resid
e
m
portant
e
This
lifec
y
mun
sho
u
n
vironment
a
in doubt,
h
ank you fo
e
ase read t
transit, do
n
arranty o
n
. Saf
e
Damage c
and the d
e
A qualifie
d
Do not sw
Protect th
e
temperat
u
This devic
e
a qualifie
d
Make sur
e
this manu
a
Do not cri
m
if necessa
r
Disconnec
by the plu
Do not lo
o
Note that
Mechanic
a
Keep the
d
. Gen
This devic
e
outdoors
w
Lighting e
f
their lives
.
Do not sh
a
Select a l
o
a minimu
m
Use an ap
Familiaris
e
operation
unprofess
i
Use the o
r
Be
v
elec
t
Kee
p
Unp
l
r
oducti
o
e
nts of th
e
e
nvironm
e
symbol on
y
cle could
h
icipal wast
e
u
ld be retu
r
a
l rules.
contact y
o
r choosing
he manual
n
't install o
r
n
the final
p
e
ty Ins
t
aused by
d
e
aler will n
o
d
technicia
n
itch the de
e
device a
g
u
re.
e
falls und
e
d
person ca
e
that the a
a
l.
m
p the po
w
r
y.
t the devic
g only.
o
k directly
a
damage c
a
a
l wear and
d
evice awa
y
eral G
u
e
is design
e
w
ith an alt
e
f
fects are
n
.
a
ke the de
v
o
cation wh
e
m
distance
o
propriate s
e
yourself
w
by unquali
f
i
onal use o
f
r
iginal pac
k
v
ery careful
t
roshocks.
p
this devi
c
l
ug the ma
i
o
n
e
Europea
e
ntal info
r
the devic
e
h
arm the e
n
e
; it shoul
d
r
ned to you
o
ur local
w
HQPOWE
R
™
thoroughly
r
use it an
d
p
ages of thi
t
ructio
n
d
isregard o
f
o
t accept r
e
n
should in
s
vice on im
m
g
ainst dam
a
e
r protecti
o
rry out the
vailable vo
w
er cord a
n
e from the
a
t the light
a
used by u
s
the LEDs
a
y
from chil
d
u
idelin
e
e
d for use
e
rnating cu
n
ot design
e
v
ice. Avoid
e
re the dev
o
f 0.5m be
t
afety cabl
e
w
ith the fu
n
f
ied people
f
the devic
e
k
aging if th
e
during th
e
c
e away fro
i
ns lead be
f
E
N
n Union
r
mation a
b
e
or the pa
c
n
vironmen
t
d
be taken
t
r distribut
o
w
aste dis
p
™
! The VD
P
before bri
n
d
contact y
o
s manual.
n
s
f
certain g
u
e
sponsibili
t
s
tall and s
e
m
ediately
a
a
ge by lea
v
o
n class I.
I
electric c
o
ltage does
n
d protect i
mains to
c
source as
s
er modific
a
a
re not co
v
d
ren and u
e
s
on stage, i
n
rrent of 23
e
d for perm
brute forc
e
ice is prot
e
t
ween the
d
e
to fix the
n
ctions of t
. Any dam
a
e
.
e
device is
e
installatio
m rain an
d
f
ore openi
n
2
N
GLI
S
b
out this
p
c
kage indic
a
t
. Do not d
t
o a specia
o
r or to a l
o
p
osal aut
h
P
L300D is
n
ging this
d
o
ur dealer.
u
idelines in
t
y for any
e
e
rvice this
d
a
fter it has
v
ing it swit
c
I
t is theref
o
o
nnection.
not excee
d
t against d
c
lean it or
w
sensitive p
a
tions to t
h
v
ered by w
a
nauthorise
n
discos, t
h
0VAC/50H
z
anent ope
r
e
when ins
t
e
cted again
d
evice’s lig
h
device (e.
g
he device
b
a
ge that m
to be tran
s
n: touchin
g
d
moisture.
n
g the hou
s
S
H
p
roduct
a
tes that d
ispose of t
h
lized comp
a
o
cal recycli
n
h
orities.
an 8-chan
n
d
evice into
s
Refer to th
e
this manu
a
e
nsuing de
f
d
evice.
been expo
c
hed off un
o
re essenti
a
d
the volta
g
amage. Ha
w
hen it is n
eople may
h
e device i
s
a
rranty.
d users.
h
eatres, et
c
z
.
r
ation: reg
u
t
alling or o
p
st extrem
e
h
t output a
g
. VDLSC7
b
efore actu
ay occur w
s
ported.
g
live wire
s
s
ing.
isposal of
t
h
e unit (or
a
ny for rec
n
g service.
n
el derby e
s
ervice. If
t
e
Vellema
n
a
l is not co
v
f
ects or pr
o
sed to cha
n
til it has r
e
a
l that the
g
e stated i
n
ve an aut
h
ot in use.
H
go into ep
i
s
not cover
e
c
. The VD
P
u
lar operat
i
p
erating th
e
heat, dus
t
nd any illu
m
or VDLSC
8
ally using i
ill most pr
o
s
can caus
e
t
he device
a
batteries)
a
ycling. Thi
s
Respect t
h
ffect using
t
he device
w
n
®
Service
v
ered by t
h
o
blems.
n
ges in te
m
e
ached roo
m
device be
e
n
the speci
f
h
orised dea
H
andle the
i
leptic seiz
u
e
d by the
w
P
L300D ca
n
i
on breaks
e device.
t
and mois
t
m
inated su
r
8).
t. Do not
a
o
bably be
d
e
life-threa
t
HQPOW
E
a
fter its
a
s unsorte
d
s
device
h
e local
90 LEDs.
w
as damag
and Qual
i
h
e warrant
y
m
perature.
m
e
arthed. H
a
f
ications of
ler replace
power cor
d
u
re if they
d
w
arranty.
n
be used
will prolon
g
t
ure. Resp
e
r
face.
a
llow
d
ue to
t
ening
E
R™
d
ed
i
ty
y
a
ve
it
d
d
o.
g
e
ct

VDPL300D HQPOWER™
3
• All modifications of the device are forbidden for safety reasons.
• Only use the device for its intended purpose. All other uses may lead to short circuits, burns,
electroshocks, crash, etc. Using the device in an unauthorised way will void the warranty.
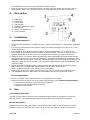
4. Description
1. DMX input
2. DMX output
3. power input
4. DIP switches
5. sensitivity adjustment knob
6. microphone
7. safety rope attachment
8. ground contact
5. Installation
a) Mounting the Device
• Have the device installed by a qualified person, respecting EN 60598-2-17 and all other applicable
norms.
• The carrying construction must be able to support 10 times the weight of the device for 1 hour
without deforming.
• The installation must always be secured with a secondary attachment e.g. a safety cable.
• Never stand directly below the device when it is being mounted, removed or serviced. Have a
qualified technician check the device once a year and once before you bring it into service.
• Install the device in a location with few passers-by that is inaccessible to unauthorised persons.
• Overhead mounting requires extensive experience: calculating workload limits, determining the
installation material to be used… Have the material and the device itself checked regularly. Do not
attempt to install the device yourself if you lack these qualifications as improper installation may
result in injuries.
• Adjust the desired inclination angle via the mounting bracket and tighten the bracket screws.
• Make sure there is no flammable material within a 0.5m radius of the device.
• Have a qualified electrician carry out the electric connection.
• Connect the device to the mains with the power plug. Do not connect it to a dimming pack.
• The installation has to be approved by an expert before the device is taken into service.
b) Fuse Replacement
• Only fit or replace a fuse when the device is unplugged from the mains.
• Replace a blown fuse with a fuse of the same type and rating (see “Technical Specifications”):
1. Remove the fuse holder using a flat-head screwdriver.
2. Remove the old fuse and install a new one.
3. Replace the fuse holder.
6. Use
Sound-Active/Auto Mode
A single unit will react to the surrounding sounds through the built-in microphone. Set all DIP
switches to OFF. Use the adjustment knob at the back of the unit to adjust the sensitivity.
Master/Slave Mode
Interconnect all units using XLR cables. Set all DIP switches to OFF on the master unit, set DIP
switches 1 and 10 to ON on the slave units. All slave units will follow the master unit’s pattern.

VDPL300D HQPOWER™
4
7. DMX Mode
The DMX mode allows you to control the unit through a universal DMX controller. Set DIP switch 10
to ON to activate the DMX mode, set the DMX address using DIP switches 1 to 9.
Detailed DMX Values per Channel
Channel Function From To Description
1 ~ 6 Clusters
0 10 No function
11 45 Red
46 80 Green
81 115 Blue
116 150 Red – green
151 185 Red – blue
186 220 Green – blue
221 255 RGB
7 Strobe
0 10 No function
11 255 S>F strobe
8 Auto speed
0 10 No function
11 24 Auto 1
25 38 Auto 2
39 52 Auto 3
53 66 Auto 4
67 80 Auto 5
81 94 Auto 6
95 108 Auto 7
109 122 Auto 8
123 136 Auto 9
137 150 Auto 10
151 164 Auto 11
165 178 Auto 12
179 192 Auto 13
193 206 Auto 14
207 220 Auto 15
221 249 Auto 15
251 255 Auto trigger
DMX512 Connection
Connect the provided XLR cable to the female 3-pin XLR output of your controller and the other side
to the male 3-pin XLR input of the VDPL300D. Multiple VDPL300Ds can be linked through serial
linking. The linking cable should be a two-core screened cable with XLR input and output connectors.
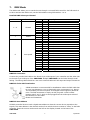
DMX512 Chain with Termination
A DMX terminator is recommended for installations where the DMX cable has
to run a long distance or is in an electrically noisy environment (e.g. discos).
The terminator prevents corruption of the digital control signal by electrical
noise. The DMX terminator is simply an XLR plug with a 120Ω resistor
between pins 2 and 3, which is then plugged into the XLR output socket of
the last device in the chain.
Please see illustrations.
DMX512 Start Address
All DMX-controlled devices need a digital start address so that the correct device responds to the
signals. This start address is the channel number from which the device starts to “listen” to the DMX
controller. Enter the correct number and read it from the display located on the base of the
VDPL300D.

VDPL300D HQPOWER™
5
You can use the same starting address for a whole group of devices or enter an individual one for
every device.
When all devices have the same address, all the VDPL300Ds will “listen” to the control signal on
one particular channel. In other words: changing the settings of one channel will affect all devices
simultaneously. If you set different addresses, each device will “listen” to a separate channel
number. Changing the settings of one channel will only affect the device in question.
In the case of the 8-channel VDPL300D, you will have to set the start address of the first
VDPL300D to 1, the second VDPL300D to 9 (1 + 8), the third to 17 (9 + 8) and so on.
8. Cleaning and Maintenance
1. All screws should be tightened and free of corrosion.
2. The housing, visible parts, mounting supports and the installation location (e.g. ceiling,
suspension, trussing) should not be deformed, modified or tampered with e.g. do not drill extra
holes in mounting supports, do not change the location of the connections.
3. Moving mechanic parts must not show any signs of wear and tear.
4. The electric power supply cables must not show any damage. Have a qualified technician
maintain the device.
5. Disconnect the device from the mains prior to maintenance activities.
6. Wipe the device regularly with a moist, lint-free cloth. Do not use alcohol or solvents.
7. There are no user-serviceable parts.
8. Contact your dealer for spare parts if necessary.
9. Technical Specifications
Power Supply 230VAC/50Hz
Power Consumption 24W
Fuse F2A, 250VAC (5 x 20mm) (order code FF2N)
DMX Connection 3-pin XLR
LEDs 90 (30 x red, 30 x green, 30 x blue)
Dimensions 300 x 382 x 187mm
Total Weight 1.8kg
Max. Ambient Temperature 40°C
Max. Housing Temperature 60°C
Use this device with original accessories only. Velleman Components nv cannot be held
responsible in the event of damage or injury resulted from (incorrect) use of this device.
For more info concerning this product, please visit our website www.hqpower.com. The
information in this manual is subject to change without prior notice.
© COPYRIGHT NOTICE
This manual is copyrighted. The copyright to this manual is owned by Velleman Components
nv. All worldwide rights reserved. No part of this manual may be copied, reproduced, translated or
reduced to any electronic medium or otherwise without the prior written consent of the copyright
holder.
-
 1
1
-
 2
2
-
 3
3
-
 4
4
-
 5
5


HQ Power VDPL300D Manuale utente
- Categoria
- Stroboscopi
- Tipo
- Manuale utente
in altre lingue
- English: HQ Power VDPL300D User manual
Documenti correlati

Altri documenti
-
Cameo Multi FX BAR Manuale del proprietario
-
Cameo CLSTORM Manuale utente
-
-
Cameo Superfly HP LED Effekt Manuale del proprietario
-
Cameo CLFLOWERHP Manuale utente
-
Cameo Flash Matrix 250 Manuale del proprietario
-
Cameo CLTRIBAR100IR Manuale utente
-
Velleman VDPDP152 Manuale utente
-
-
Cameo Auro Spot 200 Manuale utente