Lexmark 940e - X Color Laser Setup Manual
- Categoria
- Stampanti laser / LED
- Tipo
- Setup Manual
Questo manuale è adatto anche per

Lexmark MFP
Setup Guide
April 2007 www.lexmark.com
Lexmark and Lexmark with diamond design are trademarks of Lexmark International, Inc., registered in the United States and/or other countries.
All other trademarks are the property of their respective owners.
© 2007 Lexmark International, Inc.
All rights reserved.
740 West New Circle Road
Lexington, Kentucky 40550

Safety information
Connect the power supply cord to a properly grounded electrical outlet that is near the product and easily accessible.
Use only a 26 AWG or larger telecommunications (RJ-11) cord when connecting this product to the public switched telephone network.
Refer service or repairs, other than those described in the user documentation, to a professional service person.
CAUTION: The printer weighs 91.2 kg (201 lbs); therefore, it requires two people to roll it safely into place. The scanner weighs 25 kg
(55 lb); therefore, it requires two people to roll it safely while it is on its scanner shelf.
This product is designed, tested, and approved to meet strict global safety standards with the use of specific Lexmark components. The
safety features of some parts may not always be obvious. Lexmark is not responsible for the use of other replacement parts.
CAUTION: Make sure that all external connections (such as Ethernet and telephone system connections) are properly installed in
their marked plug-in ports.
This product uses a laser.
CAUTION: Use of controls or adjustments or performance of procedures other than those specified herein may result in hazardous
radiation exposure.
This product uses a printing process that heats the print media, and the heat may cause the media to release emissions. You must
understand the section in your operating instructions that discusses the guidelines for selecting print media to avoid the possibility of
harmful emissions.
This product contains mercury in the lamp (<5mg Hg). Disposal of mercury may be regulated due to environmental considerations. For
disposal or recycling information, contact your local authorities or the Electronic Industries Alliance: www.eiae.org.
This symbol indicates the presence of a hot surface or component.
CAUTION: To reduce the risk of injury from a hot component, allow the surface to cool before touching it.

Contents
Safety information.........................................................................................................2
Overview.........................................................................................................................7
Printer configurations...........................................................................................................................7
Selecting a location for the printer.......................................................................................................7
Available options.................................................................................................................................8
Step 1: Setting up the printer......................................................................................10
Unboxing the printer and removing packaging..................................................................................10
Checking the box contents .........................................................................................................................10
Removing packaging from the printer.........................................................................................................11
Installing the toner cartridges............................................................................................................14
Attaching the paper bails...................................................................................................................16
Attaching the scanner to the printer..................................................................................................18
Attaching the scanner to its shelf................................................................................................................18
Rolling the printer under the scanner shelf.................................................................................................19
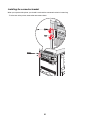
Installing the connector bracket..................................................................................................................21
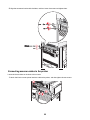
Connecting scanner cables to the printer...................................................................................................22
Connecting your printer to a single computer or to a network of computers.....................................23
Setting the printer up with local setup.........................................................................................................23
Setting the printer up with network setup ...................................................................................................24
Moving the printer..............................................................................................................................27
Before moving the printer ...........................................................................................................................27
Moving the printer and options to another location within the office...........................................................27
Disassembling the printer from the scanner shelf prior to the move ..........................................................28
Shipping the printer ....................................................................................................................................30
Setting the printer up in a new location ......................................................................................................30
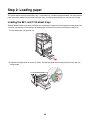
Step 2: Loading paper ................................................................................................32
Loading the 867- and 1133-sheet trays.............................................................................................32
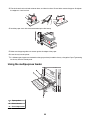
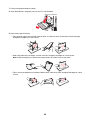
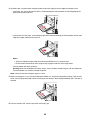
Using the multipurpose feeder...........................................................................................................33
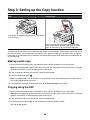
Step 3: Setting up the Copy function.........................................................................36
Making a quick copy..........................................................................................................................36
Copying using the ADF......................................................................................................................36
Copying using the scanner glass (flatbed)........................................................................................37
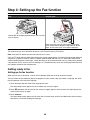
Step 4: Setting up the Fax function............................................................................38
Getting ready to fax...........................................................................................................................38
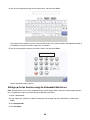
Setting up the fax function..........................................................................................................................38
Setting up the fax function using the Embedded Web Server....................................................................39
3

Sending a fax.....................................................................................................................................40
Sending a fax using the control panel ........................................................................................................40
Improving fax quality..........................................................................................................................40
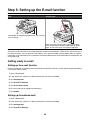
Step 5: Setting up the E-mail function.......................................................................42
Getting ready to e-mail......................................................................................................................42
Setting up the e-mail function.....................................................................................................................42
Setting up the address book.......................................................................................................................42
E-mailing a document........................................................................................................................43
Sending an e-mail using the keypad ..........................................................................................................43
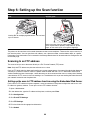
Step 6: Setting up the Scan function.........................................................................44
Scanning to an FTP address.............................................................................................................44
Setting up the scan to FTP address function using the Embedded Web Server .......................................44
Scanning to an FTP address using the keypad..........................................................................................45
Improving FTP quality.................................................................................................................................45
Improving scan quality................................................................................................................................45
Step 7: Verifying printer setup....................................................................................46
Printing information pages.................................................................................................................46
Printing a menu settings page....................................................................................................................46
Printing a network setup page....................................................................................................................46
Printing the Help menu pages ....................................................................................................................46
Conducting a test copy, scan, and fax..............................................................................................47
Making a test copy......................................................................................................................................47
Sending a test fax.......................................................................................................................................47
Testing a scan to PC profile .......................................................................................................................47
Solving setup issues...................................................................................................49
Checking an unresponsive printer.....................................................................................................49
Checking an unresponsive scanner..................................................................................................49
Checking to ensure all packaging is removed...................................................................................49
Control panel display is blank or displays only diamonds.................................................................49
Error message about reading USB drive appears.............................................................................50
Jobs do not print................................................................................................................................50
Make sure the printer is ready to print........................................................................................................50
Check to see if the standard exit bin is full .................................................................................................50
Check to see if the paper tray is empty ......................................................................................................50
Make sure the correct printer software is installed .....................................................................................50
Make sure the internal print server is installed properly and working.........................................................50
Make sure you are using a recommended USB, serial, or Ethernet cable.................................................50
Make sure printer cables are securely connected......................................................................................50
Job prints from the wrong tray or on the wrong paper.......................................................................50
Check the Paper Type setting ....................................................................................................................50
4

Incorrect characters print...................................................................................................................51
Option does not operate correctly or quits after it is installed............................................................51
Reset the printer.........................................................................................................................................51
Check to see if the option is connected to the printer.................................................................................51
Make sure the option is installed ................................................................................................................51
Make sure the option is selected................................................................................................................51
Drawers.............................................................................................................................................51
Make sure the paper is loaded correctly.....................................................................................................51
Reset the printer.........................................................................................................................................51
Duplex unit.........................................................................................................................................51
Paper frequently jams........................................................................................................................52
Check the paper .........................................................................................................................................52
Make sure there is not too much paper in the paper tray...........................................................................52
Check the paper guides..............................................................................................................................52
Has the paper absorbed moisture due to high humidity?...........................................................................52
Contacting Customer Support...........................................................................................................52
Administrative settings.......................................................................................................................52
Adjusting the brightness of the display.......................................................................................................52
Disabling control panel menus ...................................................................................................................53
Restoring the factory default settings .........................................................................................................53
Notices..........................................................................................................................54
Edition notice.....................................................................................................................................54
Industry Canada notices....................................................................................................................55
Index..............................................................................................................................62
5

6

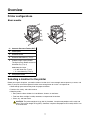
Overview
Printer configurations
Basic models
1
Automatic Document Feeder (ADF)
2
Control panel
3
Standard exit bin
4
Standard 520-sheet tray (Tray 1)
5
Cabinet or high capacity feeder.
The high capacity feeder consists of:
520-sheet tray (Tray 2)
2000-sheet dual input
• 6—867-sheet tray (Tray 3)
• 7—1133-sheet tray (Tray 4)
8
Multipurpose feeder
Selecting a location for the printer
Before you unpack the printer, you need to select a location for it. Leave enough room to open trays, covers, and
doors. If you plan to install the optional finisher, leave enough room for it also. It is important to:
• Allow enough space around the printer for proper ventilation.
• Provide a flat, sturdy, and stable surface.
• Keep the printer:
– Away from the direct airflow of air conditioners, heaters, or ventilators
– Free from direct sunlight, humidity extremes, or temperature fluctuations
– Clean, dry, and free of dust
CAUTION: The printer weighs 91.2 kg (201 lb); therefore, it requires two people to roll it safely into
place. The scanner weighs 25 kg (55 lb); therefore, it requires two people to roll it safely while it is on
its scanner shelf.
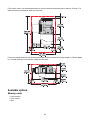
7

For the basic printer, the recommended amount of space to allow for the printer height is 693 mm (27.28 in.). For
other clearance measurements, follow this illustration:
For the fully configured printer, the recommended amount of space to allow for the printer height is 1,750 mm (68.89
in.). For other clearance measurements, follow this illustration:
Available options
Memory cards
• Printer memory
• Flash memory
• Fonts
8

Firmware cards
• Bar Code and Forms
• ImageQuick
TM
• IPDS and SCS/TNe
• PrintCryption
TM
• PRESCRIBE
Note: Use a #2 Phillips screwdriver to remove the system board access cover.
Other internal options
• RS-232 serial interface card
• Parallel 1284-B interface card
• MarkNet
TM
N8000 Series Internal Print Servers
9

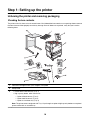
Step 1: Setting up the printer
Unboxing the printer and removing packaging
Checking the box contents
The printer and all its items arrive in several boxes. You followed the box artwork or an unpacking sheet to remove
the items from each box properly to avoid any damage. Once all boxes are unpacked, verify that you have the
following items:
1
Four toner cartridges: black, cyan, magenta, and yellow
2
Setup Guide
3
• Printer with the standard tray (Tray 1)
• High capacity feeder, which consists of:
– Optional 520-sheet tray (Tray 2)
– Optional 867-sheet tray (Tray 3)
– Optional 1133-sheet tray (Tray 4)
Note: The printer comes configured with Tray 2 if you bought an optional high capacity feeder or an optional
printer cabinet with an attached tray.
10

4
Four brackets to attach the scanner to its scanner shelf
5
Connector bracket, which secures the scanner shelf to the printer
6
Software and Documentation CD
7
USB cable
8
Power cord
9
Scanner
10
Paper bails and a template
11
Paper size labels for the trays
12
Wrench
13
Scanner shelf
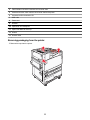
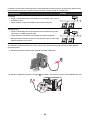
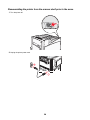
Removing packaging from the printer
1 Remove the tape from the printer.
11

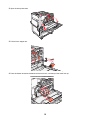
2 Open the front printer door.
3 Pull the black stopper out.
4 Press the button located on the bottom of the metal latch, and then pull the metal latch up.
12

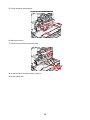
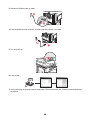
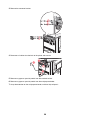
5 Pull the Styrofoam packaging out.
6 Lower the metal bar.
7 Pull the tag to remove the packaging strips.
8 Locate the side of the printer shown in step 10.
9 Lift the release latch.
13

10 Lower the door.
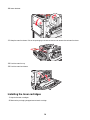
11 Keep the metal bar down. Pull on the packaging as shown to release and remove the red metal brackets.
12 Push the metal bar up.
13 Push the metal latch down.
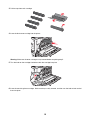
Installing the toner cartridges
1 Unpack the toner cartridges.
2 Remove the packaging wrapped around each cartridge.
14

3 Pull the tape from each cartridge.
4 Insert the black toner cartridge into the printer.
Warning: Make sure the toner cartridge is fully inserted before completing step 5.
5 Turn the knob on the cartridge clockwise to lock the cartridge into place.
6 Insert the remaining three cartridges. Make sure they are fully inserted, and then turn the knob to lock each of
them into place.
15

7 Close the door.
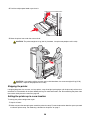
Attaching the paper bails
You should find a package with the paper bails and a template in Tray 1.
The paper bails help prevent offset bin stacking by guiding each sheet of paper or specialty media into the standard
exit bin.
1 Align the template with the top of the printer as shown.
16

2 Remove the film to expose the sticky pad on each paper bail, and then place each bail in an area indicated by
the template.
3 Press on each paper bail for 25 seconds to make sure each bail adheres well.
17

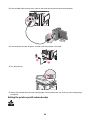
Attaching the scanner to the printer
Attaching the scanner to its shelf
Note: This operation requires a #2 Phillips screwdriver.
CAUTION: The scanner weighs 25 kg (55 lb); therefore, it requires two people to lift it safely.
1 Lift the scanner, and then set it on its shelf.
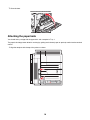
2 Locate the four brackets that came in the box with the printer and the scanner shelf.
3 Attach the left front bracket to the shelf.
18

4 Align the screw, and then tighten it.
5 Attach the right front bracket in the same way.
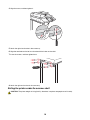
6 Align the two holes on the left rear bracket with the holes on the shelf.
7 Insert the screws, and then tighten them.
8 Attach the right rear bracket in the same way.
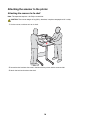
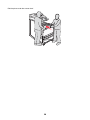
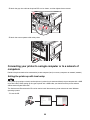
Rolling the printer under the scanner shelf
CAUTION: The printer weighs 91.2 kg (201 lb); therefore, it requires two people to roll it safely.
19

Roll the printer under the scanner shelf.
20
La pagina si sta caricando...
La pagina si sta caricando...
La pagina si sta caricando...
La pagina si sta caricando...
La pagina si sta caricando...
La pagina si sta caricando...
La pagina si sta caricando...
La pagina si sta caricando...
La pagina si sta caricando...
La pagina si sta caricando...
La pagina si sta caricando...
La pagina si sta caricando...
La pagina si sta caricando...
La pagina si sta caricando...
La pagina si sta caricando...
La pagina si sta caricando...
La pagina si sta caricando...
La pagina si sta caricando...
La pagina si sta caricando...
La pagina si sta caricando...
La pagina si sta caricando...
La pagina si sta caricando...
La pagina si sta caricando...
La pagina si sta caricando...
La pagina si sta caricando...
La pagina si sta caricando...
La pagina si sta caricando...
La pagina si sta caricando...
La pagina si sta caricando...
La pagina si sta caricando...
La pagina si sta caricando...
La pagina si sta caricando...
La pagina si sta caricando...
La pagina si sta caricando...
La pagina si sta caricando...
La pagina si sta caricando...
La pagina si sta caricando...
La pagina si sta caricando...
La pagina si sta caricando...
La pagina si sta caricando...
La pagina si sta caricando...
La pagina si sta caricando...
La pagina si sta caricando...
-
 1
1
-
 2
2
-
 3
3
-
 4
4
-
 5
5
-
 6
6
-
 7
7
-
 8
8
-
 9
9
-
 10
10
-
 11
11
-
 12
12
-
 13
13
-
 14
14
-
 15
15
-
 16
16
-
 17
17
-
 18
18
-
 19
19
-
 20
20
-
 21
21
-
 22
22
-
 23
23
-
 24
24
-
 25
25
-
 26
26
-
 27
27
-
 28
28
-
 29
29
-
 30
30
-
 31
31
-
 32
32
-
 33
33
-
 34
34
-
 35
35
-
 36
36
-
 37
37
-
 38
38
-
 39
39
-
 40
40
-
 41
41
-
 42
42
-
 43
43
-
 44
44
-
 45
45
-
 46
46
-
 47
47
-
 48
48
-
 49
49
-
 50
50
-
 51
51
-
 52
52
-
 53
53
-
 54
54
-
 55
55
-
 56
56
-
 57
57
-
 58
58
-
 59
59
-
 60
60
-
 61
61
-
 62
62
-
 63
63


Lexmark 940e - X Color Laser Setup Manual
- Categoria
- Stampanti laser / LED
- Tipo
- Setup Manual
- Questo manuale è adatto anche per
in altre lingue
- English: Lexmark 940e - X Color Laser
Documenti correlati
-
Lexmark X4975ve Manuale utente
-
Lexmark 5600 Series Manuale utente
-
-
-
-
Lexmark MX410 Series Manuale utente
-
Lexmark 6500E Manuale utente
-
-
Lexmark X500n MFP 7100-XXX Manuale utente
-
Lexmark X422 Manuale utente
Altri documenti
-
KYOCERA FS-C1020MFP Manuale del proprietario
-
Konica Minolta Bizhub 3320 Manuale utente
-
Konica Minolta bizhub 20 Manuale del proprietario
-
Ricoh Aficio SP C242SF Guida utente
-
-
Canon imageCLASS MF229dw Manuale utente
-
Epson Expression Photo XP-850 Manuale del proprietario
-
Konica Minolta PagePro 1100 Guida d'installazione
-
 Glowforge Plus Manuale utente
-
Univex Z55 Manuale utente
