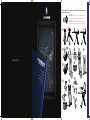
LauraStar SMART M Manuale del proprietario
- Categoria
- Ferri da stiro
- Tipo
- Manuale del proprietario
Questo manuale è adatto anche per

MAX
3-5 min.
MAX
1
5 7 8
12
9
13
11
10
14
15
17
16
6
2
3
4
www.laurastar.com
Quick start guide - Mise en marche rapide - Kurzanleitung - Snelle ingebruikname -
Messa in funzione rapida
IMPORTANT : Read this entire Instruction manual carefully
before you use the appliance and save it for future reference.
IMPORTANTE : Leia atentamente este Manual de Instruções
antes de utilizar o aparelho e guarde-o para consultas futuras.
INSTRUCTION MANUAL
MODE D’EMPLOI
BEDIENUNGSANLEITUNG
GEBRUIKSAANWIJZING
ISTRUZIONI D’USO
- 1 -
IT
NL
DE
FR
EN

27
LAURASTAR LAURASTAR LAURASTAR
1 1
2 2
3 3
3
3a
4 4
5 5
6 6
6
6a
7 7
8 8
9
10
13
14
15
17
16
16
20
22
23
24
25
18
19
21
26
26
12
11
11
28
Opt. 3Opt. 2
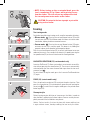
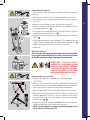
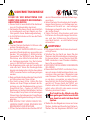
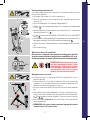
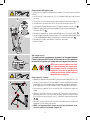
SAFETY INSTRUCTIONS
READ THE ENTIRE INSTRUCTION
MANUAL BEFORE USING THE APPLI
-
ANCE.
• This appliance is intended for private
household use only.
• Only use this appliance indoors and for
ironing textile items in accordance with
this Operator Manual.
• In an emergency, immediately unplug the
plug from the wall socket.
• DO NOT immerse any part of the appliance
in water or any other liquids.
• The appliance must ONLY be connected
to a grounded wall socket outlet. We re-
commend FI circuit breakers. NEVER use a
portable socket outlet, a multi-way adaptor
or any other extension device. The power
plug must be easily accessible in case of
emergency.
• The iron soleplate and steam jet are very
hot. DO NOT iron or apply steam to clothing
while it is being worn.
• Do not point steam in the direction of peo
-
ple or pets during vertical steaming.
• This appliance produces heat. Keep your
hands and body away from the iron sole
-
plate and steam jet while in use – they
will be HOT. Contact with hot metal parts,
hot water or steam may cause burns. Take
care when returning the steam iron to the
iron rest.
• CONTACT WITH STEAM UNDER PRES
-
SURE CAN RESULT IN SEVERE BURNS.
• DO NOT open the steam generator cap or
the drain cap while operating the appliance.
• Unscrew the steam generator cap and the
drain cap with caution – hot pressurized
steam will begin to escape after a few
turns.
• Step back from the appliance when un
-
screwing and removing the steam gene-
rator cap or the drain cap – hot steam will
escape.
• Never leave the appliance unattended
while switched on.
• The iron should always be turned OFF be
-
fore plugging into or unplugging from the
wall outlet. ALWAYS allow the appliance
to cool down for at least 2 hours before
emptying.
• KEEP OUT OF REACH OF CHILDREN.
• This appliance is NOT intended for use by
children, or persons with reduced physi
-
cal, sensory or mental capacity, or lack of
experience, unless they are supervised by
a person responsible for their safety. This
appliance is NOT intended to be used by
children under the age of 8 regardless of
supervision or training.
• Always place the iron on a flat, stable and
fire-resistant surface. NEVER rest the iron
on the ironing board cover or clothes. To
avoid risk of fire, ensure that the iron is
placed only on the iron rest.
• Take care when removing and setting
down the protective soleplate after use.
Place the hot soleplate on the heat-resis
-
tant iron rest.
• Cleaning, repairs, and maintenance on the
appliance should ONLY be performed when
the iron is switched off, cold and allowed
to cool down for at least 2 hours. Unscrew
the caps with care : any pressurized steam
present will begin to escape after a few
turns, posing a risk of burns.
• DO NOT allow the electrical cable to come
into contact with hot surfaces. Allow the
iron to cool down completely before storing.
• NOT DRINKING WATER.
• DO NOT use the appliance if it has been
damaged in a fall, shows visible signs of
damage, or has a faulty steam hose or elec
-
tric cable. Contact exclusively an authorized
Laurastar Customer Service representative
for information on repair.
• Incorrect reassembly can cause a risk of
electric shock when the appliance is used.
• DO NOT operate the appliance without
water.
• Clean the exterior of the appliance with
a soft, damp cloth. DO NOT use solvents,
oil or petrol.
• To avoid overloading your electrical installa
-
tion, do not operate another high-powered
appliance (watt) simultaneously.
• NEVER open the drain cap or steam gene-
rator cap during operation. When the
appliance is completely cooled, carefully
unscrew the drain cap/steam generator
cap : any pressurized steam present will
begin to escape after a few turns, posing
a risk of burns.
• DO NOT attempt to insert objects into the
openings of the appliance. If water or a
foreign body enters the appliance, immedi
-
ately unplug the iron from the wall socket.
Contact an authorized Laurastar Customer
Service representative for information on
repair.
• To avoid risk of electric shock, DO NOT pull
the electric cable from the wall socket –
take a firm hold of the plug and remove it.
• Position the electric cable and the steam
hose so that they cannot be pulled
or caught to avoid a tripping hazard.
• Environmental information and waste
disposal measures :
DO NOT dispose of the used appliance
with normal household waste ! Ask your
municipal or local authorities about
appropriate environmentally-friendly
disposal facilities.
Keep out of reach of children.
Children must be supervised to en-
sure that they do not play with the
appliance.
DO NOT drink filtered water. Keep
out of reach of children.
DO NOT ingest the demineraliza-
tion granules. They may be dis-
posed of with household waste.
SAVE THESE INSTRUCTIONS
CAREFULLY
WARNING !
ATTENTION !
DANGER !
- 5 -
EN
- 2 - - 3 -

Warning : Failure to comply with this
instruction manual and the safety in-
structions may result in serious injury
or damage to property. The manu-
facturer accepts no responsibility for
such injury or damage in the event
that these safety instructions are not
followed. Keep this instruction manual
for reference by any and all persons
who may use the appliance.
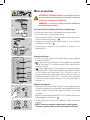
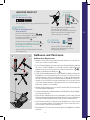
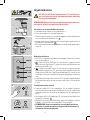
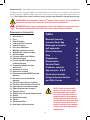
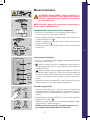
Overview and features
1. Ironing board
2. Iron
3. Steam Hose
4. Special Laurastar cover
5. Safety storage box
6. Folding iron-rest
7. Adjustable height handles
8. Steam hose holder
9. Steam buttons
10. Vacuum/blower button
11. Water reservoir
12. Small and large water reservoir lid
13. Filter compartment and anti-scale filter
14. Drain tray
15. Steam generator
16. Main ON/OFF button with indicator light
17. Laurastar SenSteam button (option)
18. Pulsed steam button (option)
19. Fan speed button (4 speeds)
20. Empty water indicator light
21. Steam generator cap
22. Drain cap
23. Power plug and Electric cable
24. Fan
25. Fan plug
26. Wheels
27. Protective soleplate
28. Protective soleplate hook
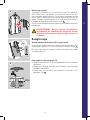
Congratulations ! You have just purchased a high-quality Laurastar ironing system that combines
Swiss design and technology. Please read this instruction manual and the safety instructions care-
fully before using your appliance for the first time and retain this instruction manual for future use.
Find all our tutorial videos and suggestions on www.laurastar.com
WARNING : Your Laurastar
TM
product generates heat and steam. Various parts of the
appliance may become very hot during operation and can cause burns.
NOTE : This appliance generates heat and can cause burns. Those parts which get very hot
are marked with this symbol.
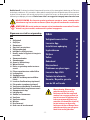
Table of Contents
Safety instructions 3
Laurastar Smart App 6
Installation and storage 6
Start up 8
Ironing 9
Filling 11
Maintenance 12
Customer service 13
Problems and solutions 14
Laurastar App: Q & A 15
Technical information 15
Guarantee / Limited Warranty
for the United States and Canada 16
- 5 -

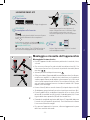
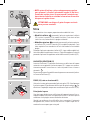
Insert the power plug of your Laurastar into the wall
socket. Activate Bluetooth on your smartphone
or tablet.
On your Laurastar, push the fan speed button (19),
keep it pressed and push the main ON/OFF button
(16).
Release the 2 buttons. All the user interface LEDs
will flash during 20 seconds.
This process can be repeated if the time
available is not sufficient. Once the
connection established, it is not necessary
to reconnect the same smartphone or tablet.
user interface
Launch the Laurastar App and follow the
instructions on your smartphone or tablet.
CONNECT
your smartphone to your Laurastar
2
DOWNLOAD
LAURASTAR SMART APP
the Laurastar App
If you have it already, make sure that the App is
up to date.
1
LAUNCH
the App
3
LAURASTAR
A B
C
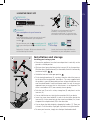
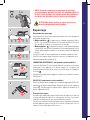
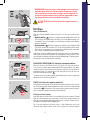
Installation and storage
Installing your ironing system
• Remove the appliance from the box and position it vertically on the
ground in a closed position.
• With one hand, grasp the board at the iron-rest (6) in close position.
With the other, grasp the board (1) at the middle, then tilt it horizontally
(maximum height).
A
B
• Unfold the iron-rest to the open position.
• Fit the ironing board cover (4), securing it from the side of the iron rest
to the tip of the ironing board, then adjust. The cover supplied with
this product is specially designed to ensure uniform distribution of air
over the whole board in vacuum or blower mode. Use only a Laurastar
approved cover to ensure that its effectiveness is not impaired. The
cover is washable at 30°C (warm water); do not spin dry.
• Take the iron (2) out of its safety storage box (5) and place it on the
iron-rest (6).
• You can fold the iron-rest into the close position (6a) if you desire.
• Insert the steam hose holder (8) in one of the two holes beside the
iron-rest (6), fix the steam hose on the steam hose holder (3a). Insert
the protective soleplate hook (28) in the other hole.
• You can lower the table height by clamping the handles (7). There are
six levels. To lift the table, simply pull it up without using the handles.
• To move your Laurastar, simply raise the tip of the board and roll.
C
- 6 -
EN

MAX
MAX
E
F
D
G
H
I
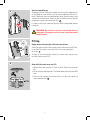
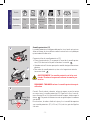
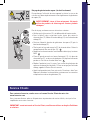
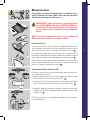
Preparing the appliance
We recommend that you rinse out the steam generator (15) before using it
for the first time:
• Check that the plug (23) is disconnected from the mains socket.
• Set the ironing board (1) to its highest position, then remove the water
reservoir (11).
• Place the drain tray (14) beneath the drain cap (22).
• First unscrew the steam generator cap (21), then unscrew the drain
cap (22).
D
• Remove the small and the large lid (12) from the water reservoir. Remove the
filter compartment with the filter (13).
E
• Fill the water reservoir with warm tap water up to the MAX level
F
• Position the large funnel shaped lid (12) at the place of the water reservoir (11)
on top of the steam generator (15) and place the water reservoir above it.
G
• Once all the water has flown through and the reservoir is empty, screw the
two caps in place again.
• Dispose of the water.
Which water should be used ?
Your Laurastar has been designed for use with tap water. It is still ab-
solutely necessary to use the supplied anti-scale filter (13) in order to
benefit fully and longer from your Laurastar.
NOTICE : Never use additives (e.g.
perfumed water), water containing
chemical products or water from tum-
ble dryers as these products will have
a detrimental effect on the function of
your Laurastar.
Storing your system
• To turn your appliance off, press the main ON/OFF button (16).
• Remove the power plug (23) and roll the electric cable around the feet
of the table. If your model has the automatic rewind, pull on the cable in
order to activate the rewind.
• Place the steam hose holder (8) horizontally in the hole designed for
this purpose.
• Place the iron in the iron safety storage box (5). Fold the iron-rest into
the “close” position on top of the table. With one hand grasp the ta-
ble at the iron-rest side (6). With the other hand grasp the ironing
board (1), tilt the table into the vertical position.
H
I
• Store your system in a vertical position. You can leave the water in the
reservoir until the next usage.
• NOTE : if you store your system in a horizontal position, you
must empty the water reservoir (11).
- 7 -

LAURASTAR
ON/OFF
SenSteam
Pulse
Fan speed
Water
MAX
10 min.
3-5 min.
A
B
C
Start up
CAUTION : ALWAYS fill the water reservoir (11) completely
before turning on your Laurastar. Operating the appliance
without water could damage the appliance.
PLEASE NOTE : Operating the appliance without water will
void any limited warranties provided with your appliance.
Installation of the anti-scale cartridge and filling
• Check that the power plug is disconnected from the mains socket.
• Set the ironing board to its highest position.
• Take the water reservoir (11) out. Take off the water reservoir lids.
Install the anti-scale filter (13).
A
• Fill the reservoir with tap water. The filtered water has to reach the
MAX level.
B
• Close the water reservoir with the lids and put the reservoir back on
the steam generator (15).
User interface
• ON/OFF = the green indicator light flashes until the appliance is ready
to be used.
• = Option Laurastar SenSteam. If your appliance is equipped with
the Laurastar SenSteam option (17), the white indicator light signals
that the function is on.
• = Option Pulsed Steam. If your appliance is equipped with the
Pulsed Steam option (18), the white indicator light signals that the
function is ON. Fan speed button (19) = choice of four speeds. The
white indicator light signals the intensity chosen.
• Empty water light (20) = the red drop shaped indicator light signals
that there is no more water in the reservoir (11).
Switching on your appliance
• Insert the power plug (23) in the socket. If your model is equipped
with the automatic rewinder, first pull the electric cable untill the
end-of-cable mark is visible at the rewinder opening.
• Press the main ON/OFF button(16), the green indicator light will flash
for 3-5 minutes.
C
• When the green indicator light stops flashing and stays on, the appli-
ance is ready. You can start ironing.
• NOTE : For your comfort and safety, your Laurastar system
will switch off after 10 minutes of non-use.
LauraStar Auto Steam Picto 01/09/16
LauraStar Auto Picto 01/09/16
- 8 -
EN

2-3
x
A
B
C
D
• NOTE : Before ironing, or after an extended break, press the
iron’s steam button (9) 2 or 3 times, while pointing it away
from the clothes. This will release any condensation from
the iron and prevent water marks on the clothes.
CAUTION : Do not point the iron at people or pets while
using vertical steam.
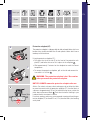
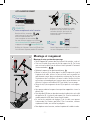
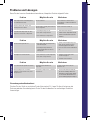
Two ironing modes
For the best possible steam ironing result, we offer two modes of ironing :
• Blower mode: Pressing the vacuum/blower button (10) on the
iron activates the fan (24) in blower mode. this blows air into the fabric
from below, helping to reduce unwanted creases.
• Vacuum mode: PPressing the vacuum/blower button (10) again,
activates the fan (24) in vacuum mode. This draws in air, holding the
garment in place on the board to facilitate perfect pleats.
Press the vacuum/blower button (10) to switch from blower to vacuum
mode and vice versa. You can adjust the intensity (4 speeds) pressing the
fan speed button (19) on the user interface of the steam generator.
LAURASTAR SENSTEAM (17) (certain models only)
Laurastar SenSteam (17) allows you to obtain an automatic steam diffu-
sion without pressing the steam button (9). The steam is automatically
activated when the iron moves forward and stops when the iron rests
or moves back
C
.
To switch back to regular mode, press the Laurastar SenSteam button
(17) again.
PULSE (18) (certain models only)
Press the pulsed steam button (18) to activate the pulse function. Then
press the steam button (9) to automatically generate small and regular
steam jets
D
. To switch back to regular mode, press the pulsed steam
button again (18).
Steam principle
Perfect ironing requires diffusion of steam across the fabric, in order to
relax the fibres, and drying to fix them in place. Creases can only be com-
pletely removed if these conditions are present.
Advice : For best results, first iron the item with steam and then iron
it again without steam, thereby enabling the iron to dry the fabric.
Ironing
B
A
- 9 -

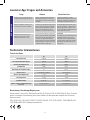
Ironing mode
Fabric type Velvet
Blower Back Darts
Inside and
linings,
sleeves
Top and
pleats
ü ü ü
Vacuum
Buttons
and collar
Turn-ups
and pleats
Buttons and
collars
Pleats
ü
10 cm/ 4
in
E
F
G
Protective soleplate (27)
The protective soleplate is indispensable for dark-coloured fabrics which can
become shiny, for delicate fabric like silk and synthetic fabrics which have a
tendency to stick to the iron.
Using the protective soleplate (27) :
• First place the tip of the iron (2) at the front of the protective sole-
plate (27) and lower the iron to fix it in place in the soleplate.
• Wait approximately 2 minutes for the soleplate to reach the correct
temperature.
• To remove the protective soleplate, pull on the tab and remove the
iron while it is still hot.
WARNING : The protective soleplate is hot ! Use caution
when you remove the protective soleplate.
NOTICE : ALWAYS remove the protective soleplate after use.
Advice : For mohair, cashmere, velvet and angora : do not allow the fabric
to come into contact with the protective soleplate (27). Iron the fabric at
a distance of approximately 10 cm (4 in) while diffusing steam, so that the
fabric does not become felted. Then take the item of clothing in your
hand and shake it to restore its volume.
For velvet, corduroy and jersey, we recommend steaming without the pro-
tective soleplate (27) at around 2-3 cm (1-2 in) from the fabric, then levelling
out by hand.
E
F
G
- 10 -
EN

LAURASTAR
LAURASTAR
bip
MAX
H
A
B
Vertical smoothing out
Suspend the item of clothing on a hanger or on the vertical support brack-
et (available on www.laurastar.com or at your approved Laurastar re-
tailer). Moving the iron from top to bottom, lightly touch the fabric using
short bursts of steam. Note : almost all fabrics smooth out easily, with the
exception of cotton, linen and certain silks.
H
If a fabric is difficult to smooth out, place it on the ironing board and iron
it normally.
WARNING : Do not iron or vertical steam clothes that are
being worn. Do not point vertical steam in the direction of
people or pets.
Empty water indicator light (20) and warning tone
A warning tone sounds and the empty water indicator light (20) flash-
es to signal that there is no water left in the steam generator’s
reservoir.
As soon as the warning tone sounds, the steam stops and you must
refill the water reservoir (11).
How to fill the water reservoir (11)
• Remove the water reservoir (11) from its place. Take off the reservoir
lids.
• Fill the reservoir with tap water. The filtered water must reach the MAX
level.
• Close the lids and put the reservoir back in its place on top of the
steam generator (15).
Filling
B
A
- 11 -

MAX
F
A
B
C
D
E
To extend the life of your appliance, we recommend that you
rinse the steam generator and clean your iron every month or
after every 10 hours of ironing.
WARNING : the appliance should be UNPLUGGED, OFF
and COLD before cleaning. Switch off and unplug the ap-
pliance. Allow your appliance to cool down for at least 2
hours. Always make sure your appliance is cold before
cleaning !
NOTICE ! Only rinse the appliance with water. NEVER use des-
caling products or other chemical products.
Cleaning the iron (2)
If the iron’s soleplate is dirty, use the cleaning mat in accordance with
the instructions. This can be obtained at www.laurastar.com or from your
approved Laurastar retailer.
Stubborn stains can be cleaned using an abrasive dishwashing sponge.
After completing this operation, remove the aluminium oxide present un-
der the soleplate by cleaning it with a damp cloth.
Clean the steam holes in the iron’s soleplate as soon as they become
blocked up or calcified. Clean the holes using the appropriate tool. This
can be obtained at www.laurastar.com or from your approved Laurastar
retailer.
C
Anti-scale filter change (13)
The anti-scale filter has to be changed when the granules are completely
brown.
• Remove the water reservoir (11) from its place. Take off the water reser-
voir lids. Remove the anti-scale filter (13).
D
• Dispose of the filter (13) in the regular houshold garbage and rinse the
compartment.
Install a new anti-scale filter in the water reservoir.
E
• Fill the reservoir with tap water. The filtered water must reach the MAX
level. Then put the reservoir back in its place on top of the steam
generator (15).
F
Note: you can wash the plastic elements of the water reservoir (11) in
the dishwasher.
Maintenance
A
B
- 12 -
EN

Rinsing the steam generator (cold iron only)
In order to prolong the effectiveness of your appliance and avoid any
traces of limescale, you must rinse the steam generator (15) on a
regular basis.
WARNING : Only rinse with water. NEVER use descaling
products or other chemical products.
Rinse the steam generator in accordance with the following instructions :
• Check that the power plug (23) is disconnected from the mains socket.
• Set the ironing board (1) to its highest position, then remove the water
reservoir (11). Place the drain tray (14) beneath the drain cap (22).
• First unscrew the steam generatorcap (21) then the drain cap (22).
• Remove the small and the large lid from the water reservoir (12). Remove
the filter compartment with the filter (13).
H
• Fill the water reservoir with warm tap water up to the MAX level.
I
• Position the large funnel shaped lid (12) at the place of the water reservoir (11)
on top of the steam generator (15) and position the water reservoir above it.
Then let the water flow through.
J
• Repeat the operation until the water coming out of the steam genera-
tor is free of residues. If no water comes out of the drain opening, call
the Laurastar Customer Service department.
• Once all the water has flown through and the reservoir is empty, screw
the two caps in place again. Dispose of the water. Place the filter back
in the water reservoir, close with the lids and put the reservoir back in
its place on top of the steam generator (15).
To contact Laurastar, visit the Consumer Service menu of our website :
www.laurastar.com
You will find other addresses of official importers and service partners, as well as the complete list of
the Laurastar accessories.
IMPORTANT : before returning any product to the Customer Service department, please refer
to the Problems and Solutions section.
Customer Service
MAX
H
J
I
- 13 -

Problems and solutions
Before calling the Laurastar Customer Service department, please check the following points :
Symptom Likely cause Remedy
STEAM GENERATOR
Makes a buzzing noise when steam
is emitted from the iron.
Makes a crackling noise when the
appliance is switched on.
The iron no longer emits steam.
The pressure has fallen.
Vibration from the appliance.
The appliance has been set to heat up
but has not been filled with water.
• The steam generator is empty.
• The appliance is switched off.
• The plug (23) is disconnected from
the mains socket.
• Fill the water reservoir (11)
• Turn the main switch ON (16)
• Connect the power plug (23) to the
mains socket.
Fill the water reservoir (11)
This noise is normal for a new appliance,
it will disappear in the course of use.
Return to the Customer Service department
Switch off the appliance and disconnect the plug (23) from the mains socket. Locate your purchase con-
tract, invoice or receipt. Call the Customer Service department and follow the instructions given.
Symptom Likely cause Remedy
IRON
The soleplate drips.
Symptom Likely cause Remedy
FAN
There is no sound from the fan.
The tip of the ironing board table
becomes wet when folded.
The fan plug (25) is disconnected from
the mains socket.
There is condensation inside the
ironing board table (1).
• Leave the appliance open until the
water has completely evaporated.
• Use less steam. Please refer to
the instruction manual, paragraph
«Steam principles».
Reconnect the fan plug (25) to the mains
socket.
The iron does not heat up.
• The appliance has not been rinsed out
recently.
• The steam generator has been rinsed
with a product other than water.
• The plug (23) is disconnected from
the mains socket.
• The appliance is switched off.
• Plug in the appliance.
• Switch on the appliance.
• Rinse out the Steam generator (15) until
the rinsing water does not contain any
more residues.
• Call the Laurastar Consumer Service.
- 14 -
EN

Technical characteristics
Technical information
CE UL
Total output
2200 W 1600 W
Generator output
1400 W 1000 W
Iron output
800 W 600 W
Steam pressure
3,5 bar 50 psi
Steam generator capacity
1,1 l 37,2 oz.
Electricity supply
220-240 VAC / 50-60 Hz 120 VAC / 60 Hz
Weight of iron
1,1 kg 2,4 lb
Total weight
23,1 kg 51 lb
Board height
82-102 cm 32.3-40.2 in
Dimensions when folded (H x W x D)
132 x 42 x 22 cm 52 x 16.6 x 8.7 in
Laurastar App: questions and answers
Designation: Pressure steam ironing system
The manufacturer, Laurastar SA, Route de Pra de Plan 18, P.O. Box 320, CH-1618 Châtel-St-Denis,
Switzerland, declares, under its own responsibility, that these products comply with the current
European directives : 2014/35/EU (LVD) 2014/30/EU (EMC) 2011/65/EU (RoHS) 2012/19/EU (WEEE)
1907/2006 (REACH) 1275/2008 et 801/2013 (Ecodesign requirements)
Question Answer Additional information
APP LAURASTAR
How can I keep in memory the settings
I have made with the App?
How many smartphones or tablets can
I connect to my Laurastar?
How can I restore the factory settings
(factory reset)?
All the settings made with the Laurastar App
are automatically stored in your Laurastar’s
memory and you will find them each time you
turn on your appliance.
It is possible to connect an unlimited
number of different smartphones or
tablets. When you start your Laurastar,
you will find the settings of the last
smartphone or tablet used.
Make a simultaneous long press on the
main ON/OFF and the fan speed button.
Keep the two buttons pressed for 10
seconds. When all the LEDs of the user
interface start to blink, the factory settings
are reset.
WARNING
Intended or unintended incorrect handling
might cause erasing of the factory settings.
This voids the Laurastar warranty and
possible costs of repair will be in charge
of the user.
Your Laurastar automatically loads the
settings of the closest smartphone or
tablet, if different from the last used and
if the Bluetooth function is activated.
If several smartphones/tablets have been
connected, your Laurastar will recognize the
closest smartphone/tablet if the Bluetooth
function is activated.
- 15 -

Laurastar international guarantee
The present guarantee does not, in any way, affect the sta-
tutory rights of the user pursuant to the national legislation
i
n force governing the sale of consumer goods, including
the rights set out by Directive 2011/83/EU of the European
Parliament and of the Council of 25 October 2011 on certain
aspects of sales and guarantees for consumer goods, or
the rights held by the user, by virtue of the sales contract,
with regard to the respective vendor. In the event that an
appliance sold by Laurastar contains manufacturing defects,
Laurastar shall be liable for the complete elimination of these
defects within the scope defined below.
1. Scope of cover
This guarantee only applies to products manufactured by or
on behalf of Laurastar, which may be identified by the brand,
the trade name or the Laurastar logo affixed to the product.
The guarantee does not apply to non-Laurastar products,
accessories or spare parts.
T
his guarantee shall be applicable only if the appliance be-
comes unusable, or if its use is significantly hindered, due to
a m
anufacturing defect, an assembly defect or a defect in
the material of the appliance, and if this defect was already
in existence when the appliance was supplied to the user.
It shall not be applicable, in particular :
• if the hindrance to use of the appliance is due to pro
-
fessional use of the appliance, namely intensive use for
w
hich the user receives monetary remuneration
• to normal wear and tear of the appliance’s components
and accessories
• to an intervention by a third party or a repairer not
approved by Laurastar
•
to failure to comply with the instructions contained in the
instruction manual, specifically the warnings concerning
start-up, use and maintenance of the appliance
• to non-compliant use.
The concept of “non-compliant use” notably includes damage
caused by :
• the fall of the appliance or of a component
• blows or marks resulting from negligence
• keeping the protective soleplate on the iron permanently
• failure to rinse the boiler
• use of water that does not comply with the specifications
• use of non-Laurastar products, accessories and spare
parts.
• Continuous connection of the power plug to the mains
socket.
2.
Entitlements held by the user
When a user asserts, in a manner compliant with the pre-
sent guarantee, an entitlement arising from the said guaran
-
tee, Laurastar shall be free to implement the most appropri-
ate method for eliminating the defect. This guarantee does
n
ot grant the user any entitlement or any additional right;
in particular, the user may not claim for reimbursement of
expenses in relation to the defect, or compensation for any
consequential loss or damage. Moreover, transportation of
the appliance from the user’s place of residence to Laura
-
star’s premises, and return transportation, shall be carried
o
ut at the user’s risk.
3. Term of validity
This guarantee is only valid for the entitlements that it ac
-
cords to the user and that the user has asserted against
L
aurastar within the guarantee term.
The guarantee term is one year for countries that are not mem
-
bers of the European Union and two years for European Union
M
ember States and Switzerland, calculated from the date of
delivery of the appliance to the user. If defects are notified after
the guarantee term has come to an end, or if the documents or
items of evidence that are necessary to assert the defects in
accordance with the present declaration are not present until
after the end of the guarantee term, the user shall not hold any
rights or entitlements by virtue of this guarantee.
4. Immediate notification of defects
When the user discovers a defect in the appliance, he / she
undertakes to communicate this to Laurastar without delay.
If the user does not do so, he / she shall lose the entitle
-
ments afforded by the present guarantee.
5.
Methods for asserting entitlements arising from
the present declaration
In order to assert the entitlements resulting from this
guarantee, the user must contact the Laurastar Customer
S
ervice department, either :
• by telephone
• by e-mail
• by fax.
He / she must follow the instructions from the Customer Ser
-
vice department and send, at his
/ her own risk :
• the appliance with the defect(s)
• a copy of the purchase contract, of the invoice, of the till
receipt or any other suitable document as evidence of
the date or place of purchase.
The Customer Service department is available to provide
any additional information on this subject.
You will find other addresses for importers and official ser
-
vice partners at www.laurastar.com.
- 16 -
EN

If an appliance is returned to the Laurastar approved service
centre when there is no defect present, the user shall be
liable for the dispatch and return costs.
6. Laurastar™ after-sales service
If a Laurastar appliance is delivered to an agreed service
centre for an intervention that is not covered by any war
-
ranty clause or after the warranty period, said intervention
w
ill be considered as a « out-of-warranty repair » and shall
be invoiced.
Special clause only applicable in France :
In addition to the contractual guarantee detailed above, cus-
tomers benefit from the legal guarantee for hidden defects
s
et out in Article 1641 et seq. of the French Civil Code.
Laurastar warrants its product to be free from defects in
materials and workmanship under normal customer use as
described in the instruction manual for 1 year from the date
of purchase as identified on the invoice or cash receipt. This
limited warranty extends only to the original purchaser and is
not transferable. Laurastar, at its option, will at no charge re
-
pair or replace defective equipment during the period of this
l
imited warranty. To obtain warranty service, the damaged
equipment must be sent or taken to an authorized Laurastar
customer service center. This limited warranty is the cus
-
tomer’s exclusive remedy and applies only to new Laurastar
pr
oducts.
This limited warranty does not cover normal wear and tear,
wear of the electric cable, wear of the soleplate, or wear
of the appliance’s components and accessories. Damage
caused by improper operation or storage, misuse or abuse,
unauthorized repair by non-Laurastar specialists, accident or
neglect, alteration, or connecting to a power source outside
the specified voltage. Equipment used for a commercial or
any other non-domestic or household purpose is not covered
by this limited warranty. “Misuse or abuse” of the product
includes the use of the equipment for any purpose, or in any
manner, not in accordance with the instructions contained
in the instruction manual provided with the equipment. Ex
-
amples of “misuse or abuse” of the product include, but are
n
ot limited to, damage caused by the appliance or one of its
components falling to the floor, failure to rinse the water
reservoir, failure to remove the protective soleplate, use of
a
ny liquid other than water, the fact of not unplugging the
power plug from the mains socket after each usage and the
use of products, accessories and spare parts not supplied
by Laurastar. The present limited warranty does not cover
damages caused by non-respect of the instructions stipula-
ted by this instruction manual.
ANY
IMPLIED WARRANTIES, INCLUDING WITHOUT
LIMITATION THE IMPLIED WARRANTIES OF MER
-
CHANTABILITY AND FITNESS FOR A PARTICULAR
P
URPOSE, SHALL BE LIMITED TO THE DURATION OF
THIS LIMITED WARRANTY. LAURASTAR SHALL UN
-
DER NO CIRCUMSTANCES BE LIABLE FOR DAMAGES
I
N EXCESS OF THE PURCHASE PRICE OF THE PRODUCT
OR FOR ANY INCIDENTAL OR CONSEQUENTIAL DAMA-
GES OF ANY KIND ARISING OUT OF THE CUSTOMER’S
A
BILITY OR INABILITY TO USE THE PRODUCT.
Some states and jurisdictions do not allow the limitation or
exclusion of incidental or consequential damages, or limi-
tation on the length of an implied warranty, so the above
l
imitations or exclusions may not apply to you. This limited
warranty gives the customer specific legal rights, and you
may have other rights that vary from state to state.
LAURASTAR™ AFTER-SALES SERVICE
If you have a claim under this limited warranty, please con
-
tact the Laurastar Customer Service department, either by
t
elephone, e-mail or fax. You must follow the instructions
from the Customer Service department and send, at your
own risk :
• the appliance ;
• a copy of the purchase contract, invoice, till receipt, or
any additional information on this subject.
You will find other addresses for importers and official
service partners at www.laurastar.com.
If an appliance is returned to the Laurastar approved service
center when there is no defect present, the user shall be
liable for the dispatch and return costs
I
f a Laurastar appliance is entrusted to the approved service
center for work outside the provisions of this limited warranty,
or after the limited warranty one-year term has come to an
end, this shall be deemed a “repair outside limited warranty”
and shall form the subject of an invoice.
Laurastar
TM
limited warranty for USA & Canada
- 17 -

CONSIGNES DE SÉCURITÉ
LISEZ TOUT LE MODE D'EMPLOI
AVANT D'UTILISER L'APPAREIL.
• Cet appareil est destiné uniquement à
l’usage dans un ménage privé.
• Utilisez cet appareil uniquement à l’intérieur
et pour le repassage de pièces textiles dans
le respect de ce mode d’emploi.
• En cas d’urgence, retirez immédiatement la
fiche secteur de la prise murale.
• N’immergez aucune pièce de l’appareil dans
l’eau ou tout autre liquide.
• L’appareil doit être connecté UNIQUEMENT
à une prise murale avec mise à terre. Nous
recommandons les commutateurs FI. NE
JAMAIS utiliser une fiche mobile, un adap-
tateur multiprises ou tout autre prolonga-
teur. La fiche secteur doit être facilement
accessible en cas d’urgence.
• La semelle du fer et le jet de vapeur sont
très chauds, NE PAS repasser ou appliquer
de la vapeur sur des vêtements que des
personnes portent sur elles.
• Ne pas diriger la vapeur verticale sur des
personnes ou des animaux pendant le dé-
froissage vertical.
• L’appareil produit de la chaleur. Gardez vos
mains et votre corps loin de la semelle du fer
et du jet de vapeur durant l’utilisation – ils
sont CHAUDS. Le contact avec les parties
métalliques chaudes, de l’eau chaude ou
de la vapeur peut provoquer des brûlures.
Prudence lorsque vous remettez le fer sur
le repose-fer.
• LE CONTACT AVEC DE LA VAPEUR SOUS
PRESSION PEUT CAUSER DE GRAVES
BRÛLURES.
• NE PAS ouvrir le bouchon du générateur
ou le bouchon de vidange durant le fonc-
tionnement.
• Dévissez le bouchon du générateur et le
bouchon de vidange avec précaution – de
la vapeur chaude sous pression commence
à sortir après quelques tours.
• Reculez-vous de l'appareil lorsque vous dé-
vissez et ôtez le bouchon du générateur ou
le bouchon de vidange – de la vapeur chaude
commencera à sortir.
• Ne jamais laisser l’appareil branché sans
surveillance.
• ÉTEIGNEZ l'appareil avant de le brancher ou
de le débrancher de la prise murale. TOU-
JOURS laisser refroidir l’appareil pendant au
moins 2 heures avant de le vidanger.
• TENIR HORS DE LA PORTÉE DES ENFANTS.
• Cet appareil n’est PAS destiné à l’utilisation
par des enfants, ainsi que par des personnes
présentant des capacités physiques, sen-
sorielles ou mentales réduites, ou avec un
manque d’expérience, sauf s’ils sont sous
la surveillance d’une personne chargée de
leur sécurité. Cet appareil n’est PAS desti-
né à être utilisé par les enfants en-dessous
de 8 ans même s’ils sont surveillés ou ont
effectué une formation.
• L’appareil doit toujours être reposé/mis en
attente sur un support plat, stable et ré-
sistant au feu. NE JAMAIS reposer le fer
à repasser sur la housse de repassage ou
le linge. Pour éviter tout risque d’incendie,
Tenir hors de la portée des enfants.
Surveillez les enfants pour empê-
cher qu’ils ne jouent avec l’appa-
reil.
AVERTISSEMENT !
DANGER !
- 18 -
FR

poser le fer à repasser uniquement sur le
repose-fer.
• Attention quand vous enlevez et déposez la
semelle protectrice après utilisation. Posez
la semelle chaude sur le pose-fer resistant
à la chaleur.
• Le nettoyage, les réparations et l’entretien
de l’appareil doivent être effectués UNIQUE-
MENT si l’appareil est éteint, froid et refroidi
pendant au moins 2 heures. Dévissez les
bouchons avec précaution : la vapeur sous
pression encore existante commence à sor-
tir après quelques tours. Risque de brûlures.
• NE PAS mettre le câble électrique en contact
avec des surfaces chaudes. Laissez refroidir
complètement le fer avant de le ranger.
• EAU NON-POTABLE.
• NE PAS utiliser l’appareil si celui-ci a été
endommagé lors d’une chute, s’il présente
des signes visibles de dégâts ou si le tube
vapeur ou le câble électrique est défec-
tueux. Faire intervenir uniquement le Service
Clients Laurastar autorisé pour la remise en
état de l’appareil.
• Un réassemblage incorrect peut provoquer
un risque de décharge électrique lors de
l’utilisation de l’appareil.
• NE PAS mettre l’appareil en marche sans
eau.
• Nettoyer l’extérieur de l’appareil avec un
chiffon doux et humide. NE PAS utiliser de
solvants, d'huile ou d'essence !
• Pour éviter une surcharge de votre instal-
lation électrique, ne faites pas fonctionner
un autre appareil à haute puissance (watt)
simultanément.
• NE JAMAIS ouvrir le bouchon de vidange
ou le bouchon du générateur de vapeur en
cours de fonctionnement. Lorsque l’appareil
a complètement refroidi, dévissez le bou-
chon de vidange / le bouchon du générateur
de vapeur avec précaution : la vapeur encore
sous pression existante commencera à sortir
après quelques tours. Risque de brûlures.
• NE PAS essayer d’insérer des objets dans
les ouvertures de l’appareil. En cas d’infiltra-
tion d’eau ou si des corps étrangers entrent
dans l’appareil, débranchez immédiatement
la fiche secteur de la prise murale. Faire
intervenir uniquement le Service Clients
Laurastar autorisé pour la remise en état
de l’appareil.
• Pour éviter tout risque de décharge élec-
trique, NE PAS retirer le câble électrique de
la prise murale en tirant dessus, mais saisis-
sez fermement la fiche secteur et retirez-la.
• Positionner le câble électrique et le tube
vapeur de telle sorte qu'ils ne puissent
pas être tirés ou accrochés. Assu-
rez-vous également que personne ne
risque de trébucher dans ces câbles.
• Remarques concernant l’environne-
ment et mesures d’élimination :
NE PAS jeter l’appareil usagé dans les
déchets ménagers
courants ! Se renseigner
auprès des services municipaux ou locaux
des possibilités d’élimination correcte dans
le respect de l’environnement.
NE PAS boire l’eau filtrée. Tenir
hors de portée des enfants.
NE PAS ingérer les granulés de
déminéralisation. Ils peuvent en
outre être jetés avec les ordures
ménagères.
CONSERVEZ PRÉCIEUSEMENT
CES INSTRUCTIONS
ATTENTION
!
- 19 -

Remarque : Le non-respect de ce
mode d’emploi / des consignes
de sécurité peut entraîner une
mise en danger par l’appareil.
Le fabricant décline toute
responsabilité pour des dommages
matériels ou des blessures
résultant d’un non-respect de ces
consignes de sécurité. Conserver
ce mode d’emploi pour toute
personne utilisant l’appareil.
Vue d'ensemble et fonctionnalités
1. Table de repassage
2. Fer
3. Tube vapeur
4. Housse spéciale Laurastar
5. Rangement de sécurité
6. Repose-fer rabattable
7. Poignées d’ajustement pour la hauteur
8. Guide-fil pour le tube vapeur
9. Boutons vapeur
10. Bouton aspiration/soufflerie
11. Réservoir d'eau
12. Grand et petit couvercle du réservoir
d’eau
13. Compartiment du filtre et
filtre anticalcaire
14. Bac de vidange
15. Générateur de vapeur
16. Bouton principal ON/OFF avec indica-
teur lumineux
17. Bouton Laurastar SenSteam (option)
18. Bouton vapeur pulseé (option)
19. Bouton vitesse ventilateur (4 vitesses)
20. Témoin lumineux de fin d’eau
21. Bouchon du générateur de vapeur
22. Bouchon de vidange
23. Fiche secteur et câble électrique
24. Ventilateur
25. Fiche du ventilateur
26. Roulettes
27. Semelle protectrice
28. Crochet pour semelle protectrice
Félicitations! Vous venez d'acquérir un système de repassage Laurastar de qualité alliant design et techno-
logie suisse. Nous vous prions de bien vouloir lire attentivement ce mode d'emploi ainsi que les consignes de
sécurité avant la première mise en marche de l’appareil et de bien vouloir conserver ce mode d’emploi pour
une utilisation future. Retrouvez toutes nos vidéos de mode d'emploi et conseils sur www.laurastar.com
AVERTISSEMENT : Votre produit Laurastar
TM
émet de la chaleur et de la vapeur ; certains
éléments peuvent être très chauds et provoquer des brûlures lors du fonctionnement.
NOTE : Cet appareil génère de la chaleur et peut causer des brûlures. Les parties qui
deviennent très chaudes sont marquées avec ce symbole.
Table des matières
Consignes de sécurité 18
App Laurastar Smart 21
Montage et rangement 21
Mise en marche 23
Repassage 24
Remplissage 26
Entretien 27
Service Clients 28
Problèmes et solutions 29
App Laurastar : Q & R 30
Informations techniques 30
Garantie / Garantie limitée
pour les USA et le Canada 31
- 20 -
FR

Branchez la fiche secteur de
votre Laurastar à la prise électrique.
Activez le mode Bluetooth sur
votre smartphone ou votre tablette.
Sur votre Laurastar, appuyez sur le bouton
vitesse du ventilateur (19), gardez-le pressé
et appuyez sur le bouton principal ON/OFF (16).
Relâchez les 2 boutons. Toutes les LEDs de l’inter-
face utilisateur clignotent pendant 20 secondes.
Ce processus peut être répété si le temps
disponible n’est pas suffisant. Une fois la
connexion effectuée, plus besoin de
reconnecter le même smartphone ou
la même tablette.
interface utilisateur
Lancez l’App Laurastar et suivez les instructions
sur votre smartphone ou tablette.
CONNECTEZ
votre smartphone à votre Laurastar
2
TÉLÉCHARGEZ
APP LAURASTAR SMART
l’App Laurastar
Si vous l’avez déjà, vérifiez qu’elle
soit mise à jour.
1
LANCEZ
l’App
3
LAURASTAR
A B
C
Montage et rangement
Montage de votre système de repassage
• Sortez l'appareil du carton et dressez-le fermé à la verticale, sur le sol.
• Saisissez la table d’une main du côté du repose-fer (6). De l'autre
main saisissez la table (1) par le milieu et faites-la pivoter à l’horizontal
(hauteur maximale).
A
B
• Rabattez le repose-fer en position extérieure.
• Mettez la housse (4) en place depuis le côté du repose-fer jusqu'à
la pointe de la table, ajustez. La housse livrée avec ce produit est
spécialement conçue pour une répartition uniforme de l'air lors de
l’aspiration et de la soufflerie sur toute la table. Veuillez n’utiliser
qu’une housse homologuée par Laurastar pour ne pas diminuer son
efficacité. La housse est lavable à 30°C (eau tiède), sans essorage.
• Sortez le fer (2) du rangement sécurisé (5) et posez-le sur le repose-
fer (6).
• Vous pouvez rabattre le repose-fer en position rapprochée si vous le
désirez. (6a)
.
• Fixez le guide-fil (8) dans un des deux trous de la table situés sur le côté
du repose-fer (6), y insérer le tube vapeur (3a). Fixez le crochet de la
semelle protectrice (28) dans l’autre trou de la table.
• En serrant les poignées de réglage (7) de la table, vous pouvez
la descendre (six hauteurs possibles). Pour la remonter, soulevez
simplement la table, sans utiliser les poignées.
• Pour déplacer votre Laurastar, soulevez la pointe de la table et roulez.
C
- 21 -

MAX
E
F
D
G
H
I
MAX
Préparation de l'appareil
Il est conseillé de rincer le générateur de vapeur (15) avant la première
utilisation:
• Vérifiez que la fiche secteur (23) soit débranchée de la prise murale.
• Fixez la table (1) dans sa position la plus haute, puis retirez le réservoir
d'eau (11).
• Mettez le bac de vidange (14) sous le bouchon de vidange (22).
• Dévissez d'abord le bouchon du générateur de vapeur (21) puis le
bouchon de vidange (22).
D
• Ôtez le petit et le grand couvercle (12) du réservoir d'eau. Retirez le
compartiment du filtre et le filtre (13).
E
• Remplissez le réservoir avec de l'eau chaude du robinet jusqu'au niveau
MAX.
F
• Placez le grand couvercle en forme d'entonnoir (12) à la place du réservoir
d'eau (11), au-dessus du générateur (15) et placez le réservoir par-dessus.
G
• Après écoulement de toute l’eau, revissez les 2 bouchons.
• Jetez l’eau.
Quelle eau utiliser ?
Votre Laurastar a été conçue pour fonctionner avec de l'eau du robinet.
Il est toutefois indispensable d'utiliser le filtre anticalcaire (13) fourni
pour profiter pleinement et plus longtemps de votre Laurastar.
REMARQUE : N'utilisez jamais
d'additifs (ex. eau parfumée) ni d'eau
contenant des produits chimiques
ni d'eau de récupération du sèche-
linge car ces produits nuisent au bon
fonctionnement de votre Laurastar.
Rangement de votre système
• Éteignez votre appareil en appuyant sur le bouton principal
ON/OFF (16).
• Retirez la fiche secteur (23) et enroulez le câble d'alimentation autour
des pieds de la table. Si votre modèle comporte l'enrouleur automatique,
tirez sur le câble afin d'enclencher l'enroulement automatique.
• Mettez le guide-fil (8) à l'horizontale dans le trou prévu à cet effet.
• Mettez le fer dans le rangement sécurisé (5) . Rabattez le repose-fer en
position rapprochée. D'une main, saisissez la partie avec le repose-
fer (6). De l'autre main, saisissez la table (1) et faites basculer la table
à la verticale.
H
I
• Rangez votre système en position verticale. Vous pouvez laisser l’eau
dans le réservoir d'eau jusqu’à la prochaine utilisation.
• NOTE : Si votre appareil est rangé en position horizontale, vous
devez vider le réservoir d'eau (11).
- 22 -
FR
La pagina sta caricando ...
La pagina sta caricando ...
La pagina sta caricando ...
La pagina sta caricando ...
La pagina sta caricando ...
La pagina sta caricando ...
La pagina sta caricando ...
La pagina sta caricando ...
La pagina sta caricando ...
La pagina sta caricando ...
La pagina sta caricando ...
La pagina sta caricando ...
La pagina sta caricando ...
La pagina sta caricando ...
La pagina sta caricando ...
La pagina sta caricando ...
La pagina sta caricando ...
La pagina sta caricando ...
La pagina sta caricando ...
La pagina sta caricando ...
La pagina sta caricando ...
La pagina sta caricando ...
La pagina sta caricando ...
La pagina sta caricando ...
La pagina sta caricando ...
La pagina sta caricando ...
La pagina sta caricando ...
La pagina sta caricando ...
La pagina sta caricando ...
La pagina sta caricando ...
La pagina sta caricando ...
La pagina sta caricando ...
La pagina sta caricando ...
La pagina sta caricando ...
La pagina sta caricando ...
La pagina sta caricando ...
La pagina sta caricando ...
La pagina sta caricando ...
La pagina sta caricando ...
La pagina sta caricando ...
La pagina sta caricando ...
La pagina sta caricando ...
La pagina sta caricando ...
La pagina sta caricando ...
La pagina sta caricando ...
La pagina sta caricando ...
La pagina sta caricando ...
La pagina sta caricando ...
La pagina sta caricando ...
La pagina sta caricando ...
La pagina sta caricando ...
La pagina sta caricando ...
La pagina sta caricando ...
La pagina sta caricando ...
La pagina sta caricando ...
-
 1
1
-
 2
2
-
 3
3
-
 4
4
-
 5
5
-
 6
6
-
 7
7
-
 8
8
-
 9
9
-
 10
10
-
 11
11
-
 12
12
-
 13
13
-
 14
14
-
 15
15
-
 16
16
-
 17
17
-
 18
18
-
 19
19
-
 20
20
-
 21
21
-
 22
22
-
 23
23
-
 24
24
-
 25
25
-
 26
26
-
 27
27
-
 28
28
-
 29
29
-
 30
30
-
 31
31
-
 32
32
-
 33
33
-
 34
34
-
 35
35
-
 36
36
-
 37
37
-
 38
38
-
 39
39
-
 40
40
-
 41
41
-
 42
42
-
 43
43
-
 44
44
-
 45
45
-
 46
46
-
 47
47
-
 48
48
-
 49
49
-
 50
50
-
 51
51
-
 52
52
-
 53
53
-
 54
54
-
 55
55
-
 56
56
-
 57
57
-
 58
58
-
 59
59
-
 60
60
-
 61
61
-
 62
62
-
 63
63
-
 64
64
-
 65
65
-
 66
66
-
 67
67
-
 68
68
-
 69
69
-
 70
70
-
 71
71
-
 72
72
-
 73
73
-
 74
74
-
 75
75


LauraStar SMART M Manuale del proprietario
- Categoria
- Ferri da stiro
- Tipo
- Manuale del proprietario
- Questo manuale è adatto anche per
in altre lingue
- English: LauraStar SMART M Owner's manual
- français: LauraStar SMART M Le manuel du propriétaire
- Deutsch: LauraStar SMART M Bedienungsanleitung
- Nederlands: LauraStar SMART M de handleiding
Documenti correlati
-
LauraStar SMART I WHITE Manuale del proprietario
-
-
-
-
-
-
-
-
-
Altri documenti
-
 Russell Hobbs 24460-56 Manuale utente
-
Domo DO7110S Manuale del proprietario
-
Domo DO7111S Manuale del proprietario
-
Domo Dampfbügeleisen, Bügelstation "DO1069S", 1,2 Liter Wassertank, 5 bar, 2200 Watt Istruzioni per l'uso
-
SEVERIN BA 3299 Manuale del proprietario
-
Domo Bügel-Station, 5 Bar, 2200 Watt Manuale del proprietario
-
Domo DO7112S Manuale del proprietario
-
-
Kärcher 1102 BSX Manuale utente
-
Rotel 9461 Manuale utente
