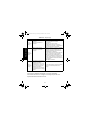
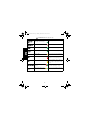
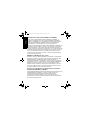
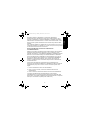
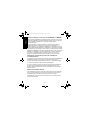
Motorola IMPRES NNTN8845 Manuale utente
- Categoria
- Batterie ricaricabili
- Tipo
- Manuale utente
Questo manuale è adatto anche per

en-US
de-DE fr-FR
it-IT ru- RU
fr-CA es-LA pt-BR zh-CN ko-KR
nl-NL uk-UA
IMPRES
TM
ADAPTIVE SINGLE UNIT
CHARGER
NNTN8845/NNTN9178
USER GUIDE
en-US es-LA zn-CNfr-CA pt-BR
de-DE it-IT
ko-KR
ru-RU uk-UAfr-FR nl-NL
MN002406A01.book Page 0 Monday, December 23, 2019 9:36 AM

MN002406A01.book Page 1 Monday, December 23, 2019 9:36 AM

2
English
IMPORTANT
SAFETY INSTRUCTIONS
SAVE THESE INSTRUCTIONS
This document contains important safety and operating instructions.
Please read these instructions carefully and save them for future
reference.
Before using the battery charger, read all the instructions and
cautionary markings on (1) the charger, (2) the battery, and (3) the
radio using the battery.
1. To reduce risk of damage to the power cord, pull the
plug rather than the cord when disconnecting from the
AC outlet or the charger.
2. An extension cord should not be used unless
absolutely necessary. Use of an improper extension
cord could result in risk of fire and electric shock. If an
extension cord must be used, make sure that the cord size is
18 AWG for lengths of up to 6.5 feet (2.0 m), and 16 AWG for
lengths up to 9.8 feet (3.0 m).
3. To reduce risk of fire, electric shock, or injury, do not operate the
charger if it has been broken or damaged in any way. Take it to a
qualified Motorola Solutions service representative.
4. Do not disassemble the charger – it is not repairable and
replacement parts are not available. Disassembly of the charger
may result in risk of electric shock or fire.
5. To reduce risk of electric shock, unplug the charger power cord
from the AC outlet before attempting any maintenance or
cleaning.
6. To reduce risk of injury, charge only rechargeable Motorola
Solutions Authorized Batteries. See Table 4 and Table 5. Other
batteries may explode, causing personal injury and damage.
7. Use of accessories not recommended by Motorola Solutions may
result in risk of fire, electric shock, or injury.
WARNING
MN002406A01.book Page 2 Monday, December 23, 2019 9:36 AM

3
English
Operational Safety Guidelines
• This equipment is not suitable for outdoor use. Use only in dry
locations/conditions.
• Maximum ambient temperature around the charger must not exceed
40 °C (104 °F).
• While a radio is in a charger pocket, the radio may be ON only if the
radio is transmitting data wirelessly, such as using Wi-Fi. Otherwise,
turn OFF the radio.
• Connect the charger to an AC outlet using only a Motorola Solutions
Authorized Power Supply. See Table 3.
• The AC outlet to which the power cord is connected should be close
and easily accessible.
• Make sure the power cord is located where it will not be stepped on,
tripped over, or subjected to water, damage, or stress.
• Connect the power cord only to an appropriately fused and wired AC
outlet with the correct voltage, as specified on the product.
• Disconnect from line voltage by removing the power cord from the
AC outlet.
• Connect no more than the appropriate number of chargers to a 15 A
circuit or 20 A circuit, as limited by any certified power strip being
used.
Note: Daisy chaining power strips are NOT RECOMMENDED. Limit circuit
loading below 80% of the circuit rating.
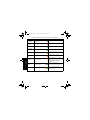
Operating Instructions
The IMPRES Adaptive Charger System is a fully automated battery
care system. Follow these simple steps:
1. Place the radio/IMPRES battery into the charger.
2. Remove the radio/IMPRES battery when it's fully charged (LED
turns steady GREEN).
The charger pocket accommodates either a radio with an attached
IMPRES 2 or IMPRES battery, or an IMPRES 2 or IMPRES battery
alone. Prior to charging a radio with an IMPRES 2 or IMPRES
battery, radio can be in the ON state only when the radio is
transmitting data wirelessly. Otherwise, turn OFF the radio.
Batteries charge best at room temperature.
MN002406A01.book Page 3 Monday, December 23, 2019 9:36 AM

4
English
Additionally, the charger is equipped with 2-USB Type A Power
Outputs that facilitates the charging of two wireless device by a
constant 2.5 W of power ( 5 V at 500 mA) per connector.
Charging Procedure
1. Plug the charger end of the power supply cord into the power
receptacle located at the back of the charger.
2. Plug the wall receptacle end of the power supply cord into the
appropriate AC outlet. A successful power-up sequence is indicated
by a Single Green Blink on the charger indicator.
3. Insert an IMPRES 2 or IMPRES battery, or a radio with an IMPRES
2 or IMPRES battery (radio can be in the ON state only when the
radio is transmitting data wirelessly. Otherwise, turn OFF the
radio), into the charger pocket by:
a. Aligning battery contacts with the charger contacts.
b. Pressing the battery into the pocket, ensuring complete contact
between charger and battery contacts.
4. To remove a radio, IMPRES 2, or IMPRES battery from the charger,
pull straight up until the battery completely clears the charger
housing.
MN002406A01.book Page 4 Monday, December 23, 2019 9:36 AM

5
English
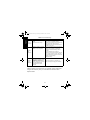
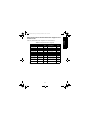
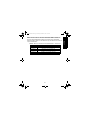
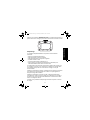
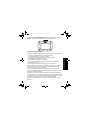
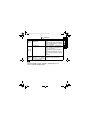
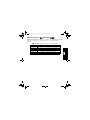
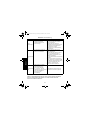
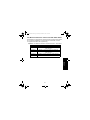
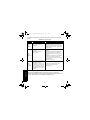
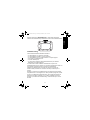
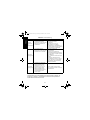
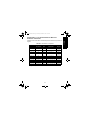
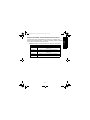
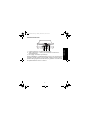
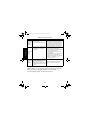
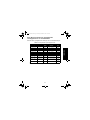
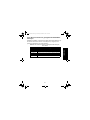
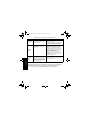
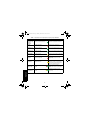
Charger back view
1. Programming Port - program the charger.
2. Dual USB ports - power source to wireless accessories and fleet
management.
3. DC inlet - connect to power supply.
Once the IMPRES 2 or IMPRES battery is properly seated into the
pocket, the charger indicator illuminates, indicating the charger has
recognized the presence of the battery. Refer to the charging indicators
in Table 1.
1
3
2
MN002406A01.book Page 5 Monday, December 23, 2019 9:36 AM

6
English
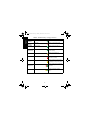
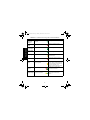
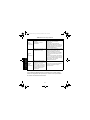
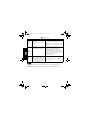
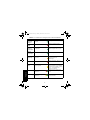
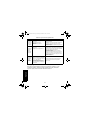
Table 1: IMPRES Battery Charging Indicators
Status LED Status Comments
Charger
Power On
Green for approx. 1 sec
Successful charger power-up.
Rapid
Charging
Steady red Battery in rapid charge mode.
Charged to
90% or more
Flashing Green
Battery is charged to 90% or
greater capacity.
Charged to
95% or more
Steady Green
Battery is charged to 95% or
greater capacity.
Calibration Steady Amber
Battery is in recondition or
calibration mode.
Fault
Flashing Red
Not chargeable; remove and re-
insert radio or battery.
Standby Flashing Amber
Battery is waiting to rapid charge.
Battery may be too hot, too cold, or
low voltage; or charger may be too
hot.
End of
Service Life
Alternating Red/Green
Battery continues to be usable but
may be nearing the end of its rated
service life.
Recalibration Alternating Amber/Green
As soon as possible, enable
Calibration and calibrate the
battery.
MN002406A01.book Page 6 Monday, December 23, 2019 9:36 AM

7
English
IMPRES 2 and IMPRES Batteries and Chargers
Features and Benefits
The IMPRES 2 energy solution is an advanced Tri-Chemistry energy
system developed by Motorola Solutions. This system includes:
1. IMPRES 2 and IMPRES Batteries
2. IMPRES 2 Adaptive Charger
3. IMPRES Radios
Charging IMPRES 2 or IMPRES batteries using an IMPRES 2
Adaptive Charger, which periodically Calibrates / Reconditions the
battery, yields the following benefits:
• Extends battery cycle life.
• Measures battery capacity, giving the radio user an indication of
effective use time.
• Determines the current battery state of charge, giving the radio user
an indication of effective use time.
• Monitors the IMPRES 2 or IMPRES battery usage pattern.
• Updates pattern information stored in the IMPRES 2 or IMPRES
battery.
• Automatically performs Calibration / Reconditioning only as needed.
• Minimizes IMPRES 2 or IMPRES battery heating, regardless of how
long the battery is left in the pocket.
• Periodically “tops off” a battery stored in the charger pocket,
maintaining a high state of readiness for the user.
• Eliminates Nickel battery memory effect, eliminating the need to
purchase special equipment or train personnel in tasks to maintain
battery cycle life.
Using this unique patented system, there is no need to track and
record IMPRES 2 or IMPRES battery use, conduct manual Calibration/
Reconditioning, or remove batteries from chargers following
completion of charge.
MN002406A01.book Page 7 Monday, December 23, 2019 9:36 AM

8
English
IMPRES 2 or IMPRES Battery Initialization
For full IMPRES 2 or IMPRES functionality, a new IMPRES 2 or
IMPRES battery must be initialized by the charger. The charger
automatically detects the new IMPRES 2 or IMPRES battery, and
automatically starts Initialization. Initialization is the first Calibration /
Reconditioning of an IMPRES 2 or IMPRES battery. This is a two-
phase process. The first phase is Battery Discharge, indicated by a
Steady Amber LED. The second phase is full charge, eventually
indicated by a Steady Green LED. This process may take up to
12 hours or more to complete, depending on the state of charge and
capacity of the battery. Interruption of either phase delays Initialization
until the next charging opportunity.
IMPRES 2 or IMPRES Pocket-to-Pocket
When charging IMPRES 2 or IMPRES batteries, the IMPRES 2 or
IMPRES charger records charging information within battery memory.
If the IMPRES 2 or IMPRES battery is removed from one IMPRES 2 or
IMPRES charger pocket and, within 30 minutes, inserted into another
or the same IMPRES 2 or IMPRES charger pocket, then charging
resumes at the point where charging was interrupted. This feature
prevents battery over-charging and minimizes the loss of cycle life.
This is especially important when charging Nickel batteries.
Automatic IMPRES 2 or IMPRES Calibration/Reconditioning
The IMPRES 2 charger automatically assesses the condition of an
IMPRES 2 or IMPRES battery. Based on this condition, the charger
automatically calibrates / reconditions the battery. Interruption of either
the discharge phase or the full charge phase delays Calibration until
the next charging opportunity.
Calibration / Reconditioning may be enabled or disabled using
Reconditioning Switch. When disabled and the IMPRES 2 or IMPRES
battery requires Calibration / Reconditioning, the LED will indicate
Alternating Amber / Green at battery insertion and after the battery is
charged.
MN002406A01.book Page 8 Monday, December 23, 2019 9:36 AM

9
English
Note: The IMPRES 2 or IMPRES battery must be outside an IMPRES 2 or
IMPRES charger pocket for more than 30 minutes for automatic Calibration/
Reconditioning.
Manually Initiating Calibration / Reconditioning
Though Calibration / Reconditioning is automatic, there may be
situations in which manual initiation is desired. For example, the
IMPRES 2 or IMPRES charger may be indicating Alternating Amber /
Green for the IMPRES 2 or IMPRES battery, because Calibration is
disabled in the charger. If within 30 minutes that battery is moved to an
IMPRES 2 or IMPRES charger that has Calibration enabled, the last
charging state will resume, preventing automatic start of Calibration /
Reconditioning.
To manually initiate Calibration / Reconditioning, ensure that the
IMPRES 2 or IMPRES battery is removed from the charger for more
than 2-1/2 minutes. Then, perform the following steps:
1. Insert the battery into the charger pocket
2. Within 2-1/2 minutes, remove the battery from the charger pocket.
3. Within 5 seconds, reinsert the battery into the charger pocket.
Calibration / Reconditioning starts immediately, typically beginning with
Battery Discharge (Steady Amber). Calibration / Reconditioning is
complete only after full charge (Steady Green).
IMPRES 2 or IMPRES End-of-Service-Life LED Indication
The IMPRES 2 charger may indicate IMPRES 2 or IMPRES battery
End-of-Service (Alternating Red/Green) upon successful completion of
Calibration / Reconditioning.
As batteries are used, normal wear reduces available capacity. At the
successful completion of Calibration / Reconditioning, IMPRES 2 or
IMPRES chargers compare IMPRES 2 or IMPRES battery capacity to
the battery Rated Capacity. When the capacity is at a very low value,
the IMPRES 2 or IMPRES battery may be nearing its End of Service.
The IMPRES 2 or IMPRES battery remains usable. In some scenarios,
it may be desirable to deploy the battery to someone who does not
require large battery capacity to complete a work shift.
MN002406A01.book Page 9 Monday, December 23, 2019 9:36 AM

10
English
Manually Terminating Calibration / Reconditioning
At any time during IMPRES 2 or IMPRES battery discharge (Steady
Amber), Calibration / Reconditioning may be terminated by performing
the following steps:
1. Remove the battery from the charger pocket.
2. Within 5 seconds, reinsert the battery into the charger pocket.
Battery discharge immediately terminates, and normal battery charging
starts. The LED indicates Charge Status.
Reconditioning Switch
The charger is equipped with a switch on the bottom of the unit that
can be utilized to manually terminate the reconditioning process (as a
systemic, on-going use-case). However, the charger will continue to
provide an indication that the battery needs to be reconditioned.
Switch the RECONDITION to “ON” located at the bottom of the charger
to enable the recondition feature.
MN002406A01.book Page 10 Monday, December 23, 2019 9:36 AM

11
English
Troubleshooting
The IMPRES Adaptive Charger incorporates the features of:
• A universal input power supply
• A constant current rapid charger
• A negative pulse conditioning charger
• A reconditioning unit
• A 2-USB Type A Power Outputs
• A user selectable on/off switch for turning ON/OFF reconditioning.
The combination of the features listed above are unique in a desktop
charger. Therefore, operation of the radio with a battery attached while
in the charger is not recommended.
During the charging process, radio operation may result in minimally
reduced radio performance and extended battery charge time.
During the reconditioning process, the battery becomes fully
discharged. As a result, the radio may shut down during reconditioning
mode. It is recommended that the battery be calibrated without radio
attached or the attached radio to be turned off.
When troubleshooting, always observe the color of the LED.
MN002406A01.book Page 11 Monday, December 23, 2019 9:36 AM

12
English
Service
Adaptive Single-unit Chargers are not repairable. Order replacement
chargers as necessary from your local Motorola Solutions Sales
Representative.
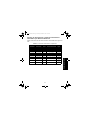
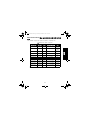
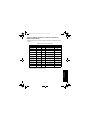
Table 2: Troubleshooting
Problem What it means... What to do...
No
charger
indication
• Charger contact is not being
made.
• No power to the charger.
Check that the radio with battery, or the
battery alone, is inserted correctly.
• Make sure that the power cord is securely
plugged into the charger and an
appropriate AC outlet, and that there is
power to the outlet.
Blinking
Red
Indication
• Charger contact is not being
made.
• Battery is not chargeable.
Remove the battery from the charger and
replace it back into the charger.
• Verify that the battery is a Motorola
Solutions-authorized battery listed in
Table 4.
Other batteries may not charge.
• Remove power from the battery charger
and, using a clean dry cloth, clean the
gold metal charging contacts of both the
battery and the charger.
• Replace battery.
Blinking
Amber
Indication
• Battery is waiting to charge.
The battery temperature may
be below 5 °C (41 °F) or
above 40 °C (104 °F) or the
battery voltage may be lower
than the predetermined
threshold level for rapid
charging.
When this condition is corrected, the
battery will begin charging automatically.
MN002406A01.book Page 12 Monday, December 23, 2019 9:36 AM

13
English
Motorola Solutions Authorized Power Supplies and
Power Cords
Use only authorized power supplies from the list below:
* Neutral and Line (Live) wires are reversed from that used in Australia.
** Slightly shortened and without holes in the blades.
Table 3: Compatible Power Supplies
Power Supply Power Cord
Plug
Type
Power Supply
Description
Country
/Region
PS000040A01 n/a Type A 3 A, 120 VAC US/NA
PS000041A01 n/a Type C 3 A, 120 VAC EMEA
PS000041A02 n/a Type G 3 A, 120 VAC EMEA
PS000041A03 n/a Type I 3 A, 120 VAC Aust/NZ
PS000041A04 n/a Type I* 3 A, 120 VAC Argentina
PS000041A05 n/a Type A** 3 A, 120 VAC China
PS000041A06 n/a Type F 3 A, 120 VAC Korea
PS000116A01 3004209T16 Type N 3 A, 100 to 240 VAC Brazil
PS000116A01 3004209T04 Type A 3 A, 100 to 240 VAC
LACR/
APAC
PS000116A01 3004209T01 Type C 3 A, 100 to 240 VAC
LACR/
APAC
PS000116A01 3004209T02 Type G 3 A, 100 to 240 VAC
LACR/
APAC
MN002406A01.book Page 13 Monday, December 23, 2019 9:36 AM

14
English
Motorola Solutions Authorized Batteries
Table 4: Motorola Solutions Authorized Batteries - APX
Kit (PN) Description
NNTN7033 IMPRES Li-Ion FM (HazLoc) IP68 4100 mAh
NNTN7034 IMPRES Li-Ion IP68 4200 mAh
NNTN7035 IMPRES NiMH FM (HazLoc) Ruggedized IP68 2200 mAh
NNTN7036 IMPRES NiMH FM (HazLoc) IP68 2200 mAh
NNTN7037 IMPRES NiMH IP68 2350 mAh
NNTN7038 IMPRES Li-Ion IP68 3100 mAh
NNTN7573 IMPRES NiMH Ruggedized IP68 2350 mAh
NNTN8092 IMPRES Li-Ion FM (HazLoc) Ruggedized 2300 mAh
NNTN8182 IMPRES Li-Ion Ruggedized IP68 3100 mAh
NNTN8921
IMPRES 2 Li-Ion TIA4950 (HazLoc) Ruggedized IP67
3700 mAh
NNTN8930
IMPRES 2 Li-Ion TIA4950 (HazLoc) Ruggedized IP67
2700 mAh
PMNN4403 IMPRES Li-Ion IP68 2150 mAh
PMNN4485 IMPRES 2 Li-Ion Ruggedized IP68 2550 mAh
PMNN4486 IMPRES 2 Li-Ion Ruggedized IP68 3400 mAh
PMNN4487 IMPRES 2 Li-Ion Ruggedized IP68 4850 mAh
PMNN4494 IMPRES 2 Li-Ion Ruggedized IP68 5100 mAh
PMNN4504
IMPRES 2 Li-Ion DIVISION 2 (HazLoc) Ruggedized IP67
3400 mAh
PMNN4505
IMPRES 2 Li-Ion DIVISION 2 (HazLoc) Ruggedized IP67
4850 mAh
PMNN4547
IMPRES 2 Li-Ion TIA4950 (HazLoc) Ruggedized IP68
3100 mAh
PMNN4573
IMPRES 2 Li-Ion TIA4950 (HazLoc) Ruggedized IP68
4600 mAh
MN002406A01.book Page 14 Monday, December 23, 2019 9:36 AM

15
English
Motorola Solutions Authorized APX NEXT Batteries
The APX-Series IMPRES 2 Chargers will charge the APX NEXT
batteries listed in Table 5. The batteries may be attached to a radio or
may be stand-alone.
Table 5: Motorola Solutions Authorized Batteries - APX NEXT
Kit (PN) Description
NNTN9087 IMPRES™ 2 Li-Ion IP68 3800 mAh
NNTN9088 IMPRES 2 Li-Ion DIV2 (HAZLOC) IP68 3800 mAh
NNTN9089 IMPRES 2 Li-Ion IP68 5650 mAh
NNTN9090 IMPRES 2 Li-Ion DIV2 (HAZLOC) IP68 5650 mAh
NNTN9126 IMPRES™ 2 Li-Ion IP68 4400 mAh
NNTN9127 IMPRES 2 Li-Ion DIV2 (HAZLOC) IP68 4400 mAh
MN002406A01.book Page 15 Monday, December 23, 2019 9:36 AM

16
English
IMPRES Feature / Benefit Description
The IMPRES energy solution is an advanced Tri-Chemistry energy
system developed by Motorola Solutions which encompasses (a)
IMPRES batteries, (b) the IMPRES Adaptive Charger and, (c) radio
hardware/software which provides the capability for IMPRES
compatible radios to communicate with IMPRES batteries.
The IMPRES Adaptive Charger, when used in conjunction with
Motorola Solutions IMPRES batteries, will:
1. Maximize operation time between charge cycles by automatically
eliminating memory effect.
2. Maximize battery life by significantly reducing heat during the trickle
and post-charge cycles.
3. Eliminate the need to purchase reconditioning equipment and train
personnel to “manage battery maintenance tasks”.
With this unique patented system approach, there is no need to track
and record IMPRES battery use, conduct manual reconditioning
cycles, or remove batteries from chargers following charging.
The IMPRES Adaptive Charger monitors the usage pattern of the
IMPRES battery, stores that information in the IMPRES battery, and
performs a recondition cycle only when needed.
The IMPRES Adaptive Charger will not overheat the IMPRES battery
regardless of how long it is left in the pocket. The charger monitors the
battery and automatically “tops off” the battery as required.
MOTOROLA, MOTO, MOTOROLA SOLUTIONS and the Stylized M logo are trademarks or
registered trademarks of Motorola Trademark Holdings, LLC and are used under license. All other
trademarks are the property of their respective owners.
© 2016 and 2019 Motorola Solutions, Inc. All rights reserved.
MN002406A01.book Page 16 Monday, December 23, 2019 9:36 AM

2
Français canadien
NOTICE DE SÉCURITÉ
IMPORTANTE
CONSERVEZ CETTE NOTICE
Ce document contient d’importantes directives relatives à la sécurité et
au fonctionnement de l’appareil. Veuillez lire attentivement cette notice
et la conserver pour vous y référer ultérieurement.
Avant d’utiliser le chargeur de batterie, lisez toutes les directives et les
marquages d’avertissement sur (1) le chargeur, (2) la batterie et (3) la
radio associée à la batterie.
1. Afin de réduire la possibilité d'endommager le cordon
d'alimentation, tirez sur la prise et non sur le cordon au
moment de le débrancher de la prise c.a. ou du chargeur.
2. Il n’est pas recommandé d’utiliser une rallonge, sauf
en cas de nécessité absolue. L’utilisation d’une
rallonge inappropriée pourrait causer un risque d’incendie et de
décharge électrique. Si une rallonge doit être utilisée, assurez-
vous que le format du cordon est de calibre 18 lorsque sa
longueur est de 2 m (6,5 pieds) ou moins et de calibre
16 lorsque sa longueur est de 3 m (9,8 pieds) ou moins.
3. Pour réduire le risque d’incendie, de décharge électrique ou de
blessure, n’utilisez pas le chargeur s’il est brisé ou endommagé de
quelque manière que ce soit. Portez-le chez un représentant de
service Motorola Solutions.
4. Ne désassemblez pas le chargeur. Il ne peut être réparé et
aucune pièce de rechange n'est disponible. Le désassemblage du
chargeur pourrait occasionner des risques de décharge électrique
ou d’incendie.
5. Pour réduire les risques de choc électrique, débranchez le câble
d'alimentation du chargeur de la prise c.a. avant de procéder à
une maintenance ou à un nettoyage.
6. Pour réduire les risques de blessure, ne chargez que des
batteries rechargeables agréées par Motorola Solutions. Voir LE
Tableau 4 et LE Tableau 5. Les batteries non approuvées
pourraient exploser et causer des blessures corporelles et
d’autres dommages.
7. L’utilisation d’accessoires non recommandés par Motorola Solutions
pourrait occasionner des risques d’incendie, de décharge électrique ou
de blessure.
AVERTISSEMENT
MN002406A01.book Page 2 Monday, December 23, 2019 9:36 AM

3
Français (Canada)
Directives d'utilisation sécuritaire
• Cet équipement n’est pas conçu pour une utilisation à l’extérieur. Ne
l'utilisez que dans des emplacements secs et sous des conditions de
nature semblable.
• La température ambiante maximale autour du chargeur ne doit pas
dépasser 40 °C (104 °F).
• Lorsqu'une radio est dans un logement du chargeur, elle ne peut être
activée que si elle transmet des données sans fil, comme lorsqu'elle
utilise un réseau Wi-Fi. Dans le cas contraire, éteignez la radio.
• Branchez le chargeur à une prise c.a. uniquement à l'aide d'un bloc
d'alimentation agréé par Motorola Solutions. Voir le Tableau 3.
• La prise de courant à laquelle le cordon d’alimentation est branché
doit se trouver à proximité et être facilement accessible.
• Assurez-vous que le cordon d’alimentation est placé à un endroit où
il ne sera pas écrasé ou endommagé, ne gênera pas le passage, ne
sera pas tendu de façon anormale et ne sera pas exposé à une
source d’humidité.
• Ne branchez le cordon d’alimentation qu’à une prise à fusible câblée
appropriée et de tension prescrite comme spécifiée sur le produit.
• Débranchez le chargeur de la tension de secteur en retirant le
cordon d’alimentation de la prise de courant.
• Ne branchez pas plus de chargeurs que le nombre approprié à un
circuit de 15 A ou 20 A, selon la limite indiquée pour toute barre
d’alimentation certifiée utilisée.
Remarque : La configuration en guirlande de barres d'alimentation n'est PAS
RECOMMANDÉE. Limitez la charge du circuit à 80 % de sa valeur nominale.
Consignes d'utilisation
Le système de chargeur adaptatif IMPRES est un système d'entretien
entièrement automatisé de batterie. Suivez ces étapes simples :
1. Placez la radio/batterie IMPRES dans le chargeur.
2. Retirez la radio/batterie IMPRES lorsqu'elle est complètement
chargée (le voyant devient VERT).
MN002406A01.book Page 3 Monday, December 23, 2019 9:36 AM

4
Français canadien
Le logement du chargeur peut accueillir soit une radio avec une
batterie IMPRES 2 ou IMPRES, soit une batterie IMPRES 2 ou
IMPRES seule. Avant de charger une radio avec une batterie
IMPRES 2 ou IMPRES, la radio peut être allumée uniquement
lorsqu'elle transmet des données sans fil. Dans le cas contraire,
éteignez la radio. Pour des résultats optimaux, chargez la batterie à la
température ambiante.
En outre, le chargeur est équipé de deux sorties d'alimentation USB de
type A qui facilitent le chargement de deux appareils sans fil avec une
alimentation constante de 2,5 W (5 V à 500 mA) par connecteur.
Procédure de charge
1. Branchez l'extrémité pour chargeur du cordon d'alimentation dans
la prise d'alimentation située derrière le chargeur.
2. Branchez la fiche d'alimentation du cordon d'alimentation dans une
prise c.a. appropriée. Le voyant du chargeur signale une séquence
de mise en marche réussie par un clignotement vert unique.
3. Insérez une batterie IMPRES 2 ou IMPRES ou une radio avec une
batterie IMPRES 2 ou IMPRES (la radio peut être allumée
uniquement lorsqu'elle transmet des données sans fil. Dans le
cas contraire, éteignez la radio), dans le logement du chargeur
comme suit :
a. Alignez les contacts de la batterie avec les contacts du chargeur.
b. Insérez la batterie dans le logement en vous assurant qu'un
contact parfait est établi entre le chargeur et les contacts de la
batterie.
4. Pour retirer une radio ou une batterie IMPRES 2 ou IMPRES du
chargeur, tirez-la vers le haut jusqu'à ce que la batterie soit
complètement sortie du boîtier du chargeur.
MN002406A01.book Page 4 Monday, December 23, 2019 9:36 AM
La pagina si sta caricando...
La pagina si sta caricando...
La pagina si sta caricando...
La pagina si sta caricando...
La pagina si sta caricando...
La pagina si sta caricando...
La pagina si sta caricando...
La pagina si sta caricando...
La pagina si sta caricando...
La pagina si sta caricando...
La pagina si sta caricando...
La pagina si sta caricando...
La pagina si sta caricando...
La pagina si sta caricando...
La pagina si sta caricando...
La pagina si sta caricando...
La pagina si sta caricando...
La pagina si sta caricando...
La pagina si sta caricando...
La pagina si sta caricando...
La pagina si sta caricando...
La pagina si sta caricando...
La pagina si sta caricando...
La pagina si sta caricando...
La pagina si sta caricando...
La pagina si sta caricando...
La pagina si sta caricando...
La pagina si sta caricando...
La pagina si sta caricando...
La pagina si sta caricando...
La pagina si sta caricando...
La pagina si sta caricando...
La pagina si sta caricando...
La pagina si sta caricando...
La pagina si sta caricando...
La pagina si sta caricando...
La pagina si sta caricando...
La pagina si sta caricando...
La pagina si sta caricando...
La pagina si sta caricando...
La pagina si sta caricando...
La pagina si sta caricando...
La pagina si sta caricando...
La pagina si sta caricando...
La pagina si sta caricando...
La pagina si sta caricando...
La pagina si sta caricando...
La pagina si sta caricando...
La pagina si sta caricando...
La pagina si sta caricando...
La pagina si sta caricando...
La pagina si sta caricando...
La pagina si sta caricando...
La pagina si sta caricando...
La pagina si sta caricando...
La pagina si sta caricando...
La pagina si sta caricando...
La pagina si sta caricando...
La pagina si sta caricando...
La pagina si sta caricando...
La pagina si sta caricando...
La pagina si sta caricando...
La pagina si sta caricando...
La pagina si sta caricando...
La pagina si sta caricando...
La pagina si sta caricando...
La pagina si sta caricando...
La pagina si sta caricando...
La pagina si sta caricando...
La pagina si sta caricando...
La pagina si sta caricando...
La pagina si sta caricando...
La pagina si sta caricando...
La pagina si sta caricando...
La pagina si sta caricando...
La pagina si sta caricando...
La pagina si sta caricando...
La pagina si sta caricando...
La pagina si sta caricando...
La pagina si sta caricando...
La pagina si sta caricando...
La pagina si sta caricando...
La pagina si sta caricando...
La pagina si sta caricando...
La pagina si sta caricando...
La pagina si sta caricando...
La pagina si sta caricando...
La pagina si sta caricando...
La pagina si sta caricando...
La pagina si sta caricando...
La pagina si sta caricando...
La pagina si sta caricando...
La pagina si sta caricando...
La pagina si sta caricando...
La pagina si sta caricando...
La pagina si sta caricando...
La pagina si sta caricando...
La pagina si sta caricando...
La pagina si sta caricando...
La pagina si sta caricando...
La pagina si sta caricando...
La pagina si sta caricando...
La pagina si sta caricando...
La pagina si sta caricando...
La pagina si sta caricando...
La pagina si sta caricando...
La pagina si sta caricando...
La pagina si sta caricando...
La pagina si sta caricando...
La pagina si sta caricando...
La pagina si sta caricando...
La pagina si sta caricando...
La pagina si sta caricando...
La pagina si sta caricando...
La pagina si sta caricando...
La pagina si sta caricando...
La pagina si sta caricando...
La pagina si sta caricando...
La pagina si sta caricando...
La pagina si sta caricando...
La pagina si sta caricando...
La pagina si sta caricando...
La pagina si sta caricando...
La pagina si sta caricando...
La pagina si sta caricando...
La pagina si sta caricando...
La pagina si sta caricando...
La pagina si sta caricando...
La pagina si sta caricando...
La pagina si sta caricando...
La pagina si sta caricando...
La pagina si sta caricando...
La pagina si sta caricando...
La pagina si sta caricando...
La pagina si sta caricando...
La pagina si sta caricando...
La pagina si sta caricando...
La pagina si sta caricando...
La pagina si sta caricando...
La pagina si sta caricando...
La pagina si sta caricando...
La pagina si sta caricando...
La pagina si sta caricando...
La pagina si sta caricando...
La pagina si sta caricando...
La pagina si sta caricando...
La pagina si sta caricando...
La pagina si sta caricando...
La pagina si sta caricando...
La pagina si sta caricando...
La pagina si sta caricando...
La pagina si sta caricando...
La pagina si sta caricando...
La pagina si sta caricando...
La pagina si sta caricando...
La pagina si sta caricando...
La pagina si sta caricando...
La pagina si sta caricando...
La pagina si sta caricando...
La pagina si sta caricando...
La pagina si sta caricando...
La pagina si sta caricando...
La pagina si sta caricando...
La pagina si sta caricando...
-
 1
1
-
 2
2
-
 3
3
-
 4
4
-
 5
5
-
 6
6
-
 7
7
-
 8
8
-
 9
9
-
 10
10
-
 11
11
-
 12
12
-
 13
13
-
 14
14
-
 15
15
-
 16
16
-
 17
17
-
 18
18
-
 19
19
-
 20
20
-
 21
21
-
 22
22
-
 23
23
-
 24
24
-
 25
25
-
 26
26
-
 27
27
-
 28
28
-
 29
29
-
 30
30
-
 31
31
-
 32
32
-
 33
33
-
 34
34
-
 35
35
-
 36
36
-
 37
37
-
 38
38
-
 39
39
-
 40
40
-
 41
41
-
 42
42
-
 43
43
-
 44
44
-
 45
45
-
 46
46
-
 47
47
-
 48
48
-
 49
49
-
 50
50
-
 51
51
-
 52
52
-
 53
53
-
 54
54
-
 55
55
-
 56
56
-
 57
57
-
 58
58
-
 59
59
-
 60
60
-
 61
61
-
 62
62
-
 63
63
-
 64
64
-
 65
65
-
 66
66
-
 67
67
-
 68
68
-
 69
69
-
 70
70
-
 71
71
-
 72
72
-
 73
73
-
 74
74
-
 75
75
-
 76
76
-
 77
77
-
 78
78
-
 79
79
-
 80
80
-
 81
81
-
 82
82
-
 83
83
-
 84
84
-
 85
85
-
 86
86
-
 87
87
-
 88
88
-
 89
89
-
 90
90
-
 91
91
-
 92
92
-
 93
93
-
 94
94
-
 95
95
-
 96
96
-
 97
97
-
 98
98
-
 99
99
-
 100
100
-
 101
101
-
 102
102
-
 103
103
-
 104
104
-
 105
105
-
 106
106
-
 107
107
-
 108
108
-
 109
109
-
 110
110
-
 111
111
-
 112
112
-
 113
113
-
 114
114
-
 115
115
-
 116
116
-
 117
117
-
 118
118
-
 119
119
-
 120
120
-
 121
121
-
 122
122
-
 123
123
-
 124
124
-
 125
125
-
 126
126
-
 127
127
-
 128
128
-
 129
129
-
 130
130
-
 131
131
-
 132
132
-
 133
133
-
 134
134
-
 135
135
-
 136
136
-
 137
137
-
 138
138
-
 139
139
-
 140
140
-
 141
141
-
 142
142
-
 143
143
-
 144
144
-
 145
145
-
 146
146
-
 147
147
-
 148
148
-
 149
149
-
 150
150
-
 151
151
-
 152
152
-
 153
153
-
 154
154
-
 155
155
-
 156
156
-
 157
157
-
 158
158
-
 159
159
-
 160
160
-
 161
161
-
 162
162
-
 163
163
-
 164
164
-
 165
165
-
 166
166
-
 167
167
-
 168
168
-
 169
169
-
 170
170
-
 171
171
-
 172
172
-
 173
173
-
 174
174
-
 175
175
-
 176
176
-
 177
177
-
 178
178
-
 179
179
-
 180
180
-
 181
181
-
 182
182
-
 183
183
-
 184
184


Motorola IMPRES NNTN8845 Manuale utente
- Categoria
- Batterie ricaricabili
- Tipo
- Manuale utente
- Questo manuale è adatto anche per
in altre lingue
- English: Motorola IMPRES NNTN8845 User manual
- français: Motorola IMPRES NNTN8845 Manuel utilisateur
- español: Motorola IMPRES NNTN8845 Manual de usuario
- Deutsch: Motorola IMPRES NNTN8845 Benutzerhandbuch
- русский: Motorola IMPRES NNTN8845 Руководство пользователя
- Nederlands: Motorola IMPRES NNTN8845 Handleiding
- português: Motorola IMPRES NNTN8845 Manual do usuário
Documenti correlati
-
Motorola NNTN8845 Guida utente
-
Motorola PS000029A07 Manuale utente
-
Motorola impres WPLN4133 Manuale utente
-
Motorola IMPRES NNTN7595 Manuale utente
-
-
-
-
-
-