HQ Power 24-channel DMX light control panel Manuale utente
- Categoria
- Pianoforti digitali
- Tipo
- Manuale utente
Questo manuale è adatto anche per

V
D
24-CHA
N
24-KAN
A
RÉGIE D
CONTR
O
24-DMX-
B
CONTR
O
USER M
A
GEBRUI
K
NOTICE
MANUA
L
BEDIEN
U
MANUA
L
D
P
N
NEL DM
X
A
ALS DM
X
E LUMIÈ
O
LADOR
B
EDIEN
F
O
LLER D
M
A
NUAL
K
ERSHA
D’EMPL
O
L
DEL U
S
U
NGSAN
L
E UTEN
T
C
1
X
LIGHT
X
LICHT
S
RE DMX
DE ILUM
F
ELD FÜ
R
M
X 24 C
A
NDLEIDI
N
O
I
S
UARIO
LEITUN
G
T
E
1
4
6
CONTR
O
S
TURIN
G
24 CAN
A
INACIÓ
N
R
BELEU
A
NALI
N
G
G
6
O
LLER
G
A
UX
N
DMX D
E
CHTUN
G
E
24 CAN
A
G
A
LES

VD
1.
T
o
Im
Th
R
e
If i
Th
Th
co
m
45
it
h
2.
•
•
•
•
•
•
•
3.
•
•
•
•
•
•
•
•
PC146
Introduct
i
o
all residen
t
portant en
v
This s
ym
the en
v
Do not
compa
n
is device sh
o
e
spect the lo
c
n doubt, co
ank
y
ou for
b
is is a 24-ch
a
m
patible. Th
e
00 steps. C
h
h
as been da
m
Safet
y
In
s
B
e
K
e
U
n
A
qualified
t
Dama
g
e ca
will not acc
e
Do not swit
c
a
g
ainst da
m
Make sure
t
Do not crim
the cord if
n
A
lwa
y
s dis
c
power cord
Note that d
a
awa
y
from
c
General
G
This device
onl
y
be use
d
Do not sha
k
Select a lo
c
Do not use
o
Familiarise
y
people. An
y
Use the ori
g
Note that al
Do not rem
o
for its inten
d
etc. Usin
g
t
h
VD
P
i
on & Fea
t
t
s of the Eu
r
v
ironmental
m
bol on the
d
v
ironment.
dispose of t
h
ny
for rec
y
cli
n
o
uld be retur
c
al environm
ntact
y
our l
o
b
u
y
in
g
the V
D
a
nnel DMX l
i
e
user can c
o
h
eck carefull
y
m
a
g
ed in tra
n
s
tructions
e
ver
y
carefu
e
ep this devi
c
n
plu
g
the ma
t
echnician s
h
used b
y
disr
e
e
pt responsi
b
c
h the devic
e
m
a
g
e b
y
leav
t
hat the avail
p the power
n
ecessar
y
.
c
onnect the
d
b
y
the plu
g
.
a
ma
g
e caus
e
c
hildren and
G
uidelines
is a li
g
htin
g
d
indoors wi
t
k
e the devic
e
c
ation where
o
r transport
t
y
ourself with
y
dama
g
e th
a
g
inal packa
g
i
l modificatio
n
o
ve the seri
a
d
ed purpose
.
h
e device in
P
C146
–
t
ures
r
opean Uni
o
information
d
evice or th
e
h
e unit
(
or b
a
ng
.
ned to
y
our
d
ental rules.
o
cal waste
d
D
PC146! Pl
e
ig
ht controll
e
o
ntrol up to
4
y
for dama
ge
n
sit.
l durin
g
the i
c
e awa
y
fro
m
ins lead bef
o
h
ould install
a
eg
ardin
g
cer
b
ilit
y
for the
e
e
on immedi
a
in
g
it switch
e
able volta
g
e
cord and pr
o
d
evice from t
h
Never pull o
u
e
d b
y
user m
unauthorise
d
controller fo
r
t
h the includ
e
e
. Avoid brut
e
the device
w
t
he device u
n
the function
a
t ma
y
occur
n
g
if the de
v
n
s of the de
v
a
l number sti
c
.
All other us
e
an unauthor
i
–
24-CH
A
o
n
about this
p
e
packa
g
e in
d
a
tteries
)
as u
n
d
istributor or
d
isposal au
t
e
ase read th
e
e
r. The devic
e
4
8 pro
g
ram
m
e
caused b
y
t
nstallation: t
o
m
rain and m
o
o
re openin
g
t
a
nd service t
h
tain
g
uidelin
e
e
nsuin
g
defe
c
a
tel
y
if it has
e
d off until it
h
does not ex
c
o
tect it a
g
ain
s
h
e mains wh
e
u
t the plu
g
b
y
odifications
t
d
users.
r
profession
a
e
d adapter
w
e
force when
w
ill be protec
t
n
der temper
a
s of the devi
will probabl
y
v
ice is to be t
r
v
ice are forbi
d
c
ker from th
e
e
s ma
y
cau
s
i
sed wa
y
will
2
A
NNEL
D
p
roduct
d
icates that
d
n
sorted mun
i
to a local re
c
t
horities.
e
manual ca
r
e
is micropr
o
m
es and up t
o
t
ransportatio
n
o
uchin
g
live
w
o
isture.
t
he housin
g
.
h
is device.
e
s in this ma
c
ts or proble
been expos
e
h
as reached
c
eed the vol
t
s
t dama
g
e fr
o
e
n it is not i
n
y
tu
gg
in
g
th
e
t
o the devic
e
a
l use on sta
g
w
orkin
g
on a
n
installin
g
or
t
ed a
g
ainst e
a
tures < 5°C
ce before a
c
y
be due to
u
r
ansported.
d
den for saf
e
e
device as d
s
e short circ
u
void the wa
r
D
MX CO
d
isposal of t
h
i
cipal waste;
cy
clin
g
servi
c
r
efull
y
before
o
cessor-cont
r
o
4 pa
g
es ca
n
. Consult
yo
w
ires can ca
nual is not c
o
ms.
e
d to chan
g
e
room temp
e
t
a
g
e stated i
n
o
m sharp ed
n
use or whe
n
e
power cord
e
are not cov
e
g
e, in discos
,
n
alternatin
g
c
operatin
g
th
e
xtreme heat
,
or > 35°C.
c
tuall
y
usin
g
i
nprofession
a
e
t
y
reasons.
oin
g
so will
v
its, burns, el
r
rant
y
.
NTROL
L
h
e device aft
e
it should be
c
e.
brin
g
in
g
thi
s
r
olled and is
n be pro
g
ra
m
o
ur dealer a
n
use life-thre
a
o
vered b
y
th
e
s in temper
a
e
rature.
n
the specifi
c
g
es. Ask an
n
y
ou wish t
o
.
e
red b
y
the
w
,
theatres, et
c
c
urrent of m
a
e
device.
,
moisture a
n
t. Do not pe
r
a
l use of the
v
oid the warr
ectroshocks
,
L
ER
e
r its lifec
y
cl
e
taken to a s
p
s
device into
full
y
DMX51
2
m
med with a
n
d don’t insta
a
tenin
g
elect
e
warrant
y
a
a
ture. Protec
t
c
ations of thi
s
authorised
d
o
clean it. O
n
w
arrant
y
. Ke
e
c
. The VDP
C
a
x. 230Vac/
5
n
d dust.
r
mit operatio
n
device.
ant
y
. Onl
y
u
s
,
lamp explo
s
VELLE
M
e
could har
m
p
ecialised
service.
2
and MIDI
total of max
.
ll this device
roshocks.
nd the deale
t
the device
s
manual.
d
ealer to repl
a
n
l
y
handle th
e
e
p the devic
e
C
146 should
5
0Hz.
n
b
y
unquali
f
s
e the devic
e
s
ions, crash
e
M
AN
m
.
if
r
a
ce
e
e
f
ied
e
e
s,

VDPC146 VELLEMAN 3
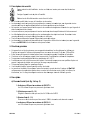
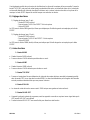
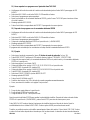
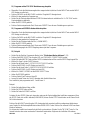
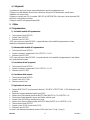
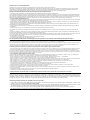
4. Description
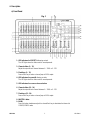
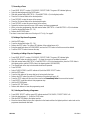
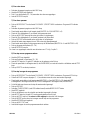
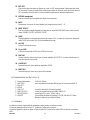
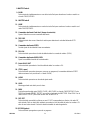
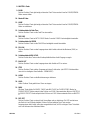
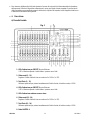
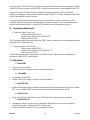
a) Front Panel
1. LED indicators for PRESET A dimming controls
The LED lights when the slide control is moved upwards.
2. Channel sliders (1 – 12)
Adjust the output of each channel between 0 – 100% or 0 - 255.
3. Flash Keys (1 – 12)
Press a flash key to make a channel jump to 100% output.
4. LED indicators for preset B dimming controls
The LED lights when the slide control is moved upwards.
5. LED indicators for scene or chase selection
6. Channel sliders (13 – 24)
Adjust the output of each channel between 0 – 100% or 0 - 255.
7. Flash keys (13 – 24)
Press a flash key to make a channel jump to 100% output.
8. MASTER A fader
9. BLIND
Press this button simultaneously with a channel flash key to deactivate that channel in
CHASE/SCENES mode.
Fig. 1

VDPC146 VELLEMAN 4
10. Master B fader
11. HOME
Press this button simultaneously with a channel flash key to reactivate that channel in
CHASE/SCENES mode.
12. Fade Time Slider
Adjust the fade time with this slider.
13. TAP SYNC
Press this button twice to the rhythm of the music to define the chase speed during the AUTO CHASE
mode.
14. SPEED slider
To adjust the chaser speed manually.
15. FULL ON
Press this button to make all channels jump to 100% output.
16. AUDIO LEVEL slider
Adjusts the music sensitivity of the audio input.
17. BLACK OUT
Press this button to reduce the output of all channels to zero.
18. STEP
Press this button to advance step by step in a programme. (speed slider should be in the lowest
position : SHOW MODE)
19. AUDIO
Press this button to access the audio control mode.
20. HOLD
Hold this button to stop the chase.
21. PARK
In DOUBLE PRESET, pressing PARK B activates the maximum value for MASTER B. In SINGLE
PRESET, pressing PARK A activates the maximum value for MASTER A.
22. REC EXIT
Press this button to add or kill a channel. The LED indicator is lit when the device is in kill mode. Press
an arbitrary flash button to reduce all channel output levels to zero, with the exception of the selected
channel. This button also deactivates the recording mode.
23. RECORD
Press this button to record a step in a programme.
24. PAGE
Select the desired scene or chase on the selected page (1 – 4).
25. MODE SELECT
In the CHASE/SCENES mode, you can press this button to choose between the DOUBLE PRESET or
SINGLE PRESET mode.

VDPC146 VELLEMAN 5
26. DARK
For a blackout of all channels, including the ones that are currently in FULL ON and FLASH mode.
27. ALL REV
Reverses the direction of a chase.
28. 0% or 0-255
Switches the display from 0-100% to 0-255 and vice versa.
29. REV ONE
Hold this button and press any button of PRESET B. The selected scene will now chase in reverse.
30. CHASE REV
This button enables you to reverse the chase controlled by the SPEED slider.
31. BEAT REV
This button enables you to reverse the chase to the beat of the music.
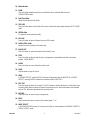
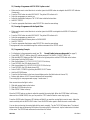
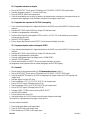
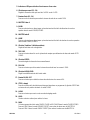
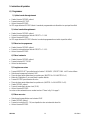
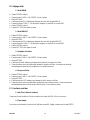
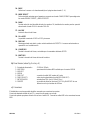
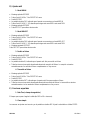
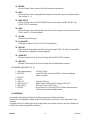
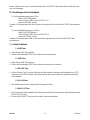
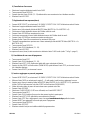
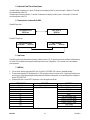
b) Back Panel
1. Power input : 12-20Vdc / 500mA
2. MIDI THRU : used to transmit MIDI data received on the MIDI IN connector
3. MIDI OUT
4. MIDI IN
5. DMX OUT : 3-pin female XLR
6. DMX POLARITY : select the polarity of the DMX OUT
7. AUDIO INPUT : RCA (cinch) line in : 100mV, 1Vp-p
8. REMOTE : FULL ON and BLACKOUT can be controlled from a distance using a ¼” stereo
jack (6.35mm)
c) Connections
The manufacturer is not responsible for damage caused by improper connections.
Connect the supplied adapter with the DC jack and connect the other end with a mains outlet.
Plug the XLR cable into the VDPDMXC146 and connect the other end with the first device you wish to control.
Plug the MIDI cables into the appropriate MIDI sockets.
Fig. 2

VDPC146 VELLEMAN 6
5. Operating Instructions
A) Programming
1) Leaving the Recording Mode
• Hold the RECORD button.
• Press the REC EXIT button.
• Release the RECORD button.
The red LED indicator above the RECORD key is now dimmed, meaning that the programming mode has been
deactivated and cannot be accessed.
2) Activating the Recording M
• Hold the RECORD button.
• Press the following flash keys in PRESET A : 1-5-6-8
• Release the RECORD button.
The red LED indicator above the RECORD key is now lit, meaning that the programming mode has been activated
and can be accessed.
3) Erasing all Programmes
• Hold the RECORD button.
• Press the following flash keys in PRESET A : 1-3-2-3.
• Release the RECORD button.
4) Clearing the Memory
• Hold the RECORD button.
• Press the REC CLEAR button.
• Release both buttons.
5) Recording a Scene
• Press MODE SELECT to select the 1-24 SINGLE / PRESET PARK function. The green LED indicator lights up.
• Select the desired page with the PAGE button
• Slide both master faders to the top position (MASTER A = 10 & MASTER B = 0)
• Place the 24 channel sliders in the desired position.
• Press the RECORD button to store the scene in the memory.
• Slide both master faders to the lowest position (MASTER A = 0 & MASTER B = 10).
• Hold the record button
• Press the flash button of your choice (13-24)
• Release the RECORD button.
The scene is now stored under one of the keys of n°7 in fig. 1 on page 2
6) Deleting a Scene
• Select the desired page with the PAGE button
• Hold the RECORD button.
• Press the flash button (13 – 24) where the scene was stored twice
• Release the RECORD button

VDPC146 VELLEMAN 7
7) Recording a Chase
• Press MODE SELECT to select 1-24 SINGLE / PRESET PARK. The green LED indicator lights up.
• Select the desired page with the PAGE button.
• Slide both master faders (MASTER A = 10 and MASTER B = 0) to the highest position
• Place the 24 channel sliders in the desired position.
• Press RECORD to store the scene in the memory
• Place the 24 channel sliders in the desired position again.
• Press RECORD to store this second scene in the memory
• Repeat the last two steps until a max. of 999 scenes have been programmed
• When you’re done programming, slide both master faders (MASTER A = 0 and MASTER B = 10) to the bottom
• Press the desired flash button (13 – 24)
• Release the RECORD button
The chase is now stored under one of the keys of n°7 in fig. 1 on page 2.
8) Deleting a Step from a Programme
• Hold the EDIT button
• Press the desired flash button (13 – 24).
• Release the EDIT button. The yellow LED indicator of the selected scene is lit.
• Bring the speed fader down (to SHOW MODE) and use the STEP button to find the scene to be deleted
• Press the DELETE button to remove the step.
9) Inserting or Adding a Step to a Programme
• Press MODE SELECT to select 1-24 SINGLE / PRESET PARK. The green LED indicator lights.
• Use the PAGE button to select the page (1 – 4) where the scene is to be added or inserted.
• Slide both master faders (MASTER A = 0 and MASTER B = 10) to the lowest position, place the FADE slider in
the highest position and the SPEED slider in the lowest position (SHOW MODE).
• The channel fader of the step to be inserted should be slid upwards.
• Press RECORD
• Select CHASE/SCENES (red LED indicator is lit) with the MODE SELECT button
• Hold the EDIT button
• Press the flash button of the scene that has to be inserted in that step.
• Release the EDIT button (the yellow LED indicator of the selected scene is lit)
• Press the STEP button until you reach the scene that will immediately follow the scene to be inserted
• Press INSERT to add the scene to that programme step.
• Hold the RECORD button
• Press the REC EXIT button
• Release both buttons to leave the programming mode
10) Selecting and Running a Programme
• Press MODE SELECT until the green LED indicator marked ‘1-24 SINGLE / PRESET PARK’ is lit.
• Select the desired page (1 – 4) with the PAGE button
• Slide the MASTER faders to the highest position
• Move the channel slider for the scene in question to the lowest and then the highest position to select and run the
programme stored under that fader.

VDPC146 VELLEMAN 8
11) Running a Programme with TAP SYNC rhythm control
• Make sure the music control function is not active (press the AUDIO button to extinguish the AUDIO LED indicator
if necessary).
• Press the PARK button to select MIX CHASE. The yellow LED indicator is lit
• Select the programme you want to run
• Adjust the speed slider and press TAP SYNC twice to define the beat time
• Hold REC SPEED.
• Press the appropriate flash button under PRESET B to store the new settings
12) Running a Programme with the Speed Slider
• Make sure the music control function is not active (press the AUDIO to extinguish the AUDIO LED indicator if
necessary).
• Press the PARK button to select MIX CHASE. The yellow LED indicator is lit
• Select the programme you want to run
• Move the speed slider all the way down to SHOW MODE
• Hold REC SPEED.
• Press the appropriate flash button under PRESET B to store the new settings
The programme is now controlled through the real-time movement of the SPEED control.
13) Programming Example
• Put the device in the programming mode (see “2) Record Enable (enter recording mode)” on page 5)
• Press MODE SELECT until the green LED indicator marked ‘1-24 SINGLE / PRESET PARK’ is lit
• Slide both MASTER faders and the FADE slider to the highest position and the SPEED slider to the bottom.
• Select page 1 with the PAGE button
• Slide channel faders 1-3-5-7-9-11-13-15-17-19-21-23 to the top
• Press RECORD (the LED display shows 001)
• Slide channel faders 2-4-6-8-10-12-14-16-18-20-22-24 to the top
• Press RECORD (the LED display shows 002)
• Select CHASE / SCENES by pressing the MODE SELECT button
• Hold the RECORD button
• Press the first flash button in the lower channel faders portion (the flash button of channel 13)
• Release both buttons. All LED channel indicators flash momentarily.
The running light is now programmed on page 1 under scene 1.
Now we want to see the light in action :
1. Slide both master faders to the bottom
2. Slide the SPEED fader to the top
3. Slide SCENE 1 fader to the top
Move the SPEED fader up or down to adjust the speed of the running light. When the SPEED fader is all the way
down and is on SHOW MODE, then you can press the STEP button to view the scene step by step.
Press the AUDIO button (the green LED indicator will light) if you want the running light to react to music. Adjust the
music sensitivity with the AUDIOLEVEL fader. Press the AUDIO button again to leave the music control mode.
You can also synchronize the running light with the music manually : Tap the TAP SYNC button twice. The interval
between the two taps will determine the rhythm of the running light. In other words : tap the button twice to the beat
of the music. The SPEED fader will resume control when it is moved.

VDPC146 VELLEMAN 9
B) Speed Settings
1) Speed adjustment (max. 5 min) :
- Hold the RECORD button
- Press flash key 5 in PRESET A three times
- Release the RECORD button
The yellow LED indicator next to 5MIN (left)is now lit, indicating that the left scale is currently being used for the
SPEED fader.
2) Speed adjustment (max. 10 min) :
- Hold the RECORD button
- Press flash key 10 in PRESET A three times
- Release the RECORD button
The yellow LED indicator next to 10MIN (right) is now lit, indicating that the left scale is now being used for the
SPEED fader.
C) Other Functions
1. BLIND button
• Hold the BLIND button.
• Press the flash button to any channel to deactivate this channel.
2. HOME button
• Hold the HOME button.
• Press the flash button for any channel to reactivate this channel.
3. TAP SYNC button
• Press this button twice to define the rhythm of the music manually (this only works in STEP mode and not in the
AUDIO mode). The interval between the two taps determines the speed)
4. FULL-ON button
• All channel outputs go to 100% as long as the user holds this button.
5. BLACK OUT button
• The programme continues to run but the connected devices do not receive the signal as long as the yellow
BLACK OUT indication LED is lit.
• Press the BLACK OUT button again to deactivate this function.
D) Midi Settings
1. MIDI-IN mode
• Hold the RECORD button
• Press flash button 1 three times in PRESET A
• Release the RECORD button
• The display now shows CH1, indicating that the device is in the MIDI-IN mode
• Press the desired flash button (1 – 16) to assign this MIDI channel to this DMX channel
• Hold the RECORD button
• Press the REC EXIT button to leave this mode

VDPC146 VELLEMAN 10
2. MIDI-OUT mode
• Hold the RECORD button
• Press flash button 2 three times in PRESET A
• Release the RECORD button
• The display now shows CH0, indicating that the device is in the MIDI-OUT mode
• Press the desired flash button (1 – 16) to assign this MIDI channel to this DMX channel
• Hold the RECORD button
• Press the REC EXIT button to leave this mode
3. Receiving a File
• Hold the RECORD button
• Press flash button 3 three times in PRESET A
• Release the RECORD button
• The display now shows IN, indicating that the device is ready to receive a file
• All other operations will be disabled during the reception of the file. The reception will stop automatically at the
end of the file or when mistakes occur.
4. Sending a File
• Hold the RECORD button
• Press flash button 4 three times in PRESET A
• Release the RECORD button
• The display now shows OUT, indicating that the device is ready to send a file
• All other operations will be disabled during the reception of the file. The transmission will stop automatically at the
end of the file or if an error occurs.
E) Special Functions
1. Fade Time
The amount of time required to dim the output from 100 to 0% or vice versa.
2. Single Chase
The scenes are executed one by one and NO is showing on the display. Adjust the speed with the SPEED fader.
3. Mix Mode
All selected programmes are executed synchronously, with each programme having its own chase speed.
4. Fade Time & Chase Speed Indications
When the time is more than 1 min, the indication includes 2 dots e.g. 1 minute and 15 seconds is displayed as 1.15.
When the time is less than one minute, the indication only has one dot e.g.11.5 seconds is displayed as 11.5

VDPC146 VELLEMAN 11
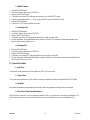
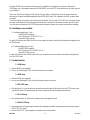
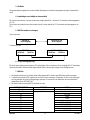
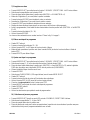
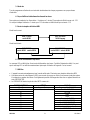
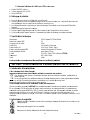
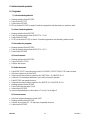
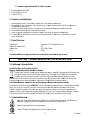
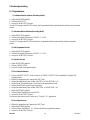
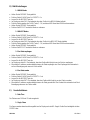
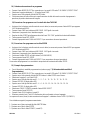
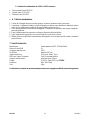
5. Transmit and Receive MIDI files
Open-loop mode
Closed-loop mode
6. Low Power
When the power voltage is low, the display will show LOP. Please check your power supply. LOP may appear briefly
just after you have turned the device on. Pay no attention to this, it’s normal.
7. MIDI Run
• If no MIDI data are received for ten minutes, the VDPDMXC146 goes to standby mode.
• You need to enter the device ID (= 55H) in order to send or receive a file. You can add scenes to the memory or
call them up and you can exchange information with a device that is connected to your VDPDMXC146.
• This unit sends or receives NOTE information as follows :
NOTE NUMBER VELOCITY FUNCTION
22 – 69 Programme Master Turn on/off programme 1 - 48
70 – 93 Channel Dimmer Turn on/off channel 1 – 24
94 FULL-ON
95 DARK
96 HOLD
97 Turn on/off audio chase
98 CHASE / SCENES mode
99 DOUBLE PRESET mode
100 SINGLE PRESET mode
101 Step change
102 BLACK OUT
8. Switch the display between 0-100% and 0-255
• Hold the RECORD button
• Press the % OR 0-255 key
• Release the RECORD button
TRANSMITTER
MIDI out
RECEIVER
MIDI in
TRANSMITTER
MIDI out MIDI in
RECEIVER
MIDI out MIDI in

VD
6.
1.
2.
3.
4.
5.
6.
7.
P
o
N
u
M
a
D
M
Au
MI
Fo
Fu
Di
m
W
e
T
h
1.
A
a
B
e
U
m
R
e
H
e
D
a
Di
t
en
g
e
da
PC146
Cleanin
g
A
ll screws f
o
corroded.
The housin
g
holes in mo
The electri
c
Disconnect
Wipe the d
e
Entrust a q
u
necessary.
Technica
l
o
wer Suppl
y
u
mber of DM
X
a
x. Cable Le
n
M
X Output
u
dio Line Inp
u
DI Input, Ou
t
ot Control In
se
m
ensions
e
i
g
ht
h
e informati
o
Inleidin
g
a
n alle in
g
e
z
e
lan
g
ri
j
ke m
Dit s
ym
dit toe
s
Gooi d
g
espe
c
m
oet dit toe
s
e
specteer de
e
bt u vra
g
e
n
a
nk u voor u
w
t
is een 24-k
a
MIDI-comp
a
pro
g
ramme
e
n de installa
t
and Main
t
o
r installin
g
t
g
, mountin
g
s
untin
g
supp
o
c
power supp
the device f
r
e
vice re
g
ular
l
u
alified tech
n
l
Specific
a
X
Channels
ng
th
u
t
t
put, Throu
gh
put
o
n in this m
a
VD
P
& Kenme
r
z
etenen van
ilieu-inform
a
m
bool op het
s
tel schade
k
it toestel
(
en
c
ialiseerd be
s
tel naar uw
v
plaatseli
j
ke
n
, contactee
r
w
aankoop!
L
a
naals DMX
a
tibel. Het to
e
e
rd met in tot
t
ie van het t
o
t
enance
t
he devices
o
s
upports an
d
o
rts, do not c
l
y
cables m
u
r
om the mai
n
ly
with a moi
s
n
ician with th
e
a
tions
h
put
a
nual is su
b
P
C146 –
r
ken
de Europe
s
a
tie betreff
e
toestel of d
e
k
an toebren
g
eventuele b
dri
j
f terechtk
v
erdeler of n
a
milieuwet
g
e
v
r
dan de pla
L
ees de han
d
lichtsturin
g
.
e
stel kan ma
aal 4500 sta
o
estel uit en
r
o
r parts of th
e
d
connection
s
han
g
e the lo
u
st be unda
m
n
s prior to m
a
s
t cloth. Do
n
e
maintenan
c
bj
ect to cha
n
24-KAN
s
e Unie
e
nde dit pro
d
e
verpakkin
g
g
en aan het
m
atteri
j
en
)
ni
e
omen voor r
e
a
ar een loka
v
in
g
.
atseli
j
ke au
t
d
leidin
g
voor
Het toestel
w
x. 48 pro
g
ra
m
ppen. Ga na
r
aadplee
g
u
w
12
e
device hav
e
s
should not
cation of the
m
a
g
ed. Have
a
intenance a
c
n
ot use alco
h
c
e of this de
v
A
C/DC ada
p
24
100m
3-pin femal
e
RCA
(
cinch
)
5-pin Din st
a
6.35mm ste
r
F0.5A
(
5 x 2
482 x 264 x
4.8kg
ng
e without
AALS
D
d
uct
g
eeft aan d
a
m
ilieu.
e
t bi
j
het
g
ew
o
e
c
y
cla
g
e.
al rec
y
cla
g
e
p
t
oriteiten in
z
u het toeste
l
w
ordt
g
estuu
r
m
ma’s sture
n
of het toest
e
w
dealer.
e
to be scre
w
be modified
connection
s
the device i
n
c
tivities.
h
ol or solven
t
v
ice. Contac
t
p
ter 12-20Vd
e
XLR
100mV, 1V
p
a
ndard interf
a
r
eo socket
0mm
)
250V
85mm
prior notic
e
D
MX LIC
H
a
t, als het na
o
ne huishou
d
p
unt bren
g
e
n
z
ake verwi
jd
in
g
ebruik n
r
d door een
m
n
en max. 4
e
l werd besc
h
w
ed down ti
g
or tampered
s
, etc.
n
stalled b
y
a
t
s.
t
y
our dealer
c/500mA
p
-p
a
ce
(
order the F
F
e
.
H
TSTU
R
zi
j
n levensc
y
d
eli
j
ke afval;
n
.
d
erin
g
.
eemt.
m
icroproces
s
pa
g
ina’s ku
n
h
adi
g
d ti
j
de
n
g
ht and must
with e.
g
. do
qualified tec
for spare p
a
F
0.5N with u
s
R
ING
y
clus wordt
w
het moet bi
j
s
or en is voll
e
n
nen worden
n
s het transp
o
VELLE
M
not be
not drill extr
a
hnician.
a
rts if
s)
w
e
gg
eworpe
n
een
e
di
g
DMX51
2
o
rt. Zo
j
a, st
e
M
AN
a
n
,
2
-
e
l

VD
2.
•
•
•
•
•
•
•
3.
•
•
•
•
•
•
•
•
4.
PC146
Veili
g
hei
d
W
e
el
e
B
e
V
e
Laat dit toe
s
De
g
arantie
handleidin
g
verband m
e
Om bescha
d
temperatuu
r
De beschik
b
de handleid
De voedin
gs
een nieuwe
Ontkoppel h
en trek nooi
t
Schade ver
o
Houd dit to
e
Al
g
emen
e
Dit toestel i
s
binnenshui
s
Schud het t
o
Bi
j
de keuz
e
temperatur
e
U ma
g
het
t
Maak u eer
s
Meestal is
b
Gebruik de
Om veili
g
h
e
De
g
arantie
toepassin
ge
van de lam
p
toestel op e
Beschri
jv
a) Frontp
1.
L
D
2.
S
R
3.
F
D
d
sinstruct
i
e
es voorzic
h
e
ktroshocks
t
e
scherm dit t
o
e
rzeker u er
v
s
tel installer
e
g
eldt niet v
o
en uw deal
e
e
e houden.
d
i
g
in
g
te ver
r
schommeli
n
b
are netspa
n
in
g
.
s
kabel ma
g
n
voedin
g
ska
b
et toestel vo
o
t
aan de voe
d
o
orzaakt do
o
e
stel uit de b
u
e
richtli
j
n
e
s
een dimm
e
s
g
ebruiken
m
o
estel niet d
o
e
van de inst
a
e
n en vochti
g
t
oestel nooit
v
s
t vertrouwd
b
eschadi
g
in
g
oorspronkeli
j
e
idsredenen
m
vervalt indi
e
e
n die hier w
o
p
en, enz. te
v
en on
g
eoorl
o
v
in
g
aneel
(
zie
L
ED indicat
o
D
e LED
g
aa
t
S
chuifre
g
el
a
R
e
g
elen het
F
lashtoetse
D
ruk op één
i
es
h
ti
g
bi
j
de ins
t
t
e vermi
j
den
o
estel te
g
en
v
an dat het t
o
e
n en onderh
o
or schade d
e
r zal de ver
a
mi
j
den, ma
g
ng
en. Wacht
n
nin
g
ma
g
ni
e
n
iet worden
g
b
el aanbren
g
o
r u het reini
g
d
in
g
skabel o
m
o
r wi
j
zi
g
in
g
e
n
u
urt van kin
d
e
n
e
rpack voor
p
m
et een AC
s
o
oreen. Ver
m
a
llatieplaats
g
heid.
v
ervoeren o
f
met de wer
k
het
g
evol
g
v
j
ke verpakki
n
m
a
g
de
g
eb
r
e
n u de stick
e
o
rden besch
r
v
ermi
j
den. U
o
ofde manie
r
fi
g
. 1 blz.
2
o
rs voor di
m
t
branden w
a
a
ars per ka
n
uit
g
an
g
sniv
e
n
(
1 – 12)
van deze k
n
t
allatie: raak
.
re
g
en en vo
o
estel niet a
a
ouden door
e
ie werd vero
a
ntwoordeli
jk
u het toeste
tot het toest
e
e
t ho
g
er zi
j
n
g
ekrimpt of
b
g
en.
t
en wannee
r
m
de plu
g
los
n
die de klan
t
d
eren en am
a
p
rofessioneel
s
troom van
m
m
i
j
d brute kr
a
moet u na
ga
f
g
ebruiken
b
k
in
g
van dit t
o
v
an onprofe
s
ng
wanneer
u
r
uiker
g
een
w
e
r met het s
e
r
even om ko
kunt het toe
r
g
ebruikt.
2)
m
re
g
elaars
v
a
nneer u de
s
n
aal
(
1 – 12)
e
au per kan
a
n
oppen om h
e
13
g
een kabel
s
chti
g
heid.
a
n
g
esloten is
e
en
g
escho
o
orzaakt doo
r
k
heid afwi
j
ze
n
l niet onmid
d
e
l kamertem
p
dan de spa
n
b
eschadi
g
d d
r
het niet in
ge
te koppelen.
t
heeft aan
ge
a
teurs.
podium
g
eb
r
m
ax. 230Vac
/
a
cht ti
j
dens d
a
an of het to
e
b
i
j
een temp
e
o
estel. On
g
e
s
s
sioneel
g
eb
r
u
het toestel
w
i
j
zi
g
in
g
en a
a
e
rienummer
v
rtsluitin
g
en,
b
stel bescha
d
v
an PRESE
T
s
chuifre
g
ela
a
a
al van 0 tot
1
e
t uit
g
an
g
sn
i
aan die on
d
op een stro
o
o
ld technicus
r
het ne
g
ere
n
n
voor defec
t
d
elli
j
k inscha
k
p
eratuur hee
f
n
nin
g
die wo
r
oor scherpe
e
bruik is. Ra
a
e
bracht aan
h
r
uik in disco'
s
/
50Hz.
e installatie
e
e
stel niet wo
r
e
ratuur van <
s
choolde pe
r
r
uik.
vervoert.
a
nbren
g
en a
a
v
erwi
j
dert. G
e
b
randwonde
n
d
i
g
en en de
g
T
A
a
r naar bove
n
1
00% of 0 to
t
i
veau van d
a
d
er stroom st
a
o
mbron alvo
r
.
n
van bepaal
d
t
en of proble
m
k
elen indien
f
t bereikt.
r
dt vermeld i
n
voorwerpen
a
k de voedin
g
h
et toestel v
a
s
, theaters,
e
e
n de bedie
n
r
dt
g
ehinder
d
5 en > dan
3
r
sonen mo
ge
a
n het toest
e
e
bruik het to
e
n
, elektrosh
o
g
arantie verv
a
n
schuift.
t
255.
a
t kanaal op
1
a
an om dod
e
r
ens het te o
p
d
e richtli
j
ne
n
m
en die hier
het werd blo
o
n
de specific
a
. Zo
j
a, laat
u
g
skabel enkel
a
llen niet on
d
e
nz. U ma
g
d
n
in
g
van dit t
o
d
door stof, e
3
5°C.
e
n dit toestel
e
l.
e
stel enkel
v
o
cks,
g
evaar
a
lt automati
s
1
00% te bre
n
VELLE
M
e
li
j
ke
p
enen.
in deze
rechtstreek
s
o
t
g
esteld aa
a
ties achter
a
u
w dealer da
aan via de p
d
er de
g
aran
t
it toestel en
k
o
estel.
xtreme
niet
g
ebruik
e
v
oor de
voor ontplof
f
s
ch indien u
h
ng
en.
M
AN
s
n
a
an
n
lu
g
t
ie.
k
el
e
n.
f
in
g
h
et

VDPC146 VELLEMAN 14
4. LED indicators voor dimregelaars van preset B
De LED licht op wanneer u de schuifregelaar naar boven schuift.
5. LED indicators voor keuze van scène of chase
6. Schuifregelaars per kanaal (13 – 24)
Regelen het uitgangsniveau van per kanaal van 0 tot 100% of 0 tot 255.
7. Flash toetsen (13 – 24)
Druk op één van deze knoppen om het uitgangsniveau van dat kanaal op 100% te brengen.
8. MASTER A fader
9. BLIND
Druk deze toets gelijktijdig in met één van de flashtoetsen om dat kanaal uit te schakelen in de
CHASE/SCENES mode.
10. Master B fader
11. HOME
Druk deze toets gelijktijdig in met een flashtoets om dat kanaal opnieuw te activeren in de
CHASE/SCENES mode.
12. Schuifregelaar voor fadetijd
Regel de fadetijd met deze schuifregelaar.
13. TAP SYNC
Druk deze knop twee maal in op het ritme van de muziek om de snelheid van de AUTO CHASE mode
in te stellen.
14. Schuifregelaar SPEED
Om de snelheid van de chase manueel te regelen.
15. FULL ON
Druk op deze knop om het uitgangsniveau van alle kanalen naar 100% te doen springen.
16. Schuifregelaar AUDIO LEVEL
Regelt de muziekgevoeligheid van de audio-ingang.
17. BLACK OUT
Druk op deze knop om het uitgangsniveau van alle kanalen terug te brengen tot 0%.
18. STEP
Druk op deze knop om in een programma stap voor stap te selecteren (SPEED schuifregelaar moet
zich in de laagste stand bevinden : SHOW MODE)
19. AUDIO
Een druk op deze knop geeft u toegang tot de instelmode voor audio.
20. HOLD
Houd deze knop ingedrukt om de chase te onderbreken.

VDPC146 VELLEMAN 15
21. PARK
Met deze knop kiest u SINGLE CHASE of MIX CHASE in de CHASE/SCENES mode. In de DOUBLE
PRESET mode drukt u op PARK B om de max. waarde voor MASTER B te activeren. In de SINGLE
PRESET mode drukt u op PARK A om de max. waarde voor MASTER A te activeren.
22. REC EXIT
Druk op deze knop om een kanaal toe te voegen of te elimineren. De bijhorende LED brandt wanneer
het toestel zich in de kill mode bevindt. Druk op om het even welke flashtoets om het uitgangsniveau
van alle kanalen te herleiden tot 0% met uitzondering van het gekozen kanaal. Deze knop deactiveert
tevens de opnamemode.
23. RECORD
Druk op deze knop om een stap van een programma op te nemen.
24. PAGE
Selecteer de gewenste scène of chase op de gekozen pagina (1 – 4).
25. MODE SELECT
Druk op deze knop in de CHASE/SCENES mode om te kiezen tussen de DOUBLE PRESET of
SINGLE PRESET mode.
26. DARK
Om de lichtsterkte van alle kanalen te herleiden tot 0, met inbegrip van de kanalen die zich op dat
moment in FLASH of FULL ON mode bevinden.
27. ALL REV
Keert de richting van de chase om.
28. 0% of 0-255
De display schakelt over van 0-100% naar 0-255 en omgekeerd.
29. REV ONE
Houd deze knop ingedrukt en druk op een willekeurige knop van PRESET B. De geselecteerde scène
wordt nu afgespeeld in omgekeerde richting.
30. CHASE REV
Met deze knop kunt u de chase omkeren die wordt gestuurd door de SPEED schuifregelaar.
31. BEAT REV
Met deze knop kunt u de chase doen omkeren op het ritme van de muziek.
b) Achterpaneel (zie fig. 2 blz. 4)
1. Voedingsingang : 12-20Vdc / 500mA
2. MIDI THRU : dient om de MIDI data door te sturen die worden ontvangen via de MIDI IN
connector
3. MIDI OUT
4. MIDI IN
5. DMX OUT : 3-pins vrouwelijke XLR
6. DMX POLARITY : kies de polariteit van de DMX uitgang (DMX OUT)
7. AUDIO INPUT : RCA (cinch) line in : 100mV, 1Vp-p
8. REMOTE : de FULL ON en BLACKOUT functies kunnen vanop afstand worden gestuurd via
een 6.35mm stereo jack

VDPC146 VELLEMAN 16
c) Aansluitingen
De fabrikant is niet aansprakelijk voor schade veroorzaakt door verkeerde aansluitingen.
Sluit de meegeleverde adapter aan op de DC jack en stop het andere uiteinde in een netstekkker.
Gebruik de XLR kabel voor de aansluiting op het lichtnet van het toestel dat u wilt sturen. Verbind de MIDI kabels
met de juiste MIDI aansluitingen.
5. Bedieningsinstructies
A) Programmeren
1) Opnamemode verlaten
• Houd de RECORD knop ingedrukt.
• Druk op de REC EXIT knop.
• Laat de RECORD knop los.
De rode LED indicator boven de RECORD knop dooft nu uit. De programmeermode is nu gedeactiveerd en kan niet
worden gebruikt.
2) Opnamemode activeren
• Houd de RECORD knop ingedrukt.
• Druk op de volgende flashtoetsen in PRESET A : 1-5-6-8
• Laat de RECORD knop los.
De rode LED indicator boven de RECORD knop licht op. De programmeermode is nu geactiveerd en kan worden
gebruikt.
3) Alle programma’s wissen
• Houd de RECORD knop ingedrukt.
• Druk op de volgende flashtoetsen in PRESET A : 1-3-2-3.
• Laat de RECORD knop los.
4) Geheugen wissen
• Houd de RECORD knop ingedrukt.
• Druk de REC CLEAR knop in.
• Laat beide knoppen los.
5) Een scène opnemen
• Druk op MODE SELECT om de functie 1-24 SINGLE / PRESET PARK te selecteren. De groene LED indicator
licht op.
• Selecteer de gewenste pagina met de PAGE knop
• Plaats beide master faders in de hoogste stand (MASTER A = 10 & MASTER B = 0)
• Plaats de 24 schuifregelaars (1 per kanaal) in de gewenste stand.
• Druk op de RECORD knop om de scène op te slaan in het geheugen.
• Plaats beide master faders in de laagste stand (MASTER A = 0 & MASTER B = 10).
• Houd de RECORD knop ingedrukt
• Druk op de flashtoets van uw keuze (13-24)
• Laat de RECORD knop los.
De scène is nu opgeslagen onder een van de toetsen van n°7 in fig. 1 op blz. 2.

VDPC146 VELLEMAN 17
6) Een scène wissen
• Selecteer de gewenste pagina met de PAGE knop
• Houd de RECORD knop ingedrukt.
• Druk 2 x op de flashtoets (13 – 24) waaronder de scène was opgeslagen
• Laat de RECORD knop los
7) Een chase opnemen
• Druk op MODE SELECT om de functie 1-24 SINGLE / PRESET PARK te selecteren. De groene LED indicator
licht op.
• Selecteer de gewenste pagina met de PAGE knop
• Plaats beide master faders in de hoogste stand (MASTER A = 10 & MASTER B = 0)
• Plaats de 24 schuifregelaars (1 per kanaal) in de gewenste stand.
• Druk op de RECORD knop om de scène op te slaan in het geheugen.
• Plaats de 24 schuifregelaars (1 per kanaal) opnieuw in de juiste stand.
• Druk op RECORD om de tweede scène op te slaan in het geheugen
• Herhaal de laatste twee stappen tot max. 999 scènes zijn geprogrammeerd
• Plaats beide master faders na het programmeren op de minimumstand (MASTER A = 0 and MASTER B = 10)
• Druk op de gewenste flashtoets (13 – 24)
• Laat de RECORD knop los
De chase is nu opgeslagen onder één van de toetsen van n°7 in fig. 1 op blz. 2.
8) Een stap van een programma wissen
• Houd de EDIT knop ingedrukt
• Druk een flashtoets in naar keuze (13 – 24).
• Laat de EDIT toets los. De gele LED indicator van de gekozen scène licht op.
• Plaats de speed fader in de laagste stand (in de SHOW MODE) en zoek de scène die u wilt deleten met de STEP
knop
• Druk op DELETE om de stap te wissen.
9) Een stap invoegen in een programma
• Druk op MODE SELECT om de functie 1-24 SINGLE / PRESET PARK te selecteren. De groene LED licht op.
• Gebruik de PAGE knop om de pagina (1 – 4) te selecteren waar de scène moet worden ingevoegd.
• Plaats beide master faders in de laagste stand (MASTER A = 0 and MASTER B = 10), plaats de FADE
schuifregelaar in de hoogste stand en de SPEED schuifregelaar in de laagste stand (SHOW MODE).
• Schuif de fader naar boven van de stap die moet worden ingevoegd.
• Druk op RECORD
• Selecteer CHASE/SCENES (rode LED indicator brandt) met de MODE SELECT button
• Houd EDIT ingedrukt
• Druk op de flashtoets van de scène die moet worden ingevoegd in die stap.
• Laat de EDIT toets los (de gele LED van de geselecteerde scène licht op)
• Druk op de STEP toets tot u de scène vindt die volgt op de scène die u wilt invoegen
• Druk op INSERT om de scène toe te voegen aan die stap van het programma.
• Houd de RECORD toets ingedrukt
• Druk op de REC EXIT toets
• Laat beide knoppen los om de programmeermode te verlaten

VDPC146 VELLEMAN 18
10) Programma selecteren en afspelen
• Druk op MODE SELECT tot de groene LED indicator van 1-24 SINGLE / PRESET PARK gaat branden.
• Selecteer de gewenste pagina (1 – 4) met de PAGE knop
• Plaats de MASTER faders in de hoogste stand
• Plaats de kanaalregelaar voor de scène in kwestie in de laagste stand en vervolgens in de hoogste stand om het
programma dat is opgeslagen onder die fader te selecteren en vervolgens te doen lopen.
11) Programma doen lopen met de TAP SYNC ritmeregeling
• Ga na of de muzieksturingsfunctie is uitgeschakeld (druk op de AUDIO knop om de AUDIO LED indicator te doen
uitdoven).
• Selecteer MIX CHASE met de PARK knop. De gele LED indicator brandt
• Selecteer het programma dat u wilt afspelen
• Stel de snelheid in met de schuifregelaar SPEED en druk 2 x op TAP SYNC om de werking te synchroniseren
met het ritme van de muziek
• Houd REC SPEED ingedrukt.
• Druk op de geschikte flashtoets onder PRESET B om de nieuwe instellingen op te slaan
12) Programma afspelen met de schuifregelaar SPEED
• Ga na of de muzieksturingsfunctie is uitgeschakeld (druk op de AUDIO knop om de AUDIO LED indicator te doen
uitdoven).
• Selecteer MIX CHASE met de PARK knop. De gele LED indicator brandt
• Selecteer het programma dat u wilt afspelen
• Plaats de schuifregelaar speed in de laagste stand (= SHOW MODE)
• Houd REC SPEED ingedrukt.
• Druk de juiste flashtoets van PRESET B in om de nieuwe instellingen op te slaan
Het programma wordt nu gestuurd door de realtime bewegingen van de SPEEDregeling.
13) Voorbeeld
• Stel het toestel in de programmeermode (zie “2) Opnamemode activeren” op blz. 5)
• Druk op MODE SELECT tot de groene LED indicator van 1-24 SINGLE / PRESET PARK brandt
• Plaats de beide MASTER faders en de FADE schuifregeling in de hoogste stand en de SPEED regeling in de
laagste stand.
• Selecteer pagina 1 met de PAGE knop
• Plaats kanaalfaders 1-3-5-7-9-11-13-15-17-19-21-23 in de hoogste stand
• Druk op RECORD (op de LED display leest u 001 af)
• Plaats kanaalfaders 2-4-6-8-10-12-14-16-18-20-22-24 in de hoogste stand
• Druk op RECORD (op de LED display leest u 002 af)
• Selecteer CHASE / SCENES door een druk op MODE SELECT
• Houd RECORD ingedrukt
• Druk de flashtoets van kanaal 13 in
• Laat beide knoppen los. De LED indicators van alle kanalen knipperen kortstondig.
Het looplicht is nu geprogrammeerd op pagina 1 onder scène 1.
Even een praktisch voorbeeld :
1. Plaats beide master faders in de laagste stand
2. Plaats de SPEED fader in de hoogste stand
3. Plaats de fader voor SCENE 1 in de hoogste stand

VDPC146 VELLEMAN 19
Schuif de SPEED fader naar boven of beneden om de snelheid van het looplicht aan te passen. Wanneer de
SPEEDfader zich in de laagste stand bevindt (SHOW MODE) kunt u de STEP knop indrukken om de scène stap per
stap te bekijken.
Druk op de AUDIO knop (de groene LED indicator licht op) indien u het looplicht op het ritme van de muziek wilt
doen werken. Regel de muziekgevoeligheid met de AUDIOLEVEL fader. Druk nogmaals op AUDIO om deze mode
te verlaten.
U kunt het looplicht ook manueel synchroniseren met de muziek. Druk 2 x op de TAP SYNC knop. De interval tussen
de eerste en de tweede druk op de knop bepaalt het ritme van het looplicht. Met andere woorden : druk de knop 2 x
in op het ritme van de muziek. De SPEED fader neemt opnieuw de controle over wanneer u deze laatste beweegt.
B) Instellingen voor snelheid
3) Snelheidsregeling (max. 5 min) :
- Houd RECORD ingedrukt
- Druk FLASH toets 5 in PRESET A 3 x in
- Laat de RECORD toets los
De gele LED indicator naast 5MIN (links) licht nu op en geeft aan dat de schaal aan de linkerkant wordt gebruikt voor
de SPEED fader.
4) Snelheidsregeling (max. 10 min) :
- Houd RECORD ingedrukt
- Druk FLASH toets 10 in PRESET A 3 x in
- Laat de RECORD toets los
De gele LED indicator naast 10MIN (rechts) licht nu op en geeft aan dat de schaal aan de linkerkant wordt gebruikt
voor de SPEED fader.
C) Andere functies
1. BLIND knop
• Houd de BLIND knop ingedrukt.
• Druk op een willekeurige FLASH toets om dit kanaal uit te schakelen.
2. HOME knop
• Houd de HOME knop ingedrukt.
• Druk op een willekeurige FLASH toets om dit kanaal opnieuw te activeren.
3. TAP SYNC knop
• Druk deze knop 2 x in om het ritme van de muziek manueel te bepalen (dit werkt enkel in de STEP mode en niet
in de AUDIO mode). De interval tussen de eerste en tweede druk op de knop bepaalt de snelheid
4. FULL-ON knop
• Alle kanalen branden op 100% sterkte zolang u deze knop ingedrukt houdt.
5. BLACK OUT knop
• Het programma wordt verder uitgevoerd maar de aangesloten toestellen ontvangen geen signaal zolang de gele
BLACK OUT LED brandt.
• Druk de BLACK OUT knop nogmaals in om deze functie uit te schakelen.

VDPC146 VELLEMAN 20
D) Midi instellingen
1. MIDI-IN mode
• Houd RECORD ingedrukt
• Druk FLASH toets 1 in PRESET A 3 x in
• Laat RECORD los
• Op de display leest u nu CH1, wat aangeeft dat het toestel zich in de MIDI-IN mode bevindt
• Druk op de gewenste FLASH toets (1 – 16) om dit MIDI kanaal toe te wijzen aan dit DMX kanaal
• Houd RECORD ingedrukt
• Druk op REC EXIT om deze mode te verlaten
2. MIDI-OUT mode
• Houd RECORD ingedrukt
• Druk FLASH toets 2 in PRESET A 3 x in
• Laat RECORD los
• Op de display leest u CH0, wat aangeeft dat het toestel zich in de MIDI-OUT mode bevindt
• Druk de gewenste FLASH toets in (1 – 16) om dit MIDI kanaal toe te wijzen aan dit DMX kanaal
• Houd RECORD ingedrukt
• Druk op REC EXIT om deze mode te verlaten
3. Ontvangst van een file
• Houd RECORD ingedrukt
• Druk FLASH toets 3 in PRESET A 3 x in
• Laat RECORD los
• Op de display leest u IN, wat aangeeft dat het toestel klaar is om een file te ontvangen
• Alle andere bewerkingen worden gedeactiveerd tijdens de ontvangst van de file. De ontvangst wordt automatisch
afgesloten wanneer de volledige file is ontvangen of indien er zich een fout voordoet.
4. Versturen van een file
• Houd RECORD ingedrukt
• Druk FLASH toets 4 in PRESET A 3 x in
• Laat RECORD los
• Op de display leest u OUT, wat aangeeft dat het toestel klaar is om een file te versturen
• Alle andere bewerkingen worden gedeactiveerd tijdens het versturen van de file. Het versturen wordt automatisch
stopgezet wanneer de volledige file is verzonden of indien er zich een fout voordoet.
E) Speciale Functies
1. Fadetijd
De hoeveelheid tijd die verstrijkt bij het dimmen van de uitgang van 100% naar 0% of omgekeerd.
2. Enkelvoudige Chase
De scènes worden om beurt uitgevoerd en op de display leest u NO af. Regel de snelheid met de SPEED fader.
La pagina sta caricando ...
La pagina sta caricando ...
La pagina sta caricando ...
La pagina sta caricando ...
La pagina sta caricando ...
La pagina sta caricando ...
La pagina sta caricando ...
La pagina sta caricando ...
La pagina sta caricando ...
La pagina sta caricando ...
La pagina sta caricando ...
La pagina sta caricando ...
La pagina sta caricando ...
La pagina sta caricando ...
La pagina sta caricando ...
La pagina sta caricando ...
La pagina sta caricando ...
La pagina sta caricando ...
La pagina sta caricando ...
La pagina sta caricando ...
La pagina sta caricando ...
La pagina sta caricando ...
La pagina sta caricando ...
La pagina sta caricando ...
La pagina sta caricando ...
La pagina sta caricando ...
La pagina sta caricando ...
La pagina sta caricando ...
La pagina sta caricando ...
La pagina sta caricando ...
La pagina sta caricando ...
La pagina sta caricando ...
La pagina sta caricando ...
La pagina sta caricando ...
La pagina sta caricando ...
La pagina sta caricando ...
La pagina sta caricando ...
La pagina sta caricando ...
La pagina sta caricando ...
La pagina sta caricando ...
La pagina sta caricando ...
La pagina sta caricando ...
La pagina sta caricando ...
La pagina sta caricando ...
La pagina sta caricando ...
-
 1
1
-
 2
2
-
 3
3
-
 4
4
-
 5
5
-
 6
6
-
 7
7
-
 8
8
-
 9
9
-
 10
10
-
 11
11
-
 12
12
-
 13
13
-
 14
14
-
 15
15
-
 16
16
-
 17
17
-
 18
18
-
 19
19
-
 20
20
-
 21
21
-
 22
22
-
 23
23
-
 24
24
-
 25
25
-
 26
26
-
 27
27
-
 28
28
-
 29
29
-
 30
30
-
 31
31
-
 32
32
-
 33
33
-
 34
34
-
 35
35
-
 36
36
-
 37
37
-
 38
38
-
 39
39
-
 40
40
-
 41
41
-
 42
42
-
 43
43
-
 44
44
-
 45
45
-
 46
46
-
 47
47
-
 48
48
-
 49
49
-
 50
50
-
 51
51
-
 52
52
-
 53
53
-
 54
54
-
 55
55
-
 56
56
-
 57
57
-
 58
58
-
 59
59
-
 60
60
-
 61
61
-
 62
62
-
 63
63
-
 64
64
-
 65
65


HQ Power 24-channel DMX light control panel Manuale utente
- Categoria
- Pianoforti digitali
- Tipo
- Manuale utente
- Questo manuale è adatto anche per
in altre lingue
- English: HQ Power 24-channel DMX light control panel User manual
- français: HQ Power 24-channel DMX light control panel Manuel utilisateur
- español: HQ Power 24-channel DMX light control panel Manual de usuario
- Deutsch: HQ Power 24-channel DMX light control panel Benutzerhandbuch
- Nederlands: HQ Power 24-channel DMX light control panel Handleiding
Documenti correlati


Altri documenti
-
PROEL PLBR256MH2 - REV 07-2006 Manuale utente
-
SHOWTEC SCENE PILOT Manuale utente
-
Martin 2518 DMX Controller Manuale utente
-
Yamaha DMC1000 Manuale del proprietario
-
Velleman VDPDP152 Manuale utente
-
Yamaha DM2000 Manuale del proprietario
-
Leviton PPIC0-V24 Manuale utente
-
-
CHAUVET DJ Foot-C Guida di riferimento
-