Indesit K1M11S(W)/R Guida utente
- Categoria
- Piani cottura
- Tipo
- Guida utente
Questo manuale è adatto anche per

Cooker
Installation and use
Êóõoííaÿ ïëèòà
Óñòàíîâêà è ïîëüçîâàíèå
K1M11S/R

3
14
Cooker with electric oven
Instructions for installation and use
Ãàçîâûå ïëèòû ñ ýëåêòðè÷åñêèìè
äóõîâêîé è ãðèëåì
Èíñòðóêöèè ïî óñòàíîâêå è ýêñïëóàòàöèè

3
Important
1 This appliance is intended for non-professional use within the
home.
2 Before using the appliance, carefully read the instructions
contained in this manual, as they provide important information
for ensuring safe installation, use and maintenance. Keep this
manual as a reference guide.
3 Remove the packing and make sure the appliance hasn’t been damaged during
transport. If you have any doubts, don’t use the appliance. Call a qualified
technician for assistance. For safety, keep packing materials (plastic bags,
polystyrene foam, tacks, etc.) away from children.
4 The appliance must be installed by a qualified technician in accordance with the
manufacturer’s instructions. No liability for injury or damage to persons, animals
or property will be accepted by the manufacturer arising from failure to follow
these instructions.
5 The electrical safety of this appliance is ensured only if it is correctly connected
to an efficiently earthed system in accordance with electrical safety regulations.
Make sure this basic safety requirement has been complied with. If in doubt,
have it checked by a qualified technician. No liability for damage will be accepted
by the manufacturer because of defective earthing.
6 Before connecting the appliance, make sure the specifications on the rating plate
correspond with those of your power supply.
7 Check that your supply and sockets are sufficient for the total load taken by your
appliance which is stated on the rating plate. If you have any doubts, contact a
qualified technician for service.
8 A multipole circuit breaker with a space between contacts of 3 mm or more must
be fitted for installation
9 If the socket and cooker plug are not compatible, have the socket replaced with
a suitable model by a qualified technician who should also check that the cross-
section of the socket cable is suited to the power absorbed by the appliance. The
use of adaptors, multiple sockets and/or extensions, is not recommended. If
their use can not be avoided, remember to use only single or multiple adapters
and extensions which comply with current safety regulations. In these cases,
never exceed the maximum current capacity indicated on the single adaptor or
extension and the maximum power indicated on the multiple adapter.
10 Do not leave the appliance plugged in if it is not necessary. Switch off the main
switch and gas cock when you are not using the cooker.
11 The openings and slots used for ventilation and dispersion of
heat must never be closed or plugged.
12 The user must not replace the supply cable of this appliance. Always call an
after-sales servicing centre authorised by the manufacturer in the case of cable
damage or replacement.
13 This appliance must be used for the purpose for which it was expressly designed.
Any other use (e.g. heating rooms) is considered to be improper and consequently
dangerous.
The manufacturer declines all responsibility for damage resulting from improper
and irresponsible use.
14 A number of fundamental rules must be followed when using electrical appliances.
The following are of particular importance:
•
do not touch the appliance when your hands or feet are wet
•
do not use the appliance barefooted
•
do not use extensions, but if these are necessary caution must be exercised.
•
never pull the power supply cable or the appliance to unplug the appliance
plug from the mains.
•
never leave the appliance exposed to atmospheric agents (rain, sun etc.)
•
do not allow children or persons who are not familiar with the appliance to
use it, without supervision.
15 Always unplug the hob from the mains or switch off the main switch before
cleaning or carrying out maintenance operations.
16 If the surface of the glass breaks, disconnect the appliance immediately. For
repairs call only an authorised after-sales servicing centre and request the use of
original spare parts only. Failure to comply with the above may compromise the
safety of the appliance.
17 If you are no longer using the appliance, remember to make it unserviceable by
unplugging the appliance from the mains and cutting the supply cable. Also make
all potentially dangerous parts of the appliance, safe, above all for children who
could play with the appliance.
18 The vitreous china hob is resistant to temperature fluctuations and shockproof.
Remember however that sharp kitchen tools or cutters may break the surface of
the hob. If this happens, unplug the cooker immediately from the mains and call
your local servicing centre.
19 Remember that the cooking surface remains hot for at least half an hour after
you switch off the surface. Do not place containers or other objects on the hot
surface.
20 Avoid setting anything on the glass surface of the cooktop.
21 Do not turn on the cooking surfaces if there are sheets of aluminium foil or plastic
on the hob.
22 Keep away from the hot surfaces.
23 When using small electrical household appliances close to the hob, ensure that
the power cable does not rest on the hot surfaces
24 Keep pot handles turned inwards to avoid knocking the pot off the hob.
25 When you turn on the cooking surface always place a pot on the surface
immediately as it will otherwise overheat very quickly and possibly damage the
heating elements.
26 Preliminary instructions. The glass sealant utilised may leave traces of
grease on the glass. Remember to wipe these away with a normal non abrasive
detergent before you turn on the appliance. During the first few hours of use there
may be a smell of rubber which will disappear very quickly.
27 When the appliance is in use, the heating elements and some
parts of the oven door become extremely hot. Make sure you
don't touch them and keep children well away.
28 Make sure the knobs are in the “•”/”o” position when the appliance is not in use.
29 If the cooker is placed on a pedestal, take the necessary precautions to prevent
the same from sliding off the pedestal itself.
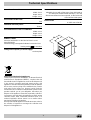
To maintain the EFFICIENCY and SAFETY of this appliance, we recommend:
• call only the Service Centers authorized by the manufacturer
• always use original Spare Parts

4
All instruction on the following pages must be carried out
by a competent person (corgi registered) in compliance
with gas safety (installation and use) regulation 1984.
Important: disconnect the cooker from the electrycity
and gas supply when any adjustment, etc.
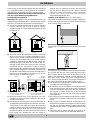
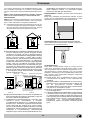
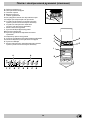
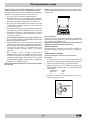
Positioning your appliance
Important: this appliance may be installed and used only
in permanently ventilated rooms in compliance with current
directives. The following precautions should be taken:
a) The room must be provided with an external exhaust
system obtained with a hood or with an electric
ventilator that goes on automatically each time the unit
is switched on.
In the case of chimneys or flues Directly to the
with branches (for cookers) exterior
b) The room must be provided with a system for air inflow
which is necessary for a regular combustion. The air
flow necessary for the combustion should be at least 2
m
3
/h for kW of installed power. The system may be
realized by drawing the air directly from outside the
building through a pipe that has at least a 100 cm
2
useable section and which must not be accidently
obstructed (Fig. A). And further it may be realized
indirectly from other adjacent rooms which are provided
with a ventilation pipe for the expulsion of the fumes to
the outside of the building as foresaid, and which must
not be part of the building in common use or rooms
with risk of fire, or bedrooms (Fig. B).
Detail A Adjacent Room to
room be ventilated
Fig. A Fig. B
Examples of ventilation openings Increased opening between
for the comburent air the door and and floor
c) During prolonged use of the appliance you may
consider it necessary to open a window to the outside
to improve ventilation.
d) The liquefied petroleum gases, which are heavier than
air, stagnate towards the ground. Therefore, the rooms
containing LPG cans must have openings towards the
outside in order to allow the venting from the ground of
eventual gas leak. Thus, the LPG cans must not be
installed or settled in rooms that are below the ground
level, (cellar, etc.) whether the cans are empty or
partially full. It is advisable to keep in the room only
the can which is being used, and it must be placed
away from direct heat sources (ovens, fireplaces,
stoves, etc.) that could make the can reach
temperatures higher than 50°C.
Levelling your appliance (only on a few models)
Your cooker is supplied with feet for levelling the appliance.
If necessary, these feet can be screwed into the housings
in the corners of the cooker base.
Mounting the legs (only on a few models)
Press-fit legs are supplied which fit under the base of your
cooker.
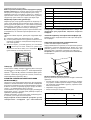
Installation of the cooker
The appliance can be installed next to furniture units which
are no taller than the top of the cooker hob. The wall in
direct contact with the back panel of the cooker must be
made of non-flammable material. During operation the
back panel of the cooker could reach a temperature of
50°C above room temperature. For proper installation of
the cooker, the following precautions must be taken:
a) The appliance can be placed in a kitchen, dining room
or bedsit, but not in a bathroom.
b) All furniture around the appliance must be placed at
least 200 mm from the top of the cooker, should the
surface of the appliance be higher than the worktop of
this furniture. Curtains should not be placed behind
the cooker or less than 200 mm away from the sides
of the appliance.
c) Any hoods must be installed according to the require-
ments in the installation manual for the hoods them-
selves.
d) If the cooker is installed beneath a wall cabinet, the
latter must be situated at a minimum of 420 mm above
the hob. The minimum distance between the worktop
and kitchen units made of combustible material is 700
mm.
e) The wall in direct contact with the back panel of the
cooker must be made of non-flammable materials.
A
Installation

5
Connecting the gas
The appliance should be connected to the mains or to a
gas cylinder in compliance with current directives. Before
making the connection, check that the cooker is regulated
for the gas supply you are using. If not, follow the
instructions indicated in the paragraph “Adapting to
different types of gas”. On some models the gas supply
can be connected on the left or on the right, as necessary;
to change the connection, reverse the position of the hose
holder with that of the cap and replace replace the gasket
(supplied with the appliance). When using liquid gas from
a cylinder, install a pressure regulator which complies with
current directive.
Important: check that the supply pressure complies with
the values indicated in table 1 “Characteristics of the
burners and nozzles” since this will ensure safe operation,
correct consumption and ensure a longer life to your
appliance.
Connection with hose
Make the connection using a gas hose complying with
the the characteristics provided in current directive. The
internal diameter of the pipe used is as follows:
- 8mm for liquid gas;
- 13mm for methane gas.
When installing the hose, remember to take the following
precautions:
• No part of the hose should touch parts whose tempe-
rature exceeds 50°C;
• The length of the hose should be less than 1500 mm;
• The hose should not be subject to twisting or pulling,
and should not have bends or kinks.
• The hose should not touch objects with sharp edges,
any moving parts, and it should not be crushed;
• The full length of the hose should be easy to inspect in
order to check its condition;
Check that the hose fits firmly into place at the two ends
and fix it with clamps complying to current directive.If any
of the above recommendations can not be adopted, flexible
metal pipes should be used.
Should the cooker be installed according to the conditions
of Class 2, subdivision 1, only a flexible metal pipe which
is in compliance with current safety standards should be
used to make the connection to the gas mains.
Connecting a flexible jointless stainless steel pipe
to a threaded attachment
Remove the hose holder fitted on the appliance. The gas
supply pipe fitting is a threaded 1/2 gas cylindrical male
attachment. Only pipes and gaskets complying with current
directives. The full length of the pipe must not exceed 2000
mm.
Tight control
Important: when installation has been completed, check
the pipe fitting for leaks with a soapy solution. Never use a
flame. Once the connection has been made, ensure that
the flexible metal tube does not touch any moving parts
and is not crushed.
Connecting the supply cable to the mains
Install a normalised plug corresponding to the load
indicated on the data plate. When connecting the cable
directly to the mains, install an omnipolar circuit-breaker
with a minimum contact opening of 3 mm between the
appliance and the mains. The omnipolar circuit breaker
should be sized according to the load and should comply
with current regulations (the earth wire should not be
interrupted by the circuit breaker).
The supply cable should be positioned so that it does not
reach a temperature of more than 50°C with respect to
the room temperature, along its length. Before making the
connection, check that:
• the limiter valve and the home system can support the
appliance load (see data plate);
• the mains is properly earthed in compliance with
current directives and regulations;
• there is easy access to the socket and omnipolar circuit
breaker, once the hob has been installed.
N.B: never use reducers, adaptors or shunts since they
can cause heating or burning.The plug and socket must
be easily accessible.
Adapting the cooker to different types of gas
In order to adapt the cooker to a different type of gas with
respect to the gas for which it was produced (indicated on
the label attached to the lid), follow these steps:
a) replace the hose holder mounted on the appliance with
that supplied in the bag of “cooker accessories”.
Important: the hose holder for liquid gas is marked 8, the
hose holder for methane gas is marked 13. Always fit the
sealing gasket.
b) Replacing the burner nozzles on the hob:
• remove the grids and slide the burners from their
housings;
• unscrew the nozzles using a 7 mm socket spanner,
and replace them with nozzles for the new type of gas
(see table 1 “Burner and nozzle characteristics”).
• replace all the components by repeating the steps in
reverse order.
c) Minimum regulation of the hob burners:
•
turn the tap to minimum;
HOOD
420
Min.
min.
650
mm. with hood
min.
700
mm. without hood
mm.
600
Min. mm.
420
Min. mm.

6
• remove the knob and adjust the regulation screw, which
is positioned in or next to the tap pin, until the flame is
small but steady.
N.B.: in the case of liquid gas, the regulation screw
must be screwed in to the bottom.
• check that the flame does not turn off when you turn
the tap quickly from high to low.
d Regulating the primary air of the burners:
The primary air of the burners requires no regulation.
Important
On completion of the operation, replace the old rating
sticker with one indicating the new type of gas used. This
sticker is available from our Service Centres.
Note
Should the pressure of the gas used be different (or vary)
from the recommended pressure, it is necessary to fit a
suitable pressure regulator onto the inlet pipe in
compliance with current National Regulations relative to
“regulators for channelled gas”.
* At 15°C and 1013 mbar- dry gas
** Propane P.C.S. = 50,37 MJ/Kg
*** Butane P.C.S. = 49,47 MJ/Kg
Natural P.C.S. = 37,78 MJ/m
3
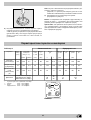
Burner and nozzle characteristics
S
R
A
Ø145
K1M11S/R
Table 1 Liquid Gas Natural Gas
Burner Diameter
(mm)
Thermal Power
kW (p.c.s.*)
By-Pass
1/100
Nozzle
1/100
Flow*
g/h
Nozzle
1/100
Flow*
l/h
Nozzle
1/100
Flow*
l/h
Nominal Reduced (mm) (mm) *** ** (mm) (mm)
Fast
(Large)(R)
100 3.00 0.7 41 86 218 214 116 286 143 286
Semi Fast
(Medium)(S)
75 1.90 0.4 30 70 138 136 106 181 118 181
Auxiliary
(Small)(A)
55 1.00 0.4 30 50 73 71 79 95 80 95
Supply
Pressures
Nominal (mbar)
Minimum (mbar)
Maximum (mbar)
28-30
20
35
37
25
45
20
17
25
13
6,5
18

7
94
50
50
85/90
Inner dimensions of the oven:
Width: 39 cm
Depth: 38 cm
Height: 34 cm
Inner Volume of the Oven:
50 lt
Maximum absorber power:
3500 W
Inner Dimensions of the Food Warmer:
Width: 42 cm
Depth: 44 cm
Height: 23 cm
ENERGY LABEL
Directive 2002/40/EC on the label of electric ovens
Norm EN 50304
Declared energy consumption for Natural convection Class
heating mode: Convection
Voltage and Frequency of Power Supply:
see data plate
Burners:
adaptable for use with all the types of gas indicated on
the data plate situated inside the flap or, once the
dishwarmer drawer has been opened, on the inside wall
of the left-hand side panel.
Electric Plate
Ø 145R mm: 1500 W
Technical Specifications
Disposal of old electrical appliances
The European Directive 2002/96/EC on Waste Electrical
and Electronic Equipment (WEEE), requires that old
household electrical appliances must not be disposed of
in the normal unsorted municipal waste stream. Old
appliances must be collected separately in order to optimise
the recovery and recycling of the materials they contain
and reduce the impact on human health and the
environment. The crossed out “wheeled bin” symbol on the
product reminds you of your obligation, that when you
dispose of the appliance it must be separately collected.
Consumers may take their old appliance to public waste
collection areas, other communal collection areas, or if
national legislation allows return it to a retailer when
purchasing a similar new product.
All major household appliance manufacturers are active in
the creation of systems to manage the collection and
disposal of old appliances.

8
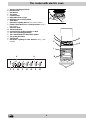
A. Tray for Catching Overflows
B. Electric Plate
C. Gas Burner
E. Top Grate
F. Control Panel
G. Adjustable Feet or Legs
H. Dripping Pan or Baking Sheet
I. Oven Rack
J. Electronic Lighting Device (only a few models)
K. Flame Failure Device for Cooktop Burners (only a
few models)
L. Selection knob
M. Thermostat knob
N. Control Knobs for Gas Burners on Hob
O. The oven-operating pilot lamp
P. The control knobs for the electric plates
Q. The green pilot lamp
S. Timer Knob
T. Electronic Lighting for Hob Burners (only a few
models)
The cooker with electric oven
G
A
F
I
H
E
B
C
N P N
S
T
M
L
N
O
Q
J
K

9
The various functions included in the cooker are selected by
operating the control devices located on the cooker control
panel.
Control Knobs for the Gas Burners on the Hob (N)
The position of the gas burner controlled by each one of the
knobs is shown by a symbol of a solid ring:
•. To light one of
the burners, hold a lighted match or lighter near the burner.
Press down and turn the corresponding knob in the counter-
clockwise direction to the maximum - setting. Each burner
can be operated at its maximum, minimum or intermediate
power. Shown on the knob are the different symbols for off
•
(the knob is on this setting when the symbol lines up with the
reference mark on the control panel), for maximum - and
minimum +.
To obtain these settings, turn the knob counter-clockwise
with respect to the off position. To turn off the burner, turn the
knob clockwise until it stops (corresponding again with the
•
symbol).
Electronic Ignition for the Gas Hob
Some of the models are provided with instant electronic
lighting of the hob gas burners; these models are identi-
fied by the presence of a lighting device (see detail J).
This device operates when a slight pressure is applied to
the “T” button marked with
symbol. To light a specific
burner just press the button labelled “T” while pushing the
corresponding knob all the way in and turning it counter-
clockwise until it lights. For immediate lighting, first
press the button and then turn the knob.
Important: Should the burner flames accidentally go
out, turn off the control knob and wait at least 1 minute
before trying to relight.
Models with Hob Gas Burner Safety Devices to
Prevent Leaks (only on certain models)
These models can be identified by the presence of the
device itself (see detail K).
Important: Since the hob burners are equipped with a
safety device, you must hold the control knob in for about
6 seconds after the burner has been lighted to allow the
gas to pass until the safety thermocouple has heated.
Notice: The first time you use your appliance, we recom-
mend that you set the thermostat to the highest setting
and leave the oven on for about half an hour with nothing
in it, with the oven door shut. Then, open the oven door
and let the room air. The odour that is often detected dur-
ing this initial use is due to the evaporation of substances
used to protect the oven during storage and until it is in-
stalled.
Attention: Only use the bottom shelf of the oven when using
the rotisserie to cook (where present). For all other types of
cooking, never use the bottom shelf and never place anything
on the bottom of the oven when it is in operation because
this could damage the enamel. Always place your cookware
(dishes, aluminium foil, etc. etc.) on the grate provided with
the appliance inserted especially along the oven guides.
The oven knobs
With these two controls you can select the different
functions of the oven and choose the cooking temperatu-
re suitable for the food you are preparing. The different
cooking functions are set up by operating the two knobs:
L - the selection knob
M - the thermostat knob on the oven panel.
For any selection-knob setting different from idle, identified
by the “0”, the oven light turns on; the knob setting marked
&
permits turning on the oven light without any heating
element being switched on. When the oven light is on, it
means that the oven is in use, and it will remain on for the
entire time the oven is being used.
1. Static oven
- Knob “L” setting:
- Knob “M” setting: anywhere between 50°C and Max
The oven light turns on and the top and bottom heating
elements (resistors) switch on. The temperature, fixed by
the thermostat knob, is reached automatically and kept
constant by the thermostat control. This function permits
cooking and type of food thanks to excellent temperature
distribution.
2. The bottom heating element
- Knob “L” setting:
- Knob “M” setting: anywhere between 50°C and Max
The oven light turns on and so does the bottom heating
element. The temperature, fixed by the thermostat knob,
is reached automatically and kept constant. This setting
is recommended for finishing the cooking of foods (placed
in pans) that are well done on the outside but still not done
inside or for desserts covered with fruit or jam which require
a light browning on top. Note that this function does not
permit reaching the maximum (250°C) temperature inside
for cooking foods always on this oven setting unless the
foods are cakes which only require temperatures below
or equal to 180°C.
3. The Top heating element
- Knob “L” setting:
- Knob “M” setting: anywhere between 50°C and Max
The oven light turns on and so does the infra-red ray grill,
and the motor starts turning the spit. The rather high and
direct temperature of the grill permits browning the outside
of meats immediately thus keeping in the juices and
assuring tenderness.
4. The grill
- Knob “L” setting:
- Knob “M” setting: anywhere between 50°C and Max
The oven light turns on and so does the double heating
element of the grill and the motor starts turning the spit.
This grill is larger than the average and has a completely
new design: cooking performance is increased 50%. The
double grill makes sure that even the corners are touched
by heat.
Important: when using the grill, keep the oven door closed
to obtain the best results and save energy (about 10%).
When utilizing the grill, place the rack at the lower levels
(see cooking table). To catch grease or fat and prevent
The different functions and uses of the oven

10
smoke, place a dripping-pan at the bottom rack level.
The rotisserie (only on a few models)
To operate the rotisserie, proceed as follows:
a) place the dripping-pan on the 1st rack;
b) insert the special rotisserie support on the 4th rack and
position the spit by inserting it through the special hole
into the rotisserie at the back of the oven;
c) to start the spit, set the oven selection knob (L) on
setting
(which delivers 50% of the total grill power)
for small quantities of food, or on setting
(which
delivers total grill power).
The oven-operating pilot lamp (O)
Signals when the oven is heating. It switches off when the
temperature inside the oven reached the temperature
selected by the knob. At this point the alternate turning on
and turning off of this light indicates that the thermostat is
operating correctly to keep the oven temperature constant.
The cook-top electric plate control knobs (P)
The cookers may be equipped with standard, fast and
automatic electric plates in various combinations (the fast
plates distinguished from the others by a red dot in the
centre, the automatic ones by a round aluminium disk at
the centre.
To avoid heat dispersion and damage to the plates,
recommend using cooking vessels with flat bottoms in
diameters which are not smaller than the plate diameter.
Table shows the correspondence between the position
indicated on the knobs and the use for which the plates
advised.
Before using the hot plates for the first time, you should
heat them at maximum temperature for approximately
4 minutes, without any pans. During this initial stage,
their protective coating hardens and reaches its
maximum resistance.
The green pilot lamp (Q)
This lights up when an electric plate is turned on.
Timer Knob
To use the timer, the ringer “S” must be wound up by turning
the knob one full turn clockwise
44
44
4; then turn it back
55
55
5, to
the desired time so that the number of minutes on the knob
matches the reference mark on the panel.
Attention
Avoid the children touch the oven door because it is very hot
during the cooking.
Practical advice for burner use
In order to get the maximum yield it is important to remember
the following:
• Use appropriate cookware for each burner (see table) so
as to avoid flames overshooting the edges.
• At boiling point turn the knob to minimum.
• Use cookware with lids.
• Always use cookware with flat bottoms.
Storage recess below the oven (only a few models)
Below the oven a recess can be used to contain cooking pans
and cooker accessories. Moreover, during oven operation, it may
be used to keep food warm.To open the storage is necessary
turn it downwards.
Caution: this storage recess must not be used to store
inflammable materials.
Caution: The internal surfaces of the compartment (where
present) may become hot.
!"#$
&&#
'$'&#"*
$'+
/#
!
!
"!!
"
"2/'$"$
*

11
The oven offers a wide range of alternatives which allow
you to cook any type of food in the best possible way. With
time you will learn to make the best use of this versatile
cooking appliance and the following directions are only a
guideline which may be varied according to your own per-
sonal experience.
Baking cakes
The oven should always be warm before putting in cakes
wait till the end of preheating (about 10-15 min.). Cake-
baking temperatures are normally around 160°C/200°C.
Do not open the oven door during the baking process as
this could cause the cake to sink.In general:
Cooking fish and meat
When cooking white meat, fowl and fish use low
temperatures. (150°C-175°C). When red meat must be
superficially well-cooked but succulent inside, it is
advisable to start with a high temperature (200-220°C)
for a short time, and then to reduce it at a later point.
Generally speaking, the more meat there is, the lower the
temperature and the longer the cooking time should
be.Place the meat in the centre of the grid and put a spill-
tray underneath to catch grease drips. Insert the grid so
that it is in the middle of the oven. If more heat from below
is required, use the 1° bottom shelf.
To grill
When using any of the grilling modes, it is recommended
that the thermostat knob be turned to the highest setting,
as it is the most efficient way to use the grill (which
utilizes infrared rays). If necessary, however, the
thermostat can be set to lower temperatures for grilling.
When using the grill functions, place the grid on the
lower racks (see cooking table) then, to prevent fat and
grease from dripping onto the bottom of the oven and
smoke from forming, place a dripping-pan on the 1st
oven rack from the bottom.
Important: always use the grill with the oven door
closed. This will allow you both to obtain excellent results
and to save on energy (approximately 10%). Table 1
includes the recommended temperatures, cooking times
and positions for you to obtain the best results when
cooking.
Cooking advice
Pastry is too dry
Increase the temperature by 10°C and reduce the
cooking time.
Pastry dropped
Use less liquid or lower the temperature by 10°C.
Cooked well on the inside but sticky on the outside
Use less liquid, lower the temperature, and increase the
cooking time.
The pastry sticks to the pan
Grease the pan well and sprinkle it with a dusting of
flour.
Pastry is too dark on top
Place it on a lower rack, lower the temperature, and
increase the cooking time.

12
Before each operation, disconnect the cooker from the
electricity.To assure the long life of the cooker, it must be
thoroughly cleaned frequently, keeping in mind that:
• Do not use steam equipment to clean the appliance.
• the enamelled parts and the self-cleaning panels are
washed with warm water without using any abrasive
powders or corrosive substances which could ruin
them;
• the inside of the oven should be cleaned fairly often
while it is still warm using warm water and detergent,
followed by careful rinsing and drying;
• the flame spreaders should be washed frequently with
hot water and detergent taking care to eliminate any
scale;
• in cookers equipped with automatic lighting, the
terminal part of the electronic instant lighting devices
should be cleaned frequently and the gas outlet holes
of the flame spreaders should be checked to make
sure they are free of any obstructions;
• the electric plates are cleaned with a damp cloth and
they should be lubricated with a little oil while they still
warm;
• Stainless steel may become marked if it comes into
contact with very hard water or harsh detergents
(containing phosphorous) for long periods of time. After
cleaning, it is advisable to rinse thoroughly and dry. It
is also recommended to dry any water drops;
•
Clean the glass part of the oven door using a sponge
and a non-abrasive cleaning product, then dry thoroughly
with a soft cloth. Do not use rough abrasive material or
sharp metal scrapers as these could scratch the surface
and cause the glass to crack.
N.B: avoid closing the cover while the gas burners are
still warm. Remove any liquid from the lid before
opening it.
Important: periodically check the wear of the gas hose
and substitute it if there are any defects; we recommended
changing it every year.
Replacing the oven lamp
• Unplug the oven from the mains;
• Remove the glass cover of the lamp-holder;
• Remove the lamp and replace with a lamp resistant to
high temperatures (300°C) with the following
characteristics::
- Voltage 230V
- Wattage 25W
- Type E14
• Replace the glass cover and reconnect the oven to the
mains.
Greasing the Taps
The taps may jam in time or they may become difficult to
turn. If so, the tap itself must be replaced.
N.B.: This operation must be performed by a technician
authorised by the manufacturer.
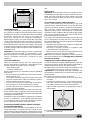
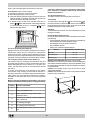
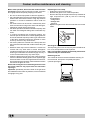
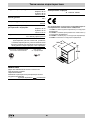
Removing the lid
The cooker lid can be removed to facilitate cleaning. To
remove the lid, first open it completely and pull it
upwards (see figure)
Cooker routine maintenance and cleaning

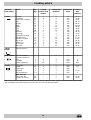
13
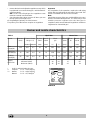
Selection
knob setting
Foods Wt.
(Kg)
Cooking
position from
bottom
Heating time
(minutes)
Thermostat
knob
Cooking
time
(minutes)
1 Static
Lasagne
Cannelloni
Pasta bakes au gratin
Veal
Chicken
Duck
Rabbit
Pork
Lamb
Mackerel
Red porgy
Trout baked in paper
Napolitan pizza
Biscuits or cookies
Flan or tart
Savoury pie
Yeast cake
Fruit cake
2,5
2,5
2,0
1,7
1,5
1,8
2
2,1
1,8
1,1
1,5
1
1
0,5
1,1
1
0,5
1
2
3
3
2
3
3
3
3
3
2
2
2
2
3
3
3
3
3
5
5
5
10
10
10
10
10
10
5
5
5
15
10
10
10
10
10
200
200
200
180
200
180
180
180
180
180
180
180
220
180
180
180
160
170
45-50
30-35
30-35
60-70
80-90
90-100
70-80
70-80
70-80
30-40
30-35
25-30
15-20
10-15
25-30
30-35
25-30
25-30
2 Oven
bottom
Finishing touches
3 Top bottom
Sole and cuttlefish
Squid and shrimp on
spits
Cod fillets
Grilled vegetables
1
1
1
1
4
4
4
3/4
5
5
5
5
Max
Max
Max
Max
8
4
10
8-10
4 Grill
Veal steaks
Cutlets
Hamburgers
Mackerels
Toast sandwiches
1
1,5
1
1
n.° 4
4
4
3
4
4
5
5
5
5
5
Max
Max
Max
Max
Max
15-20
20
7
15-20
5
With rotisserie
Veal on the spit
Chicken on the spit
1,0
2,0
-
-
5
5
Max
Max
70-80
70-80
NB:
cooking times are approximate and may vary according to personal taste. When cooking using the grill or double
grill, the dripping-pan must always be placed on the 1st oven rack from the bottom.
Cooking advice

14
Предупреждения
1 Данное изделие предназначается для непрофессионального
использования в домашних условиях.
2 Перед началом эксплуатации данного изделия
рекомендуется внимательно прочитать инструкции,
содержащиеся в данном руководстве, предоставляющие
важные рекомендации по безопасному осуществлению
монтажа, эксплуатации и технического обслуживания.
Бережно сохраните данное руководство для его
консультации в будущем.
3 После того, как Вы освободите машину от упаковки, убедитесь в том,
что машина не повреждена. В случае сомнений не пользуйтесь
изделием и обратитесь к квалифицированному технику. Части упаковки
(пластмассовые мешки, вспененный полистирол, гвозди и т.д.) не
должны попадать в руки детей, так как эти материалы представляют
собой потенциальную опасность.
4 Установка
должна быть выполнена квалифицированным
персоналом в соответствии с инструкциями производителя.
Неправильная установка может причинить ущерб людям,
животным или имуществу, за который производитель не несет
никакой ответственности.
5 Электрическая безопасность данного изделия гарантируется
только, если оно правильно подсоединено к надежной системе
заземления в соответствии с действующими правилами
электрической безопасности. Необходимо проверить соблюдение
этого важного требования
по безопасности и в случае сомнений
поручить тщательную проверку системы квалифицированному
персоналу. Производитель не несет ответственности за
возможный ущерб, вызванный отсутствием заземления
электрического изделия.
6 Перед подсоединением электрического изделия проверьте, чтобы
данные, указанные на заводской табличке, соответствовали
характеристиками сети электропитания.
7 Проверить, чтобы потребление электроэнергии электрического
изделия и электрических розеток соответствовало максимальной
мощности изделия, указанной на заводской табличке. В случае
сомнений обратитесь к квалифицированному специалисту.
8 При монтаже изделия необходимо установить многополярный
разъединитель с расстоянием между контактами равным или
больше 3 мм.
9 В случае несовместимости электророзетки и электровилки изделия
поручить замену розетки на другую, пригодную,
квалифицированному
персоналу. В частности электрик должен проверить, чтобы сечение
проводов электророзетки соответствовало поглощаемой мощности
электрического изделия. Как правило не рекомендуется использовать
переходники, тройники и/или удлинители. При необходимости в
использовании вышеуказанных устройств следует использовать
только простые или множественные переходники и удлинители,
соответствующие действующим нормативам по безопасности. При
этом важно не превышать предел расхода по
значению тока, указанный
на простом переходнике или удлинителе, и максимальную мощность,
указанную на множественном переходнике.
10 В период простоя изделия отсоедините его от сети
электропитания. Выключите главный разъединитель
электрического изделия, когда оно не используется.
11 Не закрывайте вентиляционные отверстия или решетки
рассеивания тепла;
12 Пользователь не должен самостоятельно заменять провод
электропитания данного изделия. В случае
повреждения провода
электропитания или для его замены обращайтесь только в центр
технического обслуживания, уполномоченный производителем
изделия.
13 Данное изделие должно использоваться исключительно в целях, для
которых оно было спроектировано. Любое другое его использование
(например, отопление помещения) считается ненадлежащим и
следовательно опасным. Производитель не несет ответственности
за возможный ущерб, вызванный ненадлежащим, неправильным и
неразумным использованием
изделия.
14 При использовании любого электроприбора необходимо соблюдать
некоторые основные правила. В частности:
• не прикасайтесь к электроприбору мокрыми или влажными
руками или с мокрыми ногами.
• не пользуйтесь электроприбором с босыми ногами
• используйте удинители только в случае крайней
необходимости
• не тяните за провод электропитания электроприбора или за
сам электроприбор для его отсоединения от
электророзетки.
• не подвергайте электроприбор воздействию атмосферных
осадков (дождь, солнце и т.д.)
• не разрешайте детям или недееспособным лицам
пользоваться электроприбором без присмотра
15 Перед осуществлением чистки или технического обслуживания
электроприбора отсоедините его от сети электропитания, вынув
вилку из розетки или при помощи общего выключателя.
16 Nel caso in cui si rompa la superficie del vetro, scollegare immediatamen-
te l'apparecchio. Per l'eventuale riparazione rivolgersi solamente ad un
centro di assistenza tecnica autorizzato e richiedere l'utilizzo di ricambi
originali. Il mancato rispetto di quanto sopra puт compromettere la sicu-
rezza dell'apparecchio.
17
По завершении срока службы данного изделия рекомендуется
вывести его из строя, обрезав провод электропитания, вынув
перед этим вилку из розетки. Кроме того рекомендуется
обезвредить потенциально опасные части изделия в особенности
для детей, которые могут использовать выведенный из строя
электроприбор для игры.
16 В случае разбивания стеклянной поверхности незамедлительно
отсоедините прибор от сети электропитания. Для выполнения
ремонтных работ обращайтесь только в уполномоченный центр
технического обслуживания и требуйте установки оригинальных
запасных частей. Несоблюдение вышеуказанных рекомендаций
может скомпрометировать безопасное функционирование
изделия.
18 Твердая стеклокерамическая варочная панель является
устойчивой к скачкам температуры и к ударам. Тем не менее
следует помнить, что
лезвия или острые кухонные приборы могут
повредить поверхность варочной панели. В случае повреждения
поверхности варочной панели незамедлительно выньте вилку
кухонной плиты из розетки и обратитесь в местный центр
технического обслуживания.
19 Следует помнить, что поверхность варочной панели остается
горячей в течение примерно получаса после ее выключения. Не
ставьте хрупкую посуду и не кладите другие
предметы на горячую
поверхность.
20 Не следует ставить какие-либо предметы на стеклянную
поверхность варочной панели.
21 Не включайте конфорки варочной панели, если на ней лежат листы
фольги или пластмассовые предметы.
22 Держитесь на безопасном расстоянии от горячих поверхностей.
23
При использовании мелких бытовых электроприборов рядом с
кухонной плитой обращайте внимание, чтобы их провод не касался
горячих частей плиты.
24 Поворачивайте рукоятки кастрюль и сковород так, чтобы случайно
не задеть их и не опрокинуть с варочной панели.
25 Включив поверхность варочной панели, всегда сразу же ставьте
на нее одну кастрюлю во избежание быстрого перегрева варочной
панели и повреждения нагревательных элементов.
26 Перед первым включением варочной панели. На стекле могут
остаться следы герметика, использованного
для герметизации
варочной панели. Не забудьте удалить остатки герметика
обычным неабразивным моющим веществом перед началом
эксплуатации изделия. В первые часы работы варочной панели
вы можете почувствовать запах жженой резины. Это нормальное
явление, которое быстро пропадает.
27
В процессе функционирования гриля или духовки доступные
детали духового шкафа могут сильно нагреться. Не разрешайте
детям приближаться к духовому шкафу.
28 Всегда проверяйте, чтобы рукоятки находились в положении “•”/
”o”, когда изделие не используется;
29 Если кухонная плита устанавливается на возвышение, необходимо
зафиксировать ее надлежащим образом.
Для обеспечения эффективности и безопасности данного изделия:
• обращайтесь только в уполномоченные центры технического обслуживания
• всегде требуйте установку оригинальных запасных частей

15
Ýòîò ðàçäåë ïðåäíàçíà÷åí äëÿ êâàëèôèöèðîâàííûõ òåõíè-
êîâ è ñîäåðæèò èíñòðóêöèè ïî óñòàíîâêå è îáñëóæèâàíèþ
ïëèòû â ñîîòâåòñòâèè ñ äåéñòâóþùèìè íîðìàìè áåçîïàñíî-
ñòè.
Âàæíî: ïåðåä ëþáûìè ðàáîòàìè ïî íàëàäêå, îáñëóæè-
âàíèþ è ò.ï. îòêëþ÷èòå ïëèòó îò ýëåêòðè÷åñêîé ñåòè.
Ðàñïîëîæåíèå
Âàæíî: Ïëèòà äîëæíà óñòàíàâëèâàòüñÿ è èñïîëüçîâàòüñÿ â
ïîìåùåíèÿõ ñ ïîñòîÿííîé âåíòèëÿöèåé, äëÿ ýòîãî íåîáõî-
äèìî, ÷òîáû ñîáëþäàëèñü ñëåäóþùèå òðåáîâàíèÿ:
à) Ïîìåùåíèå äîëæíî èìåòü âåíòèëÿöèîííóþ ñèñòåìó, äî-
ñòàòî÷íóþ äëÿ óäàëåíèÿ ïðîäóêòîâ ñãîðàíèÿ. Ýòî ìîæåò
áûòü âûòÿæêà èëè ýëåêòðè÷åñêèé âåíòèëÿòîð, êîòîðûé
àâòîìàòè÷åñêè âêëþ÷àåòñÿ ïðè ðàáîòå âûòÿæêè.
Âûòÿæêà ïðè íàëè÷èè äûìîõîäà Ïðÿìàÿ âûòÿæêà
á) Äëÿ íàäëåæàùåãî ñãîðàíèÿ â ïîìåùåíèå äîëæåí ïî-
ñòóïàòü ñâåæèé âîçäóõ. Ïðèòîê âîçäóõà äîëæåí
ñîñòàâëÿòü íå ìåíåå 2 ì
3
/÷àñ íà êàæäûé êèëîâàòò
ìîùíîñòè óñòàíàâëèâàåìîãî îáîðóäîâàíèÿ. Âîçäóõ
ìîæåò ïîñòóïàòü ïðÿìî ñ óëèöû ÷åðåç òðóáó ñ
ñå÷åíèåì 100 ñì
2
, êîíñòðóêöèÿ êîòîðîé íå äîïóñêàåò
çàñîðåíèÿ. Äëÿ îáîðóäîâàíèÿ, íå èìåþùåãî
óñòðîéñòâà áåçîïàñíîñòè, êîòîðîå ïðåäîòâðàùàåò
ïîäà÷ó ãàçà ïðè ñëó÷àéíîì çàòóõàíèè ãîðåíèÿ,
ñå÷åíèå òðóáû äîëæíî áûòü íå ìåíåå 200 ñì
3
(ðèñ.
À). Êðîìå òîãî, âîçäóõ ìîæåò ïîñòóïàòü èç ñìåæíîé
êîìíàòû (êðîìå ñïàëåí è ïîæàðîîïàñíûõ ïîìåùå-
íèé), åñëè îíà èìååò ïîäîáíóþ æå ïðèòî÷íóþ òðóáó,
è êîíñòðóêöèÿ äâåðè îáåñïå÷èâàåò ñâîáîäíûé
ïðîõîä âîçäóõà (ðèñ. Â).
Ïðèòî÷íîå Ñìåæíîå Ïîìåùåíèå, òðåáóþùåå
îòâåðñòèå À ïîìåùåíèå âåíòèëÿöèè
Ïðèìåð îáåñïå÷åíèÿ Îáåñïå÷åíèå çàçîðà ìåæäó äâåðüþ
ïðèòîêà âîçäóõà è ïîðîãîì äëÿ ñâîáîäíîãî ïðîõîäà
ïðèòî÷íîãî âîçäóõà
Ðèñ. À Ðèñ. Â
â) Ïðè äëèòåëüíîé ðàáîòå ïëèòû ìîæåò ïîòðåáîâàòüñÿ
äîïîëíèòåëüíàÿ âåíòèëÿöèÿ, íàïðèìåð, îòêðûòîå
îêíî èëè íàëè÷èå êîíäèöèîíåðà.
ã) Ñæèæåííûé ãàç òÿæåëåå âîçäóõà, è ïîýòîìó ñêàï-
ëèâàåòñÿ âíèçó. Ïîìåùåíèÿ, â êîòîðûõ
óñòàíàâëèâàþòñÿ áàëëîíû ñî ñæèæåííûì ãàçîì,
äîëæíû áûòü îñíàùåíû íàðóæíîé âåíòèëÿöèåé,
÷òîáû ÷åðåç íåå ìîã óõîäèòü ãàç â ñëó÷àå óòå÷êè.
Íåëüçÿ óñòàíàâëèâàòü è õðàíèòü áàëëîíû ñ ãàçîì â
ïîìåùåíèÿõ, ðàñïîëîæåííûõ íèæå óðîâíÿ ïîëà (â
ïîäâàëàõ è ïîëóïîäâàëàõ). Ðåêîìåíäóåì
äåðæàòü â êóõíå òîëüêî èñïîëüçóåìûé áàëëîí è óñ-
òàíàâëèâàòü åãî ïîäàëüøå îò èñòî÷íèêîâ òåïëà (äó-
õîâîê, êàìèíîâ, ïå÷åé è ò.ï.), ñïîñîáíûõ íàãðåòü
áàëëîí äî òåìïåðàòóðû âûøå 50°Ñ.
Âûðàâíèâàíèå ïëèòû (òîëüêîäëÿ íåêîòîðûõ
ìîäåëåé)
Âàøà ïëèòà ñíàáæåíà ðåãóëèðóåìûìè íîæêàìè, êîòîðûå
ñëóæàò äëÿ åå âûðàâíèâàíèÿ. Ïðè íåîáõîäèìîñòè, íîæêè
âêðó÷èâàþòñÿ â îòâåðñòèÿ ïî óãëàì îñíîâàíèÿ ïëèòû.
Óñòàíîâêà îïîð (òîëüêî äëÿ íåêîòîðûõ ìîäåëåé)
Ïëèòà êîìïëåêòóåòñÿ íàäñòàâíûìè îïîðàìè, êîòîðûå óñòà-
íàâëèâàþòñÿ ïîä îñíîâàíèåì ïëèòû.
Óñòàíîâêà ïëèòû
Ïëèòà èìååò òåïëîèçîëÿöèþ ñòåïåíè X, ïîýòîìó ïëèòà íå
ìîæåò áûòü óñòàíîâëåíà íåïîñðåäñòâåííî ðÿäîì ñ ìåáå-
ëüþ, êîòîðàÿ âûøå íåå. Ïëèòà ìîæåò ñîïðèêàñàòüñÿ ñî ñòå-
íîé ïîìåùåíèÿ è êóõîííîé ìåáåëüþ, åñëè îíè ñïîñîáíû
âûäåðæàòü òåìïåðàòóðó, íà 50°Ñ ïðåâûøàþùóþ êîìíàòíóþ.
Ïðè óñòàíîâêå ïëèòû íåîáõîäèìî ñîáëþäàòü ñëåäóþùèå
ìåðû ïðåäîñòîðîæíîñòè:
a) Ïëèòà ìîæåò áûòü óñòàíîâëåíà â êóõíå, êóõíå-
ñòîëîâîé èëè ãîñòèííîé, íî íå â âàííîé èëè
äóøåâîé.
á) Êóõîííàÿ ìåáåëü, ïðåâûøàþùàÿ ïî âûñîòå ïëèòó,
äîëæíà ñòîÿòü îò íåå íà ðàññòîÿíèè íå ìåíåå 110
ñì. Íå äîïóñêàåòñÿ âåøàòü çàíàâåñêè
íåïîñðåäñòâåííî çà ïëèòîé è íà ðàññòîÿíèè áëèæå
÷åì 110 ñì îò åå áîêîâûõ ñòîðîí.
â) Âûòÿæêè óñòàíàâëèâàþòñÿ ñîãëàñíî èõ èíñòðóêöèÿì
ïî ïî ýêñïëóàòàöèè.
ã) Ñòåííûå øêàôû ìîæíî íàâåøèâàòü íà îäíîé ëèíèè
ñ áîêîâîé ïëîñêîñòüþ ïëèòû, ïðè ýòîì ðàññòîÿíèå
îò íèæíåé êðîìêè øêàôà äî ðàáî÷åé ïîâåðõíîñòè
ïëèòû äîëæíî áûòü íå ìåíåå 420 ìì. Ìèíèìàëüíîå
ðàññòîÿíèå ìåæäó ïëèòîé è êóõîííîé ìåáåëüþ,
ñäåëàííîé èç ëåãêîâîñïëàìåíÿþùèõñÿ
ìàòåðèàëîâ, äîëæíî ñîñòàâëÿòü íå ìåíåå 700 ìì
(ðèñ).
A
Óñòàíîâêà

16
ä) Ñòåíà, ñîïðèêàñàþùàÿñÿ ñ çàäíåé ñòîðîíîé ïëèòû,
äîëæíà áûòü îáëèöîâàíà îãíåóïîðíûì
ìàòåðèàëîì.
ÏÎÄÊËÞ÷ÅÍÈÅ ÃÀÇÀ
Ïîäêëþ÷åíèå ïëèòû ê ãàçó äîëæíî ïðîèçâîäèòüñÿ êâàëèôè-
öèðîâàííûì ïåðñîíàëîì â ñîîòâåòñòâèè ñ äåéñòâóþùèìè
ñòàíäàðòàìè è ïîñëå ïðîâåðêè ñîîòâåòñòâèÿ òèïà ïîäêëþ-
÷àåìîãî ãàçà, òîìó, íà êîòîðûé íàñòðîåíî îáîðóäîâàíèå. Ïðè
íåñîîòâåòñòâèè òèïîâ ãàçà, ñëåäóéòå èíñòðóêöèÿì ïàðàãðà-
ôà «Íàñòðîéêà ïëèòû íà ðàçëè÷íûå òèïû ãàçà».
Äëÿ íåêîòîðûõ ìîäåëåé ïîäâîä ãàçà ìîæåò áûòü îñóùåñòâ-
ëåí êàê ñ ëåâîé, òàê è ñ ïðàâîé ñòîðîíû. ×òîáû èçìåíèòü
ìåñòî ïîäêëþ÷åíèÿ ãàçà, ïîìåíÿéòå ìåñòàìè øòóöåð è çà-
ãëóøêó è çàìåíèòå óïëîòíèòåëüíóþ ïðîêëàäêó (ïîñòàâëÿåò-
ñÿ ñ îáîðóäîâàíèåì). Åñëè ïëèòà ïîäñîåäèíÿåòñÿ ê áàëëîíó
ñî ñæèæåííûì ãàçîì, îòðåãóëèðéòå åãî äàâëåíèå â ñîîòâåò-
ñòâèè ñ äåéñòâóþùèìè íîðìàìè òåõíèêè áåçîïàñíîñòè, íà
áàëëîí ñ ãàçîì íåîáõîäèìî óñòàíîâèòü ðåäóêòîð.
Âàæíî: äëÿ áåçîïàñíîé è äîëãîé ðàáîòû îáîðóäîâàíèÿ, óáå-
äèòåñü, ÷òî äàâëåíèå ãàçà ñîîòâåòñòâóåò äàííûì, óêàçàííûì
â òàáë. 1 «Õàðàêòåðèñòèêè ãîðåëîê è æèêëåðîâ».
Ïîäêëþ÷åíèå øëàíãîì
Ïîäñîåäèíèòå ãàçîâûé øëàíã, õàðàêòåðèñòèêè êîòîðîãî îò-
âå÷àþò íàöèîíàëüíûì ñòàíäàðòàì.
Âíóòðåííèé äèàìåòð øòóöåðîâ ïîä øëàíãè:
8 ìì äëÿ ñæèæåííîãî ãàçà;
13 ìì äëÿ ìåòàíà.
Ïðè ïîäêëþ÷åíèè øëàíãîì ñîáëþäàéòå ñëåäóþùèå ìåðû
ïðåäîñòîðîæíîñòè:
· Øëàíã ïî âñåé äëèíå íå äîëæåí êàñàòüñÿ ÷àñòåé ïëèòû,
òåìïåðàòóðà êîòîðûõ ïðåâûøàåò 50°Ñ.
· Äëèíà øëàíãà íå äîëæíà áûòü áîëåå 1500 ìì.
· Øëàíã íå äîëæåí áûòü ðàñòÿíóò è ïåðåêðó÷åí, èìåòü èç-
ãèáîâ è óñòóïîâ.
· Øëàíã íå äîëæåí íè÷åì ïðèæèìàòüñÿ è ñîïðèêàñàòüñÿ
ñ ïîäâèæíûìè äåòàëÿìè è ïðåäìåòàìè, èìåþùèìè
îñòðûå êðàÿ.
· Øëàíã ïî âñåé äëèíå äîëæåí áûòü äîñòóïåí äëÿ îñìîò-
ðà è êîíòðîëÿ ñîñòîÿíèÿ.
Ïðîâåðüòå ïëîòíîñòü ïîñàäêè øëàíãà ñ îáåèõ ñòîðîí è çà-
ôèêñèðóéòå åãî çàæèìàìè. Åñëè õîòÿ áû îäíî èç ïðèâåäåí-
íûõ âûøå òðåáîâàíèé íå óäàåòñÿ âûïîëíèòü, èñïîëüçóéòå
ãèáêèå ìåòàëëèçèðîâàííûå òðóáû.
Åñëè ïëèòà óñòàíàâëèâàåòñÿ ïî ïðàâèëàì, îòíîñÿùèìñÿ ê
áûòîâûì ïðèáîðàì êëàññà 2 ïîäêëàññà 1, òî ñîãëàñíî äåé-
ñòâóþùèì ñòàíäàðòàì äëÿ ïîäêëþ÷åíèå ãàçà äîëæíû èñ-
ïîëüçîâàòüñÿ òîëüêî ãèáêèå ìåòàëëèçèðîâàííûå òðóáû.
Âíèìàíèå: ìåæäó ãàçîâîé òðóáîé è ïëèòîé ïîñëå óñòàíîâêè
øëàíãà íå äîëæíî áûòü ýëåêòðè÷åñêîãî ñîåäèíåíèÿ.
Ïîäêëþ÷åíèå ãèáêîé áåñøîâíîé ñòàëüíîé òðóáû
ê ðåçüáîâîìó ñîåäèíåíèþ
Óäàëèòå øòóöåð. Ãèáêàÿ ñòàëüíàÿ òðóáà ïðèñîåäèíÿåòñÿ ê
òîìó æå âûâîäó ñ íàðóæíîé ðåçüáîé 1/2 äþéìà. Èñïîëüçóé-
òå òîëüêî òðóáû è ïðîêëàäêè, ñîîòâåòñòâóþùèå íàöèî-
íàëüíûì ñòàíäàðòàì. Ïîëíàÿ äëèíà òðóáû íå äîëæíà
ïðåâûøàòü 2000 ìì. Ïîñëå ïîäêëþ÷åíèÿ óäîñòîâåðüòåñü,
÷òî ãèáêàÿ ñòàëüíàÿ òðóáà íå êàñàåòñÿ äâèæóùèõñÿ ïðåä-
ìåòîâ è íå ïåðåæàòà.
Êîíòðîëü ïëîòíîñòè ïîäñîåäèíåíèÿ
Âûïîëíèâ ïîäêëþ÷åíèå ãàçà ïðîâåðüòå íàëè÷èå åãî óòå÷åê,
èñïîëüçóÿ ìûëüíûé ðàñòâîð. Íèêîãäà íå èñïîëüçóéòå äëÿ
ïðîâåðêè ïëàìÿ.
ÝËÅÊÒÐÈ×ÅÑÊÈÅ ÑÎÅÄÈÍÅÍÈß
Ïîäñîåäèíåíèå êàáåëÿ ê ñåòè
Îñíàñòèòå ïèòàþùèé êàáåëü ñîîòâåòñòâóþùåé âèëêîé (ñì.
òàáëè÷êó õàðàêòåðèñòèê è ìåñòíûå ñòàíäàðòû) èëè íåïîñ-
ðåäñòâåííî ïîäêëþ÷èòå îáîðóäîâàíèå ê ñåòè (áåç âèëêè è
ðîçåòêè).  ïîñëåäíåì ñëó÷àå äîëæåí áûòü óñòàíîâëåí ìíî-
ãîëèíåéíûé âûêëþ÷àòåëü, ñîîòâåòñòâóþùèé íàãðóçêå îáî-
ðóäîâàíèÿ, ñ ðàññòîÿíèåì ìåæäó ðàçâåäåííûìè
êîíòàêòàìè íå ìåíåå 3 ìì, ïðè÷åì ëèíèÿ çàçåìëåíèÿ íå
äîëæíà ðàçðûâàòüñÿ. Ïèòàþùèé êàáåëü ñëåäóåò ðàñïîëà-
ãàòü òàê, ÷òîáû ïî âñåé äëèíå îí íèêîãäà íå íàãðåâàëñÿ äî
òåìïåðàòóðû, ïðåâûøàþùåé íà 50°Ñ êîìíàòíóþ.
Ïåðåä ïîäñîåäèíåíèåì óáåäèòåñü â òîì, ÷òî:
· ïðåäîõðàíèòåëè (ïðîáêè) èëè àâòîìàòè÷åñêèå âûêëþ÷à-
òåëè è ïðîâîäêà âûäåðæèâàþò òó íàãðóçêó, êîòîðóþ îíè
óæå íåñóò è äîïîëíèòåëüíóþ îò âíîâü óñòàíàâëèâàå-
ìîãî îáîðóäîâàíèÿ (ñì. òàáëè÷êó õàðàêòåðèñòèê);
· çàçåìëåíèå ñîîòâåòñòâóåò ïðàâèëàì è òðåáîâàíèÿì,
ïðåäúÿâëÿåìûìè ê çàçåìëåíèþ áûòîâîé òåõíèêè;
· ðîçåòêà èëè ìíîãîëèíåéíûé âûêëþ÷àòåëü íàõîäÿòñÿ â
ëåãêîäîñòóïíîì ìåñòå.
N.B. Íèêîãäà íå èñïîëüçóéòå óäëèíèòåëè, ïåðåõîäíèêè, äâîé-
íûå è áîëåå ðîçåòêè, êîòîðûå ìîãóò ñòàòü ïðè÷èíîé ïåðå-
ãðåâà è âîçãîðàíèÿ.
Îáîðóäîâàíèå, ïîäêëþ÷åííîå ñ íàðóøåíèåì òðåáîâàíèé
áåçîïàñíîñòè áûòîâûõ ïðèáîðîâ áîëüøîé ìîùíîñòè,
èçëîæåííûõ â íàñòîÿùåé èíñòðóêöèè, ÿâëÿåòñÿ ïîòåíöè-
àëüíî îïàñíûì.
Ïðîèçâîäèòåëü íå íåñåò îòâåòñòâåííîñòè çà óùåðá çäî-
ðîâüþ è ñîáñòâåííîñòè, åñëè îí âûçâàí íåñîáëþäåíèåì
óêàçàííûõ íîðì óñòàíîâêè.
Íàñòðîéêà ïëèòû íà ðàçëè÷íûå òèïû ãàçà
Äëÿ òîãî ÷òîáû ïîäãîòîâèòü ïëèòó ê ðàáîòå ñ äðóãèì òèïîì
ãàçà, íåîáõîäèìî çàìåíèòü æèêëåðû, îòðåãóëèðîâàòü ïîäà-
÷ó âîçäóõà è ìèíèìàëüíîå ïëàìÿ.
Ïîìíèòå, âî âðåìÿ âûïîëíåíèÿ ýòèõ îïåðàöèé ïëèòà
äîëæíà áûòü îòêëþ÷åíà îò ñåòè.
Âàæíî: ñíèìèòå èìåþùèéñÿ øòóöåð è óñòàíîâèòå òîò, êîòî-
ðûé íàõîäèòñÿ â ïàêåòå ïðèíàäëåæíîñòåé.
Îáðàòèòå âíèìàíèå: øòóöåð äëÿ ñæèæåííîãî ãàçà ìàðêè-
ðîâàí öèôðîé «8», øòóöåð äëÿ ìåòàíà è ãîðîäñêîãî ãàçà
èìååò ìàðêèðîâêó «13». Îáÿçàòåëüíî óñòàíîâèòå óïëîòíè-
òåëüíóþ ïðîêëàäêó.
à) Çàìåíà æèêëåðîâ âåðõíèõ ãîðåëîê:
· ñíèìèòå ðåøåòêè è âûíüòå ãîðåëêè èç ãíåçä;
· ñ ïîìîùüþ 7 ìì òîðöåâîãî êëþ÷à îòâèíòèòå æèêëåðû è
çàìåíèòå èõ æèêëåðàìè äëÿ íîâîãî òèïà ãàçà
(ñì. òàáë. 1 «Õàðàêòåðèñòèêè ãîðåëîê è æèêëåðîâ»);
· ñîáåðèòå âñå äåòàëè â îáðàòíîì ïîðÿäêå.

17
á) Ðåãóëèðîâêà ìèíèìàëüíîãî ïëàìåíè âåðõíèõ ãîðåëîê:
· ïîâåðíèòå ðóêîÿòêó ê ìèíèìàëüíîìó ïîëîæåíèþ;
· ñíèìèòå ðóêîÿòêó è âðàùàéòå åå ðåãóëèðîâî÷íûé âèíò
(ðàñïîëîæåí ñáîêó èëè âíóòðè ñòåðæíÿ ðåãóëÿòîðà) â
ðàçíûå ñòîðîíû ïîêà ïëàìÿ íå ñòàíåò ìàëûì, íî
óñòîé÷èâûì.
N.B.  ñëó÷àå ñ ñæèæåííûì ãàçîì ðåãóëèðîâî÷íûé âèíò äîë-
æåí áûòü çàêðó÷åí ïîëíîñòüþ.
· óáåäèòåñü, ÷òî ïðè áûñòðîì ïîâîðîòå ðóêîÿòêè îò ìàê-
ñèìàëüíîãî ê ìèíèìàëüíîìó ïîëîæåíèþ ïëàìÿ íå ãàñíåò.
â) Ðåãóëèðîâêà ïîñòóïëåíèÿ âîçäóõà â ãîðåëêè:
· ðåãóëèðîâêà íå òðåáóåòñÿ.
Âàæíî: ïî çàâåðøåíèè âñåõ îïåðàöèé ñòàðóþ íàêëåéêó çà-
ìåíèòå íà íîâóþ ñ óêàçàíèåì òèïà èñïîëüçóåìîãî ãàçà
(íàêëåéêó ìîæíî ïðèîáðåñòè â ñåðâèñíîì öåíòðå).
Ïðèìå÷àíèå: åñëè äàâëåíèå èñïîëüçóåìîãî ãàçà îòëè÷àåò-
ñÿ îò ðåêîìåíäóåìîãî, íà ïîäâîäíóþ òðóáó â ñîîòâåòñòâèè
äåéñòâóþùèìè ìåñòíûìè ñòàíäàðòàìè íåîáõîäèìî óñòàíî-
âèòü ïîäõîäÿùèé ðåäóêòîð.
* Ñóõîé ãàç ïðè 15°Ñ è äàâëåíèè 1013 ìáàð
** Ïðîïàí P.C.S. = 50.37 MÄæ/êã
*** Áóòàí P.C.S. = 49.47 MÄæ/êã
Ïðèðîäíûé ãàç P.C.S. = 37.78 MÄæ/ì
3
Õàðàêòåðèñòèêè ãîðåëîê è æèêëåðîâ
S
R
A
Ø145
K1M11S/R
Òàáëèöà 1 Ñæèæåííûé ãàç Ïðèðîäíûé ãàç
Ãîðåëêà
Äèà-
ìåòð
(mm)
Òåïëîâàÿ
ìîùíîñòü
êÂò (p.c.s.*)
Îòâåð-
ñòèå
1/100
Æèêëå-
ð
1/100
Ïîòîê*
g
/h
Æèêëåð
1/100
Ïîòîê*
l/h
Æèêëåð
1/100
Ïîòîê*
l/h
íîìèí. óìåíüø. (ìì) (ìì) *** ** (ìì) (ìì)
Áûñòðàÿ
(áîëüøàÿ)(R)
100 3.00 0.7 41 86 218 214 116 286 143 286
Ïîëóáûñòðàÿ
(ñðåäíÿÿ)(S)
75 1.90 0.4 30 70 138 136 106 181 118 181
Äîïîëíè-òåë-
üíàÿ
(Ìàëåíüêàÿ)
(A)
55 1.00 0.4 30 50 73 71 79 95 80 95
Äàâëåíèå
Íîìèíàëüíîå (ìáàð)
Ìèíèìàëüíîå (ìáàð)
Ìàêñèìàëüíîå (ìáàð)
28-30
20
35
37
25
45
20
17
25
13
6,5
18

18
94
50
50
85/90
Внутренние размеры духовки:
Ширина: 39 cм
Глубина: 38 cм
Высота: 34 cм
Объем духовки:
50 л
Мощность духовки (max):
3500 Вт
Внутренние размеры отделения
для хранения и подогрева:
Ширина: 42 cм
Глубина: 44 cм
Высота: 23 cм
Напряжение и частота питания:
См. таблицу характеристик
Газовые горелки:
адаптированы для всех типов газа, указанных
в таблице характеристик, расположенной слева
внутри отделения для хранения и подогрева или
на внутренней стороне дверцы этого отделения.
Электрическая конфорка
Ж 145R мм: 1500 Вт
77
77
7
Это оборудование соответствует следующим директи-
вам Европейского экономического сообщества:
- 73/23/EEC от 19/02/73 (Низкое напряжение) и последующие
модификации;
- 89/336/EEC от 03/05/89 (Электромагнитная совместимость)
и последующие модификации;
- 90/396/EEC от 29/06/90 (Газ) и последующие модификации;
- 93/68/EEC от 22/07/93 и последующие модификации.
Технические характеристики
Продукция сертифицирована Код органа
на соответствие ГОСТам: по сертификации
ENERGY LABEL
Директива 2002/40/CE касательно этикеток на
электрических духовках
Норматив EN 50304
Заявление о расходах электроэнергии для класса
натуральной конвекции
функция нагревания: Статическое
A
77

19
A Ðàáî÷àÿ ïîâåðõíîñòü
B Ýëåêòðè÷åñêèå êîíôîðêè
C Ãàçîâûå ãîðåëêè
E Âåðõíÿÿ ðåøåòêà
F Ïàíåëü óïðàâëåíèÿ
G Ðåãóëèðóåìûå íîæêè èëè íàäñòàâíûå îïîðû
H Ïîääîí äëÿ ñáîðà æèðà èëè ïðîòèâåíü
K Óñòðîéñòâî áåçîïàñíîñòè âåðõíèõ ãàçîâûõ
ãîðåëîê (òîëüêî äëÿ íåêîòîðûõ ìîäåëåé)
J Óñòðîéñòâî ýëåêòðîííîãî çàæèãàíèÿ
(òîëüêî äëÿ íåêîòîðûõ ìîäåëåé)
I Ðåøåò÷àòàÿ ïîëêà äóõîâêè
L Ðóêîÿòêà âûáîðà ôóíêöèé äóõîâêè
M Ðóêîÿòêà òåðìîñòàòà
N Ðóêîÿòêè óïðàâëåíèÿ âåðõíèìè ãàçîâûìè
ãîðåëêàìè
O Èíäèêàòîð òåðìîñòàòà äóõîâêè
P Ðóêîÿòêè óïðàâëåíèÿ ýëåêòðè÷åñêèìè êîíôîðêàìè
Q Çåëåíûé èíäèêàòîð ýëåêòðè÷åñêèõ êîíôîðîê
S Ðóêîÿòêà òàéìåðà
T Êíîïêà ýëåêòðîííîãî çàæèãàíèÿ âåðõíèõ ãàçîâûõ
ãîðåëîê (òîëüêî äëÿ íåêîòîðûõ ìîäåëåé)
Ïëèòà ñ ýëåêòðè÷åñêîé äóõîâêîé (îïèñàíèå)
J
K
N P N
S
T
M
L
N
O
Q
G
A
F
I
H
E
B
C

20
Äëÿ âûáîðà ðàçëè÷íûõ ôóíêöèé ïëèòû ñëóæàò ðóêîÿòêè è
êíîïêè íà ïàíåëè óïðàâëåíèÿ.
ÐÓÊÎÒÊÈ ÓÏÐÀÂËÅÍÈ
ÂÅÐÕÍÈÌÈ ÃÀÇÎÂÛÌÈ ÃÎÐÅËÊÀÌÈ (N)
Ïîëîæåíèå êàæäîé ãîðåëêè, óïðàâëÿåìîé ñîîòâåòñòâóþùåé
ðóêîÿòêîé, ñõåìàòè÷åñêè ïîìå÷åíî çàêðàøåííûì êðóæêîì.
×òîáû çàæå÷ü ãîðåëêó, ïîäíåñèòå ê íåé çàææåííóþ ñïè÷êó
èëè çàæèãàëêó. Îäíîâðåìåííî íàæìèòå è ïîâåðíèòå ñîîò-
âåòñòâóþùóþ ðóêîÿòêó ïðîòèâ ÷àñîâîé ñòðåëêè ïî íàïðàâ-
ëåíèþ ê ìàêñèìàëüíîìó ïîëîæåíèþ -. Ñèëà ïëàìåíè
êàæäîé ãîðåëêè ðåãóëèðóåòñÿ â ìàêñèìàëüíîì, ìèíèìàëü-
íîì èëè ïðîìåæóòî÷íûõ çíà÷åíèÿõ. Ñîîòâåòñòâóþùèå ñèì-
âîëû èçîáðàæåíû îêîëî êàæäîé ðóêîÿòêè íà ïàíåëè
óïðàâëåíèÿ: - ìàêñèìàëüíîå ïëàìÿ;
+ ìèíèìàëü-
íîå ïëàìÿ, «
•
» âûêëþ÷åíî. ×òîáû óñòàíîâèòü ðóêîÿòêó â
ýòè ïîëîæåíèÿ, ïîâåðíèòå åå ïðîòèâ ÷àñîâîé ñòðåëêè îò ïî-
çèöèè
•
(âûêëþ÷åíî) è ñîâìåñòèòå ðèñêó íà ðóêîÿòêå ñ íóæ-
íûì ñèìâîëîì. Äëÿ âûêëþ÷åíèÿ ãîðåëêè ïîâåðíèòå
ðóêîÿòêó ïî ÷àñîâîé ñòðåëêå äî óïîðà (ñîîòâåòñòâóåò ñèì-
âîëó
•
).
Ýëåêòðîííîå çàæèãàíèå âåðõíèõ ãàçîâûõ
ãîðåëîê
Íåêîòîðûå ìîäåëè îñíàùåíû âñòðîåííûì ýëåêòðîííûì çà-
æèãàíèåì âåðõíèõ ãàçîâûõ ãîðåëîê (ñì. äåòàëü J). Óñòðîé-
ñòâî ýëåêòðîííîãî çàæèãàíèÿ ñðàáàòûâàåò ïðè íàæàòèè íà
êíîïêó T, îáîçíà÷åííóþ ñèìâîëîì
. ×òîáû çàæå÷ü ãîðåë-
êó ïðîñòî íàæìèòå íà êíîïêó T è äåðæèòå åå íàæàòîé, îäíî-
âðåìåííî íàæèìàÿ è ïîâîðà÷èâàÿ ðóêîÿòêó ãîðåëêè ïðîòèâ
÷àñîâîé ñòðåëêè, ïîêà îãîíü íå çàãîðèòñÿ.
Äëÿ íåìåäëåííîãî çàæèãàíèÿ ñíà÷àëà íàæìèòå êíîïêó T, à
çàòåì ïîâåðíèòå ðóêîÿòêó ãîðåëêè.
Åñëè ãîðåëêà ñëó÷àéíî ïîãàñíåò, âûêëþ÷èòå ãàç ðó-
êîÿòêîé, è ïîäîæäèòå íå ìåíåå 1 ìèíóòû ïåðåä ïî-
âòîðíûì âêëþ÷åíèåì.
Ìîäåëè ñ óñòðîéñòâîì áåçîïàñíîñòè
Óñòðîéñòâî áåçîïàñíîñòè K ñðàáàòûâàåò, åñëè ïëàìÿ ñëó-
÷àéíî ïîãàñëî ïðåêðàùàåò ïîäà÷ó ãàçà â ãîðåëêó.
Âàæíî: ïîñëå âêëþ÷åíèÿ ãîðåëêè äåðæèòå åå ðóêîÿòêó íà-
æàòîé 6 ñåêóíä, äàâàÿ âûõîä ãàçó, ïîêà íå ïðîãðååòñÿ òåð-
ìîïàðà.
Âíèìàíèå: ïåðåä ïåðâûì èñïîëüçîâàíèåì äóõîâêè è ãðèëÿ
ïðîêàëèòå ïóñòóþ äóõîâêó â òå÷åíèå ïîëó÷àñà ñ îòêðûòîé
äâåðöåé, óñòàíîâèâ òåðìîñòàò â ìàêñèìàëüíîå ïîëîæåíèå.
Óáåäèòåñü, ÷òî êîìíàòà õîðîøî ïðîâåòðèâàåòñÿ. Íà íåêîòî-
ðîå âðåìÿ ìîæåò ïîÿâèòñÿ íåïðèÿòíûé çàïàõ ýòî ñãîðà-
þò ñìàçî÷íûå âåùåñòâà, èñïîëüçóåìûå äëÿ êîíñåðâàöèè
äóõîâêè è ãðèëÿ âî âðåìÿ õðàíåíèÿ îáîðóäîâàíèÿ.
Ïðåäóïðåæäåíèå: èñïîëüçîâàíèå äíà äóõîâêè äîïóñêàåò-
ñÿ òîëüêî ïðè ðàáîòå âåðòåëà (ïðè íàëè÷èè). Âî âñåõ äðóãèõ
ñëó÷àÿõ ãîòîâüòå ïèùó òîëüêî íà ðåøåòêå èëè ïðîòèâíå,
âñòàâëÿÿ èõ ïî íàïðàâëÿþùèì. Íè â êîåì ñëó÷àå íå ðàñïî-
ëàãàéòå ïîñóäó (áëþäà, àëþìèíèåâóþ ôîëüãó è ò.ä.) íà äíå
äóõîâêè ýòî ìîæåò ïîâðåäèòü ýìàëåâîå ïîêðûòèå.
Ðóêîÿòêè óïðàâëåíèÿ äóõîâêîé
Âûáîð ðàçëè÷íûõ ðåæèìîâ ïðèãîòîâëåíèÿ â äóõîâêå îñóùå-
ñòâëÿåòñÿ ñ ïîìîùüþ äâóõ ðóêîÿòîê, ðàñïîëîæåííûõ íà ïà-
íåëè óïðàâëåíèÿ:
L ðóêîÿòêè âûáîðà ôóíêöèé äóõîâêè ;
M ðóêîÿòêè òåðìîñòàòà ñèìâîë .
(ñèìâîëüíûå îáîçíà÷åíèÿ ðóêîÿòîê íàíåñåíû íà ïàíåëü
óïðàâëåíèÿ).
Êîãäà ðóêîÿòêà âûáîðà ôóíêöèé äóõîâêè L íàõîäèòñÿ â ëþ-
áîì ïîëîæåíèè, êðîìå «0» âûêëþ÷åíî, â äóõîâêå ãîðèò
ñâåò. Ïðè óñòàíîâêå ðóêîÿòêè â ïîçèöèþ
&
ñâåò çàæèãàåòñÿ
áåç âêëþ÷åíèÿ íàãðåâàòåëüíûõ ýëåìåíòîâ. Ãîðÿùàÿ ëàìïî÷-
êà äóõîâêè ïîêàçûâàåò, ÷òî äóõîâêà èñïîëüçóåòñÿ. Ñâåò îñ-
òàåòñÿ ãîðåòü â òå÷åíèå âñåãî âðåìåíè èñïîëüçîâàíèÿ
äóõîâêè.
1. ÑÒÀÒÈ÷ÍÀ ÄÓÕÎÂÊÀ
- Ïîëîæåíèå ðóêîÿòêè L:
- Ïîëîæåíèå ðóêîÿòêè M: ëþáîå ìåæäó 50°C è Max
Ãîðèò ëàìïà îñâåùåíèÿ, âêëþ÷åíû âåðõíèé è íèæíèé
íàãðåâàòåëüíûå ýëåìåíòû. Äóõîâêà íàãðåâàåòñÿ äî òåìïå-
ðàòóðû, çàäàííîé ðóêîÿòêîé òåðìîñòàòà; âûáðàííàÿ òåìïå-
ðàòóðà ïîääåðæèâàåòñÿ àâòîìàòè÷åñêè. Ïîòîê ãîðÿ÷åãî
âîçäóõà íàïðàâëåí ñâåðõó âíèç. Ïðåâîñõîäíîå ðàñïðåäåëå-
íèå òåìïåðàòóðû ïîçâîëÿåò ãîòîâèòü â ýòîì ðåæèìå ëþáûå
âèäû ïðîäóêòîâ.
Ñòàòè÷íàÿ äóõîâêà îñîáåííî ïîäõîäèò äëÿ ïðèãîòîâëåíèÿ
ìÿñíûõ áëþä, êîòîðûå äîëæíû ãîòîâèòüñÿ ìåäëåííî è â ïðî-
öåññå ïðèãîòîâëåíèÿ òðåáóþò äîáàâëåíèÿ æèäêîñòè, èëè
áëþä, ñîñòîÿùèõ èç äâóõ (è áîëåå) êîìïîíåíòîâ (íàïðèìåð,
ãóëÿø, ìÿñíûå çàïåêàíêè). Òàêæå ðåæèì ïîäõîäèò äëÿ ïðè-
ãîòîâëåíèÿ ñóõèõ áèñêâèòîâ, ïå÷åíüÿ, ãàëåò, çàïå÷åííûõ
ôðóêòîâ.
Äëÿ ðàâíîìåðíîãî ðàñïðåäåëåíèÿ òåïëà èñïîëüçóéòå òîëü-
êî îäèí ïðîòèâåíü (èëè ðåøåòêó). Óðîâåíü ðàñïîëîæåíèÿ
ïðîòèâíÿ âûáèðàéòå â çàâèñèìîñòè îò íåîáõîäèìîñòè áîëü-
øåãî íàãðåâà áëþäà ñâåðõó èëè ñíèçó.
2. ÍÈÆÍÈÉ ÍÀÃÐÅÂÀÒÅËÜÍÛÉ ÝËÅÌÅÍÒ
- Ïîëîæåíèå ðóêîÿòêè L:
- Ïîëîæåíèå ðóêîÿòêè M: ëþáîå ìåæäó 50°C è Max
Ãîðèò ëàìïà îñâåùåíèÿ è âêëþ÷åí íèæíèé íàãðåâàòåëüíûé
ýëåìåíò. Äóõîâêà íàãðåâàåòñÿ äî òåìïåðàòóðû, çàäàííîé ðó-
êîÿòêîé òåðìîñòàòà; âûáðàííàÿ òåìïåðàòóðà ïîääåðæèâà-
åòñÿ àâòîìàòè÷åñêè. Ýòî ïîëîæåíèå ðóêîÿòêè L ðåêîìåíäó-
åòñÿ èñïîëüçîâàòü äëÿ çàâåðøàþùåé ñòàäèè ïðèãîòîâëåíèÿ
áëþä (â ôîðìàõ), êîòîðûå óæå ãîòîâû ñíàðóæè, íî åùå ñû-
ðûå âíóòðè, èëè äëÿ ïîäðóìÿíèâàíèÿ ïîâåðõíîñòè äåñåð-
òîâ, ïîêðûòûõ ôðóêòàìè èëè äæåìîì.
Ýòà îïöèÿ íå ïîçâîëÿåò äîñòèãàòü â äóõîâêå ìàêñèìàëüíî
âîçìîæíîé òåìïåðàòóðû 250°Ñ, ïîýòîìó ðåêîìåíäóåì èñ-
ïîëüçîâàòü äàííóþ ôóíêöèþ òîëüêî äëÿ áëþä, òåìïåðàòóðà
ïðèãîòîâëåíèÿ êîòîðûõ íå ïðåâûøàåò 180°, íàïðèìåð, ïè-
ðîãîâ, òîðòîâ.
3. ÃÐÈËÜ
- Ïîëîæåíèå ðóêîÿòêè L:
- Ïîëîæåíèå ðóêîÿòêè M: ëþáîå ìåæäó 50°C è Max
 äóõîâêå ãîðèò ñâåò, ïèùà ïîäâåðãàåòñÿ òåïëîâîìó èíôðà-
êðàñíîìó èçëó÷åíèþ îò ðàñêàëåííîãî âåðõíåãî öåíòðàëüíî-
Ñèëüíîå íàïðàâëåííîå òåïëî ãðèëÿ íàãðåâàåò ïîâåðõíîñòü
ìÿñà íåïîñðåäñòâåííî (âîçäóõ íàãðåâàåòñÿ ñëàáî). Íà ìÿñå
îáðàçóåòñÿ ðóìÿíàÿ êîðî÷êà, êîòîðàÿ ñîõðàíÿåò ìÿñî ñî÷-
íûì è ìÿãêèì. Ãðèëü èäåàëåí äëÿ ïðèãîòîâëåíèÿ áëþä, òðå-
áóþùèõ âûñîêîé òåìïåðàòóðû ïîâåðõíîñòè, òàêèõ êàê:
áèôøòåêñ, ôèëå, ãàìáóðãåðû, ðîìøòåêñ è ò.ä.
4. ÃÐÈËÜ
- Ïîëîæåíèå ðóêîÿòêè L:
- Ïîëîæåíèå ðóêîÿòêè M: ëþáîå ìåæäó 50°C è Max
 äóõîâêå ãîðèò ñâåò è ðàáîòàåò äâîéíîé íàãðåâàòåëüíûé
ýëåìåíò ãðèëÿ, ìîòîð âðàùàåò âåðòåë. Ýòîò ãðèëü áîëüøå
îáû÷íîãî, åãî ìîùíîñòü íà 50% ïðåâûøàåò ìîùíîñòü ïðî-
ñòîãî ãðèëÿ. Ïðè ðàáîòå äâîéíîãî ãðèëÿ âîçäåéñòâèþ òåïëà
Èíñòðóêöèè ïî ýêñïëóàòàöèè
La pagina si sta caricando...
La pagina si sta caricando...
La pagina si sta caricando...
La pagina si sta caricando...
La pagina si sta caricando...
La pagina si sta caricando...
-
 1
1
-
 2
2
-
 3
3
-
 4
4
-
 5
5
-
 6
6
-
 7
7
-
 8
8
-
 9
9
-
 10
10
-
 11
11
-
 12
12
-
 13
13
-
 14
14
-
 15
15
-
 16
16
-
 17
17
-
 18
18
-
 19
19
-
 20
20
-
 21
21
-
 22
22
-
 23
23
-
 24
24
-
 25
25
-
 26
26


Indesit K1M11S(W)/R Guida utente
- Categoria
- Piani cottura
- Tipo
- Guida utente
- Questo manuale è adatto anche per
in altre lingue
- English: Indesit K1M11S(W)/R User guide
Documenti correlati
Altri documenti
-
Whirlpool K1M11S(W)/R Guida utente
-
-
-
-
 Euro-Kitchen SPAGNA VETRO 218 Series Manuale del proprietario
-
-
-
Hoover-Helkama HH KTE 300 Manuale utente
