Tascam 102i Series Manuale del proprietario
- Categoria
- Apparecchiature musicali supplementari
- Tipo
- Manuale del proprietario
Questo manuale è adatto anche per

ENGLISH
FRANÇAIS
ESPAÑOL
DEUTSCH
ITALIANO
日本語
OWNER'S MANUAL
MODE D’EMPLOI
MANUAL DEL USUARIO
BEDIENUNGSANLEITUNG
MANUALE DI ISTRUZIONI
取扱説明書
D01355400B
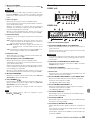
SERIES 102i
SERIES 208i
AUDIO INTERFACE

2
TASCAM SERIES 102i / SERIES 208i
TEAC CORPORATION
https://tascam.jp/jp/
Phone: +81-42-356-9143
1-47 Ochiai, Tama-shi, Tokyo 206-8530 Japan
TEAC AMERICA, INC.
https://tascam.com/us/
Phone: +1-323-726-0303
10410 Pioneer Blvd. Suite #1 Santa Fe Springs, California
90670, U.S.A.
TEAC UK Ltd.
https://www.tascam.eu/en/
Phone: +44-1923-797205
Meridien House, 69-71 Clarendon Road, Watford, Herts,
WD17 1DS, United Kingdom
TEAC EUROPE GmbH
https://www.tascam.en/de/
Phone: +49-611-71580
Bahnstrasse 12, 65205 Wiesbaden-Erbenheim, Germany
TEAC SALES & TRADING(SHENZHEN) CO., LTD
https://tascam.cn/cn/
Phone: +86-755-88311561~2
Room 817, Xinian Center A, Tairan Nine Road West, Shen-
nan Road, Futian District, Shenzhen, Guangdong Province
518040, China
• TASCAM is a registered trademark of TEAC Corporation.
• Microsoft, Windows and Windows Vista are either registered
trademarks or trademarks of Microsoft Corporation in the
United States and/or other countries.
• Apple, Mac, Mac OS X, and Lightning are trademarks of
Apple Inc.
• IOS is a trademark or registered trademark of Cisco in the
U.S. and other countries and is used under license.
• ASIO is a trademark and software of Steinberg Media
Technologies GmbH.
• Other company names, product names and logos in this
document are the trademarks or registered trademarks
of their respective owners.

TASCAM SERIES 102i / SERIES 208i
3
IMPORTANT SAFETY INSTRUCTIONS
WARNING: TO PREVENT FIRE OR SHOCK HAZARD, DO NOT
EXPOSE THIS APPLIANCE TO RAIN OR MOISTURE.
For U.S.A.
Declaration of Conformity
Model Number: SERIES 102i / SERIES 208i
Trade Name: TASCAM
Responsible party: TEAC AMERICA, INC.
Address: 10410 Pioneer Blvd. Suite #1 Santa Fe Springs,
California 90670, U.S.A.
Telephone number: 1-323-726-0303
This device complies with Part 15 of the FCC Rules. Operation is
subject to the following two conditions: (1) this device may not
cause harmful interference, and (2) this device must accept any
interference received, including interference that may cause
undesired operation.
INFORMATION TO THE USER
This equipment has been tested and found to comply with
the limits for a Class B digital device, pursuant to Part 15 of the
FCC Rules. These limits are designed to provide reasonable
protection against harmful interference in a residential instal-
lation. This equipment generates, uses, and can radiate radio
frequency energy and, if not installed and used in accordance
with the instruction manual, may cause harmful interference
to radio communications. However, there is no guarantee that
interference will not occur in a particular installation.
If this equipment does cause harmful interference to radio or
television reception, which can be determined by turning the
equipment off and on, the user is encouraged to try to correct
the interference by one or more of the following measures.
a) Reorient or relocate the receiving antenna.
b) Increase the separation between the equipment and
receiver.
c) Connect the equipment into an outlet on a circuit different
from that to which the receiver is connected.
d) Consult the dealer or an experienced radio/TV technician for
help.
CAUTION
Changes or modifications to this equipment not expressly
approved by TEAC CORPORATION for compliance could void
the user’s authority to operate this equipment.
For Canada
THIS CLASS B DIGITAL APPARATUS COMPLIES WITH CANADIAN
ICES-003.
CET APPAREIL NUMERIQUE DE LA CLASSE B EST CONFORME A
LA NORME NMB-003 DU CANADA.
This product complies with the European
Directives request and the other Commission
Regulations.
1. Read these instructions.
2. Keep these instructions.
3. Heed all warnings.
4. Follow all instructions.
5. Do not use this apparatus near water.
6. Clean only with dry cloth.
7. Do not block any ventilation openings. Install in accordance
with the manufacturer’s instructions.
8. Do not install near any heat sources such as radiators, heat
registers, stoves, or other apparatus (including amplifiers)
that produce heat.
9. Do not defeat the safety purpose of the polarized or
grounding-type plug. A polarized plug has two blades with
one wider than the other. A grounding type plug has two
blades and a third grounding prong. The wide blade or the
third prong are provided for your safety. If the provided
plug does not fit into your outlet, consult an electrician for
replacement of the obsolete outlet.
10. Protect the power cord from being walked on or pinched
particularly at plugs, convenience receptacles, and the point
where they exit from the apparatus.
11. Only use attachments/accessories specified by the manufac-
turer.
12. Use only with the cart, stand, tripod, bracket, or table
specified by the manufacturer, or sold with the apparatus.
When a cart is used, use caution when moving the cart/
apparatus combination to avoid injury from tip-over.
13. Unplug this apparatus during lightning storms or when
unused for long periods of time.
14. Refer all servicing to qualified service personnel. Servicing is
required when the apparatus has been damaged in any way,
such as power-supply cord or plug is damaged, liquid has
been spilled or objects have fallen into the apparatus, the
apparatus has been exposed to rain or moisture, does not
operate normally, or has been dropped.
• The apparatus draws nominal non-operating power from the
AC outlet with its POWER or STANDBY/ON switch not in the ON
position.
• The mains plug is used as the disconnect device, the
disconnect device shall remain readily operable.
• Caution should be taken when using earphones or
headphones with the product because excessive sound
pressure (volume) from earphones or headphones can cause
hearing loss.
• If you are experiencing problems with this product, contact
TEAC for a service referral. Do not use the product until it has
been repaired.
OWNER’S MANUAL

4
TASCAM SERIES 102i / SERIES 208i
CAUTION
• Do not expose this apparatus to drips or splashes.
• Do not place any objects filled with liquids, such as vases, on
the apparatus.
• Do not install this apparatus in a confined space such as a
book case or similar unit.
• The apparatus should be located close enough to the AC
outlet so that you can easily grasp the power cord plug at
any time.
• If the product uses batteries (including a battery pack or
installed batteries), they should not be exposed to sunshine,
fire or excessive heat.
• CAUTION for products that use replaceable lithium batteries:
there is danger of explosion if a battery is replaced with
an incorrect type of battery. Replace only with the same or
equivalent type.
For European Customers
Disposal of electrical and electronic equipment
(a) All electrical and electronic equipment should be disposed
of separately from the municipal waste stream via collection
facilities designated by the government or local authorities.
(b) By disposing of electrical and electronic equipment
correctly, you will help save valuable resources and prevent
any potential negative effects on human health and the
environment.
(c) Improper disposal of waste electrical and electronic
equipment can have serious effects on the environment
and human health because of the presence of hazardous
substances in the equipment.
(d) The Waste Electrical and Electronic Equipment
(WEEE) symbol, which shows a wheeled bin that
has been crossed out, indicates that electrical
and electronic equipment must be collected and
disposed of separately from household waste.
(e) Return and collection systems are available to end users.
For more detailed information about the disposal of old
electrical and electronic equipment, please contact your
city office, waste disposal service or the shop where you
purchased the equipment.
CAUTION
• DO NOT REMOVE THE EXTERNAL CASES OR CABINETS TO
EXPOSE THE ELECTRONICS. NO USER SERVICEABLE PARTS ARE
INSIDE.
• IF YOU ARE EXPERIENCING PROBLEMS WITH THIS PRODUCT,
CONTACT THE STORE WHERE YOU PURCHASED THE UNIT FOR
A SERVICE REFERRAL. DO NOT USE THE PRODUCT UNTIL IT HAS
BEEN REPAIRED.
• USE OF CONTROLS OR ADJUSTMENTS OR PERFORMANCE OF
PROCEDURES OTHER THAN THOSE SPECIFIED HEREIN MAY
RESULT IN HAZARDOUS RADIATION EXPOSURE
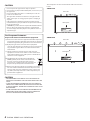
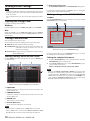
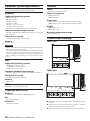
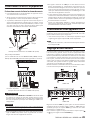
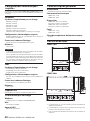
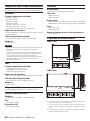
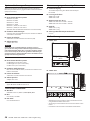
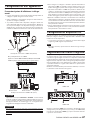
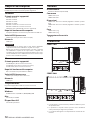
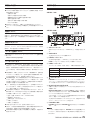
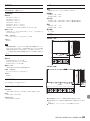
The nameplate is located on the bottom of the unit as shown
below.
SERIES 102i
Front side
SERIES 208i
Front side
Nameplate
Nameplate

TASCAM SERIES 102i / SERIES 208i
5
Introduction
Thank you very much for purchasing a TASCAM SERIES 102i/SERIES
208i audio interface.
Before connecting and using this unit, please take time to read
this manual thoroughly to ensure you understand how to properly
set it up and connect it, as well as how to use its many useful and
convenient functions. After you have finished reading this manual,
please keep it in a safe place for future reference.
You can also download this Owner’s Manual from the TEAC Global
Site (http://teac-global.com/).
Before connecting this unit to a computer, you must download
and install a dedicated driver.
Note about the Reference Manual
This Owner’s Manual explains each of the functions of this unit.
Please see the Reference Manual for detailed information about
each of the functions.
You can download the Reference Manual from the TEAC Global
Site (http://teac-global.com/).
Included items
This product includes the following items.
Take care when opening the package to avoid damaging the
items. Keep the box and packing materials for transportation in
the future.
Please contact the store where you purchased this unit if any of
these items are missing or have been damaged during transpor-
tation.
0 Main unit ...................................................................................................× 1
0 AC adapter (PS-P1220E) (with 3 alternate plugs) ....................... × 1
0 USB cable ..................................................................................................× 1
0 Set of DAW software installation guides .......................................× 1
0 Set of DAW plug-in software installation guides .......................× 1
0 Owner’s Manual (this document) including warranty .............× 1
ATTENTION
Always use the included AC adapter (PS-P1220E) when using
this unit. Never use the included AC adapter with any other de-
vice. Doing so could cause damage, fire or electric shock.
NOTE
The included AC adapter (PS-P1220E) is shipped with alternate
outlet plugs. Please see “Changing the outlet plug” on page
10.
Conventions used in this manual
In this manual, we use the following conventions:
0 Buttons, connectors and other physical parts of this unit and
connected devices are written using a bold font like this:
PHONES knob.
0 Information shown on a computer display is written like this:
“OK”.
0 As necessary, additional information is provided under TIP,
NOTE and CAUTION headings.
TIP
These are tips about how to use the unit.
NOTE
These provide additional explanations and describe spe cial
cases.
Contents
IMPORTANT SAFETY INSTRUCTIONS ........................................ 3
Introduction ................................................................................ 5
Note about the Reference Manual ............................................ 5
Included items ............................................................................ 5
Conventions used in this manual .............................................. 5
Precautions for placement and use ........................................... 6
Beware of condensation ............................................................ 6
Cleaning the unit ........................................................................ 6
Using the TEAC Global Site ........................................................ 6
Product registration ................................................................... 6
About TASCAM customer support service ................................ 6
Names and functions of parts ................................................... 6
Front panel ....................................................................................................6
Rear panel ......................................................................................................7
Installing the dedicated software ............................................. 8
Installing the Windows dedicated software ...................................... 8
Installing the Mac dedicated software ................................................ 9
Connecting the power .............................................................. 10
Changing the outlet plug ...................................................................... 10
Connecting other equipment .................................................. 11
Connecting with iOS devices ................................................... 11
Adjusting the input sound ....................................................... 11
Making various settings ........................................................... 12
Opening the Settings Panel ................................................................. 12
Settings Panel overview ........................................................................ 12
Making settings on the MIXER screen .............................................. 12
Making settings on the INFORMATION screen .............................. 12
Making settings on the ROUTING screen ........................................ 13
Changing sampling frequency ................................................ 13
Troubleshooting ....................................................................... 13
Specifications ............................................................................ 14
Ratings ......................................................................................................... 14
Analog audio input ratings ................................................................... 14
Analog outputs ......................................................................................... 15
Digital audio input ratings .................................................................... 15
Control input/output .............................................................................. 15
Audio performance ................................................................................. 15
Computer system requirements .............................................. 16
Windows ...................................................................................................... 16
Mac ................................................................................................................ 16
iOS device ................................................................................................... 16
Supported audio drivers ........................................................................ 16
General ...................................................................................... 16
Dimensional drawings ............................................................. 16

6
TASCAM SERIES 102i / SERIES 208i
ATTENTION
Failure to follow these instructions could result in damage to
equipment or lost data, for example.
V
CAUTION
Failure to follow these instructions could result in injury.
Precautions for placement and use
0 The operating temperature range of this unit is 5–35 °C.
0 Do not install this unit in the following types of locations.
Doing so could make the sound quality worse or cause malfunc-
tion.
Places with significant vibrations
Next to a window or in another location exposed to direct
sunlight
Near heaters or other extremely hot places
Extremely cold places
Very humid or poorly ventilated places
Very dusty places
0 To enable good heat dissipation, do not place anything on top
of the unit.
0 Do not place this unit on top of a power amplifier or other de-
vice that generates heat.
Beware of condensation
Condensation could occur if the unit is moved from a cold place
to a warm place, it is used immediately after a cold room has
been heated or it is otherwise exposed to a sudden temperature
change.To prevent this, or if this occurs, let the unit sit for one or
two hours at the new room temperature before using it.
Cleaning the unit
Use a dry soft cloth to wipe the unit clean. Do not wipe with chem-
ical cleaning cloths, thinner, alcohol or other chemical agents. Do-
ing so could damage the surface or cause discoloration.
Using the TEAC Global Site
You can download updates for this unit from the TEAC Global Site:
http://teac-global.com/
In the TASCAM Downloads section, select the desired language to
open the Downloads website page for that language.
Product registration
Customers in the USA, please visit the following TASCAM website
to register your TASCAM product online.
https://tascam.com/us/
About TASCAM customer support
service
TASCAM products are supported and warrantied only in their
country/region of purchase.
To receive support after purchase, on the TASCAM Distributors list
page of the TEAC Global Site (http:// teac-global.com/), search for
the local company or representative for the region where you pur-
chased the product and contact that organization.
When making inquiries, the address (URL) of the shop or web shop
where it was purchased and the purchase date are required.
Moreover, the warranty card and proof of purchase might also be
necessary.
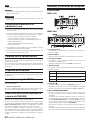
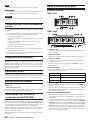
Names and functions of parts
Front panel
SERIES 102i
SERIES 208i
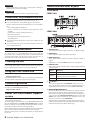
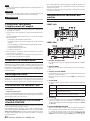
1 SIG indicators
These light green when signals (of at least -32 dBFS) are input.
2 GAIN knobs
Use to adjust the input levels of the input jacks.
3 PEAK indicators
These light red when signals are about to distort (-1 dBFS or
higher).
Adjust these so that the PEAK indicators do not light red.
4 USB indicator
This indicator shows the status of the unit by lighting, blinking
and turning off.
Status Meaning
Lit Good USB connection
Blinking
Bad USB connection
(disconnected or error occurred)
Unlit Operating in standalone mode
5 indicator
This indicator lights when the STANDBY switch is set to on.
This indicator blinks if the clock source or OPTICAL input is ir-
regular (when the clock source is set to WORD or OPTICAL).
6 MONITOR BALANCE knob
Use this to adjust the balance between the signals from this
unit’s input jacks and the output signals from the computer.
The volume of signals input through this unit’s input jacks in-
crease the more the MONITOR BALANCE knob is set to the left
(INPUT) and signals output from the computer increase the
more this is set to the right (COMPUTER).
This knob does not affect the recording level of input signals.
Input monitoring without lag is possible by monitoring the sig-
nals from the input jacks (direct monitoring).

TASCAM SERIES 102i / SERIES 208i
7
7 PHONES knob
Use to adjust the output levels of the PHONES and jacks.
V
CAUTION
Before connecting headphones, minimize the volume with the
PHONES knob. Failure to do so could result in a sudden loud
noise that could harm hearing, for example.
8 1-2 input jacks
These analog inputs are XLR/TRS combo jacks.
They can support high impedance input, including direct gui-
tar input.
Use the input switches on the front of the unit to select bal-
anced line (MIC/LINE) or unbalanced (INST) input for the TRS
jacks.
When directly connecting a guitar, bass or other instrument,
set the input switch to INST.
9 Input switches
Set according to the input source of each input jack.
INST: Select when connecting a guitar, bass or other high-im-
pedance instrument. This makes it an unbalanced input
for high impedance.
MIC/LINE: Select when connecting a balanced-output mic or
line-level-output device.
+48V: This provides +48V phantom power to the 1-2 (and 3-4
on SERIES 208i) XLR input connectors.
0 +48V indicators
These indicators light when their input switches are set to
+48V.
q 3-4 input jacks (SERIES 208i only)
These analog inputs are XLR/TRS combo jacks.
They also support high impedance input, including direct gui-
tar input.
Use the input switches on the front of the unit to select bal-
anced line (MIC/LINE) or unbalanced (INST) input for the TRS
jacks.
When directly connecting a guitar, bass or other instrument,
set the input switch to INST.
w MONITOR knob
Use to adjust the output level of the LINE OUT (BALANCED)
1-2 jacks on the back of the unit.
e PHONES / jacks
Use this standard stereo jack to connect stereo headphones.
These output the same signals as the LINE OUT (BALANCED)
1-2 jacks on the back of the unit.
Use an adapter to connect headphones with a mini plug.
NOTE
The same signals are output from both the PHONES and
PHONES jacks.
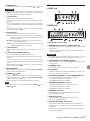
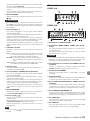
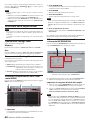
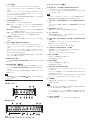
Rear panel
SERIES 102i
SERIES 208i
r Kensington Security Slot
t WORD IN/OUT connectors (SERIES 208i only)
These BNC connectors are for the input and output of word
clock signals.
Word clock signals of 44.1, 48, 88.2, 96, 176.4 and 192 kHz can
be input and output.
ATTENTION
If a digital system has multiple word clock masters, serious
problems, including damage to equipment, could occur.
y 75Ω ON/OFF switch (SERIES 208i only)
When this switch is set to ON, the WORD IN connector termi-
nates to 75 Ω.
u STANDBY switch
Press to turn the unit on and to put it into standby.
i Cord holder
Hook the cord of the included PS-P1220E AC adapter here to
prevent accidental disconnection.
o LINE OUT (BALANCED) 3-8 jacks (SERIES 208i only)
These standard TRS jacks are analog line outputs.
The nominal output level is +4 dBu.
(Tip: HOT, Ring: COLD, Sleeve: GND)
p LINE OUT (BALANCED) 1-2 jacks
These standard TRS jacks are analog line outputs.
The nominal output level is +4 dBu.
(Tip: HOT, Ring: COLD, Sleeve: GND)
a MIDI OUT connector
This 5-pin DIN is a standard MIDI output connector.
This outputs MIDI signals.
s MIDI IN connector
This 5-pin DIN is a standard MIDI input connector.
Use this to input MIDI signals.
d OPTICAL IN (S/MUX) connector(s)
These input multichannel digital audio in optical format.
44.1, 48, 88.2, 96, 176.4 and 192 kHz sampling frequencies are
supported.
88.2/96 kHz is supported by S/MUX2, and 176.4/192 kHz is
supported by S/MUX4.

8
TASCAM SERIES 102i / SERIES 208i
f USB port
Use the included USB cable to connect the unit to a computer.
(Supports USB 2.0.)
ATTENTION
i
When connected to a port that supports USB 3.0 or later, it will
function in High Speed mode equivalent to USB 2.0 (480Mbps
maximum).
i
After waking a computer from suspend (sleep) mode, if the unit
does not operate properly, turn it off and turn it on again or dis-
connect and reconnect the USB cable.
g DC IN 12V connector
Connect the included AC adapter (PS-P1220E) here.
Installing the dedicated software
To use this unit, a dedicated software must be installed on a com-
puter. The dedicated software might be updated at any time.
Download the latest software for the operating system you are
using from the TEAC Global Site (http://teac-global.com/).
0 When you install the dedicated software on a Windows com-
puter, the Windows driver and the Settings Panel application
will be installed.
0 When you install the dedicated software on a Mac, only the
Mac Settings Panel application will be installed.
The standard OS driver will be used.
0 With an iOS device, the standard OS driver will be used, so
there is no need to install any.
ATTENTION
Before starting to install software, quit other applications.
Installing the Windows dedicated soft-
ware
ATTENTION
i
Complete installation of the Windows dedicated software on
the computer before connecting the unit to it with the USB ca-
ble.
i
If you connected the unit to the computer using the USB ca-
ble before installing the Windows dedicated software and the
“Found New Hardware Wizard” launched, close the Wizard and
disconnect the USB cable.
Windows dedicated software installation
procedures
1. Download the latest Windows dedicated software for the
operating system you are using from the TEAC Global Site
(http://teac-global.com/) and save it on the computer to be
used with the unit.
2. Open the saved Windows software (zip file) on, for example,
the computer desktop.
3. Double-click the “TASCAM_SERIES_102i_208i_Installer_x.xx-
.exe” (x.xx is the version number) file in the folder that appears
after uncompression to automatically launch the installation
software.
ATTENTION
If you open a zip file without decompressing it and doubleclick
the “TASCAM_SERIES_102i_208i_Installer_x. xx.exe” file in the
folder that opens, installation will not start. Right-click the zip
file and select “Extract All”, for example, to decompress it and
then try again.
4. Depending on the computer set up, a “Security Warning” or
“User Account Control” screens might appear. If this occurs,
click the “Yes” button.
5. Read the contents of the License Agreement, and select “I ac-
cept the agreement” if you agree to the terms.
Then, click the “Next >” button.
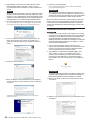
6. Next, click the “Install” button.
7. When the Windows security screen appears, click the “Install”
button to start installation.
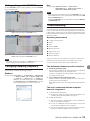
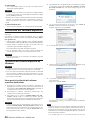
8. The following screen appears when installation has complet-
ed.
Click the “Finish” button.
The installer will quit and the Windows Settings Panel will
launch.
NOTE
The first time you connect the unit by USB to the computer af-
ter installing the software, installation of the device driver will
be executed. Some time might be necessary before the unit
is recognized because Windows Update will be automatically
searched at this time.
If the unit is still not recognized after a while, open the software
installation screen from the notification area at the bottom right
of the computer display, and click “Skip obtaining driver soft-
ware from Windows Update” to stop the search.

TASCAM SERIES 102i / SERIES 208i
9
Installing the Mac dedicated software
NOTE
i
Install the Mac software on the computer before connecting the
unit to it with the USB cable.
i
Depending on the Gatekeeper setting, a warning message
might appear during installation. For information
about Gatekeeper, see“ Note about Gatekeeper” in“ 3– Installa-
tion” of the Reference Manual.
Mac dedicated software installation proce-
dures
1. Download the latest Mac dedicated software for the operat-
ing system you are using from the TEAC Global Site (http://
teac-global.com/) and save it on the computer to be used
with the unit
2. Double-click “TASCAM_SERIES_102i_208i_Installer_x.xx.dmg”,
which is the saved disk image file for the Mac dedicated soft-
ware, and double-click “
SERIES_102i_208i_Installer.pkg
” in-
side the folder that opens.
NOTE
Depending on the computer’s settings, the downloaded zip file
might not have been uncompressed automatically. In this case,
uncompress the zip file first and then double- click the disk im-
age file.
3. When the installer starts, click the “Continue” button.
4. Next, select the desired language and click the “Continue” but-
ton.
5. Click the “Read License” button and check the contents of the
Software License Agreement. If you agree to the contents of
the license, click “Agree”.
Then, click the “Next” button.
6. Next, click the “Install” button to start installation.
7. The following screen appears when installation has complet-
ed.
Click the “Close” button.

10
TASCAM SERIES 102i / SERIES 208i
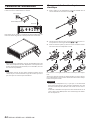
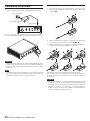
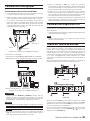
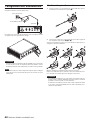
Connecting the power
Use the included AC adapter (PS-P1220E) to connect a power sup-
ply to the unit as shown below.
Power outlet
PS-P1220E (included)
DC plug
In order to prevent the cord from becoming disconnected during
use, wrap it around the cord holder when connecting it.
ATTENTION
Always use the AC adapter (PS-P1220E) that was shipped with
the unit. Using a different AC adapter could cause malfunction,
overheating, fire or other problems.
NOTE
The AC adapter for the unit includes 4 types of outlet plugs. At-
tach the type of plug that matches the power outlet that you
are using.
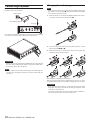
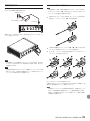
Changing the outlet plug
NOTE
When purchased new, the included PS-P1220E AC adapter for
the unit has an outlet plug (A) already attached. There should
be no need to change the plug.
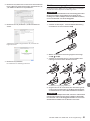
1. Move the knob (1) on the PS-P1220E AC adapter in the direc-
tion of the arrow and remove the plug (A).
2. Select the plug that matches the AC outlet from the 3 other
types included (B, C or D).
3. Move the knob (1) in the direction of the arrow again, and
attach the plug to the AC adapter.
This completes changing the outlet plug.
After changing the outlet plug, confirm that it is not loose or crook-
ed and that everything is normal before plugging it into an outlet.
ATTENTION
Do not use the adapter if there is anything abnormal about the
plug after changing it. Use when the plug is abnormal could
cause fire or electric shock.
Contact the retailer where you purchased the unit or a TEAC ser-
vice center (on the back cover) to request repair.

TASCAM SERIES 102i / SERIES 208i
11
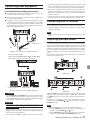
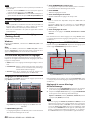
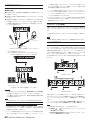
Connecting other equipment
This is an example of SERIES 102i connections.
Precautions before making connections
0 Carefully read the operation manuals of the devices to be con-
nected and then connect them correctly.
0 Before making connections, turn this unit and all equipment to
be connected off (standby).
0 If possible, install all connected devices so that they are pow-
ered from the same AC power supply line. When using a power
strip or similar device, be sure to use one that has a thick cable
with high current capacity in order to minimize voltage fluctu-
ations in the AC power supply.
Guitars
Mic
Headphones
Examples of connections to a SERIES 102i (front)
ComputerDrum machinePowered speakers
Mic preamp with S/MUX
(When using the OPTICAL OUT (S/MUX) of a TASCAM SE-
RIES 8p Dyna as the clock master for this unit)
Examples of connections to a SERIES 102i (back)
V
CAUTION
Set the MONITOR and PHONES knobs to their minimum values
before changing the input switch setting. Failure to do so could
cause sudden loud noises from monitoring equipment, and this
could damage equipment or harm hearing.
ATTENTION
i
Input switches can be set for each channel separately. Do not
set the switch to +48V when connecting a mic that does not re-
quire phantom power.
i
Do not connect or disconnect mics when the switch is set to
+48V. Doing so could cause a loud noise and might damage this
unit and connected equipment.
i
Set the switch to +48V only when using a condenser micro-
phone that requires phantom power. Setting the switch to +48V
when a dynamic mic or other device that does not require it is
connected could damage this unit and connected equipment.
i
When using condenser mics that require phantom power and
dynamic mics together, be sure to use balanced dynamic mics.
Unbalanced dynamic mics cannot be used when phantom
power is enabled.
i
Supplying phantom power to some ribbon mics could break them.
If you are unsure, do not supply phantom power to a ribbon mic.
Connecting with iOS devices
You can use a Lightning to USB Camera Adapter* to connect the
unit to an iOS device and use it as an interface with that device.
* You must obtain a genuine Apple Lightning to USB Camera
Adapter separately.
NOTE
When connected, this unit will not provide power to the iOS
device.
Adjusting the input sound
Analog audio signals input into this device from mics, guitars, key-
boards and other audio equipment can be converted into digital
signals and transmitted to the computer via USB. You can use the
features of this unit to adjust the digital signals that are sent to the
computer. In addition, by connecting speakers (through an ampli-
fier if not powered) or headphones to this unit, you can monitor
audio signals that are input to this unit and output from the com-
puter.
Use the various controls on the front of the unit as necessary while
listening to the input sound.
SERIES 102i
SERIES 208i
Adjust the GAIN knobs (4) to adjust the analog input levels of the
1-2 input jacks (1) or 3-4 input jacks (2, SERIES 208i only) so that
the PEAK indicators (3) above and to the right of the knobs do
not light.
To listen to the monitoring signal using headphones, connect
headphones to the PHONES or jack (5) and then adjust the
PHONES knob (6).
NOTE
Check the following if you cannot hear the input sounds.
i Use the PHONES knob on the front panel to adjust the out-
put levels of the PHONES and jacks.
i Use the MONITOR knob on the front of the unit to adjust the
output levels of the LINE OUT (BALANCED) 1-2 jacks.

12
TASCAM SERIES 102i / SERIES 208i
Making various settings
NOTE
In order to enable the computer to handle digital audio signals
smoothly, other loads on the computer should be minimized as
much as possible.
We recommend that you quit unneeded applications before
use.
Opening the Settings Panel
Launch the Settings Panel software.
Windows
From the Start menu select “SERIES 102i_208i” under “TASCAM”.
Mac
Using the “Finder”, select “SERIES 102i_208i” from the “Applica-
tions” folder and launch it to open the “Settings Panel” on the com-
puter display.
Settings Panel overview
The Settings Panel has three pages.
Click a tab at the top of the Settings Panel to open that page.
0 MIXER: Make built-in mixer and effect settings.
0 INFORMATION: This shows the current status of the driver and
information about connections. You can also
make various settings.
0 ROUTING: Make output settings (and Monitor Control settings
for the SERIES 208i).
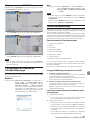
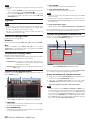
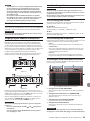
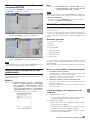
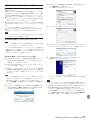
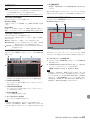
Making settings on the MIXER screen
Click the MIXER tab on the Settings Panel to open the MIXER page
as shown below.
SERIES 102i Settings Panel MIXER page in Windows
1 EQUALIZER
Equalizer settings are shown for the channel selected in the
Channel Mixer area.
2 COMPRESSOR area
Compressor settings are shown for the channel selected in the
Channel Mixer area.
3 REVERB area
This shows the reverb settings.
4 Channel Mixer area
Check and make settings for each channel.
NOTE
All channels are available when a SERIES 208i is connected.
When a SERIES 102i is connected, the INPUT 3, INPUT 4 and OPT
B1 - B8 channels cannot be used and will appear dimmed.
5 Output adjustment area
Make REVERB, AUX MASTER and STEREO MASTER settings here.
For details about other settings, see “MIXER page” in “5 - Using the
Settings Panel” of the Reference Manual.
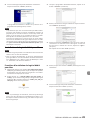
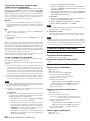
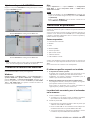
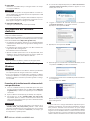
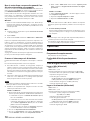
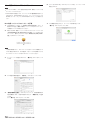
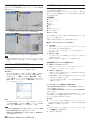
Making settings on the INFORMATION
screen
Click the INFORMATION tab on the Settings Panel to open the IN-
FORMATION page as shown below.
Windows Settings Panel INFORMATION page
For details about settings, see“ INFORMATION page” in“ 5 - Using
the Settings Panel” of the Reference Manual.
Setting the sample clock source
1. Click the INFORMATION tab on the Settings Panel to open the
INFORMATION page as shown below.
2. Click Sample Clock Source (1) on the INFORMATION page to
set the sample clock source.
Options: INTERNAL, OPTICAL A, OPTICAL B, WORD
NOTE
When set to OPTICAL A, OPTICAL B or WORD, if no signal is input
through the corresponding connector or synchronization be-
comes impossible, “Unlocked” will appear for the Clock Source
Status item in the status area (2) and the unit’s STANDBY indi-
cator will blink. (“Manually Configured” will appear when using
OPTICAL A/B with the Rate item set to Manual.)

TASCAM SERIES 102i / SERIES 208i
13
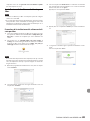
Making settings on the ROUTING screen
Click the ROUTING tab on the Settings Panel to open the ROUTING
page as shown below.
SERIES 102i Settings Panel ROUTING screen
SERIES 208i Settings Panel ROUTING screen
NOTE
For details about other settings, see “ROUTING page” in “5 - Us-
ing the Settings Panel” of the Reference Manual.
Changing sampling frequency
The sampling frequency (44.1kHz by default) can be set using
DAW software or with the following procedure.
Windows
Change using: Control Panel
w
Sound window
w
Playback tab
w
Speakers SERIES 102i or Speakers SERIES 208i
w
Properties
w
Advanced tab
w
Default For-
mat. Then, on the Recording tab, use “Set Default”
for “Mic SERIES 102i” or “Mic SERIES 208i” to set the
same sampling frequency in the same manner.
Mac
Change using: Applications folder
w
Utilities folder
w
Audio MIDI Setup
w
Audio Devices window
w
SERIES 102i or SERIES 208i w Format.
NOTE
When shipped new from the factory, the MONITOR knob is set
to its minimum value, so no signals will be output from the LINE
OUT 1-2 (MONITOR) jacks.
Adjust the MONITOR knob as desired when using the LINE OUT
1-2 (MONITOR) jacks.
Troubleshooting
Please read this chapter if you are unable to use the unit properly
even after setting it up following the procedures in this manual.
If you are still unable to resolve your problems please contact TAS-
CAM customer support (see the end of this manual) with the fol-
lowing information about the operating environment and details
about the trouble.
Operating environment
0 Computer manufacturer :
0 Model:
0 CPU:
0 Memory (RAM) :
0 Operating system:
0 Applications used:
0 Antivirus software:
0 Wireless LAN use:
If these measures do not resolve the issue, please contact the re-
tailer where you purchased this unit or a TEAC service center.
See the end of this document for contact information.
The dedicated software cannot be installed.
1. Check the operating system
The operating system being used might not be compatible
with the software that you are trying to install.
Check the compatible operating system of the software you
are trying to install again.
2. Stop software running in the background
Antivirus software and other software that runs in the back-
ground can prevent installation.
Quit software that runs in the background and try installation
again.
The unit is connected, but the computer
does not recognize it.
1. Install the dedicated software
o
If you have not done so, install the dedicated software. (See
“Installing the dedicated software” on page 8.)
2. Change the USB port
o
This unit cannot be used with USB 1.1. Use a port that sup-
ports at least USB 2.0 or USB 3.0.
o
Do not use a USB hub with this unit. Always connect the
unit directly to a USB port on the computer.
o
If the above methods do not resolve the problem, connect
the unit to a different USB port on the computer.

14
TASCAM SERIES 102i / SERIES 208i
I cannot hear any sound even when audio is
played back on the computer.
Confirm that the MONITOR BALANCE knob on the unit is not
turned all the way to the left (toward INPUT).
If that is the case, turn the MONITOR BALANCE knob to the right
of center (toward COMPUTER).
In addition, check the status of the unit’s connection with the com-
puter. Moreover, if you make the following settings, sound will be
output through this unit, but no sound will be output by the com-
puter’s speakers or headphone jack.
Windows
0 See the “Windows Media Player” section in the “6 - Application
Guide” chapter of the Reference Manual, and make settings for
the default playback device according to the OS.
Mac
1. Quit all applications and open “System Preferences…” from
the Apple menu.
2. Open “Sound” .
3. On the “Output” tab, select “SERIES 102i” or “SERIES 208i”.
After completing the setting, restart the computer and check the
sound of playback. Depending on the application that you are us-
ing, you might need to make additional device settings.
In particular, DAW applications operate using audio engines with
settings that are different from the OS settings, so confirm the
DAW settings first after installing the dedicated software for this
unit.
Please see the manuals for the applications that you are using for
detailed setting procedures.
Sound breaks up or there is noise.
The processing load on the computer causes sound to break up
and noise to occur.
Here are some methods to reduce the load on the computer.
1. A wireless LAN and software running in the background, in-
cluding antivirus software, regularly put processing loads on
the computer, which can cause sound to break up and other
noise. Stop wireless LAN transmission, antivirus software and
other software running in the background when using this
unit.
2. Set the buffer size (latency) in the audio application that you
are using or in this unit’s Settings Panel to a larger value (Win-
dows only).
NOTE
Consult the maker of the audio application that you are using
for methods to reduce its load on your computer.
3. Change the settings of your computer so that they are optimal
for audio processing.
Using Windows
1 Open the Control Panel using the appropriate method for
the OS you are using (Windows 10/Windows 8.1/Windows
7).
i In Windows 10, open the “Control Panel”. Then, click the
“System” icon.
i In Windows 8.1, right-click the ordinary Start screen
(Metro user interface screen) and then click “All apps”.
Then, right-click “Computer” and select “Properties”.
i In Windows 7, right-click “Computer” from the Windows
Start button, and select “Properties”.
2 Click “Advanced system settings”.
3 Click “Settings” in the “Performance” section of the
“Advanced” tab of the “System Properties” window.
4 In the “Visual Effects” tab of the “Performance Options” win-
dow, select “Adjust for best performance”.
Using Mac
1 Open “System Preferences…” from the Apple menu,
and select “Energy Saver”.
2 Set “Computer sleep” to “Never”.
3 Set “Display sleep” to “ Never”.
NOTE
Depending on the Mac OS version and Macintosh computer
model, this setting might not be available.
4. Change the USB port
Since the unit might not properly function with some USB
ports, try connecting it to a different USB port.
NOTE
i
Try again after disconnecting other USB devices. (Keyboards
and mice can be left connected.)
i
Do not use a USB hub. Always connect the unit directly to a USB
port on the computer (built-in)
Specifications
Ratings
Sampling frequencies
44.1, 48, 88.2, 96, 176.4, 192 kHz
Quantization bit depth
24-bit
Analog audio input ratings
Mic inputs (balanced)
SERIES 102i: 1-2
SERIES 208i: 1-2, 3-4
(when the input switch is set to MIC/LINE)
Connector : XLR-3-31 equivalent (1: GND, 2: HOT, 3: COLD)
Input impedance: 1.5 kΩ
Rated input level:
-64 dBu (0.0005 Vrms, GAIN knob at maximum)
-6 dBu (0.388 Vrms, GAIN knob at minimum)
Maximum input level: +10 dBu (2.45 Vrms)
Gain range: 58 dB
Instrument inputs (unbalanced)
SERIES 102i: 1-2
SERIES 208i: 1-2, 3-4
(when the input switch is set to INST)
Connectors: 6.3mm (1/4”) standard TS jacks
(Tip: HOT, Sleeve: GND)
Input impedance : 1 MΩ or more
Rated input level:
-64 dBV (0.0006 Vrms, GAIN knob at maximum)
-6 dBV (0.501 Vrms, GAIN knob at minimum)
Maximum input level: +10 dBV (3.162 Vrms)
Gain range: 58 dB

TASCAM SERIES 102i / SERIES 208i
15
Line inputs (balanced)
SERIES 102i: 1-2
SERIES 208i: 1-2, 3-4
(when the input switch set to MIC/LINE)
Connectors: 6.3 mm (1/4 “) standard TRS jacks
(Tip: HOT, Ring: COLD, Sleeve: GND)
Input impedance: 10 kΩ
Rated input level:
-54 dBu (0.0015 Vrms, GAIN knob at maximum)
+4 dBu (1.228 Vrms, GAIN knob at minimum)
Maximum input level: +24 dBu (12.282 Vrms)
Gain range : 58 dB
Analog outputs
Monitor outputs (balanced, LINE OUT 1-2)
Connectors: 6.3mm (1/4”) standard TRS jacks
(Tip: HOT, Ring: COLD, Sleeve: GND)
Output impedance: 230 Ω
Nominal output level: +4 dBu (1.228 Vrms)
Maximum output level: +20 dBu (7.75 Vrms)
Line outputs (balanced, LINE OUT 3-8, on
SERIES 208i only)
Connectors: 6.3mm (1/4”) standard TRS jacks
(Tip: HOT, Ring: COLD, Sleeve: GND)
Output impedance: 230 Ω
Nominal output level: +4 dBu (1.228 Vrms)
Maximum output level: +20 dBu (7.75 Vrms)
Headphone outputs (PHONES / )
Connectors: 6.3mm (1/4”) standard stereo jacks
Maximum output:
SERIES 102i: 18mW + 18mW
SERIES 208i: 45mW + 45mW
(THD+N 0.1% or less, into 32 Ω load)
Digital audio input ratings
OPTICAL (S/MUX) IN (SERIES 208i includes A
and B)
Connectors: OPTICAL (JEITA RC-5720C)
Signal format: Multi-channel optical format
(Supports S/MUX when 88.2 k, 96 k, 176.4 k or 192 kHz.)
Control input/output
USB
Connector: 4-pin USB B-type
Transfer rate: USB 2.0 High Speed (480 Mbps)
MIDI IN connector
Connector: 5-pin DIN
Format: standard MIDI
MIDI OUT connector
Connector: 5-pin DIN
Format: standard MIDI
WORD IN connector (SERIES 208i only)
Connector: BNC
Input voltage: 2.0 Vpp - 5.0 Vpp
Input impedance: 75 Ω ±10%
Permitted frequency deviation during external synchronization:
±100 ppm
Terminal on/off switch
WORD OUT connector (SERIES 208i only)
Connector: BNC
Input voltage: 2.0 Vp-p (into 75 Ω)
Output impedance: 75 Ω ±10%
Sampling frequencies: 44.1, 48, 88.2, 96, 176.4 and 192 kHz
Audio performance
Mic amp EIN (equivalent input noise)
-129 dBu or lower
Frequency response
MIC/LINE IN
At 44.1/48 kHz, 20 Hz - 20 kHz: +0 dB/-0.4 dB (JEITA)
At 88.2/96 kHz, 20 Hz - 40 kHz: +0 dB/-0.8 dB (JEITA)
S/N ratio
109 dB
(MIC/LINE IN, GAIN knob at minimum, 20 kHz SPCL LPF+A-Weight)
110 dB
(LINE OUT, MONITOR knob at maximum, 20 kHz SPCL LPF+A-Weight)
THD + N
SERIES 102i
0.0016%
(MIC IN, 1 kHz sine wave, GAIN knob at minimum, 20 kHz
SPCL LPF)
0.0023%
(LINE IN, 1 kHz sine wave, GAIN knob at minimum, 20 kHz
SPCL LPF)
0.0014%
(LINE OUT, 1 kHz sine wave, MONITOR knob at maximum, 20
kHz SPCL LPF)
SERIES 208i
0.0013%
(MIC IN, 1 kHz sine wave, GAIN knob at minimum, 20 kHz
SPCL LPF)
0.0019%
(LINE IN, 1 kHz sine wave, GAIN knob at minimum, 20 kHz
SPCL LPF)
0.0014%
(LINE OUT, 1 kHz sine wave, MONITOR knob at maximum, 20
kHz SPCL LPF)
Crosstalk
100 dB or more
(MIC/LINE
w
LINE OUT, 1kHz sine wave, GAIN knob at mini-
mum)

16
TASCAM SERIES 102i / SERIES 208i
Computer system requirements
Check the TEAC Global Site (http://teac-global.com/) for the lat-
est information about supported operating systems.
Windows
Supported operating systems
Windows 10 32-bit
Windows 10 64-bit
Windows 8.1 32-bit
Windows 8.1 64-bit
Windows 7 32-bit SP1 or later
Windows 7 64-bit SP1 or later
(Windows Vista and Windows XP are not supported)
Computer hardware requirements
Windows computer with a USB port that supports at least USB
2.0 or USB 3.0
CPU/processor speed
2 GHz or faster dual core processor (x86)
Memory
2 GB or more
ATTENTION
Operation of this unit was confirmed using standard computers
that meet the above requirements.
This does not guarantee operation with all computers that meet
the above requirements. Even computers that meet the same
system requirements might have processing capabilities that
differ according to their settings and other operating condi-
tions.
Mac
Supported operating systems
macOS Mojave (10.14 or later)
macOS High Sierra (10.13 or later)
macOS Sierra (10.12 or later)
Computer hardware requirements
Mac with a USB port that supports at least USB 2.0 or USB 3.0
CPU/processor speed
2 GHz or faster dual core processor
Memory
2 GB or more
iOS device
Apple iOS device running iOS 10 or later
Supported audio drivers
Windows
USB Audio Class 2.0, ASIO 2.2, WDM (MME), MIDI
Mac
Core Audio, Core MIDI
iOS device
Core Audio for iPhone
General
Power
DC12V AC adapter (PS-P1220E)
Power consumption
SERIES 102i: 7.2 W
SERIES 208i: 14 W
Dimensions
SERIES 102i: 186 × 65 × 160 mm (width × height × depth)
SERIES 208i: 296 × 65 × 160 mm (width × height × depth)
Weight
SERIES 102i: 1.1 kg
SERIES 208i: 1.6 kg
Operating temperature range
5–35 °C (41–95 °F)
Dimensional drawings
SERIES 102i
186mm
65mm
160mm
SERIES 208i
296mm
65mm
160mm
0 Illustrations in this manual might differ in part from the actual
product.
0 Specifications and external appearance might be changed
without notification to improve the product.
0 Detailed specifications are provided in the Reference Manual.

TASCAM SERIES 102i / SERIES 208i
17
INSTRUCTIONS DE SÉCURITÉ IMPORTANTES
AVERTISSEMENT: POUR PRÉVENIR LES RISQUES
D'INCENDIE ET D'ÉLECTROCUTION, N'EXPOSEZ PAS CET
APPAREIL À LA PLUIE NI À L'HUMIDITÉ.
Pour le Canada
THIS CLASS B DIGITAL APPARATUS COMPLIES WITH CANADIAN
ICES-003.
CET APPAREIL NUMÉRIQUE DE LA CLASSE B EST CONFORME À
LA NORME NMB-003 DU CANADA.
CET APPAREIL NUMÉRIQUE DE LA CLASSE A EST CONFORME À
LA NORME NMB-003 DU CANADA.
Ce produit est conforme aux impératifs des
directives européennes et autres règlements de
la Commission.
1. Lisez ces instructions.
2. Conservez ces instructions.
3. Tenez compte de tous les avertissements.
4. Suivez toutes les instructions.
5. N'utilisez pas cet appareil avec de l'eau à proximité.
6. Nettoyez-le uniquement avec un chiffon sec.
7. Ne bloquez aucune ouverture de ventilation. Installez-le
conformément aux instructions du fabricant.
8. Ne l'installez pas près de sources de chaleur telles que des
radiateurs, bouches de chauffage, poêles ou autres appareils
(y compris des amplificateurs) dégageant de la chaleur.
9. Ne neutralisez pas la fonction de sécurité de la fiche
polarisée ou de terre. Une fiche polarisée a deux broches,
l'une plus large que l'autre. Une fiche de terre a deux
broches identiques et une troisième broche pour la mise à la
terre. La broche plus large ou la troisième broche servent à
votre sécurité. Si la fiche fournie n'entre pas dans votre prise,
consultez un électricien pour le remplacement de la prise
obsolète.
10. Évitez de marcher sur le cordon d'alimentation et de le
pincer, en particulier au niveau des fiches, des prises secteur,
et du point de sortie de l'appareil.
11. N'utilisez que des fixations/accessoires spécifiés par le
fabricant.
12. Utilisez-le uniquement avec le chariot, socle, trépied,
support ou table spécifié par le fabricant ou vendu avec
l'appareil. Si un chariot est utilisé, faites attention à ne pas
être blessé par un renversement lors du déplacement de
l'ensemble chariot/appareil.
13. Débranchez cet appareil en cas d'orage ou de non utilisation
prolongée.
14. Confiez toute réparation à des techniciens de maintenance
qualifiés. Une réparation est nécessaire si l'appareil a été
endommagé d'une quelconque façon, par exemple si le
cordon ou la fiche d'alimentation est endommagé, si du
liquide a été renversé sur l'appareil ou si des objets sont
tombés dedans, si l'appareil a été exposé à la pluie ou à
l'humidité, s'il ne fonctionne pas normalement, ou s'il est
tombé.
• L’appareil tire un courant nominal de veille de la prise secteur
quand son interrupteur POWER ou STANDBY/ON n’est pas en
position ON.
• La fiche secteur est utilisée comme dispositif de déconnexion
et doit donc toujours rester disponible.
• Des précautions doivent être prises en cas d'utilisation
d'écouteurs ou d'un casque avec le produit car une pression
acoustique excessive (volume trop fort) dans les écouteurs ou
dans le casque peut causer une perte auditive.
• Si vous rencontrez des problèmes avec ce produit, contactez
TEAC pour une assistance technique. N'utilisez pas le produit
tant qu'il n'a pas été réparé.
MODE D'EMPLOI

18
TASCAM SERIES 102i / SERIES 208i
ATTENTION
• N'exposez pas cet appareil aux gouttes ni aux éclaboussures.
• Ne placez pas d'objet rempli de liquide sur l'appareil, comme
par exemple un vase.
• N’installez pas cet appareil dans un espace confiné comme
une bibliothèque ou un meuble similaire.
• L’appareil doit être placé suffisamment près de la prise de
courant pour que vous puissiez à tout moment attraper
facilement la fiche du cordon d'alimentation.
• Si le produit utilise des piles/batteries (y compris un pack
de batteries ou des batteries fixes), elles ne doivent pas être
exposées au soleil, au feu ou à une chaleur excessive.
• PRÉCAUTION pour les produits qui utilisent des batteries
remplaçables au lithium: remplacer une batterie par
un modèle incorrect entraîne un risque d'explosion.
Remplacez-les uniquement par un type identique ou
équivalent.
Pour les consommateurs européens
Mise au rebut des équipements électriques et
électroniques
(a) Tous les équipements électriques et électroniques doivent
être traités séparément de la collecte municipale d'ordures
ménagères dans des points de collecte désignés par le
gouvernement ou les autorités locales.
(b) En vous débarrassant correctement des équipements
électriques et électroniques, vous contribuerez à la
sauvegarde de précieuses ressources et à la prévention
de potentiels effets négatifs sur la santé humaine et
l'environnement.
(c) Le traitement incorrect des déchets d'équipements
électriques et électroniques peut avoir des effets graves
sur l'environnement et la santé humaine en raison de la
présence de substances dangereuses dans les équipements.
(d) Le symbole de déchets d'équipements électriques
et électroniques (DEEE), qui représente une
poubelle sur roues barrée d'une croix, indique
que l'équipement électrique et électronique doit
être collecté et traité séparément des déchets
ménagers.
(e) Des systèmes de retour et de collecte sont disponibles
pour l'utilisateur final. Pour des informations plus détaillées
sur la mise au rebut des vieux équipements électriques et
électroniques, veuillez contacter votre mairie, le service
d'ordures ménagères ou le magasin dans lequel vous avez
acquis l'équipement.
ATTENTION
• N’EXPOSEZ PAS L’ÉLECTRONIQUE EN OUVRANT LE BOÎTIER OU
SES CAPOTS. AUCUNE PIÈCE INTERNE N'EST RÉPARABLE PAR
L'UTILISATEUR.
• SI VOUS RENCONTREZ DES PROBLÈMES AVEC CE PRODUIT,
CONTACTEZ LE MAGASIN DANS LEQUEL VOUS L’AVEZ ACHETÉ
POUR UNE ASSISTANCE TECHNIQUE. N'UTILISEZ PAS LE
PRODUIT TANT QU'IL N'A PAS ÉTÉ RÉPARÉ.
• L'UTILISATION DE COMMANDES, DE RÉGLAGES OU LE SUIVI
DE PROCÉDURES AUTRES QUE CE QUI EST DÉCRIT DANS
CE DOCUMENT PEUT PROVOQUER UNE EXPOSITION À UN
RAYONNEMENT DANGEREUX.
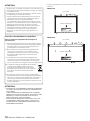
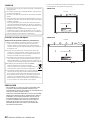
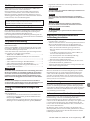
La plaque signalétique se trouve sous l’unité comme indiqué
ci-dessous.
SERIES 102i
Face avant
SERIES 208i
Face avant
Plaque signalétique
Plaque signalétique

TASCAM SERIES 102i / SERIES 208i
19
Introduction
Merci beaucoup d'avoir choisi une interface audio SERIES 102i/
SERIES 208i TASCAM.
Avant de connecter et d’utiliser cette unité, veuillez prendre le
temps de lire ce mode d'emploi en totalité pour vous assurer une
bonne compréhension de sa mise en service et de son branche-
ment, ainsi que de la façon d'utiliser ses nombreuses fonctions
utiles et pratiques. Une fois la lecture de ce mode d'emploi ter-
minée, veillez à le conserver en lieu sûr pour référence ultérieure.
Vous pouvez aussi télécharger ce mode d'emploi depuis le site
mondial de TEAC (http://teac-global.com/).
Avant de brancher cette unité à un ordinateur, un pilote dédié
doit être téléchargé et installé sur l'ordinateur.
Note à propos du manuel de
référence
Ce mode d'emploi explique chacune des fonctions de cette unité.
Veuillez consulter le manuel de référence pour des informations
détaillées sur chacune des fonctions.
Vous pouvez télécharger le manuel de référence depuis le site
mondial de TEAC (http://teac-global.com/).
Éléments fournis
Ce produit est livré avec les éléments suivants.
Ouvrez l'emballage avec soin pour ne pas les endommager.
Conservez la boîte et les matériaux d'emballage pour de futurs
transports. Si un élément quelconque est manquant ou a été en-
dommagé durant le transport, veuillez contacter le magasin dans
lequel vous avez acheté cette unité.
i Unité principale ......................................................................................× 1
i Adaptateur secteur (PS-P1220E) (avec 3jeux de broches) .....× 1
i Câble USB ................................................................................................. × 1
i Jeu de guides d'installation pour logiciels DAW ........................ × 1
i Jeu de guides d'installation pour logiciels plug-ins de DAW × 1
i Mode d'emploi (ce document) incluant la garantie .................× 1
ATTENTION
Utilisez toujours l'adaptateur secteur (PS-P1220E) fourni avec
cette unité. N'utilisez jamais un adaptateur secteur fourni avec
un autre appareil. Cela pourrait entraîner des dommages, un in-
cendie, voire un choc électrique.
NOTE
L'adaptateur secteur fourni (PS-P1220E) est livré avec des bro-
ches secteur interchangeables. Veuillez consulter « Change-
ment des broches de prise électrique» en page 24.
Conventions employées dans ce
mode d'emploi
Dans ce document, les conventions suivantes sont employées:
i Les touches, connecteurs et autres parties physiques de cette
unité et des appareils connectés sont indiqués au moyen de
caractères gras comme ceci: bouton PHONES.
i Les informations qui s'affichent sur l'écran d'un ordinateur sont
indiquées sous la forme: «OK».
i Si nécessaire, des informations supplémentaires sont fournies
sous les intitulés CONSEIL, NOTE et ATTENTION.
CONSEIL
Ce sont des conseils concernant l'emploi de l'unité.
Sommaire
INSTRUCTIONS DE SÉCURITÉ IMPORTANTES ......................... 17
Introduction .............................................................................. 19
Note à propos du manuel de référence .................................. 19
Éléments fournis ....................................................................... 19
Conventions employées dans ce mode d'emploi ................... 19
Précautions concernant l'emplacement et l'emploi .............. 20
Attention à la condensation .................................................... 20
Nettoyage de l'unité ................................................................. 20
Utilisation du site mondial TEAC ............................................. 20
À propos du service d'assistance clientèle TASCAM .............. 20
Nomenclature et fonctions des parties .................................. 20
Face avant ................................................................................................... 20
Face arrière ................................................................................................. 21
Installation du logiciel dédié ................................................... 22
Installation des logiciels dédiés pour Windows ............................ 22
Installation du logiciel dédié pour Mac ............................................ 23
Connexion de l'alimentation ................................................... 24
Changement des broches de prise électrique............................... 24
Branchement d'autres équipements ...................................... 25
Branchement à des appareils iOS ............................................ 25
Réglage du son entrant ............................................................ 25
Divers réglages ......................................................................... 26
Ouverture du panneau de réglages (Settings Panel) .................. 26
Présentation du panneau de réglages ............................................. 26
Réglages en écran MIXER ...................................................................... 26
Réglages en écran INFORMATION ...................................................... 26
Réglages en écran ROUTING ................................................................ 27
Changement de fréquence d'échantillonnage ....................... 27
Guide de dépannage ................................................................ 27
Caractéristiques techniques .................................................... 28
Données ...................................................................................................... 28
Valeurs d'entrée audio analogique .................................................... 28
Sorties analogiques ................................................................................. 29
Valeurs d'entrée audio numériques .................................................. 29
Entrée/sortie de commande ................................................................ 29
Performances audio ................................................................................ 29
Configurations informatiques requises .................................. 30
Windows ...................................................................................................... 30
Mac ................................................................................................................ 30
Appareil iOS ................................................................................................ 30
Pilotes audio pris en charge ................................................................. 30
Caractéristiques générales ...................................................... 30
Dessins avec cotes .................................................................... 30

20
TASCAM SERIES 102i / SERIES 208i
NOTE
Ce sont des explications supplémentaires et des descriptions de
cas particuliers.
ATTENTION
Ne pas suivre ces instructions peut par exemple entraîner des
dommages pour l'équipement ou la perte de données.
V
MISE EN GARDE
Le non-respect de ces instructions peut entraîner des blessures.
Précautions concernant
l'emplacement et l'emploi
i La plage de température de fonctionnement de cette unité se
situe entre 5ºC et 35ºC.
i Ne placez pas cette unité dans les types d'emplacement sui-
vants.
Cela pourrait dégrader la qualité sonore ou causer des mauvais
fonctionnements.
Lieux sujets à des vibrations importantes
Près d'une fenêtre ou à un autre endroit exposé directement
au soleil
Près de chauffages ou dans des lieux extrêmement chauds
Lieux extrêmement froids
Lieux très humides ou mal aérés
Lieux très poussiéreux
i Pour permettre une bonne dispersion thermique, ne placez
rien sur le dessus de l'unité.
i Ne placez pas cette unité sur un amplificateur de puissance ou
un autre appareil générant de la chaleur.
Attention à la condensation
De la condensation peut se produire si l'unité est déplacée d'un
endroit froid à un endroit chaud, est utilisée dans une pièce qui
vient d'être chauffée ou soumise à des changements brutaux de
température. Pour empêcher cela ou si cela se produit, laissez
l’unité une ou deux heures à la température de la nouvelle pièce
avant de l'utiliser.
Nettoyage de l'unité
Essuyez l'unité avec un chiffon sec et doux pour la nettoyer. Ne l'es-
suyez pas avec des lingettes de nettoyage contenant des produits
chimiques, du diluant, de l'alcool ou d'autres agents chimiques.
Cela pourrait endommager la surface ou causer une décoloration.
Utilisation du site mondial TEAC
Vous pouvez télécharger des mises à jour pour cette unité depuis
le site mondial:
http://teac-global.com/
Dans la section TASCAM Downloads (téléchargements TASCAM),
sélectionnez la langue souhaitée afin d'ouvrir la page de téléchar-
gement du site web pour cette langue.
À propos du service d'assistance
clientèle TASCAM
Les produits TASCAM ne bénéficient d’une assistance et d’une ga-
rantie que dans leur pays/région d'achat.
Pour bénéficier d’une assistance après l'achat, recherchez dans
la liste des distributeurs TASCAM fournie sur le site mondial TEAC
(http:// teac-global.com/) la société ou le représentant local pour
la région dans laquelle vous avez acheté le produit et contactez
cette organisation.
Pour toute demande, l'adresse physique ou URL du magasin ou
du site marchand chez qui a été effectué l’achat ainsi que la date
d’achat sont requises.
De plus, la carte de garantie et une preuve d'achat peuvent égale-
ment être nécessaires.
Nomenclature et fonctions des
parties
Face avant
SERIES 102i
SERIES 208i
1 Voyants de signal (SIG)
Ils s'allument en vert si des signaux (d'au minimum -32dBFS)
entrent.
2 Boutons GAIN
Utilisez-les pour régler les niveaux d'entrée par les prises d’en-
trée.
3 Voyants de crête (PEAK)
Ils s'allument en rouge si les signaux s’approchent du niveau de
distorsion (-1dBFS ou plus).
Réglez le niveau pour que les voyants PEAK ne s’allument pas
en rouge.
4 Voyant USB
Ce voyant indique l'état de l'unité en étant allumé, clignotant
ou éteint.
État Signification
Allumé Bonne connexion USB
Clignotant
Mauvaise connexion USB (déconnexion ou
survenue d’une erreur)
Éteint Fonctionnement en mode autonome
5 Voyant
Ce voyant s'allume quand le commutateur STANDBY est en-
clenché. Il clignote si la source d'horloge ou l'entrée optique
est irrégulière (quand la source d'horloge est réglée sur WORD
ou OPTICAL).
6 Bouton MONITOR BALANCE
Utilisez-le pour régler la balance entre les signaux reçus par les
prises d'entrée de cette unité et ceux sortant de l'ordinateur.
Le volume des signaux reçus par les prises d'entrée de cette
unité augmente d'autant plus que le bouton MONITOR BA-
LANCE est tourné vers la gauche (INPUT) et celui des signaux
La pagina si sta caricando...
La pagina si sta caricando...
La pagina si sta caricando...
La pagina si sta caricando...
La pagina si sta caricando...
La pagina si sta caricando...
La pagina si sta caricando...
La pagina si sta caricando...
La pagina si sta caricando...
La pagina si sta caricando...
La pagina si sta caricando...
La pagina si sta caricando...
La pagina si sta caricando...
La pagina si sta caricando...
La pagina si sta caricando...
La pagina si sta caricando...
La pagina si sta caricando...
La pagina si sta caricando...
La pagina si sta caricando...
La pagina si sta caricando...
La pagina si sta caricando...
La pagina si sta caricando...
La pagina si sta caricando...
La pagina si sta caricando...
La pagina si sta caricando...
La pagina si sta caricando...
La pagina si sta caricando...
La pagina si sta caricando...
La pagina si sta caricando...
La pagina si sta caricando...
La pagina si sta caricando...
La pagina si sta caricando...
La pagina si sta caricando...
La pagina si sta caricando...
La pagina si sta caricando...
La pagina si sta caricando...
La pagina si sta caricando...
La pagina si sta caricando...
La pagina si sta caricando...
La pagina si sta caricando...
La pagina si sta caricando...
La pagina si sta caricando...
La pagina si sta caricando...
La pagina si sta caricando...
La pagina si sta caricando...
La pagina si sta caricando...
La pagina si sta caricando...
La pagina si sta caricando...
La pagina si sta caricando...
La pagina si sta caricando...
La pagina si sta caricando...
La pagina si sta caricando...
La pagina si sta caricando...
La pagina si sta caricando...
La pagina si sta caricando...
La pagina si sta caricando...
La pagina si sta caricando...
La pagina si sta caricando...
La pagina si sta caricando...
La pagina si sta caricando...
La pagina si sta caricando...
La pagina si sta caricando...
La pagina si sta caricando...
La pagina si sta caricando...
La pagina si sta caricando...
La pagina si sta caricando...
La pagina si sta caricando...
La pagina si sta caricando...
-
 1
1
-
 2
2
-
 3
3
-
 4
4
-
 5
5
-
 6
6
-
 7
7
-
 8
8
-
 9
9
-
 10
10
-
 11
11
-
 12
12
-
 13
13
-
 14
14
-
 15
15
-
 16
16
-
 17
17
-
 18
18
-
 19
19
-
 20
20
-
 21
21
-
 22
22
-
 23
23
-
 24
24
-
 25
25
-
 26
26
-
 27
27
-
 28
28
-
 29
29
-
 30
30
-
 31
31
-
 32
32
-
 33
33
-
 34
34
-
 35
35
-
 36
36
-
 37
37
-
 38
38
-
 39
39
-
 40
40
-
 41
41
-
 42
42
-
 43
43
-
 44
44
-
 45
45
-
 46
46
-
 47
47
-
 48
48
-
 49
49
-
 50
50
-
 51
51
-
 52
52
-
 53
53
-
 54
54
-
 55
55
-
 56
56
-
 57
57
-
 58
58
-
 59
59
-
 60
60
-
 61
61
-
 62
62
-
 63
63
-
 64
64
-
 65
65
-
 66
66
-
 67
67
-
 68
68
-
 69
69
-
 70
70
-
 71
71
-
 72
72
-
 73
73
-
 74
74
-
 75
75
-
 76
76
-
 77
77
-
 78
78
-
 79
79
-
 80
80
-
 81
81
-
 82
82
-
 83
83
-
 84
84
-
 85
85
-
 86
86
-
 87
87
-
 88
88


Tascam 102i Series Manuale del proprietario
- Categoria
- Apparecchiature musicali supplementari
- Tipo
- Manuale del proprietario
- Questo manuale è adatto anche per
in altre lingue
- English: Tascam 102i Series Owner's manual
- français: Tascam 102i Series Le manuel du propriétaire
- español: Tascam 102i Series El manual del propietario
- Deutsch: Tascam 102i Series Bedienungsanleitung
- 日本語: Tascam 102i Series 取扱説明書
Documenti correlati
-
Tascam US-2x2HR Manuale del proprietario
-
Tascam MiNiSTUDIO Creator US-42B Manuale del proprietario
-
Tascam VL-S5 Manuale utente
-
Tascam MINISTUDIO CREATOR US-42 Manuale del proprietario
-
-
-
-
-
-