
WIRELESS SOLUTIONS
USER GUIDE
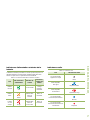
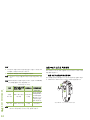
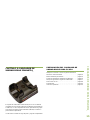
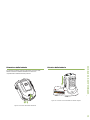
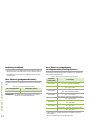
ACCESSORIES
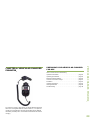
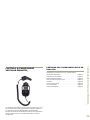
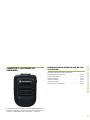
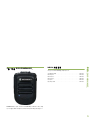
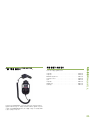
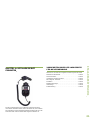
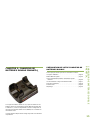
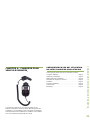
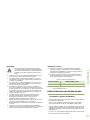
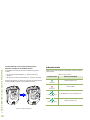
PMMN4095 WIRELESS REMOTE SPEAKER MICROPHONE
PMLN6714 DUAL-UNIT CHARGER
PMLN6716 VEHICULAR CHARGER
PMNN4461 WIRELESS REMOTE SPEAKER MICROPHONE BATTERY
en es-CO
pt-BR fr-CA
ko de-DE
fr-FR
es-ES
it-IT pt-PT nl-NL ru
(APX PORTABLE)

BackCover.fm Page 1 Monday, September 15, 2014 9:31 AM

FOREWORD
English
i
CHAPTER 1: FOREWORD
RF Energy Exposure and Product Safety Guide for
Portable Two-Way Radios
ATTENTION!
The microphone is restricted to occupational use only to satisfy ICNIRP/
FCC RF energy exposure requirements. Before using this product, read
the RF Energy Exposure and Product Safety Guide that ships with the
radio which contains instructions for safe usage and RF energy
awareness and control for compliance with applicable standards and
regulation.
This device complies with part 15 of the FCC Rules. Operation is
subject to the following two conditions: (1) This device may not cause
harmful interference, and (2) this device must accept any interference
received, including interference that may cause undesired operation.
Any changes or modifications not expressly approved by Motorola
may void the user’s authority to operate this device.
Under Industry Canada regulations, this microphone transmitter may
only operate using an antenna of a type and maximum (or lesser) gain
approved for the transmitter by Industry Ca nada. To reduce potential
radio interference to other users, the antenna type and its gain should
be so chosen that the equivalent isotropically radiated power (e.i.r.p.) is
not more than that necessary for successful communication.
This device complies with Industry Canada licence-exempt RSS
standard(s). Operation is subject to the following two conditions: (1) this
device may not cause interference, and (2) this device must accept any
interference, including interference that may cause undesired operation.
Battery Information:
Battery is shipped with a nominal charge between 30% and 50%.
Battery should be stored between -10 °C (14 °F) and 30 °C (86 °F) to
minimize permanent capacity loss.
CAUTION: Storing your fully charged accessory in high-temperature
conditions may permanently reduce the life of the internal
battery.
Important Information:
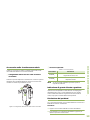
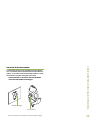
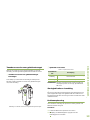
• Hold the microphone in a vertical position with the microphone at
least one inch (2.5 centimeters) away from the nose or lips.
• Body Worn Operation. When microphone is worn on the body, always
use Motorola-approved clip for this product. Using approved body-
worn accessories is important because the use of non-Motorola-
approved accessories may result in exposure levels, which exceed
the FCC occupational/controlled environment RF exposure limits.
• Use only Motorola-approved supplied or replacement batteries. Use
of non-Motorola-approved batteries may exceed the applicable RF
exposure guidelines (iEEE, ICNIRP or FCC).
• DO NOT charge your accessory in temperatures below 0 °C (32 °F)
or above 45 °C (113 °F). DO NOT store your accessory in direct
sunlight or where expected temperatures can exceed this range such
as inside a parked car.
• Storing your fully charged accessory in high-temperature conditions
may permanently reduce the life of the internal battery.
• Battery life may temporarily shorten in low-temperature conditions.

FOREWORD
English
ii
Acoustic Safety
Exposure to loud noises from any source for extended periods of time
may temporarily or permanently affect your hearing. The louder the
radio's volume, the less time is required before your hearing could be
affected. Hearing damage from loud noise is sometimes undetectable at
first and can have a cumulative effect.
To protect your hearing:
• Use the lowest volume necessary to do your job.
• Turn up the volume only if you are in noisy surroundings.
• Turn down the volume before adding headset or earpiece.
• Limit the amount of time you use headsets or earpieces at high
volume.
• When using the radio without a headset or earpiece, do not place the
radio's speaker directly against your ear.
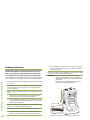
CHARGERS SAFETY INFORMATION
Important Safety Information
This document contains important safety and operating instructions.
Please read these instructions carefully and save them for future
reference.
Before using the battery charger, read all the instructions and cautionary
markings on (1) the Dual-Unit Charger / Vehicular Charger, (2) the
battery, and (3) on the Wireless Remote Speaker Microphone (WRSM).
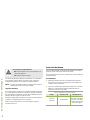
WARNINGS
!
W A R N I N G
!
2. Use of accessories not recommended by Motorola may result in
risk of fire, electric shock, or injury.
3. To reduce risk of damage to the electric plug and cord of the
DUC, pull by the plug rather than the cord when disconnecting
the charger.
4. To reduce risk of damage to the CLA and cord of the Vehicular
Charger, pull by the CLA rather than the cord when disconnecting
the charger.
5. An extension cord should not be used unless absolutely
necessary. Use of an improper extension cord could result in risk
of fire and electric shock. If an extension cord must be used,
make sure that the cord size is 18 AWG for lengths of up to
100 feet (30.48 m), and 16 AWG for lengths up to 150 feet
(45.72 m).
6. To reduce risk of fire, electric shock, or injury, DO NOT operate
the charger if it has been broken or damaged in any way. Take it
to a qualified Motorola service representative.
7. DO NOT disassemble the charger – it is not repairable and
replacement parts are not available. Disassembly of the charger
may result in risk of electric shock or fire.
8. To reduce risk of electric shock of the DUC, unplug the charger
from the AC outlet before attempting any maintenance or
cleaning.
9. To reduce risk of electric shock of the Vehicular Charger, unplug
the Vehicular Charger from the CLA power source before
attempting any maintenance or cleaning.
10. This is a class A product. In a domestic environment this product
may cause radio interference in which case the user may be
required to take adequate measures.
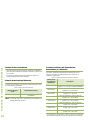
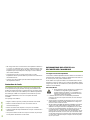
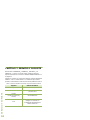
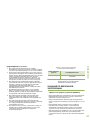
1. To reduce risk of injury, charge only the rechargeable
Motorola authorized batteries listed in Table 1.1. Other
batteries may explode, causing personal injury and
damage.

FOREWORD
English
iii
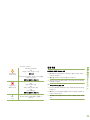
NOTE: The Dual-Unit Charger is not designed to accommodate the
alkaline battery tray.
OPERATIONAL SAFETY GUIDELINES
Dual-Unit Charger PMLN6714_
• This equipment is not suitable for outdoor use. Use only in dry
locations/conditions.
• Ensure the WRSM with attached battery or battery alone is dry before
inserting into the Dual-Unit Charger.
• Connect equipment only to an appropriately wired power supply of
the correct voltage (as specified on the product). Disconnect from line
voltage by removing main plug.
• The socket outlet to which this equipment is connected should be
close by and easily accessible.
• Maximum ambient temperature around the Dual-Unit Charger
equipment must not exceed 50 °C (122 °F).
• Output voltage from the power supply unit must not exceed the
ratings stated on the product label located on the power supply.
• Make sure the cord is located where it will not be stepped on, tripped
over, or subjected to water, damage, or stress.
Vehicular Charger PMLN6716_
• Equipment shall be used in vehicle and in dry condition. Keep in mind
that rain or snow can reach the equipment i.e. through an open
vehicle window.
• Ensure the WRSM with attached battery or battery alone is dry before
inserting into the Vehicular Charger.
• Connect equipment only to an appropriately vehicle’s cigar lighter
socket of the correct voltage (as specified on the product).
Disconnect from line voltage by removing the CLA.
• Maximum ambient temperature around the Vehicular Charger
equipment must not exceed 60 °C (140 °F).
• Output voltage from the vehicle’s cigar lighter socket unit must not
exceed the ratings stated on the product label located at the back of
the charger.
• Make sure the cord is located where it will not be stepped on, tripped
over, or subjected to water, damage, or stress.
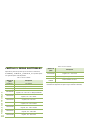
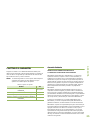
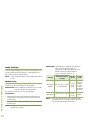
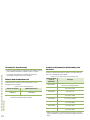
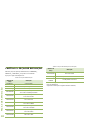
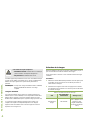
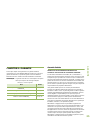
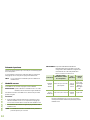
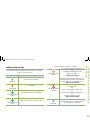
Table 1.1: Motorola Authorized Battery
Kit (Part) Number Platform/Description
PMNN4461_ Battery Standard Li-Ion 1750M1880T

FOREWORD
English
iv
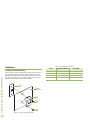
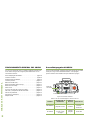
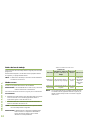
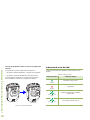
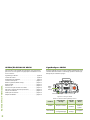
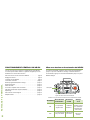
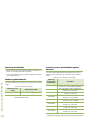
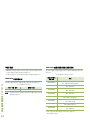
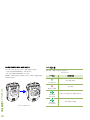
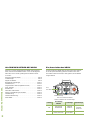
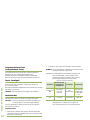
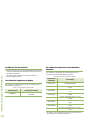
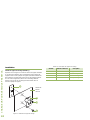
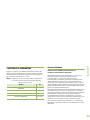
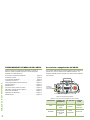
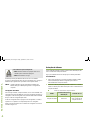
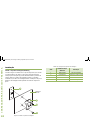
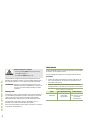
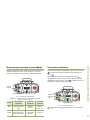
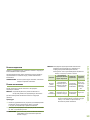
RADIOS COMPATIBILITY
The Wireless Remote Speaker Microphone is compatible with the
radios listed below:
NOTE: *Not available in North America region.
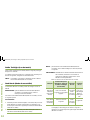
SOFTWARE COMPATIBILITY
The Wireless Remote Speaker Microphone version R01.01.00 or later
must be used for compatibility with the APX Portable radios.
The Long Range Wireless Solutions are compatible with the Mission
Critical Wireless Pod software version R01.05.00 or later.
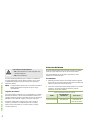
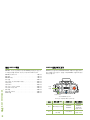
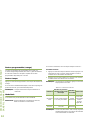
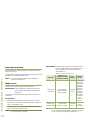
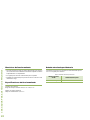
Table 1.2: Radios Compatibility
Region Model Series
Worldwide
APX7000, APX7000XE, APX6000,
APX6000XE, APX3000 and APX2000*.
North America only APX4000.

WIRELESS RSM PMMN4095_
English
1
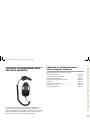
CHAPTER 2: WIRELESS RSM
PMMN4095_
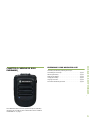
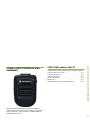
The PMMN4095 Wireless Remote Speaker Microphone (WRSM) is
designed to be used with the APX Portable radios listed in “RADIOS
COMPATIBILITY" on page iv .
PREPARING YOUR WRSM FOR USE
Assemble your WRSM by following these steps:
Assembling the Swivel Clip . . . . . . . . . . . . . . . . . . . . . . . . . . . . page 2
Attaching the Battery . . . . . . . . . . . . . . . . . . . . . . . . . . . . . . . . . page 2
Detaching the Battery. . . . . . . . . . . . . . . . . . . . . . . . . . . . . . . . . page 3
Charging the Battery . . . . . . . . . . . . . . . . . . . . . . . . . . . . . . . . . page 3
Language Selection . . . . . . . . . . . . . . . . . . . . . . . . . . . . . . . . . . page 4
Recommended Wearing Positions. . . . . . . . . . . . . . . . . . . . . . . page 5

WIRELESS RSM PMMN4095_
English
2
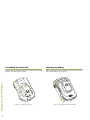
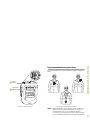
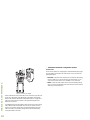
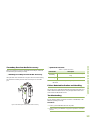
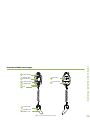
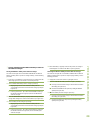
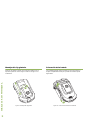
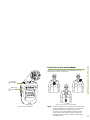
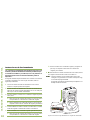
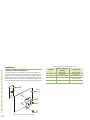
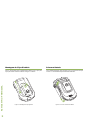
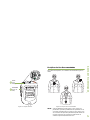
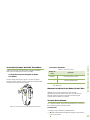
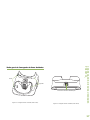
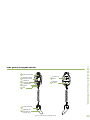
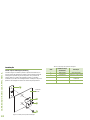
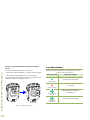
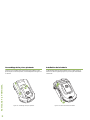
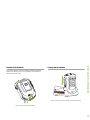
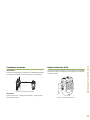
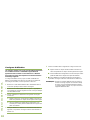
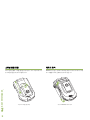
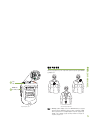
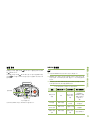
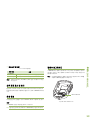
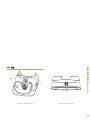
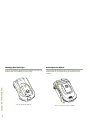
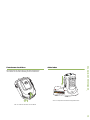
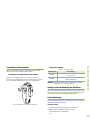
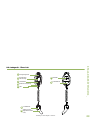
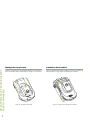
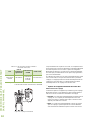
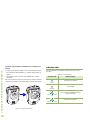
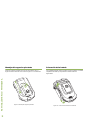
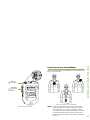
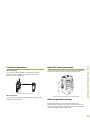
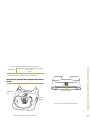
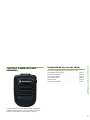
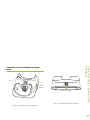
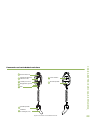
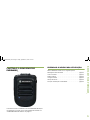
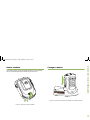
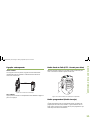
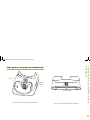
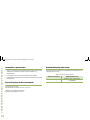
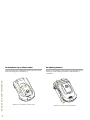
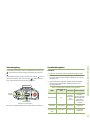
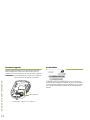
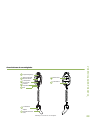
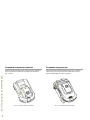
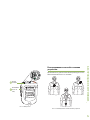
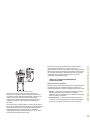
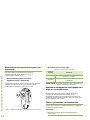
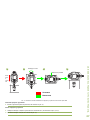
Assembling the Swivel Clip
Insert the swivel clip through the battery slot. Rotate the clip to the right
position as indicated in Figure 2.1 below.
Figure 2.1: Assembling the swivel clip
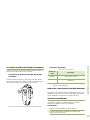
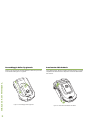
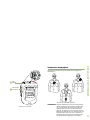
Attaching the Battery
With the WRSM turned off, align the battery to back chassis and fully
slot in until the battery latch is engaged.
Figure 2.2: Attaching the battery into the WRSM
2
1
1
2

WIRELESS RSM PMMN4095_
English
3
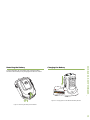
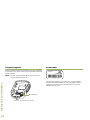
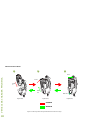
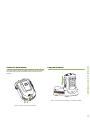
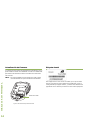
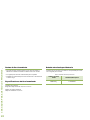
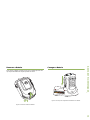
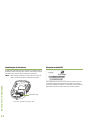
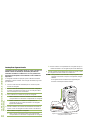
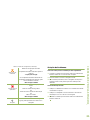
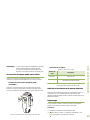
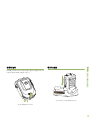
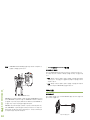
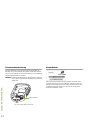
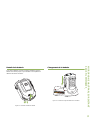
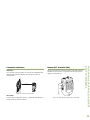
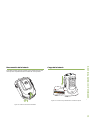
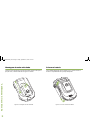
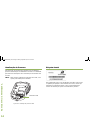
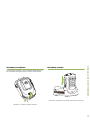
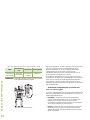
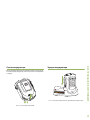
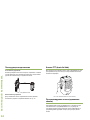
Detaching the Battery
To detach the battery, lift up the battery latch and pull the battery
backward until the battery is fully disengaged from the back chassis.
Figure 2.3: Removing the battery from the WRSM
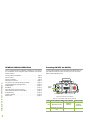
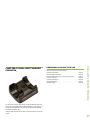
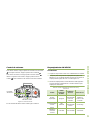
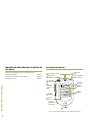
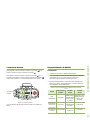
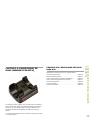
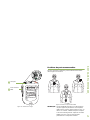
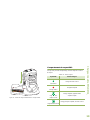
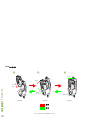
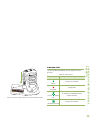
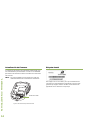
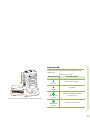
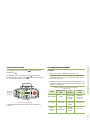
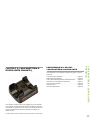
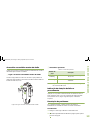
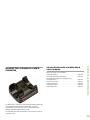
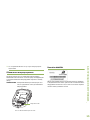
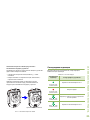
Charging the Battery
Figure 2.4: Charging position of the WRSM with battery attached
1
2
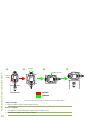
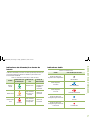
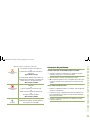
LED STATUS INDICATORS
Ready
>90%
CAUTION
Charging
Standby
RISK OF FIRE. REFER TO MANUAL FOR BATTERY TYPE
Unable to Charge

WIRELESS RSM PMMN4095_
English
4
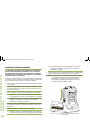
The Motorola-approved battery shipped with your WRSM is uncharged.
Prior to using a new battery, fully charge the new battery to ensure
optimum capacity and performance.
NOTE: When charging a battery attached to a WRSM, turn the
WRSM OFF to ensure a full charge.
Battery Charger
To charge the battery, place the battery, with or without the WRSM, in a
Motorola-approved charger. When initially inserting the battery into the
charger, the charger’s LED will turn red. DO NOT use WRSM until the
charger’s LED turn Green,
The charger’s LED indicates the charging progress; see Chapter 4 and
Chapter 5 or the label printed on the charger.
Align the slot of the battery with the charger’s rail and slot in. Refer to
Figure 2.4.
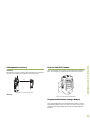
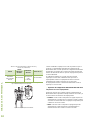
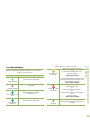
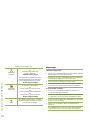
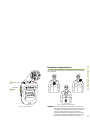
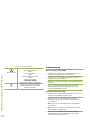
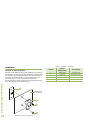
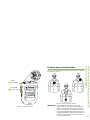
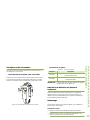
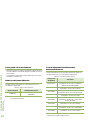
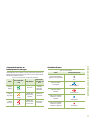
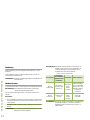
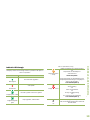
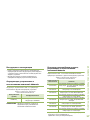
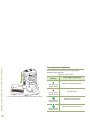
Language Selection
Power ON the WRSM by pressing and holding Power Button until you
hear the language selection prompts.
Follow the procedure below if you want to reset to your desired
language.
Procedure:
1 Hold the Power Button for 6 seconds after the power up LED
indication illuminated to enter the language selection feature.
2 Select your desired language by pressing the PTT button. Refer to
Table 2.1 below for the Language Selection Indicators.
To avoid a possible explosion:
• DO NOT replace the battery in any area labeled
“hazardous atmosphere”.
• DO NOT discard batteries in a fire.
!
W A R N I N G
!
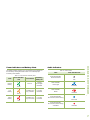
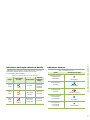
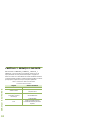
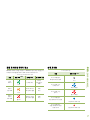
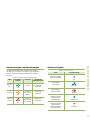
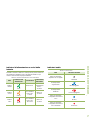
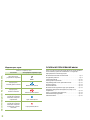
Table 2.1: Language Selection Indicators
State Power Indication LED Voice Prompt
Language Selection LED illuminated
“For English press PTT
now” (Menu selection
prompts)

WIRELESS RSM PMMN4095_
English
5
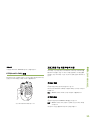
Figure 2.5: Language Selection
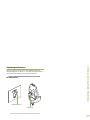
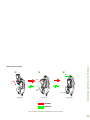
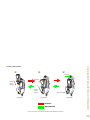
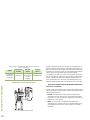
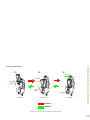
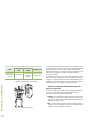
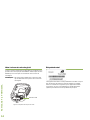
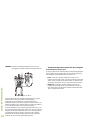
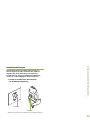
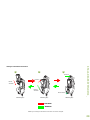
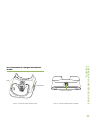
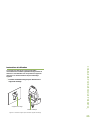
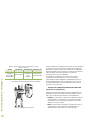
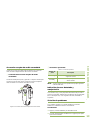
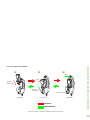
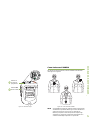
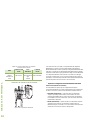
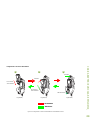
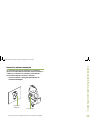
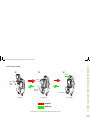
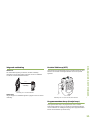
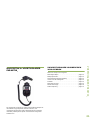
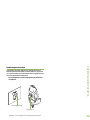
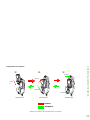
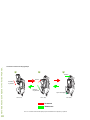
Recommended Wearing Positions
For optimum performance, wear the WRSM as highlighted in Figure 2.6
below.
Figure 2.6: Recommended wearing positions
NOTE: When the WRSM is worn on the body, always use Motorola-
approved clip. Using approved body-worn accessories is
important because the use of non-Motorola-approved
accessories may result in exposure levels, which exceed the
FCC occupational/controlled environment RF exposure limits.
1
2
Push-to-Talk
(PTT) Button
Power
Button

WIRELESS RSM PMMN4095_
English
6
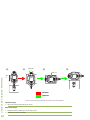
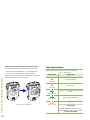
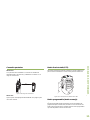
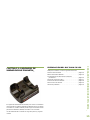
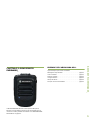
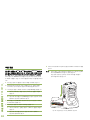
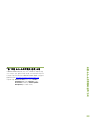
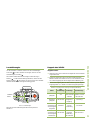
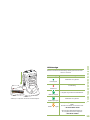
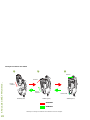
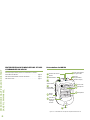
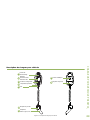
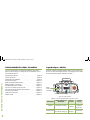
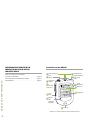
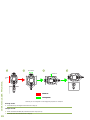
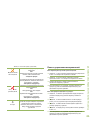
IDENTIFYING WRSM INDICATORS AND
CONTROLS
Take a moment to review the following:
Overview of the WRSM. . . . . . . . . . . . . . . . . . . . . . . . . . . . . . . page 6
Power Indicators and Battery Alerts . . . . . . . . . . . . . . . . . . . . . page 7
Audio Indicators. . . . . . . . . . . . . . . . . . . . . . . . . . . . . . . . . . . . . page 7
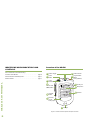
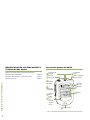
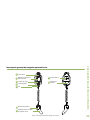
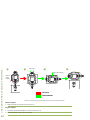
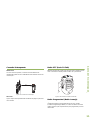
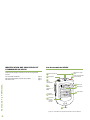
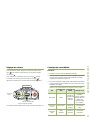
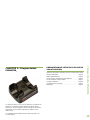
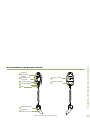
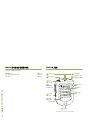
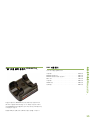
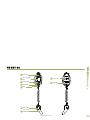
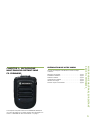
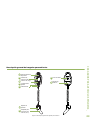
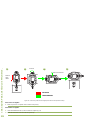
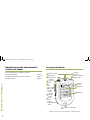
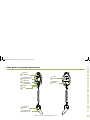
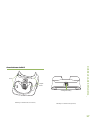
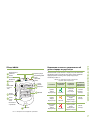
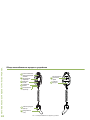
Overview of the WRSM
Figure 2.7: Wireless Remote Speaker Microphone Overview
Audio Indicator
1
2
Programmable
Button
(Orange Button)
Audio Jack
3
Microphone
4
Speaker
5
Tasklight
6
Blue Dot /
7
Tasklight
Button
8
Push-to-Talk
(PTT) Button
9
Power
Indicator
10
11
Power
Button
12
Volume Toggle
Secure
Pairing Spot

WIRELESS RSM PMMN4095_
English
7
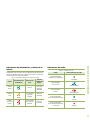
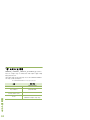
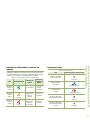
Power Indicators and Battery Alerts
The WRSM is battery powered. It is very important to pay attention to
the low battery warning described in Table 2.2 to avoid improper
functioning of the WRSM.
Audio Indicators
Table 2.2: Power Indicators and Battery Alerts
State
Power Indication
LED
Tone Indication
Remaining
Battery Life
Normal
Battery
Green
No tone
11 hours
(full charged) –
30 minutes
Low
Battery
Amber
Low Battery tone
every 2 minutes
Less than
30 minutes
Critical
Battery
Red
Low Battery tone
every 30 seconds
Less than
10 minutes
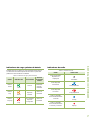
Table 2.3: Audio Indicators
State Audio Indication LED
Audio Not Available,
Device Not Paired
OFF
Audio Available,
Good Signal
Blue Blink
Audio Available,
Muted
Red Blink
Audio Not Available,
Disconnected / Reconnecting
Blue Solid
Audio Not Available,
Disconnected / Reconnecting
and Muted
Red Solid

WIRELESS RSM PMMN4095_
English
8
GENERAL WRSM OPERATION
Once you understand how your WRSM is configured, you are ready to
use your WRSM. Use this navigation guide to familiarize yourself with
the basic features:
Powering ON/OFF the WRSM . . . . . . . . . . . . . . . . . . . . . . . . . page 8
Volume Control . . . . . . . . . . . . . . . . . . . . . . . . . . . . . . . . . . . . . page 9
Pairing Your WRSM . . . . . . . . . . . . . . . . . . . . . . . . . . . . . . . . . page 9
Subsequent Connection . . . . . . . . . . . . . . . . . . . . . . . . . . . . . page 11
Poor Signal / Out Of Range Warning Indication . . . . . . . . . . . page 11
Programmable Button (Orange Button). . . . . . . . . . . . . . . . . . page 12
Tasklight Button. . . . . . . . . . . . . . . . . . . . . . . . . . . . . . . . . . . . page 12
Dark Mode. . . . . . . . . . . . . . . . . . . . . . . . . . . . . . . . . . . . . . . . page 12
Secondary Receiver Audio Accessory . . . . . . . . . . . . . . . . . . page 13
Failure Detected Indication and Handling . . . . . . . . . . . . . . . . page 13
Troubleshooting. . . . . . . . . . . . . . . . . . . . . . . . . . . . . . . . . . . . page 13
Firmware Upgrade. . . . . . . . . . . . . . . . . . . . . . . . . . . . . . . . . . page 14
Anatel Label . . . . . . . . . . . . . . . . . . . . . . . . . . . . . . . . . . . . . . page 14
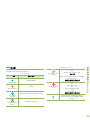
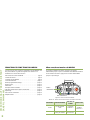
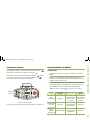
Powering ON/OFF the WRSM
To power ON the WRSM, press and hold the Power Button until you
hear “Motorola Solutions” prompt. To power OFF, press the Power
Button until the WRSM turns off.
Figure 2.8: Powering on your WRSM
Table 2.4: Power ON/OFF LED and Tone Indicators
Power Power Indication LED Tone Indication Voice Prompt
ON LED blinks 3 times
“Motorola
Solutions”
“Motorola
Solutions,
Power On”
OFF
LED blinks 3 times then
OFF
Power Off tone “Power Off”
Power
Button
Power Indicator

WIRELESS RSM PMMN4095_
English
9
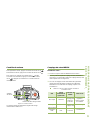
Volume Control
To increase the volume, push volume lever towards the . To decrease
the volume, push lever towards the .
To mute, hold lever to the for 2 seconds. To unmute, push lever to
the or press the PTT button. Volume returns to the previous level.
Figure 2.9: Volume Control
The color of the Audio Indicator LED changes according to Table 2.3 .
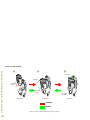
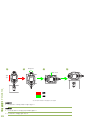
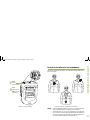
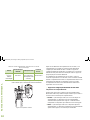
Pairing Your WRSM
Procedure:
1 Ensure both the radio and WRSM are powered on.
2 Place the blue dot (secure pairing spot) on the WRSM within one
inch of the blue dot (secure pairing spot) on the radio. Refer to
Figure 2.10.
3 During pairing, the Audio Indicator LED blinks according to the
pairing status. Refer to Table 2.5 for pairing indicators.
NOTE: * You will hear Disconnected tone every 2 minutes after the
WRSM prompts “Disconnected”.
Volume
Toggle
Audio Indicator
Table 2.5: Pairing LED, Tone Indication and Voice Prompt
State
Audio Indication
LED
Tone
Indication
Voice Prompt
Not Paired Off
Pairing Ready
tone every
2 minutes
“Touch blue dots
together to
connect” every
2 minutes
Paired
Successfully
LED illuminated
Pairing
Successful tone
“Connecting”
Wireless Link
Connected with
Host
LED Heartbeat Connected tone “Connected”
Wireless Link
Disconnected
from Host
LED illuminated
Disconnected
tone every
2 minutes
“Disconnected” *

WIRELESS RSM PMMN4095_
English
10
Figure 2.10: Pairing your WRSM
When a WRSM has been paired with a radio, its behavior upon the next
power up is dependent on the Bluetooth configurations of the Radio.
Refer to “APX Radio’s Bluetooth Configuration Options" on page 10 or
radio user manual for more details on the programming options for
Bluetooth accessories.
If the WRSM has been paired with a radio and needs to now be paired
with a different radio, the WRSM does not have to clear its previous
pairing. The previous pairing will be cleared automatically when pair
with a new radio. The previous pairing will be cleared automatically
when paired with a new radio.
APX Radio’s Bluetooth Configuration Options
Re-Pair Timer
There are two options for configuring the radio’s Bluetooth pairing type.
The type defines the duration the radio and the accessory retain the
pairing information.
• Immediate – When the radio and/or device is turned off after pairing,
they are unable to re-connect when they are turned back on. The
user must re-pair the devices to re-establish a new connection.
• Infinite – When the radio and/or device are turned off after pairing,
they can resume the Bluetooth connection without user intervention
when they are turned back on.
Align

WIRELESS RSM PMMN4095_
English
11
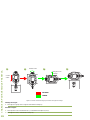
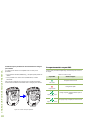
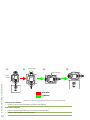
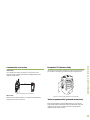
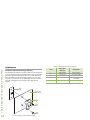
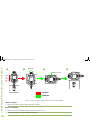
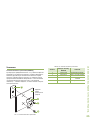
Subsequent Connection
Same Host:
If the wireless link is lost, connection will be automatically re-established
when the host and WRSM come within communication range.
Figure 2.11: Communication range
New Host:
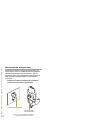
Push-to-Talk (PTT) Button
Press and hold down the PTT button to talk. Release the PTT button to
listen. The microphone is activated when the PTT button is pressed.
Figure 2.12: Pressing Push-to-Talk Button
Programmable Button (Orange Button)
The Programmable Button is programmable through radio’s Customer
Programming Software (CPS). Your radio’s User Guide contains a full
description of the programmable functions that are available through
this button.
30 m
Line Of Sight

WIRELESS RSM PMMN4095_
English
12
Tasklight Button
Press the Tasklight Button for 1 second to switch ON/OFF the tasklight.
During low/critical battery, the Tasklight blinks for 30 seconds and will be
auto switched OFF.
NOTE: The Tasklight is disabled when WRSM is in Dark Mode.
Dark Mode
Dark Mode allows you to turn OFF the LEDs on the WRSM.
IMPORTANT: When the WRSM is in Dark Mode and muted state, all
indications will be turned OFF.
To activate the Dark Mode feature, follow the steps below:
Procedure:
1 Press and hold the Tasklight Button until Dark Mode is ON. The
Tasklight will blink for 1 second upon entering/exiting Dark Mode.
2 Refer to Table 2.7 below for the Dark Mode Indicators.
NOTE: To disable the Dark Mode feature, press the Tasklight Button
for 3 seconds.
IMPORTANT: The WRSM will automatically enable or disable all
LED’s on the WRSM based on the Surveillance Mode
configuration of channels used on the APX Portable
Radio only.
NOTE: All three LEDs (Power Indicator, Audio Indicator & Tasklight)
blink for 1 second and off at the same time when turning ON/
OFF the Dark Mode.
Table 2.6: Dark Mode Indicators
Indication
Power Indication, Audio
Indication and Tasklight
LED
Tone
Indication
Voice Prompt
Dark Mode
ON
LED illuminated for 1
second then OFF
“Dark Mode”
tone
“Lights OFF,
Press and
hold Tasklight
Button to
switch lights
ON”
Dark Mode
OFF
LED illuminated for 1
second
“Dark Mode ”
tone
“Lights ON”

WIRELESS RSM PMMN4095_
English
13
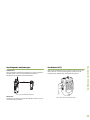
Secondary Receiver Audio Accessory
When a secondary accessory is plugged into the audio jack, audio will
be routed through secondary accessory
Attaching Secondary Receiver Audio Accessory
Lift up the dust cover and rotate 90
o
.
Plug the dust cover to the housing
slot. Insert the secondary receiver audio accessory to 3.5 mm audio
jack.
Figure 2.13: Attaching secondary receiver audio accessory
Optional Accessories
NOTE: Some part numbers may have regional prefix such as AA,
MD or AZ.
Failure Detected Indication and Handling
Any product error is indicated by alternating Red and Green blinks and
a failure detected indication (tone / voice prompt) will be heard. A few
seconds later the WRSM will recover.
Troubleshooting
If at any time the wireless connection cannot be re-established, or the
WRSM is operating incorrectly:
Procedure:
1 Power cycle the WRSM and the two-way radio.
2 Refer to “Pairing Your WRSM" on page 9” to repeat the connection
process.
1
2
Table 2.7: Optional Accessories
Part Number Description
RLN4941_
Earpiece with Coiled Cord and 3.5 mm RT Angle
Plug
RLN4885_ Receiver Earbud for Remote Speaker Microphone

WIRELESS RSM PMMN4095_
English
14
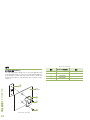
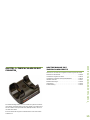
Firmware Upgrade
Firmware upgrade is available for this WRSM and it is only upgradeable
by your dealer. Check with your dealer for more information on the latest
firmware upgrades.
NOTE: DO NOT charge the WRSM with this micro USB port, it is
strictly for firmware upgrade only.
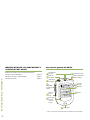
Figure 2.14: Location of the micro USB port
Anatel Label
This equipment operates as a secondary user, so it is not entitled to
protection from harmful interferences, even if generated by similar
equipment, and it may not cause harmful interference on systems
operating as primary users.
Micro USB port
1144-14-1699
PMMN4095
La pagina si sta caricando...
La pagina si sta caricando...
La pagina si sta caricando...
La pagina si sta caricando...
La pagina si sta caricando...
La pagina si sta caricando...
La pagina si sta caricando...
La pagina si sta caricando...
La pagina si sta caricando...
La pagina si sta caricando...
La pagina si sta caricando...
La pagina si sta caricando...
La pagina si sta caricando...
La pagina si sta caricando...
La pagina si sta caricando...
La pagina si sta caricando...
La pagina si sta caricando...
La pagina si sta caricando...
La pagina si sta caricando...
La pagina si sta caricando...
La pagina si sta caricando...
La pagina si sta caricando...
La pagina si sta caricando...
La pagina si sta caricando...
La pagina si sta caricando...
La pagina si sta caricando...
La pagina si sta caricando...
La pagina si sta caricando...
La pagina si sta caricando...
La pagina si sta caricando...
La pagina si sta caricando...
La pagina si sta caricando...
La pagina si sta caricando...
La pagina si sta caricando...
La pagina si sta caricando...
La pagina si sta caricando...
La pagina si sta caricando...
La pagina si sta caricando...
La pagina si sta caricando...
La pagina si sta caricando...
La pagina si sta caricando...
La pagina si sta caricando...
La pagina si sta caricando...
La pagina si sta caricando...
La pagina si sta caricando...
La pagina si sta caricando...
La pagina si sta caricando...
La pagina si sta caricando...
La pagina si sta caricando...
La pagina si sta caricando...
La pagina si sta caricando...
La pagina si sta caricando...
La pagina si sta caricando...
La pagina si sta caricando...
La pagina si sta caricando...
La pagina si sta caricando...
La pagina si sta caricando...
La pagina si sta caricando...
La pagina si sta caricando...
La pagina si sta caricando...
La pagina si sta caricando...
La pagina si sta caricando...
La pagina si sta caricando...
La pagina si sta caricando...
La pagina si sta caricando...
La pagina si sta caricando...
La pagina si sta caricando...
La pagina si sta caricando...
La pagina si sta caricando...
La pagina si sta caricando...
La pagina si sta caricando...
La pagina si sta caricando...
La pagina si sta caricando...
La pagina si sta caricando...
La pagina si sta caricando...
La pagina si sta caricando...
La pagina si sta caricando...
La pagina si sta caricando...
La pagina si sta caricando...
La pagina si sta caricando...
La pagina si sta caricando...
La pagina si sta caricando...
La pagina si sta caricando...
La pagina si sta caricando...
La pagina si sta caricando...
La pagina si sta caricando...
La pagina si sta caricando...
La pagina si sta caricando...
La pagina si sta caricando...
La pagina si sta caricando...
La pagina si sta caricando...
La pagina si sta caricando...
La pagina si sta caricando...
La pagina si sta caricando...
La pagina si sta caricando...
La pagina si sta caricando...
La pagina si sta caricando...
La pagina si sta caricando...
La pagina si sta caricando...
La pagina si sta caricando...
La pagina si sta caricando...
La pagina si sta caricando...
La pagina si sta caricando...
La pagina si sta caricando...
La pagina si sta caricando...
La pagina si sta caricando...
La pagina si sta caricando...
La pagina si sta caricando...
La pagina si sta caricando...
La pagina si sta caricando...
La pagina si sta caricando...
La pagina si sta caricando...
La pagina si sta caricando...
La pagina si sta caricando...
La pagina si sta caricando...
La pagina si sta caricando...
La pagina si sta caricando...
La pagina si sta caricando...
La pagina si sta caricando...
La pagina si sta caricando...
La pagina si sta caricando...
La pagina si sta caricando...
La pagina si sta caricando...
La pagina si sta caricando...
La pagina si sta caricando...
La pagina si sta caricando...
La pagina si sta caricando...
La pagina si sta caricando...
La pagina si sta caricando...
La pagina si sta caricando...
La pagina si sta caricando...
La pagina si sta caricando...
La pagina si sta caricando...
La pagina si sta caricando...
La pagina si sta caricando...
La pagina si sta caricando...
La pagina si sta caricando...
La pagina si sta caricando...
La pagina si sta caricando...
La pagina si sta caricando...
La pagina si sta caricando...
La pagina si sta caricando...
La pagina si sta caricando...
La pagina si sta caricando...
La pagina si sta caricando...
La pagina si sta caricando...
La pagina si sta caricando...
La pagina si sta caricando...
La pagina si sta caricando...
La pagina si sta caricando...
La pagina si sta caricando...
La pagina si sta caricando...
La pagina si sta caricando...
La pagina si sta caricando...
La pagina si sta caricando...
La pagina si sta caricando...
La pagina si sta caricando...
La pagina si sta caricando...
La pagina si sta caricando...
La pagina si sta caricando...
La pagina si sta caricando...
La pagina si sta caricando...
La pagina si sta caricando...
La pagina si sta caricando...
La pagina si sta caricando...
La pagina si sta caricando...
La pagina si sta caricando...
La pagina si sta caricando...
La pagina si sta caricando...
La pagina si sta caricando...
La pagina si sta caricando...
La pagina si sta caricando...
La pagina si sta caricando...
La pagina si sta caricando...
La pagina si sta caricando...
La pagina si sta caricando...
La pagina si sta caricando...
La pagina si sta caricando...
La pagina si sta caricando...
La pagina si sta caricando...
La pagina si sta caricando...
La pagina si sta caricando...
La pagina si sta caricando...
La pagina si sta caricando...
La pagina si sta caricando...
La pagina si sta caricando...
La pagina si sta caricando...
La pagina si sta caricando...
La pagina si sta caricando...
La pagina si sta caricando...
La pagina si sta caricando...
La pagina si sta caricando...
La pagina si sta caricando...
La pagina si sta caricando...
La pagina si sta caricando...
La pagina si sta caricando...
La pagina si sta caricando...
La pagina si sta caricando...
La pagina si sta caricando...
La pagina si sta caricando...
La pagina si sta caricando...
La pagina si sta caricando...
La pagina si sta caricando...
La pagina si sta caricando...
La pagina si sta caricando...
La pagina si sta caricando...
La pagina si sta caricando...
La pagina si sta caricando...
La pagina si sta caricando...
La pagina si sta caricando...
La pagina si sta caricando...
La pagina si sta caricando...
La pagina si sta caricando...
La pagina si sta caricando...
La pagina si sta caricando...
La pagina si sta caricando...
La pagina si sta caricando...
La pagina si sta caricando...
La pagina si sta caricando...
La pagina si sta caricando...
La pagina si sta caricando...
La pagina si sta caricando...
La pagina si sta caricando...
La pagina si sta caricando...
La pagina si sta caricando...
La pagina si sta caricando...
La pagina si sta caricando...
La pagina si sta caricando...
La pagina si sta caricando...
La pagina si sta caricando...
La pagina si sta caricando...
La pagina si sta caricando...
La pagina si sta caricando...
La pagina si sta caricando...
La pagina si sta caricando...
La pagina si sta caricando...
La pagina si sta caricando...
La pagina si sta caricando...
La pagina si sta caricando...
La pagina si sta caricando...
La pagina si sta caricando...
La pagina si sta caricando...
La pagina si sta caricando...
La pagina si sta caricando...
La pagina si sta caricando...
La pagina si sta caricando...
La pagina si sta caricando...
La pagina si sta caricando...
La pagina si sta caricando...
La pagina si sta caricando...
La pagina si sta caricando...
La pagina si sta caricando...
La pagina si sta caricando...
La pagina si sta caricando...
La pagina si sta caricando...
La pagina si sta caricando...
La pagina si sta caricando...
La pagina si sta caricando...
La pagina si sta caricando...
La pagina si sta caricando...
La pagina si sta caricando...
La pagina si sta caricando...
La pagina si sta caricando...
La pagina si sta caricando...
La pagina si sta caricando...
La pagina si sta caricando...
La pagina si sta caricando...
La pagina si sta caricando...
La pagina si sta caricando...
La pagina si sta caricando...
La pagina si sta caricando...
La pagina si sta caricando...
La pagina si sta caricando...
La pagina si sta caricando...
La pagina si sta caricando...
La pagina si sta caricando...
La pagina si sta caricando...
La pagina si sta caricando...
La pagina si sta caricando...
La pagina si sta caricando...
La pagina si sta caricando...
La pagina si sta caricando...
La pagina si sta caricando...
La pagina si sta caricando...
La pagina si sta caricando...
La pagina si sta caricando...
La pagina si sta caricando...
La pagina si sta caricando...
La pagina si sta caricando...
La pagina si sta caricando...
La pagina si sta caricando...
La pagina si sta caricando...
La pagina si sta caricando...
La pagina si sta caricando...
La pagina si sta caricando...
La pagina si sta caricando...
La pagina si sta caricando...
La pagina si sta caricando...
La pagina si sta caricando...
La pagina si sta caricando...
La pagina si sta caricando...
La pagina si sta caricando...
La pagina si sta caricando...
La pagina si sta caricando...
La pagina si sta caricando...
La pagina si sta caricando...
La pagina si sta caricando...
La pagina si sta caricando...
La pagina si sta caricando...
La pagina si sta caricando...
La pagina si sta caricando...
La pagina si sta caricando...
La pagina si sta caricando...
La pagina si sta caricando...
La pagina si sta caricando...
La pagina si sta caricando...
La pagina si sta caricando...
La pagina si sta caricando...
La pagina si sta caricando...
La pagina si sta caricando...
La pagina si sta caricando...
La pagina si sta caricando...
La pagina si sta caricando...
La pagina si sta caricando...
La pagina si sta caricando...
La pagina si sta caricando...
La pagina si sta caricando...
La pagina si sta caricando...
La pagina si sta caricando...
La pagina si sta caricando...
La pagina si sta caricando...
La pagina si sta caricando...
La pagina si sta caricando...
La pagina si sta caricando...
La pagina si sta caricando...
La pagina si sta caricando...
La pagina si sta caricando...
La pagina si sta caricando...
La pagina si sta caricando...
La pagina si sta caricando...
La pagina si sta caricando...
La pagina si sta caricando...
La pagina si sta caricando...
La pagina si sta caricando...
La pagina si sta caricando...
La pagina si sta caricando...
La pagina si sta caricando...
La pagina si sta caricando...
La pagina si sta caricando...
La pagina si sta caricando...
La pagina si sta caricando...
La pagina si sta caricando...
La pagina si sta caricando...
La pagina si sta caricando...
La pagina si sta caricando...
La pagina si sta caricando...
La pagina si sta caricando...
La pagina si sta caricando...
La pagina si sta caricando...
La pagina si sta caricando...
La pagina si sta caricando...
La pagina si sta caricando...
La pagina si sta caricando...
La pagina si sta caricando...
La pagina si sta caricando...
La pagina si sta caricando...
La pagina si sta caricando...
La pagina si sta caricando...
La pagina si sta caricando...
La pagina si sta caricando...
La pagina si sta caricando...
La pagina si sta caricando...
La pagina si sta caricando...
La pagina si sta caricando...
La pagina si sta caricando...
La pagina si sta caricando...
La pagina si sta caricando...
La pagina si sta caricando...
La pagina si sta caricando...
La pagina si sta caricando...
La pagina si sta caricando...
La pagina si sta caricando...
La pagina si sta caricando...
La pagina si sta caricando...
La pagina si sta caricando...
La pagina si sta caricando...
La pagina si sta caricando...
La pagina si sta caricando...
La pagina si sta caricando...
La pagina si sta caricando...
La pagina si sta caricando...
La pagina si sta caricando...
La pagina si sta caricando...
La pagina si sta caricando...
La pagina si sta caricando...
La pagina si sta caricando...
La pagina si sta caricando...
La pagina si sta caricando...
La pagina si sta caricando...
La pagina si sta caricando...
La pagina si sta caricando...
La pagina si sta caricando...
La pagina si sta caricando...
La pagina si sta caricando...
La pagina si sta caricando...
La pagina si sta caricando...
La pagina si sta caricando...
La pagina si sta caricando...
La pagina si sta caricando...
La pagina si sta caricando...
La pagina si sta caricando...
La pagina si sta caricando...
La pagina si sta caricando...
La pagina si sta caricando...
La pagina si sta caricando...
La pagina si sta caricando...
La pagina si sta caricando...
La pagina si sta caricando...
La pagina si sta caricando...
La pagina si sta caricando...
La pagina si sta caricando...
La pagina si sta caricando...
La pagina si sta caricando...
La pagina si sta caricando...
La pagina si sta caricando...
La pagina si sta caricando...
La pagina si sta caricando...
La pagina si sta caricando...
La pagina si sta caricando...
La pagina si sta caricando...
La pagina si sta caricando...
La pagina si sta caricando...
La pagina si sta caricando...
La pagina si sta caricando...
La pagina si sta caricando...
La pagina si sta caricando...
La pagina si sta caricando...
La pagina si sta caricando...
La pagina si sta caricando...
La pagina si sta caricando...
La pagina si sta caricando...
La pagina si sta caricando...
La pagina si sta caricando...
La pagina si sta caricando...
La pagina si sta caricando...
La pagina si sta caricando...
La pagina si sta caricando...
La pagina si sta caricando...
La pagina si sta caricando...
La pagina si sta caricando...
La pagina si sta caricando...
La pagina si sta caricando...
La pagina si sta caricando...
La pagina si sta caricando...
La pagina si sta caricando...
La pagina si sta caricando...
La pagina si sta caricando...
La pagina si sta caricando...
La pagina si sta caricando...
La pagina si sta caricando...
La pagina si sta caricando...
La pagina si sta caricando...
La pagina si sta caricando...
La pagina si sta caricando...
La pagina si sta caricando...
La pagina si sta caricando...
La pagina si sta caricando...
La pagina si sta caricando...
La pagina si sta caricando...
La pagina si sta caricando...
La pagina si sta caricando...
La pagina si sta caricando...
La pagina si sta caricando...
La pagina si sta caricando...
La pagina si sta caricando...
La pagina si sta caricando...
La pagina si sta caricando...
La pagina si sta caricando...
La pagina si sta caricando...
La pagina si sta caricando...
La pagina si sta caricando...
La pagina si sta caricando...
La pagina si sta caricando...
La pagina si sta caricando...
La pagina si sta caricando...
La pagina si sta caricando...
La pagina si sta caricando...
La pagina si sta caricando...
La pagina si sta caricando...
La pagina si sta caricando...
-
 1
1
-
 2
2
-
 3
3
-
 4
4
-
 5
5
-
 6
6
-
 7
7
-
 8
8
-
 9
9
-
 10
10
-
 11
11
-
 12
12
-
 13
13
-
 14
14
-
 15
15
-
 16
16
-
 17
17
-
 18
18
-
 19
19
-
 20
20
-
 21
21
-
 22
22
-
 23
23
-
 24
24
-
 25
25
-
 26
26
-
 27
27
-
 28
28
-
 29
29
-
 30
30
-
 31
31
-
 32
32
-
 33
33
-
 34
34
-
 35
35
-
 36
36
-
 37
37
-
 38
38
-
 39
39
-
 40
40
-
 41
41
-
 42
42
-
 43
43
-
 44
44
-
 45
45
-
 46
46
-
 47
47
-
 48
48
-
 49
49
-
 50
50
-
 51
51
-
 52
52
-
 53
53
-
 54
54
-
 55
55
-
 56
56
-
 57
57
-
 58
58
-
 59
59
-
 60
60
-
 61
61
-
 62
62
-
 63
63
-
 64
64
-
 65
65
-
 66
66
-
 67
67
-
 68
68
-
 69
69
-
 70
70
-
 71
71
-
 72
72
-
 73
73
-
 74
74
-
 75
75
-
 76
76
-
 77
77
-
 78
78
-
 79
79
-
 80
80
-
 81
81
-
 82
82
-
 83
83
-
 84
84
-
 85
85
-
 86
86
-
 87
87
-
 88
88
-
 89
89
-
 90
90
-
 91
91
-
 92
92
-
 93
93
-
 94
94
-
 95
95
-
 96
96
-
 97
97
-
 98
98
-
 99
99
-
 100
100
-
 101
101
-
 102
102
-
 103
103
-
 104
104
-
 105
105
-
 106
106
-
 107
107
-
 108
108
-
 109
109
-
 110
110
-
 111
111
-
 112
112
-
 113
113
-
 114
114
-
 115
115
-
 116
116
-
 117
117
-
 118
118
-
 119
119
-
 120
120
-
 121
121
-
 122
122
-
 123
123
-
 124
124
-
 125
125
-
 126
126
-
 127
127
-
 128
128
-
 129
129
-
 130
130
-
 131
131
-
 132
132
-
 133
133
-
 134
134
-
 135
135
-
 136
136
-
 137
137
-
 138
138
-
 139
139
-
 140
140
-
 141
141
-
 142
142
-
 143
143
-
 144
144
-
 145
145
-
 146
146
-
 147
147
-
 148
148
-
 149
149
-
 150
150
-
 151
151
-
 152
152
-
 153
153
-
 154
154
-
 155
155
-
 156
156
-
 157
157
-
 158
158
-
 159
159
-
 160
160
-
 161
161
-
 162
162
-
 163
163
-
 164
164
-
 165
165
-
 166
166
-
 167
167
-
 168
168
-
 169
169
-
 170
170
-
 171
171
-
 172
172
-
 173
173
-
 174
174
-
 175
175
-
 176
176
-
 177
177
-
 178
178
-
 179
179
-
 180
180
-
 181
181
-
 182
182
-
 183
183
-
 184
184
-
 185
185
-
 186
186
-
 187
187
-
 188
188
-
 189
189
-
 190
190
-
 191
191
-
 192
192
-
 193
193
-
 194
194
-
 195
195
-
 196
196
-
 197
197
-
 198
198
-
 199
199
-
 200
200
-
 201
201
-
 202
202
-
 203
203
-
 204
204
-
 205
205
-
 206
206
-
 207
207
-
 208
208
-
 209
209
-
 210
210
-
 211
211
-
 212
212
-
 213
213
-
 214
214
-
 215
215
-
 216
216
-
 217
217
-
 218
218
-
 219
219
-
 220
220
-
 221
221
-
 222
222
-
 223
223
-
 224
224
-
 225
225
-
 226
226
-
 227
227
-
 228
228
-
 229
229
-
 230
230
-
 231
231
-
 232
232
-
 233
233
-
 234
234
-
 235
235
-
 236
236
-
 237
237
-
 238
238
-
 239
239
-
 240
240
-
 241
241
-
 242
242
-
 243
243
-
 244
244
-
 245
245
-
 246
246
-
 247
247
-
 248
248
-
 249
249
-
 250
250
-
 251
251
-
 252
252
-
 253
253
-
 254
254
-
 255
255
-
 256
256
-
 257
257
-
 258
258
-
 259
259
-
 260
260
-
 261
261
-
 262
262
-
 263
263
-
 264
264
-
 265
265
-
 266
266
-
 267
267
-
 268
268
-
 269
269
-
 270
270
-
 271
271
-
 272
272
-
 273
273
-
 274
274
-
 275
275
-
 276
276
-
 277
277
-
 278
278
-
 279
279
-
 280
280
-
 281
281
-
 282
282
-
 283
283
-
 284
284
-
 285
285
-
 286
286
-
 287
287
-
 288
288
-
 289
289
-
 290
290
-
 291
291
-
 292
292
-
 293
293
-
 294
294
-
 295
295
-
 296
296
-
 297
297
-
 298
298
-
 299
299
-
 300
300
-
 301
301
-
 302
302
-
 303
303
-
 304
304
-
 305
305
-
 306
306
-
 307
307
-
 308
308
-
 309
309
-
 310
310
-
 311
311
-
 312
312
-
 313
313
-
 314
314
-
 315
315
-
 316
316
-
 317
317
-
 318
318
-
 319
319
-
 320
320
-
 321
321
-
 322
322
-
 323
323
-
 324
324
-
 325
325
-
 326
326
-
 327
327
-
 328
328
-
 329
329
-
 330
330
-
 331
331
-
 332
332
-
 333
333
-
 334
334
-
 335
335
-
 336
336
-
 337
337
-
 338
338
-
 339
339
-
 340
340
-
 341
341
-
 342
342
-
 343
343
-
 344
344
-
 345
345
-
 346
346
-
 347
347
-
 348
348
-
 349
349
-
 350
350
-
 351
351
-
 352
352
-
 353
353
-
 354
354
-
 355
355
-
 356
356
-
 357
357
-
 358
358
-
 359
359
-
 360
360
-
 361
361
-
 362
362
-
 363
363
-
 364
364
-
 365
365
-
 366
366
-
 367
367
-
 368
368
-
 369
369
-
 370
370
-
 371
371
-
 372
372
-
 373
373
-
 374
374
-
 375
375
-
 376
376
-
 377
377
-
 378
378
-
 379
379
-
 380
380
-
 381
381
-
 382
382
-
 383
383
-
 384
384
-
 385
385
-
 386
386
-
 387
387
-
 388
388
-
 389
389
-
 390
390
-
 391
391
-
 392
392
-
 393
393
-
 394
394
-
 395
395
-
 396
396
-
 397
397
-
 398
398
-
 399
399
-
 400
400
-
 401
401
-
 402
402
-
 403
403
-
 404
404
-
 405
405
-
 406
406
-
 407
407
-
 408
408
-
 409
409
-
 410
410
-
 411
411
-
 412
412
-
 413
413
-
 414
414
-
 415
415
-
 416
416
-
 417
417
-
 418
418
-
 419
419
-
 420
420
-
 421
421
-
 422
422
-
 423
423
-
 424
424
-
 425
425
-
 426
426
-
 427
427
-
 428
428
-
 429
429
-
 430
430
-
 431
431
-
 432
432
-
 433
433
-
 434
434
-
 435
435
-
 436
436
-
 437
437
-
 438
438
-
 439
439
-
 440
440
-
 441
441
-
 442
442
-
 443
443
-
 444
444
-
 445
445
-
 446
446
-
 447
447
-
 448
448
-
 449
449
-
 450
450
-
 451
451
-
 452
452
-
 453
453
-
 454
454
-
 455
455
-
 456
456
-
 457
457
-
 458
458
-
 459
459
-
 460
460
-
 461
461
-
 462
462
-
 463
463
-
 464
464
-
 465
465
-
 466
466
-
 467
467
-
 468
468
-
 469
469
-
 470
470
-
 471
471
-
 472
472
-
 473
473
-
 474
474
-
 475
475
-
 476
476
-
 477
477
-
 478
478
-
 479
479
-
 480
480
-
 481
481
-
 482
482
-
 483
483
-
 484
484
-
 485
485
-
 486
486
-
 487
487
-
 488
488
-
 489
489
-
 490
490
-
 491
491
-
 492
492
-
 493
493
-
 494
494
-
 495
495
-
 496
496
-
 497
497
-
 498
498
-
 499
499
-
 500
500
-
 501
501
-
 502
502
-
 503
503
-
 504
504
-
 505
505
-
 506
506
-
 507
507
-
 508
508
-
 509
509
-
 510
510


Motorola PMMN4095 series Manuale utente
- Tipo
- Manuale utente
in altre lingue
- English: Motorola PMMN4095 series User manual
- français: Motorola PMMN4095 series Manuel utilisateur
- español: Motorola PMMN4095 series Manual de usuario
- Deutsch: Motorola PMMN4095 series Benutzerhandbuch
- русский: Motorola PMMN4095 series Руководство пользователя
- Nederlands: Motorola PMMN4095 series Handleiding
- português: Motorola PMMN4095 series Manual do usuário
Documenti correlati
-
Motorola PMMN4095 series Manuale utente
-
-
-
-
-
-
-
Motorola PMMN4040 Manuale utente
-
Motorola PMLN6428 Manuale utente
-
Altri documenti
-
Uniross VC101720 Scheda dati
-
Sony DVP-NS700V Manuale utente
-
Anker 535 Manuale utente
-
Motorola Solutions NNTN8234 Guida utente
-
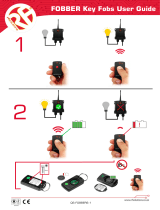 RF FOBBER Guida utente
-
Chief RSMAUW Guida d'installazione
-
RIVACASE VA4914 White Manuale utente
-
Vertu P7Q-AC35V Manuale utente
-
rfsolutions FOBLOQF-4S1 Guida utente
-
MSA Gallet F1XF Manuale utente
