Timberkits Vintage Car Instructions Manual
- Tipo
- Instructions Manual

Vintage Car

1
(UK) Symbols in these instructions. (FR) Symboles des instructions. (ESP) Simbolos en estas instrucciones. (IT) Simboli
in queste istruzioni. (Ger) Symbole in dieser anleitung
(UK) Waiting time.
(FR) Temps d’attente.
(ESP) Tiempo de espera.
(IT) Tempo d’attesa.
(DE) Wartezeit.
(UK) Glue.
(FR) Coller.
(ESP) Pegar.
(IT) Incollare.
(DE) Leimen
(UK) Don’t glue.
(FR) Ne pas coller.
(ESP) No pegar.
(IT) Non incollare.
(DE) Nicht leimen.
(UK) Glue guard. Prevents glue getting between moving parts during build. Remove after 2
minutes.
(FR) Piece de protection contre la colle. pendant l’assemblage, eviter tout depôt de colle sur les
pieces en mouvement. Enlever apres 2 minutes.
(ESP) Parte de protection de el pegamento. durante la fase de esambalje, evitar que el pegamento
se ponga sobre partes que se mueven. Quitar despues de dos minutos .
(IT) Pezzo di protezione della colla. Durante l’assemblaggio evitare che la colla vada su parti non
statiche . Imuovere dopo due minuti.
(DE) Karton. Verhindert das eindringen von leim zwischen die bewegliche teile während der
montage. Zwischen die beweglichen Teile.
(UK) Wax surface to lubricate.
(FR) Appliquer la cire sur cette
surface.
(ESP) Aplica la cera sobre esta su-
percie.
(IT) Applicare la cera su questa
supercie
(DE) Wax Oberäche zu schmieren.
Helpful hints/conseils utiles/consejos utiles/suggerimentutili/nützliche tipps
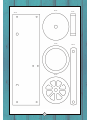
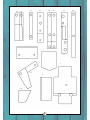
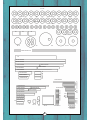
(UK) Check all parts present in trays
(FR) Vérier que toutes les pièces soient présentes dans les bacs
(ESP) Controlar que hay todas la partes en la caja
(IT) Controllare tutte le parti presenti nel kit
(DE) Bitte prüfen sie, ob alle benötigten teile vorhanden sind
(UK) Read all instructions and look at all diagrams
(FR) Lire toutes les instructions et regarder toutes les gures
(ESP) Leer las intrucciones y guardar a los diagrames
(IT) Leggere tutte le istruzioni e guardare i diagrammi
(DE) Lesen sie alle anweisungen und betrachten sie die schaubilder
(UK) Check assembly before gluing
(FR) Vérier le montage avant collage
(ESP) Controlar el montaje antes de empezar a pegar
(IT) Controllare l’assemblaggio prima di incollare
(DE) Montage prüfen vor dem einklebern
(UK) Some parts may need sanding
(FR) Certaines pièces nécessiteront d’être poncées.
(ESP) Algunas parte necesitan de ser suavizadas
(IT) Alcune parti potrebbero aver bisogno di levigatura
(DE) Möglicherweise müssen manche teile geschlien werden
Colouring tips/conseils concernant l’application de peinture/ consejos para Pintar/ suggerimenti per colorare/
lackiertipps
(UK) Do not apply paint to parts which move against one another. It is easier to paint some parts before
assembling
(FR) Ne pas appliquer de peinture sur les parties qui se déplacent l’une contre l’autre. Il est conseillé de pein
dre avant assemblage
(ESP) No aplique la pintura sobre las partes que se tocaran. Resulta mas facil pintar las partes antes de montar.
(IT) Non applicare la pittura su quelle parti dove ce attrito con un’altra parte. è piu semplice pitturare alcune
parti prima della fase di assemblaggio.
(DE) Teile, die aneinander reiben, sollten nicht lackiert werden. Fertig lackierte teile sind o leichter zu
montieren
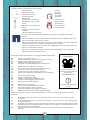
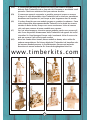
Visit our website to view
instructional videos where you
see this symbol.
www.timberkits.com
!
Pay special attention to this
section.
New Symbols in our
Instructions

2
Or visit our website for tips, advice and our
instructional videos.

2
31
28
34
x2
67
47
13
2
48
8
7
7
70
1

3
35 x2
66 x3
37 x4
36 x4
69 x2
12 x2

4
62 61
58 54 49
49
41
60
41
3
6
57
9 x2
8
4

50
5
39 39
27 25
14 x2
56
56
30
30
43
43
51
15 x2
42 42 55 55
63 59
71 71
17 17
38 38
2222
5
46
46
53
53
53
53
21
21
29
29

6
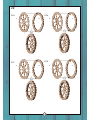
33 x12
33 x3
44 x4
64
16 x4
52 x4 10 x12
40 x4
65 65 65
18 x2 20 68 45 x2
3mmx145mm x2
32
6mmx126mm
6mmx126mm
6mmx56mm
6mmx48mm
6mmx88mm
6mmx53mm
6mmx48mm
6mmx35mm
6mmx26mm
6mmx22mm
6mmx17mm
5mmx82mm
5mmx36mm
5mmx29mm
5mmx46mm
5mmx42mm
5mmx22mm
19
5mmx20mm
24
26 x2
23 11 x4 3mmx8mm
3mmx10mm x12
3mmx47mm
3mmx
28mm x4
3mmx24mm
3mmx15mm
5mmx36mm
5mmx29mm
5mmx22mm
3mmx
22mm x3
3mmx
20mm x4
3mm x
18mm x5
3mmx13mm

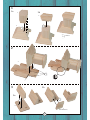
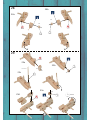
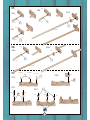
1
1
1a
7
2
1b
3
4
2
3
6
5
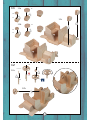
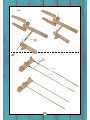
3a
3b
7
(Mirrored Pair)
10mins

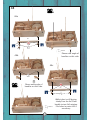
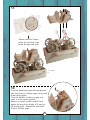
Please note correct angle
of Part # 7 & 7
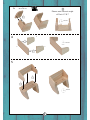
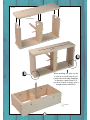
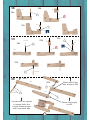
8
3c
4
8
9
9
10mins
10mins
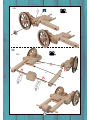
5
10mins
7
(Mirrored Pair)

9
10
6
15mins
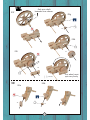
7
3mmx8mm
11
11
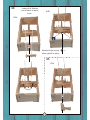
8
8a
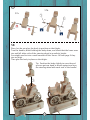
Please note angle of seat
must line up with angle
of base.

10
8b
11
11
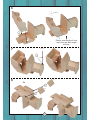
9
12
12
9a
9b
10mins

11
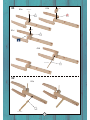
9
10a
13
10
14
14
15
15
10b
10mins

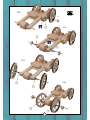
12
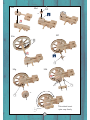
11
16
17
18
16
17
18
11a
11b
11c
12
12a
12b
19
20
10
3mmx13mm

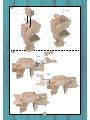
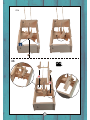
13
13
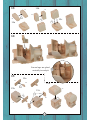
13a
13b
13c
14
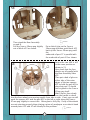
Ensure legs are glued
centrally in cockpit
15
21
21
22
22
24
23
25
26
26
27
15a
15b
15c
15d

14
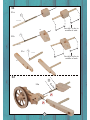
16
28
3mmx18mm
3mmx18mm
5mmx20mm
16a
16b
16c
17
17a
18b
17b
29
30
30
29
30
2929
30
18
18a
3mmx28mm
3mmx28mm
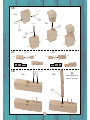
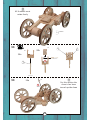
31
32
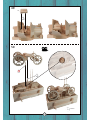
Ensure hole at
end is on top

15
19
19a
6mmx26mm
19b
19c
3mmx10mm
3mmx10mm
33
6mmx22mm
3mmx10mm
3mmx10mm

16
3mmx15mm
19d
3mmx10mm
20
20a
3mmx10mm
3mmx10mm
3mmx10mm
34
3mmx10mm
3mmx10mm
3mmx10mm
3mmx10mm
34
20b

17
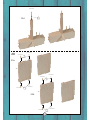
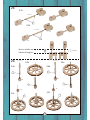
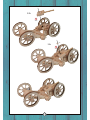
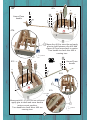
21
21b
21a
102mm
100mm
21c
35
(Mirrored Pair)

18
20mins
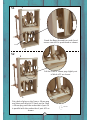
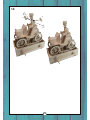
When waiting for glue to dry
it can be a great help if you
clamp the assembly together
to ensure a good bond. (If
you don’t have a clamp use a
weight where labelled).
Place weight here while the glue is drying for 20
minutes
21d
35
(Mirrored Pair)
La pagina sta caricando ...
La pagina sta caricando ...
La pagina sta caricando ...
La pagina sta caricando ...
La pagina sta caricando ...
La pagina sta caricando ...
La pagina sta caricando ...
La pagina sta caricando ...
La pagina sta caricando ...
La pagina sta caricando ...
La pagina sta caricando ...
La pagina sta caricando ...
La pagina sta caricando ...
La pagina sta caricando ...
La pagina sta caricando ...
La pagina sta caricando ...
La pagina sta caricando ...
La pagina sta caricando ...
La pagina sta caricando ...
La pagina sta caricando ...
La pagina sta caricando ...
La pagina sta caricando ...
La pagina sta caricando ...
La pagina sta caricando ...
La pagina sta caricando ...
La pagina sta caricando ...
La pagina sta caricando ...
La pagina sta caricando ...
-
 1
1
-
 2
2
-
 3
3
-
 4
4
-
 5
5
-
 6
6
-
 7
7
-
 8
8
-
 9
9
-
 10
10
-
 11
11
-
 12
12
-
 13
13
-
 14
14
-
 15
15
-
 16
16
-
 17
17
-
 18
18
-
 19
19
-
 20
20
-
 21
21
-
 22
22
-
 23
23
-
 24
24
-
 25
25
-
 26
26
-
 27
27
-
 28
28
-
 29
29
-
 30
30
-
 31
31
-
 32
32
-
 33
33
-
 34
34
-
 35
35
-
 36
36
-
 37
37
-
 38
38
-
 39
39
-
 40
40
-
 41
41
-
 42
42
-
 43
43
-
 44
44
-
 45
45
-
 46
46
-
 47
47
-
 48
48


Timberkits Vintage Car Instructions Manual
- Tipo
- Instructions Manual
in altre lingue
- English: Timberkits Vintage Car
- français: Timberkits Vintage Car
Altri documenti
-
Kenwood OV340B Manuale del proprietario
-
BBC Bircher RK 31C-CP / RK 33C-P Manuale utente
-
Kenwood TURBO QUARTZ PRIX Manuale del proprietario
-
Kenwood KCC9060S Manuale del proprietario
-
Kenwood KCC9048S Manuale del proprietario
-
-
Tefal OF463830 Manuale utente
-
MULTIPLEX 21 4164 Manuale del proprietario
-
-
 Italeri 6433 Manuale utente
