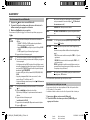
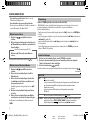
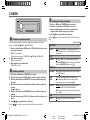
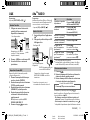
Kenwood KDC-BT48DAB Manuale del proprietario
- Categoria
- Mixer audio
- Tipo
- Manuale del proprietario

Data Size: B6L (182 mm x 128 mm)
Book Size: B6L (182 mm x 128 mm)
GET0975-001A (EW/E0)© 2013 JVC KENWOOD Corporation
KDC-BT48DAB
CD-RECEIVER
INSTRUCTION MANUAL
AMPLI-TUNER LECTEUR DE CD
MODE D’EMPLOI
CD-RECEIVER
BEDIENUNGSANLEITUNG
CD RECEIVER
GEBRUIKSAANWIJZING
SINTOLETTORE STEREO COMPACT DISC
ISTRUZIONI PER L’USO
REPRODUCTOR DE DISCOS COMPACTOS RECEPTOR DE FM/AM
MANUAL DE INSTRUCCIONES
JS_KWD_KDC_BT48DAB_EWE0_02_EN.indd 1JS_KWD_KDC_BT48DAB_EWE0_02_EN.indd 1 25/11/2013 5:17:20 PM25/11/2013 5:17:20 PM

i
Data Size: B6L (182 mm x 128 mm)
Book Size: B6L (182 mm x 128 mm)
Information on Disposal of Old Electrical and Electronic Equipment and Batteries
(applicable for EU countries that have adopted separate waste collection systems)
Products and batteries with the symbol (crossed-out wheeled bin) cannot be disposed as
household waste.
Old electrical and electronic equipment and batteries should be recycled at a facility capable of
handling these items and their waste byproducts.
Contact your local authority for details in locating a recycle facility nearest to you. Proper
recycling and waste disposal will help conserve resources whilst preventing detrimental effects
on our health and the environment.
Notice: The sign “Pb” below the symbol for batteries indicates that this battery contains lead.
Information sur l’élimination des anciens équipements électriques et électroniques
et piles électriques (applicable dans les pays de l’Union Européenne qui ont adopté
des systèmes de collecte sélective)
Les produits et piles électriques sur lesquels le pictogramme (poubelle barrée) est apposé ne
peuvent pas être éliminés comme ordures ménagères.
Les anciens équipements électriques et électroniques et piles électriques doivent être recyclés
sur des sites capables de traiter ces produits et leurs déchets.
Contactez vos autorités locales pour connaître le site de recyclage le plus proche. Un recyclage
adapté et l’élimination des déchets aideront à conserver les ressources et à nous préserver des
leurs effets nocifs sur notre santé et sur l’environnement.
Remarque: Le symbole “Pb“ ci-dessous sur des piles électrique indique que cette pile contient
du plomb.
Entsorgung von gebrauchten elektrischen und elektronischen Geräten und Batterien
(anzuwenden in den Ländern der Europäischen Union und anderen europäischen
Ländern mit einem separaten Sammelsystem für solche Geräte)
Das Symbol (durchgestrichene Mülltonne) auf dem Produkt oder seiner Verpackung weist darauf
hin, dass dieses Produkt nicht als normaler Haushaltsabfall behandelt werden darf, sondern an
einer Annahmestelle für das Recycling von elektrischen und elektronischen Geräten und batterien
abgegeben werden muss.
Durch Ihren Beitrag zur korrekten Entsorgung dieses Produktes schützen Sie die Umwelt und
die Gesundheit Ihrer Mitmenschen.
Unsachgemässe oder falsche Entsorgung gefährden Umwelt und Gesundheit. Weitere
Informationen über das Recycling dieses Produktes erhalten Sie von Ihrer Gemeinde oder den
kommunalen Entsorgungsbetrieben.
Achtung: Das Zeichen „Pb“ unter dem Symbol fur Batterien zeigt an, dass diese Batterie Blei
enthalt.
Informatie over het weggooien van elektrische en elektronische apparatuur en
batterijen (particulieren)
Dit symbool geeft aan dat gebruikte elektrische, elektronische producten en batterijen niet bij
het normale huishoudelijke afval mogen.
Lever deze producten in bij de aangewezen inzamelingspunten, waar ze gratis worden
geaccepteerd en op de juiste manier worden verwerkt, teruggewonnen en hergebruikt.
Voor inleveradressen zie www.nvmp.nl, www.ictmilieu.nl, www.stibat.nl. Wanneer u dit
product op de juiste manier als afval inlevert, spaart u waardevolle hulpbronnen en voorkomt
u potentiële negatieve gevolgen voor de volksgezondheid en het milieu, die anders kunnen
ontstaan door een onjuiste verwerking van afval.
Opgelet: Het teken “Pb” onder het teken van de batterijen geeft aan dat deze batterij lood
bevat.
JS_KWD_KDC_BT48DAB_EWE0_02_EN.indd iJS_KWD_KDC_BT48DAB_EWE0_02_EN.indd i 25/11/2013 5:17:21 PM25/11/2013 5:17:21 PM

ii
Data Size: B6L (182 mm x 128 mm)
Book Size: B6L (182 mm x 128 mm)
For Israel
For Turkey
Bu ürün 28300 sayılı Resmi Gazete’de yayımlanan Atik Elektrikli ve Elektronik Eşyalarin
Kontrolü Yönetmeliğe uygun olarak üretilmiştir.
Eski Elektrik ve Elektronik Ekipmanların İmha Edilmesi Hakkında Bilgi (ayrı atık
toplama sistemlerini kullanan ülkeleri için uygulanabilir)
Sembollü (üzerinde çarpı işareti olan çöp kutusu) ürünler ev atıkları olarak
atılamaz.
Eski elektrik ve elektronik ekipmanlar, bu ürünleri ve ürün atıklarını geri
dönüştürebilecek bir tesiste değerlendirilmelidir. Yaşadığınız bölgeye
en yakın geri dönüşüm tesisinin yerini öğrenmek için yerel makamlara
müracaat edin. Uygun geri dönüşüm ve atık imha yöntemi sağlığımız ve
çevremiz üzerindeki zararlı etkileri önlerken kaynakların korunmasına da
yardımcı olacaktır.
Informazioni sullo smaltimento delle vecchie apparecchiature elettriche ed
elettroniche e delle batterie (valide per i Paesi Europei che hanno adottato sistemi di
raccolta differenziata)
I prodotti e le batterie recanti il simbolo di un cassonetto della spazzatura su ruote barrato non
possono essere smaltiti insieme ai normali rifiuti di casa.
I vecchi prodotti elettrici ed elettronici e le batterie devono essere riciclati presso un'apposita
struttura in grado di trattare questi prodotti e di smaltirne i loro componenti.
Per conoscere dove e come recapitare tali prodotti nel luogo a voi più vicino, contattare
l'apposito ufficio comunale. Un appropriato riciclo e smaltimento aiuta a conservare la natura e
a prevenire effetti nocivi alla salute e all'ambiente.
Nota: Il simbolo “Pb” sotto al simbolo delle batterie indica che questa batteria contiene
piombo.
Información acerca de la eliminación de equipos eléctricos, electrónicos y baterías al
final de la vida útil (aplicable a los países de la Unión Europea que hayan adoptado
sistemas independientes de recogida de residuos)
Los productos y las baterías con el símbolo de un contenedor con ruedas tachado no podrán ser
desechados como residuos domésticos.
Los equipos eléctricos, electrónicos y baterías al final de la vida útil, deberán ser reciclados en
instalaciones que puedan dar el tratamiento adecuado a estos productos y a sus subproductos
residuales correspondientes.
Póngase en contacto con su administración local para obtener información sobre el punto de
recogida más cercano. Un tratamiento correcto del reciclaje y la eliminación de residuos ayuda
a conservar los recursos y evita al mismo tiempo efectos perjudiciales en la salud y el medio
ambiente.
Nota: El símbolo “Pb” debajo del (contenedor con ruedas tachado) en baterías indica que
dicha batería contiene plomo.
JS_KWD_KDC_BT48DAB_EWE0_02_EN.indd iiJS_KWD_KDC_BT48DAB_EWE0_02_EN.indd ii 25/11/2013 5:17:21 PM25/11/2013 5:17:21 PM

iii
Data Size: B6L (182 mm x 128 mm)
Book Size: B6L (182 mm x 128 mm)
The marking of products using lasers
The label is attached to the chassis/case and says that the component uses
laser beams that have been classified as Class1. It means that the unit
is utilizing laser beams that are of a weaker class. There is no danger of
hazardous radiation outside the unit.
Marquage des produits utilisant un laser
L’étiquette est attachée au châssis/boîtier de l’appareil et indique que
l’appareil utilise des rayons laser de classe 1. Cela signifie que l’appareil
utilise des rayons laser d’une classe faible. Il n’y a pas de danger de radiation
accidentelle hors de l’appareil.
Kennzeichnung von Geräten mit Laser-Abtastern
Das Etikett ist am Chassis/Gehäuse angebracht und besagt, dass sich die
Komponente Laserstrahlen bedient, die als Laserstrahlen der Klasse 1
klassifiziert wurden. Dies weist darauf hin, dass sich das Gerät Laserstrahlen
bedient, die einer schwächeren Klasse angehören. Das bedeutet, dass durch
den sehr schwachen Laserstrahl keine Gefahr durch gefährliche Strahlungen
außerhalb des Geräts besteht.
Markering op produkten die laserstralen gebruiken
Dit label is aangebracht op de behuizing/houder en toont dat de component
een laserstraal gebruikt die als Klasse 1 is geclassificeerd. Dit betekent dat de
laserstraal relatief zwak is en er geen gevaar van straling buiten het toestel is.
Etichetta per i prodotti che impiegano raggi laser
L’etichetta si trova sul rivestimento o sulla scatola e serve ad avvertire che il
componente impiega raggi laser che sono stati classificati come classe 1. Ciò
significa che l’apparecchio utilizza raggi laser di una classe inferiore. Non c’è
alcun pericolo di radiazioni pericolose all’esterno dell’apparecchio.
La marca para los productos que utilizan láser
Esta etiqueta está colocada en el chasis e indica que el componente funciona
con rayos láser de clase1. Esto significa que el aparato utiliza rayos láser
considerados como de clase débil. No existe el peligro de que este aparato
emita al exterior una radiación peligrosa.
Declaration of Conformity with regard to the R&TTE
Directive 1999/5/EC
Declaration of Conformity with regard to the EMC
Directive 2004/108/EC
Declaration of Conformity with regard to the RoHS
Directive 2011/65/EU
Manufacturer:
JVC KENWOOD Corporation
3-12, Moriya-cho, Kanagawa-ku, Yokohama-shi, Kanagawa,
221-0022, Japan
EU Representative:
JVCKENWOOD NEDERLAND B.V.
Amsterdamseweg 37, 1422 AC UITHOORN, The Netherlands
Déclaration de conformité vis à vis de la Directive
1999/5/CE de R&TTE
Déclaration de conformité se rapportant à la directive
EMC 2004/108/EC
Déclaration de conformité se rapportant à la directive
RoHS 2011/65/EU
Fabricant:
JVC KENWOOD Corporation
3-12, Moriya-cho, Kanagawa-ku, Yokohama-shi, Kanagawa,
221-0022, Japan
Représentants dans l’UE:
JVCKENWOOD NEDERLAND B.V.
Amsterdamseweg 37, 1422 AC UITHOORN, The Netherlands
Konformitätserklärung in Bezug auf die R&TTE-Vorschrift
1999/5/EC
Konformitätserklärung in Bezug auf die EMC-Vorschrift
2004/108/EC
Konformitätserklärung in Bezug auf die RoHS-Vorschrift
2011/65/EU
Hersteller:
JVC KENWOOD Corporation
3-12, Moriya-cho, Kanagawa-ku, Yokohama-shi, Kanagawa,
221-0022, Japan
EU-Vertreter:
Kenwood Electronics Europe BV
Amsterdamseweg 37, 1422 AC UITHOORN, Niederlande
Conformiteitsverklaring met betrekking tot de R&TTE-
richtlijn van de Europese Unie (1999/5/EC)
Conformiteitsverklaring met betrekking tot de EMC-richtlijn
van de Europese Unie (2004/108/EC)
Conformiteitsverklaring met betrekking tot de RoHS richtlijn
van de Europese Unie (2011/65/EU)
Fabrikant:
JVC KENWOOD Corporation
3-12, Moriya-cho, Kanagawa-ku, Yokohama-shi, Kanagawa,
221-0022, Japan
EU-vertegenwoordiger:
JVCKENWOOD NEDERLAND B.V.
Amsterdamseweg 37, 1422 AC UITHOORN, Nederland
Dichiarazione di conformità alla Direttiva R & TTE
1999/5/CE
Dichiarazione di conformità relativa alla direttiva EMC
2004/108/CE
Dichiarazione di conformità relativa alla direttiva RoHS
2011/65/EU
Produttore:
JVC KENWOOD Corporation
3-12, Moriya-cho, Kanagawa-ku, Yokohama-shi, Kanagawa,
221-0022, Japan
Rappresentante UE:
JVCKENWOOD NEDERLAND B.V.
Amsterdamseweg 37, 1422 AC UITHOORN, The Netherlands
Declaración de conformidad con respecto a la Directiva
R&TTE 1999/5/CE
Declaración de conformidad con respecto a la Directiva
EMC 2004/108/CE
Declaración de conformidad con respecto a la Directiva
RoHS 2011/65/EU
Fabricante:
JVC KENWOOD Corporation
3-12, Moriya-cho, Kanagawa-ku, Yokohama-shi, Kanagawa,
221-0022, Japan
Representante en la UE:
JVCKENWOOD NEDERLAND B.V.
Amsterdamseweg 37, 1422 AC UITHOORN, Países Bajos
JS_KWD_KDC_BT48DAB_EWE0_03_EN.indd iiiJS_KWD_KDC_BT48DAB_EWE0_03_EN.indd iii 5/12/2013 10:45:37 AM5/12/2013 10:45:37 AM

iv
Data Size: B6L (182 mm x 128 mm)
Book Size: B6L (182 mm x 128 mm)
English
Hereby, JVC KENWOOD declares that this unit
KDC-BT48DAB is in compliance with the essential
requirements and other relevant provisions of
Directive 1999/5/EC.
Français
Par la présente JVC KENWOOD déclare que l’appareil
KDC-BT48DAB est conforme aux exigences
essentielles et aux autres dispositions pertinentes
de la directive 1999/5/CE.
Par la présente, JVC KENWOOD déclare que
ce KDC-BT48DAB est conforme aux exigences
essentielles et aux autres dispositions de la directive
1999/5/CE qui lui sont applicables.
Deutsch
Hiermit erklärt JVC KENWOOD, dass sich dieser
KDC-BT48DAB in Übereinstimmung mit den
grundlegenden Anforderungen und den anderen
relevanten Vorschriften der Richtlinie 1999/5/EG
befindet. (BMWi)
Hiermit erklärt JVC KENWOOD die Übereinstimmung
des Gerätes KDC-BT48DAB mit den grundlegenden
Anforderungen und den anderen relevanten
Festlegungen der Richitlinie 1999/5/EG. (Wien)
Nederlands
Hierbij verklaart JVC KENWOOD dat het toestel
KDC-BT48DAB in overeenstemming is met de
essentiële eisen en de andere relevante bepalingen
van richtlijn 1999/5/EG.
Bij deze verklaat JVC KENWOOD dat deze
KDC-BT48DAB voldoet aan de essentiële eisen en
aan de overige relevante bepalingen van Richtlijn
1999/5/EC.
Italiano
Con la presente JVC KENWOOD dichiara che questo
KDC-BT48DAB è conforme ai requisiti essenziali
ed alle altre disposizioni pertinenti stabilite dalla
direttiva 1999/5/CE.
Español
Por medio de la presente JVC KENWOOD declara
que el KDC-BT48DAB cumple con los requisitos
esenciales y cualesquiera otras disposiciones
aplicables o exigibles de la Directiva 1999/5/CE.
Português
JVC KENWOOD declara que este KDC-BT48DAB está
conforme com os requisitos essenciais e outras
disposições da Directiva 1999/5/CE.
Polska
JVC KENWOOD niniejszym oświadcza, że
KDC-BT48DAB spełnia zasadnicze wymogi oraz inne
istotne postanowienia dyrektywy 1999/5/EC.
Český
JVC KENWOOD tímto prohlašuje, že tento
KDC-BT48DAB je ve shode se základními požadavky
a dalšími príslušnými ustanoveními smernice
1999/5/ES.
Magyar
Alulírott, JVC KENWOOD, kijelenti, hogy a jelen
KDC-BT48DAB megfelel az 1999/5/EC irányelvben
meghatározott alapvető követelményeknek és
egyéb vonatkozó előírásoknak.
Svenska
Härmed intygar JVC KENWOOD att denna
KDC-BT48DAB stär l överensstämelse med de
väsentliga egenskapskrav och övriga relevanta
bestämmelser som framgår av direktiv 1999/5/EG.
Suomi
JVC KENWOOD vakuuttaa täten että KDC-BT48DAB
tyyppinen laite on direktiivin 1999/5/EY oleellisten
vaatimusten ja sitä koskevien direktiivin muiden
ehtojen mukainen.
Slovensko
S tem JVC KENWOOD izjavlja, da je ta KDC-BT48DAB
v skladu z osnovnimi zahtevami in ostalimi
ustreznimi predpisi Direktive 1999/5/EC.
Slovensky
Spoločnosť JVC KENWOOD týmto vyhlasuje, že
KDC-BT48DAB spĺňa zákldné požiadavky a ďalšie
prislušné ustanovenia Direktĺvy 1999/5/EC.
Dansk
Undertegnede JVC KENWOOD erklærer harved,
at følgende udstyr KDC-BT48DAB overholder de
væsentlige krav og øvrige relevante krav i direktiv
1999/5/EF.
Ελληνικά
ΜΕ ΤΗΝ ΠΑΡΟΥΣΑ JVC KENWOOD ΔΗΛΩΝΕΙ ΟΤΙ
KDC-BT48DAB ΣΥΜΜΟΡΦΩΝΕΤΑΙ ΠΡΟΣ ΤΙΣ
ΟΥΣΙΩΔΕΙΣ ΑΠΑΙΤΗΣΕΙΣ ΚΑΙ ΤΙΣ ΛΟΙΠΕΣ ΣΧΕΤΙΚΕΣ
ΔΙΑΤΑΞΕΙΣ ΤΗΣ ΟΔΗΓΙΑΣ 1999/5/EK.
Eesti
Sellega kinnitab JVC KENWOOD, et see
KDC-BT48DAB vastab direktiivi 1999/5/EC
põhilistele nõudmistele ja muudele asjakohastele
määrustele.
Latviešu
Ar šo, JVC KENWOOD, apstiprina, ka KDC-BT48DAB
atbilst Direktīvas 1999/5/EK galvenajām prasībām
un citiem tās nosacījumiem.
Lietuviškai
Šiuo, JVC KENWOOD, pareiškia, kad šis
KDC-BT48DAB atitinka pagrindinius Direktyvos
1999/5/EB reikalavimus ir kitas svarbias nuostatas.
Malti
Hawnhekk, JVC KENWOOD, jiddikjara li dan
KDC-BT48DAB jikkonforma mal-ħtiġijiet essenzjali
u ma provvedimenti oħrajn relevanti li hemm
fid-Dirrettiva 1999/5/EC.
Українська
Компанія JVC KENWOOD заявляє, що цей виріб
KDC-BT48DAB відповідає ключовим вимогам
та іншим пов’язаним положенням Директиви
1999/5/EC.
Turkish
Bu vesileyle JVC KENWOOD, KDC-BT48DAB
ünitesinin, 1999/5/EC Direktifinin başlıca
gereksinimleri ve diğer ilgili hükümleri ile uyumlu
olduğunu beyan eder.
JS_KWD_KDC_BT48DAB_EWE0_02_EN.indd ivJS_KWD_KDC_BT48DAB_EWE0_02_EN.indd iv 25/11/2013 5:17:22 PM25/11/2013 5:17:22 PM

2
Data Size: B6L (182 mm x 128 mm)
Book Size: B6L (182 mm x 128 mm)
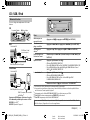
CONTENTS BEFORE USE
Warning
Do not operate any function that takes your attention away from safe driving.
Caution
Volume setting:
• Adjust the volume so that you can hear sounds outside the car to prevent accidents.
• Lower the volume before playing digital sources to avoid damaging the speakers by the sudden increase of
the output level.
General:
• Avoid using the USB device or iPod/iPhone if it might hinder safe driving.
• Make sure all important data has been backed up. We shall bear no responsibility for any loss of recorded
data.
• Never put or leave any metallic objects (such as coins or metal tools) inside the unit, to prevent a short
circuit.
• If a disc error occurs due to condensation on the laser lens, eject the disc and wait for the moisture to
evaporate.
Remote control (RC-406):
• Do not leave the remote control in hot places such as on the dashboard.
• The Lithium battery is in danger of explosion if replaced incorrectly. Replace it only with the same or
equivalent type.
• The battery pack or batteries shall not be exposed to excessive heat such as sunshine, fire or the like.
• Keep the battery out of reach of children and in its original packaging when not in used. Dispose of used
batteries promptly. If swallowed, contact a physician immediately.
BEFORE USE 2
BASICS 3
GETTING STARTED 4
DIGITAL RADIO (DAB) 5
ANALOG RADIO 7
CD / USB / iPod 9
AUX 11
Aha
TM
RADIO 11
BLUETOOTH® 12
AUDIO SETTINGS 17
DISPLAY SETTINGS 18
MORE INFORMATION 18
TROUBLESHOOTING 19
SPECIFICATIONS 21
INSTALLATION /
CONNECTION 23
How to read this manual
• Operations are explained mainly
using buttons on the faceplate.
•
[XX]
indicates the selected items.
•
( XX)
indicates references are
available on the stated page.
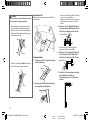
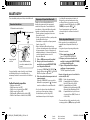
Maintenance
Cleaning the unit: Wipe off dirt on the faceplate with a dry silicone or soft cloth.
Cleaning the connector: Detach the faceplate and clean the connector
gently with a cotton swab, being careful not to damage the connector.
Handling discs:
• Do not touch the recording surface of the disc.
• Do not stick tape etc. on the disc, or use a disc with tape stuck on it.
• Do not use any accessories for the disc.
• Clean from the center of the disc and move outward.
• Clean the disc with a dry silicone or soft cloth. Do not use any solvents.
• When removing discs from this unit, pull them out horizontally.
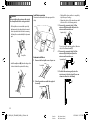
• Remove burrs from the center hole and disc edge before inserting a disc.
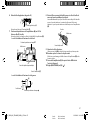
Connector (on the reverse
side of the faceplate)
JS_KWD_KDC_BT48DAB_EWE0_02_EN.indd 2JS_KWD_KDC_BT48DAB_EWE0_02_EN.indd 2 25/11/2013 5:17:22 PM25/11/2013 5:17:22 PM

3
Data Size: B6L (182 mm x 128 mm)
Book Size: B6L (182 mm x 128 mm)
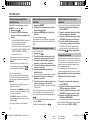
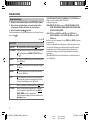
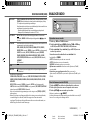
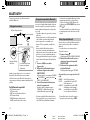
BASICS
To Do this (on the faceplate) Do this (on the remote control)
Turn on the power
Press B SRC.
• Press and hold to turn off the power.
Press and hold SRC to turn off the power.
( Pressing SRC does not turn on the power. )
Adjust the volume Turn the volume knob. Press VOL
or VOL .
Press ATT during playback to attenuate the sound.
• Press again to cancel.
Select a source
Press B SRC repeatedly.
Press SRC repeatedly.
Change the display
information
Press DISPSCRL repeatedly.
• Press and hold to scroll the current display information.
( not available )
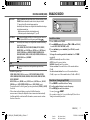
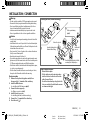
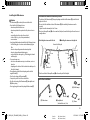
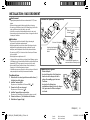
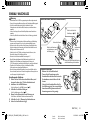
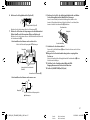
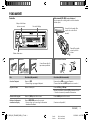
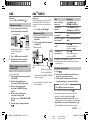
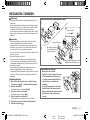
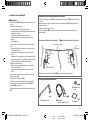
Faceplate
How to resetAttach Detach
Remote control (RC-406) (not supplied)
(However, this unit can be remotely controlled with an
optionally purchased remote control.)
Volume knob
(turn/press)
Detach button
Display window
ENGLISH |
Pull out the
insulation sheet
when using for the
first time.
Your preset
adjustments will also
be erased.
How to replace the battery
Remote sensor (Do not expose
to bright sunlight.)
JS_KWD_KDC_BT48DAB_EWE0_03_EN.indd 3JS_KWD_KDC_BT48DAB_EWE0_03_EN.indd 3 5/12/2013 4:34:50 PM5/12/2013 4:34:50 PM

4
Data Size: B6L (182 mm x 128 mm)
Book Size: B6L (182 mm x 128 mm)
GETTING STARTED
Cancel the demonstration
When you turn on the power (or after you reset the unit), the display
shows: “SELLANGUAGE”
“PRESS” “VOLUMEKNOB”
1 Turn the volume knob to select
[ENG]
(English) or
[RUS] (Russian)
, then
press the knob.
[ENG]
is selected for the initial setup.
Then, the display shows: “CANCELDEMO” “PRESS”
“VOLUMEKNOB”
2 Press the volume knob.
[YES]
is selected for the initial setup.
3 Press the volume knob again.
“DEMOOFF” appears.
Set the clock
1
Press the volume knob to enter
[FUNCTION]
.
2 Turn the volume knob to select
[CLOCK]
, then press the knob.
3 Turn the volume knob to select
[CLOCK ADJUST]
, then press the knob.
4 Turn the volume knob to make the settings, then press the knob.
Day Hour Minute
5 Turn the volume knob to select
[CLOCK FORMAT]
, then press the knob.
6 Turn the volume knob to select
[12H]
or
[24H]
, then press the knob.
7 Press and hold to exit.
To return to the previous setting item or hierarchy, press .
1
2
Set the initial settings
1
Press B SRC to enter STANDBY.
2 Press the volume knob to enter
[FUNCTION]
.
3 Turn the volume knob to make a selection (see the following table),
then press the knob.
4 Press and hold to exit.
To return to the previous setting item or hierarchy, press .
Default:
XX
AUDIO CONTROL
SP SELECT
OFF
/
5/4
/
6 × 9/6
/
OEM
: Selects according to the speaker size (5inches
or 4inches, 6×9inches or 6inches) or OEM speakers for optimum
performance.
DISPLAY
EASY MENU
ON
:Both display and button illumination change to white color when
entering
[FUNCTION]
.;
OFF
:Both display and button illumination remain
as
[COLOR SELECT]
color.
( 18)
TUNER SETTING
DAB L-BAND
ON
:Receives L-BAND ensemble during digital audio reception.;
OFF
:Cancels.
DAB ANT
POWER
ON
:Supplies power to the DAB antenna. Selects when using the supplied
antenna.;
OFF
:Does not supply power. Selects when using passive
antenna without booster.
( 25)
PRESET TYPE
NORMAL
: Memorizes one station for each preset button in each band
(FM1/ FM2/ FM3/ MW/ LW/ DB1/ DB2/ DB3). ;
MIX
: Memorizes one station
for each preset button, regardless of the selected band.
SYSTEM
KEY BEEP
ON
:Activates the keypress tone.;
OFF
:Deactivates.
3
JS_KWD_KDC_BT48DAB_EWE0_03_EN.indd 4JS_KWD_KDC_BT48DAB_EWE0_03_EN.indd 4 5/12/2013 10:45:57 AM5/12/2013 10:45:57 AM

5
ENGLISH |
Data Size: B6L (182 mm x 128 mm)
Book Size: B6L (182 mm x 128 mm)
SOURCE SELECT
AHA SRC
ON
:Enables AHA in source selection.;
OFF
:Disables.
( 11)
BUILT-IN AUX
ON
:Enables AUX in source selection.;
OFF
:Disables.
( 11)
RUSSIAN SET
Selects the display language
for
[FUNCTION]
menu and Tag
information (folder name, file name,
song title, artist name, album name) if
applicable.
OFF
:Display language is English.;
BКЛ
:Display language is Russian.
P-OFF WAIT
Applicable only when the
demonstration mode is turned off.
Sets the duration when the unit will
automatically turns off (while in
standby mode) to save the battery.
20M
: 20minutes;
40M
: 40minutes;
60M
: 60minutes;
WAIT TIME – – –
:Cancels
CD READ 1
:Automatically distinguishes between
audio file disc and music CD.;
2
: Forces
to play as an music CD. No sound can be
heard if an audio file disc is played.
F/W UPDATE
UPDATE SYSTEM / UPDATE BT/ UPDATE DAB1/
UPDATE DAB2
F/W UP xx.xx/
F/W UP xx.x.x/
F/W UP Vxxx
YES
:Starts upgrading the firmware.;
NO
:Cancels (upgrading is not
activated).
For details on how to update the
firmware, see:
www.kenwood.com/cs/ce/
GETTING STARTED
DIGITAL RADIO (DAB)
About DAB (Digital Audio Broadcasting)
DAB is one of the digital radio broadcasting
systems available today. It can deliver
digital quality sound without any annoying
interference or signal distortion. Furthermore, it
can carry text, pictures and data.
In contrast to FM broadcast, where each
program is transmitted on its own frequency,
DAB combines several programs (called
“services”) to form one “ensemble.”
The “primary component” (main radio station)
is sometimes accompanied by a “secondary
component” which can contain extra programs
or other information.
Preparation:
1 Connect a DAB antenna to the DAB
antenna jack.
( 25)
2 Press B SRC to select DAB.
3 Press and hold to start the Service
List update.
“LIST UPDATE” appears and update
starts. “UPDATED” appears when update
completes.
Updates take up to 3 minutes. No
interruption (such as traffic information) is
possible during updates.
• To cancel the Service List update: Press and
hold
again.
Start listening
1
Press B SRC to select DAB.
2 Press J BAND repeatedly (or press #FM+ on RC-406) to select DB1/ DB2/ DB3.
3 Press and hold S / T (or press and hold S / T(+) on RC-406) to search for an
ensemble.
4 Press S / T (or press S / T(+) on RC-406) to select an ensemble, service or
component to listen.
• To change the tuning method for S / T: Press K SEEK repeatedly.
AUTO1: Press S / T: Select an ensemble, service or component.
Press and hold S / T: Automatically search for an ensemble.
AUTO2: Press S / T: Search for a preset service.
MANUAL: Press S / T: Select an ensemble, service or component.
Press and hold S / T: Manually search for an ensemble.
JS_KWD_KDC_BT48DAB_EWE0_03_EN.indd 5JS_KWD_KDC_BT48DAB_EWE0_03_EN.indd 5 5/12/2013 10:45:58 AM5/12/2013 10:45:58 AM

6
Data Size: B6L (182 mm x 128 mm)
Book Size: B6L (182 mm x 128 mm)
DIGITAL RADIO (DAB)
• To store a service: Press and hold one of the number buttons
(1to6).
• To select a stored service: Press one of the number buttons
(1to6) (or press one of the number buttons (1to6) on RC-406).
Select a service
1
Press to enter Service Search mode.
2 Turn the volume knob or press J / K to select a service, then
press the knob.
(or using RC-406)
Press J / K to search for a service.
To cancel the Service Search mode, press
.
Select a service by name
1
Press to enter Service Search mode.
2 Turn the volume knob quickly to enter Alphabet Search
mode.
3 Turn the volume knob or press S / T to select the
character to be searched for.
Press J / K to go to the previous/next page.
4 Press the volume knob to start searching.
5 Turn the volume knob to select a service, then press the knob.
To cancel the Alphabet Search mode, press .
Replay
Press and hold K SEEK (or press K on RC-406).
“REPLAY MODE” appears and replay starts from the live position. You can replay
a certain length of time of the current service (depending on the audio bit rate).
During Replay...
• To pause or resume playback, press 6 IW (or press ENT IW on RC-406).
• To skip the current song backward/forward, press S / T (or press
S / T(+) on RC-406).
• To rewind/fast-forward, press and hold S / T (or press and hold
S / T(+) on RC-406).
• To exit from Replay and go to live, press and hold K SEEK (or press and hold
K on RC-406).
Other settings
1
Press the volume knob to enter
[FUNCTION]
.
2 Turn the volume knob to make a selection (see the following table), then
press the knob.
3 Press and hold to exit.
To return to the previous setting item or hierarchy, press .
Default:
XX
TUNER SETTING
AF SET
ON
:
While listening to DAB...
Automatically switch to FM broadcasting the same program if the DAB signal becomes
weak. It will switch back to DAB sound when the signal becomes strong again.
While listening to FM...
Automatically switch to DAB source broadcasting the same program (if available).;
OFF
:Cancels.
TI ON
:Allows the unit to temporarily switch to Traffic Information.;
OFF
:Cancels.
PTY SEARCH
Press the volume knob to enter PTY language selection. Turn the volume knob to
select the PTY language (
ENGLISH
/
FRENCH
/
GERMAN
), then press the knob.
Selects the available Program Type
( 7)
, then, press
S / T
to start.
JS_KWD_KDC_BT48DAB_EWE0_02_EN.indd 6JS_KWD_KDC_BT48DAB_EWE0_02_EN.indd 6 25/11/2013 5:17:23 PM25/11/2013 5:17:23 PM

7
ENGLISH |
Data Size: B6L (182 mm x 128 mm)
Book Size: B6L (182 mm x 128 mm)
Search for a station
1
Press B SRC to select TUNER.
2 Press JBAND repeatedly (or press
*
AM–/#FM+ on RC-406)
to select FM1/ FM2/ FM3/ MW (or LW).
3 Press S / T (or press S / T(+) on RC-406) to search
for a station.
• To change the searching method for S / T: Press KSEEK
repeatedly.
AUTO1: Automatically search for a station.
AUTO2: Search for a preset station.
MANUAL: Manually search for a station.
• To store a station: Press and hold one of the number buttons
(1to6).
• To select a stored station: Press one of the number buttons
(1to6) (or press one of the number buttons (1to6) on RC-406).
Direct Access Tuning (using RC-406)
1
Press DIRECT to enter Direct Access Tuning.
2 Press the number buttons to enter a frequency.
3 Press ENTIW to search for a station.
• To cancel, press or DIRECT.
• If no operation is done for 10seconds after step
2, Direct Access
Tuning is automatically canceled.
ANALOG RADIODIGITAL RADIO (DAB)
ASW SELECT TRAVEL, WARNINGS, NEWS, WEATHER, EVENT, SPECIAL, RAD INFO, SPORTS,
FINANCE:
Turn the volume knob to make a selection, then press the knob.
“
*
” appears in front of the activated announcement type.
Automatically switch from any source to Digital radio ensembles broadcasting an
activated announcement type.
•
Multiple announcement can be activated simultaneously.
•
To deactivate, press the volume knob again (“
*
” goes off).
LIST UPDATE AUTO
:Automatically update the DAB Service List when the power is turned on.;
MANUAL
:Updates the DAB Service List by pressing and holding .
PTY WATCH
Automatically switch from any source to Digital Radio ensembles broadcasting a
selected type of program.
NEWS, AFFAIRS, INFO, SPORT, EDUCATE, DRAMA, CULTURE, SCIENCE,
VARIED, POP M
(music)
, ROCK M
(music)
, EASY M
(music)
, LIGHT M
(music)
,
CLASSICS, OTHER M
(music)
, WEATHER, FINANCE, CHILDREN, SOCIAL,
RELIGION, PHONE IN, TRAVEL, LEISURE, JAZZ, COUNTRY, NATION M
(music)
,
OLDIES, FOLK M
(music)
, DOCUMENT
OFF
:Cancels.
CLOCK
TIME SYNC
ON
:Synchronizes the unit’s time to the Digital Radio signal station time.;
OFF
:Cancels.
• Available Program Type:
SPEECH
:
NEWS
,
AFFAIRS
,
INFO
(information),
SPORT
,
EDUCATE
,
DRAMA
,
CULTURE
,
SCIENCE
,
VARIED
,
WEATHER
,
FINANCE
,
CHILDREN
,
SOCIAL
,
RELIGION
,
PHONE IN
,
TRAVEL
,
LEISURE
,
DOCUMENT
MUSIC
:
POP M
(music),
ROCK M
(music),
EASY M
(music),
LIGHT M
(music),
CLASSICS
,
OTHER M
(music),
JAZZ
,
COUNTRY
,
NATION M
(music),
OLDIES
,
FOLK M
(music)
The unit will search for the Program Type categorized under
[SPEECH]
or
[MUSIC]
if selected.
• If the volume is adjusted during reception of traffic information,
announcement or alarm, the adjusted volume is memorized automatically.
It will be applied the next time traffic information, announcement or alarm
function is turned on.
JS_KWD_KDC_BT48DAB_EWE0_03_EN.indd 7JS_KWD_KDC_BT48DAB_EWE0_03_EN.indd 7 5/12/2013 10:46:08 AM5/12/2013 10:46:08 AM

8
Data Size: B6L (182 mm x 128 mm)
Book Size: B6L (182 mm x 128 mm)
Other settings
1
Press the volume knob to enter
[FUNCTION]
.
2 Turn the volume knob to make a selection (see the following table),
then press the knob.
3 Press and hold to exit.
To return to the previous setting item or hierarchy, press .
Default:
XX
TUNER SETTING
LOCAL SEEK
ON
: Searches only FM stations with good reception. ;
OFF
: Cancels.
AUTO MEMORY YES
:Automatically starts memorizing 6 stations with good
reception.;
NO
:Cancels. (Selectable only if
[NORMAL]
is selected for
[PRESET
TYPE]
.)
(
4)
MONO SET
ON
:Improves the FM reception, but the stereo effect may be lost.;
OFF
:Cancels.
NEWS SET ON
: The unit will temporarily switch to News Programme if available. ;
OFF
: Cancels.
REGIONAL ON
: Switches to another station only in the specific region using the “AF”
control.;
OFF
:Cancels.
AF SET ON
: Automatically searches for another station broadcasting the same
program in the same Radio Data System network with better reception
when the current reception is poor.;
OFF
: Cancels.
TI
*
ON
:Allows the unit to temporarily switch to Traffic Information.;
OFF
:Cancels.
PTY SEARCH
Press the volume knob to enter PTY language selection. Turn the volume
knob to select the PTY language (
ENGLISH
/
FRENCH
/
GERMAN
), then
press the knob.
Selects the available Program Type (see the following), then, press
S / T
to start.
ANALOG RADIO
•
[LOCAL SEEK]
/
[MONO SET]
/
[NEWS SET]
/
[REGIONAL]
/
[AF SET]
/
[PTY SEARCH]
is
selectable only when the band is FM1/ FM2/ FM3.
• Available Program Type:
SPEECH
:
NEWS
,
AFFAIRS
,
INFO
(information),
SPORT
,
EDUCATE
,
DRAMA
,
CULTURE
,
SCIENCE
,
VARIED
,
WEATHER
,
FINANCE
,
CHILDREN
,
SOCIAL
,
RELIGION
,
PHONE
IN
,
TRAVEL
,
LEISURE
,
DOCUMENT
MUSIC
:
POP M
(music),
ROCK M
(music),
EASY M
(music),
LIGHT M
(music),
CLASSICS
,
OTHER M
(music),
JAZZ
,
COUNTRY
,
NATION M
(music),
OLDIES
,
FOLK M
(music)
The unit will search for the Program Type categorized under
[SPEECH]
or
[MUSIC]
if selected.
• If the volume is adjusted during reception of traffic information, alarm
or news bulletin, the adjusted volume is memorized automatically. It
will be applied the next time traffic information, alarm or news bulletin
function is turned on.
*
[TI]
in MW/LW band is for enabling traffic interruption to DAB source
only.
JS_KWD_KDC_BT48DAB_EWE0_02_EN.indd 8JS_KWD_KDC_BT48DAB_EWE0_02_EN.indd 8 25/11/2013 5:17:24 PM25/11/2013 5:17:24 PM

9
ENGLISH |
Data Size: B6L (182 mm x 128 mm)
Book Size: B6L (182 mm x 128 mm)
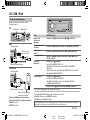
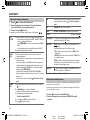
Start playback
The source changes automatically and playback
starts.
CD
USB
iPod/iPhone
Press 5 iPod to select the control mode while
in iPod source.
MODE ON:
From the iPod
*
2
.
MODE OFF:
From the unit.
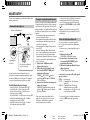
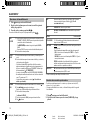
Label side
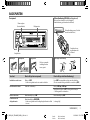
M
Eject disc
USB input terminal
USB input terminal
CA-U1EX (max.: 500mA)
(optional accessory)
CD / USB / iPod
USB cable from the rear of the unit
and/ or
KCA-iP102 (optional accessory) or
accessory cable of the iPod/iPhone
*
1
USB cable from the rear of the unit
and/ or
To Do this
Pause or resume
playback
Press 6 IW (or press ENT IW on RC-406).
Select a track/file
Press S / T (or press S / T(+) on RC-406).
Select a folder
*
3
Press J / K (or press
*
AM– / #FM+ on RC-406).
Reverse/Fast-forward
Press and hold S / T (or press and hold S / T(+) on RC-406).
Repeat play
*
4
Press 4 repeatedly.
• Audio CD: TRACKREPEAT, REPEATOFF
• MP3/WMA/AAC/WAV file or iPod: FILEREPEAT, FOLDERREPEAT,
REPEATOFF
• KENWOOD Music Editor Light (KME Light)/ KENWOOD Music Control
(KMC) file
( 18)
: FILEREPEAT, REPEATOFF
Random play
*
4
Press 3 repeatedly.
• Audio CD: DISCRANDOM, RANDOMOFF
• MP3/WMA/AAC/WAV file or iPod or KME Light/ KMC file:
FOLDERRANDOM, RANDOMOFF
Press and hold 3 to select “ALLRANDOM”.
*
5
*
1
Do not leave the cable inside the car when not using.
*
2
You can still play/pause, file skip, fast-forward or reverse files from the unit.
*
3
Only for MP3/WMA/AAC/WAV files. This does not work for iPod.
*
4
For iPod: Applicable only when
[MODE OFF]
is selected.
*
5
For CD: Only for MP3/WMA/AAC files.
If you connect the iPod/iPhone to the USB input terminal of the unit (while listening to TuneIn
Radio, TuneIn Radio Pro or Aupeo), the unit will output the sound from these apps.
JS_KWD_KDC_BT48DAB_EWE0_03_EN.indd 9JS_KWD_KDC_BT48DAB_EWE0_03_EN.indd 9 5/12/2013 10:46:14 AM5/12/2013 10:46:14 AM

10
Data Size: B6L (182 mm x 128 mm)
Book Size: B6L (182 mm x 128 mm)
Set the skip search ratio
While listening to iPod or KME Light/ KMC file...
1 Press the volume knob to enter
[FUNCTION]
.
2 Turn the volume knob to select
[USB]
, then
press the knob.
3 Turn the volume knob to select
[SKIP SEARCH]
, then press the knob.
4 Turn the volume knob to make a selection,
then press the knob.
0.5%
(default)/
1%
/
5%
/
10%
: Skip search
ratio over the total files.
5 Press and hold to exit.
Change the USB drive
When a smartphone (Mass Storage Class) is
connected to the USB input terminal, you can
select its internal memory or external memory
(such as an SD card) to playback the stored songs.
You can also select the desired drive to playback
when a multiple drives device is connected.
Press 5 iPod repeatedly to select the desired
drive.
(or)
1 Press the volume knob to enter
[FUNCTION]
.
2 Turn the volume knob to select
[USB]
, then
press the knob.
3 Turn the volume knob to select
[MUSIC DRIVE]
, then press the knob.
4 Press the volume knob to select
[DRIVE CHANGE]
.
The next drive is selected automatically.
Repeat steps 1 to
4 to select the following
drives.
Selectable items:
[DRIVE
1]
to
[DRIVE
5]
Direct Music Search (using RC-406)
1
Press DIRECT.
2 Press the number buttons to enter a track/
file number.
3 Press ENT IW to search for music.
• To cancel, press .
• Not available if Random Play is selected.
• Not applicable for iPod, KME Light/ KMC file.
Select a song by name
While listening to iPod...
1 Press .
2 Turn the volume knob to select a category,
then press the knob.
3 Turn the volume knob quickly to enter
character search.
4 Turn the volume knob to select the
character to be searched for.
5 Press S / T to move to the entry
position.
You can enter up to 3characters.
6 Press the volume knob to start searching.
7 Turn the volume knob to make a selection,
then press the knob.
Repeat step
7 until the desired item is
selected.
• To search for a character other than A to Z
and 0 to 9, enter only “
*
”.
• To return to the previous hierarchy, press
.
• To return to the top menu, press number
button 5 iPod.
• To cancel, press and hold
.
CD / USB / iPod
Select a track/file from a list
For iPod: Applicable only when
[MODE OFF]
is
selected.
( 9)
1 Press .
2 Turn the volume knob to make a selection,
then press the knob.
• MP3/WMA/AAC/WAV file: Select the
desired folder, then a file.
• iPod or KME Light/ KMC file: Select the
desired file from the list (PLAYLISTS,
ARTISTS, ALBUMS, SONGS, PODCASTS
*
,
GENRES, COMPOSERS
*
).
*
Only for iPod.
• To return to the root folder (or first file), press
number button 5 iPod.
• To return to the previous setting item or
hierarchy, press
.
• To cancel, press and hold
.
If you have many files....
You can search through them quickly (on step 2
above) at a preset skip search ratio by pressing
S / T.
• See also “Set the skip search ratio.”
• Pressing and holding S / T skip songs at
the maximum ratio (10
%
) regardless of the
setting made.
• For USB: Only for files registered in the
database created with KME Light/ KMC.
• Not applicable for audio CD.
JS_KWD_KDC_BT48DAB_EWE0_02_EN.indd 10JS_KWD_KDC_BT48DAB_EWE0_02_EN.indd 10 25/11/2013 5:17:24 PM25/11/2013 5:17:24 PM

11
ENGLISH |
Data Size: B6L (182 mm x 128 mm)
Book Size: B6L (182 mm x 128 mm)
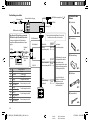
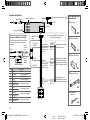
AUX Aha
TM
RADIO
Preparation:
Select
[ON]
for
[BUILT-IN AUX]
.
( 5)
Start listening
1
Connect a portable audio player
(commercially available).
2 Press B SRC to select AUX.
3 Turn on the portable audio player and
start playback.
Set the AUX name
While listening to a portable audio player
connected to the unit...
1 Press the volume knob to enter
[FUNCTION]
.
2 Turn the volume knob to select
[SYSTEM]
,
then press the knob.
3 Turn the volume knob to select
[AUX NAME SET]
, then press the knob.
4 Turn the volume knob to make a
selection, then press the knob.
AUX
(default)/
DVD
/
PORTABLE
/
GAME
/
VIDEO
/
TV
5 Press and hold to exit.
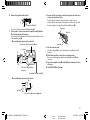
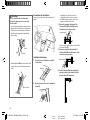
Auxiliary input jack
Portable audio
player
3.5mm stereo mini plug with “L”
shaped connector (commercially
available)
Preparation:
Install the latest version of Aha
TM
application onto your device (iPhone/
iPod touch), then create an account and
log in to Aha
TM
.
• Select
[ON]
for
[AHA SRC]
.
( 5)
Start listening
1
Open the Aha
TM
application on your
device.
2 Connect your device to the USB
input terminal.
The source changes to AHA FRONT/
AHA REAR and broadcast starts.
* Do not leave the cable inside the car
when not using.
To Do this
Pause or resume
playback
Press 6 IW (or press
ENT IW on RC-406).
Select a content
Press S / T (or press
S / T(+) on RC-406).
Forward 30seconds
of a content
*
1
Press and hold T.
Backward 15seconds
of a content
*
1
Press and hold S.
“Likes” current
content
*
2
Press J .
• To unvote, press J
again.
“Dislikes” current
content
*
2
Press K .
• To unvote, press K
again.
*
1
Applicable to audiobook and podcast only.
*
2
Not applicable to audiobook and Location Based
Stations (LBS).
Search for a station
1
Press .
2 Turn the volume knob to select a station, then
press the knob.
3 Turn the volume knob to the desired content,
then press the knob.
(or using RC-406)
Press J / K to search for a station.
To cancel, press and hold .
You can make a call when your device is connected to
the unit via Bluetooth connection
( 12)
...
• To call a number in the content*: Press 1, then press
the volume knob to call.
• To end or disconnect a call: Press
.
* The availability is depending on the selected station.
USB input terminal
KCA-iP102 (optional accessory) or
accessory cable of the iPod/iPhone
*
USB cable from the rear of the unit
and/ or
JS_KWD_KDC_BT48DAB_EWE0_02_EN.indd 11JS_KWD_KDC_BT48DAB_EWE0_02_EN.indd 11 29/11/2013 9:36:50 AM29/11/2013 9:36:50 AM

12
Data Size: B6L (182 mm x 128 mm)
Book Size: B6L (182 mm x 128 mm)
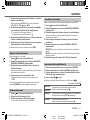
BLUETOOTH®
You can operate Bluetooth devices using this unit.
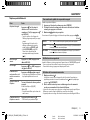
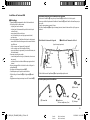
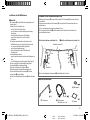
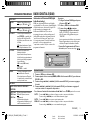
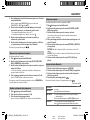
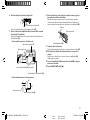
Connect the microphone
If you turn off the unit or detach the control panel
during a phone call conversation, the Bluetooth
connection is disconnected. Continue the
conversation using your mobile phone.
Supported Bluetooth profiles
– Hands-Free Profile (HFP)
– Serial Port Profile (SPP)
– Phonebook Access Profile (PBAP)
– Object Push Profile (OPP)
– Advanced Audio Distribution Profile (A2DP)
– Audio/Video Remote Control Profile (AVRCP)
Adjust the microphone
angle
Secure using cord clamps (not
supplied) if necessary.
MIC (Microphone input terminal)
Microphone (supplied)
Rear panel
• Pairing request (via Bluetooth) is
automatically activated if an iPhone/iPod
touch is connected through the USB input
terminal. (Applicable only if
[AUTO PAIRING]
is
set to
[ON]
.)
( 16)
Press the volume knob to pair once you
have confirm the device name.
Bluetooth test mode
You can check the connectivity of the
supported profile between the Bluetooth
device and the unit.
• Make sure there is no Bluetooth device
connected.
1 Press and hold .
“PLEASE PAIR YOUR PHONE” appears.
2 Search and select this unit model name
(KDC-BT4*DAB) on the Bluetooth device.
3 Operate the Bluetooth device to confirm
pairing.
“TESTING” flashes on the display.
The connectivity result (OK or NG) appears
after the test.
PAIRING: Pairing status
HF CNT: Hands-Free Profile (HFP)
compatibility
AUD CNT: Advanced Audio Distribution
Profile (A2DP) compatibility
PB DL: Phonebook Access profile (PBAP)
compatibility
• To cancel check mode, press and hold
B SRC to turn off the unit.
Pair a Bluetooth device
When connecting a Bluetooth device to
the unit for the first time, perform pairing
between the unit and the device. Once the
pairing is completed, the Bluetooth device
will remain registered in the unit even if you
reset the unit.
• Up to five devices can be registered (paired)
in total.
• A maximum of two Bluetooth phones
and one Bluetooth audio device can be
connected at any time.
• This unit supports Secure Simple Pairing
(SSP).
• Some Bluetooth devices may not
automatically connect to the unit after
pairing. Connect the device to the unit
manually. Refer to the instruction manual of
the Bluetooth device for more information.
1 Press B SRC to turn on the unit.
2 Search and select this unit model name
(KDC-BT4*DAB) on the Bluetooth device.
“PAIRING”
“PASS XXXXXX” Device
name
“PRESS” “VOLUME KNOB”
scrolls on the display.
3 Press the volume knob to start pairing.
“PAIRING OK” appears when pairing is
completed and “
” will light up when the
Bluetooth connection is established.
• For some Bluetooth devices, you may need
to enter the Personal Identification Number
(PIN) code immediately after searching.
JS_KWD_KDC_BT48DAB_EWE0_02_EN.indd 12JS_KWD_KDC_BT48DAB_EWE0_02_EN.indd 12 25/11/2013 5:17:24 PM25/11/2013 5:17:24 PM

13
ENGLISH |
Data Size: B6L (182 mm x 128 mm)
Book Size: B6L (182 mm x 128 mm)
BLUETOOTH®
Bluetooth mobile phone
To Do this
Receive a call
Press or the volume knob or one of
the number buttons (1 to 6) (or press
on RC-406).
• All the buttons and display
illumination flash when there is an
incoming call.
During a call, the buttons and display
illuminate according to the settings
made for
[DISPLAY]
.
(
18)
• When
[AUTO ANSWER]
is set to the
selected time, the unit answers
incoming call automatically.
(
14)
Reject an incoming
call
Press B SRC (or press on RC-406).
End a call
Press or B SRC (or press on
RC-406).
Switch between
hands-free and
private talk modes
Press 6IW during a call.
• Operations may vary according to the
connected Bluetooth device.
Adjust the phone
volume
Turn the volume knob during a call.
Phone volume:
[00]
to
[35]
(Default:
[15]
)
• This adjustment will not affect the
volume of the other sources.
Switch between two
connected phones
Press repeatedly.
• Not applicable during a call.
Improve the sound quality during a call
While talking on the phone...
1 Press the volume knob to enter
[FUNCTION]
.
2 Turn the volume knob to make a selection (see the following table), then
press the knob.
3 Press and hold to exit.
To return to the previous setting item or hierarchy, press .
Default:
XX
MIC GAIN –20
—+
8
(
0
):The sensitivity of the microphone increases as the number
increased.
NR LEVEL –5
—
–20
(
–10
):Adjust the noise reduction level until the least noise is being
heard during a phone conversation.
ECHO CANCEL 1
—
10
(
4
):Adjust the echo cancellation delay time until the least echo is being
heard during a phone conversation.
Text message notification
When the phone receives a text message, the unit rings and “SMS RECEIVED”
appears.
• You cannot read, edit, or send a message through the unit.
• To clear the message, press any button.
Use Voice Recognition
1
Press and hold .
The connected phone (which has been paired the earliest) is activated.
However, if priority device is connected, pressing and holding
activate the
priority device.
( 15, DVC PRIORITY)
2 Speak the name of the contact you want to call or the voice command to
control the phone functions.
• Supported Voice Recognition features vary for each phone. Refer to the
instruction manual of the connected phone for details.
• This unit also supports the intelligent personal assistant function of iPhone.
JS_KWD_KDC_BT48DAB_EWE0_02_EN.indd 13JS_KWD_KDC_BT48DAB_EWE0_02_EN.indd 13 29/11/2013 9:38:24 AM29/11/2013 9:38:24 AM

14
Data Size: B6L (182 mm x 128 mm)
Book Size: B6L (182 mm x 128 mm)
BLUETOOTH®
VOICE
Speak the name of the contact you want to call or use the voice command
to control the phone functions.
(
13, Use Voice Recognition)
BATT* LOW
/
MID
/
FULL
:Shows the strength of the battery.
SIGNAL* NO SIGNAL
/
LOW
/
MID
/
MAX
:Shows the strength of the current
received signal.
SETTINGS
Default:
XX
AUTO ANSWER
1
—
30
:The unit answer incoming call automatically in the selected
time.;
OFF
:Cancels.
RING MODE SYSTEM:
The unit rings to notify you when a call/text message comes in.
(Default ring tone is different according to the paired device.)
•
CALL:
Selects your preferred ring tone (
TONE 1 — 5
) for incoming
calls.
•
MESSAGE:
Selects your preferred ring tone (
TONE 1 — 5
) for
incoming text messages.
PHONE:
The unit uses the connected phones’ ring tone to notify you
when a call/text message comes in. (The connected phone will ring if it
does not support this feature.)
SMS NOTIFY* ON:
The unit rings and “SMS RECEIVED” appears to notify you of an
incoming text message.;
OFF
:Cancels.
* Functionality depends on the type of the phone used.
Select a contact by name
• You can search through the contacts quickly according to the first letter
(A to Z), number (0 to 9), or symbol.
• The second alphabet of the contact will be searched if the first alphabet
does not exist.
1 Press to enter Bluetooth mode.
2 Turn the volume knob to select
[PHONE BOOK]
, then press the knob.
Bluetooth mode operations
1
Press to enter Bluetooth mode.
2 Turn the volume knob to make a selection (see the following table),
then press the knob.
3 Press and hold to exit.
To return to the previous setting item or hierarchy, press .
CALL
HISTORY
1
Press the volume knob to select a name or a phone number.
• “INCOMING”, “OUTGOING”, or “MISSED” is shown on the lower part of the
display to indicate the previous call status.
• Press
DISP SCRL
to change the display category (NUMBER or NAME).
• “NO DATA” appears if there is no recorded call history.
2
Press the volume knob to call.
PHONE
BOOK
1
Turn the volume knob to select a name, then press the knob.
2
Turn the volume knob to select a phone number, then press the knob to
call.
• If the phone supports PBAP, the phonebook of the connected phone is
automatically transferred to the unit when pairing. If the phone does not
support PBAP, “TRANSFER PB” appears. Transfer the phonebook manually.
(
16, TRANSFER PB)
• Contacts are categorized as: HOME, OFFICE, MOBILE, OTHER, GENERAL
• This unit can display only non-accent letters. (Accent letters such as “Ú” is
showns as “U”.)
• If the phonebook contains many contacts,
(
Select a contact by name).
NUMBER
DIAL
1
Turn the volume knob to select a number (0 to 9) or character ( , #, +).
2
Press
S / T
to move the entry position.
Repeat steps
1
and
2
until you finish entering the phone number.
3
Press the volume knob to call.
(or using RC-406)
1
Press the number buttons (
0
to
9
) to enter the phone number.
2
Press
to call.
JS_KWD_KDC_BT48DAB_EWE0_06_EN.indd 14JS_KWD_KDC_BT48DAB_EWE0_06_EN.indd 14 17/12/2013 3:14:51 PM17/12/2013 3:14:51 PM

15
ENGLISH |
Data Size: B6L (182 mm x 128 mm)
Book Size: B6L (182 mm x 128 mm)
BLUETOOTH®
3 Turn the volume knob quickly to enter alphabet search mode.
The first menu (ABCDEFGHIJK) appears. To go to the other menu
(LMNOPQRSTUV or WXYZ1
), press J / K.
4 Turn the volume knob or press S / T to select the desired first
letter, then press the knob.
• To search with numbers, select “1”.
• To search with symbols, select “ ”.
5 Turn the volume knob to select a name, then press the knob.
6 Turn the volume knob to select a phone number, then press the
knob to call.
To return to the previous hierarchy, press
.
Store a contact in memory
You can store up to 6 contacts.
1 Press to enter Bluetooth mode.
2 Turn the volume knob to select
[CALL HISTORY]
,
[PHONE BOOK]
, or
[NUMBER DIAL]
, then press the knob.
3 Turn the volume knob to select a contact or enter a phone number.
If a contact is selected, press the volume knob to show the phone
number.
4 Press and hold one of the number buttons (1 to 6).
“STORED” appears when the contact is stored.
To erase a contact from the preset memory, select
[NUMBER DIAL]
in
step
2
and store a blank number.
Make a call from memory
1
Press to enter Bluetooth mode.
2 Press one of the number buttons (1 to 6).
3 Press the volume knob to call.
“NO MEMORY” appears if there is no contacts stored.
Delete a contact
Not applicable for mobile phone that supports PBAP.
1 Press to enter Bluetooth mode.
2 Turn the volume knob to select
[CALL HISTORY]
or
[PHONE BOOK]
, then
press the knob.
3 Turn the volume knob to select a contact.
If a contact is selected, press the volume knob to show the phone
number.
4 Press and hold the volume knob to enter delete mode.
5 Turn the volume knob to select
[DELETE ONE]
or
[DELETE ALL]
, then
press the knob.
DELETE ONE
: Selected name or phone number in step 3 is deleted.
DELETE ALL
: All names or phone numbers from the selected menu in
step 2 is deleted.
6 Turn the volume knob to select
[YES]
or
[NO]
, then press the knob.
Bluetooth mode settings
1
Press the volume knob to enter
[FUNCTION]
.
2 Turn the volume knob to select
[BT MODE]
, then press the knob.
3 Turn the volume knob to make a selection (see the following table),
then press the knob.
4 Press and hold to exit.
To return to the previous setting item or hierarchy, press .
Default:
XX
PHONE SELECT
Selects the phone or audio device to connect or disconnect.
“ ”
appears in front of the device name.
AUDIO SELECT
DEVICE DELETE
1
Turn the volume knob to select a device to delete, then press the
knob.
2
Turn the volume knob to select
[YES]
or
[NO]
, then press the knob.
DVC PRIORITY
Selects a device to be connected as priority device.
“ ”
appears in front of the device name set as priority.
JS_KWD_KDC_BT48DAB_EWE0_07_EN.indd 15JS_KWD_KDC_BT48DAB_EWE0_07_EN.indd 15 23/12/2013 5:09:30 PM23/12/2013 5:09:30 PM

16
Data Size: B6L (182 mm x 128 mm)
Book Size: B6L (182 mm x 128 mm)
BLUETOOTH®
TRANSFER PB
*
“DL PB ” appears and transfer the
phonebook of the connected phone to
this unit manually.
* Selectable only when the connected
phone supports OPP.
PIN CODE EDIT
(0000)
Changes the PIN code (up to 6 digits).
1
Turn the volume knob to select a
number.
2
Press
S / T
to move the entry
position.
Repeat steps
1
and
2
until you finish
entering the PIN code.
3
Press the volume knob to confirm.
RECONNECT ON
:The unit automatically reconnect
when the Bluetooth device is within
range.;
OFF
:Cancels.
AUTO PAIRING ON
:The unit automatically pair
supported Bluetooth device (iPhone/
iPod touch) when it is connected
through USB input terminal.Depending
on the iOS version of the connected
iPhone/iPod touch, this function may
not work. ;
OFF
:Cancels.
BT HF/AUDIO FRONT
:Ouputs audio from the front left
and right speakers.;
ALL
:Outputs audio
from all the speakers.
INITIALIZE YES
:Initializes all the Bluetooth settings
(including stored pairing, phonebook,
and etc.).;
NO
:Cancels.
Bluetooth audio player
Operations and display indications may differ
according to their availability on the connected
device.
To Do this
Playback
1 Press B SRC (or press SRC on
RC-406) to select BTAUDIO.
2 Operate the Bluetooth audio
player to start playback.
Pause or
resume
playback
Press 6IW (or press ENTIW
on RC-406).
Select group
or folder
Press J / K (or press
*
AM–/
#FM+ on RC-406).
Reverse/
forward skip
Press S / T (or press
S / T (+) on RC-406).
Reverse/fast-
forward
Press and hold S / T (or
press and hold S / T (+) on
RC-406).
Repeat play
Press 4 repeatedly to make a
selection.
ALLREPEAT, FILEREPEAT,
REPEATOFF
Random
play
Press 3 repeatedly to make a
selection.
FOLDERRANDOM, RANDOMOFF
Press and hold 3 to select
“ALLRANDOM.”
Internet radio via Bluetooth
Listen to Aha
TM
Radio
Preparation:
Select
[ON]
for
[AHA SRC]
.
( 5)
You can listen to Aha
TM
Radio on your smart
phone (Android OS) through Bluetooth on
this unit.
1 Open the Aha
TM
application on your
smart phone.
2 Connect your smart phone via
Bluetooth connection.
( 12)
3 Press B SRC to select AHA.
The source switches and broadcast
starts automatically.
• You can operate Aha
TM
Radio in the same
way as Aha
TM
Radio for iPod/iPhone.
( 11)
• To call a number in the content*: Press 1,
then press the volume knob to call.
• To end or disconnect a call: Press
.
* The availability is depending on the
selected station.
JS_KWD_KDC_BT48DAB_EWE0_07_EN.indd 16JS_KWD_KDC_BT48DAB_EWE0_07_EN.indd 16 23/12/2013 5:09:31 PM23/12/2013 5:09:31 PM
La pagina sta caricando ...
La pagina sta caricando ...
La pagina sta caricando ...
La pagina sta caricando ...
La pagina sta caricando ...
La pagina sta caricando ...
La pagina sta caricando ...
La pagina sta caricando ...
La pagina sta caricando ...
La pagina sta caricando ...
La pagina sta caricando ...
La pagina sta caricando ...
La pagina sta caricando ...
La pagina sta caricando ...
La pagina sta caricando ...
La pagina sta caricando ...
La pagina sta caricando ...
La pagina sta caricando ...
La pagina sta caricando ...
La pagina sta caricando ...
La pagina sta caricando ...
La pagina sta caricando ...
La pagina sta caricando ...
La pagina sta caricando ...
La pagina sta caricando ...
La pagina sta caricando ...
La pagina sta caricando ...
La pagina sta caricando ...
La pagina sta caricando ...
La pagina sta caricando ...
La pagina sta caricando ...
La pagina sta caricando ...
La pagina sta caricando ...
La pagina sta caricando ...
La pagina sta caricando ...
La pagina sta caricando ...
La pagina sta caricando ...
La pagina sta caricando ...
La pagina sta caricando ...
La pagina sta caricando ...
La pagina sta caricando ...
La pagina sta caricando ...
La pagina sta caricando ...
La pagina sta caricando ...
La pagina sta caricando ...
La pagina sta caricando ...
La pagina sta caricando ...
La pagina sta caricando ...
La pagina sta caricando ...
La pagina sta caricando ...
La pagina sta caricando ...
La pagina sta caricando ...
La pagina sta caricando ...
La pagina sta caricando ...
La pagina sta caricando ...
La pagina sta caricando ...
La pagina sta caricando ...
La pagina sta caricando ...
La pagina sta caricando ...
La pagina sta caricando ...
La pagina sta caricando ...
La pagina sta caricando ...
La pagina sta caricando ...
La pagina sta caricando ...
La pagina sta caricando ...
La pagina sta caricando ...
La pagina sta caricando ...
La pagina sta caricando ...
La pagina sta caricando ...
La pagina sta caricando ...
La pagina sta caricando ...
La pagina sta caricando ...
La pagina sta caricando ...
La pagina sta caricando ...
La pagina sta caricando ...
La pagina sta caricando ...
La pagina sta caricando ...
La pagina sta caricando ...
La pagina sta caricando ...
La pagina sta caricando ...
La pagina sta caricando ...
La pagina sta caricando ...
La pagina sta caricando ...
La pagina sta caricando ...
La pagina sta caricando ...
La pagina sta caricando ...
La pagina sta caricando ...
La pagina sta caricando ...
La pagina sta caricando ...
La pagina sta caricando ...
La pagina sta caricando ...
La pagina sta caricando ...
La pagina sta caricando ...
La pagina sta caricando ...
La pagina sta caricando ...
La pagina sta caricando ...
La pagina sta caricando ...
La pagina sta caricando ...
La pagina sta caricando ...
La pagina sta caricando ...
La pagina sta caricando ...
La pagina sta caricando ...
La pagina sta caricando ...
La pagina sta caricando ...
La pagina sta caricando ...
La pagina sta caricando ...
La pagina sta caricando ...
La pagina sta caricando ...
La pagina sta caricando ...
La pagina sta caricando ...
La pagina sta caricando ...
La pagina sta caricando ...
La pagina sta caricando ...
La pagina sta caricando ...
La pagina sta caricando ...
La pagina sta caricando ...
La pagina sta caricando ...
La pagina sta caricando ...
La pagina sta caricando ...
La pagina sta caricando ...
La pagina sta caricando ...
La pagina sta caricando ...
La pagina sta caricando ...
La pagina sta caricando ...
La pagina sta caricando ...
La pagina sta caricando ...
La pagina sta caricando ...
La pagina sta caricando ...
La pagina sta caricando ...
La pagina sta caricando ...
La pagina sta caricando ...
La pagina sta caricando ...
La pagina sta caricando ...
La pagina sta caricando ...
La pagina sta caricando ...
La pagina sta caricando ...
La pagina sta caricando ...
La pagina sta caricando ...
La pagina sta caricando ...
La pagina sta caricando ...
La pagina sta caricando ...
La pagina sta caricando ...
-
 1
1
-
 2
2
-
 3
3
-
 4
4
-
 5
5
-
 6
6
-
 7
7
-
 8
8
-
 9
9
-
 10
10
-
 11
11
-
 12
12
-
 13
13
-
 14
14
-
 15
15
-
 16
16
-
 17
17
-
 18
18
-
 19
19
-
 20
20
-
 21
21
-
 22
22
-
 23
23
-
 24
24
-
 25
25
-
 26
26
-
 27
27
-
 28
28
-
 29
29
-
 30
30
-
 31
31
-
 32
32
-
 33
33
-
 34
34
-
 35
35
-
 36
36
-
 37
37
-
 38
38
-
 39
39
-
 40
40
-
 41
41
-
 42
42
-
 43
43
-
 44
44
-
 45
45
-
 46
46
-
 47
47
-
 48
48
-
 49
49
-
 50
50
-
 51
51
-
 52
52
-
 53
53
-
 54
54
-
 55
55
-
 56
56
-
 57
57
-
 58
58
-
 59
59
-
 60
60
-
 61
61
-
 62
62
-
 63
63
-
 64
64
-
 65
65
-
 66
66
-
 67
67
-
 68
68
-
 69
69
-
 70
70
-
 71
71
-
 72
72
-
 73
73
-
 74
74
-
 75
75
-
 76
76
-
 77
77
-
 78
78
-
 79
79
-
 80
80
-
 81
81
-
 82
82
-
 83
83
-
 84
84
-
 85
85
-
 86
86
-
 87
87
-
 88
88
-
 89
89
-
 90
90
-
 91
91
-
 92
92
-
 93
93
-
 94
94
-
 95
95
-
 96
96
-
 97
97
-
 98
98
-
 99
99
-
 100
100
-
 101
101
-
 102
102
-
 103
103
-
 104
104
-
 105
105
-
 106
106
-
 107
107
-
 108
108
-
 109
109
-
 110
110
-
 111
111
-
 112
112
-
 113
113
-
 114
114
-
 115
115
-
 116
116
-
 117
117
-
 118
118
-
 119
119
-
 120
120
-
 121
121
-
 122
122
-
 123
123
-
 124
124
-
 125
125
-
 126
126
-
 127
127
-
 128
128
-
 129
129
-
 130
130
-
 131
131
-
 132
132
-
 133
133
-
 134
134
-
 135
135
-
 136
136
-
 137
137
-
 138
138
-
 139
139
-
 140
140
-
 141
141
-
 142
142
-
 143
143
-
 144
144
-
 145
145
-
 146
146
-
 147
147
-
 148
148
-
 149
149
-
 150
150
-
 151
151
-
 152
152
-
 153
153
-
 154
154
-
 155
155
-
 156
156
-
 157
157
-
 158
158
-
 159
159
-
 160
160
-
 161
161
-
 162
162


Kenwood KDC-BT48DAB Manuale del proprietario
- Categoria
- Mixer audio
- Tipo
- Manuale del proprietario
in altre lingue
- English: Kenwood KDC-BT48DAB Owner's manual
- français: Kenwood KDC-BT48DAB Le manuel du propriétaire
- español: Kenwood KDC-BT48DAB El manual del propietario
- Deutsch: Kenwood KDC-BT48DAB Bedienungsanleitung
- Nederlands: Kenwood KDC-BT48DAB de handleiding
Documenti correlati
-
Kenwood KMM-302BT Manuale del proprietario
-
Kenwood KDC-DAB34U Manuale del proprietario
-
Kenwood KDC-461U Manuale del proprietario
-
-
Kenwood KDC-161UG Manuale del proprietario
-
Kenwood KDC-BT44U Manuale del proprietario
-
Kenwood KMM-BT35 Manuale del proprietario
-
Kenwood Receiver Manuale utente
-
Kenwood KDC-BT520U Manuale utente
-
Kenwood KDC-121RY Manuale del proprietario