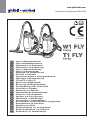
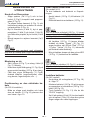
Ghibli & Wirbel T1 FLY Use And Maintenance
- Tipo
- Use And Maintenance

www.ghibliwirbel.com
Professional Cleaning Machines Since 1968
IT
Uso e Manutenzione
EN
Use and Maintenance
FR
Utilisation et Entretien
DE
Gebrauch und wartung
ES
Uso y Mantenimiento
PT
Uso e manutenção
NL
Gebruik en Onderhoud
CS
RU
PL
AR
NO
Bruk og vedlikehold
Brug og vedligeholdelse
SV
Användning och underhåll
TR
HU
Használat és karbantartás
RO
EL
HR
SR
BG
ET
FI
LV
LT
SL
8050824
ed. 04/2022

www.ghibliwirbel.com
Professional Cleaning Machines Since 1968
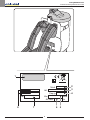
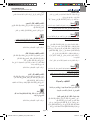
2
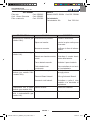
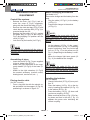
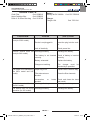
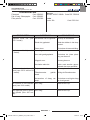
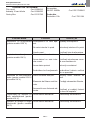
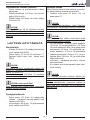
Mod.
Art.
Cap.ty
Vac mba
Air flow l/s
Nr
3
4
56
7
8
1
2

www.ghibliwirbel.com
Professional Cleaning Machines Since 1968
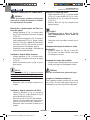
3
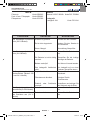
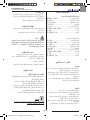
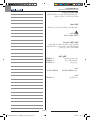
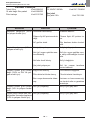
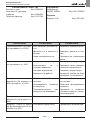
1 2 3 4 5 6 7 8
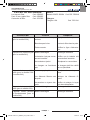
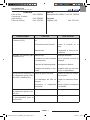
IT Produttore Modello Articolo Capacità fusto Capacità aspirazione Portata d’aria N° Matricola Caratteristiche elettriche
EN Manufacturer Model Article Container capacity Vacuum Air flow Serial N° Electrical characteristics
FR Producteur Modèle Article Capacité de la cuve Capacité d’aspiration Débit d’air N° Matricule Caractéristiques électriques
DE Hersteller Modell Artikel
Fassungsvermögen des Körpers
Ansaugleistung Luftdurchsatz Matrikelnr. Elektrische Eigenschaften
ES Fabricante Modelo Artículo Capacidad del bidón Capacidad de aspiración Caudal de aire N° Matrícola Características eléctricas
PT Produtor Modelo Artigo Capacidade do reservatório Capacidade de aspiração Caudal de ar Número de série Características elétricas
NL Producent Model Artikel Inhoud reservoir Zuigcapaciteit Luchtdebiet Serienummer Elektrische eigenschappen
NO Produsent Modell Artikkel Beholderkapasitet Sugekapasitet Luftmengde Matrikkelnr. Elektriske egenskaper
DK Fabrikant Model Artikel Beholdervolumen Sugeeffekt Luftmængde Matrikelnummer El-specifikationer
SV Tillverkare Modell Artikel Korgens kapacitet Sugkapacitet Luftflöde Serienummer Elektriska egenskaper
PL Producent Model Nr. Fabryczny
CS Výrobce Model Typ Obsah nádoby Sací výkon Elektrické údaje
SK Výrobca Model Výrobok Objem nádoby Sací výkon Prietok vzduchu Elektrické vlastnosti
TR Üretici Model Ürün Gövde kapasitesi Aspirasyon kapasitesi Seri No Elektriksel Özellikler
HU Gyártó Modell Cikk A szár teljesítménye Szívó teljesítmény
Törzskönyvi szám
Elektromos sajátosságok
RO Model Articol Capacitate rezervor Volum aer Nr. Matricol Caracteristici electrice
EL
RU
HR Model Proizvod Zapremnina spremnika Usisni kapacitet Protok zraka Registracijski br.
SR Model Proizvod Kapacitet postolja Kapacitet usisa Nosivost vazduha Br° Proizvoda
BG
ET Tootja Mudel Artikkel Paagi maht Imemisvõimsus Õhuvool Seerianumber Elektrilised omadused
FI Valmistaja Mallil Artikkeli Kapasiteetti tekojärvi Kapasiteetti poisto Virtaus ilma Sarjanumero Sähköiset ominaisuudet
LV Modelis Raksts Tvertnes tilpums Elektriskie raksturlielumir
LT Gamintojas Modelis Straipsnis Bako talpa Øsiurbimo galimybòs
SL Proizvajalec Model Prostornina rezervoarja Sesalna zmogljivost Pretok zraka
AR

www.ghibliwirbel.com
Professional Cleaning Machines Since 1968
4
4
5
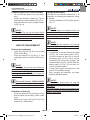
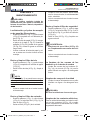
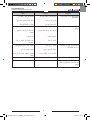
Fig. 4
Fig. 7
Fig. 8
Fig. 9
10
11
Fig. 10
Fig. 1
Fig. 3
3
2Fig. 5 Fig. 6
9
8
12
11
1a
3
2
Fig. 2
1
1
2
23
21
24
25
26
22
16
15
14
17
19
6
20
14
14
Fig. 14
Fig. 15
Fig. 13
Fig. 11 Fig. 12
18
13
6
7
7

www.ghibliwirbel.com
Professional Cleaning Machines Since 1968
5
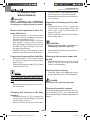
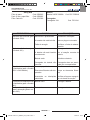
23
21
24
25
26
22
16
15
14
17
19
6
20
14
14
Fig. 14
Fig. 15
Fig. 13
Fig. 11 Fig. 12
18
13
6
7
7

www.ghibliwirbel.com
Professional Cleaning Machines Since 1968
6
27
Fig. 16
28
29
10
5
13
14
30
1
2
3
4
Fig. 17
Fig. 21
Fig. 19
Fig. 18
Fig. 23
Fig. 22
5
33
31
32 31
Fig. 20
14

www.ghibliwirbel.com
Professional Cleaning Machines Since 1968
7
IT
Italiano ................................................................................................... ITALIANO -1
(Istruzioni originali)
EN
English ...................................................................................................ENGLISH -1
(Translation of original instructions)
FR
Français .............................................................................................. FRANÇAIS -1
(Traduction des instructions d’origine)
DE
Deutsch ................................................................................................ DEUTSCH -1
(Übersetzung der Originalanleitung)
ES
Español .................................................................................................ESPAÑOL -1
(
Traducción de las instrucciones originales
)
PT
Português ........................................................................................ PORTUGUÊS -1
(Tradução das instruções originais)
NL Nederlands ....................................................................................NEDERLANDS -1
(Vertalinig van de originele instructies)
CS
........................................................................................................ -1
(Překladoriginálníhonávodu)
RU
................................................................................................ -1
PL
Polski .........................................................................................................POLSKI -1
AR
...................................................................................................................... 1
NO
Norsk ................................................................................................................ NO -1
(Oversettelseavoriginalinstruksjonene)
DK
Dansk ................................................................................................................DK -1
(Oversættelseaforiginalvejledning)
SV
Svenska ............................................................................................................SV -1
(Översättningavoriginalinstruktionerna)
SK
.........................................................................................................SK -1
(Prekladoriginálnychpokynov)
TR
Türkçe ...............................................................................................................TR -1
(Orijinaltalimatlarınçevirisi)
HU
Magyar ............................................................................................................. HU -1
(Eredetiutasításokfordítása)
RO
............................................................................................................ RO -1
(Traducereainstrucţiunilororiginale)
EL
............................................................................................................ EL -1
()
HR
Hrvatski ............................................................................................................ HR -1
(Prijevodoriginalnihuputa)
SR
..............................................................................................................SR -1
BG
........................................................................................................ BG -1
ET
Eesti ..................................................................................................................ET -1
(Tõlgealgupärasekasutusjuhendi)
FI
Suomi ................................................................................................................. FI -1
(Käännösalkuperäistenohjeiden)
LV
.......................................................................................................... LV -1
(Tulkojumsnooriģinālvalodasinstrukciju)
LT
Lietuvos ............................................................................................................. LT -1
(Originaliosinstrukcijosvertimas)
SL
Slovensko .......................................................................................................... SL -1
(Prevodizvirnihnavodil)


www.ghibliwirbel.com
Professional Cleaning Machines Since 1968
ITALIANO -
1
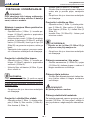
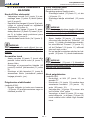
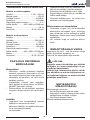
CARATTERISTICHE
TECNICHE
Modello con alimentazione di rete
Tensione ...............................115V - 400 Hz
Potenza motore ..................................650 W
Livello sonoro .................................60 dB(A)
Depressione ..................................165 mbar
Capacità sacchetto carta....................... 3,3 l
Dimensioni ..............240 x 495h x 202Ø mm
Peso ................................................... 4,8 kg
Accessori................................Ø 32 (36) mm
Modello con alimentazione a batteria
Tensione ...............................................24 V
Tensione caricabatterie ............... 220-240 V
Potenza motore ..................................300 W
Livello sonoro .................................54 dB(A)
Depressione ..................................125 mbar
Capacità sacchetto carta....................... 3,3 l
Dimensioni ..............240 x 580h x 202Ø mm
Peso ................................................... 7,5 kg
Accessori................................Ø 32 (36) mm
AVVERTENZE DI
SICUREZZA AGGIUNTIVE
Batterie
- Non introducete nei fori di contatto del pac-
co batterie oggetti metallici, in quanto po-
trebbe verificarsi un corto circuito fra i poli.
- Non lasciare il pacco batterie o l’apparec-
chio al sole per parecchi minuti.
- Attenzione! Utilizzate esclusivamente bat-
terie originali; NON manomettere il pacco
batterie e NON rimuovere il sigillo di ga-
ranzia.
- Fare attenzione che le batterie non ricevi-
no urti, l’involucro esterno si potrebbe rom-
pere.
Caricabatterie
- Utilizzate solo il caricabatterie in dotazione
e nessun altro tipo.
Non utilizzare il caricabatterie per caricare
accumulatori o batterie diverse;
potrebbe danneggiarsi.
- Evitare che il cavo di alimentazione del ca-
ricabatterie venga danneggiato o calpesta-
to quando è in funzione.
- Non trascinare il caricabatterie tirando il
cavo.
- Eventuali cavi di prolunga devono avere
una sezione uguale o superiore a quella
del cavo.
- Non tirare il cavo del caricabatterie per
estrarre la spina dalla presa.
Smaltimento batterie
- Non gettare nel fuoco e/o non disperdere
nell’ambiente le batterie esauste ma con-
segnarle agli appositi centri di smaltimento
attenendosi alle indicazioni delle norme in
vigore del paese di utilizzo.
- NON smaltire insieme ai rifiuti domestici.
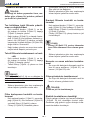
TIPO D’USO
Utilizzare questo apparecchio solo come
aspirapolvere per aspirare polvere, briciole,
ecc...
Solo per questo utilizzo è stato concepito.
PERICOLO:
Il costruttore non può essere ritenuto re-
sponsabile per eventuali danni dovuti ad
un uso improprio o scorretto.
Qualsiasi altro utilizzo solleva il costrut-
tore da responsabilità per danni a perso-
ne e/o cose e fa decadere qualsiasi condi-
zione di garanzia.
USO SCORRETTO
Non utilizzare l’apparecchio per:
- Aspirare liquidi di qualsiasi tipo;
- Aspirare sostanze infiammabili, esplosi-
ve, corrosive, tossiche.
- Aspirare sostanze calde.
Non utilizzare l’apparecchio in ambienti con
rischio di esplosione.
Manuale T1-W1-FLY_8050824_1ed_04-2017.indd 1 04/05/17 16:01

www.ghibliwirbel.com
Professional Cleaning Machines Since 1968
ITALIANO -
2
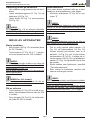
PREPARAZIONE
APPARECCHIO
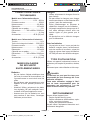
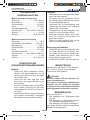
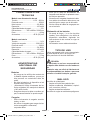
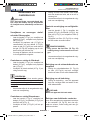
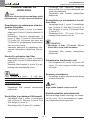
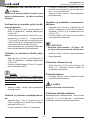
Controllo sistemi filtranti
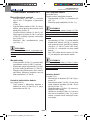
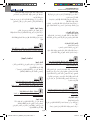
- Sganciare la leva (1a/1 Fig.1) e rimuove-
re il coperchio (2 Fig.2) completo di sac-
chetto in carta (3 Fig.2).
- Rimuovere il filtro in stoffa (4 Fig.3) e con-
trollare che all’interno dell’apparecchio
sia montata la cartuccia filtro (5 Fig.4).
- Rimontare il filtro in tela (4 Fig.3), rimon-
tare il sacchetto in carta (3 Fig.5) sul co-
perchio (2 Fig.5) e mantenendolo in posi-
zione rimontare il coperchio (2 Fig.6).
- Bloccare il coperchio tramite la leva (1a/1
Fig.1).
NOTA:
Il coperchio può essere montato con uscita
del tubo destra o sinistra in funzione alle esi-
genze dell’utente.
Assemblaggio tubazioni
- Inserire il manicotto (8 Fig.7) del tubo
flessibile in dotazione nel foro (9 Fig.7) di
aspirazione aria.
- Agganciare all’impugnatura ergonomica
(10 Fig.8) del tubo flessibile le prolunghe
rigide (11 Fig.8).
- Agganciare alle prolunghe rigide (11
Fig.9) l’accessorio voluto (bocchetta di
aspirazione, spazzola a pennello, boc-
chetta a lancia, ecc..)
Posizionamento cavo elettrico
(per modello 230V)
- Formare un’anello con il con il cavo elet-
trico e agganciarlo sul dente (12 Fig.10)
posizionandolo come indicato in figura
10.
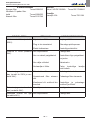
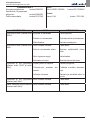
Prima ricarica delle batterie
(solo per modello 24V)
Prelevare dall’imballo il caricabatterie e il
pacco batterie.
- Collegare il cavo (13 Fig.11) al pacco bat-
terie (14 Fig.11).
- Collegare elettricamente il caricabatterie
(15 Fig.11).
NOTA:
Collegando il cavo di alimentazione elettrica
del caricabatterie (15 Fig. 11) prima di colle-
gare il cavo (13 Fig.11) al pacco batterie (14
Fig. 11) il caricabatterie NON FUNZIONA.
- Sul caricabatterie (15 Fig. 11) si illumina
lampeggiando due volte il led “Verde” (16
Fig. 11) indicando il corretto funziona-
mento; poi si illuminerà il led “Rosso” (17
Fig. 11) o il led “Giallo” (18 Fig. 11) a se-
conda dello stato di carica delle batterie.
- Quando sul caricabatterie si illumina fisso
il led verde (16 Fig. 11) le batterie sono
cariche.
NOTA:
Non lasciare mai il cavo (13 Fig. 11) colle-
gato al pacco batterie con il cavo di rete del
caricabatterie scollegato; le batterie si scari-
cherebbero e potrebbero rovinarsi.
Installazione batterie
(per modello 24V)
- Controllare che l’interruttore (27 Fig.16)
sia in posizione “0”.
- Montare il pacco batterie (14 Fig. 12) sul
corpo macchina inserendo i contatti (19
Fig. 12) nei fori (20 Fig. 12).
- Premere il pacco batterie (14 Fig. 13)
verso il basso fino a sentire il “CLICK” di
aggancio.
- Assicurarsi che la levetta (6 Fig.13) sia
rivolta verso il basso e che nella fessura
(7 fig.13) sia visualizzato il colore verde
indicando il corretto aggancio.
Manuale T1-W1-FLY_8050824_1ed_04-2017.indd 2 04/05/17 16:01

www.ghibliwirbel.com
Professional Cleaning Machines Since 1968
ITALIANO -
3
Posizionamento apparecchio sulle
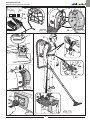
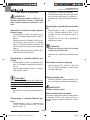
spalle
- Sollevare l’apparecchio e posizionarselo
sulle spalle.
- Regolare gli spallacci (21 Fig.14) agendo
sulle fibbie (22 Fig.14).
- Regolare la cintura (23 Fig.14) agendo
sulla fibbia (24 Fig.14).
NOTA:
Sulla cintura (23 Fig.14) sono posizionate
delle fettucce elastiche (25 Fig.14) che ser-
vono per il posizionamento degli accessori
come la spazzola a pennello, la bocchetta a
lancia, ecc..
USO DELL’APPARECCHIO
Avviamento dell’apparecchio
- Inserire la spina (26 Fig.15) nella presa di
corrente (solo per modello 230V).
- Premere l’interruttore (27 Fig.16) su “I” (la
lampada dell’interruttore si illumina, solo
per modello 230V).
NOTA:
È possibile regolare la forza di aspirazione
agendo sul selettore (28 Fig.17) posizionato
sull’impugnatura ergonomica (10 Fig.17).
Aprendo la nestrella (29 Fig.17) si ha una
minore azione aspirante.
NOTA per modello 24V:
Per una maggiore autonomia delle batterie si
consiglia di spegnere l’apparecchio durante i
trasferimenti.
Spegnimento dell’apparecchio
- Premere l’interruttore (27 Fig.16) per
spegnere l’apparecchio (la lampada
dell’interruttore si spegne, solo per mo-
dello 230V).
- Staccare la spina (26 Fig.15) dalla presa
di corrente (solo per modello 230V).
Ricarica delle batterie
Quando durante l’uso la macchina si spegne
è necessario ricaricare le batterie agendo
come segue:
- Controllare che l’interruttore (27 Fig. 16)
sia in posizione “0”.
NOTA:
Non è possibile caricare le batterie con l’ap-
parecchio avviato; è presente un dispositivo
di sicurezza che spegne l’apparecchio auto-
maticamente all’inserimento del connettore
caricabatterie nel pacco batterie.
NOTA:
É possibile ricaricare le batterie anche se
non sono completamente scariche senza
pregiudicare la durata delle stesse.
-
É possibile collegare direttamente il cavo
(13 Fig. 18) sul pacco batterie (14 Fig.
18) ancora montato sull’apparecchio, op-
pure rimuovere il pacco batterie (14 Fig.
19) spostando la levetta di sicurezza (6
Fig.13), premendo il pulsante di sgancio
(30 Fig. 19) e sollevando il pacco batterie
(14 Fig. 19) e quindi rimuoverlo verso l’e-
sterno.
- Collegare il caricabatterie come descritto
nel paragrafo “Prima ricarica delle batte-
rie”.
- Finita la ricarica delle batterie rimontare
le stesse come indicato in precedenza.
NOTA:
Non ritirare mai l’apparecchio dopo il suo
utilizzo con batteria scarica, nel caso fosse
necessario, effettuare la ricarica del o dei
pacchi batteria.
Per tempi prolungati di stoccaggio dell’ap-
parecchio e dei pacchi batteria, controllare
periodicamente (15/30gg) lo stato di carica.
Manuale T1-W1-FLY_8050824_1ed_04-2017.indd 3 04/05/17 16:01

www.ghibliwirbel.com
Professional Cleaning Machines Since 1968
ITALIANO -
4
PULIZIA E MANUTENZIONE
PERICOLO:
Prima di effettuare qualsiasi operazione
di manutenzione rimuovere la spina dalla
presa di corrente o il pacco batterie a se-
conda del modello.
Rimozione e sostituzione filtro racco-
gli polvere in carta
- Sganciare la leva (1 Fig.1) e rimuovere il
coperchio (2 Fig.2) completo di sacchetto
in carta (3 Fig.2).
- Togliere il sacchetto in carta (3 Fig.2) rac-
cogli polvere dal coperchio (2 Fig.2), sol-
levare la linguetta (31 Fig.20) e piegarla
all’interno del foro (32 Fig.20) incastran-
dola sul bordo in gomma quindi buttarlo.
- Sostituire il sacchetto in carta e rimontare
il tutto procedendo in senso inverso allo
smontaggio.
Controllo e pulizia filtro in stoffa
- Sganciare la leva (1 Fig.1) e rimuovere il
coperchio (2 Fig.2) completo di sacchetto
in carta (3 Fig.2).
- Rimuovere il filtro in stoffa (4 Fig.3) e pu-
lirlo togliendo la polvere presente.
NOTA:
Il filtro in stoffa (4 Fig. 3) può essere lavato
con acqua tiepida e detersivo tenendo con-
to che prima del riutilizzo deve essere ben
asciutto.
- Rimontare il tutto procedendo in senso
inverso allo smontaggio.
Controllo e pulizia cartuccia filtro
- Sganciare la leva (1 Fig.1), rimuovere il
coperchio (2 Fig.2), il filtro a sacchetto (3
Fig.2) e il filtro in stoffa (4 Fig.3).
- Rimuovere il filtro (5 Fig.21) dall’apparec-
chio.
- Pulire il filtro dall’interno verso l’esterno
con un getto d’aria; se si presenta troppo
sporco è necessario sostituirlo.
- Rimontare il tutto procedendo in senso
inverso allo smontaggio.
Controllo e pulizia filtro di sicurezza
- Sganciare la leva (1 Fig.1), rimuovere il
coperchio (2 Fig.2), il filtro a sacchetto (3
Fig.2) e il filtro in stoffa (4 Fig.3) e la car-
tuccia filtro (5 Fig.21).
- Rimuovere il filtro (33 Fig. 23) e pulirlo in
acqua corrente.
AVVERTENZA:
- Accertarsi che il ltro (33 Fig. 23) sia
completamente asciutto prima di ri-
montarlo.
- Rimontare il tutto procedendo in senso
inverso allo smontaggio.
Pulizia degli spallacci e cintura
- Pulire gli spallacci (21 Fig.14) e la cintura
(23 Fig.14) con un panno umido d’acqua
o detergente neutro.
Pulizia corpo apparecchio
- Pulire il corpo apparecchio utilizzando un
panno umido d’acqua o detergente neu-
tro.
PERICOLO:
Non lavare l’apparecchio con getti d’ac-
qua.
Pulizia contatti elettrici
Per apparecchio alimentato a batteria con-
trollare che i contatti (19 Fig. 12) non siano
sporchi, eventualmente pulirli con apposito
detergente sgrassante.
Manuale T1-W1-FLY_8050824_1ed_04-2017.indd 4 04/05/17 16:01

www.ghibliwirbel.com
Professional Cleaning Machines Since 1968
ITALIANO -
5
RICAMBI
Filtro tela Cod. 6588010
Conf. 10 sac. filtro carta Cod. 6588035
Filtro a cartuccia Cod. 2512749
Batterie
Batterie 24VDC 280Wh Cod. RIC.7589041
Caricabatterie
Caricabatterie 10A Cod. 7501194
PROBLEMA CAUSA RIMEDIO
Aspiratore non funziona (per
modello 230V).
Interruttore non premuto.
Spina non inserita.
Mancanza corrente.
Premere l’interruttore.
Inserire la spina nella presa
di corrente.
Verificare la linea di alimen-
tazione.
Aspiratore non funziona (per
modello 24V).
Batteria scarica.
Batteria non inserita corretta-
mente.
Pacco batterie esaurito.
Carica batterie non
funzionante.
Ricaricare la batteria.
Controllare il corretto inseri-
mento della batteria.
Sostituire il pacco batterie.
Fare controllare da un tecni-
co il caricabatterie.
L’aspirazione non è soddi-
sfacente (per modello 230V
e modello 24V).
Sacchetto in carta pieno.
Elementi filtranti intasati.
Accessori o tubi otturati.
Sostituire il sacchetto
raccogli polvere.
Pulire gli elementi filtranti.
Controllare e pulire il tubo
flessibile e la bocchetta di
aspirazione.
L’aspirazione non è soddi-
sfacente (per modello 24V).
Batteria scarica. Ricaricare la batteria.
L’apparecchio si spegne du-
rante il funzionamento (per
modello 24V).
Batteria scarica. Ricaricare la batteria.
Manuale T1-W1-FLY_8050824_1ed_04-2017.indd 5 04/05/17 16:01

www.ghibliwirbel.com
Professional Cleaning Machines Since 1968
ITALIANO -
6
Manuale T1-W1-FLY_8050824_1ed_04-2017.indd 6 04/05/17 16:01

www.ghibliwirbel.com
Professional Cleaning Machines Since 1968
ENGLISH -
1
TECHNICAL
FEATURES
Direct supply model
Tension ..................................115V - 400 Hz
Motor power .......................................650 W
Noise level......................................60 dB(A)
Depression ....................................165 mbar
Fleece bag capacity .............................. 3,3 l
Dimensions .............240 x 495h x 202Ø mm
Weight ................................................ 4,8 kg
Accessories ............................ Ø 32 (36) mm
Battery supply model
Tension ..................................................24 V
Battery voltage ............................ 220-240 V
Motor power .......................................300 W
Noise level......................................54 dB(A)
Depression ....................................125 mbar
Fleece bag capacity .............................. 3,3 l
Dimensions .............240 x 580h x 202Ø mm
Weight ................................................ 7,5 kg
Accessories ............................ Ø 32 (36) mm
ADDITIONAL SAFETY
WARNINGS
Battery
- Do not insert metal objects in the battery’s
contact wholes because it could cause a
short-circuit between the poles.
- Do not leave your battery or device in the
sun for several minutes.
- Warning! Use only original batteries, DO
NOT manipulate the battery and DO NOT
remove the seal.
- Make sure the batteries are not subject to
shocks, the outer casing may break.
Charger
- Use only the provided chargerand no other
type.
Do not use the charger for charging other
batteries; it could be damaged.
- Avoid damaging or crushing the charger
cable during use.
- Never pull the charger by the cable.
- Extension cables must have a section
equal or bigger than the cable.
- Never pull the cord to unplug the charger.
Battery disposal
- Do not throw away in fire and/or do not dis-
pose of batteries in the environment. Hand
them to the collection centre , following the
rules in force in the country of use.
- DO NOT dispose along with household
waste.
TYPE OF USE
Use this device only as a vacuum cleaner to
suck up dust, crumbs, etc...
The device has been designed only for this
use.
DANGER:
The manufacturer can not be held respon-
sible for any damage due to improper use.
Any other use relieves the manufacturer
from liability for damages to persons and/
or property and invalidates any guaran-
tees.
MISUSE
Do not use the unit for:
- Suctioning of liquids of any kind;
- Vacuum flammable, explosive, corrosive,
toxic substances.
- Vacuum hot substances.
Do not use the equipment in hazardous en-
vironments.
Manuale T1-W1-FLY_8050824_1ed_04-2017.indd 1 04/05/17 16:02

www.ghibliwirbel.com
Professional Cleaning Machines Since 1968
ENGLISH -
2
PREPARATION OF
EQUIPMENT
Control filter systems
- Release the lever (1a/1 Fig.1) and re-
move the cover (2 Fig.2) completely,
along with the fleece filter bag (3 Fig.2).
- Remove the cloth dust bag (4 Fig. 3) and
check that the cartridge filter (5 Fig. 4) is
mounted inside the unit.
- Replace the filter cloth (4 Fig.3), replace
the paper bag (3 Fig.5) on the cover (2
Fig.5) and keeping it in position refit the
cover (2 Fig.6).
- Lock the lid by the handle (1a/1 Fig.1)
NOTE:
The cover can be mounted with the output of
the tube left or right according to the needs
of the user.
Assembling of pipes
- Insert the sleeve (8 Fig.7) hose supplied
in the air intake hole (9 Fig.7).
- Attach the rigid extensions to the ergo-
nomic handle (10 Fig.8) of the hose (11
Fig.8).
- Attach to the rigid extension (11 Fig.9)
the wanted accessory (suction nozzle,
dusting brush, crevice tool, etc. ..)
Placing electric cable
(for 230 V model)
- Form a ring with the with the electric ca-
ble and attach it to the support (12 Fig.10)
positioning it as shown in figure 10.
Before recharging the batteries
(for Model 24 V)
Remove the charger and the battery from the
pack.
- Plug the cable (13 Fig.11) to the battery
(14 Fig.11).
- Connect the charger to the socket.
(15 Fig.11).
NOTE:
After connecting the power cable (15 Fig. 11)
before connecting the cable (13 Fig.11) to
the battery (14 Fig. 11) the charger WON’T
WORK.
- On the charger (15 Fig. 11) the „green”
led will blink twice (16 Fig. 11) indicating
proper functioning;; then, the red led will
turn on (17 Fig. 11) or the yellow one (18
Fig. 11) depending on the battery’s condi-
tion.
- When the charger light turns greeb (16
Fig. 11) the batteries are charged.
NOTE:
Do not leave the cable (13 Fig. 11) con-
nected to the battery with the network cable
disconnected from the charger; the batteries
may discharge and could be damaged.
Installing the batteries
(for 24V model)
- Check if the switch (27 Fig.16) is on posi-
tion “0”.
- Place the battery (14 Fig. 12) on the de-
vice by inserting the contacts (19 Fig. 12)
in the wholes (20 Fig. 12).
- Press the battery (14 Fig. 13) down until
you here a coupling „CLICK”.
- Make sure that the lever (6 Fig. 13) is fac-
ing down and that in the slot (7 fig. 13)
appears the green color indicating the
correct coupling.
Manuale T1-W1-FLY_8050824_1ed_04-2017.indd 2 04/05/17 16:02

www.ghibliwirbel.com
Professional Cleaning Machines Since 1968
ENGLISH -
3
Positioning device on the shoulders
- Lift the unit and place it on your shoul-
ders.
- Adjust the shoulder straps (21 Fig.14)
with the help of the buckles (22 Fig.14).
- Adjust the belt (23 Fig.14) using the buck-
le (24 Fig.14).
NOTE:
On the belt (23 Fig.14) are positioned elastic
tapes (25 Fig.14) which serve for the posi-
tioning of accessories such as the dusting
brush, for tight spaces, etc...
USE OF EQUIPMENT
Start-up of equipment
- Insert the plug (26 Fig.15) in the socket
(230V model only).
- Press the switch (27 Fig.16) to “I” (the
lamp lights switch only for the 230V mod-
el).
NOTE:
You can adjust the suction force acting on
the switch (28 Fig.17), positioned on the er-
gonomic handle (10 Fig.17).
Opening the window (29 Fig.17) lowers the
suction force.
For the 24 V device, PLEASE NOTE:
For a greater autonomy of the battery you
must stop the power supply during transfers.
Shutdown of the unit
- Press the switch (27 Fig.16) to turn off the
device (switch off the lamp, 230V model
only).
- Remove the plug (26 Fig.15) from the
outlet (230 V model only).
Charging the battery
If during use the devices switches off, it is
necessary to recharge the batteries, acting
as follows:
- Check if the switch (27 Fig.16) is on posi-
tion “0”.
NOTE:
You cannot charge the batteries while the
device is on; there is a safety device which
stops automatically the machine if you con-
nect the charger to the battery.
NOTE:
You can charge the batteries even though
they aren’t fully discharged without affecting
the battery life.
- It is possible to connect directly the cable
(13 Fig. 18) on the battery pack (14 Fig.
18) still mounted on the unit, or remove
the battery pack (14 Fig. 19) by moving
the safety lever (6 Fig.13), pressing the
release button (30 Fig. 19) and lifting the
battery pack (14 Fig. 19) and then re-
move it towards outside
.
- Connect the charger as described in the
section “First battery charge”.
- After charging the batteries, put them
back as described above.
NOTE:
Do not store the device after use, with the
battery discharged. If necessary, recharge
the battery.
For long storage periods of the device and
battery, periodically check the battery charge
status (15/30 days).
Manuale T1-W1-FLY_8050824_1ed_04-2017.indd 3 04/05/17 16:02

www.ghibliwirbel.com
Professional Cleaning Machines Since 1968
ENGLISH -
4
CLEANING AND
MAINTENANCE
DANGER:
Before performing any maintenance
work, remove the plug from the wall outlet
or battery pack, depending on the model.
Removal and replacement dust col-
lector filter fleece
- Release the lever (1 Fig.1) and remove
the cover (2 Fig.2) completely, along with
the fleece filter bag (3 Fig.2).
- Remove the fleece filter bag (3 Fig.2) the
dust collector from the cover (2 Fig.2),
pick up the tab (31 Fig.20) and fold it into
the hole (32 Fig.20), fitting it on the rub-
ber edge, then throw it.
- Replace the fleece filter bag and reas-
semble in the reverse order of removal.
Control and cleaning of the cloth filter
- Release the lever (1 Fig.1) and remove
the cover (2 Fig.2) along with the paper
bag (3 Fig.2).
- Remove the cloth dust bag (4 Fig. 3) and
clean away the dust.
NOTE:
The fabric filter (4 Fig. 3) can be washed with
warm water and detergent taking into ac-
count that before re-use must be thoroughly
dry.
- Reassemble everything in the reverse or-
der of removal.
Checking and cleaning of the filter
cartridge
- Release the lever (1 Fig.1), remove the
cover (2 Fig.2), the filter bag (3 Fig.2) and
the filter fabric (4 Fig. 3).
- Remove the filter (5 Fig.21) from the unit.
- Clean the filter on the inside with a jet of
air; if it’s too dirty, it must be replaced.
- Reassemble everything in the reverse or-
der of removal.
Verification and cleaning of the safe-
ty filter
- Release the lever (1 Fig.1), remove the
cover (2 Fig.2), the filter bag (3 Fig.2) the
fabric filter (4 Fig. 3) and the filter car-
tridge (5 Fig. 21).
- Remove the filter (33 Fig.23) and clean it
with running water.
WARNING:
- Ensure that the lter (33 Fig.23) is
completely dry before replacing.
- Reassemble everything in the reverse or-
der of removal.
Cleaning of the shoulder straps and
hip belt
- Wipe the shoulder straps (21 Fig.14) and
belt (23 Fig.14) with a damp cloth with
water or mild detergent.
Cleaning of the unit body
- Clean the body of the appliance using a
damp cloth with water or mild detergent.
DANGER:
Do not wash the unit with water jets.
Cleaning of electrical contacts
For battery powered devices check the con-
tacts if are dirty (19 Fig. 12); eventually they
will be cleaned with a suitable degreaser de-
tergent.
Manuale T1-W1-FLY_8050824_1ed_04-2017.indd 4 04/05/17 16:02

www.ghibliwirbel.com
Professional Cleaning Machines Since 1968
ENGLISH -
5
SPARE PARTS
Cloth Filter Cod. 6588010
Hepa Cartridge filter Cod. 6588035
Pack of 10 fleece filter bag Cod. 2512749
Battery
Battery 24VDC 280Wh Cod. RIC.7589041
Charger
Charger 10A Cod. 7501194
PROBLEM CAUSE SOLUTION
Vacuum cleaner does not
work (for 230V model).
Switch is not pressed.
Device is not plugged in.
Lack of electricity.
Press the switch.
Insert the plug into the sock-
et.
Check power line.
Vacuum cleaner does not
work (for 24V model).
Discharged battery.
The battery is not inserted
correclty.
Battery exhausted.
Charger not working.
Recharge the battery.
Check of battery is inserted
correctly.
Replace the battery.
The charger must be
checked by a specialist.
The intake is not satisfactory
(for 230V model and 24V
model).
Paper bag is full.
Filter elements are
blocked.
Accessories or hoses
blocked.
Replace dust collection bag.
Clean the filter elements.
Check and clean the hose
and nozzle.
The intake is not satisfactory
(for 24V model).
Discharged battery. Recharge the battery.
The device turns off during
operation (for 24V model).
Discharged battery. Recharge the battery.
Manuale T1-W1-FLY_8050824_1ed_04-2017.indd 5 04/05/17 16:02

www.ghibliwirbel.com
Professional Cleaning Machines Since 1968
ENGLISH -
6
Manuale T1-W1-FLY_8050824_1ed_04-2017.indd 6 04/05/17 16:02
La pagina si sta caricando...
La pagina si sta caricando...
La pagina si sta caricando...
La pagina si sta caricando...
La pagina si sta caricando...
La pagina si sta caricando...
La pagina si sta caricando...
La pagina si sta caricando...
La pagina si sta caricando...
La pagina si sta caricando...
La pagina si sta caricando...
La pagina si sta caricando...
La pagina si sta caricando...
La pagina si sta caricando...
La pagina si sta caricando...
La pagina si sta caricando...
La pagina si sta caricando...
La pagina si sta caricando...
La pagina si sta caricando...
La pagina si sta caricando...
La pagina si sta caricando...
La pagina si sta caricando...
La pagina si sta caricando...
La pagina si sta caricando...
La pagina si sta caricando...
La pagina si sta caricando...
La pagina si sta caricando...
La pagina si sta caricando...
La pagina si sta caricando...
La pagina si sta caricando...
La pagina si sta caricando...
La pagina si sta caricando...
La pagina si sta caricando...
La pagina si sta caricando...
La pagina si sta caricando...
La pagina si sta caricando...
La pagina si sta caricando...
La pagina si sta caricando...
La pagina si sta caricando...
La pagina si sta caricando...
La pagina si sta caricando...
La pagina si sta caricando...
La pagina si sta caricando...
La pagina si sta caricando...
La pagina si sta caricando...
La pagina si sta caricando...
La pagina si sta caricando...
La pagina si sta caricando...
La pagina si sta caricando...
La pagina si sta caricando...
La pagina si sta caricando...
La pagina si sta caricando...
La pagina si sta caricando...
La pagina si sta caricando...
La pagina si sta caricando...
La pagina si sta caricando...
La pagina si sta caricando...
La pagina si sta caricando...
La pagina si sta caricando...
La pagina si sta caricando...
La pagina si sta caricando...
La pagina si sta caricando...
La pagina si sta caricando...
La pagina si sta caricando...
La pagina si sta caricando...
La pagina si sta caricando...
La pagina si sta caricando...
La pagina si sta caricando...
La pagina si sta caricando...
La pagina si sta caricando...
La pagina si sta caricando...
La pagina si sta caricando...
La pagina si sta caricando...
La pagina si sta caricando...
La pagina si sta caricando...
La pagina si sta caricando...
La pagina si sta caricando...
La pagina si sta caricando...
La pagina si sta caricando...
La pagina si sta caricando...
La pagina si sta caricando...
La pagina si sta caricando...
La pagina si sta caricando...
La pagina si sta caricando...
La pagina si sta caricando...
La pagina si sta caricando...
La pagina si sta caricando...
La pagina si sta caricando...
La pagina si sta caricando...
La pagina si sta caricando...
La pagina si sta caricando...
La pagina si sta caricando...
La pagina si sta caricando...
La pagina si sta caricando...
La pagina si sta caricando...
La pagina si sta caricando...
La pagina si sta caricando...
La pagina si sta caricando...
La pagina si sta caricando...
La pagina si sta caricando...
La pagina si sta caricando...
La pagina si sta caricando...
La pagina si sta caricando...
La pagina si sta caricando...
La pagina si sta caricando...
La pagina si sta caricando...
La pagina si sta caricando...
La pagina si sta caricando...
La pagina si sta caricando...
La pagina si sta caricando...
La pagina si sta caricando...
La pagina si sta caricando...
La pagina si sta caricando...
La pagina si sta caricando...
La pagina si sta caricando...
La pagina si sta caricando...
La pagina si sta caricando...
La pagina si sta caricando...
La pagina si sta caricando...
La pagina si sta caricando...
La pagina si sta caricando...
La pagina si sta caricando...
La pagina si sta caricando...
La pagina si sta caricando...
La pagina si sta caricando...
La pagina si sta caricando...
La pagina si sta caricando...
La pagina si sta caricando...
La pagina si sta caricando...
La pagina si sta caricando...
La pagina si sta caricando...
La pagina si sta caricando...
La pagina si sta caricando...
La pagina si sta caricando...
La pagina si sta caricando...
La pagina si sta caricando...
La pagina si sta caricando...
La pagina si sta caricando...
La pagina si sta caricando...
La pagina si sta caricando...
La pagina si sta caricando...
La pagina si sta caricando...
La pagina si sta caricando...
La pagina si sta caricando...
La pagina si sta caricando...
La pagina si sta caricando...
La pagina si sta caricando...
La pagina si sta caricando...
La pagina si sta caricando...
La pagina si sta caricando...
La pagina si sta caricando...
La pagina si sta caricando...
-
 1
1
-
 2
2
-
 3
3
-
 4
4
-
 5
5
-
 6
6
-
 7
7
-
 8
8
-
 9
9
-
 10
10
-
 11
11
-
 12
12
-
 13
13
-
 14
14
-
 15
15
-
 16
16
-
 17
17
-
 18
18
-
 19
19
-
 20
20
-
 21
21
-
 22
22
-
 23
23
-
 24
24
-
 25
25
-
 26
26
-
 27
27
-
 28
28
-
 29
29
-
 30
30
-
 31
31
-
 32
32
-
 33
33
-
 34
34
-
 35
35
-
 36
36
-
 37
37
-
 38
38
-
 39
39
-
 40
40
-
 41
41
-
 42
42
-
 43
43
-
 44
44
-
 45
45
-
 46
46
-
 47
47
-
 48
48
-
 49
49
-
 50
50
-
 51
51
-
 52
52
-
 53
53
-
 54
54
-
 55
55
-
 56
56
-
 57
57
-
 58
58
-
 59
59
-
 60
60
-
 61
61
-
 62
62
-
 63
63
-
 64
64
-
 65
65
-
 66
66
-
 67
67
-
 68
68
-
 69
69
-
 70
70
-
 71
71
-
 72
72
-
 73
73
-
 74
74
-
 75
75
-
 76
76
-
 77
77
-
 78
78
-
 79
79
-
 80
80
-
 81
81
-
 82
82
-
 83
83
-
 84
84
-
 85
85
-
 86
86
-
 87
87
-
 88
88
-
 89
89
-
 90
90
-
 91
91
-
 92
92
-
 93
93
-
 94
94
-
 95
95
-
 96
96
-
 97
97
-
 98
98
-
 99
99
-
 100
100
-
 101
101
-
 102
102
-
 103
103
-
 104
104
-
 105
105
-
 106
106
-
 107
107
-
 108
108
-
 109
109
-
 110
110
-
 111
111
-
 112
112
-
 113
113
-
 114
114
-
 115
115
-
 116
116
-
 117
117
-
 118
118
-
 119
119
-
 120
120
-
 121
121
-
 122
122
-
 123
123
-
 124
124
-
 125
125
-
 126
126
-
 127
127
-
 128
128
-
 129
129
-
 130
130
-
 131
131
-
 132
132
-
 133
133
-
 134
134
-
 135
135
-
 136
136
-
 137
137
-
 138
138
-
 139
139
-
 140
140
-
 141
141
-
 142
142
-
 143
143
-
 144
144
-
 145
145
-
 146
146
-
 147
147
-
 148
148
-
 149
149
-
 150
150
-
 151
151
-
 152
152
-
 153
153
-
 154
154
-
 155
155
-
 156
156
-
 157
157
-
 158
158
-
 159
159
-
 160
160
-
 161
161
-
 162
162
-
 163
163
-
 164
164
-
 165
165
-
 166
166
-
 167
167
-
 168
168
-
 169
169
-
 170
170
-
 171
171
-
 172
172


Ghibli & Wirbel T1 FLY Use And Maintenance
- Tipo
- Use And Maintenance
in altre lingue
- română: Ghibli & Wirbel T1 FLY
Documenti correlati
-
 Ghibli & Wirbel POWER D 12 HE Use And Maintenance
-
 Ghibli & Wirbel AS 2 Use And Maintenance
-
 Ghibli & Wirbel S2 80 D 70 BC Use And Maintenance
-
 Ghibli & Wirbel POWER TOOL PRO FD 36 P EL Use And Maintenance
-
 Ghibli & Wirbel S-Team 6 V Use And Maintenance
-
 Ghibli & Wirbel POWER D 22 I Use And Maintenance
-
 Ghibli & Wirbel M 26 I ULKA Use And Maintenance
-
 Ghibli & Wirbel POWER EXTRA 7 I Auto Use And Maintenance
-
 Ghibli & Wirbel O 143 S 10 Use And Maintenance
-
 Ghibli & Wirbel SB 150 U 13 Use And Maintenance


Altri documenti
-
DeWalt DCV586 Manuale utente
-
DeWalt DWH161 Manuale utente
-
-
Facom FCL045 Manuale del proprietario
-
Maserati Ghibli Manuale del proprietario
-
DeWalt DCV584L Manuale utente
-
DeWalt DCD730L Manuale utente
-
Beghelli 19600 Emergency Lighting Manuale utente
-
Beghelli 8584 Manuale utente
-
 flow med flow-med vac-clean uv Rechargeable Mini Vacuum Cleaner for All Hearing Aids Manuale utente
