
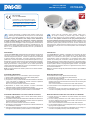
C573/6-EN
DESCRIZIONE
La plafoniera C573/6-EN è caratterizzata da un altoparlante a larga banda
(Ø 130mm) e da un trasformatore per linee a tensione costante che
consente di regolarne la potenza - fornisce una resa sonora assimilabile
a quella di diffusore bass-refl ex. L’innovativa calotta di protezione in
plastica PET, consente di contenere il peso del diffusore (inferiore a 1 kg).
È dotata di un morsetto ceramico 2x2 pin e di un fusibile termico integrato;
il grado di protezione IP 21C ne garantisce la resistenza all’infl uenza
degli agenti atmosferici. Il design piatto e la sua ridotta profondità la
rendono particolarmente adatta per la posa in controsoffi tti ove lo spazio
a disposizione per l’installazione è minimo.
Nota: È possibile sostituire la calotta in plastica con la calotta metallica
opzionale AC973.
DESCRIPTION
The C573/6-EN ceiling speaker is equipped with a Ø130mm full-range
loudspeaker chassis and a 100V transformer for power adjustments.
Thanks to an innovative air fl ow system, this model provides sound
characteristics which are attributed to a conventional bass reflex
speaker. Its extremely fl at construction method, together with the PET
fi redom, allows a low mounting depth, with less than 1 kg product weight.
For additional reliability, a 2x2 pin-ceramic block, a thermal fuse is provided
and the speaker chassis is impregnated against wetness. The speaker
is also secured with protection class IP 21C against the security risks of
environmental infl uences.
Note: It is possible to change the plastic fi redome with the optional AC973
metallic one.
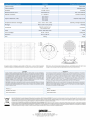
ISTRUZIONI DI MONTAGGIO
Dopo aver effettuato il foro nel controsoffi tto, operare come segue:
1) Svitare il dado a galletto posto al centro della calotta plastica.
2) Rimuovere la calotta dalla plafoniera.
3) Far passare il cavo proveniente dalla linea di distribuzione attraverso
il foro sulla calotta e collegarlo al morsetto ceramico impostando
quindi la potenza d’uscita desiderata.
Nota: si raccomanda di isolare i terminali non utilizzati.
4) Ri
posizionare la calotta sulla plafoniera e fi ssarla nuovamente
utilizzando il dado a galletto precedentemente rimosso.
5) Inserire la plafoniera all’interno del foro nel controsoffi tto tenendo dritti
i due ganci a molla laterali e portarla a battuta col controsoffi tto.
ISTRUZIONI DI MONTAGGIO CON CALOTTA METALLICA AC973
1) Svitare il dado a galletto posto al centro della calotta plastica e
rimuoverla dalla plafoniera.
2) Far passare il cavo proveniente dalla linea di distribuzione attraverso il
foro sulla calotta AC973 e collegarlo al morsetto ceramico impostando
quindi la potenza d’uscita desiderata.
Nota: si raccomanda di isolare i terminali non utilizzati.
4) P
osizionare la calotta metallica sulla plafoniera e fi ssarla utilizzando le
viti autofi lettanti in dotazione.
5) Inserire la plafoniera all’interno del foro nel controsoffi tto tenendo dritti
i due ganci a molla laterali e portarla a battuta col controsoffi tto.
MOUNTING INSTRUCTIONS WITH AC973 METALLIC FIREDOME
1) Unscrew the nut in the middle of the plastic fi redome and remove
it from the speaker.
2) Put the incoming distribution line cable cable through the hole on
the AC973 fi redome and connect the terminals at the ceramic block
choosing the desired output power.
Note: it is recommended to insulate the unused cable terminals.
4) Put the metallic fi redome on the loudspeaker and fi x it using the self-
tapping screws supplied with it
.
5) Lift up the leg springs and insert the loudspeaker into the ceiling cut-
out until it’s completely locked up withe the false-ceiling.
MOUNTING INSTRUCTIONS
Once drilled the false-ceiling, please follow these steps:
1) Unscrew the nut in the middle of the plastic fi redome.
2) Remove the plastic fi redome.
3) Put the incoming distribution line cable cable through the hole on the
fi redome and connect the terminals at the ceramic block choosing the
desired output power.
Note: it is recommended to insulate the unused cable terminals.
4) Put the fi redome on the loudspeaker and fi x it again using the formerly
removed nut
.
5) Lift up the leg springs and insert the loudspeaker into the ceiling cut-
out until it’s completely locked up withe the false-ceiling.
Leggere attentamente il presente foglio istruzioni. PASO S.p.A
declina ogni responsabilità per danni a persone e/o cose derivanti
dalla non corretta installazione e dall’uso improprio del prodotto.
La messa in opera del diffusore deve sempre essere effettuata da
personale addestrato: un’errata installazione potrebbe comportare
il rischio di scossa elettrica. Questo diffusore
è stato appositamente
sviluppato per essere impiegato in sistemi d’emergenza e d’evacuazione
(VES): è infatti dotato di morsettiera ceramica e di fusibile termico, che
garantiscono la salvaguardia della linea di collegamento altoparlanti nel
caso in cui un possibile incendio metta fuori uso uno o più diffusori ad
essa collegati.
Please read this instruction sheet carefully. PASO S.p.A.
will accept no liability for personal injury and/or damage to
property resulting from incorrect installation or improper use of
the product. The speaker unit must be set up by trained personnel.
Incorrect installation could result in the risk of electric shocks.
These
speaker units have been developed specifi cally for use in emergency and
evacuation systems (VES) and each has its own ceramic terminal strip
and thermal fuse. These ensure the protection of the line connecting the
loudspeakers if a fi re puts one or more of the speaker units connected to
it out of use.
IT EN
Plafoniera 6W EN54
EN54 6W Ceiling speaker
EN 54-24:2008
Cert. no. 1438-CPR-0582
Loudspeaker for voice alarm systems for fi re
detection and fi re alarm systems for buildings
Ceiling speaker, 6W | C573/6-EN | Type A
PASO S.p.A Via Settembrini, 34
20020 Lainate (MI) - ITALY
17

-
 1
1
-
 2
2


in altre lingue
- English: Paso C573/6-EN Owner's manual
Documenti correlati
-
Paso C531/10-EN Manuale del proprietario
-
-
-
-
-
-
-