Deagostini HMS Bounty Admiralty Ship Guida utente
- Tipo
- Guida utente

PACK 06

PHASE PAGE
44 Frame 9 198
45 Frame 10 202
46 Frame 13 206
47 Frames e Keel 2 210
48 Keel 3 229
49 Stern frames 233
50 Keelson 237
51 Culverin 06 240
Design and production by Incipit srl
Assembly guide edited by Milanoedit srl - www.milanoedit.com
Published in Italy by De Agostini Publishing Italia S.p.A., 28100 Novara, Via G. da Verrazano 15
All rights reserved © 2020.
UNSUITABLE FOR CHILDREN UNDER 14. THE PRODUCT IS NOT A TOY
AND MUST BE USED UNDER ADULT SUPERVISION.
PARTS MAY BE DIFFERENT FROM THOSE PICTURED

PACK 06
197
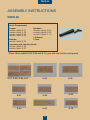
ASSEMBLY INSTRUCTIONS
PACK 06
6-01
5-07, 5-08, 6-06, 6-07 6-08 6-09
6-05
6-02 6-03
6-106-04
List of Components
Frames:
wooden tablet 6-01
wooden tablet 6-02
wooden tablet 6-03
wooden tablet 6-04
Keelson:
wooden tablet 6-05
Transoms and hawse pieces:
wooden tablet 6-06
wooden tablet 6-07
Lifeboat:
wooden tablet 6-08
wooden tablet 6-09
wooden tablet 6-10
1 Culverin
1 Fork
* Note: Store tablet 6-08, 6-09 and 6-10, you will use it in the next packs.

PACK 06
198
B
A
2
3
4
5
76
9
8
1
19
28
3 7
4
5
6
Drawing of
tablet 6-01
A
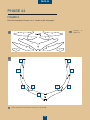
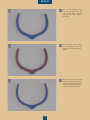
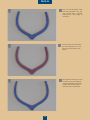
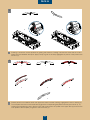
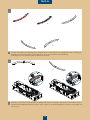
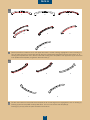
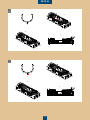
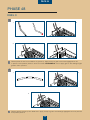
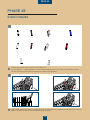
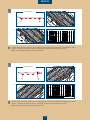
PHASE 44
FRAME 9
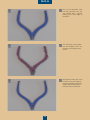
Print the template of frame 9 in 1:1 scale on A4 size paper.
Place the pieces of the frame 9 as shown in picture B.
B

PACK 06
199
1
2
3
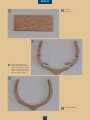
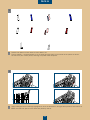
Glue the pieces of the
frame and before the glue
dries, superimpose it onto
the 1:1 scale template to
check if the pieces have
been properly placed.
2
Frame 9
tablet 6-01.
1
Completed frame 9.
3

PACK 06
200
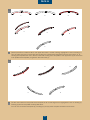
4
6
5
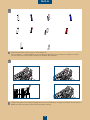
Gently le the inner part of the
frame from the inner edge of
the blue template to the inner
edge of the red template on
the other side of the frame.
6
Turn the frame over and glue
the red template onto it fol-
lowing the inner edge of the
frame.
5
Cut out the templates. Glue
the blue template onto the
part marked with a number
following the outer edge of
the frame.
4

PACK 06
201
7
9
8
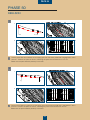
Gently le the outer part of the
frame from the outer edge of
the red template to the outer
edge of the blue template on
the other side of the frame.
7
Remove the blue template
from the frame on the side
marked with a number.
8
Remove the red template from
the other side of the frame.
9

PACK 06
202
B
A
2
3
4
5
7
6
9
8
1
19
2 8
37
4
5
6
Drawing of
tablet 6-02
A
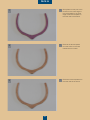
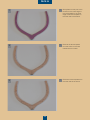
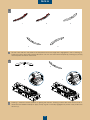
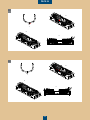
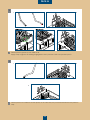
PHASE 45
FRAME 10
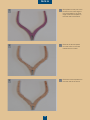
Print the template of frame 10 in 1:1 scale on A4 size paper.
Place the pieces of the frame 10 as shown in picture B.
B

PACK 06
203
1
2
3
Glue the pieces of the
frame and before the glue
dries, superimpose it onto
the 1:1 scale template to
check if the pieces have
been properly placed.
2
Frame 10
tablet 6-02.
1
Completed frame 10.
3

PACK 06
204
4
6
5
Gently le the inner part of the
frame from the inner edge of
the blue template to the inner
edge of the red template on
the other side of the frame.
6
Turn the frame over and glue
the red template onto it fol-
lowing the inner edge of the
frame.
5
Cut out the templates. Glue
the blue template onto the
part marked with a number
following the outer edge of
the frame.
4

PACK 06
205
7
9
8
Gently le the outer part of the
frame from the outer edge of
the red template to the outer
edge of the blue template on
the other side of the frame.
7
Remove the blue template
from the frame on the side
marked with a number.
8
Remove the red template from
the other side of the frame.
9

PACK 06
206
B
A
2
3
4
5
7
6
9
8
1
1 9
28
37
4
5
6
Drawing of
tablet 6-03
A
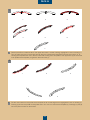
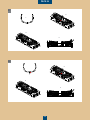
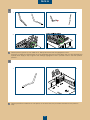
NOTE: the reference
notches marked by
red circles must be
glued to the inner
part of the frame.
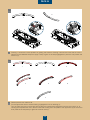
PHASE 46
FRAME 13
Print the template of frame 13 in 1:1 scale on A4 size paper.
Place the pieces of the frame 13 as shown in picture B.
B

PACK 06
207
1
2
3
Glue the pieces of the
frame and before the glue
dries, superimpose it onto
the 1:1 scale template to
check if the pieces have
been properly placed.
2
Frame 13
tablet 6-03.
1
Completed frame 13.
3

PACK 06
208
4
6
5
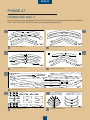
Gently le the inner part of the
frame from the inner edge of
the blue template to the inner
edge of the red template on
the other side of the frame.
6
Turn the frame over and glue
the red template onto it fol-
lowing the inner edge of the
frame.
5
Cut out the templates. Glue
the blue template onto the
part marked with a number
following the outer edge of
the frame.
4

PACK 06
209
7
9
8
Gently le the outer part of the
frame from the outer edge of
the red template to the outer
edge of the blue template on
the other side of the frame.
7
Remove the blue template
from the frame on the side
marked with a number.
8
Remove the red template from
the other side of the frame.
9

PACK 06
210
AB
A
A
BB
CC
DD
C D
GF
E
A
PM1
A
A
B
PM2
B
B
C
PM4
PM3
PM5
C
Drawing of tablet 6-06.
C
Drawing of tablet 6-05.
E
Drawing of tablet 6-07.
D
Drawing of tablet 6-09.
G
Drawing of tablet 6-04.
F
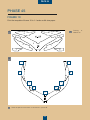
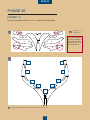
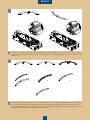
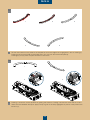
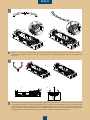
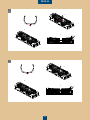
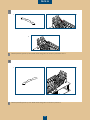
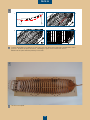
PHASE 47
FRAMES AND KEEL 2
On your work top, arrange tablets 5-07 and 5-08, which you received with pack 05, and tablets
6-04, 6-05, 6-06, 6-07 and 6-09, which you received with this pack.
Drawing of tablet 5-07.
ADrawing of tablet 5-08.
B

PACK 06
211
2
1
4 5
1 2 3
2 3
45
7
6
1
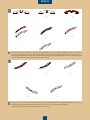
Detach piece A from tablet 6-07. On the upper face there is a laser marking, highlighted in red on drawing (1).
Turn the piece over and on the lower face (2) glue the corresponding template of set 06 (3) as shown (4, 5).
Holding the template face down, le the inner side working from the prole of the upper face (6) as far as the
inner prole of the template you glued to the lower face (7).
1
File the outer side from the prole of the template as far as the edge that is highlighted in red on drawing (1).
Drawing (2) shows the prole correctly led down. You can now remove the template (3).
Drawings (4) and (5) show the piece worked on both faces.
2

PACK 06
212
4
3
4 5 6
7
1 2 3
2
3 4
1
Drawing 1 shows the correct position for glueing the transom. Drawing 2 shows the cutout that is to be in-
serted into the rabbeted sternpost. Apply a drop of glue on the step highlighted in picture 3 and position the
transom (4).
3
Detach piece C from tablet 6-06.On the upper face there is a laser marking, highlighted in red on drawing (1).
Turn the piece over and on the lower face (2) glue the corresponding template of set 06 (3) as shown (4, 5).
Holding the template face down, le the inner side working from the prole of the upper face (6) as far as the
inner prole of the template you glued to the lower face (7).
4

PACK 06
213
5
4 5
1 2 3
File the outer side from the prole of the template as far as the edge that is highlighted in red on drawing (1).
Drawing (2) shows the prole correctly led down. You can now remove the template (3). Drawings (4) and (5)
show the piece worked on both faces.
5
6
2
3 4
1
Drawing 1 shows the correct position for glueing the transom. Drawing 2 shows the cutout that is to be in-
serted into the rabbeted sternpost. Apply a drop of glue on the step highlighted in picture 3 and position the
transom (4).
6

PACK 06
214
8
7
4 5
1 2 3
2 3
4 5
7
6
1
Detach piece B from tablet 6-06.On the upper face there is a laser marking, highlighted in red on drawing (1).
Turn the piece over and on the lower face (2) glue the corresponding template of set 06 (3) as shown (4, 5).
Holding the template face down, le the inner side working from the prole of the upper face (6) as far as the
inner prole of the template you glued to the lower face (7).
7
File the outer side from the prole of the template as far as the edge that is highlighted in red on drawing (1).
Drawing (2) shows the prole correctly led down. You can now remove the template (3). Drawings (4) and (5)
show the piece worked on both faces.
8
La pagina si sta caricando...
La pagina si sta caricando...
La pagina si sta caricando...
La pagina si sta caricando...
La pagina si sta caricando...
La pagina si sta caricando...
La pagina si sta caricando...
La pagina si sta caricando...
La pagina si sta caricando...
La pagina si sta caricando...
La pagina si sta caricando...
La pagina si sta caricando...
La pagina si sta caricando...
La pagina si sta caricando...
La pagina si sta caricando...
La pagina si sta caricando...
La pagina si sta caricando...
La pagina si sta caricando...
La pagina si sta caricando...
La pagina si sta caricando...
La pagina si sta caricando...
La pagina si sta caricando...
La pagina si sta caricando...
La pagina si sta caricando...
La pagina si sta caricando...
La pagina si sta caricando...
-
 1
1
-
 2
2
-
 3
3
-
 4
4
-
 5
5
-
 6
6
-
 7
7
-
 8
8
-
 9
9
-
 10
10
-
 11
11
-
 12
12
-
 13
13
-
 14
14
-
 15
15
-
 16
16
-
 17
17
-
 18
18
-
 19
19
-
 20
20
-
 21
21
-
 22
22
-
 23
23
-
 24
24
-
 25
25
-
 26
26
-
 27
27
-
 28
28
-
 29
29
-
 30
30
-
 31
31
-
 32
32
-
 33
33
-
 34
34
-
 35
35
-
 36
36
-
 37
37
-
 38
38
-
 39
39
-
 40
40
-
 41
41
-
 42
42
-
 43
43
-
 44
44
-
 45
45
-
 46
46


Deagostini HMS Bounty Admiralty Ship Guida utente
- Tipo
- Guida utente
in altre lingue
Documenti correlati
Altri documenti
-
ROBBE PAULA IV Building Instructions
-
 Hangar 9 HAN4770 Manuale del proprietario
-
Brother Innov-is XV8550D Manuale utente
-
ABB Relion 615 series Engineering Manual
-
Pulse Pacesetter BES Lettering 2 Manuale utente
-
-
ABB Relion 650 series ANSI Engineering Manual
-
ABB Relion REC615 Istruzioni per l'uso
