EnGenius A8J-EUB1200AC Manuale utente
- Categoria
- Punti di accesso WLAN
- Tipo
- Manuale utente
Questo manuale è adatto anche per

EnGenius
®
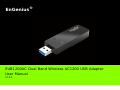
EUB1200AC Dual Band Wireless AC1200 USB Adapter
User Manual
V1.0.0

TABLE OF CONTENTS
I
TABLE OF CONTENTS
Introduction
Introduction 1-1
Features. . . . . . . . . . . . . . . . . . . . . . . . . . . . . . . . . . . . . . . . . . . . . . . . . . . . . . . . . . .1-1
Package contents . . . . . . . . . . . . . . . . . . . . . . . . . . . . . . . . . . . . . . . . . . . . . . . . . . . .1-1
USB Adapter Description . . . . . . . . . . . . . . . . . . . . . . . . . . . . . . . . . . . . . . . . . . . . . . .1-1
System Requirements . . . . . . . . . . . . . . . . . . . . . . . . . . . . . . . . . . . . . . . . . . . . . . . . .1-2
Applications . . . . . . . . . . . . . . . . . . . . . . . . . . . . . . . . . . . . . . . . . . . . . . . . . . . . . . . .1-2
Network Configuration . . . . . . . . . . . . . . . . . . . . . . . . . . . . . . . . . . . . . . . . . . . . . . . . .1-2
Ad-hoc (peer-to-peer) Mode . . . . . . . . . . . . . . . . . . . . . . . . . . . . . . . . . . . . . . . . . . .1-2
Infrastructure Mode . . . . . . . . . . . . . . . . . . . . . . . . . . . . . . . . . . . . . . . . . . . . . . . . .1-2
WPS Setup 1-3

TABLE OF CONTENTS
II
Windows
USB Adapter 2-1
Before you Begin 2-1
Installing and Uninstalling the Driver 2-1
Installing the Driver. . . . . . . . . . . . . . . . . . . . . . . . . . . . . . . . . . . . . . . . . . . . . . . . . . .2-1
Uninstalling the Driver . . . . . . . . . . . . . . . . . . . . . . . . . . . . . . . . . . . . . . . . . . . . . . . . .2-3
Wireless LAN Utility 2-4
General . . . . . . . . . . . . . . . . . . . . . . . . . . . . . . . . . . . . . . . . . . . . . . . . . . . . . . . . . . .2-4
Profile . . . . . . . . . . . . . . . . . . . . . . . . . . . . . . . . . . . . . . . . . . . . . . . . . . . . . . . . . . . .2-5
Wireless Network Properties Dialog. . . . . . . . . . . . . . . . . . . . . . . . . . . . . . . . . . . . . . .2-5
Adding a Profile. . . . . . . . . . . . . . . . . . . . . . . . . . . . . . . . . . . . . . . . . . . . . . . . . . . . . .2-6
Editing a Profile . . . . . . . . . . . . . . . . . . . . . . . . . . . . . . . . . . . . . . . . . . . . . . . . . . . .2-8
Available Network . . . . . . . . . . . . . . . . . . . . . . . . . . . . . . . . . . . . . . . . . . . . . . . . . . .2-10
Status . . . . . . . . . . . . . . . . . . . . . . . . . . . . . . . . . . . . . . . . . . . . . . . . . . . . . . . . . . .2-11
Wi-Fi Protected Setup . . . . . . . . . . . . . . . . . . . . . . . . . . . . . . . . . . . . . . . . . . . . . . . .2-12

TABLE OF CONTENTS
III
MAC OS X
USB Adapter 3-1
Installing and Uninstalling the Driver 3-1
Installing the Driver. . . . . . . . . . . . . . . . . . . . . . . . . . . . . . . . . . . . . . . . . . . . . . . . . . .3-1
Uninstalling the Driver . . . . . . . . . . . . . . . . . . . . . . . . . . . . . . . . . . . . . . . . . . . . . . . . .3-3
Wireless LAN Utility 3-4
Link Status. . . . . . . . . . . . . . . . . . . . . . . . . . . . . . . . . . . . . . . . . . . . . . . . . . . . . . . . .3-4
Profile . . . . . . . . . . . . . . . . . . . . . . . . . . . . . . . . . . . . . . . . . . . . . . . . . . . . . . . . . . . .3-4
Wireless Network Properties Dialog. . . . . . . . . . . . . . . . . . . . . . . . . . . . . . . . . . . . . . .3-5
Adding a Profile . . . . . . . . . . . . . . . . . . . . . . . . . . . . . . . . . . . . . . . . . . . . . . . . . . . .3-6
Editing a Profile . . . . . . . . . . . . . . . . . . . . . . . . . . . . . . . . . . . . . . . . . . . . . . . . . . . .3-8
Available Network . . . . . . . . . . . . . . . . . . . . . . . . . . . . . . . . . . . . . . . . . . . . . . . . . . . .3-9
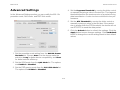
Advanced Settings. . . . . . . . . . . . . . . . . . . . . . . . . . . . . . . . . . . . . . . . . . . . . . . . . . .3-10
Wi-Fi Protected Setup . . . . . . . . . . . . . . . . . . . . . . . . . . . . . . . . . . . . . . . . . . . . . . . .3-11
Information . . . . . . . . . . . . . . . . . . . . . . . . . . . . . . . . . . . . . . . . . . . . . . . . . . . . . . .3-12
Appendix A
Federal Communication Commission Interference Statement A-1
Radiation Exposure Statement . . . . . . . . . . . . . . . . . . . . . . . . . . . . . . . . . . . . . . . . .A-2


Introduction
Chapter 1

INTRODUCTION INTRODUCTION
1-1
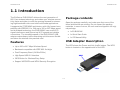
1.1 Introduction
The EnGenius EUB1200AC delivers the next generation of
802.11ac wireless technology and makes your wireless connec-
tivity faster and wider to meet the growing demand for stream-
ing high-bandwidth video and other multimedia applications.
It supports the 2T2R MIMO architecture with fully forward com-
patibility with IEEE802.11n. With up to 300 or 867 Mbps speed
and dual band technology, the EUB1200AC can avoid Wi-Fi
signal interference and ensure top Wi-Fi speeds and reliable
connections. The incredible speed of the EUB1200AC USB
adapter makes heavy traffic networking activities more flexible
and takes the wireless into practical road.
Features
Up to 300 or 867 Mbps Wireless Speed
Backward compatible with IEEE 802.11a/b/g/n
Dual-Frequency Band (2.4GHz/5GHz)
High Speed USB 3.0 Interface
WPS Button for Wireless Easy Setup
Support WEP/WPA and WPA2 Security Encryption
Package contents
Open the package carefully, and make sure that none of the
items listed below are missing. Do not discard the packing
materials, in case of return; the unit must be shipped in its origi-
nal package.
1x EUB1200AC
1x Quick Start Guide
1x CD Manual/Utility
USB Adapter Description
The LED shows the Power and Link (traffic) status. The WPS
button is located on the opposite side of the LED.
WPS
LED

INTRODUCTION SYSTEM REQUIREMENTS
1-2
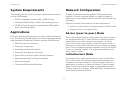
System Requirements
The following are the minimum system requirements in order to
use the USB adapter.
PC/AT compatible computer with a USB interface.
Windows 2000/XP/Vista or MAC OS operating system.
30 MB of free disk space for installing the USB adapter
driver and utility program.
Applications
EnGenius wireless LAN products are easy to install and easy to
use. The following list describes some of the many applications
made possible through the EnGenius wireless LAN products:
Difficult-to-wire environments
Temporary workgroups
Accessing real-time information
Frequently changing environments
Small Office and Home Office (SOHO) networks
Wireless extensions to Ethernet networks
Wired LAN backup
Training and Educational facilities
Network Configuration
To better understand how the wireless LAN products work
together to create a wireless network, it might be helpful to
depict some of the possible wireless LAN PC card network con-
figurations.
EnGenius wireless LAN products can be configured as:
Ad-hoc (or peer-to-peer) for departmental or SOHO LANs.
Infrastructure for enterprise LANs.
Ad-hoc (peer-to-peer) Mode
This is the simplest network configuration with several comput-
ers equipped with the PC Cards that form a wireless network
whenever they are within range of one another. In ad-hoc
mode, each client is peer-to-peer, would only have access to
the resources of the other client and does not require an access
point. This is the easiest and least expensive way for the SOHO
to set up a wireless network. The image below depicts a net-
work in ad-hoc mode.
Infrastructure Mode
The infrastructure mode requires the use of an Access Point
(AP). In this mode, all wireless communication between two
computers has to be via the AP. It doesn’t matter if the AP is
stand-alone or wired to an Ethernet network. If used in stand-
alone, the AP can extend the range of independent wireless
LANs by acting as a repeater, which effectively doubles the dis-
tance between wireless stations.

INTRODUCTION WPS SETUP
1-3
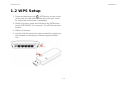
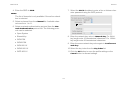
1.2 WPS Setup
1. Press and hold down the WPS button on your router
(check with the User Manual that came with your router
for any further instructions if necessary).
2. Within 2 minutes, press and hold down the WPS button
on the EUB1200AC for 2 seconds. The LED should start
to blink.
3. Wait for 2 minutes.
4. Confirm that the connection was successful by opening a
web browser or checking the wireless signal indicator
icon.

Windows
Chapter 2

WINDOWS USB ADAPTER
2-1
2.1 USB Adapter
2.1.1 Before you Begin
During the installation, XP may need to copy systems files from its installation CD. Therefore, you may need a copy of the Windows
installation CD at hand before installing the drivers. On many systems, instead of a CD, the necessary installation files are archived
on the hard disk in C:\WINDOWS\OPTIONS\CABS directory.
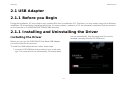
2.1.1 Installing and Uninstalling the Driver
Installing the Driver
Before you can use the EUB1200AC Dual Band USB Adapter
you must install the device driver.
To install the USB adapter drivers, follow these steps:
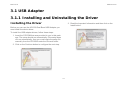
1. Insert the CD-ROM that was provided to you in this pack-
age. The setup should run automatically. If the setup does
not run automatically, then the setup.exe file must be
selected manually from the CD-ROM drive.

WINDOWS INSTALLING THE DRIVER
2-2
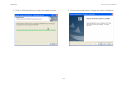
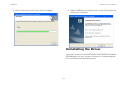
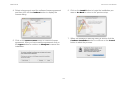
2. Click on Windows Driver to start the install process. 3. Click on the Next button to begin the driver installation.

WINDOWS UNINSTALLING THE DRIVER
2-3
4. Wait until the driver and client utility is installed. 5. When installation is complete click on the Finish button to
restart your computer.
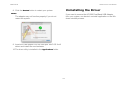
Uninstalling the Driver
If you want to remove the EUB1200AC EUB1200AC Dual Band
USB Adapter from your system, use device’s uninstall applica-
tion or the Windows uninstall process.

WINDOWS WIRELESS LAN UTILITY
2-4
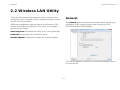
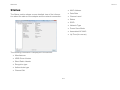
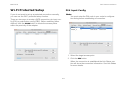
2.2 Wireless LAN Utility
There are five sections that allow the user to configure and
monitor the device: general, profile, available networks, status,
and Wi-Fi protected setup.
Additional configuration options located at the bottom of the
window that define the behavior of the utility. The available
options are as follows:
Show Tray Icon: Show/hide the Utility icon in the system tray.
Radio Off: Temporarily turn off wireless radio.
Disable Adapter: Temporarily disable the wireless adapter
General
The General section shows the connection status, speed, type,
encryption, SSID, signal strength, and link quality of the
AC1200 Dual Band USB Adapter.
Click on the Renew IP button to re-initiate the wireless connec-
tion with the AP.

WINDOWS PROFILE
2-5
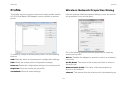
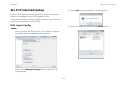
Profile
The Profile section is used to create and modify profiles that the
AC1200 Dual Band USB Adapter uses to connect to access
points.
To create or modify an access point profile, use the following
buttons:
Add: Manually enter an access point’s configuration settings.
Edit: Modify an access point’s configuration settings.
Remove: Delete the configuration settings of an access point.
Duplicate: Clone an access point’s profile.
Set Default: Reset all saved settings.
Wireless Network Properties Dialog
Use the wireless network properties dialog to enter the connec-
tion properties for an access point.
Fill in the following wireless network properties to create an
access point profile:
Ad hoc Enables the adapter to operate in ad hoc or infrastruc-
ture mode.
Profile Name The name of the access point that is shown in
the profile list.
Network Name (SSID) The name of the access point as
shown on the network.
Channel The channel that the access point is broadcasting on.

WINDOWS ADDING A PROFILE
2-6
Network Authentication The protocol used for network
authentication.
Data Encryption The protocol used for data encryption.
ASCII Enables use of ASCII characters in the passphrase.
Passphrase Enables the use of hexadecimal characters pass-
phrase.
Key Index (advanced) User has to specify which of the four
keys will be active. Please make sure that both the AP/Router
you are connected to and the EUB1200AC use the same key.
Network Key The encryption key used to encrypt the data
packets during data transmission.
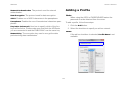
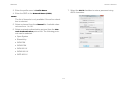
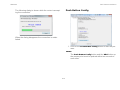
Adding a Profile
Note:
When using the ASCII or PASSPHRASE feature the
password must be obtained from the router.
To add a profile, follow these steps:
1. Click the Add button.
2. Select the checkbox to specify an ad hoc network.
Note:
If the ad hoc checkbox is selected, Profile Name is not
available.

WINDOWS ADDING A PROFILE
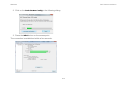
2-7
3. Enter the profile name in Profile Name.
4. Enter the SSID in the Network Name (SSID).
Note:
The list of channels is only available if the ad hoc check-
box is selected.
5. Select a channel from the Channel list. Available chan-
nels are from 1 to 161.
6. Select a network authentication protocol from the Net-
work Authentication protocol list. The following proto-
cols can be selected:
Open System
Shared Key
WPA-PSK
WPA2-PSK
WPA 802.1X
WPA2 802.1X
WEP 802.1X
7. Select the ASCII checkbox to enter a password using
ASCII characters.

WINDOWS ADDING A PROFILE
2-8
8. Select the PASSPHRASE checkbox to enter a password
using hexadecimal characters. The passphrase key
length can be either 64 or 128 bits.
9. Select the key index from the Key index list.
10.Enter the network key value in Network key.
11.Enter the same network key value again in Confirm net-
work key.
12.Click the OK button to save the profile settings or the
Cancel button to discard settings.
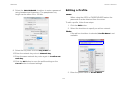
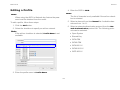
Editing a Profile
Note:
When using the ASCII or PASSPHRASE feature the
password must be obtained from the router.
To edit a profile, follow these steps:
1. Click the Edit button.
2. Select the checkbox to specify an ad hoc network.
Note:
If the ad hoc checkbox is selected, Profile Name is not
available.
3. Enter the profile name in Profile Name.

WINDOWS ADDING A PROFILE
2-9
4. Enter the SSID in the Network Name (SSID).
Note:
The list of channels is only available if the ad hoc check-
box is selected.
5. Select a channel from the Channel list. Available chan-
nels are from 1 to 161.
6. Select a network authentication protocol from the Net-
work Authentication protocol list. The following proto-
cols can be selected:
Open System
Shared Key
WPA-PSK
WPA2-PSK
WPA 802.1X
WPA2 802.1X
WEP 802.1X
7. Select the ASCII checkbox to enter a password using
ASCII characters.

WINDOWS AVAILABLE NETWORK
2-10
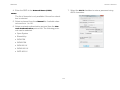
8. Select the PASSPHRASE checkbox to enter a password
using hexadecimal characters. The passphrase key
length can be either 64 or 128 bits.
9. Select the key index from the Key index list.
10.Enter the network key value in Network key.
11.Enter the same network key value again in Confirm net-
work key.
12.Click the OK button to save the profile settings or the
Cancel button to discard settings.
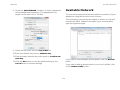
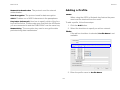
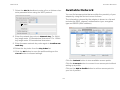
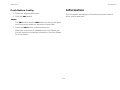
Available Network
You can find access points that are within the proximity of your
adapter by using the device to scan for them.
The information returned by the adapter is shown in a list and
includes the SSID, channel, encryption type, authentication
type and signal strength.
If you want to view available access points, click the Refresh
button.
If you want to add an access point to your list of profiles, click
on the Add to Profile button.
La pagina si sta caricando...
La pagina si sta caricando...
La pagina si sta caricando...
La pagina si sta caricando...
La pagina si sta caricando...
La pagina si sta caricando...
La pagina si sta caricando...
La pagina si sta caricando...
La pagina si sta caricando...
La pagina si sta caricando...
La pagina si sta caricando...
La pagina si sta caricando...
La pagina si sta caricando...
La pagina si sta caricando...
La pagina si sta caricando...
La pagina si sta caricando...
La pagina si sta caricando...
La pagina si sta caricando...
La pagina si sta caricando...
La pagina si sta caricando...
La pagina si sta caricando...
La pagina si sta caricando...
La pagina si sta caricando...
La pagina si sta caricando...
La pagina si sta caricando...
La pagina si sta caricando...
La pagina si sta caricando...
-
 1
1
-
 2
2
-
 3
3
-
 4
4
-
 5
5
-
 6
6
-
 7
7
-
 8
8
-
 9
9
-
 10
10
-
 11
11
-
 12
12
-
 13
13
-
 14
14
-
 15
15
-
 16
16
-
 17
17
-
 18
18
-
 19
19
-
 20
20
-
 21
21
-
 22
22
-
 23
23
-
 24
24
-
 25
25
-
 26
26
-
 27
27
-
 28
28
-
 29
29
-
 30
30
-
 31
31
-
 32
32
-
 33
33
-
 34
34
-
 35
35
-
 36
36
-
 37
37
-
 38
38
-
 39
39
-
 40
40
-
 41
41
-
 42
42
-
 43
43
-
 44
44
-
 45
45
-
 46
46
-
 47
47


EnGenius A8J-EUB1200AC Manuale utente
- Categoria
- Punti di accesso WLAN
- Tipo
- Manuale utente
- Questo manuale è adatto anche per
in altre lingue
- English: EnGenius A8J-EUB1200AC User manual
Documenti correlati
Altri documenti
-
Zoom Network Router 4410A Manuale utente
-
Approx APPUSB300 Guida utente
-
aqprox! appUSB150 Manuale utente
-
aqprox! appPCI300 Manuale utente
-
ZyXEL NWD2705 Manuale utente
-
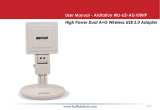 Buffalo Technology WLI-U2-AG108HP Manuale utente
-
Hama 00062740 Manuale del proprietario
-
Atlantis Net Fly U-108 Manuale utente
-
DeLOCK 12535 Scheda dati
