Omega OC95TXA Manuale utente
- Categoria
- Piani cottura
- Tipo
- Manuale utente
La pagina si sta caricando...

PIANO COTTURA VETROCERAMICO
Installazione - Uso - Manutenzione
COOKING HOBS VITROCERAMIC
Installation - Use - Maintenance
TABLES DE CUISSON VITROCÉRAMIQUE
Installation - Emploi - Entretien
KOCHFELD
GLASKERAMIK
Installation - Gebrauch - Wartung
PLACA DE COCCION VIDRIOCERÁMICO
Instalación - Uso - Mantenimiento
INBOUW-KOOKPLAAT
VERGLAASD KERAMIEK
Installatie - Gebruik - Onderhoud
PLANO DE COZEDURA VIDROCERÂMICA
Instalação - Uso - Manutenção
IT
GB
FR
DE
ES
PT
NL
TOUCH CONTROL

IT GB FR
2
Caro Cliente,
sentitamente La ringra-
ziamo e ci congratuliamo
per la scelta da Lei fatta.
Questo nuovo prodotto,
accuratamente progettato e
costruito con materiali di
primissima qualità, è stato
accuratamente collaudato
per poter soddisfare tutte le
Sue esigenze di una perfetta
cottura.
La preghiamo pertanto di
leggere e rispettare le facili
istruzioni che Le permet-
teranno di raggiungere
eccellenti risultati sin dalla
prima utilizzazione.
Con questo moderno appar-
ecchio Le formuliamo i
nostri più vivi auguri.
IL COSTRUTTORE
Dear customer,
We thank you and con-
gratulate you on your
choice.
This new carefully designed
product, manufactured with
the highest quality mate-
rials, has been carefully
tested to satisfy all your
cooking demands.
We would therefore request
you to read and follow
these easy instructions
which will allow you to
obtain excellent results
right from the start.
May we wish you all the
very best with your modern
appliance!
THE MANUFACTURER
Cher client,
merci et sincères félici-
tations pour le choix que
vous avez fait.
Ce nouveau produit,
développé avec soin et
fabriqué avec des matières
de toute première qualité, a
été soigneusement rodé
pour satisfaire toutes Vos
exigences d’une cuisson
parfaite.
Veuillez lire attentivement
les instructions simples
portées sur cette notice qui
vous permettront d’obtenir
d’excellents résultats dès la
première utilisation.
Nous vous souhaitons une
entière et pleine satisfaction
quant à l’utilisation de cet
appareil moderne.
LE CONSTRUCTEUR
Indice
Istruzioni
per l’utente
installazione 4
uso 4
funzioni 4-26-42-62
manutenzione 88
Istruzioni
per l’installatore
installazione 90
posizionamento 90
collegamento elettrico 90
elementi riscaldanti 94
QUESTO
PRODOTTO
È
STATO
CONCEPITO
PER
UN
IMPIEGO
DI
TIPO
DOMESTICO
.
IL
COSTRUTTORE
DECLINA
OGNI
RESPONSABILITÀ
NEL
CASO
DI
EVENTUALI
DANNI
A
COSE
O
PERSONE
DERIVANTI
DA
UNA
NON
CORRETTA
INSTALLAZIONE
O
DA
USO
IMPROPRIO
,
ERRONEO
OD
ASSURDO
.
Index
Instructions
for use
installation 4
use 4
functions 4-26-42-62
maintenance 88
Instructions for the
installation technician
installation 90
positioning 90
electrical connection 90
heating elements 94
THIS
APPLIANCE
IS
CONCEIVED
FOR
DOMESTIC
USE
ONLY
.
THE
MANUFACTURER
SHALL
NOT
IN
ANY
WAY
BE
HELD
RESPONSIBLE
FOR
WHATEVER
INJURIES
OR
DAMAGES
ARE
CAUSED
BY
INCORRECT
INSTALLATION
OR
BY
UNSUITABLE
,
WRONG
OR
ABSURD
USE
.
Index
Notice
d’emploi
installation 4
emploi 4
fonctions 4-26-42-62
entretien 88
Modalités
d’installation
installation 90
positionnement 90
branchement électrique90
élements de chauffe 94
CE PRODUIT EST CONÇU
EXCLUSIVEMENT
POUR USAGE
DOMESTIQUE
. LE CONSTRUCTEUR
DÉCLINE
TOUTE RESPONSABILITÉ
POUR
DOMMAGES ET BLESSURES
CAUSÉES
PAR UNE INSTALLATION
INCORRECTE
OU PAR UN USAGE
IMPROPRE
, ERRONÉ OU ABSURDE.

IT GB FR
4
ISTRUZIONI
PER L’UTENTE
Installazione
Tutte le operazioni relative
all’installazione (allacciamento
elettrico) devono essere eseguite
da personale qualificato
secondo le norme vigenti.
Per le istruzioni specifiche vedi
la parte riservata all’installato-
re.
Uso
ELEMENTI RISCALDANTI
TOUCH CONTROL
(Fig. 6-7)
Tasti a sfioramento
Tutte le operazioni possono essere
compiute tramite tasti a
sfioramento (sensori di tipo
capacitivo) posti sulla faccia
frontale della scheda; ad ogni
tasto corrisponde un display.
Ogni attività viene confermata da
un segnale acustico.
Accensione e spegnimento
Touch control
“
X
”
(Fig. 1a-1b-2a-2b-2c-2d)
Accensione del dispositivo
1. Premere il tasto a
sfioramento ( / ) per 2
secondi.
Il controllo viene attivato: gli
indicatori di livello di
regolazione (3) mostrano “0”
ed i punti decimali (13)
lampeggiano.
La prossima operazione deve
essere compiuta entro 10
secondi, altrimenti il dispositivo
si spegne automaticamente.
Accensione della zona di cottura
All’accensione del dispositivo
con il tasto (1), l’accensione di
una zona di cottura deve
INSTRUCTIONS
PERTAINING TO USER
Installation
All operations relative to
installation (electric
connection) should be carried
out by skilled personnel in
conformity with the rules in
force.
As for the specific instructions
see part pertaining to installer.
Use
TOUCH CONTROL
HEATING ELEMENTS
(Figs. 6-7)
Touch sensitive keys
All operations can be
performed using touch
sensitive keys (capacitive
sensors) located on the front
of the control board; each key
has a corresponding display.
All actions are confirmed by
an audible signal.
Switching the appliance on and off
Touch control
“X”
(Figs. 1a-1b-2a-2b-2c-2d)
Switching on the appliance
1. Touch the touch key (
/
) for 2 seconds.
The control is powered on: the
power level indicators (3)
show “0” and the decimal
points (13) flash.
The next operation must be
performed within 10 seconds
or the appliance will
automatically switch off.
Switching on a cooking zone
After switching on the
appliance by pressing (1), a
cooking zone must be
INSTRUCTIONS
POUR L’UTILISATEUR
Installation
Toutes les opérations relatives à
l’installation (raccordement
électrique) doivent être faites
par un personnel qualifié, en
conformité avec les normes en
vigueur.
En ce qui concerne les
instructions spécifiques voir la
partie réservée à l’installateur.
Emploi
ÉLÉMENTS CHAUFFANTS
TOUCH CONTROL
(Fig. 6-7)
Touches à effleurement
Toutes les opérations peuvent
être effectuées à l’aide des
touches à effleurement
(capteurs capacitifs), situés sur
le panneau avant de la carte ; à
chaque touche correspond un
display. Toute activité sera
confirmée par un signal sonore.
Mise en marche et arrêt.
Touch control
“X”
(Fig. 1a-1b-2a-2b-2c-2d)
Allumage du dispositif
1. Toucher la touche à
effleurement
( / )
pendant
2 secondes.
Le contrôle est activé : les
indicateurs de niveau de
réglage (3) affichent « 0 » et les
décimales (13) clignotent.
L’opération suivante doit être
faite dans les 10 secondes,
sinon le dispositif s’éteint
automatiquement.
Allumage de la zone de cuisson
Lors de la mise en route du
dispositif à l’aide de la touche
(1), la zone de cuisson doit être

IT GB FR
6
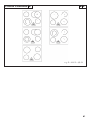
Fig. 1a - Abb. 1a - Afb. 1a
1 Accensione/Spegnimento ON / OFF
2 zona cottura
3 display valore impostato
4 meno
5più
6 doppio circuito
7 timer
8 display timer
9 blocco
10 spia doppio circuito
11 spie timer
12 spia blocco
13 punto decimale
1 Power ON/ Power OFF
2 cooking zone
3 setting display
4 minus
5 plus
6 dual circuit
7 timer
8 timer display
9lock function
10 dual circuit indicator light
11 timer indicator lights
12 lock indicator light
13 decimal point
1 Marche/Arrêt ON / OFF
2 Zone cuisson
3 Display de la valeur programmée
4 Moins
5Plus
6 Double circuit
7 Minuterie
8 Display minuterie
9 Arrêt
10 Témoin du double circuit
11 Témoin de la minuterie
12 Témoin d’arrêt
13 Point décimal
1 Encendido/Apagado ON / OFF
2 zona de cocción
3 display valor programado
4 menos
5 más
6 circuito doble
7 timer
8 display timer
9 bloqueo
10 piloto circuito doble
11 pilotos timer
12 piloto bloqueo
13 punto decimal
1 Aan/Uit ON / OFF
2 kookplaat
3 display ingestelde waarde
4 minder (-)
5 meer (+)
6 dubbel circuit
7 timer
8 display timer
9 blokkering
10 verklikkerlichtje dubbel circuit
11 verklikkerlichtjes timer
12 verklikkerlichtje blokkering
13 decimale punt
1 Activação/Desactivação ON / OFF
2 zona de cozedura
3 display valor programado
4 menos
5 mais
6 duplo circuito
7 timer
8 display timer
9bloqueio
10 visor do duplo circuito
11 visores timer
12 visor de bloqueio
13 ponto decimal
TOUCH CONTROL X V
1 Ein / Aus Taste
2 Kochzone
3 Anzeige eingestellter Wert
4 Minus
5 Plus
6 Doppelter Heizkreis
7 Timer
8 Anzeige Timer
9 Sperre
10 Warnleuchte doppelter Heizkreis
11 Timer-Warnleuchten
12 Warnleuchte Sperre
13 Dezimalpunkt

ES NL PTDE
7
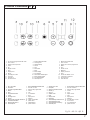
Fig. 1b - Abb. 1b - Afb. 1b
1 Accensione/Spegnimento ON / OFF
2 zona cottura
3 display valore impostato
4 meno
5più
6 doppio circuito
7 timer
8 display timer
9 blocco
10 spia doppio circuito
11 spie timer
12 spia blocco
13 punto decimale
1 Power ON/ Power OFF
2 cooking zone
3 setting display
4 minus
5 plus
6 dual circuit
7 timer
8 timer display
9 lock function
10 dual circuit indicator light
11 timer indicator lights
12 lock indicator light
13 decimal point
1 Marche/Arrêt ON / OFF
2 Zone cuisson
3 Display de la valeur programmée
4 Moins
5 Plus
6 Double circuit
7 Minuterie
8 Display minuterie
9 Arrêt
10 Témoin du double circuit
11 Témoin de la minuterie
12 Témoin d’arrêt
13 Point décimal
1 Encendido/Apagado ON / OFF
2 zona de cocción
3 display valor programado
4 menos
5más
6 circuito doble
7 timer
8 display timer
9 bloqueo
10 piloto circuito doble
11 pilotos timer
12 piloto bloqueo
13 punto decimal
1 Aan/Uit ON / OFF
2 kookplaat
3 display ingestelde waarde
4 minder (-)
5 meer (+)
6 dubbel circuit
7 timer
8 display timer
9 blokkering
10 verklikkerlichtje dubbel circuit
11 verklikkerlichtjes timer
12 verklikkerlichtje blokkering
13 decimale punt
1 Activação/Desactivação ON / OFF
2 zona de cozedura
3 display valor programado
4 menos
5 mais
6 duplo circuito
7 timer
8 display timer
9bloqueio
10 visor do duplo circuito
11 visores timer
12 visor de bloqueio
13 ponto decimal
1 Ein / Aus Taste
2 Kochzone
3 Anzeige eingestellter Wert
4 Minus
5 Plus
6 Doppelter Heizkreis
7 Timer
8 Anzeige Timer
9 Sperre
10 Warnleuchte doppelter Heizkreis
11 Timer-Warnleuchten
12 Warnleuchte Sperre
13 Dezimalpunkt
TOUCH CONTROL X O

IT GB FR
8
avvenire entro i 10 secondi nel
seguente modo.
1. Premere il tasto (2) relativo
alla zona di cottura interessata.
Sul display relativo compare
uno “0”. Il punto decimale del
display (13) si accende, facendo
così vedere che quella zona è
attiva.
2. Regolare il livello (da 1 a 9)
mediante i tasti “+” e “-” (5/4).
I tasti “+” e “-“ sono dotati di
funzione di ripetizione. La
pressione continua su uno di
questi tasti determina l’aumento
o la diminuzione del valore
impostato di un’unità ogni 0.3
secondi.
Può essere attiva solo una zona
alla volta, pertanto può risultare
acceso solo un punto decimale.
Spegnimento della zona di
cottura
1. La zona di cottura deve
essere attivata. Il punto
decimale (13) della zona
corrispondente deve essere
acceso.
2. Portare il valore impostato a
“0” mediante il tasto (4). Dopo
3 secondi la zona di cottura si
spegne automaticamente.
Spegnimento rapido:
1. La zona di cottura richiesta
deve essere attivata ed il punto
decimale (13) di quella zona
deve essere acceso.
2. Toccando
contemporaneamente i tasti “+”
e “-“ (5/4), la zona si spegne
immediatamente.
Indicatori di calore residuo
Quando la temperatura sulla
zona di cottura è ancora
elevata, al punto tale da causare
ustioni, il display relativo a
quella zona mostra il simbolo
“H” (calore residuo).
L’indicazione scompare solo
quando non vi è più alcun
switched on within 10 seconds
as follows:
1. Press the key (2)
corresponding to the cooking
zone. The relative display will
show “0”. The decimal point
of display (13) will light up,
indicating that the zone is now
on.
2. Set the power level (1 to 9)
using the keys “+” and “-” (5/
4).
The keys “+” and “-“ have a
repeater function, i.e. holding
these keys pressed will
increase or reduce the setting
by one unit every 0.3 seconds.
Only one cooking zone may
be switched on at a time, so
only one decimal point is lit
up.
Switching off a cooking zone
1. The cooking zone must be
on. The corresponding
decimal point (13) must be lit
up.
2. Reduce the power level to
“0” by pressing (4). After 3
seconds the cooking zone will
switch off automatically.
Rapid switch off:
1. The cooking zone must be
on and the corresponding
decimal point (13) must be lit
up.
2. Press keys “+” and “-“ (5/4)
simultaneously and the zone
will switch off immediately.
Residual heat indicators.
While the cooking zone is still
hot enough to cause burns, the
corresponding display shows
the symbol “H” (residual
heat). The symbol only
disappears when the
temperature falls below 60° C
and there is no longer any risk
allumée dans les 10 secondes de
la façon qui suit.
1. Presser la touche (2)
correspondant à la zone de
cuisson voulue. Le display
correspondant affiche « 0 ». Le
point décimal du display (13)
s’allume tout en indiquant la
zone active.
2. Régler le niveau (de 1 à 9) à l’aide
des touches « + » et « - » (5/4).
Les touches « + » et « - » sont
munies d’une fonction de
répétition. Si on maintient la
pression sur une de ces touches,
la valeur programmée
augmente ou diminue d’une
unité toutes les 0,3 secondes.
Une seule zone de cuisson peut
être active à la foi ; ainsi donc,
un seul point décimal sera
allumé.
Arrêt de la zone de cuisson
1. La zone de cuisson doit être
allumée. Le point décimal (13)
de la zone correspondante doit
être allumé.
2. Porter la valeur programmée
sur « 0 » à l’aide de la touche
(4). Après 3 secondes, la zone
de cuisson s’éteint
automatiquement.
Arrêt rapide
1. La zone de cuisson voulue
doit être allumée et le point
décimal (13) de cette zone doit
être allumé.
2. Effleurer en même temps les
touches « + » et « - » (5/4) : la
zone de cuisson s’éteint
automatiquement.
Indicateurs de chaleur
résiduelle
Lorsque la température de la
zone de cuisson est encore
élevée et qu’elle peut provoquer
des brûlures, le display
correspondant de la zone en
question affiche le symbole « H
» (chaleur résiduelle).

IT GB FR
10
pericolo (a 60
°
C).
Il display mostra “0” fintanto
che la temperatura rimane sotto
i 60
°
C, mentre mostra “H”
quando la temperatura supera i
60
°
C.
Per risparmiare energia
spegnere la zona di cottura in
anticipo, al fine di sfruttare il
calore residuo.
La segnalazione di calore
residuo “H” viene persa a
seguito di interruzione di
tensione di rete superiore a 3
secondi.
Spegnimento dell’apparato
L’apparato può essere spento in
qualsiasi momento mediante il
tasto di accensione (1).
Zone di cottura a doppio
circuito
Due zone di cottura posssono
essere dotate di secondo
circuito: per esempio la zona si
compone di un disco centrale e
di una corona esterna. E’
possibile accendere la sola zona
centrale oppure entrambe. Ciò
consente l’adattamento
dell’area riscaldante alla
pentola utilizzata.
Accensione di una zona a
doppio circuito
1.La zona a doppio circuito deve
essere attivata. Sul display
relativo alla zona, deve essere
acceso il punto decimale (13).
2. Selezionare il livello
desiderato (1
÷
9).
3. Accendere il secondo circuito
mediante il tasto di doppio
circuito (6).
La spia (10) relativa alla zona
selezionata si accende; il
secondo circuito si accende
assieme a quello primario.
of burns.
The display shows “0” as long
the temperature remains
below 60°C, switching to “H”
only when the temperature
rises above 60°C.
To save energy, switch off the
cooking zone before cooking
is completed in order to make
use of the residual heat.
The residual heat indicator
“H” will go out if the power
supply is interrupted for more
than 3 seconds.
The appliance may be
switched off at any time by
pressing the power key (1).
Dual circuit cooking zone.
Two cooking zones may be
equipped with a dual circuit,
e.g., a central disc and an
outer ring. You can either use
the central zone alone or both
zones together and thus adapt
the cooking area to suit the
size of the pan.
Switching on a dual circuit
zone.
1. The relative zone must be
on. The decimal point (13) on
the corresponding display
must be lit up.
2. Select the desired power
level (1 to 9).
3. Switch on the second
circuit by pressing the dual
circuit key (6).
The indicator light (10) of the
selected zone will illuminate;
the second circuit is switched
on together with the first.
L’indication disparaît lorsqu’il
n’y a plus de danger (à 60
°
C).
Le display affiche « 0 » si la
température est en dessous de
60
°
C, tandis qu’il affiche « H »
lorsqu’elle est supérieure à 60
°
C.
Pour économiser de l’énergie, il
est conseillé d’éteindre la zone
de cuisson un peu avant, afin
d’exploiter la chaleur
résiduelle.
L’indication de la chaleur
résiduelle « H » est perdue à la
suite d’une interruption de la
tension de réseau pendant plus
de 3 secondes.
Arrêt de l’appareil
On peut éteindre l’appareil à
n’importe quel moment à l’aide
de la touche de mise en route (1).
Zones de cuisson à double
circuit
Deux zones de cuisson peuvent
être munies d’un deuxième
circuit ; par exemple, la zone est
formée d’un disque central et
d’une couronne. On peut allumer
uniquement la zone centrale ou
les deux. Ceci permet d’adapter
la zone chauffante à la casserole
utilisée.
Allumage d’une zone à double
circuit
1. La zone à double circuit doit
être activée. Sur le display
correspondant à la zone en
question, le point décimal (13)
doit être allumé.
2. Sélectionner le niveau désiré
(1
÷
9).
3. Allumer le deuxième circuit à
l’aide de la touche du double
circuit (6).
Le témoin (10) correspondant à
la zone sélectionnée s’allume ;
le deuxième circuit s’allume en
même temps que le premier.

IT GB FR
12
Spegnimento del secondo
circuito di una zona di cottura
1. La zona a doppio circuito
deve essere attivata. Sul display
relativo alla zona, deve essere
acceso il punto decimale (13).
2. Toccare il tasto di doppio
circuito (6).
La spia (10) si spegne e si
spegne inoltre il circuito
secondario della zona di
cottura.
Blocco dell’apparato o della
zona di cottura
Blocco dell’apparato
L’intero apparato può essere
bloccato con il tasto di blocco
(9), al fine di impedire
operazioni non intenzionali. La
funzione serve anche come
sicurezza per i bambini.
Se la funzione di blocco non
viene disattivata prima di
spegnere l’apparato, alla
successiva riaccensione questa
risulterà ancora attivata.
Fintanto che la funzione di
blocco è attiva, l’azione sui tasti
non ha alcun effetto.
Spegnimento di sicurezza
Se una o più zone di cottura
rimangono inavvertitamente
accese, il controllo provvede a
spegnerle automaticamente
dopo un certo periodo di tempo.
Nel caso di spegnimento
automatico di sicurezza, viene
visualizzato il simbolo “H”.
Per evitare lo spegnimento
automatico è sufficiente toccare
il tasto di selezione della zona o
i tasti “+” e “-” prima dello
scadere del tempo limite.
Preriscaldamento automatico
Questo automatismo semplifica
Switching off the second
circuit of a dual circuit zone.
1. The dual circuit zone must
be on. The decimal point (13)
on the corresponding display
must be illuminated.
2. Touch the dual circuit key
(6).
The indicator light (10) goes
out and the second circuit is
switched off.
Appliance lock function and
automatic safety switch off
Appliance lock function
The entire appliance may be
locked to prevent
unintentional operation by
pressing the lock key (9). This
also serves a child safety
function.
If the lock function is not
deactivated before the
appliance is switched off, it
will still be active when the
appliance is next switched on.
While the lock function is
activated, operating the keys
will have no effect.
Automatic safety switch off
If one or more of he cooking
zones is left on by mistake,
the control will automatically
switch them off after a certain
time limit.
In the event of automatic
safety switch off, the symbol
“H” is displayed.
To prevent automatic switch
off, simply touch the zone
selection key or the “+” and “-
” keys before the time limit
expires.
Automatic preheating
This function simplifies the
Arrêt du deuxième circuit d’une
zone de cuisson
1. La zone à double circuit doit
être activée. Sur le display
correspondant à la zone en
question, le point décimal (13)
doit être allumé.
2. Effleurer la touche du double
circuit (6).
Le témoin (10) et le deuxième
circuit de la zone de cuisson
s’éteignent.
Blocage de l’appareil ou de la
zone de cuisson
Blocage de l’appareil
Le fonctionnement de tout
l’appareil peut être bloqué à
l’aide de la touche de blocage
(9), afin d’empêcher toute
opération involontaire. La
fonction sert également de
sécurité pour les enfants.
Si cette fonction de blocage
n’est pas désactivée avant
d’éteindre l’appareil, celle-ci
sera encore activée lors de la
mise en marche successive.
Tant que la fonction de blocage
est active, l’action sur les
touches n’a aucun effet.
Arrêt de sécurité
Si une ou plusieurs zones de
cuisson restent allumées sans le
vouloir, le contrôle les éteint
automatiquement après un
certain temps.
Si l’appareil s’est éteint
automatiquement, le display
affiche le symbole « H ». Pour
éviter l’arrêt automatique, il
suffit d’effleurer la touche de
sélection de la zone ou les
touches « + » et « - » avant la
fin du temps limite.
Préchauffage automatique
Cet automatisme simplifie le

IT GB FR
14
il processo di cottura in quanto
non è richiesta la presenza
umana durante tutto il ciclo di
cottura.
La funzione determina un
preriscaldamento della zona di
cottura alla massima potenza, in
modo da portare velocemente la
zona alla temperatura di
regime. Dopo un certo tempo, il
livello di potenza ritorna
spontaneamente a quello
impostato.
Attivazione del
preriscaldamento automatico
Selezionare la zona di cottura
interessata tramite il tasto (2).
Selezionare il livello 9
medianter il tasto “-“; quindi
selezionare il livello 9 con il
tasto “+”. Selezionare allora il
livello di potenza desiderato, ad
esempio il livello 6, con il tasto
“-”.
Nella modalità di
preriscaldamento automatico, il
display della relativa zona di
cottura mostra alternativamente
il livello impostato (“6” ) ed il
simbolo “A”.
Modifica del livello di potenza
durante il preriscaldamento
automatico
1. La zona interessata deve
essere attivata. Il punto
decimale (13) della rispettiva
zona deve essere acceso.
2. Cambiare livello tramite i
tasti “+” e “-“.
Se il livello viene aumentato, il
nuovo tempo di
preriscaldamento viene
calcolato considerando quello
già intercorso con la precedente
impostazione.
Esempio: Viene selezionato il
livello 1, al quale corrisponde
un tempo di preriscaldamento di
1’.
Dopo 30”, si aumenta il livello
fino a 4. A questo livello il
tempo di preriscaldamento è di
6’30”.
cooking process as it obviates
the need for human
intervention.
The cooking zone is first
preheated at maximum power
to rapidly bring the zone up to
the cooking temperature, after
which the power is
automatically reduced to the
preset level.
Activating the automatic
preheating function.
Select the cooking zone by
pressing key (2).
Select power level 9 using the
“-“key, then select level 9
using the “+” key. Now select
the desired power level, e.g.
6, using the “-” key.
In automatic preheating
mode, the cooking zone
display will alternately show
the set level (“6”) and the
symbol “A”.
Changing the power level
setting during automatic
preheating
1. The relative cooking
zone must be on. The
decimal point (13) on the
corresponding display must
be lit up.
2. Change the power level
using the keys “+” and “-“.
If the level is increased, the
new preheating time will be
calculated taking account
the time elapsed since the
previous setting.
Example: Level 1 is first
selected, corresponding to a
preheating time of 1’.
After 30”, the power level
is increased to 4, which
requires a preheating time
of 6’30”.
After changing the level,
processus de cuisson, étant
donné qu’on peut s’absenter
durant tout le cycle de cuisson.
Cette fonction lance le
préchauffage de la zone de
cuisson à la puissance
maximum, de façon à porter
rapidement la zone en question
à la température de régime.
Après un certain temps, le
niveau de puissance revient
spontanément à celui qui a été
programmé.
Mise en marche du
préchauffage automatique
Sélectionner la zone de cuisson
voulue à l’aide de la touche (2).
Sélectionner le niveau 9 à l’aide
de la touche « - », puis
sélectionner le niveau 9 à l’aide
de la touche « + ». Sélectionner
alors le niveau de puissance
désiré, par exemple, le niveau 6,
à l’aide de la touche « - ».
Avec la modalité « préchauffage
automatique », le display de la
zone de cuisson correspondante
affiche alternativement le
niveau programmé (« 6 ») et le
symbole « A ».
Modification du niveau de
puissance durant le
préchauffage automatique
1. La zone concernée doit être
activée. Le point décimal (13)
de la zone correspondante doit
être allumé.
2. Modifier le niveau de
puissance à l’aide des touches «
+ » et « - ».
Si le niveau est plus élevé, le
nouveau temps de préchauffage
sera calculé en fonction du
temps écoulé à partir de la
précédente programmation.
Exemple : Le niveau 1, auquel
correspond un temps de
préchauffage de 1 mn, a été
sélectionné.
Après 30 s, on augmente le
niveau jusqu’à 4. A ce point, le
temps de préchauffage est de 6
mn 30 s.

IT GB FR
16
In seguito alla modifica del
livello, il preriscaldamento
automatico durerà ancora 6’
(risultato della sottrazione
6’30” – 30”).
Disattivazione della funzione di
preriscaldamento automatico.
Con il simbolo “A” mostrato sul
display della zona:
1. la zona interessata deve
essere attivata. Il punto
decimale (13) della rispettiva
zona deve essere acceso;
2. premere il tasto “-” (4) dopo
almeno 10 secondi dall’attiva-
zione della funzione.
Funzione Timer
Anche questo automatismo
semplifica il processo di cottura
in quanto non è richiesta la
presenza umana durante tutto il
ciclo di cottura. La zona di
cottura verrà spenta
automaticamente all’esaurirsi di
un tempo impostato.
Se nessuna zona viene
esplicitamente programmata,
allora la funzione di timer
funziona semplicemente da
contaminuti (si veda il capitolo
specifico “funzione timer come
contaminuti” ).
Attivazione della funzione timer
1. la zona interessata deve
essere attivata. Il punto
decimale (13) della rispettiva
zona deve essere acceso.
2. Selezionare un livello tra 1 e
9.
3. Toccare il tasto di timer (7):
il display del timer visualizza
ora “00”.
4. Selezionare il tempo di
cottura (da 0 a 99 minuti) per
mezzo dei tasti “+” e “-“ (5 e
4).
La funzione di timer si avvia
automaticamente entro pochi
secondi.
La spia (11) corrispondente alla
the automatic preheating
will last a further 6’ (6’30”
– 30”).
Deactivating the automatic
preheating function.
With the zone display
showing the symbol “A”:
1. the relative zone must be
on. The decimal point (13) on
the corresponding display
must be lit up;
2. press “-” (4) after the
function has been activated
for at least 10 seconds.
Timer Function
This automatic function also
obviates the need for human
intervention during the entire
cooking cycle. The cooking
zone is automatically switched
off after the set time period.
If none of the zones is
specifically programmed for
this function, the timer
operates as a simple minute
counter (see section “Using
the timer function as a minute
counter”).
Activation of the timer
function.
1. the zone to be programmed
must be on. The decimal point
(13) on the corresponding
display must be lit up;
2. Select a level between 1
and 9.
3. Press the timer key (7): the
timer display will show “00”.
4. Select the cooking time
(from 0 to 99 minutes) using
keys “+” and “-“ (5 and 4).
The timer function is
automatically activated within
a few seconds.
The indicator light (11)
corresponding to the
Par suite de la modification du
niveau, le préchauffage
automatique durera encore 6
mn (résultat de la soustraction :
6 mn 30 s - 30 s).
Arrêt de la fonction de
préchauffage automatique
Lorsque le symbole « A » est
affiché sur le display de la zone :
1. la zone concernée doit être
activée. Le point décimal (13)
de la zone correspondante doit
être allumé ;
2. presser la touche « - » (4) au
moins 10 s après l’activation de
la fonction.
Fonction minuterie
Cet automatisme simplifie
également le processus de
cuisson, puisqu’il évite d’être
présent pendant tout le cycle de
cuisson. La zone de cuisson
s’éteindra automatiquement à la
fin du temps programmé.
Si aucune zone n’est
programmée, la fonction
minuterie fonctionne tout
simplement comme minuteur
(voir le chapitre spécifique «
Fonction minuterie utilisée
comme minuteur »).
Activation de la fonction
minuterie
1. La zone concernée doit être
activée. Le point décimal (13)
de la zone correspondante doit
être allumé.
2. Sélectionner un niveau entre
1 et 9.
3. Effleurer la touche du
minuterie (7) : le display du
minuterie affiche « 00 ».
4. Sélectionner le temps de
cuisson (de 0 à 99 mn) à l’aide
des touches « + » et « - » (5 et
4).
La fonction minuterie se met en
route automatiquement après
quelques secondes.

IT GB FR
18
zona programmata con la
funzione timer, si illumina.
Per impostare rapidamente il
tempo di cottura, mantenere
costantemente premuto il tasto
“+” o “-“.
La funzione timer si applica ad
una zona di cottura.
Modifica del tempo di cottura
già impostato
Il tempodi cottura può essere
modificato in qualsiasi
momento.
1. la zona interessata deve
essere attivata. Il punto
decimale (13) della rispettiva
zona deve essere acceso.
2. Toccare il tasto di timer (7).
3. Impostare il nuovo tempo con
i tasti “+” e “-“ (5 e 4).
Per impostare rapidamente il
tempo di cottura, mantenere
costantemente premuto il tasto
“+” o “-“.
Disattivazione della funzione
timer
Quando il tempo è scaduto,
viene emesso un segnale
acustico per la durata di 2
minuti.
Per interrompere in anticipo la
segnalazione acustica è
sufficiente toccare un tasto
qualunque.
La zona di cottura è ora spenta.
Se si vuole interrompere il timer
prima del suo scadere:
1. la zona interessata deve
essere attivata. Il punto
decimale (13) della rispettiva
zona deve essere acceso.
2. Toccare il tasto di timer (7).
3. Azzerare il tempo tenendo
premuto il tasto “-“ (4).
La funzione timer è ora
disattivata ma la zona di cottura
rimane accesa, fintanto che non
la si spegne manualmente.
programmed zone illuminates.
To rapidly adjust the cooking
time, hold pressed the “+” or
“-“ keys.
The timer function applies to
one cooking zone.
Changing a previously set
cooking time.
The programmed cooking
time may be changed at any
time.
1. the relative zone must be
on. The decimal point (13) on
the corresponding display
must be lit up.
2. Press the timer key (7).
3. Set a new cooking time
using the keys “+” and “-“ (5
and 4).
To rapidly adjust the cooking
time, hold pressed the “+” or
“-“ keys.
Deactivating the timer
function.
When the set cooking time has
elapsed, an audible signal
sounds for 2 minutes.
To interrupt the signal, simply
press any key.
The cooking zone is now
switched off.
If you want to interrupt the
timer before the programmed
time period has elapsed:
1. the relative zone must be
on. The decimal point (13) on
the corresponding display
must be lit up.
2. Press the timer key (7).
3. Zero the time by pressing “-
“ (4).
The timer is now deactivated
but the cooking zone will
remain on until it is switched
off manually.
Le témoin (11) correspondant à
la zone programmée avec la
fonction minuterie s’allume.
Pour programmer rapidement
le temps de cuisson, maintenir
pressée la touche « + » ou « - ».
La fonction minuterie
s’applique à une seule zone de
cuisson.
Modification du temps de
cuisson programmé
A tout instant, on peut modifier
le temps de cuisson.
1. La zone concernée doit être
activée. Le point décimal (13)
de la zone correspondante doit
être allumé.
2. Effleurer la touche de la
minuterie (7).
3. Programmer le nouveau
temps de cuisson à l’aide des
touches « + » et « - » (5 et 4).
Pour programmer rapidement
le temps de cuisson, maintenir
pressée la touche « + » ou « - ».
Arrêt de la fonction minuterie
Lorsque le laps de temps est
écoulé, l’appareil émet un
signal sonore pendant 2 mn.
Pour interrompre ce signal
sonore, il suffit d’effleurer une
touche quelconque.
La zone de cuisson est
maintenant éteinte.
Pour arrêter la minuterie avant
la fin :
1. La zone concernée doit être
activée. Le point décimal (13)
de la zone correspondante doit
être allumé.
2. Effleurer la touche de la
minuterie (7).
3. Mettre à zéro le temps en
maintenant pressée la touche « -
» (4).
La fonction minuterie est
arrêtée, mais la zone de cuisson
reste allumée jusqu’à ce qu’on
ne l’éteigne manuellement.

IT GB FR
20
Spegnimento rapido:
1. la zona interessata deve
essere attivata. Il punto
decimale (13) della rispettiva
zona deve essere acceso.
2. Premendo simultaneamente i
tasti “+” e “-“ (5 e 4), la zona
di cottura si spegne
immediatamente. In tal modo
viene disattivato anche il timer.
La funzione timer usata come
contaminuti
Se la funzione non viene usata
per una zona di cottura
specifica, essa può essere
impiegata come semplice
contaminuti.
Impostazione del contaminuti
Se il dispositivo è spento:
1. toccare il tasto di accensione
(1);
2. toccare il tasto di timer (7);
3. impostare il tempo desiderato
con i tasti “+” e “-“.
Se il dispositivo è acceso ed una
zona di cottura è attiva:
1. deselezionare la zona
toccando il relativo tasto di
selezione (2): il punto decimale
(13) si spegne;
2. toccare il tasto di timer (7);
3. impostare il tempo desiderato
con i tasti “+” e “-“.
Spegnimento della funzione
contaminuti
Quando il tempo è scaduto,
viene emesso un segnale
acustico per la durata di 2
minuti.
Per interrompere in anticipo la
segnalazione acustica è
sufficiente toccare un tasto
qualunque.
Se si vuole interrompere il timer
prima del suo scadere:
Rapid switch off:
1. the relative zone must be
on. The decimal point (13) on
the corresponding display
must be lit up
2. Press keys “+” and “-“ (5
and 4) simultaneously; the
cooking zone is switched off
immediately. The timer will
also be deactivated.
Using the timer function as a
minute counter
If the timer function is not
being used to program a
specific cooking zone, it may
be used as a simple minute
counter.
Setting the minute counter
If the appliance is switched
off:
1. press the power key (1);
2. press the timer key (7);
3. set the required time using
“+” and “-“.
If the appliance is switched on
and one of the cooking zones
is also on:
1. deselect the zone by
pressing the relative key (2):
the decimal point(13) will go
out;
2. press the timer key (7);
3. set the required time using
“+” and “-“.
Switching off the minute
counter function.
When the set time period
has elapsed, an audible
signal sounds for 2 minutes.
To interrupt the audible
signal simply press any of
the keys.
If you want to interrupt the
timer before the set time
period has expired:
1. press the timer key (7);
Arrêt rapide
1. La zone concernée doit être
activée. Le point décimal (13)
de la zone correspondante doit
être allumé.
2. Presser simultanément les
touches « + » et « - » (5 et 4) ;
la zone de cuisson s’éteint
immédiatement. La minuterie
aussi est arrêtée.
Fonction minuterie utilisée
comme minuteur
Si la fonction n’est pas utilisée
pour une zone de cuisson
spécifique, elle peut être
employée comme simple
minuteur.
Programmation du minuteur
Si l’appareil est éteint :
1. Effleurer la touche
d’allumage (1).
2. Effleurer la touche de la
minuterie (7).
3. Programmer le temps désiré à
l’aide des touches « + » et « - ».
S
i l’appareil est allumé et une
zone de cuisson est active :
1. Désélectionner la zone en
effleurant la touche de sélection
correspondante (2) : le point
décimal (13) s’éteint.
2. Effleurer la touche de la
minuterie (7).
3. Programmer le temps désiré à
l’aide des touches « + » et « - ».
Arrêt de la fonction minuteur
Lorsque le laps de temps est
écoulé, l’appareil émet un
signal sonore pendant 2 mn.
Pour interrompre ce signal
sonore, il suffit d’effleurer une
touche quelconque.
La zone de cuisson est
maintenant éteinte.
Pour arrêter la minuterie avant
la fin :
1. Effleurer la touche de la

IT GB FR
22
1. toccare il tasto di timer (7);
2. azzerare il tempo tenendo
premuto il tasto “-“ (4).
Spegnimento rapido:
1. premendo simultaneamente i
tasti “+” e “-“ (5 e 4), il timer
viene disattivato.
2. zero the time by pressing
“-“ (4).
Rapid switch off:
1. on pressing the keys “+”
and “-“ (5 and 4)
simultaneously, the timer is
deactivated.
minuterie (7).
2. Mettre à zéro le temps en
maintenant pressée la touche « - »
(4).
Arrêt rapide
1. Presser simultanément les
touches « + » et « - » (5 et 4) :
la minuterie est arrêtée.
Fig. 2a - Abb. 2a - Afb. 2a
TOUCH CONTROL
X V A 1
Fig. 2b - Abb. 2b - Afb. 2b
TOUCH CONTROL
X V B 1
La pagina si sta caricando...
La pagina si sta caricando...

IT GB FR
26
Accensione del
Touch Control “H”
(Fig. 3)
1 - Toccare il tasto (1) per attivare
il controllo: gli indicatori del
livello di regolazione (3) ed i
display timer (7) mostrano “0”
ed i punti decimali (12)
lampeggiano;
2 -Eseguire la successiva
operazione entro 10 secondi,
altrimenti il dispositivo si
spegne automaticamente;
Controllo della
Potenza e del Timer
attraverso i tasti “+”
e “-”
I tasti “+” e “-” (4) vengono
utilizzati per controllare sia la
potenza delle piastre che il tempo
impostato nel Timer/Contaminuti
(7). Essendo i comandi “+” e “-”
(4) comuni ad entrambe le
funzionalità, se si desidera
controllare la potenza delle piastre
occorrerà, dapprima, selezionare la
zona interessata tramite il tasto (2)
e il relativo livello di potenza con i
tasti “+” e “-” (4) quindi
selezionare la funzione timer,
mediante il tasto (6) e poi regolare
il tempo con il “+” o “-” (4).
Accensione della
zona di cottura:
Una volta acceso il dispositivo,
l’accensione di una zona di cottura
deve avvenire entro i 10 secondi,
nel seguente modo:
1 - Premere uno dei tasti (2) per
selezionare la zona di cottura che
interessa pilotare. Sul display
relativo (3) compare uno “0” e si
accende il punto decimale (12), per
evidenziare che la zona di cottura
che interessa è attiva;
Switching on the
Touch Control “H”
(Fig. 3)
1. Press the key (1) to activate the
control: the adjustment level
indicators (3) and the timer
display (7) are set to “0” while
the decimal points (12) flash.
2. Perform the next operation
within 10 seconds, otherwise
the device will switch off au-
tomatically.
Adjusting power and
the timer by means of
the “+” and “-” keys
Use the “+” and “-” keys (4) to
adjust the setting of the plates
and the required time on timer/
minute counter (7). The “+” and
“-” controls (4) are common to
both functions. Accordingly, to
regulate the power of the hob,
first select the zone with key (2),
then adjust the relative power
level using the “+” and “-” keys
(4); this done, select the timer
function with key (6) and pro-
ceed to set the duration, likewise
using the “+” or “-” key (4).
Switching on the
cooking area
Once the device has been
activated, switch on the
cooking area (within 10
seconds) as follows:
1. Press one of the keys (2) to
select the cooking area re-
quired. The relative display
(3) will indicate a “0” and
the decimal point (12) will
illuminate to show that the
cooking area has been ac-
tivated.
Mise en marche du
Touch Control “H”
(Fig. 3)
1 – Toucher la touche (1) pour
activer le contrôle : les
indicateurs du niveau de
réglage (3) et les afficheurs
minuteur (7) indiquent “ 0 ”
et les points décimaux (12)
clignotent.
2 – Effectuer l’opération
suivante dans les 10
secondes, sinon le dispositif
s’éteint automatiquement.
Contrôle de la puis-
sance et du minuteur à
l’aide des touches “+”
et “-”
Les touches “+” et “-” (4) sont
utilisées pour contrôler la
puissance des plaques et le temps
réglé dans le minuteur/compte-
minutes (7). Les commandes “+”
et “-” (4) sont communes aux
deux fonctions. Pour contrôler la
puissance des plaques,
sélectionner d’abord le foyer avec
la touche (2) et la puissance
correspondante avec les touches
“+” et “-” (4). Sélectionner
ensuite la fonction minuteur avec
la touche (6). Régler le temps de
cuisson avec les touches “+” ou
“-” (4).
Allumage de la zone de
cuisson :
Lorsque le dispositif est allumé,
l’allumage d’une zone de cuisson
doit avoir lieu en l’espace de 10
secondes comme suit :
1 – Appuyer sur une des touches (2)
pour sélectionner la zone de
cuisson que l’on souhaite piloter.
Un “ 0 ” apparaît sur l’afficheur
correspondant et le point décimal
(12) s’allume pour signaler que la
zone de cuisson qui intéresse est
active.

IT GB FR
28
2 - Toccare i tasti “+” e “-” (4) per
regolare il livello di potenza (da 1 a
9). Tali tasti sono dotati di funzione
di ripetizione. La pressione
continua di uno di questi tasti
determina l’aumento o la
diminuzione del valore impostato.
Spegnimento della
zona di cottura:
1 - La zona di cottura richiesta deve
essere attivata ed il punto
decimale corrsopondente (12)
deve essere acceso;
2 -Portare il valore impostato a
“0” mediante il tasto “-” (4).
Dopo 3 secondi la zona di
cottura si spegna
automaticamente;
Spegnimento rapido
della zona di cottura:
1 - La zona di cottura richiesta deve
essere attivata ed il punto
decimale corrsopondente (12)
deve essere acceso;
2 -Per spegnere automaticamente
la zona di cottura selezionata si
toccano contemporaneamente i
tasti “+” e “-” (4);
Indicatore di calore
residuo (“H”):
Una volta spenta la zona di cottura,
se la temperatura di quest’ultima è
ancora elevata, al punto tale da
causare ustioni, il display (3)
relativo a quella zona mostra il
simbolo “H” (calore residuo).
L’indicazione scompare solo
quando non vi è più alcun pericolo
(a 60
°
C).
Spegnimento
dell’apparato:
L’apparecchio può essere spento in
qualsiasi momento mediante il tasto
di accensione/spegnimento (1).
2. Use the “+” and “-” keys
(4) to adjust the heat level
(from 1 to 9). Press and
hold down these keys to in-
crease or decrease the
setting.
Switching off the
cooking area
1. The relevant cooking area
must already be activated
with relative decimal point
(12) illuminated.
2. Return the setting to “0” by
means of the key “-” (4). Af-
ter three seconds, the cook-
ing area will automatically
switch off.
Rapid shutdown of
the cooking area
1. The relevant cooking
area must already be
activated with relative
decimal point (12) illu-
minated.
2. To shut down the se-
lected cooking area
immediately, press the
“+” and “-” keys (4) at
the same time.
Residual heat indica-
tor (“H”)
If the temperature of the cooking
area is still high (and a burn risk
still present) after it has been
switched off, the display (3) for
the area will indicate the letter
“H” (residual heat).
The letter will only switch off
when the burn risk is no longer
present (at 60°C).
Switching off the hob
The hob can be switched off
at any time by means of the
ON / OFF switch (1).
2 – Toucher les touches “+” et “-”
(4) pour régler le niveau de puis-
sance (de 1 à 9). Ces touches ont
une fonction de répétition. La
pression continue d’une de ces
touches provoque l’augmentation
ou la diminution de la valeur
configurée.
Arrêt de la zone de
cuisson :
1 – La zone de cuisson requise
doit être activée et le point
décimal correspondant (12)
doit être allumé.
2 – Mettre la valeur configurée
sur “0” à l’aide de la touche
“-” (4). Après 4 secondes, la
zone de cuisson s’éteint
automatiquement.
Arrêt rapide de la zone
de cuisson :
1 – La zone de cuisson requise
doit être activée et le point
décimal correspondant
(12) doit être allumé.
2 – Pour éteindre
automatiquement la zone
de cuisson sélectionnée, il
faut toucher simultanément
les touches “+” et “-” (4).
Indicateur de chaleur
résiduelle (“ H ”) :
Une fois la zone de cuisson
éteinte, si la température de cette
dernière est encore élevée, au
point de provoquer des brûlures,
l’afficheur (3) relatif à cette zone
montre le symbole “ H ”
(chaleur résiduelle). Cette indi-
cation disparaît seulement
lorsqu’il n’y a plus aucun danger
(à 60
°
C).
Arrêt de l’appareil :
L’appareil peut être éteint
à tout moment à l’aide de
la touche marche/arrêt (1).

IT GB FR
30
Zone di cottura a
doppio circuito
A seconda del modello una o due
zone possono essere dotate di un
secondo circuito. Tali zone possono
esere di due tipi:
TONDA: formata da un disco
centrale e di una corona esterna;
OVALE: formata da un disco
laterale e di una semicorona.
E’ possibile accendere una sola
zona a disco oppure entrambe
(disco + corona o semicorona).
Accensione di una
zona a doppio circuito:
1 - La zona a doppio circuito deve
essere attivata e quindi deve
essere acceso il punto decimale
(12) sul display relativo alla
zona interessata;
2 - Selezionare il livello di
regolazione desiderato (1:9);
3 - Accendere il secondo circuito
toccando il tasto di doppio
circuito (5). Il led (9) relativo
all azona selezionata si accende
e si accende anche il secondo
circuito, assieme a quello
primario.
Spegnimento del
secondo circuito di
una zona di cottura:
1 - La zona a doppio circuito deve
essere attivata e quindi deve
essere acceso il punto decimale
(12) sul display relativo alla zona
interessata;
2 - Toccare il tasto di soppio circuito
(5). Il led (9) relativo alla zona
selezionata si spegne e si spegna
anche il circuito secondario della
zona di cottura;
Twin circuit cooking
areas
Depending on the model, one or
two areas may have a second
circuit. There are two types:
ROUND: comprising a central
disk and external crown;
OVAL: comprising a lateral
disk and half-crown.
One disk zone or both (disco +
crown/half-crown) can be
switched on.
Switching on a twin
circuit zone:
1. The twin circuit zone
must already be acti-
vated with relative
decimal point (12) illu-
minated.
2. Select the required
setting (1 - 9).
3. Press the twin circuit
key (5) to switch it on.
The LED (9) for the se-
lected zone will light up;
the second circuit will be
activated together with
the first.
.
Switching off the sec-
ond circuit
1. The twin circuit zone
must already be acti-
vated with relative
decimal point (12) illu-
minated.
2. Press the twin circuit key
(5). The LED (9) for the
selected zone will go out
to indicate deactivation
of the second circuit.
Zones de cuisson à
double circuit
Selon le modèle, une ou deux
zones peuvent avoir un
deuxième circuit. Ces zones
peuvent être de deux types :
RONDE : formée d’un
disque central et d’une
couronne extérieure.
OVALE : formée d’un disque
latéral et d’une demie couronne.
Il est possible d’allumer une seule
zone à disque ou les deux (disque +
couronne ou demie couronne).
Allumage d’une zone
à double circuit :
1 – La zone à double circuit
doit être activée et le point
décimal (12) doit donc être
allumé sur l’afficheur
relatif à la zone concernée.
2 – Sélectionner le niveau de
réglage voulu (1:9).
3 – Allumer le deuxième
circuit en touchant la
touche de double circuit
(5). La del (9) relative à la
zone sélectionnée
s’allume ; le deuxième
circuit s’allume en même
temps que le primaire.
Arrêt du deuxième cir-
cuit d’une zone de
cuisson :
1 – La zone à double circuit doit
être activée et le point décimal
(12) doit donc être allumé sur
l’afficheur relatif à la zone
concernée.
2 – Toucher la touche de double
circuit (5). La del (9) relative
à la zone sélectionnée s’éteint
et le circuit secondaire de la
zone de cuisson s’éteint
également.

IT GB FR
32
Blocco dell’apparato
o della zona di
cottura (chiave)
L’intero apparato può essere
bloccato con il tasto di blocco o
chiave (8), al fine di impedire
operazioni non intenzionali. La
funzione serve anche come
sicurezza per i bambini. Fintanto
che la funzione di blocco è attiva,
l’azione sui tasti non ha alcun
effetto salvo lo spegnimento (1).
Spegnimento di
sicurezza
Se una o più zone di cottura
rimangono inavvertitamente accese,
il sistema di controllo, trascorso il
tempo limite d’accensione,
provvede a spegnerle
automaticamente. In questo caso
viene visualizzato il simbolo “H”.
Preriscaldamento
automatico
Quest’automatismo semplifica il
processo di cottura in quanto non è
richiesta la presenza umana
durante tutto il ciclo di cottura. La
funzione determina un
preriscaldamento della zona di
cottura alla massima potenza, in
modo da portare velocemente la
zona temperatura di regime. Dopo
un certo tempo, il livello di potenza
ritorna spontanemaente a quello
impostato.
Attivazione del
preriscaldamento
automatico
Selezionare la zona di cottura
interessata tramite il tsto (2).
Selezionare il livello di potenza 9
con il tsto “+” (4) e premere
ancora una volta il tasto “+” (4),
per inserire la modalità di
preriscaldamento (accensione del
simbolo “A” sul display relativo).
Shutting down the
unit or the cooking
area (key)
To shut down the unit to
prevent operation (e.g. by
children), use the lock key
(8).
While the lock is engaged,
all operation of the keys
is disabled, with the ex-
ception of the OFF key
(1).
Safety shutdown
In the event that one or more
cooking areas is inadvertently
left on, the safety system will
shut the zones down automati-
cally after a certain time has
elapsed, after which the letter
“H” will be displayed.
Automatic preheating
This function is designed to
facilitate cooking, given that
the cooking cycle may be
carried out without the need
for human supervision. The
function uses maximum
power to preheat the cooking
area to bring it to the required
operating temperature. After
a time interval, the power
level automatically returns to
the original setting.
Using the automatic
preheating function
Select the required cooking area
by means of the key (2).
Select power level 9 by means of
key “+” (4), then press the “+”
key (4) again to activate
preheating. The letter “A” will be
shown on the relative display.
To preheat the unit with
spontaneous movement
Blocage de l’appareil
ou de la zone de
cuisson (clé)
Tout l’appareil peut être bloqué
avec la touche de blocage ou
la clé (8) afin d’empêcher de
fausses manœuvres. Cette
fonction sert aussi de sécurité
pour les enfants. Tant que la
fonction de blocage est active,
l’action sur les touches n’a
aucun effet sauf l’arrêt (1).
Arrêt de sécurité
Si une ou plusieurs zones de
cuisson restent allumées par
inadvertance, le système de
contrôle les éteint
automatiquement passé le
temps limite d’allumage.
Dans ce cas, le symbole
“H” est affiché.
Préchauffage
automatique
Cet automatisme simplifie le
processus de cuisson car la
présence humaine n’est pas
requise pendant tout le cycle de
cuisson. Cette fonction
détermine un préchauffage de
la zone de cuisson à la puis-
sance maximum de façon à por-
ter rapidement la zone à la
température de régime. Après
un certain laps de temps, le
niveau de puissance retourne
spontanément à celui configuré.
Activation du
préchauffage
automatique
Sélectionner la zone de cuisson
concernée à l’aide de la touche
(2). Sélectionner le niveau de
puissance 9 avec la touche “+”
(4) et appuyer encore une fois sur
la touche “+” (4) pour entrer le
mode de préchauffage (le
symbole “ A ” s’allume sur
l’afficheur correspondant).

IT GB FR
34
Per realizzare un preriscaldamento
con deriva spontanea verso il
livello di potenza desiderato (ad
esempio (“6”) utilizzare il tasto “-”
(4) e portare la potenza a 6.
Terminata quest’ultima operazione
il sistema entrerà in modalità di
preriscaldamento automatico ed il
display visualizzerà
alternativamente il livello di
potenza impostato (“6”) ed il
simbolo di preriscaldamento
automatico (“A”).
Disattivazione della
funzione
preriscaldamento
automatico
Una volta che la zona di cottura è
in preriscaldamento (simbolo “A”
mostrato sul display) per
disattivare tale funzione occorre
toccare il tasto “-” (4) dopo
almeno 10 secondi dall’attivazione.
Funzione Timer
Anche questa funzione semplifica il
processo di cottura permettendo di
fare a meno della presenza umana
durante tutto il ciclo di cottura.
Impostato il timer, una volta
trascorso il tempo impostato, la
zona di cottura verrà spenta
automativamente. Se nessuna zona
viene esplicitamente programmata,
allora la funzione timer funziona
semplicemente come contaminuti (si
veda il capotolo specifico “funzione
timer come contaminuti”).
towards the required power
level (e.g. “6”), set the power
to 6 by means of the “-” key
(4).
After the system has set to
automatic preheating mode,
the display panel will alter-
nate the set power level (“6”)
and the automatic preheating
function (indicated by the
letter “A”).
Switching off the au-
tomatic preheating
function
To deactivate the preheating
function (indicated by the
letter “A” on the display),
press the “-” key (4) at least
10 seconds since the function
has been activated.
Timer function
This function too simpli-
fies operation by not
requiring human supervi-
sion during the cooking
cycle.
Once the set time on the
timer has elapsed, the
cooking area is automati-
cally switched off. If no
zone has been pro-
grammed, the timer
simply operates as a mi-
nute counter (see the
section “Using the timer
as a minute counter”).
Pour un préchauffage avec
dérive spontanée vers le
niveau de puissance voulu
(par exemple, “6”), utiliser
la touche “-” (4) et porter la
puissance à 6. Une fois cette
opération terminée, le
système entrera en mode
préchauffage automatique et
l’afficheur montrera
alternativement le niveau de
puissance réglé (“6”) et le
symbole de préchauffage
automatique (“A”).
Désactivation de la
fonction de
préchauffage
automatique
Une fois que la zone de cuisson
est en préchauffage (symbole
“A” montré sur l’afficheur), il
faut toucher la touche “-” (4)
10 secondes au moins après
l‘activation pour désactiver
cette fonction. Si aucune zone
n’est manifestement
programmée, la fonction
minuteur fonctionne
simplement comme un compte-
minutes (voir le chapitre
“fonction minuteur comme
compte-minutes).
Fonction Minuteur
Cette fonction simplifie elle
aussi le processus de cuisson
en permettant de se passer de
la présence humaine pendant
tout le cycle de cuisson.
Lorsque le minuteur est pro-
grammé, la zone de cuisson
s’éteint automatiquement à
l’expiration du temps pro-
grammé. Si aucune zone n’est
explicitement programmée, la
fonction minuteur fera simple-
ment office de compte-minutes
(voir le paragraphe “ fonction
minuteur comme compte-
minutes).

IT GB FR
36
Attivazione della
funione timer:
1 - La zona di cottura deve essere
attivata, ossia il punto
decimale (12) relativo alla
zona in questione deve essere
acceso;
2 - Selezionare, se già non lo si è
fatto, un livello di potenza
compreso tra 1 e 9;
3 - Toccare il tasto timer (6): il
display del timer visualizza
“00” e la spia (10),
corrispondente alla zona da
programmare s’illumina;
4 - Selezionare il tempo di cottura
(da 0 a 99 minuti) per mezzo
dei tasti “+” e “-” (4). La
funzione timer si avvia
automaticamente entro pochi
secondi. Tenendo
costantemente premuto il tasto
“+” o “-” (4) è possibile
impostare rapidamente il
tempo di cottura. La funzione
timer si applica alla zona di
cottura selezionata.
Spegnimento rapido
della zona di cottura
e del timer relativo:
Toccando simultaneamente i tasti
“+” e “-” (4) la zona di cottura
viene spenta immediatamente. In
tal modo viene anche disattivata
la funzione timer.
La funzione Timer
usata come
contaminuti
Se la funzione non viene
utilizzata per una zona di
cottura specifica, essa può
essere impiegata come
contaminuti. In tal modo,
quando scatta il contaminuti
la zona di cottura non viene
spenta.
Using the timer func-
tion
1. The cooking area must
already be activated with
relative decimal point
(12) illuminated.
2. Select a power level be-
tween 1 and 9.
3. Press the timer key (6);
the timer display shows
“00” and the indicator
(10) relative to the zone
being programmed lights
up.
4. Select the cooking time
(between 0 to 99 minutes)
by means of the “+” and
“-” keys (4). The timer
will start up automatically
in a few seconds.
Press and hold down the
“+” or “-” key (4) to scroll
the time setting. Note that
the timer function applies
to the selected cooking
area only.
Rapid shutdown of
the cooking area and
relative timer
Press the “+” and “-” keys (4)
at the same time to shut down
the relative cooking area imme-
diately. Note that the timer
function will also be deacti-
vated.
Using the timer as a
minute counter
When the timer function is
not programmed, the timer
display can be used simply
to count down minutes (i.e.
when the displayed time
elapses, the cooking area is
not deactivated).
Activation de la
fonction minuteur :
1- La zone de cuisson doit être
activée, à savoir que le point
décimal (12) relatif à la zone
en question doit être allumé.
2- Sélectionner, si cela n’a pas
été déjà fait, un niveau de pu-
issance compris entre 1 et 9.
3- Toucher la touche minuteur
(6) ; l’afficheur du minuteur
indique “ 00 ” et le témoin
(10) correspondant à la zone
à programmer s’allume.
4- Sélectionner le temps de
cuisson (de 0 à 99 minutes) à
l’aide des touches “+” et “-”
(4). La fonction minuteur
démarre automatiquement en
l’espace de quelques secon-
des. En appuyant
constamment sur la touche
“+” ou “-” (4), il est possible
de régler rapidement le temps
de cuisson. La fonction
minuteur s’applique à la zone
de cuisson sélectionnée.
Arrêt rapide de la zone
de cuisson et du
minuteur respectif :
En touchant simultanément
les touches “+” et “-” (4), la
zone de cuisson s’éteint im-
médiatement. La fonction
minuteur se désactive
également ainsi.
La fonction Minuteur
utilisée comme compte-
minutes
Si la fonction n’est pas
utilisée pour une zone de
cuisson spécifique, elle peut
être utilisée comme compte-
minutes. Ainsi, lorsque le
compte-minutes se
déclenche, la zone de
cuisson ne s’éteint pas.

IT GB FR
38
Impostazione del
contaminuti:
Se il dispositivo è spento:
1- Toccare il tasto
d’accensione (1);
2 -Toccare il tasto di timer (6);
3- Impostare il tempo
desiderato con i tasti “+” e
“-” (4).
Se il dispositivo è acceso e una
zona di cottura è attiva:
1 - Deselezionare la zona toccando
il relativo tasto di selezione (2):
il punto decimale (13) si spegne;
2 - Toccare il tasto di timer (6);
3 -Impostare il tempo desiderato
con i tasti “+” e “-” (4).
Spegnimento della
funzione
contaminuti:
Quando il tempo è scaduto viene
emesso un segnale acustico per la
durata di 2 minuti.
Per interrompere in anticipo la
segnalazione acustic è sufficiente
toccare un tasto qualunque.
Se si vuole interrompere il timer
prima del suo scadere:
1 - Toccare il tasto di timer (6);
2 -Azzerare il tempo, tenendo
premuto il tasto “-” (4).
Disattivazione rapida
della funzione
contaminuti:
Premere simultaneamente i
tasti “+” e “-” (4).
Setting the minute
counter
When the unit is off:
1. Press the ON key (1).
2. Press the timer key (6).
3. Use the “+” and “-” keys
(4) to set the required time
to be counted back.
When the unit is on and a cooking area
is activated:
1. Deselect the zone by pressing the
relative key (2); the decimal point
(13) will go out.
2. Press the timer key (6).
3. Set the time required by means of
the “+” and “-” keys (4).
Deactivating the mi-
nute counter function
When the set time has
elapsed, an acoustic
signal is emitted for two
minutes.
To silence the signal,
press any key.
To interrupt the timer,
proceed as follows:
1. Press the timer key (6).
2. Press the “-” key to
reset the time (4).
Rapid deactivation of
the minute counter
Press “+” and “-” keys (4)
at the same time.
Configuration du
compte-minutes :
Si le dispositif est éteint :
1 – Toucher la touche
d’allumage (1).
2 – Toucher la touche du
minuteur (6)
3 – Régler le temps voulu
avec les touches “+” et
“-” (4).
Si le dispositif est allumé et une
zone de cuisson est active :
1 – Désactiver la zone en touchant
la zone de sélection
correspondante (2) : le point
décimal (13) s’éteint.
2 – Toucher la touche du minuteur
(6).
3 – Régler le temps voulu avec les
touches “+” et “-” (4).
Arrêt de la fonction
compte-minutes :
A l’expiration du temps
réglé, un signal sonore
d’une durée de 2 minutes
retentit.
Pour interrompre ce sig-
nal sonore, il suffit de
toucher une touche
quelconque.
Pour interrompre le
minuteur avant :
1 – Toucher la touche
minuteur (6).
2 – Remettre le temps sur
zéro en appuyant sur la
touche “-” (4).
Désactivation rapide de
la fonction compte-
minutes :
Appuyer simultanément
sur les touches “+” et “-
” (4).
La pagina si sta caricando...
La pagina si sta caricando...
La pagina si sta caricando...
La pagina si sta caricando...
La pagina si sta caricando...
La pagina si sta caricando...
La pagina si sta caricando...
La pagina si sta caricando...
La pagina si sta caricando...
La pagina si sta caricando...
La pagina si sta caricando...
La pagina si sta caricando...
La pagina si sta caricando...
La pagina si sta caricando...
La pagina si sta caricando...
La pagina si sta caricando...
La pagina si sta caricando...
La pagina si sta caricando...
La pagina si sta caricando...
La pagina si sta caricando...
La pagina si sta caricando...
La pagina si sta caricando...
La pagina si sta caricando...
La pagina si sta caricando...
La pagina si sta caricando...
La pagina si sta caricando...
La pagina si sta caricando...
La pagina si sta caricando...
La pagina si sta caricando...
La pagina si sta caricando...
La pagina si sta caricando...
La pagina si sta caricando...
-
 1
1
-
 2
2
-
 3
3
-
 4
4
-
 5
5
-
 6
6
-
 7
7
-
 8
8
-
 9
9
-
 10
10
-
 11
11
-
 12
12
-
 13
13
-
 14
14
-
 15
15
-
 16
16
-
 17
17
-
 18
18
-
 19
19
-
 20
20
-
 21
21
-
 22
22
-
 23
23
-
 24
24
-
 25
25
-
 26
26
-
 27
27
-
 28
28
-
 29
29
-
 30
30
-
 31
31
-
 32
32
-
 33
33
-
 34
34
-
 35
35
-
 36
36
-
 37
37
-
 38
38
-
 39
39
-
 40
40
-
 41
41
-
 42
42
-
 43
43
-
 44
44
-
 45
45
-
 46
46
-
 47
47
-
 48
48
-
 49
49
-
 50
50
-
 51
51
-
 52
52
-
 53
53
-
 54
54
-
 55
55


Omega OC95TXA Manuale utente
- Categoria
- Piani cottura
- Tipo
- Manuale utente
in altre lingue
- English: Omega OC95TXA User manual
- français: Omega OC95TXA Manuel utilisateur
Altri documenti
-
ROSIERES RDH32 Manuale del proprietario
-
Groupe Brandt 2MFT-2S Manuale del proprietario
-
Candy CDH32X Manuale utente
-
-
-
Whirlpool B 20 L 2 VTC F Manuale del proprietario
-
Franke FRSM 603 C TD Manuale utente
-
-
M-system MKK - 902 Manuale del proprietario
-
Nodor RDOS 46 Manuale utente