AEG HD955100NB Manuale utente
- Categoria
- Piani cottura
- Tipo
- Manuale utente


CONTENTS
1. SAFETY INFORMATION......................................................................................2
2. SAFETY INSTRUCTIONS.................................................................................... 5
3. INSTALLATION.....................................................................................................7
4. PRODUCT DESCRIPTION.................................................................................12
5. DAILY USE......................................................................................................... 14
6. HINTS AND TIPS................................................................................................19
7. CARE AND CLEANING...................................................................................... 21
8. TROUBLESHOOTING........................................................................................22
9. TECHNICAL DATA............................................................................................. 25
10. ENERGY EFFICIENCY.....................................................................................27
FOR PERFECT RESULTS
Thank you for choosing this AEG product. We have created it to give you
impeccable performance for many years, with innovative technologies that help
make life simpler – features you might not find on ordinary appliances. Please
spend a few minutes reading to get the very best from it.
Visit our website to:
Get usage advice, brochures, trouble shooter, service and repair information:
www.aeg.com/support
Register your product for better service:
www.registeraeg.com
Buy Accessories, Consumables and Original spare parts for your appliance:
www.aeg.com/shop
CUSTOMER CARE AND SERVICE
Always use original spare parts.
When contacting our Authorised Service Centre, ensure that you have the
following data available: Model, PNC, Serial Number.
The information can be found on the rating plate.
Warning / Caution-Safety information
General information and tips
Environmental information
Subject to change without notice.
1. SAFETY INFORMATION
Before the installation and use of the appliance, carefully
read the supplied instructions. The manufacturer is not
responsible for any injuries or damages that are the
result of incorrect installation or usage. Always keep the
www.aeg.com2

instructions in a safe and accessible location for future
reference.
1.1 Children and vulnerable people safety
• This appliance can be used by children aged from 8
years and above and persons with reduced physical,
sensory or mental capabilities or lack of experience
and knowledge if they have been given supervision or
instruction concerning the use of the appliance in a
safe way and understand the hazards involved.
• Children between 3 and 8 years of age and persons
with very extensive and complex disabilities shall be
kept away unless continuously supervised.
• Children of less than 3 years of age should be kept
away unless continuously supervised.
• Do not let children play with the appliance.
• Keep all packaging away from children and dispose of
it appropriately.
• Keep children and pets away from the appliance when
it operates or when it cools down. Accessible parts are
hot.
• If the appliance has a child safety device, it should be
activated.
• Children shall not carry out cleaning and user
maintenance of the appliance without supervision.
1.2 General Safety
• WARNING: The appliance and its accessible parts
become hot during use. Care should be taken to avoid
touching heating elements.
• Do not operate the appliance by means of an external
timer or separate remote-control system.
• WARNING: Unattended cooking on a hob with fat or
oil can be dangerous and may result in fire.
• NEVER try to extinguish a fire with water, but switch
off the appliance and then cover flame e.g. with a lid
or a fire blanket.
ENGLISH 3

• CAUTION: The cooking process has to be supervised.
A short term cooking process has to be supervised
continuously.
• WARNING: Danger of fire: Do not store items on the
cooking surfaces.
• Metallic objects such as knives, forks, spoons and lids
should not be placed on the hob surface since they
can get hot.
• Do not use a steam cleaner to clean the appliance.
• After use, switch off the hob element by its control and
do not rely on the pan detector.
• If the glass ceramic surface / glass surface is cracked,
switch off the appliance and unplug it from the mains.
In case the appliance is connected to the mains
directly using junction box, remove the fuse to
disconnect the appliance from power supply. In either
case contact the Authorised Service Centre.
• In case of hotplate glass breakage:
– shut immediately off all burners and any electrical
heating element and isolate the appliance from the
power supply,
– do not touch the appliance surface,
– do not use the appliance.
• If the supply cord is damaged, it must be replaced by
the manufacturer, an authorized Service or similarly
qualified persons in order to avoid a hazard.
• Where the appliance is directly connected to the
power supply, an all-pole isolating switch with a
contact gap is required. Complete disconnection in
compliance with the conditions specified in
overvoltage category III must be guaranteed. The
earth cable is excluded from this.
• When you route the mains cable, make sure that the
cable doesn't come into direct contact (for example
using insulating sleeving) with parts that can reach
temperatures of more than 50°C above room
temperature.
www.aeg.com4

• WARNING: Use only hob guards designed by the
manufacturer of the cooking appliance or indicated by
the manufacturer of the appliance in the instructions
for use as suitable or hob guards incorporated in the
appliance. The use of inappropriate guards can cause
accidents.
2. SAFETY INSTRUCTIONS
This appliance is suitable for the
following markets: IT
2.1 Installation
WARNING!
Only a qualified person must
install this appliance.
WARNING!
Risk of injury or damage to
the appliance.
• Remove all the packaging.
• Do not install or use a damaged
appliance.
• Follow the installation instructions
supplied with the appliance.
• Keep the minimum distance from
other appliances and units.
• Always take care when moving the
appliance as it is heavy. Always use
safety gloves and enclosed footwear.
• Seal the cut surfaces with a sealant to
prevent moisture to cause swelling.
• Protect the bottom of the appliance
from steam and moisture.
• Do not install the appliance adjacent
to a door or under a window. This
prevents hot cookware falling from the
appliance when the door or the
window is opened.
• If the appliance is installed above
drawers make sure that the space,
between the bottom of the appliance
and the upper drawer, is sufficient for
air circulation.
• The bottom of the appliance can get
hot. Make sure to install a non-
combustible separation panel under
the appliance to prevent access to the
bottom.
• Make sure that the ventilation space
of 2 mm, between the worktop and
the front of the below unit, is free. The
warranty does not cover damages
caused by the lack of an adequate
ventilation space.
2.2 Electrical Connection
WARNING!
Risk of fire and electric
shock.
• All electrical connections should be
made by a qualified electrician.
• The appliance must be earthed.
• Before carrying out any operation
make sure that the appliance is
disconnected from the power supply.
• Make sure that the parameters on the
rating plate are compatible with the
electrical ratings of the mains power
supply.
• Make sure the appliance is installed
correctly. Loose and incorrect
electricity mains cable or plug (if
applicable) can make the terminal
become too hot.
• Use the correct electricity mains
cable.
• Do not let the electricity mains cable
tangle.
• Make sure that a shock protection is
installed.
• Use the strain relief clamp on the
cable.
• Make sure the mains cable or plug (if
applicable) does not touch the hot
appliance or hot cookware, when you
connect the appliance to the near
sockets.
• Do not use multi-plug adapters and
extension cables.
ENGLISH 5

• Make sure not to cause damage to
the mains plug (if applicable) or to the
mains cable. Contact our Authorised
Service Centre or an electrician to
change a damaged mains cable.
• The shock protection of live and
insulated parts must be fastened in
such a way that it cannot be removed
without tools.
• Connect the mains plug to the mains
socket only at the end of the
installation. Make sure that there is
access to the mains plug after the
installation.
• If the mains socket is loose, do not
connect the mains plug.
• Do not pull the mains cable to
disconnect the appliance. Always pull
the mains plug.
• Use only correct isolation devices: line
protecting cut-outs, fuses (screw type
fuses removed from the holder), earth
leakage trips and contactors.
• The electrical installation must have
an isolation device which lets you
disconnect the appliance from the
mains at all poles. The isolation
device must have a contact opening
width of minimum 3 mm.
2.3 Gas connection
• All gas connections should be made
by a qualified person.
• Before installation, make sure that the
local distribution conditions (nature of
the gas and gas pressure) and the
adjustment of the appliance are
compatible.
• Make sure that there is air circulation
around the appliance.
• The information about the gas supply
is on the rating plate.
• This appliance is not connected to a
device, which evacuates the products
of combustion. Make sure to connect
the appliance according to current
installation regulations. Pay attention
to requirements regarding adequate
ventilation.
2.4 Use
WARNING!
Risk of injury, burns and
electric shock.
• Remove all the packaging, labelling
and protective film (if applicable)
before first use.
• This appliance is for household use
only.
• Do not change the specification of this
appliance.
• Make sure that the ventilation
openings are not blocked.
• Do not let the appliance stay
unattended during operation.
• Set the cooking zone to “off” after
each use.
• Do not rely on the pan detector.
• Do not put cutlery or saucepan lids on
the cooking zones. They can become
hot.
• Do not operate the appliance with wet
hands or when it has contact with
water.
• Do not use the appliance as a work
surface or as a storage surface.
• If the surface of the appliance is
cracked, disconnect immediately the
appliance from the power supply. This
to prevent an electrical shock.
• Users with a pacemaker must keep a
distance of minimum 30 cm from the
induction cooking zones when the
appliance is in operation.
• When you place food into hot oil, it
may splash.
WARNING!
Risk of fire and explosion
• Fats and oil when heated can release
flammable vapours. Keep flames or
heated objects away from fats and
oils when you cook with them.
• The vapours that very hot oil releases
can cause spontaneous combustion.
• Used oil, that can contain food
remnants, can cause fire at a lower
temperature than oil used for the first
time.
• Do not put flammable products or
items that are wet with flammable
products in, near or on the appliance.
WARNING!
Risk of damage to the
appliance.
• Do not keep hot cookware on the
control panel.
www.aeg.com6

• Do not put a hot pan cover on the
glass surface of the hob.
• Do not let cookware to boil dry.
• Be careful not to let objects or
cookware fall on the appliance. The
surface can be damaged.
• Do not activate the cooking zones
with empty cookware or without
cookware.
• Do not put aluminium foil on the
appliance.
• Cookware made of cast iron,
aluminium or with a damaged bottom
can cause scratches on the glass /
glass ceramic. Always lift these
objects up when you have to move
them on the cooking surface.
• Use only stable cookware with the
correct shape and diameter larger
than the dimensions of the burners.
• Make sure cookware is centrally
positioned on the burners.
• Do not use large cookware that
overlap the edges of the appliance.
This can cause damage to the
worktop surface.
• Use only the accessories supplied
with the appliance.
• Do not install a flame diffuser on the
burner.
• The use of a gas cooking appliance
results in the production of heat and
moisture. Provide good ventilation in
the room where the appliance is
installed.
• Prolonged intensive use of the
appliance may call for additional
ventilation, for example opening of a
window, or more effective ventilation,
for example increasing the level of
mechanical ventilation where present.
• This appliance is for cooking
purposes only. It must not be used for
other purposes, for example room
heating.
• Do not let acid liquids, for example
vinegar, lemon juice or limescale
remover, touch the hob. This can
cause matt patches.
• Discoloration of the enamel or
stainless steel has no effect on the
performance of the appliance.
2.5 Care and cleaning
WARNING!
Do not remove the buttons,
knobs or gaskets from the
control panel. Water may get
inside the appliance and
cause damage.
• Clean the appliance regularly to
prevent the deterioration of the
surface material.
• Deactivate the appliance and let it
cool down before you clean it.
• Disconnect the appliance from the
electrical supply before maintenance.
• Do not use water spray and steam to
clean the appliance.
• Clean the appliance with a moist soft
cloth. Only use neutral detergents. Do
not use any abrasive products,
abrasive cleaning pads, solvents or
metal objects.
• Do not clean the burners in the
dishwasher.
2.6 Service
• To repair the appliance contact an
Authorised Service Centre.
• Use original spare parts only.
2.7 Disposal
WARNING!
Risk of injury or suffocation.
• Contact your municipal authority for
information on how to discard the
appliance correctly.
• Disconnect the appliance from the
mains supply.
• Cut off the mains electrical cable
close to the appliance and dispose of
it.
• Flat the external gas pipes.
3. INSTALLATION
WARNING!
Refer to Safety chapters.
ENGLISH 7

3.1 Before the installation
Before you install the hob, write down the
information bellow from the rating plate.
The rating plate is on the bottom of the
hob.
Model .......................................
PNC .........................................
Serial number ...........................
3.2 Built-in hobs
Only use the built-in hobs after you
assemble the hob into correct built-in
units and work surfaces that align to the
standards.
3.3 Gas Connection
WARNING!
The following instructions
about installation,
maintenance and ventilation
must be carried out by
qualified personnel in
compliance with the
regulation in force (UNI-CIG
7129 - 7131). Make sure that
the kitchen is well ventilated:
keep natural ventilation
holes open (at least 100
cm²) or install a mechanical
extractor hood.
Choose fixed connections or use a
flexible pipe in stainless steel in
compliance with the regulation in force. If
you use flexible metallic pipes, be careful
they do not come in touch with mobile
parts or they are not squeezed. Also be
careful when the hob is put together with
an oven.
Make sure that the gas
supply pressure of the
appliance obeys the
recommended values.
If the supplied pressure has not the
specified value, it is necessary to
assemble a proper pressure regulator in
compliance with the standard UNI EN 88.
For Liquid Gas (LPG) the use of pressure
regulator is allowed only if they are in
compliance with UNI EN 12864. The
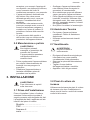
adjustable connection is fixed to the
comprehensive ramp by means of a
threaded nut G 1/2". Screw the parts
without force, adjust the connection in
the necessary direction and tighten
everything.
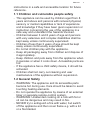
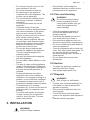
A
B
C
A. End of shaft with nut
B. Washer supplied with the appliance
C. Elbow supplied with the appliance
Rigid connection:
Carry out connection by using metal rigid
pipes (copper with mechanical end)
(UNI-CIG 7129).
Flexible connection:
Use a flexible pipe in stainless steel
(UNI-CIG 9891) with a maximum length 2
m.
WARNING!
When installation is
complete, make sure that
the seal of each pipe fitting
is correct. Use a soapy
solution, not a flame!
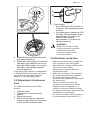
3.4 Injectors replacement
1. Remove the pan supports.
2. Remove the caps and crowns of the
burner.
3. With a socket spanner 7 remove the
injectors and replace them with the
ones which are necessary for the
type of gas you use (see table in
"Technical Information" chapter).
www.aeg.com8

4. Assemble the parts, follow the same
procedure backwards.
5. Replace the rating plate (it is near the
gas supply pipe) with the one for the
new type of gas supply. You can find
this plate in the package supplied
with the appliance.
If the supply gas pressure is changeable
or different from the necessary pressure,
you must fit an applicable pressure
adjuster on the gas supply pipe.
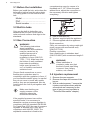
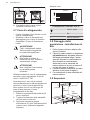
3.5 Adjustment of minimum
level
To adjust the minimum level of the
burners:
1. Light the burner.
2. Turn the knob on the minimum
position.
3. Remove the knob.
4. With a thin screwdriver, adjust the
bypass screw position (A for external
crown and B for internal crown).
A
B
5. If you change:
• from natural gas G20 20 mbar to
liquid gas, fully tighten the bypass
screw in.
• from liquid gas to natural gas G20
20 mbar, undo the bypass screw
approximately 1/4 of a turn for
internal crown (B) and
approximately 1/3 of a turn for
external crown (A).
WARNING!
Make sure the flame does
not go out when you quickly
turn the knob from the
maximum position to the
minimum position.
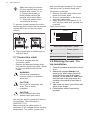
3.6 Electrical connection
• Make sure that the rated voltage and
type of power on the rating plate
agree with the voltage and the power
of the local power supply.
• Always use a correctly installed
shockproof socket.
• Make sure that there is an access to
the mains plug after the installation.
• Do not pull the mains cable to
disconnect the appliance. Always pull
the mains plug.
• There is a risk of fire when the
appliance is in connection with an
extension cable, an adapter or a
multiple connection. Make sure that
the ground connection agrees with the
standards and regulations.
• Do not let the power cable to heat up
to a temperature higher than 90° C.
ENGLISH 9

Make sure that you connect
the blue neutral cable to the
terminal with a letter "N" on
it. Connect the brown (or
black) phase cable to the
terminal which has a letter
"L". Keep the phase cable
connected at all times.
To prevent contact between the cable
and the appliance below the hob use the
clamps which are on the side of the
cabinet.
A
A. Rigid copper pipe or flexible pipe of
stainless steel
3.7 Connection cable
• The hob is supplied with the
connection cable.
• Replace the damaged mains cable
only with the spare parts cable. Speak
to your local Authorised Service
Center.
WARNING!
All electrical connections
must be made by a qualified
electrician.
CAUTION!
Do not drill or solder the wire
ends. This is strictly
forbidden!
CAUTION!
Do not connect the cable
without cable end sleeve.
Use only the special connection cable or
its equivalent. The cable type is:
H05V2V2-F T90.
Make sure that the cable section is
applicable to the voltage and the working
temperature. The yellow / green earth
wire must be approximately 2 cm longer
than the brown (or black) phase wire.
Two-phase connection
1. Remove the cable end sleeve from
black and brown wires.
2. Remove an insulation of the brown
and black cable ends.
3. Apply a new wire end sleeve of 2.5
mm² on each cable end. (special tool
required).
Cable cross section
N
L
230V~
One-phase connection - 230 V~
Green - yellow
N Blue
L Black and brown
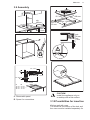
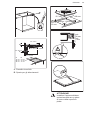
3.8 Attaching the seal - On-
top installation
1. Clean the worktop around the cut out
area.
2. Attach the supplied thinner seal
stripe to the lower edge of the hob
along the outer edge of the glass
ceramic. Do not extend it. Make sure
that the ends of the seal stripe are
located in the middle of one side of
the hob.
3. Add some mm when you cut the seal
stripe to the length.
4. Push the two ends of seal stripe
together.
www.aeg.com10

3.9 Assembly
min.
450mm
min.
650mm
min.
2mm
min. 2 mm
A
B
min.20 mm
(max.150 mm)
A
12 mm
28 mm
38 mm
B
57 mm
41 mm
31 mm
min. 500 mm
min. 60 mm
D
C
C. Removable panel
D. Space for connections
R 5 mm
min.
55 mm
490
mm
830
mm
600 mm
min.
38 mm
min.
2 mm
CAUTION!
Install the appliance only on
a worktop with a flat surface.
3.10 Possibilities for insertion
Kitchen unit with oven
The electrical connection of the hob and
the oven must be installed separately for
ENGLISH 11

safety reasons and to let easy remove
oven from the unit.
If you install the hob
asymmetrically rightward the
minimum distance between
left edge of the hob and left
support must be 72 mm.
min.
72 mm
CAUTION!
The bottom of the appliance
can get hot. If an oven isn't
installed beneath the hob, a
non-combustible separation
panel must be installed
under the appliance to
prevent access to the
bottom. The position of the
panel is described in the
"Installation" chapter.
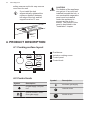
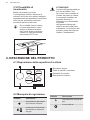
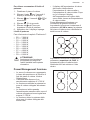
4. PRODUCT DESCRIPTION
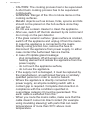
4.1 Cooking surface layout
145 mm
145 mm
180 mm
210 mm
4 3
21
1
Dual burner
2
Induction cooking zones
3
Control panel
4
Control knob
4.2 Control knob
Symbol Description
no gas supply / off posi‐
tion
ignition position / maxi‐
mum gas supply
Symbol Description
minimum gas supply
internal crown
double crown
www.aeg.com12

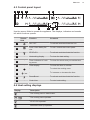
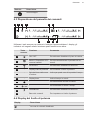
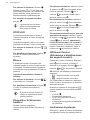
4.3 Control panel layout
1 2 3
5
64
8 710
9
Use the sensor fields to operate the appliance. The displays, indicators and sounds
tell which functions operate.
Sensor
field
Function Comment
1
ON / OFF To activate and deactivate the hob.
2
Lock / Child Safety De‐
vice
To lock / unlock the control panel.
3
STOP+GO To activate and deactivate the function.
4
- Heat setting display To show the heat setting.
5
- Timer indicators of cook‐
ing zones
To show for which zone you set the time.
6
- Timer display To show the time in minutes.
7
- To select the cooking zone.
8
/
- To increase or decrease the time.
9
PowerBoost To activate and deactivate the function.
10
- Control bar To set a heat setting.
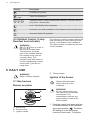
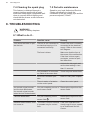
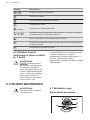
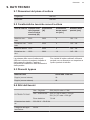
4.4 Heat setting displays
Display Description
The cooking zone is deactivated.
-
The cooking zone operates.
STOP+GO operates.
Automatic Heat Up operates.
ENGLISH 13

Display Description
PowerBoost operates.
+ digit
There is a malfunction.
/ /
OptiHeat Control (3 step Residual heat indicator): continue cooking /
keep warm / residual heat.
Lock / Child Safety Device operates.
Incorrect or too small cookware or no cookware on the cooking zone.
Automatic Switch Off operates.
4.5 OptiHeat Control (3 step
Residual heat indicator)
WARNING!
/ / There is a risk of
burns from residual heat.
The indicators show the
level of the residual heat for
the cooking zones you are
currently using. The
indicators may also come on
for the neighbouring cooking
zones even if you are not
using them.
The induction cooking zones produce the
heat necessary for the cooking process
directly in the bottom of the cookware.
The glass ceramic is heated by the heat
of the cookware.
5. DAILY USE
WARNING!
Refer to Safety chapters.
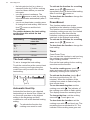
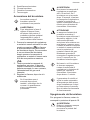
5.1 Gas burners
Burner overview
A
B
C
D
A. Burner cap
B. Burner crown
C. Ignition candle
D. Thermocouple
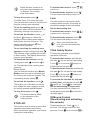
Ignition of the burner
Always light the burner
before you put on the
cookware.
WARNING!
Be very careful when you
use open fire in the kitchen
environment. The
manufacturer declines any
responsibility in case of the
flame misuse.
1. Push the control knob down and turn
it counterclockwise to the maximum
gas supply position (
). The flame
will switch on in the two burner
crowns of Dual burner. To light the
www.aeg.com14

internal crown of the Dual burner
push down the control knob and turn
it clockwise to the maximum position
( ).
2. Keep the control knob pushed for
equal or less than 10 seconds. This
lets the thermocouple warm up. If
not, the gas supply is interrupted.
3. Adjust the flame after it is regular.
If after some tries the burner
does not light, check if the
crown and its cap are in
correct positions.
WARNING!
Do not keep the control knob
pushed for more than 15
seconds. If the burner does
not light after 15 seconds,
release the control knob,
turn it into off position and try
to light the burner again after
minimum 1 minute.
CAUTION!
In the absence of electricity
you can ignite the burner
without electrical device; in
this case approach the
burner with a flame, turn the
control knob counter-
clockwise to maximum gas
supply position and push it
down. Keep the control knob
pushed for equal or less
than 10 seconds to let the
thermocouple warm up.
If the burner accidentally
goes out, turn the control
knob to the off position and
try to light the burner again
after minimum 1 minute.
The spark generator can
start automatically when you
switch on the mains, after
installation or a power cut. It
is normal.
Turning the burner off
To put the flame out, turn the knob to the
off position .
WARNING!
Always turn the flame down
or switch it off before you
remove the pans from the
burner.
Using the wok stand
The wok stand lets you use a round
bottomed wok on the hob. Use the wok
stand on the Dual burner only. When you
refit the wok stand, make sure the
recesses on the frame fit securely to the
bars of the pan supports.
The shape of pan supports can be
different in other models of the
appliance.
When you refit the grate of
the Dual burner, make sure
to match the hollow part of
the grate with the reference
located on the plate fixed to
the glass.
5.2 Induction cooking zones
Activating and deactivating
Touch for 1 second to activate or
deactivate the hob.
Automatic Switch Off
The function deactivates the hob
automatically if:
• all cooking zones are deactivated,
• you do not set the heat setting after
you activate the hob,
• you spill something or put something
on the control panel for more than 10
seconds (a pan, a cloth, etc.). An
acoustic signal sounds and the hob
deactivates. Remove the object or
clean the control panel.
ENGLISH 15

• the hob gets too hot (e.g. when a
saucepan boils dry). Let the cooking
zone cool down before you use the
hob again.
• you use incorrect cookware. The
symbol comes on and the cooking
zone deactivates automatically after 2
minutes.
• you do not deactivate a cooking zone
or change the heat setting. After some
time comes on and the hob
deactivates.
The relation between the heat setting
and the time after which the hob
deactivates:
Heat setting The hob deacti‐
vates after
, 1 - 3
6 hours
4 - 7 5 hours
8 - 9 4 hours
10 - 14 1.5 hour
The heat setting
To set or change the heat setting:
Touch the control bar at the correct heat
setting or move your finger along the
control bar until you reach the correct
heat setting.
Automatic Heat Up
Activate this function to get a desired
heat setting in a shorter time. When it is
on, the zone operates on the highest
setting in the beginning and then
continues to cook at the desired heating
setting.
To activate the function the
cooking zone must be cold.
To activate the function for a cooking
zone: touch ( comes on).
Immediately touch a desired heat setting.
After 3 seconds comes on.
To deactivate the function: change the
heat setting.
PowerBoost
This function makes more power
available to the induction cooking zones.
The function can be activated for the
induction cooking zone only for a limited
period of time. After this time the
induction cooking zone automatically
sets back to the highest heat setting.
To activate the function for a cooking
zone: touch . comes on.
To deactivate the function: change the
heat setting.
Timer
Count Down Timer
You can use this function to set how long
the cooking zone should operate for a
single cooking session.
First set the heat setting for the cooking
zone then set the function.
To set the cooking zone: touch
again and again until the indicator of a
necessary cooking zone comes on.
To activate the function: touch of
the timer to set the time (00 - 99
minutes). When the indicator of the
cooking zone starts to flash slowly the
time counts down.
To see the remaining time: set the
cooking zone with
. The indicator of
the cooking zone starts to flash quickly.
The display shows the remaining time.
To change the time: set the cooking
zone with . Touch or .
To deactivate the function: set the
cooking zone with and touch . The
remaining time counts back to 00. The
indicator of the cooking zone goes out.
www.aeg.com16

When the time comes to an
end, the sound operates and
00 flashes. The cooking
zone deactivates.
To stop the sound: touch .
CountUp Timer (The count up timer)
You can use this function to monitor how
long the cooking zone operates.
To set the cooking zone: touch
again and again until the indicator of a
necessary cooking zone comes on.
To activate the function: touch of
the timer. comes on. When the
indicator of the cooking zone starts to
flash slowly the time counts up. The
display switches between
and
counted time (minutes).
To see how long the cooking zone
operates: set the cooking zone with .
The indicator of the cooking zone starts
to flash quickly. The display shows how
long the zone operates.
To deactivate the function: set the
cooking zone with and touch or
. The indicator of the cooking zone
goes out.
Minute Minder
You can use this function as a Minute
Minder when the hob is activated and
the cooking zones do not operate. The
heat setting display shows .
To activate the function: touch .
Touch or of the timer to set the
time. When the time comes to an end,
the sound operates and 00 flashes.
To stop the sound: touch .
The function has no effect
on the operation of the
cooking zones.
STOP+GO
This function sets all cooking zones that
operate to the lowest heat setting.
When the function operates, you cannot
change the heat setting.
To activate the function: touch .
comes on.
To deactivate the function: touch .
The previous heat setting comes on.
Lock
You can lock the control panel while
cooking zones operate. It prevents an
accidental change of the heat setting.
Set the heat setting first.
To activate the function: touch .
comes on for 4 seconds.
To deactivate the function: touch
.
The previous heat setting comes on.
When you deactivate the
hob, you also deactivate this
function.
Child Safety Device
This function prevents an accidental
operation of the hob.
To activate the function: activate the
hob with
. Do not set the heat setting.
Touch for 4 seconds. comes on.
Deactivate the hob with .
To deactivate the function: activate the
hob with . Do not set the heat setting.
Touch for 4 seconds. comes on.
Deactivate the hob with .
To override the function for only one
cooking time: activate the hob with .
comes on. Touch for 4 seconds.
Set the heat setting in 10 seconds.
You can operate the hob. When you
deactivate the hob with
the function
operates again.
OffSound Control
(Deactivating and activating
the sounds)
Deactivate the hob. Touch for 3
seconds. The display comes on and
goes out. Touch for 3 seconds. or
ENGLISH 17

comes on. Touch of the timer to
choose one of the following:
• - the sounds are off
• - the sounds are on
To confirm your selection wait until the
hob deactivates automatically.
When the function is set to
you can
hear the sounds only when:
• you touch
• Minute Minder comes down
• Count Down Timer comes down
• you put something on the control
panel.
Power limitation
Originally the hob is at its highest
possible power level.
To decrease or increase the power
level:
1. Deactivate the hob.
2. Touch
for 3 seconds. The display
comes on and goes off.
3. Touch for 3 seconds. or
comes on.
4. Touch . P0 comes on.
5. Touch / of the Timer to set the
power level.
6. Wait for the display to go off.
Power levels
Refer to “Technical data” chapter.
• P0 — 7200 W
• P1 — 1500 W
• P2 — 2000 W
• P3 — 2500 W
• P4 — 3000 W
• P5 — 3500 W
• P6 — 4000 W
• P7 — 4500 W
• P8 — 5000 W
• P9 — 6000 W
CAUTION!
Make sure that the selected
power fits to the house
installation fuses.
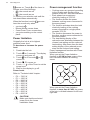
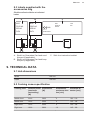
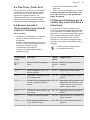
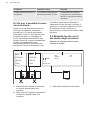
Power management function
• Cooking zones are grouped according
to the location and number of the
phases in the hob. See the illustration.
• Each phase has a maximum
electricity loading of 3700 W.
• The function divides the power
between cooking zones connected to
the same phase.
• The function activates when the total
electricity loading of the cooking
zones connected to a single phase
exceeds 3700 W.
• The function decreases the power to
the other cooking zones connected to
the same phase.
• The heat setting display of the
reduced zones alternates between the
chosen heat setting and the reduced
heat setting. After some time the heat
setting display of the reduced zones
stays on the reduced heat setting.
Power management function with Power
limitation function
When you set the Power limitation
function to 4.5 kW or less, power of the
hob is divided between all cooking
zones.
When you set the Power limitation
function to more than 4.5 kW, the power
of the hob is divided between its left and
right side.
www.aeg.com18

6. HINTS AND TIPS
WARNING!
Refer to Safety chapters.
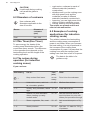
6.1 Cookware
Electric:
For induction cooking zones
a strong electro-magnetic
field creates the heat in the
cookware very quickly.
Use the induction cooking
zones with suitable
cookware.
Cookware material
• correct: cast iron, steel, enamelled
steel, stainless steel, multi-layer
bottom (with a correct marking from a
manufacturer).
• not correct: aluminium, copper,
brass, glass, ceramic, porcelain.
Cookware is suitable for an induction
hob if:
• water boils very quickly on a zone set
to the highest heat setting.
• a magnet pulls on to the bottom of the
cookware.
The bottom of the cookware
must be as thick and flat as
possible.
Ensure pan bases are clean
and dry before placing on
the hob surface.
Cookware dimensions
Induction cooking zones adapt to the
dimension of the bottom of the cookware
automatically.
The cooking zone efficiency is related to
the diameter of the cookware. The
cookware with a diameter smaller than
the minimum receives only a part of the
power generated by the cooking zone.
Refer to "Technical data".
CAUTION!
Do not use cast iron pans,
clay or earthenware pots,
grill or toaster plates.
Gas:
WARNING!
Do not put the same pan on
two burners.
WARNING!
Do not put unstable or
damaged pots on the burner
to prevent spills and injuries.
CAUTION!
Make sure that pot handles
are not above the front edge
of the cooktop.
CAUTION!
Make sure that the pots are
placed centrally on the
burner in order to get the
maximum stability and a
lower gas consumption.
ENGLISH 19

CAUTION!
Liquids spilt during cooking
can cause the glass to
break.
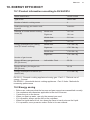
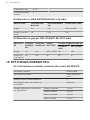
6.2 Diameters of cookware
Use cookware with
diameters applicable to the
size of burners.
Burner Diameter of
cookware
(mm)
Dual 220 - 300
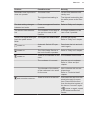
6.3 Öko Timer (Eco Timer)
To save energy, the heater of the
cooking zone deactivates before the
count down timer sounds. The difference
in the operation time depends on the
heat setting level and the length of the
cooking operation.
6.4 The noises during
operation (for induction
cooking zones)
If you can hear:
• crack noise: cookware is made of
different materials (sandwich
construction).
• whistle sound: you the cooking zone
with high power level and the
cookware is made of different
materials (sandwich construction).
• humming: you use high power level.
• clicking: electric switching occurs.
• hissing, buzzing: the fan operates.
The noises are normal and do not
refer to hob malfunction.
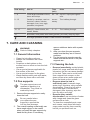
6.5 Examples of cooking
applications (for induction
cooking zones)
The relation between the heat setting
and the cooking zone consumption of
power is not linear. When you increase
the heat setting, it is not proportional to
the increase of the cooking zone
consumption of power. It means that the
cooking zone with the medium heat
setting uses less than a half of its power.
The data in the table is for
guidance only.
Heat setting Use to: Time
(min)
Hints
- 1
Keep cooked food warm. as nec‐
essary
Put a lid on the cookware.
1 - 3 Hollandaise sauce, melt: but‐
ter, chocolate, gelatine.
5 - 25 Mix from time to time.
1 - 3 Solidify: fluffy omelettes, baked
eggs.
10 - 40 Cook with a lid on.
3 - 5 Simmer rice and milkbased
dishes, heating up ready-
cooked meals.
25 - 50 Add the minimum twice as
much liquid as rice, mix milk
dishes part procedure through.
5 - 7 Steam vegetables, fish, meat. 20 - 45 Add some tablespoons of liq‐
uid.
7 - 9 Steam potatoes. 20 - 60 Use max. ¼ l water for 750 g
of potatoes.
www.aeg.com20
La pagina si sta caricando...
La pagina si sta caricando...
La pagina si sta caricando...
La pagina si sta caricando...
La pagina si sta caricando...
La pagina si sta caricando...
La pagina si sta caricando...
La pagina si sta caricando...
La pagina si sta caricando...
La pagina si sta caricando...
La pagina si sta caricando...
La pagina si sta caricando...
La pagina si sta caricando...
La pagina si sta caricando...
La pagina si sta caricando...
La pagina si sta caricando...
La pagina si sta caricando...
La pagina si sta caricando...
La pagina si sta caricando...
La pagina si sta caricando...
La pagina si sta caricando...
La pagina si sta caricando...
La pagina si sta caricando...
La pagina si sta caricando...
La pagina si sta caricando...
La pagina si sta caricando...
La pagina si sta caricando...
La pagina si sta caricando...
La pagina si sta caricando...
La pagina si sta caricando...
La pagina si sta caricando...
La pagina si sta caricando...
La pagina si sta caricando...
La pagina si sta caricando...
La pagina si sta caricando...
La pagina si sta caricando...
La pagina si sta caricando...
La pagina si sta caricando...
La pagina si sta caricando...
La pagina si sta caricando...
-
 1
1
-
 2
2
-
 3
3
-
 4
4
-
 5
5
-
 6
6
-
 7
7
-
 8
8
-
 9
9
-
 10
10
-
 11
11
-
 12
12
-
 13
13
-
 14
14
-
 15
15
-
 16
16
-
 17
17
-
 18
18
-
 19
19
-
 20
20
-
 21
21
-
 22
22
-
 23
23
-
 24
24
-
 25
25
-
 26
26
-
 27
27
-
 28
28
-
 29
29
-
 30
30
-
 31
31
-
 32
32
-
 33
33
-
 34
34
-
 35
35
-
 36
36
-
 37
37
-
 38
38
-
 39
39
-
 40
40
-
 41
41
-
 42
42
-
 43
43
-
 44
44
-
 45
45
-
 46
46
-
 47
47
-
 48
48
-
 49
49
-
 50
50
-
 51
51
-
 52
52
-
 53
53
-
 54
54
-
 55
55
-
 56
56
-
 57
57
-
 58
58
-
 59
59
-
 60
60


AEG HD955100NB Manuale utente
- Categoria
- Piani cottura
- Tipo
- Manuale utente
in altre lingue
- English: AEG HD955100NB User manual
Documenti correlati
Altri documenti
-
Electrolux KIR6042K Manuale utente
-
-
Aeg-Electrolux HK854080XB Manuale utente
-
Aeg-Electrolux HC451500EB Manuale utente
-
Progress PAI6001F Manuale utente
-
-
-
-
Electrolux KTI6430E Manuale utente
-
Leonard LAI6031A Manuale utente