Progress PHN1320S Manuale utente
- Categoria
- Cucina
- Tipo
- Manuale utente

1 progress
User Instructions
Libretto di istruzioni
Instrucciones de uso
PHN 1320
User Instructions
Cucina da incasso
Horno empotrado

2 progress
Safety information
Step-by-step instructions
Practical tips
Environmental information
Applicable Directives
)
Contents
This appliance conforms to the following EEC Directives:
- 2006/95 (Low-voltage Directive);
- 2004/108 (EMC Directive);
and subsequent amendments.
Warnings and important safety instructions ...................................................................... 3
Description of the appliance ............................................................................................. 5
Operation ......................................................................................................................... 6
Before using for the first time............................................................................................ 8
Using the oven ................................................................................................................. 9
Cooking tables ............................................................................................................... 13
Cleaning and maintenance ............................................................................................. 15
Troubleshooting ............................................................................................................. 20
Technical data ................................................................................................................ 21
Instructions for the installer............................................................................................. 22
Installation instructions ................................................................................................... 24
Customer service ........................................................................................................... 25
MANUFACTURER:
ELECTROLUX HOME PRODUCTS ITALY S.p.A.
Viale Bologna, 298
47100 FORLÌ (Italy)

3 progress
Warnings and important safety instructions
Always keep these user instructions with the appliance. If the appliance is given
or sold to a third party, or if you move house and leave the appliance in a former
residence, it is extremely important that the new owner is provided with these user
instructions.
These warnings are provided for the safety of the users and co-residents. So
read them carefully before connecting and/or using the appliance.
Installation
· Installation must be undertaken by a
qualified engineer in compliance with the
current regulations. The individual steps
for installing the appliance are described
under the instructions for the installer.
· Installation and connection of the appli-
ance should only be carried out by a
qualified engineer who will be aware of
the currently applicable Directives.
· Any modifications to the power supply,
which may be necessary to install the ap-
pliance, must also be carried out by a
qualified engineer.
· Depending on the version, this oven has
been manufactured as a single appliance
or as a combination appliance with
electric hotplate for connection to 1, 2 or
3 phases (without groups) of a 230V
supply. Connection to multiple phases
without a neutral (400V) will lead to
destruction of the oven and the
connected hotplates.
Operation
· This oven is designed for food prepara-
tion; never use it for any other purpose.
· Use the oven with care. Owing to the ex-
treme heat generated by the heating ele-
ments, the oven shelf and other parts be-
come very hot.
· If, for any reason, aluminium foil is to be
used in food preparation, it should never
come into direct contact with the floor of
the oven.
· When cleaning the oven, proceed with
care: never spray anything onto the
grease filter (if fitted), the heating ele-
ments or the thermostat sensor.
· It is dangerous to modify this appliance or
any of its features.
· During baking, roasting and grilling the
oven window and other parts become
very hot. Children should therefore be
kept away from the appliance. When
connecting other electrical appliance to
sockets near the oven, ensure that the
cables do not come into contact with hot
cooking surfaces or become jammed in
the hot oven door.
· Always use oven gloves to remove fire-
resistant hot dishes and pans from the
oven.
· Regular cleaning prevents deterioration
of the surface materials.
· Before cleaning the oven, either switch
the power off or pull out the plug.
· Ensure that the oven is switched to the
“OFF” position when not in use.
· The appliance should never be cleaned
using a superheated steam or steam jet
cleaner.
· Never use abrasives or sharp metal
scrapers. You might scratch the door
panels and cause the glass to shatter.
People safety
· This appliance is intended for use by
adults. It is dangerous to allow children to
use or play with it.
· Keep children away from the oven while it
is in use. Even when you have switched
the oven off, the door remains hot for
some time.
· This appliance is not intended for use by
children or other persons whose physical,

4 progress
sensory or mental capabilities or lack of
experience and knowledge prevents
them from using the appliance safely
without supervision or instruction by a
responsible person to ensure that they
can use the appliance safely.
Disposal
Packaging material
· The packaging materials are environmen-
tally friendly and recyclable. The plastic
parts are coded, e. g. >PE>, >PS< etc.
Dispose of the packaging materials ac-
cording to their code in the collection bins
provided at communal waste disposal
centres.
Old appliances
· The symbol on the product or on its
packaging indicates that this product
may not be treated as household waste.
Instead it should be taken to the
appropriate collection point for the
recycling of electrical and electronic
equipment. By ensuring this product is
disposed of correctly, you will help
prevent potential negative consequences
for the environment and human health,
which could otherwise be caused by
inappropriate waste handling of this
product. For more detailed information
about recycling of this product, please
contact your local council, your
household waste disposal service or the
shop where you purchased the product.
Warning: Before disposing of an old
appliance, ensure it no longer repre-
sents any danger by making it unus-
able.
To do so, disconnect from the mains
and remove the power cable from the
appliance.
Customer service
· The appliance must only be serviced and/
or repaired by our authorised service
centres. Only original replacement parts
may be used.
· Never attempt to repair the appliance
yourself in the event of a malfunction or
damage. Repairs carried out by untrained
persons may cause damage or injury.

5 progress
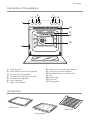
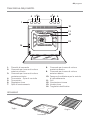
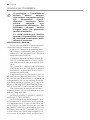
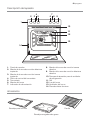
Description of the appliance
Accessories
Oven shelf
Baking tray
Dripping pan
1. Control panel
2. Knob switch for front left hotplate
3. Knob for left rear hotplate
4. Temperature regulator indicator
5. Temperature regulator
6. Oven regulator
7. Mains on indicator
8. Knob switch for right rear hotplate
9. Knob for right front hotplate
10. Ventilations slots for cooling fan
11. Grill
12. Interior light
13. Oven fan
14. Rating plate
14
12
11
10
986532
7
4
1
13

6 progress
Operation
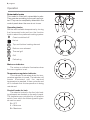
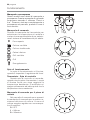
Retractable knobs
This model is fitted with retractable knobs.
They operate according to the push-pull sys-
tem. They can be completely retracted in the
control panel when the oven is not in use.
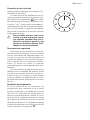
Operating knobs
Set the most suitable temperature by turning
the thermostat knob and turn the function
knob to select the preferred cooking system:
0 Oven is switched off
Hot air
Top and bottom heating element
Bottom oven element
Thermal grill
Grill
Defrosting
Mains on indicator
The mains on indicator illuminates when
the oven regulator is set.
Temperature regulator indicator
This indicator illuminates when the tem-
perature regulator is turned. The indicator will
remain illuminated until the required
temperature is reached. It then cycles on and
off to indicate that the temperature is being
maintained.
Control knobs for hob
The selector knobs for the four hob heat-
ing elements are located on the switch panel.
The hotplates are controlled by a 9-position
switch, from which the following working lev-
els can be used:
0 = OFF
1 = Minimum
9 = Maximum

7 progress
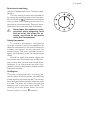
Dual-circuit switching
(see list of appliances in the “Technical data”
section)
The two heating circuits are switched on
by turning the cooking zone knob from posi-
tion 9 to position
(clockwise); an audible
click is heard. Both heating circuits are now
switched on simultaneously. Then set the re-
quired level (turn the knob anti-clockwise).
Never leave the appliance unsu-
pervised when preparing food
with oil or fat, like chips, for ex-
ample, as oil and fat can easily
catch fire if overheated.
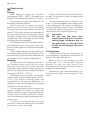
Safety thermostat
To prevent dangerous overheating
(through incorrect use of the appliance or
defective components), the oven is fitted with
a safety thermostat, which interrupts the
power supply. The oven switches back on
again automatically when the temperature
drops.
Should the safety thermostat trigger due
to incorrect use of the appliance, simply rem-
edy the error after the oven has cooled down.
However, if the thermostat has been trig-
gered by a faulty component, please contact
customer services.
Cooling fan
The oven is equipped with a cooling fan,
which cools the control panel, the operating
knobs and the oven door handle. The cooling
fan is activated automatically when the oven
is in use. The warm air is blown through the
opening next to the oven door handle. The
cooling fan shuts down when the oven
function switch is in the "
0" position.

8 progress
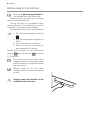
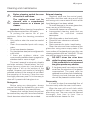
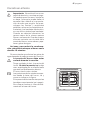
Before using for the first time
Always grasp the handle in the
middle to open the door.
Remove all packaging materials in
and outside the oven before use.
Before using for the first time, the empty
oven should be heated up.
During this time, an unpleasant odour
may be emitted. This is absolutely normal. It
is caused by manufacturing residues.
Ensure that the kitchen is well ventilated.
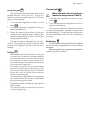
1. Turn the oven regulator to hot air
.
2. Turn the temperature regulator to
250°C.
3. Open a window for ventilation.
4. Allow the oven to run empty for
approximately 45 minutes.
Repeat the procedure for top and bottom
heating
and thermal grill for about
5-10 minutes.
Then let the oven cool down. Now
dampen a soft cloth with warm water
and mild washing-up liquid and clean
the oven cavity.
Before using for the first time,
carefully wash the oven accessories
as well.
)

9 progress
Using the oven
Important! - Do not line the oven with
aluminium foil and do not place a
baking tray etc. on the oven floor as
the oven enamel may be damaged by
the build up of heat. Always place
dishes and pans, heat-resistant dishes
and pans and aluminium sheets on the
shelf inserted in one of the shelf
runners. As food is heated, steam is
released as in a kettle. When the
steam comes into contact with the
glass in the oven door, it condenses
and creates water droplets.
To reduce condensation, always
preheat the empty oven for 10 minutes.
We recommend you wipe the water
droplets away after every cooking process.
The oven door must be closed
during cooking.
Open the oven door with care. Never
let the oven door ”fall open“, but use
the door handle until the door is
completely opened.
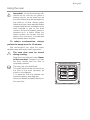
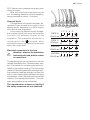
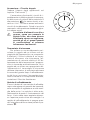
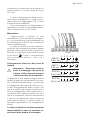
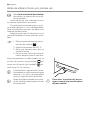
The oven has four shelf levels.
The shelf positions are counted from
the floor of the oven upwards, as
shown in the diagram.
It is essential that the shelves are
inserted properly (see diagram).
Never put dishes and pans directly on
the oven floor.

10 progress
Top and bottom heating element
1. Turn the oven regulator to the required
function
.
2. Turn the temperature regulator to the
required temperature.
- Heat circulates best around the middle
shelf level. If foods should be browned
underneath, simply select a lower shelf
level. If the food is to be browned on the
top, choose a higher shelf level.
- The material and finish of the baking tray
and the dishes used will affect the degree
of base browning. The bottom of dishes
cooked in enamelled, dark, heavy and
uncoated tins and cookware will brown
more than those in glass, shiny
aluminium or polished steel containers as
these reflect the heat and therefore
permit only minimum browning on the
underside.
- Place dishes in the middle shelf position
to get even browning.
- Always use baking trays of adequate size
so that no liquids can leak on to the oven
floor. This will also save on cleaning.
- Never put dishes, tins or trays directly on
to the oven floor as this becomes very hot
and damage may occur. On this setting,
heat is generated by the upper and lower
heating elements. You therefore only
require one shelf level for the cooking
process. This setting is particularly
suitable for dishes which must also be
browned underneath, like quiches and
pies.
This setting is also excellent for lasagne
and other dishes cooked au gratin, which
have to be browned on top.
Bottom oven element
1. Turn the oven regulator to switch on the
oven
.
2. Turn the temperature regulator to the re-
quired temperature.
This function is particularly useful when
pastry has to be baked blind. It can also be
used for quiches and pies because it guaran-
tees that the pastry base is cooked through.
The temperature regulator LED lights
up until the correct temperature has
been reached. It then cycles on and off
to indicate that the temperature is being
maintained.
Hot air
1. Turn the oven regulator to switch on the
oven .
2. Turn the temperature regulator to the re-
quired temperature.
- The food is cooked by convection, with
hot air distributed evenly round the oven
interior by a fan in the oven rear wall.
- The heat reaches all oven zones quickly
and evenly. This means you can simulta-
neously bake, roast and stew different
foods on several levels. Cooking by con-
vection quickly eliminates moisture; the
dry oven air prevents the different flavours
and aromas of one dish being transmit-
ted to the others.
- Being able to cook on several levels
means that you can simultaneously bake
different dishes and up to three types of
cake or mini-pizzas for eating or freezing.
- Naturally, you can also use just one shelf
in the oven. In this case, you should use
the lowest shelf position so that you can
keep a closer eye on the baking process.
- The oven is also particularly suitable for
sterilising preserves, cooking homemade
jams and -drying mushrooms and fruit.

11 progress
Using the grill
The grill rapidly provides direct heat to the
middle section of the grill pan. The grill is
ideal for cooking smaller amounts. This also
helps to save energy.
1. Turn the oven regulator to switch on the
oven
.
2. Turn the temperature regulator to the re-
quired temperature.
3. Select the right shelf position for the grid
and grill pan, depending on whether the
food to be grilled is flat or thick. Then follow
the grilling instructions.
The grill element is regulated by the ther-
mostat. During grilling, the grill switches itself
on and off at regular intervals to avoid over-
heating.
Grilling
- Most foods should be placed on the grid
in the grill pan to ensure the best possible
air circulation and to ensure that the food
is not lying in fat and its own juices. Fish,
liver and kidneys can also be laid directly
in the grill pan if required.
- The food should be as dry as possible
before it is grilled to avoid spitting. Coat
lean meat or fish lightly with oil or melted
butter so that the grilled food remains
moist during cooking.
- Accompanying vegetables like tomatoes
and mushrooms can be laid underneath
the grid when grilling meat.
- Bread should be toasted on the highest
shelf setting.
- The food should be turned from time to
time during grilling.
Thermal grill
When using the thermal grill set a
maximum temperature of 200°C.
1. Turn the oven regulator to switch on the
oven
.
2. Turn the temperature regulator to the re-
quired temperature.
This function offers an alternative method
of cooking food items normally cooked on a
conventional grill. The grill element and the fan
function alternately so that hot air circulates in
the oven.
Defrosting
The fan works without heat and circulates
the air at room temperature in the cooking
chamber.
Make sure that the temperature regulator
is set to the OFF position.

12 progress
Before carving, leave the joint to rest for
at least 15 minutes, so that the meat juices
do not run out.
To reduce the build up of smoke in the
oven, it is recommended to pour a little water
in the roasting pan. To prevent condensation
forming, add water several times. The plates
can be kept warm in the oven at minimum
temperature until required for serving.
Important!
Do not line the oven with
aluminium foil and do not place
baking trays, cookware, etc. on
the oven floor, as the heat that
builds up will damage the oven
enamel.
Cooking times
Cooking times may vary, depending on
the composition, ingredients and amount of
liquid in the individual dishes.
Make a note of the settings you used
during your first cooking and roasting
attempt so that you can record your
experiences for the next time you want to
prepare the same foods.
Based upon your own experiences, you
will be able to modify the values given in the
tables.
Practical tips
Baking:
Most baking is done at a medium
temperature (150°C - 200°C). The oven must
therefore be preheated for about 10 minutes.
Do not open the oven door before 3/4 of
the baking time has expired.
Short-crust pastry is baked in a spring-
form tin or on a tray for up to 2/3 of the baking
time and then garnished before being fully
baked. This further baking time depends on
the type and amount of topping or filling.
Sponge mixtures must be of slow dropping
consistency. Too much liquid would prolong
the baking time unnecessarily.
If two baking trays with pastries or biscuits
are inserted into the oven at the same time,
there must be a gap of one shelf level between
the trays.
If two loaded baking trays are inserted in
the oven at the same time, the positions of the
top and bottom trays must be swapped and
turned about 2/3 through the baking time.
Roasting:
Do not roast joints weighing less than 1
kg. Smaller pieces could dry out when
roasting. Dark meat that should be well
cooked on the outside but remain medium to
rare on the inside must be roasted at a higher
temperature (200°C - 250°C).
White meat, poultry and fish, on the other
hand, require a lower temperature (150°C -
175°C). For shorter cooking times, the
ingredients for sauces are added to the
roasting tin right at the beginning. Otherwise
add them in the last half hour.
You can use a spoon to test whether the
meat is cooked: If it makes no indent, the
meat is cooked through. Roast beef and fillet
of beef, which should remain pink inside,
must be roasted at a higher temperature for a
shorter time.
If meat is to be cooked directly on the
oven shelf, insert the roasting pan in the shelf
level below to catch the juices.

13 progress
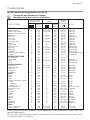
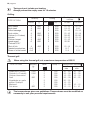
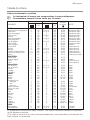
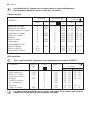
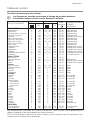
Top and bottom heating element and hot air.
Timings do not include pre-heating.
Always preheat the oven for 10 minutes.
The temperatures given are guidelines. The temperature must be modified as necessary to suit your
personal requirements.
(
*
)
If you are cooking several foods at the same time, we recommend that you place them
on the levels given in brackets.
Cooking tables
CAKES
Cake mixture 2 170 2 (1und3)* 160 45-60 Cake tin
Short-crust pastry 2 170 2 (1und3)* 160 20-30 Cake tin
Buttermilk cheesecake 1 175 2 165 60-80 Cake tin
Apple cake 1 170 2 (1und3)* 160 90-120 Cake tin
Strudel 2 180 2 160 60-80 Baking tray
Jam tart 2 190 2 (1und3)* 180 40-45 Cake tin
Fruit cake 2 170 2 150 60-70 Cake tin
Sponge cake 1 170 2 (1und3)* 165 30-40 Cake tin
Stollen 1 150 2 150 120-150 Cake tin
Plum cake 1 175 2 160 50-60 Bread tin
Small cakes 3 170 2 160 20-35 Baking tray
Biscuits 2 160 2 (1und3)* 150 20-30 Baking tray
Meringue 2 135 2 (1und3)* 150 60-90 Baking tray
Cookies 2 200 2 190 12~20 Baking tray
Pastries Choux pastry 2 or 3 210 2 (1und3)* 170 25-35 on the baking tray
Tartlets 2 180 2 170 45-70 In cake tins
BREAD AND PIZZA
White bread 1 195 2 185 60-70
Rye bread 1 190 1 180 30-45 Bread tin
Rolls 2 200 2 (1und3)* 175 25-40 Baking tray
Pizza 2 200 2 200 20-30 Baking tray
FLANS, Soufflés
Pasta flan 2 200 2 (1und3)* 175 40-50 Baking tin
Vegetable flan 2 200 2 (1und3)* 175 45-60 Baking tin
Quiches 1 210 1 190 30-40 Baking tin
Lasagne 2 200 2 200 25-35 Baking tin
Cannelloni 2 200 2 200 25-35 Baking tin
MEAT
Beef 2 190 2 175 50-70 Shelf
Pork 2 180 2 175 100-130 Shelf
Veal 2 190 2 175 90-120 Shelf
English roast beef,
medium
rare 2 210 2 200 50-60 Shelf
medium 2 210 2 200 60-70 Shelf
well done 2 210 2 200 70-80 shelf
Shoulder of pork 2 180 2 170 120-150 with crackling
Knuckle of pork 2 180 2 160 100-120 2 pieces
Lamb 2 190 2 175 110-130 Leg
Chicken 2 190 2 200 70-85 Whole
Turkey 2 180 2 160 210-240 Whole
Duck 2 175 2 220 120-150 Whole
Goose 2 175 1 160 150-200 Whole
Rabbit 2 190 2 175 60-80 In pieces
Hare 2 190 2 175 150-200 In pieces
Pheasant 2 190 2 175 90-120 Whole
Meat loaf 2 180 2 170 150 in total Bread tin
FISH
Trout / sea bream 2 190 2 (1und3)* 175 40-55 3-4 Fish
Tuna / salmon 2 190 2 (1und3)* 175 35-60 4-6 Filets
TYPE OF DISH
Top and bottom
heating element
Hot air
Temp.
(°C)
Temp.
(°C)
Cooking
time
in minutes
NOTE
4
3
2
1
Level
Level
4
3
2
1

14 progress
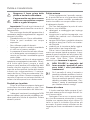
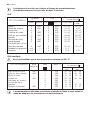
The temperatures given are guidelines. Temperatures must be modified as
necessary to suit your personal requirements.
Grilling
1st side
Temp. (°C)
Pieces
g
Quantity
Cooking time in
minutes
2nd side
Grilling
TYPE OF DISH
Fillet steaks 4 800 3 250 12~15 12~14
Beef steak 4 600 3 250 10~12 6~8
Grilled sausage 8 / 3 250 12~15 10~12
Pork cutlets 4 600 3 250 12~16 12~14
Chicken (in 2 halves) 2 1000 3 250 30~35 25~30
Kebabs 4 / 3 250 10~15 10~12
Chicken breast 4 400 3 250 12~15 12~14
Hamburgers* 6 600 2 250 20-30
*Preheat 5’00'’
Fillet of fish 4 400 3 250 12~14 10~12
Toasted sandwiches 4~6 / 3 250 5~7 /
Slices of white bread 4~6 / 3 250 2~4 2~3
Level
TYPE OF DISH quantity Level Temp.
°C
Cooking time in minutes
(g) bottom top
side side
Rolled joints
(Turkey) 1000 3 200 30 ~ 40 20 ~ 30
Chicken (in 2 halves) 1000 3 200 25 ~ 30 20 ~ 30
Chicken drumsticks - 3 200 15 ~ 20 15 ~ 18
Quail
500 3 200 25 ~ 30 20 ~ 25
Vegetables au gratin - 3 200 20 ~ 25 -
pieces. Scallops - 3 200 15 ~ 20 -
Mackerel - 3 200 15 ~ 20 10 ~ 15
Fish slices 800 3 200 12 ~ 15 8 ~ 10
Thermal grill
4
3
2
1
4
3
2
1
When using the thermal grill, set a maximum temperature of 200°C.
Timings do not include pre-heating.
Always preheat the empty oven for 10 minutes.

15 progress
Before cleaning, switch the oven
off and let it cool down.
The appliance must not be
cleaned with a superheated
steam cleaner or a steam jet
cleaner.
Important: Before cleaning the appliance
must be disconnected from the mains.
To prolong the service life of your
appliance, follow the cleaning procedure
below:
- Only perform when the oven has cooled
down.
- Clean the enamelled parts with soapy
water.
- Do not use abrasive cleaners.
- Dry the stainless steel parts and glass with
a soft cloth.
- If there are stubborn stains, use
commercially available cleaning agents for
stainless steel or warm vinegar.
The oven’s enamel is extremely durable
and stain-resistant. Nevertheless, hot fruit
juices (lemons, plums etc.) can leave dull,
rough stains if left on the surface of the
enamel. However, such marks in the brightly
polished surface of the enamel do not affect
the operation of the oven. Clean the oven
thoroughly after every use. Dirt is then easy to
clean off. It prevents dirt being burnt on.
Detergents
Before using any detergents, always
ensure that they are suitable for your oven
and recommended by the manufacturer.
Cleaners that contain bleach should not
be used as they may dull the surface finishes.
Harsh abrasives should also be avoided.
Cleaning and maintenance
External cleaning
Regularly wipe over the control panel,
oven door and door seal using a soft cloth
well wrung out in warm water to which a little
liquid detergent has been added.
To avoid damage to the oven glass door,
never use any of the following:
• Household cleaners and bleaches
• Impregnated cleaning pads that are
unsuitable for non-stick coated
saucepans.
• Brillo/Ajax pads or steel wool pads
• Chemical oven cleaners or aerosols
• Rust removers
• Stain removers for sinks / wash basins
Clean the outer and inner surfaces of the
glass door using warm soapy water. If the
inner surface of the glass door is very dirty, use
cleaning products such as “Hob Brite”. Do not
use paint scrapers to remove soilage.
DO NOT clean the oven door
while the glass panels are warm.
If this precaution is not observed
the glass panels may shatter.
If the glass panel has cracks or deep
scratches, the structure of the glass is
compromised. The panel must be
replaced to avoid any risk of shattering.
Contact your local customer services
who will be pleased to advise further.
Oven cavity
It is best to clean the enamelled floor of
the oven cavity while the oven is still warm.
Wipe the oven with a soft cloth which
should be washed in warm, soapy water
after every use. The oven must be cleaned
thoroughly from time to time. Use a
conventional oven cleaner for this.

16 progress
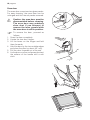
Oven door
The oven door comprises two glass panels.
For easy cleaning, the oven door can be
unhinged and the internal panels removed.
Caution: the oven door must be
disassembled before cleaning.
The oven door may suddenly
slam shut if you attempt to
remove the inner panels while
the oven door is still in position.
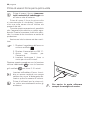
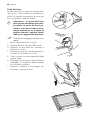
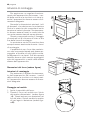
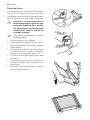
To remove the door, proceed as
follows:
1. Open the door completely.
2. Locate the two door hinges.
3. Lift the levers on the hinges and fold
them forwards.
4. Hold the door by the two outside edges
and close the door by about 45° only.
5. Pull the door forwards out of its seat.
6. Lie the door on a firm surface and protect
the surface of the handle with a soft
cloth.
)

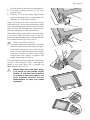
17 progress
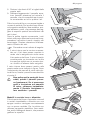
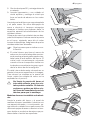
7. Use the bolts to remove the inner panels.
8. Turn both locking screws by 90° and
remove them.
9. Carefully lift the top panel slightly and
remove the panel which is framed on all 4
sides by an ornamental border.
Clean the oven door with luke-warm water
and a soft cloth. Do not use metal pads, metal
wool, abrasive pads or acids to clean the oven
door as they will damage the special heat-
reflective surfaces of the inner panels.
After cleaning the inner panels, re-insert them
in the door. Refit the oven door; to do so,
repeat the above sequence in reverse. Ensure
the panels are the right way round.
Then, proceed as follows:
a) The inner panel with the frame on 4 sides
must be inserted so that the printing on
the screen is facing to the outside of the
oven. You will know the panel is properly
in place if, when you touch the visible
surface with your fingers, it doesn’t feel
rough where the printing is.
The inner panel must be inserted in positionas
shown in the diagram. After inserting the
panel in the oven door, fix in position as
described under point 8.
Never clean the oven door when
it is warm as the panels might
shatter. If you can see scratches
or cracks in the glass panel, call
your nearest service centre
immediately to have the panel
replaced.
)
90°
1
2

18 progress
Models in stainless steel or aluminium:
Clean the oven door and operating panel in
stainless steel or aluminium with a damp
sponge and then dry carefully with a soft cloth.
Never use metal pads, metal wool, acids or
abrasives for cleaning because they may
scratch the surfaces.
Cleaning the oven door seal
A seal is attached around the opening of the
oven.
Regularly check the condition of
the seal. Clean the seal if neces-
sary without using any abrasive
materials or objects. If you find
that the seal is damaged, call your
nearest service centre immedi-
ately. Do not use the oven until the
seal has been changed.
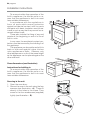
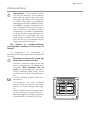
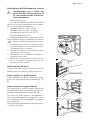
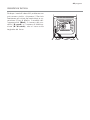
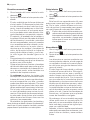
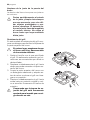
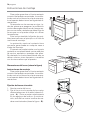
Grill heating element
This model has been fitted with a hinged grill
element to enable you to clean the roof of
the oven easily.
First ensure that the oven has
cooled down and has been discon-
nected from the mains.
1. Loosen the screw that fixes the grill ele-
ment in position. When carrying out this
operation for the first time, we recom-
mend using a screwdriver.
2. Carefully lower the grill element so that
the oven roof becomes accessible.
3. Clean the oven roof with a suitable
cleaner and wipe dry before replacing
the hinged grill element.
4. Gently push the grill element back into
place and firmly screw into position with
the retaining nut.
Ensure the retaining nut on the
grill element is properly tightened
so that it does not fall down when
in use.

19 progress
)
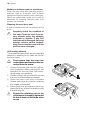
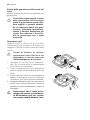
Changing the interior light bulb
Separate the appliance from the
power supply by switching off
the fuse.
If the oven light needs replacing, the new
bulb must have the following specifications:
- Electric power: 15 W / 25 W
- Electric voltage: 230 V (50 Hz)
- Heat resistance to 300 °C
- Type of connection: E14
These replacement bulbs can be
purchased from your dealer.
To change the oven light:
1. First ensure that the oven has cooled
down and has been disconnected from
the mains.
2. Turn the glass cover of the light counter-
clockwise.
3. Remove the used bulb and insert a new
one.
4. Replace the glass cover and reconnect the
oven to the mains.
1
2
3
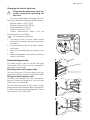
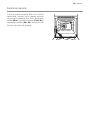
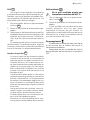
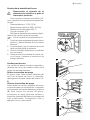
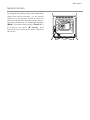
Oven shelf support rails
The shelf support rails on the left and right
hand sides of the oven can be removed for
cleaning the side walls.
Removing the shelf support rails
First pull the front of the rail away from the
oven wall and then unhitch at the back (1, 2).
Fitting the shelf support rails
To install, first reattach the rails at the back,
then put them into position at the front and
press them into place (3).
To clean the shelf support rails, soak in warm
soapy water and remove stubborn marks with
a well wetted soap impregnated pad. Rinse
well and dry with a soft cloth.

20 progress
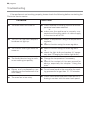
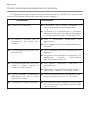
If the appliance is not working properly, please check the following before contacting the
Electrolux service centre.
Troubleshooting
SOLUTION
Check whether a cooking function and tem-
perature have been selected
or
make sure the appliance is properly con-
nected and the plug switch or mains supply
to the oven is set to ON.
Select a temperature using the temperature
regulator,
or
select a function using the oven regulator.
select a function using the oven regulator.
or
check the light bulb and replace it if neces-
sary (see "Changing the interior light bulb").
Change the temperature if necessary,
or
consult the content of this user manual for
advice, especially the chapter “Using the
oven”.
Do not leave foods in the oven after the cook-
ing process for longer than 15 - 20 minutes.
Check that shelves and bake-ware are not vi-
brating in contact with the oven back panel.
PROBLEM
The oven does not come on.
The LED for the oven tempera-
ture does not light up.
The interior oven light does not
come on.
The foods take too long to cook,
or are cooking too quickly.
Steam and condensation are
collecting on the foods and in the
oven cavity.
The oven fan is too noisy.
La pagina sta caricando ...
La pagina sta caricando ...
La pagina sta caricando ...
La pagina sta caricando ...
La pagina sta caricando ...
La pagina sta caricando ...
La pagina sta caricando ...
La pagina sta caricando ...
La pagina sta caricando ...
La pagina sta caricando ...
La pagina sta caricando ...
La pagina sta caricando ...
La pagina sta caricando ...
La pagina sta caricando ...
La pagina sta caricando ...
La pagina sta caricando ...
La pagina sta caricando ...
La pagina sta caricando ...
La pagina sta caricando ...
La pagina sta caricando ...
La pagina sta caricando ...
La pagina sta caricando ...
La pagina sta caricando ...
La pagina sta caricando ...
La pagina sta caricando ...
La pagina sta caricando ...
La pagina sta caricando ...
La pagina sta caricando ...
La pagina sta caricando ...
La pagina sta caricando ...
La pagina sta caricando ...
La pagina sta caricando ...
La pagina sta caricando ...
La pagina sta caricando ...
La pagina sta caricando ...
La pagina sta caricando ...
La pagina sta caricando ...
La pagina sta caricando ...
La pagina sta caricando ...
La pagina sta caricando ...
La pagina sta caricando ...
La pagina sta caricando ...
La pagina sta caricando ...
La pagina sta caricando ...
La pagina sta caricando ...
La pagina sta caricando ...
La pagina sta caricando ...
La pagina sta caricando ...
La pagina sta caricando ...
La pagina sta caricando ...
La pagina sta caricando ...
La pagina sta caricando ...
La pagina sta caricando ...
La pagina sta caricando ...
La pagina sta caricando ...
La pagina sta caricando ...
-
 1
1
-
 2
2
-
 3
3
-
 4
4
-
 5
5
-
 6
6
-
 7
7
-
 8
8
-
 9
9
-
 10
10
-
 11
11
-
 12
12
-
 13
13
-
 14
14
-
 15
15
-
 16
16
-
 17
17
-
 18
18
-
 19
19
-
 20
20
-
 21
21
-
 22
22
-
 23
23
-
 24
24
-
 25
25
-
 26
26
-
 27
27
-
 28
28
-
 29
29
-
 30
30
-
 31
31
-
 32
32
-
 33
33
-
 34
34
-
 35
35
-
 36
36
-
 37
37
-
 38
38
-
 39
39
-
 40
40
-
 41
41
-
 42
42
-
 43
43
-
 44
44
-
 45
45
-
 46
46
-
 47
47
-
 48
48
-
 49
49
-
 50
50
-
 51
51
-
 52
52
-
 53
53
-
 54
54
-
 55
55
-
 56
56
-
 57
57
-
 58
58
-
 59
59
-
 60
60
-
 61
61
-
 62
62
-
 63
63
-
 64
64
-
 65
65
-
 66
66
-
 67
67
-
 68
68
-
 69
69
-
 70
70
-
 71
71
-
 72
72
-
 73
73
-
 74
74
-
 75
75
-
 76
76


Progress PHN1320S Manuale utente
- Categoria
- Cucina
- Tipo
- Manuale utente
in altre lingue
- English: Progress PHN1320S User manual
- español: Progress PHN1320S Manual de usuario
Documenti correlati
-
Progress PHN1320X Manuale utente
-
Progress PHN1310W Manuale utente
-
Progress PHN1110W Manuale utente
-
Progress PHN1220X Manuale utente
-
Progress PBN1320X Manuale utente
-
-
-
-
-