
Mobile Phone CF888
User’s Guide
Visit us on the web at: http://mobile.ericsson.com
ERICSSON Z

First edition (August 1998)
This manual is published by Ericsson Inc., without any warranty. Improvements and changes to this manual necessitated by typographical errors, inaccuracies of cur-
rent information, or improvements to programs and/or equipment, may be made by Ericsson Inc. At any time and without notice. Such changes will, however, be in-
corporated into new editions of this manual.
All rights reserved.
© Ericsson Inc., 1998
Publication Number: LZT 123 4459 R1
Printed in the USA.

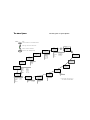
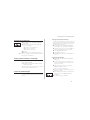
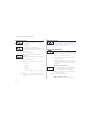
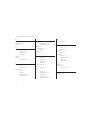
The Menu Sys tem Some menus/features are operator dependent. The Menu Sys tem Some menus/features are operator dependent.
Start here
ERICSSON
12:35
MENU
Ring level
( )
MENU
Change to
LINE 2?
MENU
Forward
MENU
Mail
MENU
Keylock
On?
MENU
Clock
MENU
Settings
MENU
Calculator
MENU
Phone book
MENU
Next
call type
MENU
Networks
MENU
Access
MENU
Info
Name Recall
Position Recall
Store
Edit
Erase
Erase All from
Phone
Copy All
Copy
Call Card Numbers
Fixed Numbers
Answered calls
Dialed Numbers
Info Recall
Service Recall
Voice Mail
Read Messages
Send Messages
Area Info
Area Messages
Set Voice Mail
Missed Calls
Set Alarm
Set Clock
Set Date
Clock Mode
Date Mode
Ear Volume
Ring Type
Edit Melody
Mail Alert
Keylock
Key Sound
Light
Min Minder
Call Info
Answering Mode
Analog Vox
Greeting
Phone No
Language
Data Menus
Line 1 Tag
Master Reset
Restrict Calls
Fixed Dial
Call Waiting
Lock to this Line
Unlock Card
Change PIN
Code
Change PIN2
Code
Phone Lock
Phone Lock
Change Code
Call Cards
Security
Select Net
Searchmode
Edit List
System
Analog Opt
New Search
Phone Number*
Fax Number*
Data Number*
All Numbers
Speech
Fax
Data
Last Call
Tot Calls
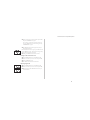
Press .... To...
Move clockwise or counterclockwise
Back up one level in the menus
Select a menu or function
Return to the standby mode
MENU
Activate
IR Port
*These menus only appear if you
have turned on the data menus.
*

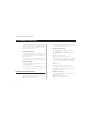
Contents
Congratulations... 1
Valuable Information 2
Operators & Subscription, Dual Band/Dual Mode – GSM 1900 & Analog
800, SIM & PIN
The Phone, Keypad, and Display
Preparing Your Phone for Use 4
The SIM Card, The Battery
Turning On the Phone 7
The Antenna, When No Network Name Is Displayed, Turning Off the
Phone, Initial Settings
Making and Receiving Calls 9
Emergency Calls, Making Domestic Calls, Making International Calls, Re-
ceiving a Call, Redialing a Number, Calling Someone Who Has Called You,
Unanswered Calls, Hiding or Showing Your Number
During a Call 13
Changing the Earpiece Volume, Muting the Microphone, Using the Display
as a Scratch Pad, Sending Tone Signals
The Menu System 15
Navigating the Menu System, Display Text and Symbols
The Phone Book 16
Before You Start, Entering Characters, Creating Your Personal Phone Book,
Recalling a Phone Number, Keeping Your Phone Book Up to Date, Copying
Phone Numbers between Positions and Memories
Sending and Receiving Text Messages 22
Two Memories, Setting the Phone for Text Messaging, Composing and
Sending Messages, Reading a Message, Replying to a Message, Embedded
Numbers in SMS, Erasing a Message, Storing a Received Message,
Reading Stored Messages, Calling a Phone Number in a Message, Frequently
Used Messages
Communicating via the Modem 28
Before you Start, The Data Menus, Installing the Infrared Modem , Connect
-
ing Using the IR Link, Connecting Using the RS232 Cable, Making Fax and
Data Calls, Receiving Fax and Data Calls
The Mobile Office Suite 34
Installing the Mobile Office Suite, Uninstalling the Mobile Office Suite
Networks 36
Search Mode, Selecting a Network, Selecting a System, National Roaming,
List of Preferred Networks
Security 40
The Card Lock, The Phone Lock, Call Restrict, The Keypad Lock, Fixed
Dialing
Forwarding Incoming Calls 45
Activating a Call Forward, Checking the Forward Status, Cancelling Certain
Call Forwards
Handling More than One Call 47
The Call Waiting Service, Receiving a Second Call, Receiving a Third Call,
Making a Second Call, Connecting Two Calls
i
Some features/menus are operator dependent

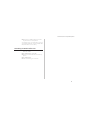
Conference Calls 50
Initiating a Conference Call, Having a Private Conversation, Releasing One
of the Members, Making a Call while a Conference Call is in Progress,
Ending a Conference Call
Handsfree Calling 52
Selecting Answering Mode, Other Handsfree Related Settings
Area Information 53
Turning On the Area Information, Turning the Area Information Off, Area
Information Message Types, The Area Information Message List, Receiving
Area Information
The Two Line Service 55
Selecting a Line, Receiving a Call on Line 1 or Line 2, Different Settings for
Each Line, Changing the Name of the Two Lines
Other Useful Features 56
Personalizing Your Phone, The Ring Signal Level, The Answering Service,
Time, Date and Alarm, The Call Time/Call Cost, Calling or Credit Card Calls,
The Calculator
Guidelines for Safe and Efficient Use 65
General, Exposure to Radio Frequency Energy, Efficient Phone Operation,
Tips for Efficient Operation, Driving, Electronic Devices, Aircraft, Children,
Blasting Areas, Potentially explosive atmospheres, Product Care
Index 69
ii
Some features/menus are operator dependent

Congratulations...
…and thank you for choosing the CF888, a mobile phone
specially suited for the demanding user of communication
tools. Retaining the slim, streamlined size that has become
associated with the Ericsson family of phones, the CF888
sets a new standard for others to follow.
Apart from its unique toughness and extraordinary sound
quality, the CF888 comes packed with features that will help
you stay ahead. Some highlights include:
•
With the built-in GSM modem, you can forget all about
PC Cards. It’s already inside your phone, guaranteeing
you instant access to your PC, laptop or handheld com-
municator -- wireless if you prefer that, thanks to the in-
frared capabilities.
•
Dual band, dual-mode operation extends the potential
for efficient network usage, especially so if you frequently
use your phone in urban areas. The dual-band antenna
ensures optimal reception in both frequency bands.
Like the other phones from Ericsson, the CF888 is produced
to meet the highest quality standards.
This guide introduces you to your CF888 and shows you how
to get the most out of it. Before you start, please read the
“Guidelines for Safe and Efficient Use” in the back of the
manual.
1
Some features/menus are operator dependent

Valuable Information
Operators & Subscription
To be able to use your phone, you need to have a subscrip
-
tion to a network. This is obtained from the network opera
-
tor. The services included in your subscription depend on
your choice of operator and/or subscription. Therefore,
some of the services and functions described in this manual
may not be accessible to you. If you want a complete list of
the services included in your subscription, please contact
your network operator.
Dual Band/Dual Mode –
GSM 1900 & Analog 800
The Ericsson CF888 is a dual band/dual mode phone, so
you can operate your phone in two different kinds of net-
works – the GSM 1900 (PCS) and the AMPS 800 systems.
The digital GSM system operates at 1900 MHz, while the
analog system, AMPS, operates at 800 MHz.
A dual band/dual mode phone, such as your CF888, com
-
bines the two standards and can use both frequencies. You
have the power of the GSM 1900 in your home network
while being able to roam in the widespread analog coverage.
GSM 1900 is sometimes called GSM or PCS.
Analog information/instructions will appear in blue.
SIM & PIN
Together with your subscription you will obtain a 3-volt SIM
(Subscriber Identity Module) card. The SIMmustbe a dual
mode SIM card to operate as a dual mode phone. A sin
-
gle mode SIM will only access GSM 1900 networks.
The SIM card contains a computer chip that keeps track of
your phone number, the services you have ordered from your
network operator and your Phone Book information, among
others.
Your SIM card is supplied with a security code or Personal
Identity Number (PIN), which you need in order to gain ac-
cess to the network. Your PIN may also be required when
you want to change settings in your phone. Furthermore,
some operators may have services that require a second PIN,
the PIN2. You will find your PIN (and PIN2) in the informa-
tion from your operator.
When you turn on your phone you may be prompted to enter
your PIN if the PIN is activated. If the PIN is entered incor
-
rectly three times in succession, the SIM card will be blocked.
If this happens you can unlock it by using your Personal Un
-
blocking Key (PUK) code, which is also obtained from your
operator. See chapter “Security”.
You should be careful with your PIN, since it is your protec
-
tion against unauthorized use of your phone and subscrip
-
tion.
2
Some features/menus are operator dependent

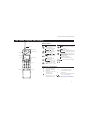
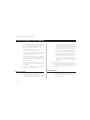
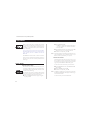
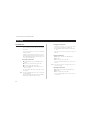
The Phone, Keypad, and Display
Some features/menus are operator dependent
3
Antenna
Indicator Light
InfraRed (IR) Port
Navigation Key
Keypad
Volume Keys
Earpiece
Display
Microphone
Active Flip
Key Functions
•
, used to:
make calls, answer incoming
calls, put calls on hold and
switch between calls.
confirm selections and inputs.
•
and , used to:
turn the phone on or off.
end calls, reject incoming calls
and cancel selections.
•
, press or
(or press and hold) to ac-
cess and navigate the menu
system.
•
(Clear), used to
erase digits from the display.
mute the telephone.
•
S, used to enter
the digits 0–9 and to enter text.
The 0 key also enters the inter-
national prefix (+) if held
down.
•
, used to:
enter the * character.
enter a pause character (’p’) if held down.
•
, used to:
enter the characters # or ¤.
recall a phone number from the Phone Book.
•
on the side of the phone, used
to:
change the earpiece volume during a call.
reject an incoming call.
silently adjust ring type and ring level (must
select from menus).
check date when roaming.
temporarily disables the active flip.
•
answers and ends call when activated.
Indicators in the Display
•
Signal strength.
The more bars that are shown,
the higher the signal strength.
•
Battery meter.
The fuller the icon, the better
the battery charge.
•
The keypad is locked.
•
All incoming calls are for
-
warded to another number.
•
The ring signal is turned off.
•
You have received a text message.
•
You have received a voice mail.
•
The alarm is set.
•
The line currently selected. (Requires that
you have the Two Line Service.)
•
The phone is locked to a network other
than your home network. Analog only.
4
2
7
8
l
S
Mm
Tt
L1
B

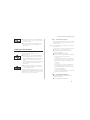
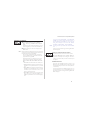
Preparing Your Phone for Use
The SIM Card
When you register as a subscriber with a network operator,
you obtain a SIM card.
SIM cards come in two sizes. One is the size of a credit card,
and the other is considerably smaller (about the size of a regu
-
lar stamp). The CF888 uses the smaller card. Many operators
deliver credit card size SIM cards where the small size card is
punched out to be easily removed.
Before you can use your phone, you must insert the SIM card into
the phone.
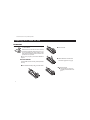
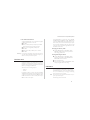
To Insert the SIM Card
To insert the SIM card, remove the battery (if attached) and follow
these steps:
Release the SIM card holder by sliding it toward the antenna.
Fold out the holder.
Slide the SIM card into the holder. Make
certain that the angled corner is top right
Fold down the holder.
Lock the holder by pressing it down
and sliding it toward the bottom of the
phone.
4
Some features/menus are operator dependent
Preparing Your Phone for Use
The SIM Card
When you register as a subscriber with a network operator,
you obtain a SIM card.
SIM cards come in two sizes. One is the size of a credit card,
and the other is considerably smaller (about the size of a regu
-
lar stamp). The CF888 uses the smaller card. Many operators
deliver credit card size SIM cards where the small size card is
punched out to be easily removed.
Before you can use your phone, you must insert the SIM card into
the phone.
To Insert the SIM Card
To insert the SIM card, remove the battery (if attached) and follow
these steps:
Release the SIM card holder by sliding it toward the antenna.
Fold out the holder.
Slide the SIM card into the holder. Make
certain that the angled corner is top right
Fold down the holder.
Lock the holder by pressing it down
and sliding it toward the bottom of the
phone.

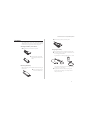
The Battery
Your mobile phone comes with a nickel metal hydride
(NiMH) battery. The battery is not charged when purchased,
but there may be enough power to turn on the phone.
Attaching the Battery to the Phone:
Place the battery on the back of the phone.
Press the battery upwards and
against the phone until you hear
a click.
Removing the Battery
Make sure that the phone is turned off before removing the
battery. Then:
Press the locking catch on
the bottom of the battery.
Lift the battery up and away from the phone.
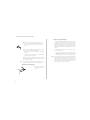
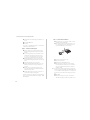
Charging the Battery
Make sure that the battery is attached to the phone. Then:
Connect the charger to the outlets. You will receive one
of the chargers pictured below.
A green indicator on the charger lights up. If not, make
sure you have inserted the plug to the charger correctly
(you may have to press hard).
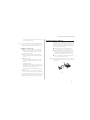
If applicable, connect the clear plastic plug on the
charger cable to the charger. It is correctly inserted
when you hear a click.
5
Some features/menus are operator dependent

Connect the other end of the cable to the phone ac
-
cording to the picture. The flash symbol on the plug
must face upwards. Note that you may have to press
hard.
The phone will automatically start charging the battery as you
attach the charger. To indicate the charging:
•
the battery meter in the display is continuously filled and
emptied.
• the indicator on top of the phone shows a steady red light
(green if the phone is turned on).
When the battery is fully charged, the battery meter in the dis-
play will show full and the indicator on top of the phone will
show a steady green light.
Note! It is possible to use the phone while the battery is being
charged. This will, however, increase the charging time.
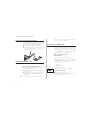
Disconnecting the Charger
l Lift the plug connected to
the phone upwards and
pull it out.
When to Charge the Battery
The nickel metal hydride (NiMH) battery that comes with
your phone can be charged whenever you wish without los
-
ing performance. This is not the case with the nickel cadmium
type batteries, often sold as accessories from other suppliers.
For optimal talk and standby time in the long run, we recom
-
mend that you only use Ericsson original batteries with your
CF888.
As a reminder that the battery needs to be charged or re
-
placed with a charged one...
•
an alarm signal (a long beep) sounds and the message
Battery low appears for ten seconds in the display.
•
the indicator light on top of the phone starts blinking red.
Note! If the phone is left turned on, the low battery alarm will be re-
peated several times and, finally, the phone will turn itself off
when the battery is no longer able to power it satisfactorily. It
might be possible to turn the phone on again, but you will not
be able to make or receive any calls. Instead the battery must
be charged or replaced with a charged one.
6
Some features/menus are operator dependent

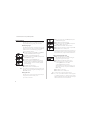
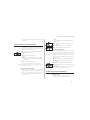
Turning On the Phone
When No Network Name Is Displayed
Emergency Calls Only
No network
Networks
Turning Off the Phone
7

Initial Settings
The first time you turn on your CF888, you may want to
change the default language setting, and set the clock.
Display Language
Most SIM cards automatically set the display language to the
language of the country where you purchased your SIM card.
If this is not the case, the default language is English.
To change the display language:
Press the navigation key to the LEFT or to the RIGHT re
-
peatedly until the Settings menu appears.
Press YES to enter the Settings menu.
Press the navigation key to the LEFT repeatedly until the
Language menu appears.
Press YES to enter the Language menu.
Press the navigation key repeatedly until you find the
desired language. Your CF888 offers English, French,
Spanish, Portuguese, and Auto Alternative (the SIM
preferred language).
Press YES to select the language.
Press CLR to return to the standby mode.
Note! If by accident your phone displays a language you do not un
-
derstand, you can return to English by entering the sequence
L0000R at any time.
Setting the Time
The time is shown at the bottom of the display. When you
buy the phone, the time is normally not set.
If you want to set the time:
Press the navigation key to the LEFT repeatedly until
the Clock menu appears.
Press YES to enter the Clock menu.
Press the navigation key to the RIGHT repeatedly until
the Set clock menu appears.
Press YES to enter the Set clock function.
Enter the correct time in hours, minutes and press YES.
Press CLR to return to standby mode.
Note! The time is by default presented in the 12-hour format. If you
prefer the 24-hour format, you can change the default setting.
For more information, see chapter “Other Useful Features”.
Setting the Ring Signal Level
Press the navigation key to the RIGHT.
The text Ring level and a bar representing the
ring signal level appears in the display.
Press YES to enter the Ring level menu.
Use the navigation key to set the ring signal level.
• Pressing RIGHT increases the volume.
•
Pressing LEFT decreases the volume.
The phone will ring once with the actual setting as you
press the navigation key, except for the Silent and
Step settings.
Press YES to save the setting.
Press CLR to return to standby mode.
Tip! Use the side keys to change the ring level silently.
Note! If you have your CF888 connected to external equipment
(e.g. handsfree equipment or a vibrating accessory) the ring
signal level will be set for this situation separately. See chapter
“Other Useful Features” for more information.
8
Some features/menus are operator dependent

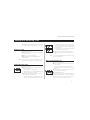
Making and Receiving Calls
The instructions in this chapter assume that you have turned
on your phone and that you are within range of a network.
Emergency Calls
To make an emergency call:
If the phone is not on, turn it on by pressing the NO key
until you hear a click.
Enter 911 (or 112, where applicable).
Press YES. The display shows Attempting
Emergency.
Note! Some operators may require that a SIM card has been in-
serted into the phone and that you have a valid subscription.
Making Domestic Calls
To make a domestic call:
Enter the area code and phone number. The digits are
shown in the display.
•
If you need to erase a digit, press CLR.
•
To erase all digits, press and hold the CLR key until all
digits have been erased or press NO.
Press YES to make the call. The display shows Call
-
ing, followed by Connecting.
•
When the call is answered, a call time meter in the dis
-
play shows the elapsed time in minutes and seconds.
•
If nobody answers your call or you cannot get through,
press
NO. The number is stored in a memory which
makes it easy to repeat the call (see “Redialing the Last
Number” below).
•
If the number is busy, it can be redialed automatically
(see “Redialing a Number” below).
When you want to end the call, press NO. The Call
Time meter shows the duration of the call for three sec
-
onds.
Tip! It is possible to check the duration of the call later. See chap-
ter “Other Useful Features”.
Making International Calls
To make an international call:
Press and hold the 0 key until the international charac-
ter + is displayed.
The + will automatically be replaced by the interna
-
tional dialing prefix for the country from which you are
calling.
Enter the country code, the area code (without the lead
-
ing zero) and the phone number.
Press YES to make the call.
Note! When you are roaming, your phone will automatically search
for a network. Which networks you can use depends on the
agreements your operator has signed with the operators in
the area you are visiting. See chapter “Networks”.
9
Some features/menus are operator dependent

Note! Some operators may not support international dialing prefix
(+). You may be required to enter a specific code (ex: 011 for
USA).
Receiving a Call
When you receive a call, the phone rings and the indicator
light on top of the phone rapidly blinks green. The display
shows Answer?.
If your subscription includes the service Calling Line Identifi
-
cation and the caller’s network sends the number, you will see
the caller’s number on the bottom row of the display. If the
number is stored together with a name in the phone book,
the name will be shown in the display.
Note! The phone must be turned on and within coverage of a net-
work before a call can be received.
The active flip can be temporarily disabled by pressing and
holding the side volume key while opening/closing the flip.
To Answer the Call
Open flip. If already open, press YES.
When the call is finished, press NO, or close flip.
To Reject the Call
There are two ways of rejecting the call:
•
Press the NO key.
•
Press the volume key on the side of the phone twice.
The caller will hear a busy tone if the caller’s network sup
-
ports this function.
If you press NO in Analog mode, the ringer will be muted,
and the phone will return to standby.
Redialing a Number
Your CF888 has a function that conveniently lets you redial
the last 15 phone numbers you have called. It can also redial a
number automatically if the connection failed when you first
called. This may vary depending on your SIM.
To Redial Previously Called Numbers
Press YES. The display now shows Call? together
with the last dialed number.
Press the navigation key to the RIGHT or LEFT until the
number you want to call is shown on the bottom row of
the display.
Press YES to make the call.
Note! Should you want to clear the last dialed numbers memory, do
the following:
Press the navigation key to the LEFT. The Phone
book menu appears.
Press YES to enter the Phone book menu.
Press the navigation key to the LEFT. The Dialed
numbers function appears.
Press YES to select the Dialed numbers func
-
tion.
Press and hold the CLR key. The question Erase
all? appears.
Press YES to erase the last dialed numbers from the
memory.
Press CLR to return to standby mode.
10
Some features/menus are operator dependent

The Automatic Redialing Function
If the connection fails, the display shows Retry? on the
top row and the reason for the failure on the second row.
To automatically redial the number:
l Press
YES.
•
The number will automatically be redialed until the call
is answered, or 10 times at the most.
•
If you press any key or you receive a call, the redialing
is interrupted.
•
If the redialing is successful, the phone beeps and then
you hear a ring signal.
l Press
NO if you do not want to retry.
Calling Someone Who Has Called You
If you subscribe to the service Calling Line Identification,
and the caller’s network sends the number, the numbers of
the last ten answered calls are stored in the phone.
To recall one of the last answered numbers:
Press the navigation key to the LEFT. The Phone
book menu appears.
Press YES to enter the Phone book menu.
Press the navigation key LEFT repeatedly until the An
-
swered calls function appears.
Press YES to select the Answered calls func
-
tion.
Press the navigation key repeatedly until the required
number is displayed.
Press YES to make the call.
Unanswered Calls
If you have received calls but have been unable to answer, the
number of unanswered calls will be shown in the display until
you press the CLR key.
Information about the ten last missed calls will be saved in
your phone’s memory, which makes it possible for you to
check when the calls were received. If your subscription in
-
cludes the service Calling Line Identification and the caller’s
network sends the number, you can also find out who called.
Finding Out Who Called and When
Press the navigation key to the LEFT repeatedly until the
Mail menu appears.
Press YES to enter the Mail menu.
Press the navigation key repeatedly until the Missed
calls function appears.
Press YES to enter the Missed calls function.
The last caller’s number (if your subscription includes
the Calling Line Identification service) is now shown in
the display together with the time (or date) when the
call was received. If no information about the caller’s
number was received, the display will show one of the
following:
•
Unidentified, which means that no informa
-
tion was available.
•
Restricted, which means that the caller wanted
to withhold the number.
11
Some features/menus are operator dependent

To see the other unanswered calls, press the navigation
key repeatedly.
Press CLR to return to standby mode.
Note! If you check a missed call within 24 hours, the time of the call
will be displayed. Otherwise, the time is replaced by the date.
You can toggle between date and time by pressing *.
To Erase a Number from the Missed Calls
Memory
When the information about the call is shown, press
CLR.
Press YES.
Hiding or Showing Your Number
For most common subscriptions, the caller’s number will be
sent when a call is made. This means that the receiver can see
your phone number when you make a call. However, some
operators offer subscriptions where your phone number is
normally hidden.
You can alter the normal setting (according to your subscrip
-
tion) for a particular call.
Hiding Your Phone Number for a Particular
Call:
Enter the phone number you wish to call.
Press the navigation key to the RIGHT.
The Special functions menu now appears.
Press YES to enter the Special functions
menu.
Press the navigation key repeatedly until Hide Id
appears.
Press YES to make the call.
Showing Your Number for a Particular Call
Enter the phone number you wish to call.
Press the navigation key to the RIGHT.
The Special functions menu now appears.
Press YES to enter the Special functions
menu.
Press the navigation key repeatedly until Send Id
appears.
Press YES to make the call.
Some features are not available in your Analog subscription.
12
Some features/menus are operator dependent

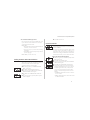
During a Call
When you are engaged in a call, there are several functions in
your CF888 to help you perform actions you might need dur
-
ing the conversation.
Changing the Earpiece Volume
If you want to change the earpiece volume during a call:
l Press the volume key on the side of the phone up or
down.
• Pressing UP increases the volume.
• Pressing DOWN decreases the volume.
Muting the Microphone
To temporarily mute the microphone during a call:
Press and hold the CLR key. Mute is shown in the dis-
play.
To resume conversation, release the CLR key.
Using the Display as a Scratch Pad
If you, during a call, need to write down a phone number, you
can use the Scratch Pad function in the CF888. To do this:
l Enter the number using the numeric keys.
When you end the call, the number remains in the display.
You can now call the number by pressing
YES or save it in the
Phone Book (see chapter “The Phone Book”).
Sending Tone Signals
In order to, for example, perform banking by phone or con
-
trol a phone answering machine, you need to use codes.
These codes are sent as tone signals (also called DTMF
tones).
To send tone signals/codes during a call:
l Press the appropriate keys (1-9, * and #).
Sending DTMF tones in standby mode:
When dialing a number with pause(s) in standby mode, the
first part of the number is sent as a telephone number. Any
numbers after the p are sent as DTMF. A 3-second pause is
generated for each p sign, but the 3-second timer can be
forced by pressing SEND.
In Analog mode, the digits between pauses are sent as DTMF
when YES is pressed. If LONG YES is pressed, the digits
between pauses are hookflashed.
Note! A p (pause) is sent by holding down a * key.
13
Some features/menus are operator dependent

Sending DTMF Tones While on a Call:
Digits entered during an active call are automatically sent as
DTMF. If YES is pressed, the call will be set-up to the
number entered.
This applies to both AMPS and GSM modes.
Sending Digits from Your Phone Book While
on a Call
While on a call, you can recall a phone book entry. A second
call can be placed by pressing and holding the YES key.
In analog mode, press
YES to send digits (before pauses) as
DTMF.
Tip! You can also enter the code before you make the call or store
it in the Phone Book. See Creating Your Personal Phone Book in
the “Phone Book” chapter on how to do this.
14
Some features/menus are operator dependent

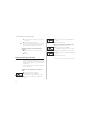
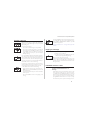
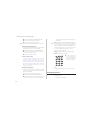
The Menu System
The menu sys tem of your CF888 al lows you to con trol the
phone’s func tions and to cus tom ize it to suit your per sonal
pref er ences.
Each menu is a list of op tions you can choose from. Some of
the op tions con tain sub menus with ad di tional op tions. As a
help for find ing your way among the menus, we rec om mend
that you use the fold- out on the in side of the cover.
Navigating the Menu System
The menus are ar ranged in a con tinu ous loop (see the fold-
out), which you move through with the YES, NO,
NAVIGATION and CLR keys.
Press…..to…
Move clock wise or coun ter clock wise.
Se lect a menu or func tion.
Back up one level and/or leave a set ting un changed.
Go back to the standby menu.
To se lect a menu or make a set ting:
ΠPress the navi ga tion key to the LEFT or RIGHT un til you
reach the de sired menu or func tion.
• Press YES to en ter the menu or to se lect the func tion.
Ž Press the navi ga tion key to find the de sired sub menu or
to se lect a set ting al ter na tive.
• Press YES to en ter the sub menu or to con firm the set -
ting.
Note! If you have en tered the menu sys tem, but have not pressed
any key for 60 sec onds, the phone will re turn to the standby
dis play.
Tip! In stead of press ing the navi ga tion key re peat edly you can
press and hold it down un til you reach the de sired menu or
sub menu.
Display Text and Symbols
When you navi gate the menu sys tem, there are some in di ca -
tions in the dis play:
• Up percase let ters are used to in di cate the menu or func -
tion se lected.
• When ~ and • are dis played, there are more op tions you
can scroll through with the navi ga tion key.
• Text within brack ets in di cates the cur rent set ting for the
dis played func tion.
15
Some fea tures/menus are op era tor dependent
SETTINGS
Ear volume
( )
La pagina si sta caricando...
La pagina si sta caricando...
La pagina si sta caricando...
La pagina si sta caricando...
La pagina si sta caricando...
La pagina si sta caricando...
La pagina si sta caricando...
La pagina si sta caricando...
La pagina si sta caricando...
La pagina si sta caricando...
La pagina si sta caricando...
La pagina si sta caricando...
La pagina si sta caricando...
La pagina si sta caricando...
La pagina si sta caricando...
La pagina si sta caricando...
La pagina si sta caricando...
La pagina si sta caricando...
La pagina si sta caricando...
La pagina si sta caricando...
La pagina si sta caricando...
La pagina si sta caricando...
La pagina si sta caricando...
La pagina si sta caricando...
La pagina si sta caricando...
La pagina si sta caricando...
La pagina si sta caricando...
La pagina si sta caricando...
La pagina si sta caricando...
La pagina si sta caricando...
La pagina si sta caricando...
La pagina si sta caricando...
La pagina si sta caricando...
La pagina si sta caricando...
La pagina si sta caricando...
La pagina si sta caricando...
La pagina si sta caricando...
La pagina si sta caricando...
La pagina si sta caricando...
La pagina si sta caricando...
La pagina si sta caricando...
La pagina si sta caricando...
La pagina si sta caricando...
La pagina si sta caricando...
La pagina si sta caricando...
La pagina si sta caricando...
La pagina si sta caricando...
La pagina si sta caricando...
La pagina si sta caricando...
La pagina si sta caricando...
La pagina si sta caricando...
La pagina si sta caricando...
La pagina si sta caricando...
La pagina si sta caricando...
La pagina si sta caricando...
-
 1
1
-
 2
2
-
 3
3
-
 4
4
-
 5
5
-
 6
6
-
 7
7
-
 8
8
-
 9
9
-
 10
10
-
 11
11
-
 12
12
-
 13
13
-
 14
14
-
 15
15
-
 16
16
-
 17
17
-
 18
18
-
 19
19
-
 20
20
-
 21
21
-
 22
22
-
 23
23
-
 24
24
-
 25
25
-
 26
26
-
 27
27
-
 28
28
-
 29
29
-
 30
30
-
 31
31
-
 32
32
-
 33
33
-
 34
34
-
 35
35
-
 36
36
-
 37
37
-
 38
38
-
 39
39
-
 40
40
-
 41
41
-
 42
42
-
 43
43
-
 44
44
-
 45
45
-
 46
46
-
 47
47
-
 48
48
-
 49
49
-
 50
50
-
 51
51
-
 52
52
-
 53
53
-
 54
54
-
 55
55
-
 56
56
-
 57
57
-
 58
58
-
 59
59
-
 60
60
-
 61
61
-
 62
62
-
 63
63
-
 64
64
-
 65
65
-
 66
66
-
 67
67
-
 68
68
-
 69
69
-
 70
70
-
 71
71
-
 72
72
-
 73
73
-
 74
74
-
 75
75


