
The 642 LCD Keypad includes a programmable 32-character LCD screen, keypad zone, and supports the Paradox Memory Key.Allofthe
LCD keypad’s features and options can only be accessed through the keypad’s programming mode.
This option allows you to program some of the messages that appear on the keypad’s LCD screen. After entering Keypad Programming Mode,
select option
[1]
. Enter the three-digit section that corresponds to the message you wish to change.
[101] to [124] = Zone 1 to Zone 24
[125] =PartitionA
[126] =PartitionB
[127] = Partition A & B
[201] to [208] = Notes
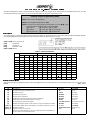
Table 1: Character Reference
After entering Keypad Programming Mode, select option [2]. Press the corresponding keys until all desired options are set, and then press
[ENTER].
Entering Keypad Programming Mode
STEP 1: Press and hold the [ENTER] key.
.
STEP 2: Enter the [KEYPAD CODE]. Default: 0000
STEP 3:
Press the key corresponding to the desired option or use the
[ ][ ]
keys
to scroll through the available options and press
[ENTER].
[
1] = Labels [4] = Read Key [7] =SetDay
[
2] = Options [5] =WriteKey [8] = Set Language
[
3] = Keypad Code [6] =SetTime [9] = Keypad Lock
Key [UC] Mode [LC] Mode [SP] Mode
X1 X2 X3 X4 X1 X2 X3 X4 X1 X2 X3 X4
[1] ABC1abc-ÛÙÚÜ
[2] DEF2def&ûùúÔ
[3] GHI3ghi *ÒÓo
ô
[4] JKL4jkl(òóö¿
[5] MNO5mno)ÊÈÉË
[6] PQR6pqr[êèéë
[7] STU7stu]ÅÄåâ
[8] VWX8vwx>àáäA
[9] space Y Z 9 space y z < a ÎÌÍ
[0] @!=0‘ {}0ï iÑñ
Key Description OFF ON
[1] Keypad Zone
Disabled Enabled
[2] Keypad Zone Requires 1kΩ EOL Resistor
No Yes
[3] Keypad Zone Set to
Zone A Zone B
[4] Keypad Zone Supervision
Disabled Enabled
[5] Keypad Tamper Supervision
Disabled Enabled
[6] Partitioning (Enable this option if the system is partitioned)
Disabled Enabled
[7] Master/Slave (See “Slave/Master Option” on page 2)
Master Slave
[8] Arming Display for systems that support
Less than 12 zones More than 12 zones
[9] Multiple Zone Display (status of several zones on one screen without zone label)
Disabled Enabled
[Arm] = A Scrolling Zone Display (each screen displays zone label and status of one zone)
Disabled Enabled
[Stay] = B Keypad Clock Mode
Refreshed by Panel Stand alone
[Force] = C DisplayACstatusonLCDscreen
Note: It is recommended that you turn on the option(No) for the 748/748ES pan-
els since they do not support this function.
Yes No
Bold = Default

Slave/Master Option
Only activate this option with panels featuring more than 12 zones. Only one LCD keypad can be master and all other LCD keypads
are slaves. All slave keypads (LCD and LED) must be used in “mute” mode.
Use this option to change the Keypad Code (default: 0000). After entering Keypad Programming Mode, select option [3]. Enter the new four-
digit keypad code. During the keypad’s power up, the display reads:
To set the keypad
codetodefault,pressandholdthe
[ENTER] key.Withoutreleasingthe[ENTER] key,press andholdthe[CLEAR] key.Holdbothkeysuntilthe display
shows the system status.
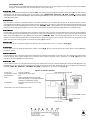
Use this option to copy the programmed options and labels (messages) from a Paradox Memory Key to the keypad’s memory. Insert a
programmed Paradox Memory Key into the keypad connector labelled “key” (see Figure 1). After entering Keypad Programming Mode, select
option [4]
and then press the [ENTER] key. The display reads: . The keypad will copy the contents from the key into keypad
memory. This may take approximately 15 seconds. Once the information has been copied, the keypad will emit a confirmation beep.
Use this option to copy the programmed options and labels (messages) from a keypad to a Paradox Memory Key. Insert the Paradox Memory
Key into the keypad connector labelled “key” (see Figure 1). Make sure the Memory Key’s jumper is on. After entering Keypad Programming
Mode, select option [5] and then press
[ENTER]. The display will read: . This may take approximately 15 seconds. When the
process is complete, the keypad will emit a confirmation beep. Program one keypad, copy its contents to the memory key as explained in this
option, then program as many keypads as required using option [4] (see above).
Use this option to set or change the keypad time. Enter the time using the 24-hour clock (i.e. 4:05pm = [1] [6] [0] [5]).
Use this option to set or change the keypad day of week. Use the [ ][ ] keys to scroll through the days of the week. Press the [ENTER] key
to save the change.
Use this option to set or change the language the keypadwilluse to display allmessages on the LCD screen. The keypad has eight languages
stored in memory. These include: English, French, Spanish, Italian, Polish, Portuguese, Czech, and Slovak. Use the [
][ ] keys to scroll
through the list. Press
[ENTER] to save the selection.
Use this option to prevent your keypad code from being set to default in the event of a system shutdown.After selecting option[9], press keys:
[1], [4], [7] to lock your code. Once the keypad code is locked the system will not reset to the default code and the keypad will not display the
message:
during power up. To unlock, press [0], [0], [0].
Figure 1: Connection Overview
Power Input: Typically 11-16Vdc
Current Consumption: Typically 40mA, Max. 55mA
Tamper Switch: Yes
LCD: Super Twisted Nematic Display (STN),
wide viewing angle, 2 lines of 16 characters,
backlight, and adjustable contrast
Compatibility: All Esprit+ control panels (versions 3.0
onward)
Specifications may change without prior notice.
-
 1
1
-
 2
2


in altre lingue
- English: PARADOX Esprit+ 642
Altri documenti
-
Risco ProSYS 128 Manuale utente
-
-
-
ADEMCO Vista-20PCN Manuale utente
-
Pyronix Matrix 832 Guida d'installazione
-
-
Crow RUNNER 8/64 Guida d'installazione
-
Pyronix Matrix 832 Manuale utente
-
DSC PK5500 Guida d'installazione