
VS146 6-Port 3G/HD/SD-SDI Splitter Quick Start Guide VS146 Repartidor de 3G/HD/SD-SDI de 6 puertos Guía rápida
Répartiteur 3G/HD/SD-SDI à 6 ports VS146 – Guide de démarrage rapide Splitter a 6 porte 3G/HD/SD-SDI VS146 – Guida rapida
VS146 3G-/HD-/SD-SDI-Splitter mit 6 Ports Kurzanleitung Краткое руководство пользователя 6-портового 3G/HD/SD-SDI разветвителя VS146
www.aten.com www.aten.com
www.aten.com www.aten.com
www.aten.com www.aten.com
Package Contents
1 VS146 6-Port 3G/HD/SD-SDI Splitter
1 Power Adapter
1 User Instructions
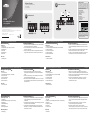
Hardware Review
A
Front View
1. SDI Input Port
2. SDI LED Status (orange: SD; green: 3G/HD)
3. SDI Output Port
4. Power LED
5. SDI Output Port
6. Power Jack
Rear View
1. SDI Output Port
Presentación del hardware
A
Vista frontal
1. Puerto de entrada SDI
2. Indicador LED de estado SDI (naranja: SD; verde: 3G/HD)
3. Puerto de salida SDI
4. Indicador de alimentación
5. Puerto de salida SDI
6. Entrada de alimentación
Vista posterior
1. Puerto de salida SDI
Hardware
A
Vista anteriore
1. Porta di ingresso SDI
2. LED di stato SDI (Arancione: SD; verde: 3G/HD)
3. Porta di uscita SDI
4. LED d’alimentazione
5. Porta di uscita SDI
6. Presa d’alimentazione
Vista posteriore
1. Porta di uscita SDI
Обзор оборудования
A
Вид спереди
1. Вход SDI
2. Индикатор состояния SDI (оранжевый: SD; зеленый: 3G/HD)
3. Выход SDI
4. Индикатор питания
5. Выход SDI
6. Гнездо питания
Вид сзади
1. Выход SDI
Description de l’appareil
A
Vue avant
1. Port d’entrée SDI
2. Voyant d’état SDI (orange: SD; vert: 3G/HD)
3. Port de sortie SDI
4. Voyant d’alimentation
5. Port de sortie SDI
6. Prise d’alimentation
Vue arrière
1. Port de sortie SDI
Hardwareübersicht
A
Vorderseitige Ansicht
1. SDI-Eingang
2. SDI-Zustandsanzeige (orange: SD; grün: 3G/HD)
3. SDI-Ausgang
4. LED-Betriebsanzeige
5. SDI-Ausgang
6. Stromeingangsbuchse
Rückseitige Ansicht
1. SDI-Ausgang
Hardware Installation
B
1. Use a Coaxial cable to connect the SDI monitor or other SDI display
devices to the SDI Output port on the VS146.
2. Use a Coaxial cable to connect the SDI source device to the SDI
Input port on the VS146.
3. Plug the provided power adapter into an appropriate power source;
plug the power adapter cable into the Power Jack on the VS146.
Instalar el hardware
B
1. Conecte el monitor SDI u otro dispositivo de visualización SDI al
puerto de salida SDI Output del VS146. Para ello, utilice un cable
coaxial.
2. Conecte el dispositivo fuente de señales SDI al puerto de entrada
SDI Input del VS146. Para ello, utilice un cable coaxial.
3. Conecte un extremo del adaptador de alimentación incluido a una
toma eléctrica y el otro extremo a la toma Power del VS146.
Installazione dell’hardware
B
1. Utilizzare un cavo coassiale per collegare il monitor SDI o altri
dispositivi di visualizzazione SDI alla porta di uscita SDI del VS146.
2. Utilizzare un cavo coassiale per collegare il dispositivo sorgente SDI
alla porta di ingresso SDI del VS146.
3. Inserire la spina dell’alimentatore in dotazione in una presa di
corrente, quindi inserire il cavo dell’alimentatore nella presa
d’alimentazione del VS146.
Установка оборудования
B
1. Используя коаксиальный кабель, подключите монитор SDI или
другое устройство отображения SDI к выходу SDI устройства
VS146.
2. Используя коаксиальный кабель, подключите устройство-
источник SDI к входу SDI устройства VS146.
3. Подключите идущий в комплекте адаптер питания к
соответствующему источнику питания, после чего подключите
кабель адаптера питания к гнезду питания устройства VS146.
Installation du matériel
B
1. Utilisez un câble coaxial pour relier l’écran SDI ou d’autres
périphériques d’afchage SDI au port de sortie SDI du répartiteur
VS146.
2. Utilisez un câble coaxial pour relier le périphérique source SDI au
port d’entrée SDI du répartiteur VS146.
3. Branchez une extrémité de l'adaptateur secteur fourni sur une prise
de courant adaptée, et l'autre extrémité sur la prise d'alimentation du
répartiteur VS146.
Hardware installieren
B
1. Verbinden Sie den SDI-Monitor oder ein anderes SDI-Anzeigegerät
mit dem SDI-Ausgang am VS146. Verwenden Sie dazu ein
Koaxialkabel.
2. Verbinden Sie die SDI-Signalquelle mit dem SDI-Eingang am VS146.
Verwenden Sie dazu ein Koaxialkabel.
3. Schließen Sie das mitgelieferte Netzteil an eine stromführende
Steckdose an, und verbinden Sie das Kabel des Netzteils mit der
Buchse Power am VS146.
A
Hardware Review
B
Hardware Installation
Important Notice
Considering environmental protection, ATEN
does not provide a fully printed user manual
for this product. If the information contained
in the Quick Start Guide is not enough for
you to configure and operate your product,
please visit our website www.aten.com, and
download the full user manual.
Online Registration
http://eservice.aten.com
Technical Phone Support
International:
886-2-86926959
North America:
1-888-999-ATEN Ext: 4988
United Kingdom:
44-8-4481-58923
All information, documentation, firmware,
software utilities, and specifications
contained in this package are subject to
change without prior notification by the
manufacturer. Please visit our website
http://www.aten.com/download/?cid=dds for
the most up-to-date versions.
The following contains information that relates
to China:
© Copyright 2014 ATEN
®
International Co., Ltd.
ATEN and the ATEN logo are trademarks of ATEN International Co., Ltd. All rights reserved. All
other trademarks are the property of their respective owners.
This product is RoHS compliant.
Part No. PAPE-1223-C70G Printing Date: 05/2014
6-Port 3G/HD/SD-SDI Splitter
Quick Start Guide
VS146
Front View Rear View
1 2 3 4 5 6
1
3
2
VS146 (Front View)
1
Blue-ray Player
x6
VS146 (Rear View)
La pagina si sta caricando...
-
 1
1
-
 2
2


in altre lingue
- English: ATEN VS146 Quick start guide
- français: ATEN VS146 Guide de démarrage rapide
- español: ATEN VS146 Guía de inicio rápido
- Deutsch: ATEN VS146 Schnellstartanleitung
- русский: ATEN VS146 Инструкция по началу работы
- português: ATEN VS146 Guia rápido
- 日本語: ATEN VS146 クイックスタートガイド