USER
MANUAL
DS-1000 EVO
DS-1000 EVO LINE
EN
IT


Thank you for purchasing one of our units
and welcome into the Gold Note world,
where we turn High-End audio and music
into a new experience.
Maurizio Aterini,
founder of Gold Note
EN
IT

|
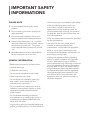
IMPORTANT SAFETY
| INFORMATIONS
the third prong are provided for your safety.
If the provided plug does not fit into
your outlet, consult an electrician for
replacement of the obsolete outlet. or
pinched particularly at plugs, convenience
receptacles, and the point where they exit
from the apparatus.
|Only use attachments/accessories specied
by the manufacturer.
|Use only with the cart, stand, tripod,
bracket, or table specied by the
manufacturer, or sold with the apparatus.
When a cart is used, use caution when
moving the cart/apparatus combination to
avoid injury from tip-over.
|Unplug this apparatus during lightning
storms or when unused for long periods
of time. Refer all servicing to qualied
service personnel only. Servicing is required
when the apparatus has been damaged in
any way (such as when the power cord or
plug is damaged, liquid has been spilled
or objects have fallen into the apparatus,
the apparatus has been exposed to rain
or moisture) and in any case when the
apparatus does not operate normally or
has been dropped.
PLEASE NOTE
1 Do not disassemble any part of the
product.
2 Do not use any part of the product for
other purposes.
3 For service and problems of any kind,
contact qualified Gold Note personnel.
4 Protect the product from rain, humidity
and keep away from heat sources, electric
and electronic motors etc. The power
cord supplied must be used only on this
unit.
5 Gold Note does not have responsibility
for any improper use of this unit.
GENERIC INFORMATION
|Read these instructions and store them.
|Heed all warnings.
|Follow the instructions.
|Do not use this apparatus near water.
|Clean only with a dry cloth.
|Do not block the ventilation openings
and install in accordance with the
manufacturer’s instructions.
|Do not install near heat sources such as
radiators, heat registers, stoves or other
apparatus (including ampliers) that
produce heat.
|Do not defeat the safety purpose of
the polarised or grounding-type plug: a
polarised plug hastwo blades with one
wider than the other.
|A grounding type plug has two blades and
a third grounding prong. The wide blade or

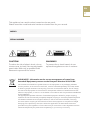
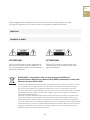
This appliance has a serial number located on the rear panel.
Please record the model and serial number and retain them for your records.
MODEL
SERIAL NUMBER
CAUTION!
To reduce the risk of electric shock, do not
remove cover (or back). No user-serviceable
parts inside. Refer only to qualified Gold
Note service personnel for service.
WARNING!
To prevent fire or shock hazard, do not
expose this appliance to rain or moisture.
GOLD NOTE - Information on the correct management of waste from
household Equipment pursuant to the European Directive 2012/19/EU
The crossed-out wheelie bin symbol shown on the equipment or its packaging indicates
that the product, at the end of its useful life, must be collected separately from other waste
to allow its proper treatment and recycling. The user must therefore deliver, free of charge,
the end-of-life equipment to the centres for the separate collection of waste electrical and
electronic equipment, or return it to the dealer in accordance with the procedures established
by the legislation.
The appropriate separate collection of discarded equipment allows for proper recycling,
treatment and environmentally compatible disposal, helping to avoid the possible dispersion
of hazardous substances and negative effects on the environment and health, favouring
the reuse and/or recycling of the materials of which the equipment is composed of. Illegal
dumping of the product by the user involves the application of administrative sanction
provided for by the legislation in force. We invite you consult the current legislation and the
measures adopted by the public service operating in your country or territory.
EN
IT


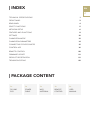
| INDEX
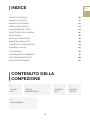
| PACKAGE CONTENT
TECHNICAL SPECIFICATIONS 1
FRONT PANEL 3
REAR PANEL 4
SELECT FUNCTIONS 5
NETWORK SETUP 6
FEATURES AND FUNCTIONS 8
SETTINGS 10
CHAMELEON MODE 12
CHAMELEON PARAMETERS 14
CONNECTING OTHER SOURCES 15
CONTROL APP 16
REMOTE CONTROL 20
FIRMWARE UPDATE 21
PRODUCT REGISTRATION 21
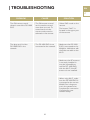
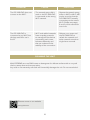
TROUBLESHOOTING 22
1x
DS-1000
EVO
1x
POWER
CABLE
1x
WI-FI
ANTENNA
1x
REMOTE
CONTROL
1x
USER
MANUAL
EN
IT

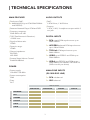
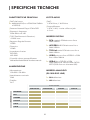
RESOLUTION
PCM 24/192 PCM 32/384 DSD256 DSD512
NETWORK
RCA
AES/EBU
TOS-Link
USB-A
USB-B
1
MAIN FEATURES
|Dual mono DAC:
AKM AK4493 (up to PCM 32bit/768kHz
and DSD512)
|Streamer Network Player PCM and DSD
|Frequency response:
20Hz-20kHz ±0.1dB
|THD (Total Harmonic Distortion):
0.001% max
|Signal to Noise ratio:
125dB
|Dynamic range:
120dB
|Output impedance:
RCA 50Ω
XLR 100Ω
|Preamp Stage Volume Control:
Enabled/disabled
POWER
|Power supply:
100-240V / 50-60Hz
|Power consumption:
30W
|Fuse:
2A T
AUDIO OUTPUTS
|DAC:
1 RCA 2Vrms, 1 XLR 2Vrms
|Preamp:
1 RCA, 1 XLR, 1 headphone output with 6.3
mm jack
DIGITAL INPUTS
RCA coaxial PCM asynchronous up to
24bit/192kHz
AES/EBU balanced PCM asynchronous
up to 24bit/192kHz
TOS-Link PCM asynchronous up to
24bit/192kHz
USB-B up to DSD512 and PCM up to
32bit/384kHz
USB-A port DSD256 and PCM up to
32bit/384kHz, formatted in FAT32/NTFS
(32Gb max for pen drives)
ANALOGUE INPUTS
(DS-1000 EVO LINE)
RCA unbalanced
XLR balanced
| TECHNICAL SPECIFICATIONS
INPUT
1x
1x
1x
1x
1x
2x
2x
1x

2
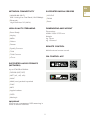
NETWORK CONNECTIVITY
|LAN/WLAN (Wi-Fi):
802.11a/b/g/n/ac Dual Band (10/433Mbps)
|Bluetooth:
High-Definition 5.0 (44/16)
HIGH QUALITY STREAMING
|Roon Ready
|Airplay
|MQA
|Qobuz
|Deezer
|Spotify Connect
|Tidal
|Tidal Connect
|vTuner
SUPPORTED AUDIO FORMATS
(NETWORK)
Up to PCM 32bit/384kHz
|DSD256 (DSF, DFF)
|AIFF (.aif, .aiff, .aifc)
|ALAC
|WAV (.wav) packed/unpacked
|FLAC
|MP3
|Apple Lossless
|OGG
|Monkey’s
IMPORTANT
UPnP server must support DSD streaming in
order to stream DSD files.
SUPPORTED MEDIA SERVERS
|All UPnP
|DLNA
|Roon
DIMENSIONS AND WEIGHT
Dimensions:
430W | 135H | 375D mm
Weight:
kg. 10 net
kg. 15 boxed
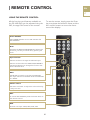
REMOTE CONTROL
Multifunctional remote control
GN CONTROL APP
EN
IT

3
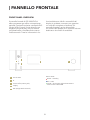
FRONT PANEL OVERVIEW
The front panel of the DS-1000 EVO has
been designed for ease of use and everyday
reliability. Everything revolves around the
interface with two key elements - the large
display and the SKC (Single Knob Control).
These provide you with intuitive controls
so that you can check the DS-1000 EVO
settings at glance and adjust parameters
either using the knob, the remote or our
App. On the front panel you’ll also find
the headphone output, which features a
dedicated volume control and two levels of
output sensitivity.
| FRONT PANEL
Headphone output (6.3mm jack)
LED status light:
Red = standby
Blue = ON
Green = powered by the external power
supply PSU-1250/1000
Display
IR
LED status light
SKC (Single Knob Control)
2
1
3
5
4
1
2
3
54

4
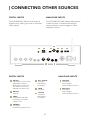
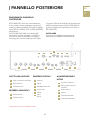
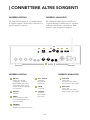
REAR PANEL OVERVIEW
The DS-1000 EVO features a wide selection
of high-quality connections to provide
maximum versatility. The digital inputs
include USB-A and USB-B, TOS, COAX, AES/
EBU, and Ethernet.
On the DS-1000 EVO LINE are also available
one XLR and one RCA connectors as analog
inputs to connect a source such as the PH-
1000.
| REAR PANEL
POWER AND OTHERS
IEC socket
16
Master switch ON/OFF
17
PSU IN
15
Wi-Fi Antenna
14
USB-C (firmware updates)
8
17
GN Link connector
6
ANALOGUE LINE
OUTPUT
Tube (dedicated connector)
XLR balanced
RCA unbalanced
1
2
3
XLR balanced 1
4
ANALOGUE LINE
INPUT
RCA unbalanced 1
5
1 43
9
10
11 12 13 14
2 5
6 7
8
1615
The PSU IN input is dedicated to the external
power supply PSU-1250/1000 to enhance
the performance of your DS-1000 EVO.
PLEASE NOTE
The antenna is packed separately, please
ensure to install it correctly.
DIGITAL INPUT
Ethernet
7
USB-A
9
AES/EBU balanced
10
RCA COAX
11
USB-B
12
TOS 1
TOS 2
13
1 Available only on DS-1000 EVO LINE
EN
IT

5
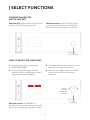
TURNING ON AND OFF
THE DS-1000 EVO
With the SKC: press and hold the knob for 1
second, the LED will change status.
With the remote: press the Power button
once while pointing at the DS-1000 EVO,
don’t hold down the button for too long.
HOW TO SELECT THE FUNCTIONS
1 Press the knob once to activate the
SELECTION FRAME.
2 Turn the knob left or right until the
desired function is highlighted in white
then press the knob to select it.
| SELECT FUNCTIONS
3 The frame will turn red: now you can turn
the knob to change the function.
4 Press the knob again when the desired
value is set to confirm and exit the
selection.
Single push
Turn left
or right to
highlight the
selection
1 second push
With the remote: The ENTER key
corresponds to pressing the knob, while the
IN+/- keys correspond to right/left rotation.

6
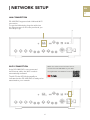
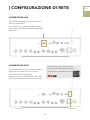
| NETWORK SETUP
LAN CONNECTION
DS-1000 EVO supports both LAN and Wi-Fi
connection.
To use the LAN simply plug the cable into
the Ethernet port on the rear panel and you
are ready to go.
WI-FI CONNECTION
If the DS-1000 EVO is not connected
via Ethernet cable, the Wi-Fi mode is
automatically activated.
The Wi-Fi blue LED blinks steadily to
indicate that the DS-1000 EVO is ready to be
associated to your network.
EN
IT
Watch the video tutorial to learn how to
connect the DS-1000 EVO to your WiFi.
www.goldnote.it/is-1000-wifi-tutorial

7
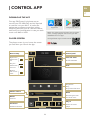
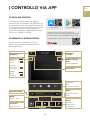
WI-FI CONNECTION
1 Turn ON the Wi-Fi on your mobile device
and find Gold-Note_XXXX.
2 Connect to Gold-Note_XXXX using
“password” as the password.
3 Launch GN Control and go to DEVICE
SETUP > DS-1000 S/N: XXXX > Wi-Fi
Network Selection.
Turn ON the Wi-Fi and connect
to Gold-Note_XXXX.
Launch GN Control and go to
DEVICE SETUP > DS-1000 S/N:
XXXX > Wi-Fi Network Selection.
Select the Wi-Fi you want the DS-
1000 EVO to connect to.
4 Here are listed the Wi-Fi networks
available, select the one you want the
DS-1000 EVO to connect to.
5 The DS-1000 EVO is now connected to
the selected Wi-Fi network.
6 Connect your mobile device to the same
network used by DS-1000 EVO.

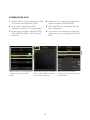
PRE
OFF
PCM 192 kHz
LINE OUT
PRE/DAC mode
PRE: variable output (preamp stage is active)
DAC: fixed output (preamp stage is bypassed)
Streaming information
File format (DSD/PCM)
File resolution
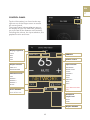
8
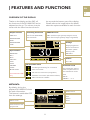
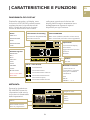
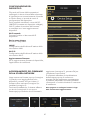
OVERVIEW OF THE DISPLAY
Thanks to the display and the SKC, all
the functions of the DS-1000 EVO can be
adjusted on the go. The volume is at the
center with the other functions found in
| FEATURES AND FUNCTIONS
Settings
Display brightness
Device information
Firmware update
Factory reset
Metadata
Input selection
NETWORK
XLR *
RCA *
USB DAC
TOS 1
TOS 2
AES/EBU
COAX
BLUETOOTH
*DS-1000 EVO LINE
only
Volume
0 to 100
Track total time and
progress bar
Album cover
Audio source
Title
Album
Artist
Chameleon mode
The presets are used to
store the parameters of
the Chameleon mode.
OFF
SETUP
PRESET 1 - 2 - 3
the top and the bottom part of the display.
Please refer to the image below for details
about the options available for each function.
Wi-Fi network status
Wi-Fi connected
No internet connection (using Wi-Fi)
P2P Wi-Fi connection (see section above)
WPS connection enabled
Initialising and waiting for connection
Output selection
LINE OUT
HEADPHONES
HIGH
HEADPHONES
LOW
METADATA
By default, during the
playback DS-1000 EVO shows
the track information.
This feature is switchable OFF
from the settings.
EN
IT

9
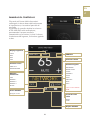
USING THE DS-1000 EVO
OUTPUT SELECTION
The DS-1000 EVO has two audio outputs:
|LINE OUT
|HEADPHONES (HIGH/LOW)
Each output features a dedicated preamp
stage and you can send audio to both
outputs at the same time while adjusting the
volume for each independently.
For example, you can play music on LINE
OUT at a volume of 55 and at the same time
on HEADPHONES at a volume of 42.
Plug in your headphones and the DS-1000
EVO will automatically select HEADPHONES
as the output and mute LINE OUT. Select
LINE OUT to send audio to the RCA and XLR
outputs while the headphones are plugged
in.
To adjust the volume of an output, select it
from the menu first and then use the remote
or the SKC to change the volume. If you are
playing audio from both outputs and want
to mute one, select it first and then put it on
MUTE.
HEADPHONE OUTPUT LEVEL
When using the headphone output, you can
adjust the output level to match it to your
headphones’ requirements. We suggest to
select HIGH if you are using low-sensitivity
headphones, and LOW for high-sensitivity
headphones.
SETTING OUTPUT
LOW 1W
HIGH 5W
HEADPHONE TYPE
High-sensitivity
Low-sensitivity
PRE AND DAC MODE
The DS-1000 EVO can operate in two
modes:
|PRE
|DAC
When used in PRE mode, the preamp stage
is active and you can adjust the volume using
the remote, the SKC or the app GN Control.
In DAC mode, the DS-1000 EVO deactivates
the volume control so the signal is at the
fixed output of the source and you will need
an external preamp stage to adjust it.
When you select the DAC mode, a warning
message will show as a safety measure,
confirming the selection to proceed. Be
always careful to avoid damages to your
loudspeakers and system when switching to
the DAC mode.
BLUETOOTH CONNECTION
Select BLUETOOTH as the input to activate
the Bluetooth connection. The streamer will
appear as “Gold Note” or “DS Gold Note”.
To turn off the Bluetooth, simply change the
active input.
AUDIO FORMAT AND INFO
The file format and resolution of the audio
stream are displayed in real-time, including
additional info such as when you are playing
MQA files (the MQA icon shows at the top).
MUTE CONTROL
To mute or un-mute the audio input, press
twice the SKC.

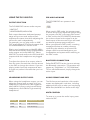
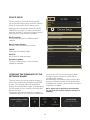
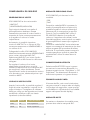
Select the gear icon and press the SKC
once to access the settings. Turn the SKC to
browse the settings, press it once to adjust
the highlighted setting.
To exit the menu, select BACK and press the
SKC once.
DISPLAY
Rotate the SKC until the DISPLAY setting
is highlighted, then press the SKC once to
select it.
Rotate the SKC to choose the desired
brightness, then press it once to confirm.
The brightness can be set to:
|100%
|50%
|25%
|OFF
When the display is set to OFF, use the SKC
or press a button on the remote to activate it
again for 3 seconds.
DEVICE INFORMATION
Press the SKC once to view the device
information, such as:
|Model
|Serial number (S/N)
|Firmware version (FW VERSION)
|IP address (IP, only when the DS-1000 EVO
is connected to the network).
FACTORY RESET
Select OK to reset the unit or CANCEL to
exit the menu.
The unit goes on standby after each reset.
| SETTINGS
MODEL:
FW VERSION:
S/N:
IP:
DEVICE INFO
DS-10 EVO
BACK
OK CANCEL
Normal
Highlighted
DISPLAY 100%
DISPLAY 100%
DISPLAY 100%
Selected
10
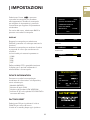
METADATA COVER
FACTORY RESET
FIRMWARE UPDATE
DISPLAY 100%
BACK
DEVICE INFORMATION
EN
IT

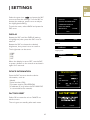
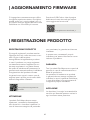
FIRMWARE UPDATE
The unit can be updated OTA (Over The
Air) over the Internet. Launch the firmware
update to check for new releases, if there are
no updates available the unit will display the
message beside.
In case a new update is available, select OK
to download and wait while the update is in
progress. The unit will display a message of
success when the update is completed.
If the unit cannot complete the update, it will
display an error message. Please check the
Internet connection and try again.
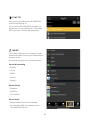
METADATA
By default, the DS-1000 EVO shows
metadata about tracks. To change the type
of metadata displayed, select the gear icon
then METADATA and choose the
desired setting, then press once to confirm.
The metadata can be set to:
|TEXT: shows source, title, album, artist and
track duration.
|COVER: adds the album cover to the TEXT
mode.
|OFF
11
Text
Cover

PRE
SETUP
PCM 192 kHz
LINE OUT
PRE
OFF
PCM 192 kHz
LINE OUT
12
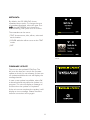
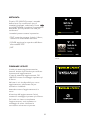
OFF
DS-1000 EVO is in standard mode, the
Chameleon mode is OFF.
Setup
Press the knob or the Enter key on the remote to
access the Chameleon mode menu.
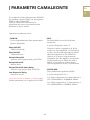
THE CHAMELEON DAC
The Chameleon mode is a special feature
designed to let you fine-tune the behaviour
of the DAC. Acting on three parameters,
you can test 48 different setups, adapting
the DS-1000 EVO to your music and
stereo system with the highest degree
of customisation. These parameters are
Equalisation Curve, De-emphasis Curve and
DSD filter - and your choices are stored into
the memory of the DS-1000 EVO using the
presets.
ACCESS THE PRESET MENU
Use the SKC to select the Chameleon Mode,
then press it once.
Select SETUP to adjust the Chameleon
parameters for each preset.
| CHAMELEON MODE EN
IT

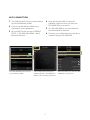
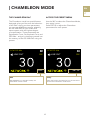
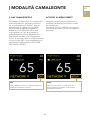
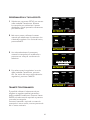
CUSTOMISE YOUR LISTENING
1 Enter the Chameleon mode by selecting
SETUP, turn the knob to highlight the
desired preset then press the knob once
to select it.
2 In the preset menu, use the same method
to select the parameter you wish to
adjust. To exit the menu, press BACK.
3 Once the parameter is selected, turn the
SKC to change it and then press once to
confirm the selection.
4 To save all the adjustments and exit the
Chameleon mode, press OK. To exit the
menu without saving the adjustments,
press CANCEL.
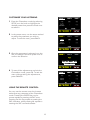
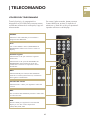
USING THE REMOTE CONTROL
You can use the remote control to browse
and adjust any parameter of the Chameleon
mode. Pressing the ENTER key on the
remote equals to pressing the SKC once.
Pressing the IN+ key equals to rotating the
SKC clockwise, while pressing IN- equals to
rotating the SKC counterclockwise.
13
La pagina si sta caricando...
La pagina si sta caricando...
La pagina si sta caricando...
La pagina si sta caricando...
La pagina si sta caricando...
La pagina si sta caricando...
La pagina si sta caricando...
La pagina si sta caricando...
La pagina si sta caricando...
La pagina si sta caricando...
La pagina si sta caricando...
La pagina si sta caricando...
La pagina si sta caricando...
La pagina si sta caricando...
La pagina si sta caricando...
La pagina si sta caricando...
La pagina si sta caricando...
La pagina si sta caricando...
La pagina si sta caricando...
La pagina si sta caricando...
La pagina si sta caricando...
La pagina si sta caricando...
La pagina si sta caricando...
La pagina si sta caricando...
La pagina si sta caricando...
La pagina si sta caricando...
La pagina si sta caricando...
La pagina si sta caricando...
La pagina si sta caricando...
La pagina si sta caricando...
La pagina si sta caricando...
La pagina si sta caricando...
La pagina si sta caricando...
La pagina si sta caricando...
La pagina si sta caricando...
La pagina si sta caricando...
La pagina si sta caricando...
La pagina si sta caricando...
La pagina si sta caricando...
La pagina si sta caricando...
-
 1
1
-
 2
2
-
 3
3
-
 4
4
-
 5
5
-
 6
6
-
 7
7
-
 8
8
-
 9
9
-
 10
10
-
 11
11
-
 12
12
-
 13
13
-
 14
14
-
 15
15
-
 16
16
-
 17
17
-
 18
18
-
 19
19
-
 20
20
-
 21
21
-
 22
22
-
 23
23
-
 24
24
-
 25
25
-
 26
26
-
 27
27
-
 28
28
-
 29
29
-
 30
30
-
 31
31
-
 32
32
-
 33
33
-
 34
34
-
 35
35
-
 36
36
-
 37
37
-
 38
38
-
 39
39
-
 40
40
-
 41
41
-
 42
42
-
 43
43
-
 44
44
-
 45
45
-
 46
46
-
 47
47
-
 48
48
-
 49
49
-
 50
50
-
 51
51
-
 52
52
-
 53
53
-
 54
54
-
 55
55
-
 56
56
-
 57
57
-
 58
58
-
 59
59
-
 60
60