Cuisinart CJE1000E Manuale del proprietario

Categoria
Robot da cucina
Tipo
Manuale del proprietario
Instructions - Hinweise - Instructies - Istruzioni - Instrucciones CJE1000E
Centrifugeuse
Juice extractor
2
SOMMAIRE
1. INTRODUCTION . . . . . . . . . . . . . . . . . . . . . . . . . . . . . . . . . . . . . . . . . . . . . . . . . . . . . . . . . . . . . . . . . . . . . . . . . . . . . . . . . . . . . . . . . . . . . . . . . . . . . . . . . . . 6
2. CARACTERISTIQUES PRODUIT . . . . . . . . . . . . . . . . . . . . . . . . . . . . . . . . . . . . . . . . . . . . . . . . . . . . . . . . . . . . . . . . . . . . . . . . . . . . . . . . . . . . . . . . . . . . . 7
3. UTILISATION . . . . . . . . . . . . . . . . . . . . . . . . . . . . . . . . . . . . . . . . . . . . . . . . . . . . . . . . . . . . . . . . . . . . . . . . . . . . . . . . . . . . . . . . . . . . . . . . . . . . . . . . . . . . . . 8
a. Avant la première utilisation . . . . . . . . . . . . . . . . . . . . . . . . . . . . . . . . . . . . . . . . . . . . . . . . . . . . . . . . . . . . . . . . . . . . . . . . . . . . . . . . . . . . . . . . . . . . 8
b. Assemblage de la centrifugeuse . . . . . . . . . . . . . . . . . . . . . . . . . . . . . . . . . . . . . . . . . . . . . . . . . . . . . . . . . . . . . . . . . . . . . . . . . . . . . . . . . . . . . . . . . 8
c. Système de gestion de la mousse . . . . . . . . . . . . . . . . . . . . . . . . . . . . . . . . . . . . . . . . . . . . . . . . . . . . . . . . . . . . . . . . . . . . . . . . . . . . . . . . . . . . . . . . 8
d. Démontage de la centrifugeuse. . . . . . . . . . . . . . . . . . . . . . . . . . . . . . . . . . . . . . . . . . . . . . . . . . . . . . . . . . . . . . . . . . . . . . . . . . . . . . . . . . . . . . . . . . 9
4. UTILISATION DE LA CENTRIFUGEUSE . . . . . . . . . . . . . . . . . . . . . . . . . . . . . . . . . . . . . . . . . . . . . . . . . . . . . . . . . . . . . . . . . . . . . . . . . . . . . . . . . . . . . . . 9
5. QUESTIONS/REPONSES. . . . . . . . . . . . . . . . . . . . . . . . . . . . . . . . . . . . . . . . . . . . . . . . . . . . . . . . . . . . . . . . . . . . . . . . . . . . . . . . . . . . . . . . . . . . . . . . . . . . 10
6. NETTOYAGE ET ENTRETIEN . . . . . . . . . . . . . . . . . . . . . . . . . . . . . . . . . . . . . . . . . . . . . . . . . . . . . . . . . . . . . . . . . . . . . . . . . . . . . . . . . . . . . . . . . . . . . . . . 11
7. CONSIGNES DE SECURITE. . . . . . . . . . . . . . . . . . . . . . . . . . . . . . . . . . . . . . . . . . . . . . . . . . . . . . . . . . . . . . . . . . . . . . . . . . . . . . . . . . . . . . . . . . . . . . . . . . 11
CONTENTS
1. INTRODUCTION . . . . . . . . . . . . . . . . . . . . . . . . . . . . . . . . . . . . . . . . . . . . . . . . . . . . . . . . . . . . . . . . . . . . . . . . . . . . . . . . . . . . . . . . . . . . . . . . . . . . . . . . . . 13
2. PRODUCT FEATURES . . . . . . . . . . . . . . . . . . . . . . . . . . . . . . . . . . . . . . . . . . . . . . . . . . . . . . . . . . . . . . . . . . . . . . . . . . . . . . . . . . . . . . . . . . . . . . . . . . . . . . 14
3. USE . . . . . . . . . . . . . . . . . . . . . . . . . . . . . . . . . . . . . . . . . . . . . . . . . . . . . . . . . . . . . . . . . . . . . . . . . . . . . . . . . . . . . . . . . . . . . . . . . . . . . . . . . . . . . . . . . . . . . . . 15
a. Before using for the  rst time . . . . . . . . . . . . . . . . . . . . . . . . . . . . . . . . . . . . . . . . . . . . . . . . . . . . . . . . . . . . . . . . . . . . . . . . . . . . . . . . . . . . . . . . . . . . 15
b. Assembling the juice extractor. . . . . . . . . . . . . . . . . . . . . . . . . . . . . . . . . . . . . . . . . . . . . . . . . . . . . . . . . . . . . . . . . . . . . . . . . . . . . . . . . . . . . . . . . . . 15
c. Foam management system . . . . . . . . . . . . . . . . . . . . . . . . . . . . . . . . . . . . . . . . . . . . . . . . . . . . . . . . . . . . . . . . . . . . . . . . . . . . . . . . . . . . . . . . . . . . . . 15
d. Dismantling the juice extractor . . . . . . . . . . . . . . . . . . . . . . . . . . . . . . . . . . . . . . . . . . . . . . . . . . . . . . . . . . . . . . . . . . . . . . . . . . . . . . . . . . . . . . . . . . 16
4. USING THE JUICE EXTRACTOR. . . . . . . . . . . . . . . . . . . . . . . . . . . . . . . . . . . . . . . . . . . . . . . . . . . . . . . . . . . . . . . . . . . . . . . . . . . . . . . . . . . . . . . . . . . . . . 16
5. QUESTIONS/ANSWERS . . . . . . . . . . . . . . . . . . . . . . . . . . . . . . . . . . . . . . . . . . . . . . . . . . . . . . . . . . . . . . . . . . . . . . . . . . . . . . . . . . . . . . . . . . . . . . . . . . . . 17
6. CLEANING AND MAINTENANCE. . . . . . . . . . . . . . . . . . . . . . . . . . . . . . . . . . . . . . . . . . . . . . . . . . . . . . . . . . . . . . . . . . . . . . . . . . . . . . . . . . . . . . . . . . . . 18
7. SAFETY PRECAUTIONS. . . . . . . . . . . . . . . . . . . . . . . . . . . . . . . . . . . . . . . . . . . . . . . . . . . . . . . . . . . . . . . . . . . . . . . . . . . . . . . . . . . . . . . . . . . . . . . . . . . . . 18
3
INHALTSVERZEICHNIS
1. EINLEITUNG . . . . . . . . . . . . . . . . . . . . . . . . . . . . . . . . . . . . . . . . . . . . . . . . . . . . . . . . . . . . . . . . . . . . . . . . . . . . . . . . . . . . . . . . . . . . . . . . . . . . . . . . . . . . . . 20
2. EIGENSCHAFTEN DES PRODUKTS . . . . . . . . . . . . . . . . . . . . . . . . . . . . . . . . . . . . . . . . . . . . . . . . . . . . . . . . . . . . . . . . . . . . . . . . . . . . . . . . . . . . . . . . . . 21
3. GEBRAUCH . . . . . . . . . . . . . . . . . . . . . . . . . . . . . . . . . . . . . . . . . . . . . . . . . . . . . . . . . . . . . . . . . . . . . . . . . . . . . . . . . . . . . . . . . . . . . . . . . . . . . . . . . . . . . . . 22
a. Vor dem ersten Gebrauch . . . . . . . . . . . . . . . . . . . . . . . . . . . . . . . . . . . . . . . . . . . . . . . . . . . . . . . . . . . . . . . . . . . . . . . . . . . . . . . . . . . . . . . . . . . . . . . 22
b. Zusammensetzen des Entsafters . . . . . . . . . . . . . . . . . . . . . . . . . . . . . . . . . . . . . . . . . . . . . . . . . . . . . . . . . . . . . . . . . . . . . . . . . . . . . . . . . . . . . . . . 22
c. System für die Schaumkontrolle . . . . . . . . . . . . . . . . . . . . . . . . . . . . . . . . . . . . . . . . . . . . . . . . . . . . . . . . . . . . . . . . . . . . . . . . . . . . . . . . . . . . . . . . . 22
d. Ausainandernehmen des Entsafters . . . . . . . . . . . . . . . . . . . . . . . . . . . . . . . . . . . . . . . . . . . . . . . . . . . . . . . . . . . . . . . . . . . . . . . . . . . . . . . . . . . . . 23
4. GEBRAUCH DES ENTSAFTERS. . . . . . . . . . . . . . . . . . . . . . . . . . . . . . . . . . . . . . . . . . . . . . . . . . . . . . . . . . . . . . . . . . . . . . . . . . . . . . . . . . . . . . . . . . . . . . 23
5. FRAGEN/ANTWORTEN . . . . . . . . . . . . . . . . . . . . . . . . . . . . . . . . . . . . . . . . . . . . . . . . . . . . . . . . . . . . . . . . . . . . . . . . . . . . . . . . . . . . . . . . . . . . . . . . . . . . 24
6. REINIGUNG UND PFLEGE . . . . . . . . . . . . . . . . . . . . . . . . . . . . . . . . . . . . . . . . . . . . . . . . . . . . . . . . . . . . . . . . . . . . . . . . . . . . . . . . . . . . . . . . . . . . . . . . . 25
7. HINWEISE ZUR SICHERHEIT . . . . . . . . . . . . . . . . . . . . . . . . . . . . . . . . . . . . . . . . . . . . . . . . . . . . . . . . . . . . . . . . . . . . . . . . . . . . . . . . . . . . . . . . . . . . . . . . 25
INHOUD
1. INLEIDING. . . . . . . . . . . . . . . . . . . . . . . . . . . . . . . . . . . . . . . . . . . . . . . . . . . . . . . . . . . . . . . . . . . . . . . . . . . . . . . . . . . . . . . . . . . . . . . . . . . . . . . . . . . . . . . . . 27
2. PRODUCTKENMERKEN . . . . . . . . . . . . . . . . . . . . . . . . . . . . . . . . . . . . . . . . . . . . . . . . . . . . . . . . . . . . . . . . . . . . . . . . . . . . . . . . . . . . . . . . . . . . . . . . . . . . 28
3. GEBRUIK . . . . . . . . . . . . . . . . . . . . . . . . . . . . . . . . . . . . . . . . . . . . . . . . . . . . . . . . . . . . . . . . . . . . . . . . . . . . . . . . . . . . . . . . . . . . . . . . . . . . . . . . . . . . . . . . . . 29
a. Voor het eerste gebruik . . . . . . . . . . . . . . . . . . . . . . . . . . . . . . . . . . . . . . . . . . . . . . . . . . . . . . . . . . . . . . . . . . . . . . . . . . . . . . . . . . . . . . . . . . . . . . . . . 29
b. Montage van de sapcentrifuge . . . . . . . . . . . . . . . . . . . . . . . . . . . . . . . . . . . . . . . . . . . . . . . . . . . . . . . . . . . . . . . . . . . . . . . . . . . . . . . . . . . . . . . . . . 29
c. Schuimscheidingssysteem . . . . . . . . . . . . . . . . . . . . . . . . . . . . . . . . . . . . . . . . . . . . . . . . . . . . . . . . . . . . . . . . . . . . . . . . . . . . . . . . . . . . . . . . . . . . . . . 29
d. Demontage van de sapcentrifuge . . . . . . . . . . . . . . . . . . . . . . . . . . . . . . . . . . . . . . . . . . . . . . . . . . . . . . . . . . . . . . . . . . . . . . . . . . . . . . . . . . . . . . . 30
4. GEBRUIK VAN DE SAPCENTRIFUGE . . . . . . . . . . . . . . . . . . . . . . . . . . . . . . . . . . . . . . . . . . . . . . . . . . . . . . . . . . . . . . . . . . . . . . . . . . . . . . . . . . . . . . . . . 30
5. VRAGEN/ANTWOORDEN . . . . . . . . . . . . . . . . . . . . . . . . . . . . . . . . . . . . . . . . . . . . . . . . . . . . . . . . . . . . . . . . . . . . . . . . . . . . . . . . . . . . . . . . . . . . . . . . . . 31
6. REINIGING EN ONDERHOUD . . . . . . . . . . . . . . . . . . . . . . . . . . . . . . . . . . . . . . . . . . . . . . . . . . . . . . . . . . . . . . . . . . . . . . . . . . . . . . . . . . . . . . . . . . . . . . . 32
7. VEILIGHEIDSVOORSCHRIFTEN . . . . . . . . . . . . . . . . . . . . . . . . . . . . . . . . . . . . . . . . . . . . . . . . . . . . . . . . . . . . . . . . . . . . . . . . . . . . . . . . . . . . . . . . . . . . . 32
4
INDICE
1. INTRODUZIONE . . . . . . . . . . . . . . . . . . . . . . . . . . . . . . . . . . . . . . . . . . . . . . . . . . . . . . . . . . . . . . . . . . . . . . . . . . . . . . . . . . . . . . . . . . . . . . . . . . . . . . . . . . . 34
2. CARATTERISTICHE PRODOTTO. . . . . . . . . . . . . . . . . . . . . . . . . . . . . . . . . . . . . . . . . . . . . . . . . . . . . . . . . . . . . . . . . . . . . . . . . . . . . . . . . . . . . . . . . . . . . 35
3. UTILIZZO . . . . . . . . . . . . . . . . . . . . . . . . . . . . . . . . . . . . . . . . . . . . . . . . . . . . . . . . . . . . . . . . . . . . . . . . . . . . . . . . . . . . . . . . . . . . . . . . . . . . . . . . . . . . . . . . . 36
a. Prima del primo utilizzo . . . . . . . . . . . . . . . . . . . . . . . . . . . . . . . . . . . . . . . . . . . . . . . . . . . . . . . . . . . . . . . . . . . . . . . . . . . . . . . . . . . . . . . . . . . . . . . . 36
b. Assemblaggio della centrifuga . . . . . . . . . . . . . . . . . . . . . . . . . . . . . . . . . . . . . . . . . . . . . . . . . . . . . . . . . . . . . . . . . . . . . . . . . . . . . . . . . . . . . . . . . . 36
c. Sistema di gestione della schiuma . . . . . . . . . . . . . . . . . . . . . . . . . . . . . . . . . . . . . . . . . . . . . . . . . . . . . . . . . . . . . . . . . . . . . . . . . . . . . . . . . . . . . . . . 36
d. Smontaggio della centrifuga . . . . . . . . . . . . . . . . . . . . . . . . . . . . . . . . . . . . . . . . . . . . . . . . . . . . . . . . . . . . . . . . . . . . . . . . . . . . . . . . . . . . . . . . . . . . . 37
4. UTILIZZO DELLA CENTRIFUGA . . . . . . . . . . . . . . . . . . . . . . . . . . . . . . . . . . . . . . . . . . . . . . . . . . . . . . . . . . . . . . . . . . . . . . . . . . . . . . . . . . . . . . . . . . . . . 37
5. DOMANDE/RISPOSTE: . . . . . . . . . . . . . . . . . . . . . . . . . . . . . . . . . . . . . . . . . . . . . . . . . . . . . . . . . . . . . . . . . . . . . . . . . . . . . . . . . . . . . . . . . . . . . . . . . . . . . 38
6. PULIZIA E MANUTENZIONE . . . . . . . . . . . . . . . . . . . . . . . . . . . . . . . . . . . . . . . . . . . . . . . . . . . . . . . . . . . . . . . . . . . . . . . . . . . . . . . . . . . . . . . . . . . . . . . 39
7. ISTRUZIONI DI SICUREZZA. . . . . . . . . . . . . . . . . . . . . . . . . . . . . . . . . . . . . . . . . . . . . . . . . . . . . . . . . . . . . . . . . . . . . . . . . . . . . . . . . . . . . . . . . . . . . . . . . 39
ÍNDICE
1. INTRODUCCIÓN . . . . . . . . . . . . . . . . . . . . . . . . . . . . . . . . . . . . . . . . . . . . . . . . . . . . . . . . . . . . . . . . . . . . . . . . . . . . . . . . . . . . . . . . . . . . . . . . . . . . . . . . . . 41
2. CARACTERÍSTICAS DEL PRODUCTO. . . . . . . . . . . . . . . . . . . . . . . . . . . . . . . . . . . . . . . . . . . . . . . . . . . . . . . . . . . . . . . . . . . . . . . . . . . . . . . . . . . . . . . . 42
3. UTILIZACIÓN . . . . . . . . . . . . . . . . . . . . . . . . . . . . . . . . . . . . . . . . . . . . . . . . . . . . . . . . . . . . . . . . . . . . . . . . . . . . . . . . . . . . . . . . . . . . . . . . . . . . . . . . . . . . . 43
a. Antes de la primera utilización . . . . . . . . . . . . . . . . . . . . . . . . . . . . . . . . . . . . . . . . . . . . . . . . . . . . . . . . . . . . . . . . . . . . . . . . . . . . . . . . . . . . . . . . . . 43
b. Montaje de la licuadora . . . . . . . . . . . . . . . . . . . . . . . . . . . . . . . . . . . . . . . . . . . . . . . . . . . . . . . . . . . . . . . . . . . . . . . . . . . . . . . . . . . . . . . . . . . . . . . . . 43
c. Sistema de control de la espuma . . . . . . . . . . . . . . . . . . . . . . . . . . . . . . . . . . . . . . . . . . . . . . . . . . . . . . . . . . . . . . . . . . . . . . . . . . . . . . . . . . . . . . . . . 43
d. Desmontaje de la licuadora . . . . . . . . . . . . . . . . . . . . . . . . . . . . . . . . . . . . . . . . . . . . . . . . . . . . . . . . . . . . . . . . . . . . . . . . . . . . . . . . . . . . . . . . . . . . . . 44
4. UTILIZACIÓN DE LA LICUADORA. . . . . . . . . . . . . . . . . . . . . . . . . . . . . . . . . . . . . . . . . . . . . . . . . . . . . . . . . . . . . . . . . . . . . . . . . . . . . . . . . . . . . . . . . . . 44
5. PREGUNTAS Y RESPUESTAS:. . . . . . . . . . . . . . . . . . . . . . . . . . . . . . . . . . . . . . . . . . . . . . . . . . . . . . . . . . . . . . . . . . . . . . . . . . . . . . . . . . . . . . . . . . . . . . . . 45
6. LIMPIEZA Y MANTENIMIENTO . . . . . . . . . . . . . . . . . . . . . . . . . . . . . . . . . . . . . . . . . . . . . . . . . . . . . . . . . . . . . . . . . . . . . . . . . . . . . . . . . . . . . . . . . . . . . 46
7. CONSIGNAS DE SEGURIDAD . . . . . . . . . . . . . . . . . . . . . . . . . . . . . . . . . . . . . . . . . . . . . . . . . . . . . . . . . . . . . . . . . . . . . . . . . . . . . . . . . . . . . . . . . . . . . . . 46
5
6
1. INTRODUCTION
Félicitations pour votre achat !
Depuis plus de 30 ans, Cuisinart® développe une gamme complète d’appareils culinaires qui permettent aux passionnés de cuisine et
aux grands chefs d’exprimer pleinement leur créativité.
Tous les appareils Cuisinart® sont le résultat d’une étroite collaboration entre des ingénieurs et des grands
noms de la Cuisine, tels que Paul Bocuse, ambassadeur charismatique de la marque. Chaque produit allie
robustesse, innovation, performance et ergonomie.
Réalisés dans des matériaux d’origine professionnels tels que l’acier brossé inoxydable, nos produits sintègrent
facilement dans chaque cuisine, grâce à un design sobre et élégant.
7
2. CARACTERISTIQUES PRODUIT
1. Base moteur
2. Sélecteur de vitesses et bouton ON/OFF
3. Filtre en acier inoxydable
4. Bol (Non illustré)
5. Disque de gestion de la mousse (Non illustré)
6. Trémie extra large (7.5cm) (Non illustré)
7. Poussoir
8. Bec verseur avec débit réglable
9. Carafe de collecte du jus (1L)
10. Bac de récupération de la pulpe (2L)
11. Brosse de nettoyage
12. Poignée d’ouverture facile
8
9
7
11
3
12
12
10
10
8
3. UTILISATION DU PRODUIT
A. Avant la première utilisation
Retirez tous les matériaux d’emballage et toutes les étiquettes
de votre centrifugeuse. Assurez-vous que toutes les pièces (voir
section 2) de votre nouvel appareil ont bien été jointes avant de
jeter l’emballage.
Nous vous recommandons de laver soigneusement tous les
accessoires et bols avant la première utilisation.
B. Assemblage de la centrifugeuse
Assembler la carafe de collecte du jus
1 . Posez la carafe de collecte du jus sur une surface plane.
2 . Insérez le séparateur de mousse.
3 . Mettez le couvercle en place.
4 . Placez la carafe sous le bec verseur de la centrifujeuse
Assembler la centrifugeuse
1. Placez la base de la centrifugeuse sur une surface plane.
2. Insérez le bol sur la base moteur
3. Placez le disque de gestion de la mousse dans le bol en alignant
les encoches
4. Fixez fermement le  ltre dans le bol.
5. Appuyez sur le bouton de la poignée pour la déverrouiller.
Tenez le couvercle par la poignée, charnière vers le bas. Emboitez
la charnière sur la base moteur et basculez le couvercle.
6. Appuyez sur la poignée pour la verrouiller.
7. Faites glisser le poussoir dans la trémie en alignant la rainure
du poussoir dans le petit renfoncement situé à l’intérieur de
trémie d’alimentation.
8. Placez le récipient destiné à contenir la pulpe en inclinant son
ouverture légèrement sous le couvercle.
9. Placez la carafe de collecte du jus sous le bec verseur, la
poignée vers l’avant.
10. Assurez-vous que le bec verseur soit bien ouvert. Ne pressez
jamais de fruits lorsque le bec verseur est fermé.
C. Système de gestion de la mousse
Si vous préférez un jus sans trop de mousse, utilisez le disque de
gestion de la mousse et placez le bec verseur sur une ouverture
moins large.
Si vous préférez davantage de mousse, n’utilisez pas ce disque et
placez le bec verseur sur une ouverture plus large.
9
D. Démontage de la centrifugeuse
1. Débranchez la centrifugeuse
2. Retirez le poussoir.
3. Appuyez sur le bouton de la poignée pour la déverrouiller.
4. Basculez et retirez le couvercle.
5. Retirez délicatement le  ltre en tirant vers le haut sur l’un des
côtés. Faites attention de ne pas toucher les lames dans le
fond du  ltre.
6. Retirez le disque du  ltre de gestion de la mousse.
7. Retirez le bol en tirant vers le haut l’un des côtés.
4. UTILISATION DE LA CENTRIFUGEUSE
1. Assurez-vous que la centrifugeuse soit assemblée
correctement. (Section 3b).
2. Branchez l’appareil sur une prise de 230V.
3. Véri ez que le bec verseur soit bien ouvert. NE PRESSEZ
JAMAIS DE FRUITS LORSQUE LE BEC VERSEUR EST FERME.
4. Lavez les fruits ou les légumes choisis.
5. Placez le sélecteur de vitesses sur le réglage souhaité. L’anneau
de lumière bleue clignote.
6. Appuyez sur le bouton ON/OFF pour démarrer la centrifugeuse.
L’anneau de lumière bleue reste allumé.
7. Soulevez le poussoir et retirez-le de la trémie. Insérez les
aliments et poussez les aliments à l’aide du poussoir, appuyez
fermement.
8. Adaptez la vitesse de la centrifugeuse au type d’aliment choisi.
Plus l’aliment est dur et plus la vitesse doit être élevée.
9. Le jus coulera dans la carafe de collecte du jus et la pulpe
s’accumulera dans le bac de récupération de la pulpe.
10. Lorsque tout le jus a été extrait, appuyez sur le bouton
ON/OFF et tournez le sélecteur de vitesse sur «0» pour éteindre
la centrifugeuse.
11. Avant de retirer la carafe de collecte du jus, fermez le bec
verseur.
10
5. QUESTIONS/REPONSES :
QUE FAIRE SI: REPONSES
La centrifugeuse ne s'allume pas La sécurité de la poignée n'est pas débloquée.
Régler le sélecteur de vitesse entre 1 et 5.
Appuyez sur le bouton ON/OFF.
Le débit du jus est faible Assurez-vous que le bec verseur soit bien totalement ouvert.
Trop de pulpe dans le panier du  ltre peut ralentir le débit du jus.
Eteignez la centrifugeuse et nettoyez le panier du  ltre.
Le couvercle ne se verrouille pas Appuyez sur le bouton de la poignée pour la déverrouiller puis appuyez sur la poignée
pour la verrouiller.
11
6. NETTOYAGE ET RANGEMENT
Toutes les pièces pouvant être retirées de l’appareil peuvent
être immergées dans l’eau pour être nettoyées. Elles peuvent
également être lavées au lave-vaisselle.
N’immergez pas la base moteur dans l’eau et ne l’aspergez pas
d’eau. Nettoyez-la uniquement à l’aide d’une éponge, d’un chi on
ou de papier essuie-tout humide. Pour ce faire, utilisez un produit
de vaisselle liquide, n’utilisez pas de produits nettoyants abrasifs
qui pourraient rayer la surface.
Pour un nettoyage aisé, lavez toujours immédiatement l’appareil
après chaque utilisation. Les légumes et les fruits vont durcir
si vous les laissez sécher sur des pièces de l’appareil, ce qui les
rendra encore plus di ciles à nettoyer.
1. Commencez par Débrancher la centrifugeuse.
2. Retirez les di érentes parties de la centrifugeuse sur le en
suivant les instructions de démontage (Section 3D).
Rincez tout d’abord à l’eau froide. Nettoyez ensuite le bac de
récupération de la pulpe, la carafe de collecte du jus, le poussoir,
le couvercle et le  ltre dans de l’eau chaude et savonneuse ou
placez-les dans le lave-vaisselle. N’utilisez pas de brosse ou
d’éponge métallique.
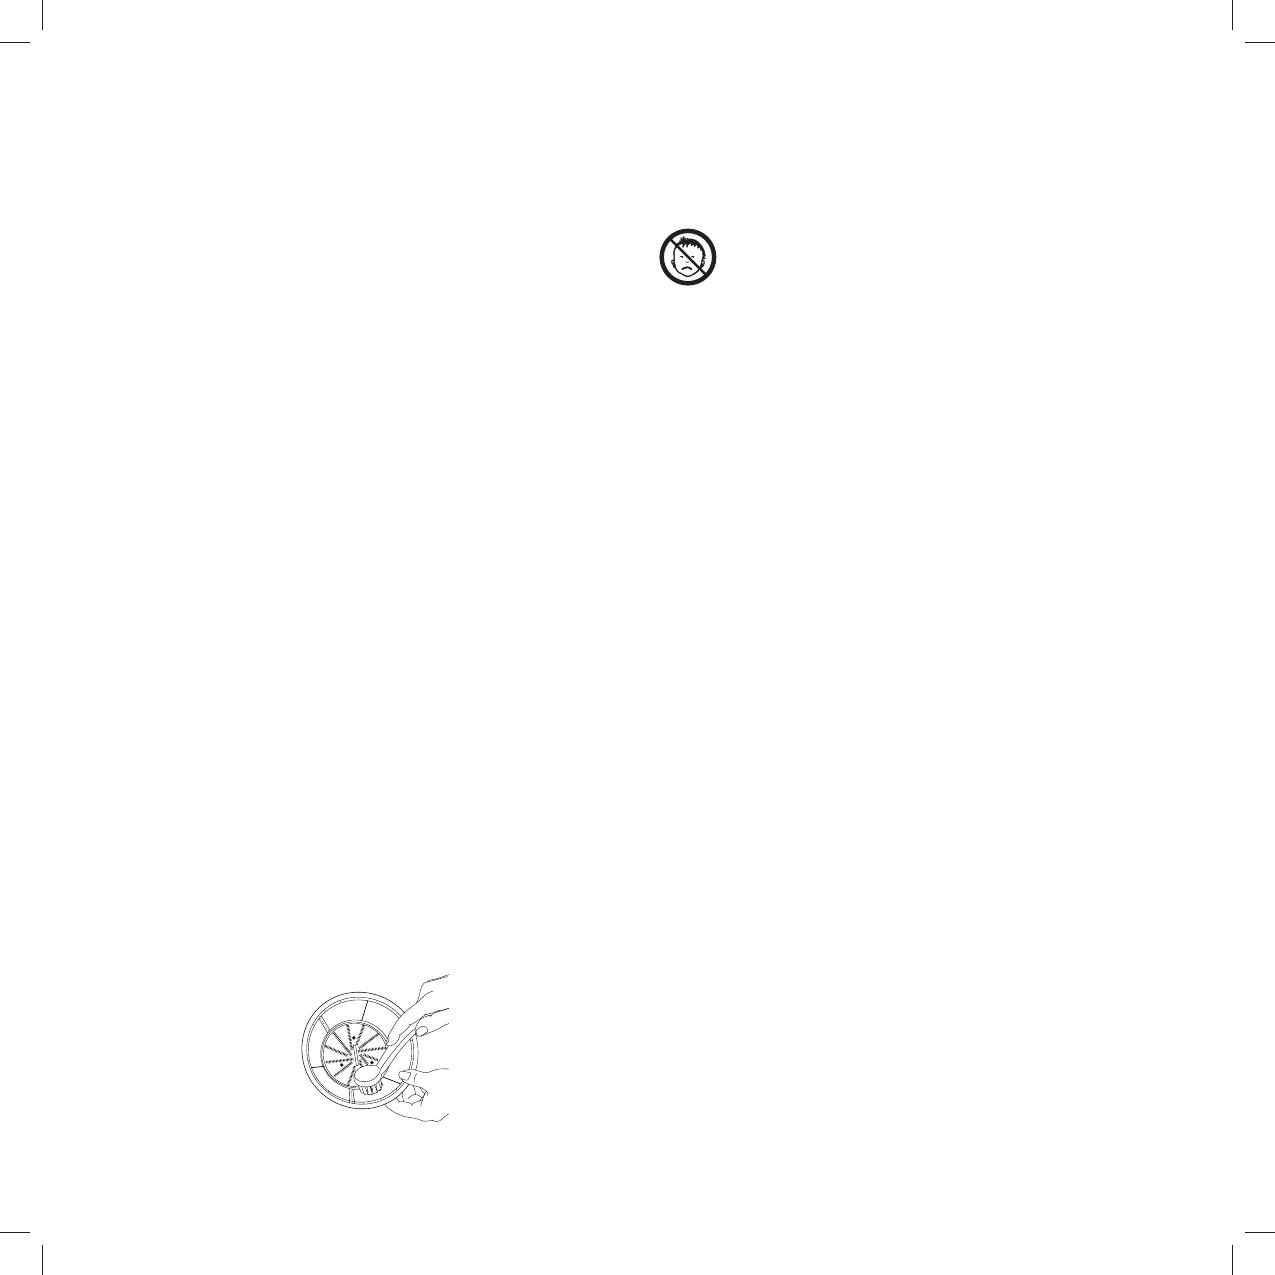
ATTENTION : Soyez prudent(e) lorsque vous manipulez le  ltre
pendant le nettoyage, car les lames qui se trouvent au fond du
panier sont très coupantes.
Pour obtenir plus de jus, nettoyez toujours soigneusement le  ltre
à l’aide de la brosse fournie.
3. Séchez toutes les parties à l’aide d’une serviette.
7. CONSIGNES DE SECURITE
Comme tout appareil électroménager, cette centrifugeuse doit
être manipulée avec précaution. Suivre les conseils ci-dessous
a n déviter tout risque de blessure.
ATTENTION: Les sachets en polyéthylène qui entourent
l’appareil ou l’emballage peuvent être dangereux. Pour éviter tout
danger de su ocation, conserver ces sachets hors de la portée de
bébés et des enfants. Ces sachets ne sont pas des jouets.
Manier le  ltre avec le plus grand soin. Éviter de toucher les
parties métalliques tranchantes.
Avant d’allumer l’appareil, s’assurer que le  ltre est enfoncé
au maximum sur l’axe du moteur, et que le couvercle est
correctement placé. Ne pas forcer ou bloquer le mécanisme du
couvercle.
Pour enfoncer les aliments, utilisez toujours le poussoir. Ne
pousser jamais avec les doigts ni aucun autre ustensile.
Toujours attendre que le  ltre ait cessé de tourner avant de
retirer le poussoir ou le couvercle.
Eteindre et débrancher l’appareil avant de le nettoyer, de mettre
en place ou de retirer le bac récupérateur de pulpe ou d’approcher
les parties qui sont mobiles lors du fonctionnement.
Ne pas utiliser l’appareil si le  ltre rotatif est endommagé.
Utiliser exclusivement cet appareil avec les accessoires fournis
par Cuisinart®.
Ne pas immerger la base moteur de l’appareil dans l’eau ou tout
autre liquide.
Débrancher l’appareil après utilisation, avant de l’assembler
ou de le démonter, avant de retirer les aliments et avant de le
nettoyer. Ne jamais laisser l’appareil branché sans surveillance.
Pour débrancher, tirer sur la  che et jamais sur le cordon.
Ne pas laisser le cordon dépasser du bord du plan de travail, et
ne pas le mettre en contact avec des surfaces chaudes.
Cet appareil nest pas prévu pour être utilisé par des personnes
(y compris les enfants) dont les capacités physiques, sensorielles
ou mentales sont réduites, ou des personnes dénuées
d’expérience ou de connaissance, sauf si elles ont pu béné cier,
par l’intermédiaire d’une personne responsable de leur sécurité,
d’une surveillance ou d’instructions préalables concernant
l’utilisation de l’appareil. Il convient de surveiller les enfants pour
s’assurer quils ne jouent pas avec l’appareil.
Ne pas utiliser l’appareil si le cordon est endommagé ou si
l’appareil est tombé ou présente des traces de dommage.
12
Si le câble d’alimentation est endommagé, il doit être remplacé
par le fabricant, son service après vente ou des personnes de
quali cation similaire a n d’éviter un danger.
Aucune réparation ne peut être e ectuée par l’utilisateur.
Cet appareil satisfait aux exigences essentielles des directives
2004/108/CE (compatibilité électromagnétique) et 2006/95/ CE
(sécurité des appareils électro-domestiques).
Utiliser cet appareil exclusivement pour cuisiner, en suivant les
instructions de ce manuel.
Ne pas utiliser à l’extérieur.
A usage strictement domestique.
Equipements électriques et électroniques en  n de vie.
Dans l’intérêt de tous et pour participer activement à l’e ort
collectif de protection de l’environnement :
• Ne jetez pas vos produits avec les déchets ménagers.
Utilisez les systèmes de reprise et de collecte qui sont mis à votre
disposition.
Certains matériaux pourront ainsi être recyclés ou valorisés.
13
1. INTRODUCTION
For over 30 years, Cuisinart® has been developing a wide range of kitchen appliances that let both passionate amateurs and great chefs
express their creativity to the fullest.
All Cuisinart® appliances are the fruit of close collaboration between engineers and some of the great names in cooking, like Paul
Bocuse, charismatic ambassador for the brand. Every product combines strength, innovation, performance and ergonomics.
Made using such professional materials as brushed stainless steel, our products  t easily into any kitchen thanks to their simple and
elegant design.
14
8
9
7
11
3
12
12
10
10
2. PRODUCT FEATURES
1. Housing base
2. Speed control and ON/OFF switch
3. Stainless steel  lter
4. Bowl (Not shown)
5. Foam management disk (Not shown)
6. Extra large (7.5cm) feed tube (Not shown)
7. Pusher
8. Adjustable  ow spout
9. Juice pitcher (1L)
10. Pulp container (2L)
11. Cleaning brush
12. Easy unlock handle
15
3. USE
A. Before using for the  rst time
Remove all packaging materials and all labels from your
juice extractor. Make sure all the parts (see section 2) of your
new appliance have been unpacked before discarding the
packaging.
We recommend you carefully wash all the accessories and bowls
before using the appliance for the  rst time.
B. Assembling the juice extractor
Assemble the juice pitcher
1 . Place the juice pitcher on a level surface.
2 . Insert the foam  lter.
3 . Put the lid in place.
4 . Place the pitcher below the juice extractors  ow spout.
Assemble the juice extractor
1. Place the juice extractor housing base on a level surface.
2. Place the bowl on the housing base.
3. Place the foam management disk in the bowl by aligning the
notches.
4. Firmly lock the  lter in the bowl.
5. Press the button in the handle to unlock.
Hold the lid by the handle, hinge facing down. Fit the hinge and
the housing base together and tilt the lid.
6 . Press down on the handle to lock.
7. Slide the pusher into the feed tube and line up the slot of the
pusher with the small recess located inside the feed tube.
8. Put the container for the pulp in place by slightly tilting its
opening to slide under the lid.
9. Place the juice pitcher under the  ow spout with the handle
facing the front.
10. Make sure that the pour spout is open properly. Never press
fruit when the pour spout is closed.
C. Foam management system
If you prefer juice without too much foam, use the foam
management disk by setting the pour spout to a smaller
opening.
If you prefer more foam, do not use this disk and set the pour
spout to a larger opening
16
D. Dismantling the juice extractor
1. Unplug the juice extractor
2. Remove the pusher.
3. Press the button in the handle to unlock.
4. Tilt and remove the lid.
5. Gently remove the  lter by pulling up on one of the sides.
Careful not to touch the blades at the bottom of the  lter.
6. Remove the foam management  lter disk.
7. Remove the bowl by pulling up on one of the sides.
4. USING THE JUICE EXTRACTOR
1. Make sure that the juice extractor is properly assembled
(Section 3b).
2. Plug the unit into a 230V electrical outlet.
3. Check that the ow spout is open. NEVER PRESS FRUIT WHEN
THE POUR SPOUT IS CLOSED.
4. Wash the selected fruit or vegetables.
5. Select the desired speed. The ring of blue light will start to
ash.
6. Press the ON/OFF button to start the fruit extractor. The ring of
blue light will remain lit.
7. Lift the pusher and remove it from the feed tube. Insert the
food and push the food using the pusher, pressing  rmly.
8. Adjust the speed of the juice extractor to suit the food being
pressed. The harder the food, the higher the speed used.
9. The juice will  ow into the juice pitcher and the pulp will collect
in the pulp container.
10. When all the juice has been extracted, press the ON/OFF
button and turn the speed control to «0» to turn o the juice
extractor.
11. Before removing the juice pitcher, close the pour spout.
17
5. QUESTIONS/ANSWERS :
WHAT DO I DO IF: ANSWERS
The juice extractor doesn’t turn on? The safety mechanism in the handle has not been unlocked.
Set the speed to between 1 and 5.
Press the ON/OFF button.
The  ow is weak? Make sure the  ow spout is fully opened.
Too much pulp in the  lter can slow the  ow of juice.
Turn the extractor o and clean the  lter basket.
The lid does not lock? Press on the button in the handle to unlock then press on the handle to lock.
18
6. CLEANING AND MAINTENANCE
All the pieces that can be removed from the unit may be washed
in water. They are also dishwasher safe.
Never immerse the housing base in water nor spray it with water.
Clean it using a damp sponge, cloth or household paper towel
only. When doing so, use washing up liquid, never use abrasive
cleaning products which could scratch the surface.
To make cleaning easier, always wash the unit immediately after
use. Vegetables and fruit will harden if you leave them to dry on
the appliance parts, which will make it more di cult to clean.
1. Make sure the extractor is unplugged.
2. Remove the parts of the extractor by following the dismantling
instructions (Section 3D).
First rinse in cold water. Then clean the pulp container, the juice
pitcher, the pusher, the lid and the  lter in warm, soapy water or
place these parts in the dishwasher. Do not use metal brushes or
sponges.
CAUTION: Handle the  lter with care when washing, because the
blades at the base of the basket are very sharp.
For more juice, always carefully clean the  lter using the brush
provided. (See sketch.)
3. Dry all parts with a towel.
7. SAFETY INSTRUCTIONS
As with all domestic electrical appliances, this juice extractor must
be handled with care. Follow the instructions below to avoid any
risk of injury.
ATTENTION: The plastic bags used to wrap this
appliance or the packaging may be dangerous. To avoid risk
of su ocation, keep these bags out of the reach of babies and
children. These bags are not toys.
Handle the  lter very carefully. Avoid touching the sharp metal
parts.
Before turning the appliance on, make sure the  lter is  rmly
pressed onto the motor shaft, and that the lid is correctly placed.
Do not force or block the mechanism of the lid.
To push the food, always use the pusher. Never push with your
ngers or any utensil.
Always wait until the  lter has stopped turning before removing
the pusher or the lid.
Turn the unit o and unplug it before cleaning, attaching or
removing the pulp container or handling the parts that move
when operating.
• Do not use the unit if the rotating  lter is damaged.
Only use this appliance with accessories provided or sold by
Cuisinart®.
Never immerse the housing base of the unit in water or any
other liquid.
Unplug the appliance after each use, before assembling or
dismantling, before removing food and before cleaning. Never
leave the appliance unattended when plugged in. To unplug,
pull the plug and never the lead.
Do not allow the lead to hang over the kitchen table or worktop,
and keep it away from hot surfaces.
This unit is not intended for use by people (including children)
whose physical, sensory or mental capacities are reduced, or
by persons who lack experience or knowledge, unless they are
supervised or have been given instructions beforehand on the
use of the unit and are adequately supervised. Children should
be supervised to ensure they do not use the appliance as a toy.
Do not use the appliance if the lead is damaged or if the appliance
has been dropped or appears to be damaged.
If the lead is damaged, it must be replaced by the manufacturer,
its after-sales service or similarly quali ed professionals to avoid
danger.
19
No repair should be carried out by the user.
This appliance complies with the basic requirements of Directives
2004/108/EEC (Electromagnetic Compatibility) and 2006/95/EEC
(Safety of domestic electrical appliances).
This appliance should be used only for preparing food and drink
following the instructions in this booklet.
• For indoor use only.
• For domestic use only.
Electrical and electronic equipment at the end of life.
In everybodys interest and to participate actively in protecting
the environment:
• Do not discard these products with your household waste.
• Use return and collection systems available in your country.
Some materials can in this way be recycled or recovered.
20
1. EINLEITUNG
Herzlichen Glückwunsch zu Ihrem Kauf!
Seit über 30 Jahren entwickelt Cuisinart® ein komplettes Sortiment von Küchengeräten, die es sowohl passionierten Liebhabern einer
guten Küche als auch großen Küchenchefs ermöglichen, ihrer Kreativität freien Lauf zu lassen.
Alle Geräte von Cuisinart® sind aus einer engen Zusammenarbeit zwischen Ingenieuren und namhaften Vertretern der Kochkunst wie
Paul Bocuse, dem charismatischen Botschafter der Marke, entstanden. Jedes Produkt vereint in sich Robustheit, Innovation, Leistung
und Ergonomie.
Unsere Produkte werden aus Materialien wie gebürstetem rostfreiem Edelstahl gefertigt, die aus dem Pro bereich stammen und
lassen sich dank des nüchtern-eleganten Designs leicht in jede Küche integrieren.
  • Page 1 1
  • Page 2 2
  • Page 3 3
  • Page 4 4
  • Page 5 5
  • Page 6 6
  • Page 7 7
  • Page 8 8
  • Page 9 9
  • Page 10 10
  • Page 11 11
  • Page 12 12
  • Page 13 13
  • Page 14 14
  • Page 15 15
  • Page 16 16
  • Page 17 17
  • Page 18 18
  • Page 19 19
  • Page 20 20
  • Page 21 21
  • Page 22 22
  • Page 23 23
  • Page 24 24
  • Page 25 25
  • Page 26 26
  • Page 27 27
  • Page 28 28
  • Page 29 29
  • Page 30 30
  • Page 31 31
  • Page 32 32
  • Page 33 33
  • Page 34 34
  • Page 35 35
  • Page 36 36
  • Page 37 37
  • Page 38 38
  • Page 39 39
  • Page 40 40
  • Page 41 41
  • Page 42 42
  • Page 43 43
  • Page 44 44
  • Page 45 45
  • Page 46 46
  • Page 47 47
  • Page 48 48

Cuisinart CJE1000E Manuale del proprietario

Categoria
Robot da cucina
Tipo
Manuale del proprietario