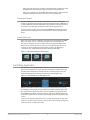
AJA KONA LHe Plus Manuale utente
- Categoria
- Apparecchiature musicali supplementari
- Tipo
- Manuale utente
Questo manuale è adatto anche per

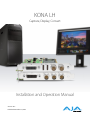
KONA LH
Capture, Display, Convert
Version 15.5
Published November 12, 2019
Installation and Operation Manual

KONA LH Capture, Display, Convert v15.5 2 www.aja.com
Notices
Trademarks
AJA® and Because it matters.® are registered trademarks of AJA Video Systems, Inc.
for use with most AJA products. AJA™ is a trademark of AJA Video Systems, Inc. for
use with recorder, router, software and camera products. Because it matters.™ is a
trademark of AJA Video Systems, Inc. for use with camera products.
CION®, Corvid Ultra®, lo®, Ki Pro®, KONA®, KUMO®, ROI® and T-Tap® are registered
trademarks of AJA Video Systems, Inc.
AJA Control Room™, KiStor™, Science of the Beautiful™, TruScale™, TruZoom™,
V2Analog™ and V2Digital™ are trademarks of AJA Video Systems, Inc.
All other trademarks are the property of their respective owners.
Copyright
Copyright © 2019 AJA Video Systems, Inc. All rights reserved. All information in
this manual is subject to change without notice. No part of the document may be
reproduced or transmitted in any form, or by any means, electronic or mechanical,
including photocopying or recording, without the express written permission of AJA
Video Systems, Inc.
Contacting AJA Support
When calling for support, have all information at hand prior to calling. To contact AJA
for sales or support, use any of the following methods:
Telephone +1.530.271.3190
FAX +1.530.271.3140
Web https://www.aja.com
Support Email suppor[email protected]
Sales Email [email protected]

KONA LH Capture, Display, Convert v15.5 3 www.aja.com
Contents
Notices . . . . . . . . . . . . . . . . . . . . . . . . . . . . . . . . . . . . . .2
Trademarks . . . . . . . . . . . . . . . . . . . . . . . . . . . . . . . . . . . . . . . . . . . 2
Copyright . . . . . . . . . . . . . . . . . . . . . . . . . . . . . . . . . . . . . . . . . . . . 2
Contacting AJA Support . . . . . . . . . . . . . . . . . . . . . . . . . . . . . . . . . . . 2
Chapter 1 – Introduction . . . . . . . . . . . . . . . . . . . . . . . . . . .5
Overview. . . . . . . . . . . . . . . . . . . . . . . . . . . . . . . . . . . . . . . . . . . . .5
KONA Models Covered in this Manual. . . . . . . . . . . . . . . . . . . . . . . . .5
AJA Software & Utilities . . . . . . . . . . . . . . . . . . . . . . . . . . . . . . . . . .5
System Requirements. . . . . . . . . . . . . . . . . . . . . . . . . . . . . . . . . . . . .6
Disk Storage Methods . . . . . . . . . . . . . . . . . . . . . . . . . . . . . . . . . . .7
KONA LHi Features. . . . . . . . . . . . . . . . . . . . . . . . . . . . . . . . . . . . . . .7
KONA LHe Plus Features . . . . . . . . . . . . . . . . . . . . . . . . . . . . . . . . . . . 8
Cable Connections . . . . . . . . . . . . . . . . . . . . . . . . . . . . . . . . . . . . . . 9
KONA LHi and LHe Plus Connectors . . . . . . . . . . . . . . . . . . . . . . . . . . 9
Using Breakout Boxes. . . . . . . . . . . . . . . . . . . . . . . . . . . . . . . . . . . . 10
KLHi-Box for KONA LHi . . . . . . . . . . . . . . . . . . . . . . . . . . . . . . . . . 10
KL-Box for KONA LHe Plus . . . . . . . . . . . . . . . . . . . . . . . . . . . . . . . 11
Detailed Connector Descriptions . . . . . . . . . . . . . . . . . . . . . . . . . . . . 11
LHe Plus/LHi Connectors . . . . . . . . . . . . . . . . . . . . . . . . . . . . . . . . 11
LHi Only Connectors . . . . . . . . . . . . . . . . . . . . . . . . . . . . . . . . . . . 12
Chapter 2 – Installation . . . . . . . . . . . . . . . . . . . . . . . . . . . 13
Installation Overview . . . . . . . . . . . . . . . . . . . . . . . . . . . . . . . . . . . . 13
AJA System Test Application. . . . . . . . . . . . . . . . . . . . . . . . . . . . . . 13
Unpacking . . . . . . . . . . . . . . . . . . . . . . . . . . . . . . . . . . . . . . . . . . . 13
Shipping Box Contents . . . . . . . . . . . . . . . . . . . . . . . . . . . . . . . . . 13
Installing the KONA Card. . . . . . . . . . . . . . . . . . . . . . . . . . . . . . . . . . 14
Cabling the System . . . . . . . . . . . . . . . . . . . . . . . . . . . . . . . . . . . . . 15
KONA LHi Cable Connections . . . . . . . . . . . . . . . . . . . . . . . . . . . . . 15
KONA LHe Plus Cable Connections. . . . . . . . . . . . . . . . . . . . . . . . . . 16
Installing KONA LH Software . . . . . . . . . . . . . . . . . . . . . . . . . . . . . . . 17
Download . . . . . . . . . . . . . . . . . . . . . . . . . . . . . . . . . . . . . . . . . 17
Software Package Installation and Re-installation . . . . . . . . . . . . . . . . 17
Firmware Update Procedure. . . . . . . . . . . . . . . . . . . . . . . . . . . . . . 17
Chapter 3 – Operation . . . . . . . . . . . . . . . . . . . . . . . . . . . .19
Using KONA with Professional Video /Audio Software . . . . . . . . . . . . . . . 19
Capture Formats . . . . . . . . . . . . . . . . . . . . . . . . . . . . . . . . . . . . . 19
AJA Control Panel Overview . . . . . . . . . . . . . . . . . . . . . . . . . . . . . . . 19
AJA Control Panel Operating Modes. . . . . . . . . . . . . . . . . . . . . . . . . 19
AJA Control Panel User Interface . . . . . . . . . . . . . . . . . . . . . . . . . . . 20
Controlling Application . . . . . . . . . . . . . . . . . . . . . . . . . . . . . . . . . 22
Presets. . . . . . . . . . . . . . . . . . . . . . . . . . . . . . . . . . . . . . . . . . . . 23
Default Preferences . . . . . . . . . . . . . . . . . . . . . . . . . . . . . . . . . . . 23
Function Screens. . . . . . . . . . . . . . . . . . . . . . . . . . . . . . . . . . . . . . . 25
Control Panel Operation . . . . . . . . . . . . . . . . . . . . . . . . . . . . . . . . . . 26
Control Screen. . . . . . . . . . . . . . . . . . . . . . . . . . . . . . . . . . . . . . . 26
Format Screen . . . . . . . . . . . . . . . . . . . . . . . . . . . . . . . . . . . . . . . 28
Conversion Screen . . . . . . . . . . . . . . . . . . . . . . . . . . . . . . . . . . . . 29
Input Select Screen. . . . . . . . . . . . . . . . . . . . . . . . . . . . . . . . . . . . 30
SDI Output Screen . . . . . . . . . . . . . . . . . . . . . . . . . . . . . . . . . . . . 32
HDMI Screen (LHi Only). . . . . . . . . . . . . . . . . . . . . . . . . . . . . . . . . 33
Analog Out Screen . . . . . . . . . . . . . . . . . . . . . . . . . . . . . . . . . . . . 35
Video Setup Screen . . . . . . . . . . . . . . . . . . . . . . . . . . . . . . . . . . . 36
Audio Setup Screen . . . . . . . . . . . . . . . . . . . . . . . . . . . . . . . . . . . 37
DS Keyer Screen. . . . . . . . . . . . . . . . . . . . . . . . . . . . . . . . . . . . . . 38
LUT Screen . . . . . . . . . . . . . . . . . . . . . . . . . . . . . . . . . . . . . . . . . 40

KONA LH Capture, Display, Convert v15.5 4 www.aja.com
Timecode Screen . . . . . . . . . . . . . . . . . . . . . . . . . . . . . . . . . . . . . 42
Presets Screen . . . . . . . . . . . . . . . . . . . . . . . . . . . . . . . . . . . . . . . 43
Firmware Screen . . . . . . . . . . . . . . . . . . . . . . . . . . . . . . . . . . . . . 44
Info Screen. . . . . . . . . . . . . . . . . . . . . . . . . . . . . . . . . . . . . . . . . 45
Using Multiple AJA Products . . . . . . . . . . . . . . . . . . . . . . . . . . . . . . . 45
Notes on Using Multiple AJA Products: . . . . . . . . . . . . . . . . . . . . . . . 46
Additional Information . . . . . . . . . . . . . . . . . . . . . . . . . . . . . . . . . . . 46
About 8-bit Versus 10-bit Video. . . . . . . . . . . . . . . . . . . . . . . . . . . . 46
About 12-bit Video . . . . . . . . . . . . . . . . . . . . . . . . . . . . . . . . . . . . 47
About RGB and YCbCr (YUV) Video . . . . . . . . . . . . . . . . . . . . . . . . . 47
Appendix A – Specications . . . . . . . . . . . . . . . . . . . . . . . . 48
KONA LHi Tech Specs . . . . . . . . . . . . . . . . . . . . . . . . . . . . . . . . . . . . 48
KONA LHe Plus Tech Specs . . . . . . . . . . . . . . . . . . . . . . . . . . . . . . . . 51
Appendix B – Safety & Compliance. . . . . . . . . . . . . . . . . . . .54
Warranty and Liability Information . . . . . . . . . . . . . . . . . . . .61
Limited Warranty on Hardware. . . . . . . . . . . . . . . . . . . . . . . . . . . . . . 61
Limitation of Liability . . . . . . . . . . . . . . . . . . . . . . . . . . . . . . . . . . . . 61
Governing Law and Language; Your Rights. . . . . . . . . . . . . . . . . . . . . . 62
Index. . . . . . . . . . . . . . . . . . . . . . . . . . . . . . . . . . . . . . .63

KONA LH Capture, Display, Convert v15.5 5 www.aja.com
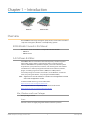
Chapter 1 – Introduction
Overview
The AJA KONA series brings the highest quality 2K, HD, and SD video and audio to
computers running Mac, Windows or Linux Operating Systems.
KONA Models Covered in this Manual
This manual covers the installation and operation of these models:
• KONA LHi
• KONA LHe Plus
AJA Software & Utilities
AJA’s KONA software and hardware were developed for powerful integrated
video/audio capture, editing, and production with a variety of 3rd-party
software. With KONA and a qualified computer, you have the ultimate system
for production, post-production, broadcast, and streaming work. AJA software
is distributed as a unified package which includes all the software, firmware,
plugins, and utility programs for AJA’s Io, KONA, and T-TAP products.
Four retail packages are available, one for Mac, one for Windows, and two for
Linux (one package for Ubuntu, one package for Red Hat/CentOS).
NOTE: Support for the Linux OS retail drivers is based on the Linux application used and
comes from the application’s vendor.
To download AJA software, go to the AJA website:
https://www.aja.com/en/support/downloads
For a complete software compatibility list, see the AJA website link:
https://www.aja.com/en/category/edit/compatibility
Mac, Windows and Linux Packages
These packages include:
Drivers
AJA device drivers for tightly integrated hardware/software operation.

KONA LH Capture, Display, Convert v15.5 6 www.aja.com
AJA Control Panel
The Control Panel provides:
• Source selection and control of your AJA hardware.
• A block diagram to show visually what routing and processing is being
performed.
AJA Control Room
Control Room is a cross-platform software application for ingest, playback and
output with AJA devices.
AJA System Test
System Test provides accurate and detailed evaluations of drive and system
performance statistics, allowing you to measure the capabilities of your system
for recording and playing back various resolutions and codecs. The application
includes:
• System Disk Test
• AJA Device Test
• Disk + Device Test
• System Report
The application tests Read and Write, Capture and Playback speeds in both
Megabytes per second and Frames per second. The disk speed tests differ from
standard disk I/O performance applications in that they specifically test the
system under conditions typically encountered with video capture, playback, and
editing.
NOTE: Theoretically the best test is to fill your storage disk to 80% and then test capture
at the highest data rate you will use.
Additional with Mac and Windows Packages
3rd-Party Plugins
AJA provided plugins for popular 3rd-party Professional Video Applications from
Adobe, Avid, Apple, Telestream, and others.
System Requirements
AJA Video recommends that your system meet minimum hardware and software
requirements to achieve a satisfactory level of performance. Updates to system
requirements are subject to change.
NOTE: See Software Vendor system requirements for GPU recommendations and
additional hardware requirements and recommendations.
AJA recommends:
• Mac OS 10.12 Sierra or later (including 10.15 Catalina)
• Win 10 or later with all updates
• Linux Redhat/CentOS 7
• Linux Ubuntu 14.04 LTS and Ubuntu 16.04 LTS
• 2.5 GHz quad core i7 minimum, for HD
• 3.5 GHz eight core minimum, faster processors and more cores recommended,
for UltraHD/4K workows, especially with high frame rate
• 16GB RAM minimum, 32GB or more recommended, especially for UltraHD/4K
or High Frame Rate applications

KONA LH Capture, Display, Convert v15.5 7 www.aja.com
• A reasonably fast and powerful graphics card, with plenty of on-board
memory. Examples (may be specic to application version and/or host CPU)
include:
• NvidiaK5200
• Nvidia K4200
• Nvidia M6000
• Nvidia M5000
• Nvidia M4000
• AMD W7100
• AMD W8100
• Media storage with adequate bandwidth to sustain the capture and playback
of the material you expect to be working with.
NOTE: For large scale installations with shared storage, or for very high performance
requirements, AJA recommends consultation with an experienced a system
integrator. A consultant will be able to assist with many important variables.
Disk Storage Methods
To ensure performance and quality, the disk storage system used with
the workstation must be able to meet the demands of storing real-time
uncompressed media. At the very minimum, the disk storage system must be
able to provide and maintain a consistent transfer rate from the workstation to
disk (read/write). There are a variety of system configurations and peripherals that
can provide this level of performance.
For more on disk storage performance see "AJA System Test Application" on page
13.
KONA LHi Features
The KONA LHi card offers a large number of unique features for optimum quality,
ease of use, and support for a wide variety of workflows and environments.
KONA LHi provides flexible standard definition and high definition capture
and playback, a hardware-based converter for working in mixed SD/HD
environments—and it supports both analog and digital audio/video I/O—
including HDMI.
Video I/O
• 10-bit uncompressed QuickTime capture card
• 3G/HD/SD SDI I/O
• HDMI v1.3a w/Deep Color at 30 bits per pixel input/output
• 12-bit SD and HD Analog Component/Composite/S-Video I/O
Conversion
• Broadcast quality hardware-based 10-bit down-conversion
• Broadcast quality hardware based 10-bit up-conversion
• Broadcast quality hardware based 10-bit cross-conversion (1080 to 720 and
720 to 1080)
• Broadcast quality hardware based 10-bit SD aspect ratio conversion
(anamorphic to letterbox, etc.)
Audio I/O
• 2-channel analog balanced XLR audio I/O

KONA LH Capture, Display, Convert v15.5 8 www.aja.com
• 2-channel AES XLR audio I/O
• 8-channel SDI embedded audio I/O
Signal Timing
• HD/SD genlock on analog video inputs
• LTC Input (on Reference input)
Cabling
• Cables standard
• Optional KLHi-Box Breakout Box—provides rack mounting and exible
easy I/O (KLHi-Box cabling is included with the KLHi-Box).
KONA LHi Audio
KONA LHi supports 2-channel 24-bit 48kHz or 96kHz AES audio via XLR
connections, and 8 channel embedded 24 bit 48kHz audio over HDMI or the same
single SDI connection as the video. If you are using a digital deck—you’ll have the
proper connections to the deck.
For analog audio, KONA LHi provides two-channel balanced audio input and
output. If you purchase the optional KLHi-Box breakout box, you also get two-
channel unbalanced audio output (RCA jacks).
KONA LHi also features AES input sample rate conversion; this feature eliminates
the requirement for audio source synchronization. Sample rate converters auto-
lock to any AES or HDMI input, 32-96KHz, and then convert it to 24 bit 48KHz
audio, perfectly locked to internal KONA LHi video. Sample rate conversion is
done at very high quality (over 120db THD). (HDMI audio can be 20 to 24 bit and
will be saved as 24 bit samples.)
KONA LHe Plus Features
The KONA LHe Plus card offers a large number of unique features for
optimum quality, ease of use, and support for a wide variety of workflows and
environments. KONA LHe Plus provides flexible standard definition and high
definition capture and playback, a hardware down-converter for working in
mixed SD/HD environments—and it supports both analog and digital audio/
video I/O.
Video I/O
• 10-bit uncompressed SD/HD QuickTime capture card
• 12-bit HD Analog Component I/O
• 12-bit SD Analog Component/Composite/S-Video I/O
• One SDI or HD-SDI Input
• Two independent SDI/HD-SDI outputs
Conversion
• Broadcast quality hardware-based 10-bit down-conversion
Audio I/O
• 2-channel analog balanced XLR audio I/O
• 2-channel AES XLR audio I/O
• 8-channel SDI embedded audio I/O

KONA LH Capture, Display, Convert v15.5 9 www.aja.com
Signal Timing
• HD/SD genlock on analog video inputs
Cabling
• Cables standard
• Optional KL-Box Breakout Box—provides rack mounting and exible easy I/O
(KL-Box cabling is included with the KL-Box). When ordering, specify a KL-Box
for the KONA LHe Plus since it uses a unique cable.
KONA LHe Plus Audio
KONA LHe Plus supports two-channel 24-bit 48kHz AES audio via XLR
connections, and eight-channel embedded 24-bit 48kHz audio over the same
single SDI connection as the video. If you are using a digital deck—you’ll have the
proper connections to the deck.
For analog audio, KONA LHe Plus provides two-channel balanced audio input
and output. If you purchase the optional KL-Box breakout box, you also get two-
channel unbalanced audio output (RCA jacks).
KONA LHe Plus also features AES input sample rate conversion; this feature
eliminates the requirement for audio source synchronization. Sample rate
converters auto-lock to any AES input, 32-96KHz, and then convert it to 24 bit
48KHz audio, perfectly locked to internal KONA LHe Plus video. Sample rate
conversion is done at very high quality (over 120db THD).
Cable Connections
KONA offers unsurpassed cable connectivity for a video/audio capture card.
Connections are made via the breakout cable (included with the card) and
connectors mounted on the KONA Card endplate.
KONA LHi and LHe Plus Connectors
The breakout cable used for both KONA LHi and LHe Plus models provides:
• Reference Input (BNC connector)
• Component/Composite/S Video Input (3x BNC)
• Component/Composite/S Video Output (3x BNC)
• AES In (2x XLR)
• AES Out (2x XLR)
• Balanced Audio In (2x XLR)
• Balanced Audio Out (2x XLR)
• RS-422 Machine Control (9-pin)

KONA LH Capture, Display, Convert v15.5 10 www.aja.com
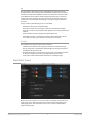
Figure 1. Breakout Cable for LHe Plus and LHi Models
RS422 Machine Control
to VTR (9-pin)
Analog Audio Channel 1 Input
Analog Audio Channel 2 Input
Analog Audio Channel 1 Output
Analog Audio Channel 2 Output
Digital AES Input Channels 1 & 2
Digital AES Output Channels 1 & 2
Multiple-pin
connector
to KONA LH
Y/CVBS In BNC
Pb/Y In BNC
Pr/C In BNC
Y/G/CVBS Out BNC
Pb/B/Y Out BNC
Pr/R/C Out BNC
green
blue
red
green
blue
red
6 BNCs (Analog Connections): Can be
Congured for Component, Composite, or Y/C
Reference Input or LTC Input BNC
Balanced Audio
Analog Video
KONA LHi Endplate
Connectors on the KONA LHi card endplate additionally provide:
• Standard-denition or High-denition SDI input (1 BNC) and output (1 BNC)
• HDMI input and output (2x HDMI mini-connectors)
KONA LHe Plus Endplate
The KONA LHe Plus endplate provides one BNC for SDI input and two
independent SDI output BNCs.
Using Breakout Boxes
The KONA product line offers two optional 19” 1RU rack-mountable breakout
boxes that attach to the KONA card via cables that connect to the back of the
breakout box. These cables are supplied with the breakout box. The breakout
boxes offer the same inputs and outputs as the standard breakout cables and
more. Breakout boxes can be easily rack mounted or placed on top of a broadcast
monitor or editing desk.
KLHi-Box for KONA LHi
The KLHi-Box offers the same connections as the KL-Box except a single
connector is provided for the following: SDI input, SDI output, HDMI v1.3a input,
and HDMI v1.3a output.

KONA LH Capture, Display, Convert v15.5 11 www.aja.com
NOTE: The HDMI connectors on the breakout box are full-size, not mini as on the LHi
endplate
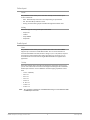
Figure 2. KLHi-Box Model Breakout Box
.
RS422
Machine
Control
External
Ref. or LTC
(loop)
Analog
Audio
Output
Balanced Audio In
Channels 1 & 2
Balanced Audio Out
Channels 1 & 2
Composite/
Component
Video In
Composite/
Component
Video Out
AES/EBU Audio
In and Out
SDI
In
HDMI v1.3a
Out
HDMI v1.3a
In
SDI
Out
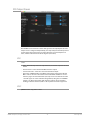
KL-Box for KONA LHe Plus
The KL-Box is connected via one 60-pin to 60-pin, and one 3-BNC to 3-BNC cable.
When you purchase the KL-Box, you get two-channel unbalanced audio output
(2 RCA Jacks) not available with the standard cable. When ordering a KL-Box,
specify the KONA card model you’ll be using the KL box with to ensure you get
the proper cable set.
Figure 3. KL-Box Model Breakout Box
RS422
Machine
Control
External
Reference
(loop)
Analog Audio
Output
Balanced Audio In
Channels 1 & 2
Balanced Audio Out
Channels 1 & 2
Composite/
Component
Video In
Composite/
Component
Video Out
AES/EBU Audio
In and Out
Serial
Digital
In
Out
Serial
Digital
Detailed Connector Descriptions
LHe Plus/LHi Connectors
Connectors on the standard cable set are labeled by their function for easy
installation and maintenance. Connectors on the optional KL-Box are similarly
labeled
SDI Input and Outputs
BNC connectors are provided on the KONA LHe and LHi card endplates for
one SD-SDI or HD-SDI input. The LHe Plus has two, and LHi has one SDI output
(format independent of the input). The SDI input and outputs support video and
embedded 24-bit digital audio. Use SDI wherever possible for the best quality 10-

KONA LH Capture, Display, Convert v15.5 12 www.aja.com
bit uncompressed video input, capture and output. If peripheral equipment has
a variety of inputs/outputs, look to see if it has SDI I/O, and use it where possible.
Most high-end professional broadcast equipment supports SDI (VTRs, cameras,
media storage servers, etc.).
2-Channel Digital AES/EBU Audio Inputs And Outputs
One female XLR connector is provided for the channel 1 and 2 inputs, while
a male XLR connector carries channel 1 and 2 outputs. AES/EBU signals are
handled internally as 24-bit digital. The optional KL-Box also provides XLR audio
connections on the front panel.
NOTE: AES XLR connections are digital and cannot be used with analog equipment
having XLR connectors.
Analog 2-Channel Balanced Audio
Two sets of analog XLR connectors, one for each channel, support balanced audio
connections. Male XLRs are provided for outputs and female XLRs are provided
for inputs. Balanced audio (differential) connections provide better analog
audio quality over longer cable runs. Most professional quality VTRs and audio
equipment have XLR style connectors for analog audio. Analog audio signals are
converted internally to 24-bit digital.
Unbalanced Audio on KL-Box
On the KL-Box are two analog output connectors, one for each channel. These
connectors are RCA-style phono jacks.
RS-422 Machine Control
A female DE-9 connector on the LHi/LHe Plus breakout cable provides connection
for VTRs, camcorders, disk media servers, and other devices using RS-422 SMPTE
(Sony) protocol. This RS-422 connector is also present on the optional KL-Box
(connector pinout is Sony 9-pin protocol).
LHi Only Connectors
HDMI Input and Output
Two HDMI mini-connectors on the LHi endplate (full-size HDMI connectors on
the KLHi-Box) provide for input and output of HDMI compatible video (version
1.1) and multi-channel embedded audio (8 channels). HDCP is not supported on
either input or output. The LHi’s HDMI output does not have HDCP, and input
sources having HDCP are not supported. The HDMI input is designed to support
long cable runs—up to 100 ft. when using 22 or 24AWG HDMI cable, or up to 50
ft. using 28 or 30AWG HDMI cable. The HDMI output supports standard HDMI
cables only.

KONA LH Capture, Display, Convert v15.5 13 www.aja.com
Chapter 2 – Installation
Installation Overview
The installation and set up of a KONA card is simple, and may vary slightly
depending on your system.
For the most up-to-date Mac system requirements for KONA, see the following
AJA website:
https://www.aja.com/en/support/kona-system-configuration/
For the most up-to-date Windows system requirements for KONA, see the
following AJA website:
https://www.aja.com/en/support/kona-pc-system-configuration/
AJA System Test Application
AJA System Test is a utility for measuring system performance with AJA KONA
Video Capture cards. It is installed with the KONA Driver. The application includes:
• System Disk Test
• AJA Device Test
• Disk + Device Test
• System Report
The application tests Read and Write, Capture and Playback speeds tests in both
Megabytes per second and Frames per second. The disk speed tests differ from
standard disk I/O performance applications in that they specifically test the
system under conditions typically encountered with video capture, playback, and
editing.
We suggest the best test is to fill your storage disk to 80% and then test capture at
the highest data rate you will use.
Unpacking
Shipping Box Contents
Your KONA shipment includes:
• KONA PCI-Express card
• KONA I/O cables.

KONA LH Capture, Display, Convert v15.5 14 www.aja.com
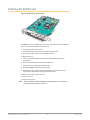
Installing the KONA Card
Figure 4. KONA Card (model LHe Plus)
The KONA card can be installed into a PC chassis, legacy Mac Pro chassis with PCIe
slots, or into a Thunderbolt PCIe external chassis.
1. Turn o power to the host chassis.
2. Touch the outside of the chassis to discharge any body static.
3. Remove the power cable from the back of the chassis.
4. Open the chassis.
5. Locate a recommended PCIe slot (see the AJA website for slot selection
instructions).
6. Remove the backplate and screw from the PCIe slot.
7. Touch the chassis to discharge any body static.
8. Remove the KONA card from its anti-static bag.
9. Carefully insert the card by rocking it slowly into the slot. Ensure the card
aligns properly with the slot opening and is fully seated.
10. Replace the screw to secure the card.
11. Close the chassis.
12. Power up the chassis.
NOTE: Always put a RAID controller and KONA on separate PCIe busses. This improves
performance by reducing bus contention.

KONA LH Capture, Display, Convert v15.5 15 www.aja.com
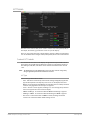
Cabling the System
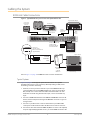
KONA LHi Cable Connections
Figure 5. Typical KONA LHi System Shown with Optional KLHi-Box
Digital VTR with SDI Inputs
RS422
Machine
Control
SDI Video
with Embedded
Audio In/Out
Audio Monitor
AES/EBU Audio In/Out
to Monitor System
Reference Monitors
Analog Audio
Inputs/Outputs
(Balanced)
POWER
CMPTR
External Storage
Computer Monitor
•
•
•
•
•
•
•
•
•
•
•
•
•
•
•
•
•
•
•
•
•
•
•
•
•
•
•
•
•
•
•
•
•
•
•
•
Optional
Genlock
Reference
Video Monitor
Component
Video
Apple Mac Pro
with OSX
or PC with
Windows 7
AJA KONA LHi Card
Connect to
KLHi-Box Using
Cables and Instructions
Supplied With it
Installed
Inside Mac
or PC
Connect HDMI In/Out
Adapter Cables
Between KONA LHi
Card and KLHi-Box
Also see Figure 1 on page 10 for KONA LH cable connector identification.
Typical System
Figure 5 on page 15 shows typical system interconnections for a system
with digital A/V sources. Your system may differ depending on VTRs, audio
monitoring, and video monitoring.
1. If desired, connect your house reference sync to the KONA LHi Ref Loop
connector (BNC). The second KONA LHi Ref Loop connector on the KLHi-
Box (if used) can be connected to the VTR or terminated with a 75-ohm
terminator. If instead using LTC timecode input, connect to the Ref Loop
input.
2. Connect an HDMI Video Monitor to the KONA LHi HDMI Out connector. Or
instead, use the Component Analog Video Out BNC connectors to go to an
analog monitor.
3. Connect a 9-pin DE9 machine control cable between your VTR’s RS422
control port and the breakout cable’s RS-422 machine control connector.
4. Connect two SDI cables between KONA LHi (BNCs are on the card endplate)
and your digital VTR (Digital Betacam etc.), one from KONA LHi SDI In to the

KONA LH Capture, Display, Convert v15.5 16 www.aja.com
VTR SDI Out, and one from KONA LHi SDI Out to the VTR SDI In. The KONA
LHi SDI connections have embedded audio so the VTR must be congured
accordingly.
5. If you have an AES/EBU-ready audio monitoring system, then connect the
two channels of AES/EBU output from KONA LHi’s XLR connectors (channels
1 and 2) to the monitoring system AES/EBU inputs. If you instead have an
analog audio monitoring system, you can use either the XLR balanced audio
connectors or the two RCA-style unbalanced stereo output jacks on the
Optional KLHi-Box for output.
KONA LHe Plus Cable Connections
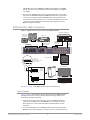
Figure 6. Typical LHe Plus System Shown with Optional KL-Box
Digital VTR with SDI Inputs
RS422
Machine
Control
SDI Video
with Embedded
Audio In/Out
External Reference
Audio System
AES/EBU Audio In/Out
to Monitor System
Reference Monitors
Analog Audio
Inputs/Outputs
(Balanced)
RAID storage
Computer Monitor
Optional
Genlock
Reference
Video Monitor
Component
Video
Workstation
AJA KONA LHe Plus Card
Connect to
KL-Box Using
Cables and Instructions
supplied with it
Installed
inside the
computer
HBA for connection
of external storage
See Figure 1 on page 10 for KONA LH cable connector identification.
Typical System
Figure 6 on page 16 shows typical system interconnections for KONA LHe Plus
with digital A/V sources. Your system may differ depending on VTRs, audio
monitoring, and video monitoring.
1. If desired, connect your house reference sync to the KONA LHe Plus Ref
Loop connector (BNC). The second KONA Ref Loop connector on the KL-
Box (if used) can be connected to the VTR or terminated with a 75-ohm
terminator.
2. Connect a Video Monitor to the KONA LHe Plus Component Analog Video
Out BNC connectors (preferred), or instead connect to a composite monitor.

KONA LH Capture, Display, Convert v15.5 17 www.aja.com
3. Connect a 9-pin DE9 machine control cable between your VTR’s RS422
control port and the breakout cable’s RS-422 machine control connector.
4. Connect two SDI cables between the KONA card (BNCs are on the card
endplate) and your digital VTR (Digital Betacam etc.), one from KONA card’s
SDI In to the VTR SDI Out, and one from card’s SDI Out (1 or 2) to the VTR SDI
In. The KONA LHe Plus SDI connections have embedded audio so the VTR
must be congured accordingly.
5. If you have an AES/EBU-ready audio monitoring system, connect the two
channels of AES/EBU output from KONA’s XLR connectors (channels 1 and
2) to the monitoring system AES/EBU inputs. If, instead, you have an analog
audio monitoring system, you can use either the XLR balanced audio
connectors or the two RCA-style unbalanced stereo output jacks on the
Optional KL-Box for output.
Installing KONA LH Software
NOTE: Always uninstall previous versions of KONA software before updating your
software.
Download
Go to the AJA website and download the latest KONA LH driver software
containing the AJA Control Panel application:
https://www.aja.com/en/support/downloads/
System software updates may occasionally become available to AJA KONA LH
owners on our website (www.aja.com). We recommend checking occasionally for
both software updates and additional product information.
NOTE: If your computer has previously had another video capture or multimedia device
installed, ensure you uninstall any related software before installing KONA LH
This will prevent any hardware or software conflicts.
Software Package Installation and Re-installation
Before installing the KONA LH software package, ensure that your capture/editing
application is installed as detailed in its user documentation. You cannot use
KONA LH with a third-party application until the application has been installed
and run at least once on your workstation. Next, install the AJA software package.
If you add KONA LH supported applications at a later date and have not
previously installed the appropriate drivers, you must run the install program
again selecting the appropriate application support software to be installed.
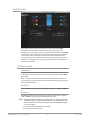
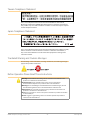
Firmware Update Procedure
After the AJA Software Package has been installed on a computer with your AJA
hardware installed, the firmware on that AJA device can be updated if a newer
version of firmware is included with that software package.
1. Open the AJA Control Panel application.
2. If more than one AJA device is connected, choose the device you want to
update by selecting its name from the drop-down menu at the top of the
screen.
3. Go to the Control Panel Firmware Screen.

KONA LH Capture, Display, Convert v15.5 18 www.aja.com
4. Select the rmware version (if multiple versions exist) in the Desired
dropdown.
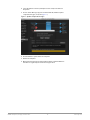
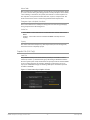
5. Click on Install. Messages appear and when nished, rmware update
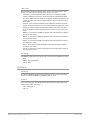
completed messages are shown (Figure 7).
Figure 7. Update Completed Messages
6. Click Shutdown to power down the computer.
7. Restart the computer.
8. Open AJA Control Panel. The AJA hardware with the updated rmware
should be recognized by the Control Panel application.

KONA LH Capture, Display, Convert v15.5 19 www.aja.com
Chapter 3 – Operation
Using KONA with Professional Video /Audio Software
After you install the AJA software package on your computer, you’re ready to
begin capturing and playing back video and audio using your choice of third-
party software. You can go here for AJA software and documentation:
https://www.aja.com/en/support/downloads/
For further support information and downloads for third-party software and
DirectShow for Developers, go to:
https://www.aja.com/en/category/edit/compatibility
Capture Formats
When capturing, you can record data in the following file formats:
• BMP
• DPX
• MOV (QuickTime)
NOTE: Support by KONA of QuickTime for Windows has been discontinued.
• MXF
• TGA
NOTE: Other file types can be captured using third-party capture applications such as
Sienna, Softron, Tools on Air, Drastic, or Quadrus.
AJA Control Panel Overview
The AJA Control Panel is a software application that provides a simple visual
showing how the KONA hardware is currently configured and allows you to make
changes. You can change signal input and output parameters and define the
video processing that will be performed.
The AJA software installer automatically installs the Control Panel application on
your computer.
AJA Control Panel Operating Modes
AJA Control Panel has two fundamental operating modes.

KONA LH Capture, Display, Convert v15.5 20 www.aja.com
Playback Mode - Used for playing back video files from the computer, usually
with a non-linear editing application (NLE) or AJA Control Room, through the
KONA card to that card’s video/audio outputs for viewing and/or external
recording.
Capture Mode - Used for capturing video/audio signals that are coming into
the KONA card from an external source to create video files on the computer
using AJA Control Room or an NLE, or just for display on the KONA outputs.
This mode is also used for stand-alone video display or conversion when
Control Panel is being used without an external controlling application.
The current KONA operating mode is reported on the Control Panel UI screen,
below the block diagram.
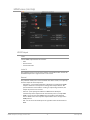
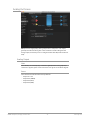
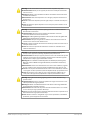
AJA Control Panel User Interface
The AJA Control Panel user interface includes a visual block diagram of the unit’s
current configuration. The current status, input and output settings, and many
other details are depicted in the color-coded block diagram. Below this block
diagram are various controls for changing operating parameters, which will vary
depending on which function screen has been selected.
The left side of the AJA Control Panel provides a navigation list of available
function screens. Clicking on a link (or alternatively, a related element in the block
diagram) displays a function screen corresponding to that topic.
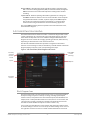
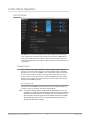
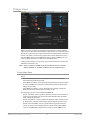
Figure 8. AJA Control Panel, Block Diagram and Controls
Inputs
Framebuer
Format
(Primary)
Outputs
Currently
Selected
Function
Screen
Parameter
Controls
Block Diagram Area
The top block diagram area of the Control Panel screen is a visual representation
of the processing, if any, that’s currently occurring, including inputs/outputs,
reference source, and system status. Lines between inputs, the framebuffer, and
outputs, show a video path. Where there are no lines, there is no connection; this
can be because an input or output isn’t selected in the Input Select menu. The
lines will also show whether the outputs are video or video + key.
You can click any of the function screen selection links in the left column to view
its current settings or click on an icon to call up its related settings screen. You can
also right-click or Control-click to see context-sensitive information and choices.
La pagina si sta caricando...
La pagina si sta caricando...
La pagina si sta caricando...
La pagina si sta caricando...
La pagina si sta caricando...
La pagina si sta caricando...
La pagina si sta caricando...
La pagina si sta caricando...
La pagina si sta caricando...
La pagina si sta caricando...
La pagina si sta caricando...
La pagina si sta caricando...
La pagina si sta caricando...
La pagina si sta caricando...
La pagina si sta caricando...
La pagina si sta caricando...
La pagina si sta caricando...
La pagina si sta caricando...
La pagina si sta caricando...
La pagina si sta caricando...
La pagina si sta caricando...
La pagina si sta caricando...
La pagina si sta caricando...
La pagina si sta caricando...
La pagina si sta caricando...
La pagina si sta caricando...
La pagina si sta caricando...
La pagina si sta caricando...
La pagina si sta caricando...
La pagina si sta caricando...
La pagina si sta caricando...
La pagina si sta caricando...
La pagina si sta caricando...
La pagina si sta caricando...
La pagina si sta caricando...
La pagina si sta caricando...
La pagina si sta caricando...
La pagina si sta caricando...
La pagina si sta caricando...
La pagina si sta caricando...
La pagina si sta caricando...
La pagina si sta caricando...
La pagina si sta caricando...
La pagina si sta caricando...
-
 1
1
-
 2
2
-
 3
3
-
 4
4
-
 5
5
-
 6
6
-
 7
7
-
 8
8
-
 9
9
-
 10
10
-
 11
11
-
 12
12
-
 13
13
-
 14
14
-
 15
15
-
 16
16
-
 17
17
-
 18
18
-
 19
19
-
 20
20
-
 21
21
-
 22
22
-
 23
23
-
 24
24
-
 25
25
-
 26
26
-
 27
27
-
 28
28
-
 29
29
-
 30
30
-
 31
31
-
 32
32
-
 33
33
-
 34
34
-
 35
35
-
 36
36
-
 37
37
-
 38
38
-
 39
39
-
 40
40
-
 41
41
-
 42
42
-
 43
43
-
 44
44
-
 45
45
-
 46
46
-
 47
47
-
 48
48
-
 49
49
-
 50
50
-
 51
51
-
 52
52
-
 53
53
-
 54
54
-
 55
55
-
 56
56
-
 57
57
-
 58
58
-
 59
59
-
 60
60
-
 61
61
-
 62
62
-
 63
63
-
 64
64


AJA KONA LHe Plus Manuale utente
- Categoria
- Apparecchiature musicali supplementari
- Tipo
- Manuale utente
- Questo manuale è adatto anche per
in altre lingue
- English: AJA KONA LHe Plus User manual
- Deutsch: AJA KONA LHe Plus Benutzerhandbuch
Documenti correlati
-
AJA T-TAP® Manuale utente
-
AJA KONA 4 Manuale utente
-
AJA LUT-box Istruzioni per l'uso
-
AJA KONA 3G Installation and Operation Guide
-
AJA io XT Manuale utente
-
AJA HD10A-Plus Installation and Operation Guide
-
-
AJA R5CE Manuale utente
-
AJA IPR-10G-HDMI Manuale utente
-