Deltaco 8Channel Manuale utente
- Categoria
- Videoregistratori digitali (DVR)
- Tipo
- Manuale utente
Questo manuale è adatto anche per

User Guide
INFORMATION MAY CHANGE WITHOUT NOTICE.
4/8/16CH Triplex DVR
Digital Video Recorder

2
4/8/16CH Triplex DVR
Digital Video Recorder
Table of Contents
C
C
a
a
u
u
t
t
i
i
o
o
n
n
.
.
.
.
.
.
.
.
.
.
.
.
.
.
.
.
.
.
.
.
.
.
.
.
.
.
.
.
.
.
.
.
.
.
.
.
.
.
.
.
.
.
.
.
.
.
.
.
.
.
.
.
.
.
.
.
.
.
.
.
.
.
.
.
.
.
.
.
.
.
.
.
.
.
.
.
.
.
.
.
.
.
.
.
.
.
.
.
.
.
.
.
.
.
.
.
.
.
.
.
.
.
.
.
.
.
.
.
.
.
.
.
.
.
.
.
.
.
.
.
.
.
.
.
.
.
.
.
.
.
.
.
.
.
.
.
.
.
.
.
.
.
.
.
.
.
.
.
.
.
.
.
.
.
.
.
.
.
.
.
.
.
.
.
.
.
.
.
.
.
.
.
.
.
.
.
.
.
.
.
.
.
.
.
.
.
.
.
.
.
.
.
.
.
.
.
.
.
.
.
.
.
.
.
.
.
.
.
.
.
.
.
.
.
6
6
P
P
a
a
c
c
k
k
a
a
g
g
e
e
C
C
o
o
n
n
t
t
e
e
n
n
t
t
s
s
.
.
.
.
.
.
.
.
.
.
.
.
.
.
.
.
.
.
.
.
.
.
.
.
.
.
.
.
.
.
.
.
.
.
.
.
.
.
.
.
.
.
.
.
.
.
.
.
.
.
.
.
.
.
.
.
.
.
.
.
.
.
.
.
.
.
.
.
.
.
.
.
.
.
.
.
.
.
.
.
.
.
.
.
.
.
.
.
.
.
.
.
.
.
.
.
.
.
.
.
.
.
.
.
.
.
.
.
.
.
.
.
.
.
.
.
.
.
.
.
.
.
.
.
.
.
.
.
.
.
.
.
.
.
.
.
.
.
.
.
.
.
.
.
.
.
.
.
.
.
.
.
.
.
.
.
.
.
.
.
.
.
.
.
.
.
.
.
.
.
.
.
.
.
.
.
.
.
6
6
I
I
n
n
t
t
r
r
o
o
d
d
u
u
c
c
t
t
i
i
o
o
n
n
.
.
.
.
.
.
.
.
.
.
.
.
.
.
.
.
.
.
.
.
.
.
.
.
.
.
.
.
.
.
.
.
.
.
.
.
.
.
.
.
.
.
.
.
.
.
.
.
.
.
.
.
.
.
.
.
.
.
.
.
.
.
.
.
.
.
.
.
.
.
.
.
.
.
.
.
.
.
.
.
.
.
.
.
.
.
.
.
.
.
.
.
.
.
.
.
.
.
.
.
.
.
.
.
.
.
.
.
.
.
.
.
.
.
.
.
.
.
.
.
.
.
.
.
.
.
.
.
.
.
.
.
.
.
.
.
.
.
.
.
.
.
.
.
.
.
.
.
.
.
.
.
.
.
.
.
.
.
.
.
.
.
.
.
.
.
.
.
.
.
.
.
.
.
.
.
.
.
.
.
.
.
.
.
.
.
.
.
.
.
.
.
.
.
.
.
.
.
.
.
7
7
1. Product Overview........................................................................................7
2. Product Outline ...........................................................................................8
3. Front Panel...................................................................................................8
3.1. The slim model (4/8CH DVR).............................................................8
3.2. The removable drive (CD-ROM/DVD-ROM) model (4/8CH DVR) ....9
3.3. 16CH DVR............................................................................................9
4. Rear Panel..................................................................................................11
5. IR Remote Controller ................................................................................13
I
I
n
n
s
s
t
t
a
a
l
l
l
l
a
a
t
t
i
i
o
o
n
n
.
.
.
.
.
.
.
.
.
.
.
.
.
.
.
.
.
.
.
.
.
.
.
.
.
.
.
.
.
.
.
.
.
.
.
.
.
.
.
.
.
.
.
.
.
.
.
.
.
.
.
.
.
.
.
.
.
.
.
.
.
.
.
.
.
.
.
.
.
.
.
.
.
.
.
.
.
.
.
.
.
.
.
.
.
.
.
.
.
.
.
.
.
.
.
.
.
.
.
.
.
.
.
.
.
.
.
.
.
.
.
.
.
.
.
.
.
.
.
.
.
.
.
.
.
.
.
.
.
.
.
.
.
.
.
.
.
.
.
.
.
.
.
.
.
.
.
.
.
.
.
.
.
.
.
.
.
.
.
.
.
.
.
.
.
.
.
.
.
.
.
.
.
.
.
.
.
.
.
.
.
.
.
.
.
.
.
.
.
.
.
.
.
.
.
.
.
.
.
.
1
1
5
5
1. Install the disk drives................................................................................15
1.1. Install the removable disk drive on the front panel.......................15
1.2. Install the internal disk drives (IDE interface) for 4/8CH DVR......15
1.3. Install the internal disk drives (SATA interface) for 4/8CH DVR ..17
1.4. Install the internal disk drives for 16CH DVR ................................19
2. USB connector on rear panel...................................................................20
3. Camera connections.................................................................................20
4. RS485/RS232 Selection ............................................................................21
4.1. 4 CH Triplex DVR..............................................................................21
4.2. 8 CH Triplex DVR..............................................................................22
4.3. 16 CH Triplex DVR............................................................................22
5. Video Format Selection ............................................................................23
5.1. 4 CH Triplex DVR..............................................................................23
5.2. 8 CH Triplex DVR..............................................................................23
5.3. 16 CH Triplex DVR............................................................................23
6. Cablings.....................................................................................................24
6.1. 4 CH Triplex DVR..............................................................................24
6.2. 8 CH Triplex DVR..............................................................................24
6.3. 16 CH Triplex DVR............................................................................24
7. Sensor Installation....................................................................................25
7.1. 4 CH Triplex DVR..............................................................................25
7.2. 8 CH Triplex DVR..............................................................................25
7.3. 16 CH Triplex DVR............................................................................25
8. Alarm Installation......................................................................................26

3
4/8/16CH Triplex DVR
Digital Video Recorder
8.1. 4 CH Triplex DVR..............................................................................26
8.2. 8 CH Triplex DVR..............................................................................26
8.3. 16 CH Triplex DVR............................................................................26
S
S
t
t
a
a
r
r
t
t
u
u
p
p
t
t
h
h
e
e
D
D
V
V
R
R
S
S
y
y
s
s
t
t
e
e
m
m
.
.
.
.
.
.
.
.
.
.
.
.
.
.
.
.
.
.
.
.
.
.
.
.
.
.
.
.
.
.
.
.
.
.
.
.
.
.
.
.
.
.
.
.
.
.
.
.
.
.
.
.
.
.
.
.
.
.
.
.
.
.
.
.
.
.
.
.
.
.
.
.
.
.
.
.
.
.
.
.
.
.
.
.
.
.
.
.
.
.
.
.
.
.
.
.
.
.
.
.
.
.
.
.
.
.
.
.
.
.
.
.
.
.
.
.
.
.
.
.
.
.
.
.
.
.
.
.
.
.
.
.
.
.
.
.
.
.
.
.
.
.
.
.
.
.
.
.
.
.
.
.
2
2
7
7
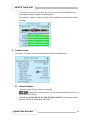
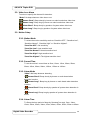
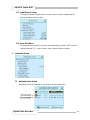
1. Commands.................................................................................................28
1.1. Operating Buttons............................................................................28
1.2. Mouse Operating..............................................................................28
1.3. State Information..............................................................................29
1.4. Icons..................................................................................................29
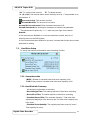
2. Main Menu..................................................................................................31
3. Channel Setup...........................................................................................32
3.1. Channel Number...............................................................................32
3.2. Active Channel..................................................................................32
3.3. Record Channel................................................................................33
3.4. Hidden Channel................................................................................33
3.5. Channel Name...................................................................................33
3.6. Rotation Time....................................................................................33
3.7. Color Adjustment .............................................................................33
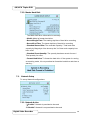
4. Record Setup.............................................................................................34
4.1. Auto Record......................................................................................34
4.2. Video Quality.....................................................................................34
4.3. Record Resolution (only for 16CH DVR) ........................................34
4.4. Record Frame Rate...........................................................................34
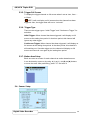
4.5. Record Schedule..............................................................................35
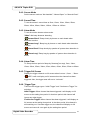
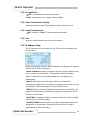
5. Detector Setup...........................................................................................38
5.1. Channel Number...............................................................................38
5.2. Video Loss Alarm.............................................................................39
5.3. Motion Setup.....................................................................................39
5.4. Sensor Setup ....................................................................................40
6. System Setup.............................................................................................42
6.1. Query Error Message.......................................................................42
6.2. View Setup ........................................................................................42
6.3. Date/Time Setup ...............................................................................44
6.4. Button Beep Setup...........................................................................45
6.5. Input Device Setup...........................................................................46
6.6. Auto Exit Menu .................................................................................46
7. Hardware Setup.........................................................................................46
7.1. Authentication Setup .......................................................................46

4
4/8/16CH Triplex DVR
Digital Video Recorder
7.2. Hard Drive Setup ..............................................................................47
7.3. Network Setup ..................................................................................48
7.4. Screen Setup.....................................................................................52
7.5. Audio Setup ......................................................................................53
7.6. Keyboard/PTZ Setup........................................................................53
7.7. Firmware Update ..............................................................................55
7.8. Load Default Setting.........................................................................56
8. Language Selection ..................................................................................57
9. Exit Main Menu..........................................................................................57
9.1. Exit & Save Changes........................................................................57
9.2. Exit & Discard Changes...................................................................57
P
P
l
l
a
a
y
y
b
b
a
a
c
c
k
k
.
.
.
.
.
.
.
.
.
.
.
.
.
.
.
.
.
.
.
.
.
.
.
.
.
.
.
.
.
.
.
.
.
.
.
.
.
.
.
.
.
.
.
.
.
.
.
.
.
.
.
.
.
.
.
.
.
.
.
.
.
.
.
.
.
.
.
.
.
.
.
.
.
.
.
.
.
.
.
.
.
.
.
.
.
.
.
.
.
.
.
.
.
.
.
.
.
.
.
.
.
.
.
.
.
.
.
.
.
.
.
.
.
.
.
.
.
.
.
.
.
.
.
.
.
.
.
.
.
.
.
.
.
.
.
.
.
.
.
.
.
.
.
.
.
.
.
.
.
.
.
.
.
.
.
.
.
.
.
.
.
.
.
.
.
.
.
.
.
.
.
.
.
.
.
.
.
.
.
.
.
.
.
.
.
.
.
.
.
.
.
.
.
.
.
.
.
.
.
.
.
.
.
.
.
.
5
5
8
8
D
D
a
a
t
t
a
a
B
B
a
a
c
c
k
k
u
u
p
p
b
b
y
y
U
U
S
S
B
B
.
.
.
.
.
.
.
.
.
.
.
.
.
.
.
.
.
.
.
.
.
.
.
.
.
.
.
.
.
.
.
.
.
.
.
.
.
.
.
.
.
.
.
.
.
.
.
.
.
.
.
.
.
.
.
.
.
.
.
.
.
.
.
.
.
.
.
.
.
.
.
.
.
.
.
.
.
.
.
.
.
.
.
.
.
.
.
.
.
.
.
.
.
.
.
.
.
.
.
.
.
.
.
.
.
.
.
.
.
.
.
.
.
.
.
.
.
.
.
.
.
.
.
.
.
.
.
.
.
.
.
.
.
.
.
.
.
.
.
.
.
.
.
.
.
.
.
.
.
.
.
.
.
.
.
.
.
.
.
.
.
.
.
.
.
.
6
6
0
0
1. Backup by USB..........................................................................................60
2. Backup by CDRW......................................................................................61
E
E
v
v
e
e
n
n
t
t
S
S
e
e
a
a
r
r
c
c
h
h
.
.
.
.
.
.
.
.
.
.
.
.
.
.
.
.
.
.
.
.
.
.
.
.
.
.
.
.
.
.
.
.
.
.
.
.
.
.
.
.
.
.
.
.
.
.
.
.
.
.
.
.
.
.
.
.
.
.
.
.
.
.
.
.
.
.
.
.
.
.
.
.
.
.
.
.
.
.
.
.
.
.
.
.
.
.
.
.
.
.
.
.
.
.
.
.
.
.
.
.
.
.
.
.
.
.
.
.
.
.
.
.
.
.
.
.
.
.
.
.
.
.
.
.
.
.
.
.
.
.
.
.
.
.
.
.
.
.
.
.
.
.
.
.
.
.
.
.
.
.
.
.
.
.
.
.
.
.
.
.
.
.
.
.
.
.
.
.
.
.
.
.
.
.
.
.
.
.
.
.
.
.
.
.
.
.
.
.
.
.
.
.
6
6
2
2
P
P
T
T
Z
Z
.
.
.
.
.
.
.
.
.
.
.
.
.
.
.
.
.
.
.
.
.
.
.
.
.
.
.
.
.
.
.
.
.
.
.
.
.
.
.
.
.
.
.
.
.
.
.
.
.
.
.
.
.
.
.
.
.
.
.
.
.
.
.
.
.
.
.
.
.
.
.
.
.
.
.
.
.
.
.
.
.
.
.
.
.
.
.
.
.
.
.
.
.
.
.
.
.
.
.
.
.
.
.
.
.
.
.
.
.
.
.
.
.
.
.
.
.
.
.
.
.
.
.
.
.
.
.
.
.
.
.
.
.
.
.
.
.
.
.
.
.
.
.
.
.
.
.
.
.
.
.
.
.
.
.
.
.
.
.
.
.
.
.
.
.
.
.
.
.
.
.
.
.
.
.
.
.
.
.
.
.
.
.
.
.
.
.
.
.
.
.
.
.
.
.
.
.
.
.
.
.
.
.
.
.
.
.
.
.
.
.
.
.
.
.
.
.
.
.
.
.
.
.
.
6
6
3
3
P
P
C
C
C
C
o
o
n
n
n
n
e
e
c
c
t
t
i
i
o
o
n
n
t
t
h
h
r
r
o
o
u
u
g
g
h
h
L
L
o
o
c
c
a
a
l
l
A
A
r
r
e
e
a
a
N
N
e
e
t
t
w
w
o
o
r
r
k
k
(
(
n
n
e
e
t
t
w
w
o
o
r
r
k
k
h
h
u
u
b
b
)
)
.
.
.
.
.
.
.
.
.
.
.
.
.
.
.
.
.
.
.
.
.
.
.
.
.
.
.
.
.
.
.
.
.
.
.
.
.
.
6
6
5
5
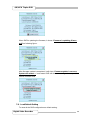
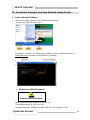
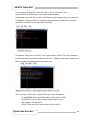
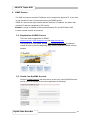
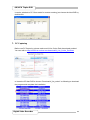
1. Search Router IP Address........................................................................65
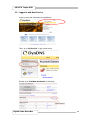
2. DDNS Service ............................................................................................67
2.1. Registration of DDNS Service.........................................................67
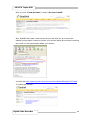
2.2. Create Your DynDNS Account ........................................................67
2.3. Logged In and Host Service............................................................69
2.4. Router Setting...................................................................................70
2.5. DVR DDNS Setting............................................................................71
2.6. PC Client Setting ..............................................................................71
P
P
C
C
C
C
l
l
i
i
e
e
n
n
t
t
&
&
P
P
C
C
V
V
i
i
e
e
w
w
e
e
r
r
.
.
.
.
.
.
.
.
.
.
.
.
.
.
.
.
.
.
.
.
.
.
.
.
.
.
.
.
.
.
.
.
.
.
.
.
.
.
.
.
.
.
.
.
.
.
.
.
.
.
.
.
.
.
.
.
.
.
.
.
.
.
.
.
.
.
.
.
.
.
.
.
.
.
.
.
.
.
.
.
.
.
.
.
.
.
.
.
.
.
.
.
.
.
.
.
.
.
.
.
.
.
.
.
.
.
.
.
.
.
.
.
.
.
.
.
.
.
.
.
.
.
.
.
.
.
.
.
.
.
.
.
.
.
.
.
.
.
.
.
.
.
.
.
.
.
.
.
.
.
.
.
.
.
.
.
.
.
.
.
.
.
7
7
2
2
1. DirectX........................................................................................................72
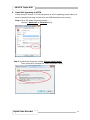
2. PC Client/PC Viewer Program Installation..............................................72
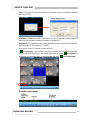
3. Open Disk Operating in VISTA.................................................................73
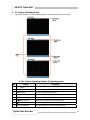
4. PC Viewer Operating Guide......................................................................74
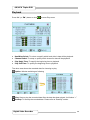
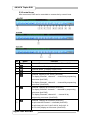
4.1. PC Viewer Operating buttons & Operating mode..........................74
4.2. Playback............................................................................................76
4.3. Capture..............................................................................................77
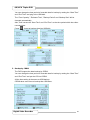
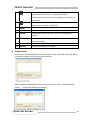
5. PC Client Operating Guide.......................................................................78
5.1. Connect PC Client to DVR...............................................................78
5.2. Status information............................................................................79
5.3. Control Icons ....................................................................................80

5
4/8/16CH Triplex DVR
Digital Video Recorder
6. Name Server ..............................................................................................81
7. PC Capturing .............................................................................................82
8. Playback.....................................................................................................84
R
R
e
e
m
m
o
o
t
t
e
e
S
S
u
u
r
r
v
v
e
e
i
i
l
l
l
l
a
a
n
n
c
c
e
e
t
t
h
h
r
r
o
o
u
u
g
g
h
h
I
I
E
E
B
B
r
r
o
o
w
w
s
s
e
e
r
r
.
.
.
.
.
.
.
.
.
.
.
.
.
.
.
.
.
.
.
.
.
.
.
.
.
.
.
.
.
.
.
.
.
.
.
.
.
.
.
.
.
.
.
.
.
.
.
.
.
.
.
.
.
.
.
.
.
.
.
.
.
.
.
.
.
.
.
.
.
.
.
.
.
.
.
.
.
.
.
.
.
.
.
.
.
.
.
.
.
.
.
.
.
.
.
.
.
.
8
8
5
5

6
4/8/16CH Triplex DVR
Digital Video Recorder
C
C
a
a
u
u
t
t
i
i
o
o
n
n
z For your safety, unplugging the power before moving the DVR, installing, or
replacing any parts or hard drive.
z Make sure all the power cable and wires are properly set up before using the
DVR.
z To avoid a short circuit, don’t leave any unnecessary parts inside the DVR.
z Please avoid dramatic changes of the environment, such as dust, temperature,
and humidity. Keep the DVR in a temperature ranging from 5℃~40℃.
z Keep the DVR in a well-ventilated place and away from any heat-generating
objects.
z Do not block the DVR’s fan and vent.
z Do not expose this unit to the sun directly.
z If you are not sure of the installation and setup, please consult the technicians.
z Don’t fix it yourself if there’s any damage to this unit or the power supply,
Consult the technician or the distributor.
P
P
a
a
c
c
k
k
a
a
g
g
e
e
C
C
o
o
n
n
t
t
e
e
n
n
t
t
s
s
z DVR Main unit x 1
z Power Adapter x 1
z AC Power Cord x 1
z Manual x 1
z Software CD x 1
z USB Mouse X1
z IR Remote Controller x 1
If there is any damage, shortage or inappropriate item in the package, please
contact with your local dealer.

7
4/8/16CH Triplex DVR
Digital Video Recorder
I
I
n
n
t
t
r
r
o
o
d
d
u
u
c
c
t
t
i
i
o
o
n
n
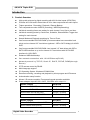
1. Product Overview
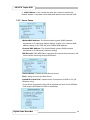
z High quality pictures by digital recording with 4/8/16 video inputs (NTSC/PAL)
z Provides one VGA and S-video/video-in*2 for video output and two audio inputs
z Triplex operations : Recording / Playback / Remote Backup
z Two compressive modes: MJPEG (recording) / MPEG4(networking)
z Individual recording frame rate setting for each channel, from 1fps to real time
z Individual recording mode by Continuous, Schedule, Sensor/Motion Trigger that
setting for each channel.
z Search Mode and Playback searching by Time or Event.
z One front accessible R/W DVD-ROM (or accommodated one removable hard
drive) and one internal 3.5” hard drives (optional – IDE to SATA bridge) for 4/8CH
DVR
z One front accessible R/W DVD-ROM / two internal 3.5” hard drives with IDE or
SATA HDD interface or up to four internal 3.5” hard drives with SATA HDD
interface for 16CH DVR
z Enhanced USB disk backup
z One network connection with 10/100 Ethernet(RJ-45)
z Network protocol by TCP/IP, Static IP, DHCP, PPPoE, DDNS(through
Router)
z P/T/Z camera control by RS485
z Multi-Language support
z PC Operating System: Windows XP/2000/Vista
z Remote monitoring, recording and playback by client program and IE browser
z Authentication setup function.
z Mouse / IR remote controller /Front panel keypad operation available
z Power adapter: Input AC100~240V, 50/60Hz and output is ..
Model \ Output 4/8CH DVR
Slim model/ IDE HDD +12VDC / 4Amp
Slim model/SATA HDD +12VDC / 4Amp
w/removable drive & IDE HDD +12VDC / 5.0Amp
w/removable drive & SATA HDD +12VDC / 5.0Amp
Model \ Output 16CH DVR
w/one DVD-RW & two internal HDD +12VDC / 6.6Amp
w/four internal HDD (SATA) +12VDC / 8.5Amp

8
4/8/16CH Triplex DVR
Digital Video Recorder
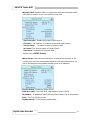
z Dimension(Width x Height x Depth):
290x52x220mm (4/8CH DVR with one 3.5”HDD)
340x60x280mm (4/8CH DVR with Removable HDD+3.5”HDD)
430x80x320mm (16CH DVR)
z Display/Recording frame rate and resolution:
Models 4CH DVR 8CH DVR 16CH DVR
Display Frame Rate 120/100fps 240/200fps 480/400fps
Recording Frame Rate
60(NTSC)/50(PAL)fps
60(NTSC)/50(PAL)fps
120(NTSC)/100(PAL)fps
Display Resolution 640x448 (NTSC) / 640x544(PAL)
Recording Resolution 640x224(NTSC) / 640x272(PAL)
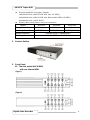
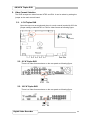
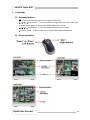
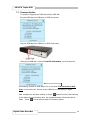
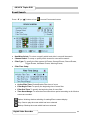
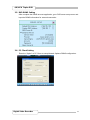
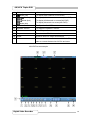
2. Product Outline
3. Front Panel
3.1. The slim model (4/8CH DVR)
-with one internal HDD
(Type I)
(Type II)

9
4/8/16CH Triplex DVR
Digital Video Recorder
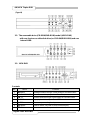
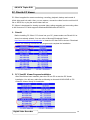
(Type III)
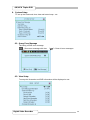
3.2. The removable drive (CD-ROM/DVD-ROM) model (4/8CH DVR)
-with one front-accessible disk drive (or CD-ROM/DVD-ROM) and one
internal HDD
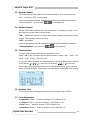
3.3. 16CH DVR
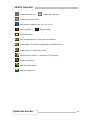
Controls:
No. Name Function
1 WW REW Backward search through a time-shifted or recorded video.
2 II/X PLAY/PAUSE Start / Pause video playback or Enter Play menu
3 XX FF Forward search through a time-shifted or recorded video.
4 STOP Stop playback / backup or Enter PTZ control menu
5
● REC
Start or stop recording/backup.
6
MODE
Press to select 1/4(1/4/8 for 8ch) screen display.
7 MENU Enter menu or back to previous menu list..

10
4/8/16CH Triplex DVR
Digital Video Recorder
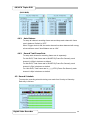
8 Ç / SUP Moves up through the list of menu. Also used to select menu
options or change the DVR configuration values.
Or Enter Event Search Menu.
9 È / T DOWN Moves down through the list of menu. Also used to select
menu options or change the DVR configuration values.
10
SELECT/ENTER
Use this button to change values on main menu or sub menu
setting.
15
II PAUSE
Pause video playback
16
IIX PLAY
Start video playback
17
Full Screen
Press to select full screen display (CH1~CH8)
18
Full Screen
Press to select full screen display (CH9~CH16)
19
2x2 4 Split View
Press to select 4 split view on screen display. With a
sequence of CH1~CH4,CH5~CH8,CH9~CH12, CH13~CH16
20
3x3 9 Split View
Press to select 9 split view on screen display. With a
sequence of CH1~CH8, CH9~CH16
21
4x4 16 Split View
Press to select 16 split view on screen display as CH1~CH16
Indicators:
No. Name Function
11 Power LED The DVR unit is powered up and running. (Green color)
12 Hard disk
Actived LED
LED indicator flashes at hard disk is acting (Red color)
I/O:
No. Name Function
13 IR Receiver IR Control receiver (Refer to IR Remote Controller)
14 USB Connects PC for firmware upgrading/USB backup

11
4/8/16CH Triplex DVR
Digital Video Recorder
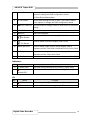
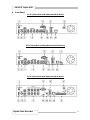
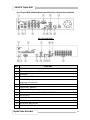
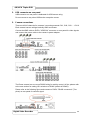
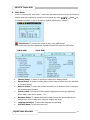
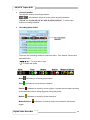
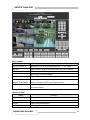
4. Rear Panel
4 CH Triplex DVR (with Removable Disk Drive)
4 CH Triplex DVR (without Removable Disk Drive)
8 CH Triplex DVR (with Removable Disk Drive)

12
4/8/16CH Triplex DVR
Digital Video Recorder
8 CH Triplex DVR (without Removable Disk Drive, without Sensor/Alarm)
16 CH Triplex DVR
No. Function
1 IR Extender connector (Optional)
2 VGA Display Connector (DB-9)
3 AUDIO-IN
4 POWER ON/OFF Switch
5 USB PORT (dedicated Only for Mouse Connection, must connect at the
beginning of Power On)
6 S-VIDEO
7 VIDEO OUT (Monitor)
8 VIDEO IN (BNC)
9 General Purpose I/O for SENSOR/ALARM/RS485
10 DC-IN (12V)
11 AUDIO-OUT
12 LAN (RJ45)
13 NTSC/PAL SELECTOR
14 SPOT MONITOR

13
4/8/16CH Triplex DVR
Digital Video Recorder
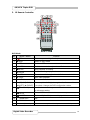
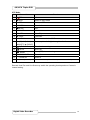
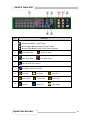
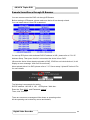
5. IR Remote Controller
DVR Mode
No Button / Name Function
1
REC
Start or stop recording / backup.
2 z DVR Switch to DVR mode
3 z PTZ Switch to PTZ mode
4 WW REW Backward search through a time-shifted or recorded video.
5 STOP Stop playback or backup.
6
II PAUSE
Pause recording or playback.
7 XX FF Forward search through a time-shifted or recorded video.
8 ► PLAY Start video playback.
9 MENU Enter menu or exit.
10 ▲(UP)/ ▼(DOWN)/
W (LEFT)/ ►(RIGHT)
Moves up/down/left/right through the list of menus. Or use
it to select / change the DVR configuration values.
11
(Enter/Select)
Use this button to change or confirm values on main menu
or sub menu setting.
12
4 AUTO
Press AUTO button to start screen auto sequence.
13
MODE
Back to 4/8 (for 4/8ch) screen display while screen is full..
14
- ZOOM OUT
N/A
15
+ ZOOM IN
N/A
16 1,2,----16 (Channels) Channels Selector (CH1~CH16 depends on each DVR)

14
4/8/16CH Triplex DVR
Digital Video Recorder
PTZ Mode
No Button / Name Function
1
REC
N/A.
2 z DVR Switch to DVR mode
3 z PTZ Switch to PTZ mode
4 WW REW Move Left.
5 STOP N/A.
6
II PAUSE
N/A.
7 XX FF Move Right
8 ► PLAY Line Scan
9 MENU Exit menu or switch to DVR.
10 ▲(UP)/ ▼(DOWN)/
W (LEFT)/ ►(RIGHT)
Moves up/down/left/right through the list of menus.
11
(Enter/Select)
Enter function setting menu
12
4 AUTO
Auto Pan
13
MODE
Enter (PTZ) channel setting menu.
14
- ZOOM OUT
Zoom Out
15
+ ZOOM IN
Zoom In
16 1,2,----16 (Channels) Channels Selector (CH1~CH16 depends on each DVR)
Remark: Auto Pan and Line Scan may switch the operating that depends on Camera’s
internal setting.

15
4/8/16CH Triplex DVR
Digital Video Recorder
I
I
n
n
s
s
t
t
a
a
l
l
l
l
a
a
t
t
i
i
o
o
n
n
Be sure there is no power connection before starting installation!
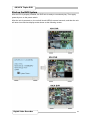
1. Install the disk drives
There are two spaces for disk drives installation on the DVR: One front accessible R/W
CD-ROM/DVD-ROM (or removable HDD drive) and one internal 3.5” hard drives with
IDE (default) or SATA interface.
Set the HDD (installed with OS/DVR software) jumper into “Master” to make sure all
operating will be normal. The other HDD would be set to “Slave”.
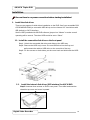
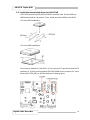
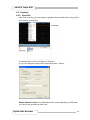
1.1. Install the removable disk drive on the front panel
Step1: Unlock the removable disk drive and slide out the HDD tray.
Step2: Remove the HDD tray’s cover. Put one HDD drive into the tray and
well-connect the cable to HDD drive on the rear side of the tray.
Setp3: Fix four screws on both sides, put the cover back and slide back the HDD
tray.
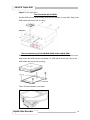
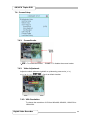
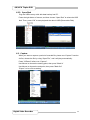
1.2. Install the internal disk drives (IDE interface) for 4/8CH DVR
Step1: Unscrew three screws on DVR’s rear panel. Then slide backward the
chassis’s top cover and move it upward

16
4/8/16CH Triplex DVR
Digital Video Recorder
Step2: Fix the hard drive
The Slim Model (4/8 CH DVR)
Put the HDD into the HDD bracket and fixed two screws on each side. Plug in the
HDD cable and power line for using.
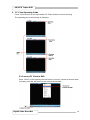
The removable drive (CD-ROM/DVD-ROM) model (4/8CH DVR)
Unscrew two screws HDD bracket near to the front panel. Slide it forward to rear
side to take the HDD bracket and install 3.5” HDD drives on the top. Plug in the
HDD cable and power line for using
Then, Put the chassis’s cover back

17
4/8/16CH Triplex DVR
Digital Video Recorder
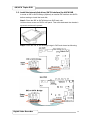
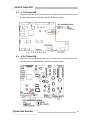
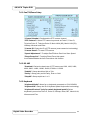
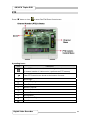
1.3. Install the internal disk drives (SATA interface) for 4/8CH DVR
It needs an IDE to SATA Bridge (Optional) to transfer IDE interface into SATA
before starting to install the hard disk,
Step 1: Place the IDE to SATA Bridge into DVR main unit.
Unscrew three screws on DVR’s rear panel. Then slide backward the chassis’s
top cover and move it upward.
Step 2: Place the IDE to SATA Bridge lodge in DVR main board as following:

18
4/8/16CH Triplex DVR
Digital Video Recorder
Step 3: Make sure the jumpers on IDE to SATA bridge (JS2) have been set to
P1,2-short and P3,4-short as following
Step 4: Unscrew two screws HDD bracket near to the front panel. Slide it forward
to rear side to take the HDD bracket and install 3.5” HDD drives on the top
Then, Put the chassis’s cover back
OR

19
4/8/16CH Triplex DVR
Digital Video Recorder
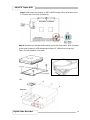
1.4. Install the internal disk drives for 16CH DVR
16CH DVR provides PATA (IDE) and SATA interface both. Put the HDD into
HDD bracket and fix it by screws. Then, install the whole HDD set into DVR.
<For two HDD installation>
<For one HDD installation>
There are two models for 16ch DVR: 1) Four internal 3.5” hard drives with SATA
interface. Or 2) One front accessible R/W DVD-ROM and one internal 3.5” hard
drives with PATA (IDE) or SATA interface as following figure.

20
4/8/16CH Triplex DVR
Digital Video Recorder
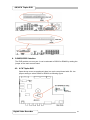
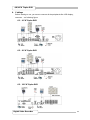
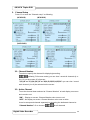
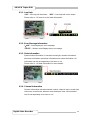
2. USB connector on rear panel
USB connector on rear panel is dedicated for USB mouse using.
Do not connect to any other USB device except the mouse.
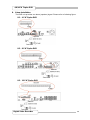
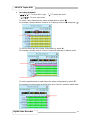
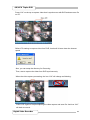
3. Camera connections
There are 4/8/16 channels for cameras’ connections named CH1, CH2, CH3 …. CH16.
Each camera has two wirings basically: BNC and Power.
Connect the BNC cable to DVR’s “VIDEO-IN” connector on rear panel for video signals
and connect the power cable to the camera’s power adapter.
The Dome camera has one more RS485 wiring for activity control. At first, please refer
to the next section for setting JS1 selection to RS485 (default is RS485).
Please refer to the following figure and connect to DVR’s “RS485 connectors” (Two
pines) on rear panel for controls signal.
La pagina si sta caricando...
La pagina si sta caricando...
La pagina si sta caricando...
La pagina si sta caricando...
La pagina si sta caricando...
La pagina si sta caricando...
La pagina si sta caricando...
La pagina si sta caricando...
La pagina si sta caricando...
La pagina si sta caricando...
La pagina si sta caricando...
La pagina si sta caricando...
La pagina si sta caricando...
La pagina si sta caricando...
La pagina si sta caricando...
La pagina si sta caricando...
La pagina si sta caricando...
La pagina si sta caricando...
La pagina si sta caricando...
La pagina si sta caricando...
La pagina si sta caricando...
La pagina si sta caricando...
La pagina si sta caricando...
La pagina si sta caricando...
La pagina si sta caricando...
La pagina si sta caricando...
La pagina si sta caricando...
La pagina si sta caricando...
La pagina si sta caricando...
La pagina si sta caricando...
La pagina si sta caricando...
La pagina si sta caricando...
La pagina si sta caricando...
La pagina si sta caricando...
La pagina si sta caricando...
La pagina si sta caricando...
La pagina si sta caricando...
La pagina si sta caricando...
La pagina si sta caricando...
La pagina si sta caricando...
La pagina si sta caricando...
La pagina si sta caricando...
La pagina si sta caricando...
La pagina si sta caricando...
La pagina si sta caricando...
La pagina si sta caricando...
La pagina si sta caricando...
La pagina si sta caricando...
La pagina si sta caricando...
La pagina si sta caricando...
La pagina si sta caricando...
La pagina si sta caricando...
La pagina si sta caricando...
La pagina si sta caricando...
La pagina si sta caricando...
La pagina si sta caricando...
La pagina si sta caricando...
La pagina si sta caricando...
La pagina si sta caricando...
La pagina si sta caricando...
La pagina si sta caricando...
La pagina si sta caricando...
La pagina si sta caricando...
La pagina si sta caricando...
La pagina si sta caricando...
La pagina si sta caricando...
La pagina si sta caricando...
-
 1
1
-
 2
2
-
 3
3
-
 4
4
-
 5
5
-
 6
6
-
 7
7
-
 8
8
-
 9
9
-
 10
10
-
 11
11
-
 12
12
-
 13
13
-
 14
14
-
 15
15
-
 16
16
-
 17
17
-
 18
18
-
 19
19
-
 20
20
-
 21
21
-
 22
22
-
 23
23
-
 24
24
-
 25
25
-
 26
26
-
 27
27
-
 28
28
-
 29
29
-
 30
30
-
 31
31
-
 32
32
-
 33
33
-
 34
34
-
 35
35
-
 36
36
-
 37
37
-
 38
38
-
 39
39
-
 40
40
-
 41
41
-
 42
42
-
 43
43
-
 44
44
-
 45
45
-
 46
46
-
 47
47
-
 48
48
-
 49
49
-
 50
50
-
 51
51
-
 52
52
-
 53
53
-
 54
54
-
 55
55
-
 56
56
-
 57
57
-
 58
58
-
 59
59
-
 60
60
-
 61
61
-
 62
62
-
 63
63
-
 64
64
-
 65
65
-
 66
66
-
 67
67
-
 68
68
-
 69
69
-
 70
70
-
 71
71
-
 72
72
-
 73
73
-
 74
74
-
 75
75
-
 76
76
-
 77
77
-
 78
78
-
 79
79
-
 80
80
-
 81
81
-
 82
82
-
 83
83
-
 84
84
-
 85
85
-
 86
86
-
 87
87


Deltaco 8Channel Manuale utente
- Categoria
- Videoregistratori digitali (DVR)
- Tipo
- Manuale utente
- Questo manuale è adatto anche per
in altre lingue
- English: Deltaco 8Channel User manual
Altri documenti
-
König SEC-DVRMON20 Manuale utente
-
ERNITEC EDNS1000 - 4 CH Manuale utente
-
 MPEG LA 16CH Manuale utente
-
Vimar 46916.001 Manuale utente
-
Swann SW244-DRC Manuale utente
-
 IVS System AVC793D Guida d'installazione
-
Sanyo DSR-M810PA Manuale utente
-
Elvox 46340.F08 Manuale utente
-
Rugged CCTV Workhorse 120-4 Operating Instructions & User Manual
-
Comelit HDVR836B Instructions Manual

