Horizon Hobby BLH8570 Manuale utente
- Categoria
- Giocattoli telecomandati
- Tipo
- Manuale utente

1
1
Part # Description
1
BLH8521 Pro Motor Set (4): Inductrix Pro
2
BLH8520 Prop Set (4),Black:
3
BLH8515 Canopy Set
4
BLH8516 Flight Control, Beta ight
5
BLH8517 FX805 FPV Camera, 25mW
Part # Description
6
BLH8517EU FX805 FPV Camera, 25mW
7
BLH8519 Main Frame, Black
EFLB2001S45 200mAh 1S 3.7V 45C LiPo Battery
EFLC1008 1S USB Li-Po Charger, 300mA
Part # Description
BLH8506 Prop Set (4), Yellow: Inductrix
BLH8510 Inductrix FPV Race Gates
Part # Description
SPMVM430 Spektrum 4.3 inch video monitor,
sunshade, mount
Grey-bottom motor = clockwise
White-bottom motor = counter-clockwise
Transmitter Setup
Timer
Mode Count Down
Time 3:00
Start Throttle Out
Over 25%
One Time Inhibit
Servo Setup
Chan Travel Reverse
THR 150/150 Normal
AIL 148/148 Normal
ELE 148/148 Normal
RUD 148/148 Normal
GER 100/100 Normal
AUX1 100/100 Normal
FUNCTION LIST
D/R & Expo
Chan Switch (B) Pos D/R Expo
AILE
0 100/100 0
1 100/100 0
2 100/100 0
ELEV
0 100/100 0
1 100/100 0
2 100/100 0
SETUP LIST
F-Mode Setup
Switch 1 Inhibit
Switch 2 Inhibit
Model Type
Airplane
Channel Assign
Channel Input Confi g
1 Throttle
2 Aileron
3 Elevator
4 Rudder
5 Gear Switch B
6 Aux 1 Switch H
Frame Rate
11ms
DSMX
DX6, DX7 (Gen 2), DX8 (Gen 2), DX9, DX18, DX20
Switch Functions
Flight Mode Switch = Switch B
Motor Arm Switch = Switch H
FPV Pro BNF® Quadcopter
Instruction Manual / Bedienungsanleitung / Manuel d’utilisation / Manuale di Istruzioni
Age Recommendation: Not for children under 14 years. This is not a toy.
Charging Warnings
WARNING: Failure to comply with the
following warnings could result in product
malfunction, electrical issues, excessive heat,
FIRE, and ultimately injury and property damage.
• NEVER LEAVE CHARGING BATTERIES
UNATTENDED.
• NEVER CHARGE BATTERIES OVERNIGHT.
• Never charge damaged batteries. If the battery
begins to swell during charging or use, discontinue
immediately.
• Always use the included battery and charger.
Disconnect the battery after charging.
• Charge batteries away from ammable materials
in a well-ventelated area.
• Never charge, transport, or store batteries in hot,
cold, or very sunny places
(recommended between 40–120° F or 5–49° C).
Specifications
Length 3.26 in (83mm) Propeller Diameter 2.56 in (65mm)
Height 1.10 in (28mm) Flying Weight .85 oz (24 g)
Charge the Flight Battery
NOTICE: Inspect the battery to make sure it is not damaged e.g., swollen, bent, broken or
punctured. Charge only batteries that are cool to the touch and are not damaged.
Insert the charger into a USB port.
Connect the battery to the charger.
CHARGING (Solid Red LED)
MAX CHARGE (LED OFF )
Disconnect the ight battery from the charger immediately upon completion of charging.
CAUTION: Only use chargers speci cally designed to charge the included Li-Po battery.
Failure to do so could result in re, causing injury or property damage.
CAUTION: Never exceed the recommended charge rate.
CAUTION: Once charging is complete, immediately remove the battery.
Never leave a battery connected to the charger.
Install the Flight Battery
2
CAUTION: Always disconnect the Li-Po battery from the aircraft
when not ying to avoid over-discharging the battery. Batteries
discharged to a voltage lower than the lowest approved voltage may
become damaged, resulting in loss of performance and potential re
when the batteries are charged.
Throttle down Power ON Transmitter
Operating Safety Precautions
• As the user of this product, you are responsible for
operating it safely, not endangering yourself and others,
or damaging the product or the property of others.
• Operate your product in open spaces away from
people and property.
• Never operate your product with damaged electrical
components.
• Keep the transmitter powered on while model is
powered on.
• Let parts cool after use before touching, motors will
get hot in use.
• Remove batteries after use, as applicable.
General Product Safety Precautions
• Keep all batteries, chemicals, small parts and
anything electrical out of the reach of children.
• Avoid water exposure to this product. Keep parts dry.
• Keep moving parts clean.
3
4
USB Li-Po
Charger
EFLC1008
SOLID RED LED
–Charging
DC Input:5.0V 350mA
DC Output:4.2V 300mA
LED OFF
–Charge
Complete
To receive product updates, special offers and more, register your product at www.bladehelis.com.
WARNING: Read the ENTIRE instruction manual to become familiar with the features of the product
before operating. Failure to operate the product correctly can result in damage to the product, personal
property and cause serious injury.
This is a sophisticated hobby product. It must be operated with caution and common sense and requires some
basic mechanical ability. Failure to operate this Product in a safe and responsible manner could result in injury
or damage to the product or other property. This product is not intended for use by children without direct
adult supervision. Do not attempt disassembly, use with incompatible components or augment product in any
way without the approval of Horizon Hobby, LLC. This manual contains instructions for safety, operation and
maintenance. It is essential to read and follow all the instructions and warnings in the manual, prior to assembly,
setup or use, in order to operate correctly and avoid damage or serious injury.
MEANING OF SPECIAL LANGUAGE
The following terms are used throughout the product literature to indicate various levels of potential
harm when operating this product:
NOTICE: Procedures, which if not properly followed, create a possibility of physical property damage
AND a little or no possibility of injury.
CAUTION: Procedures, which if not properly followed, create the probability of physical property damage
AND a possibility of serious injury.
WARNING: Procedures, which if not properly followed, create the probability of property damage,
collateral damage, and serious injury OR create a high probability of super cial injury.
NOTICE
All instructions, warranties and other collateral documents are subject to change at the sole
discretion of Horizon Hobby, LLC. For up-to-date product literature, visit horizonhobby.com and
click on the support tab for this product.
If you are operating this product in North America, you are required to have
an Amateur Radio (HAM) license. Visit www.arrl.org for more information.
• In angle mode (switch position 0 ), the quadcopter will self-level and has a bank angle limit
of approximately 60 degrees.
• In air mode (switch position 1), the quadcopter will not self-level and does not have a bank angle
limit. At low throttle, the ight controller will continue to stabilize the quadcopter to hold whatever
attitude was last commanded. This mode is useful for ying smooth aerobatic maneuvers at both
high and low throttle settings.
• In acro mode (switch position 2 ), the quadcopter will not self-level and does not have a bank
angle limit. At low throttle, the ight controller will not stabilize the quadcopter. The pilot must
actively control the quadcopter to maintain a desired attitude. This mode is most preferred when
immediate changes in altitude are desired, such as in racing. Use rates and expo to tune the
performance according to your ying style.
Refer to the Transmitter Setup for transmitter switch selection and speci c setup information.
Flight Mode and Rate Selection
Transmitter and Receiver Binding
Bind the quadcopter to your transmitter following the directions below.
General Binding Procedure
1. Disconnect the ight battery from the quadcopter.
2. Set the model type in your transmitter settings to “Acro” mode.
3. Center all trims on your transmitter.
4. Power off the transmitter and fully lower the throttle.
5. Connect the ight battery in the quadcopter. The LED on the 3-in-1 control unit ashes red
during initialization, then ashes blue when it is ready to bind.
6. Put the transmitter into bind mode while powering on the transmitter.
7. Release the bind button/switch after 2–3 seconds. The quadcopter is bound when the blue LED
on the 3-in-1 control unit turns solid.
8. Disconnect the ight battery and power the transmitter off.
If you encounter problems, obey the binding instructions and refer to the troubleshooting guide for
other instructions. If needed, contact the appropriate Horizon Product Support of ce. For a list of
compatible DSM® transmitters, please visit www.bindnfl y.com.
Aileron
Elevator
Rudder
Understand the Primary Flight Controls
If you are not familiar with the controls of your Inductrix quadcopter, take a few minutes to familiarize
yourself with them before attempting your rst ight.
Throttle
Aileron left Aileron right
ForwardElevator down Elevator up Backward
Left Side View Left Side View
Rudder left Rudder right Nose Yaws Right
Nose Yaws Left
Throttle down
Throttle up
Left Side View Left Side View
Descend
Climb
Left
Rear View
Right
Rear View
Fly the Quadcopter
Low Voltage Cuto (LVC)
Once the battery reaches 3V under load, the ESC will continuously lower power supplied to the motor
until complete shutdown occurs. This helps prevent over-discharge of the Li-Po battery. Land imme-
diately once the ESC activates LVC. Continuing to y after LVC can damage the battery, cause a crash
or both. Crash damage and batteries damaged due to over-discharge are not covered under warranty.
Repeatedly ying the aircraft until LVC activates will damage the ight battery.
Disconnect and remove the Li-Po battery from the aircraft after use to prevent trickle discharge.
During storage, make sure the battery charge does not fall below 3V per cell.
FPV Camera and Video Transmitter
Channel Selection:
1. Channel 1 is indicated by the red LED glowing solid.
2. Press the button to cycle through the channels
(1-8). The red LED will ash once as you cycle
through each channel. Press the button once for
each channel until the desired channel is reached.
If unsure of the current transmitter channel, press
the button to cycle the channels until you reach
channel 1, indicated by a solid red LED, then cycle
to the channel desired.
Band Selection:
1. Press and hold the button to change the video
transmitter band.
2. Each time the button is pressed and held the
blue band LED will indicate a change to the next
available band. The blue LEDs indicate FS/IRC band,
band E (North America only), band A, race band and
band B, in that order as shown in the illustration.
NOTICE: Consult local laws and ordinances before operating FPV ( rst person view) equipment.
In some areas, FPV operation may be limited or prohibited. You are responsible for operating this
product in a legal and responsible manner.
See the Available Frequency table to nd the desired video channel and band. The video transmitter
channel and band are changed using the button on the side of the camera module, as shown. There are
6 LEDs on the back of the camera module. The red LED is the channel indicator. The next 5 blue LEDs
are the band indicators.
IMPORTANT: The 25mW video transmitter included with the European Union version of the Inductrix FPV
Pro (BLH8570EU) has 4 blue LEDs. Band E is not available on this version.
Fly in open areas, away from people, trees, cars, and buildings. The range of the system can be
impacted by any obstructions blocking your signal. It is normal to see break up in the video going
behind trees and other obstacles.
Parts List
Exploded View
Optional Parts List
EN
1
3
7
56 4
2
BAND CH 1 CH 2 CH 3 CH 4 CH 5 CH 6 CH 7 CH 8
FS/IRC 5740 5760 5780 5800 5820 5840 5860 5880
Band E 5705 5685 5665 5665 5885 5905 5905 5905
Band A 5865 5845 5825 5805 5785 5765 5745 5725
RaceBand 5658 5695 5732 5769 5806 5843 5880 5917
Band B 5733 5752 5771 5790 5809 5828 5847 5866
Available Frequencies, North America (mHz)
Available Frequencies, European Union (mHz)
BAND CH 1 CH 2 CH 3 CH 4 CH 5 CH 6 CH 7 CH 8
FS/IRC 5740 5760 5780 5800 5820 5840 5860 5860
Band A 5865 5845 5825 5805 5785 5765 5745 5745
RaceBand 5732 5732 5732 5769 5806 5843 5843 5843
Band B 5733 5752 5771 5790 5809 5828 5847 5866
Video Transmitter LEDs
150mW North American version
25mW EU version
Channel Band
LEDs
This product uses Beta ight Third Party Software in portions of its coding. For more information on
Beta ight Software, please visit: https://github.com/beta ight/beta ight/wiki.
THIRD PARTY SOFTWARE. This product may include code developed by one or more third parties (“Third
Party Software”). Some Third Party Software may be subject to other terms and conditions that may be
available for download with the product documentation. Notwithstanding the terms and conditions of this
Agreement, the Third Party Software is licensed to you subject to the terms and conditions of the software
license agreement identi ed in the open source software disclosure. If the third party terms and conditions
include licenses that provide for the availability of source code (such as the GNU General Public License),
the open source software disclosure or the media on which the software may be delivered will provide
instructions where a copy of such source code can be obtained.
The LEDs on the Inductrix indicate the front and back of the quadcopter. The white LEDs indicate the front.
The red LEDs indicate the back.
Takeo
Start the motors by setting the motor arm switch to the on position. Increase the throttle until the model is
approximately 2 ft. (600mm) off the ground in a low-level hover and concentrate on balancing the throttle
stick’s position so that the quadcopter holds a steady hover altitude. In some cases, you may need to make
a few short “hops” to an altitude of just a few inches until you become familiar with the control inputs and
trim settings required to maintain a steady hover and altitude.
Hovering
The Inductrix quadcopter requires minor throttle adjustments to maintain its altitude in hover. Remem-
ber to keep these throttle adjustments as minimal as possible. Large adjustments could result in a
loss of control or a possible crash.
While attempting to establish a low-level hover, check to see if any trim adjustments are required to
help keep the quadcopter from constantly drifting in various directions. If you nd that it constantly drifts
without any directional control input, land the model before making any adjustments to the trim settings.
• If the nose of the quadcopter rotates to the left or right, adjust the rudder trim.
• If the quadcopter continually drifts forward or backward, adjust the elevator trim.
• If the quadcopter continually drifts to the left or right, adjust the aileron trim.
Continue making minor trim adjustments until the machine hovers at a low altitude with very little
drifting and directional control input. If this is your rst multicopter or helicopter, seek the help of an
experienced pilot to trim the model for you before making your rst ight.
With your quadcopter properly trimmed and maintaining a stable low-level hover, practice using the
rudder, elevator and aileron controls to familiarize yourself with the machine’s responses to control
inputs. Remember to keep the control inputs as minimal as possible.
Average ight times are approximately 4 minutes.
NOTICE: Crash damage is not covered under warranty.
Landing
To land, slowly decrease the throttle while in a low-level hover. After landing, stop the motors by changing the
motor arm switch to the off position; disconnect and remove the battery from the aircraft after use to prevent
over discharge. To prevent excessive wear to the motors, always allow the motors to cool between ights.
During storage, make sure the battery charge does not fall below 3V per cell.
If for any reason it is necessary to change one or
more of the propellers on the quadcopter refer to the
illustration to nd the correct rotation direction of the
propeller being replaced. Only replace the propeller
with a propeller of the same rotation direction.
To install the propeller, simply press onto the motor
shaft. Make sure the propeller spins freely after
installation.
Do not press the propeller too far onto the motor
shaft. Doing so may damage the propeller or motor
and keep the propeller from rotating freely.
Propeller Installation

2
Warnungen zum Laden
WARNUNG: Alle Anweisungen und
Warnhinweise müssen genau befolgt
werden. Falsche Handhabung von Li-Po-
Akkus kann zu Brand, Personen- und/oder
Sachwertschäden führen.
• ADEN SIE NIEMALS AKKUS UNBEAUFSICHTIGT.
• LADEN SIE NIEMALS AKKUS ÜBER NACHT.
• Laden Sie njemals beschädigte Akkus Sollte der
Akku zu einem beliebigen Zeitpunkt beginnen, sich
aufzublähen oder anzuschwellen, stoppen Sie die
Verwendung unverzüglich.
• Verwenden Sie immer das Ladegerät und den Akku
aus dem Lieferumfang. Trennen Sie nach dem
Laden den Akku.
• Laden Sie die Akkus immer weit entfernt von
brennbaren in gut belüfteten Bereichen.
• Laden, transportieren oder lagern Sie niemals
Akkus in heißen, kalten oder Plätzen mit
starker Sonneneinstrahlung. (Empfohlener
Temperaturbereich 40 - 120°)
Sicherheitsvorkehrungen und Warnhinweise
• Als Nutzer dieses Produktes sind Sie allein für den
sicheren Betrieb ohne Gefährdung des Produktes,
ihrer selbst und dritter oder deren Eigentum
verantwortlich.
• Betreiben Sie ihr Produkt auf weiten, offenen Flächen
weg von Menschen und anderem Eigentum
• Betreiben Sie das Produkt niemals mit beschädigten
elektrischen Komponenten
• Lassen Sie den Sender eingeschaltet wenn das
Modell eingeschaltet ist
• Lassen Sie die Teile abkühlen bevor Sie sie anfassen.
Die Motoren werden während des Betriebes heiß
• Allgemeine Sicherheitshinweise zum Produkt
• Halten Sie alle Batterien, Akkus, Chemikalien Kleinteile
und Elektronikkomponenten aus der Reichweite von
Kindern
Allgemeine Sicherheitshinweise zum Produkt
• Halten Sie alle Akkus, Batterien, Chemikalien und
Kleinteile und andere elektrische Komponenten aus
der Reichweite von Kindern.
• Vermeiden Sie mit diesem Produkt Wasserkontakt.
Halten Sie die Teile trocken.
• Halten Sie die beweglichen Teile sauber.
Nicht geeignet für Kinder unter 14 Jahren. Dies ist kein Spielzeug.
Spezifikationen
Länge 83mm Rotordurchmesser 65mm
Höhe 28mm Fluggewicht 24 g
Bitte registrieren Sie ihr Produkt unter www.bladehelis.com um Updates, spezielle Angebote und
weitere Informationen zu erhalten.
Laden des Flugakkus
HINWEIS: Laden Sie Akkus nur, wenn sie auf Umgebungstemperatur abgekühlt sind. Schauen Sie sich
den Akku an und stellen Sie sicher, dass dieser nicht beschädigt oder aufgequollen ist.
Stecken Sie den Lader in den USB Port.
Schließen Sie den Akku an das Ladegerät.
Laden (LED rot )
Fertig geladen (LED aus)
Entnehmen Sie den Akku immer aus dem Lader, sobald der Ladevorgang beendet ist.
ACHTUNG: Verwenden Sie nur Ladegeräte, die für LIPO Akkus vorgesehen sind.
Nichtbeachtung kann zu Feuer, Beschädigungen oder Verletzungen führen.
ACHTUNG: Überschreiten Sie niemals die vorgesehene Ladezeit.
ACHTUNG: Entnehmen Sie den Akku aus dem Lader, sobald dieser fertig geladen ist.
Belassen Sie den Akku niemals im Lader.
USB Li-Po
Charger
EFLC1008
SOLID RED LED
–Charging
DC Input:5.0V 350mA
DC Output:4.2V 300mA
LED OFF
–Charge
Complete
Einsetzen des Flugakkus
ACHTUNG: Trennen Sie den Li-Po-Akku immer vom Empfänger
des Flugzeugs wenn Sie nicht iegen um eine Tiefentladung zu
vermeiden. Akkus die unter die zulässige Mindestspannung entladen wer-
den, können dadurch beschädigt werden, was sich in Leistungsverlust und
potentieller Brandgefahr bei dem Laden bemerkbar machen kann.
1 Gas nach unten 2 Einschalten 3
4
DE
Wenn Probleme auftreten beachten Sie bitte die Bindeanweisungen und schauen in die Hilfestellung
zur Problemlösung. Kontaktieren Sie falls notwendig den technischen Service von Horizon Hobby. Eine
Liste der kompatiblen DSM Sender sehen Sie unter www.bindnfl y.com.
Der Bindevorgang
1. Trennen Sie den Flugakku von ihrem Quadcopter.
2. Wählen Sie im Sender den Modelltyp Acro.
3. Zentrieren Sie im Sender alle Trimmungen.
4. Schalten Sie den Sender aus und reduzieren das Gas vollständig.
5. Installieren Sie den Akku im Quadcopter. Die LED auf der 3in1 Platine blinkt rot bei der Initialisierung
und dann blau, um Bindebereitschaft anzuzeigen.
6. Bringen Sie den Sender in den Bindemode während Sie ihn einschalten.
7. Lassen Sie den Bindeschalter nach 2 -3 Sekunden los. Der Quad-Copter ist gebunden wenn die blaue
LED auf der 3-in-1 Einheit leuchtet.
8. Trennen Sie den Flugakku und schalten den Sender aus.
Binden Sie den Quadcopter an Ihren Sender unter Beachtung der nachfolgenden Anweisungen.
Binden von Sender und Empfänger
• Im Winkelmodus (Schalterposition0) nivelliert sich der Quadrocopter selbst und weist eine
Schräglagenbegrenzung von ca. 60Grad auf.
• Im Luftmodus (Schalterposition1) nivelliert sich der Quadrocopter nicht selbst und weist keine
Schräglagenbegrenzung auf. Bei niedrigem Gas sorgt der Flug-Controller weiterhin für die Stabi-
lisierung des Quadrocopters und hält ihn in der zuletzt eingegebenen Stellung. Dieser Modus ist bei
ruhigen Kunst ugmanövern sowohl bei hoher als auch bei niedriger Gaseinstellung hilfreich.
• Im Akro-Modus (Schalterposition2) nivelliert sich der Quadrocopter nicht selbst und weist keine
Schräglagenbegrenzung auf. Bei niedrigem Gas nimmt der Flug-Controller keine Stabilisierung des
Quadrocopters vor. Der Pilot muss den Quadrocopter aktiv steuern, um die gewünschten Stellung
zu halten. Dieser Modus wird vorzugsweise verwendet, wenn eine sofortige Änderung der Flughöhe
gewünscht ist, etwa bei Rennen. Verwenden Sie Geschwindigkeiten und Exponential zum Einstellen
der Leistung entsprechend Ihres Flugstils.
Angaben zur Auswahl für den Senderschalter und den einzelnen Einstellungsoptionen nden Sie
unter Einrichtung des Senders.
Flugmodus und Tempowahl
HINWEIS
Alle Anweisungen, Garantien und anderen zugehörigen Dokumente können im eigenen Ermessen
von Horizon Hobby, LLC jederzeit geändert werden. Die aktuelle Produktliteratur nden Sie auf
horizonhobby.com unter der Registerkarte „Support“ für das betreffende Produkt.
BEDEUTUNG DER SIGNALWÖRTER
Die folgenden Begriffe werden in der gesamten Produktliteratur verwendet, um auf unterschiedlich
hohe Gefahrenrisiken beim Betrieb dieses Produkts hinzuweisen:
HINWEIS: Wenn diese Verfahren nicht korrekt befolgt werden, können sich möglicherweise
Sachschäden UND geringe oder keine Gefahr von Verletzungen ergeben.
ACHTUNG: Wenn diese Verfahren nicht korrekt befolgt werden, ergeben sich wahrscheinlich
Sachschäden UND die Gefahr von schweren Verletzungen.
WARNUNG: Wenn diese Verfahren nicht korrekt befolgt werden, ergeben sich wahrscheinlich
Sachschäden, Kollateralschäden und schwere Verletzungen ODER mit hoher Wahrscheinlichkeit
ober ächliche Verletzungen.
ACHTUNG: Lesen Sie die GESAMTE Bedienungsanleitung, um sich vor dem Betrieb mit den
Produktfunktionen vertraut zu machen. Wird das Produkt nicht korrekt betrieben, kann dies zu
Schäden am Produkt oder persönlichem Eigentum führen oder schwere Verletzungen verursachen.
Dies ist ein hochentwickeltes Hobby-Produkt. Es muss mit Vorsicht und gesundem
Menschenverstand betrieben werden und benötigt gewisse mechanische Grundfähigkeiten.
Versuchen Sie nicht ohne Genehmigung durch Horizon Hobby, LLC das Produkt zu zerlegen, es
mit inkompatiblen Komponenten zu verwenden oder auf jegliche Weise zu erweitern.
Warranty and Service Contact Information
Country of
Purchase Horizon Hobby Contact Information Address
United States
of America
Horizon Service Center
(Repairs and Repair Requests) servicecenter.horizonhobby.com/
RequestForm/
4105 Fieldstone Rd
Champaign, Illinois, 61822 USA
Horizon Product Support
(Product Technical Assistance)
productsupport@
horizonhobby.com
877-504-0233
Sales [email protected]
800-338-4639
European
Union
D 22885 Barsbüttel, Germany
Sales: Horizon Hobby GmbH +49 (0) 4121 2655 100
FCC Information
IC Information
IC: 6157A-BLH8516
This device complies with Industry Canada license-exempt RSS standard(s). Operation is subject to
the following two conditions: (1) this device may not cause interference, and (2) this device must ac-
cept any interference, including interference that may cause undesired operation of the device.
Compliance Information for the European Union
Instructions for disposal of WEEE by users in the European Union
This product must not be disposed of with other waste. Instead, it is the user’s
responsibility to dispose of their waste equipment by handing it over to a designated
collections point for the recycling of waste electrical and electronic equipment. The
separate collection and recycling of your waste equipment at the time of disposal will
help to conserve natural resources and make sure that it is recycled in a manner that
protects human health and the environment. For more information about where you
can drop off your waste equipment for recycling, please contact your local city of ce,
your household waste disposal service or where you purchased the product.
EU Compliance Statement:
Horizon Hobby, LLC hereby declares that this product is in compliance with the essential
requirements and other relevant provisions of the R&TTE, RED, and EMC Directives.
A copy of the EU Declaration of Conformity is available online at:
http://www.horizonhobby.com/content/support-render-compliance.
FCC ID: BRWBLH8516
This equipment has been tested and found to comply with the limits for Part 15 of the FCC rules.
These limits are designed to provide reasonable protection against harmful interference in a resi-
dential installation. This equipment generates uses and can radiate radio frequency energy and, if
not installed and used in accordance with the instructions, may cause harmful interference to radio
communications.
However, there is no guarantee that interference will not occur in a particular installation. If this equip-
ment does cause harmful interference to radio or television reception, which can be determined by
turning the equipment off and on, the user is encouraged to try to correct the interference by one or
more of the following measures:
• Reorient or relocate the receiving antenna.
• Increase the separation between the equipment and receiver.
• Connect the equipment to an outlet on a circuit different from that to which the receiver is
connected.
This device complies with part 15 of the FCC rules. Operation is subject to the following two
conditions: (1) This device may not cause harmful interference, and (2) this device must accept any
interference received, including interference that may cause undesired operation.
NOTICE: Modi cations to this product will void the user’s authority to operate this equipment.
What this Warranty Covers
Horizon Hobby, LLC, (Horizon) warrants to the original purchaser that the product purchased (the “Product”) will be
free from defects in materials and workmanship at the date of purchase.
What is Not Covered
This warranty is not transferable and does not cover (i) cosmetic damage, (ii) damage due to acts of God, accident,
misuse, abuse, negligence, commercial use, or due to improper use, installation, operation or maintenance, (iii)
modi cation of or to any part of the Product, (iv) attempted service by anyone other than a Horizon Hobby authorized
service center, (v) Product not purchased from an authorized Horizon dealer, (vi) Product not compliant with applicable
technical regulations, or (vii) use that violates any applicable laws, rules, or regulations.
OTHER THAN THE EXPRESS WARRANTY ABOVE, HORIZON MAKES NO OTHER WARRANTY OR REPRESENTATION,
AND HEREBY DISCLAIMS ANY AND ALL IMPLIED WARRANTIES, INCLUDING, WITHOUT LIMITATION, THE IMPLIED
WARRANTIES OF NON-INFRINGEMENT, MERCHANTABILITY AND FITNESS FOR A PARTICULAR PURPOSE. THE
PURCHASER ACKNOWLEDGES THAT THEY ALONE HAVE DETERMINED THAT THE PRODUCT WILL SUITABLY MEET
THE REQUIREMENTS OF THE PURCHASER’S INTENDED USE.
Purchaser’s Remedy
Horizon’s sole obligation and purchaser’s sole and exclusive remedy shall be that Horizon will, at its option, either (i)
service, or (ii) replace, any Product determined by Horizon to be defective. Horizon reserves the right to inspect any
and all Product(s) involved in a warranty claim. Service or replacement decisions are at the sole discretion of Horizon.
Proof of purchase is required for all warranty claims. SERVICE OR REPLACEMENT AS PROVIDED UNDER THIS
WARRANTY IS THE PURCHASER’S SOLE AND EXCLUSIVE REMEDY.
Limitation of Liability
HORIZON SHALL NOT BE LIABLE FOR SPECIAL, INDIRECT, INCIDENTAL OR CONSEQUENTIAL DAMAGES, LOSS
OF PROFITS OR PRODUCTION OR COMMERCIAL LOSS IN ANY WAY, REGARDLESS OF WHETHER SUCH CLAIM IS
BASED IN CONTRACT, WARRANTY, TORT, NEGLIGENCE, STRICT LIABILITY OR ANY OTHER THEORY OF LIABILITY,
EVEN IF HORIZON HAS BEEN ADVISED OF THE POSSIBILITY OF SUCH DAMAGES. Further, in no event shall the
liability of Horizon exceed the individual price of the Product on which liability is asserted. As Horizon has no control
over use, setup, nal assembly, modi cation or misuse, no liability shall be assumed nor accepted for any resulting
damage or injury. By the act of use, setup or assembly, the user accepts all resulting liability. If you as the purchaser
or user are not prepared to accept the liability associated with the use of the Product, purchaser is advised to return
the Product immediately in new and unused condition to the place of purchase.
Law
These terms are governed by Illinois law (without regard to con ict of law principals). This warranty gives you speci c
legal rights, and you may also have other rights which vary from state to state. Horizon reserves the right to change
or modify this warranty at any time without notice.
WARRANTY SERVICES
Questions, Assistance, and Services
Your local hobby store and/or place of purchase cannot provide warranty support or service. Once assembly,
setup or use of the Product has been started, you must contact your local distributor or Horizon directly. This will
enable Horizon to better answer your questions and service you in the event that you may need any assistance. For
questions or assistance, please visit our website at www.horizonhobby.com, submit a Product Support Inquiry, or call
the toll free telephone number referenced in the Warranty and Service Contact Information section to speak with a
Product Support representative.
Inspection or Services
If this Product needs to be inspected or serviced and is compliant in the country you live and use the Product in,
please use the Horizon Online Service Request submission process found on our website or call Horizon to obtain a
Return Merchandise Authorization (RMA) number. Pack the Product securely using a shipping carton. Please note
that original boxes may be included, but are not designed to withstand the rigors of shipping without additional
protection. Ship via a carrier that provides tracking and insurance for lost or damaged parcels, as Horizon is not
responsible for merchandise until it arrives and is accepted at our facility. An Online Service Request is available at
http://www.horizonhobby.com/content/service-center_render-service-center. If you do not have internet access,
please contact Horizon Product Support to obtain a RMA number along with instructions for submitting your product
for service. When calling Horizon, you will be asked to provide your complete name, street address, email address
and phone number where you can be reached during business hours. When sending product into Horizon, please
include your RMA number, a list of the included items, and a brief summary of the problem. A copy of your original
sales receipt must be included for warranty consideration. Be sure your name, address, and RMA number are clearly
written on the outside of the shipping carton.
Limited Warranty
NOTICE: Do not ship LiPo batteries to Horizon. If you have any issue with a LiPo battery, please contact
the appropriate Horizon Product Support offi ce.
Warranty Requirements
For Warranty consideration, you must include your original sales receipt verifying the proof-of-
purchase date. Provided warranty conditions have been met, your Product will be serviced or replaced free of
charge. Service or replacement decisions are at the sole discretion of Horizon.
Non-Warranty Service
Should your service not be covered by warranty, service will be completed and payment will be required without
noti cation or estimate of the expense unless the expense exceeds 50% of the retail purchase cost. By submitting
the item for service you are agreeing to payment of the service without noti cation. Service estimates are available
upon request. You must include this request with your item submitted for service. Non-warranty service estimates
will be billed a minimum of ½ hour of labor. In addition you will be billed for return freight. Horizon accepts money
orders and cashier’s checks, as well as Visa, MasterCard, American Express, and Discover cards. By submitting any
item to Horizon for service, you are agreeing to Horizon’s Terms and Conditions found on our website
http://www.horizonhobby.com/content/service-center_render-service-center.
ATTENTION: Horizon service is limited to Product compliant in the country of use and ownership. If
received, a non-compliant Product will not be serviced. Further, the sender will be responsible for
arranging return shipment of the un-serviced Product, through a carrier of the sender’s choice and at
the sender’s expense. Horizon will hold non-compliant Product for a period of 60 days from notifi cation,
after which it will be discarded. 10/15.
Troubleshooting Guide
If you are operating this product in North America, you are required to have
an Amateur Radio (HAM) license. Visit www.arrl.org for more information.
Problem Possible Cause Solution
Will not respond to
throttle
Throttle too high and/or throttle
trim is too high Reset controls with the throttle stick
and throttle trim at the lowest setting
Does not function
and smells burnt after
connecting the fl ight
battery
Flight battery connected with the
wrong polarity Replace the 3-in-1 board. Connect the ight
battery noting proper polarity
LED on receiver fl ashes
rapidly and quadcopter
will not respond to trans-
mitter (during binding)
Transmitter too near aircraft
during binding process
Power off the transmitter. Move the transmit-
ter a larger distance from the aircraft. Dis-
connect and reconnect the ight battery to
the aircraft. Follow the binding instructions
Bind switch or button was not
held while transmitter was
powered on
Power off transmitter and repeat bind
process
Aircraft or transmitter is too close
to large metal object, wireless
source or another transmitter
Move aircraft and transmitter to another
location and attempt binding again
LED on the receiver
fl ashes rapidly and the
quadcopter will not re-
spond to the transmitter
(after binding)
Less than a 5-second wait
between rst powering on the
transmitter and connecting the
ight battery to the quadcopter
Leave the transmitter powered on. Discon-
nect and reconnect the ight battery to the
quadcopter
The quadcopter is bound to
a different model memory
(ModelMatch™ transmitters only)
Select the correct model memory on the
transmitter. Disconnect and reconnect the
ight battery to the quadcopter
Flight battery or transmitter bat-
tery charge is too low Replace or recharge batteries
Aircraft or transmitter is too
close to
large metal object, wireless
source or
another transmitter
Move aircraft and transmitter to another
location and attempt connecting again
Crashes immediately upon
lift-off or doesn’t lift off
Propellers in wrong locations Make necessary adjustments
Static in FPV feed
Interference on chosen channel Change the video transmitter and receiver
channel
Sendereinstellung
Timer
Mode Count Down
Time 3:00
Start Throttle Out
Über 25%
One Time Inhibit
Servoeinstellung
Kanal Weg Umkehr
THR 150/150 Normal
AIL 148/148 Normal
ELE 148/148 Normal
RUD 148/148 Normal
GER 100/100 Normal
AUX1 100/100 Normal
Funktionsliste
D/R & Expo
Kanal
Switch (B)
Pos D/R Expo
AILE
0 100/100 0
1 100/100 0
2 100/100 0
ELEV
0 100/100 0
1 100/100 0
2 100/100 0
SETUP LIST
F-Mode Setup
Switch 1 Inhibit
Switch 2 Inhibit
Modelltyp
Airplane
Kanalquelle
Kanalzuweisung
1 Throttle
2 Aileron
3 Elevator
4 Rudder
5 Gear Switch B
6 Aux 1 Switch H
Pulsrate
11ms
DSMX
DX6, DX7 (Gen 2), DX8 (Gen 2), DX9, DX18, DX20
Schalter Funktionen
Flugmode Schalter = Schalter B
Motorschalter = Schalter H
Dieses Produkt verwendet teilweise Beta ight-Fremdsoftware für seine Codierung. Weitere Informationen
zur Beta ight-Software nden Sie unter: https://github.com/beta ight/beta ight/wiki.
FREMDSOFTWARE. Dieses Produkt kann Code umfassen, der von einem oder mehreren Dritten
entwickelt wurde („Fremdsoftware“). Einige Fremdsoftware kann anderen Geschäftsbedingungen
unterliegen, die mit der Produktdokumentation für den Download verfügbar sein können. Unabhängig
von den Geschäftsbedingungen dieser Vereinbarung wird Ihnen die Fremdsoftware gemäß den
Geschäftsbedingungen der in der Open-Source-Softwareweitergabe identi zierten Software-
Lizenzvereinbarung lizenziert. Falls die Geschäftsbedingungen Dritter Lizenzen umfassen, die eine
Verfügbarkeit des Quellcodes (wie die GNU General Public License) bereitstellen, so kann die Open-
Source-Softwareweitergabe oder das Medium, auf dem die Software zu nden sein kann, Anweisungen
bereitstellen, wo eine Kopie derartiger Quellcodes erhältlich sein könnte.

3
Teil # Beschreibung
1
BLH8521 Pro Motor Set (4): Inductrix Pro
2
BLH8520 Propellerschutz (4), schwarz
3
BLH8515 Canopy Set
4
BLH8516 Flight Control, Beta ight
5
BLH8517 FX805 FPV Kamera, 25mW
Teil # Beschreibung
6
BLH8517EU FX805 FPV Kamera, 25mW
7
BLH8519 Main Frame, schwarz
EFLB2001S45
200mAh 1S 3.7V 45C LiPo Akku
EFLC1008 1S USB Li-Po Charger, 300mA
Rechtliche Informationen für die Europäische Union
EU Konformitätserklärung
Horizon LLC erklärt hiermit, dass dieses Produkt konform zu den essentiellen Anforder-
ungen der R&TTE, RED, und EMC ist.
Eine Kopie der Konformitätserklärung ist online unter folgender Adresse verfügbar :
http://www.horizonhobby.com/content/support-render-compliance.
Anweisungen zur Entsorgung von Elektro-und Elektronik-Altgeräten für
Benutzer in der Europäischen Union
Dieses Produkt darf nicht zusammen mit anderem Abfall entsorgt werden. Stattdessen
ist der Benutzer dafür verantwortlich, unbrauchbare Geräte durch Abgabe bei einer
speziellen Sammelstelle für das Recycling von unbrauchbaren elektrischen und
elektronischen Geräten zu entsorgen. Die separate Sammlung und das Recycling von
unbrauchbaren Geräten zum Zeitpunkt der Entsorgung hilft, natürliche Ressourcen zu
bewahren und sicherzustellen, dass Geräte auf eine Weise wiederverwertet werden,
bei der die menschliche Gesundheit und die Umwelt geschützt werden. Weitere
Informationen dazu, wo Sie unbrauchbare Geräte zum Recycling abgeben können, erhalten Sie bei
lokalen Ämtern, bei der Müllabfuhr für Haushaltsmüll sowie dort, wo Siedas Produkt gekauft haben.
Niederspannungabschaltung (LVC)
Die ESC versorgt den Motor durchgehend mit weniger Leistung, bis dieser sich vollständig abschaltet,
wenn der Akku unter Last unter 9 V entladen wird. Dadurch wird eine Tiefentladung des LiPo-Akkus
vermieden. Wenn die ESC die LVC aktiviert, setzen Sie sofort zur Landung an. Wenn Sie das Fluggerät
dennoch weiter iegen, kann dies zu Akkuschaden, Absturz oder beidem führen. Absturzschäden und
Akkuschäden, die durch eine Tiefentladung bedingt sind, werden von der Garantie nicht abgedeckt.
Durch wiederholtes Fliegen des Helikopters bis zur LVC-Aktivierung wird der Akku des Helikopters beschädigt.
Entfernen Sie den LiPo-Akku nach Gebrauch aus dem Fluggerät, um eine allmähliche Entladung zu ver-
hindern. Stellen Sie während der Lagerung sicher, dass die Akkuladung nicht unter 3 V pro Zelle abfällt.
Hilfestellung zur Problemlösung
Die LEDs des Inductrix zeigen die Vorder und Rückseite des Quacopters an. Die weisse LED zeigt die Front,
die rote LED zeigt das Heck.
Start
Die Motoren durch Stellen des Motorarm-Schalters auf die Ein-Position starten. Gas erhöhen, bis das
Modell etwa 600mm (2 Fuß) über dem Boden ausgerichtet schwebt, und sich darauf konzentrie-
ren, die Position des Gashebels so zu balancieren, dass der Quadcopter eine gleichmäßige Höhe
beim Schweben hält. In einigen Fällen müssen ein paar kleine „Sprünge“ auf eine Höhe von einigen
Zentimetern durchgeführt werden, bis man mit den Steuereingaben und Trimmungseinstellungen zum
Beibehalten eines gleichmäßigen Schwebe ugs und der Höhe.
Schwebefl ug
Der Quadcopter braucht für das Halten des Schwebe ug nur minimale Gaseingaben. Halten Sie die
Gaseingaben so gering wie möglich, da große Gasbewegungen einen Verlust der Höhe und Kontrolle mit
möglichen Absturz bedeuten können.
Während Sie den Schwebe ug einsteuern können Sie auch überprüfen ob der Quadcopter in eine bestim-
mte Richtung driftet. Falls ja, landen Sie zur Einstellung das Modell. Zusätzliche Informationen über die
Funktion und Anordnung der Trimmung des Modells können Sie dem Abschnitt der Verstehen der Flugkon-
trollen in dieser Anleitung entnehmen.
• Sollte die Nase des Quadcopter nach links oder rechts drehen stellen Sie die Seitenrudertrimmung ein.
• Sollte der Quadcopter kontinuierlich vorwärts oder rückwärts driften stellen Sie die Höhenrudertrimmung ein.
• Sollte der Quadcopter kontinuierlich nach links oder rechts driften stellen Sie die Querrudertrimmung ein.
Trimmen Sie das Modell so weit dass es im Schwebe ug sehr wenig driftet und dazu wenig Eingaben in die
Steuerung benötigt.
Üben Sie mit den korrekt getrimmten Copter im Schwebe ug die Wirkung von Seiten- Höhen- (Nick) und
Querruder (Roll), um sich mit den Reaktionen des Copters vertraut zu machen. Halten Sie die Ruderauss-
chläge dabei so gering wie möglich.
Die durchschnittliche Flugdauer beträgt etwa 4Minuten.
HINWEIS: Absturzschäden sind nicht durch die Garantie gedeckt.
Lassen Sie die Motoren zwischen den Flügen abkühlen um einen größeren Verschleiß zu vermeiden.
Landen
Zum Landen die Gaszufuhr im Schwebe ug in niedriger Höhe verringern. Nach dem Landen die
Motoren durch Ändern des Motorarm-Schalters auf die Aus-Position stoppen, den Akku nach dem
Gebrauch trennen und vom Fluggerät entfernen, um eine Tiefenentladung zu vermeiden. Die Motoren
zwischen den Flügen immer abkühlen lassen, um einen übermäßigen Verschleiß der Motoren zu
verhindern.
Achten Sie beim Lagern darauf, dass die Akkuladung nicht unter 3 V pro Zelle fällt.
Fliegen des Quadcopters
FPV-Kamera und Videosender
Teileliste
Explosionszeichnung
Optionale Bauteile
Teil # Beschreibung
BLH8506 Prop Set (4), Yellow: Inductrix
BLH8510 Inductrix FPV Race Gates
Teil # Beschreibung
SPMVM430 Spektrum 11-cm-Videomonitor
Querruder
Höhenruder
Querruder
nach links Nach links Nach rechts
Rückansicht
Vorwärts Rückwärts
Seitenansicht Seitenansicht
Rückansicht
Höhenruder
nach unten Höhenruder
nach oben
Querruder
nach rechts Band CH 1 CH 2 CH 3 CH 4 CH 5 CH 6 CH 7 CH 8
FS/IRC 5740 5760 5780 5800 5820 5840 5860 5880
Band E 5705 5685 5665 5665 5885 5905 5905 5905
Band A 5865 5845 5825 5805 5785 5765 5745 5725
RaceBand 5658 5695 5732 5769 5806 5843 5880 5917
Band B 5733 5752 5771 5790 5809 5828 5847 5866
Band CH 1 CH 2 CH 3 CH 4 CH 5 CH 6 CH 7 CH 8
FS/IRC 5740 5760 5780 5800 5820 5840 5860 5860
Band A 5865 5845 5825 5805 5785 5765 5745 5745
RaceBand 5732 5732 5732 5769 5806 5843 5843 5843
Band B 5733 5752 5771 5790 5809 5828 5847 5866
Verfügbare Frequenzen, Nordamerika (mHz)
Verfügbare Frequenzen, Europäische Union (mHz)
Falls es aus irgendwelchen Gründen notwendig
ist, einen oder mehrere Propeller am Quadcopter
auszutauschen, siehe die Abbildung für die korrekte
Drehrichtung des auszutauschenden Propellers.
Den Propeller nur mit einem Propeller mit gleicher
Drehrichtung ersetzen.
Zur Montage den Propeller einfach auf die Motorwelle
drücken. Sicherstellen, dass sich der Propeller nach
der Montage frei dreht.
Den Propeller nicht zu weit auf die Motorwelle drücken.
Dies kann zu Schäden an Propeller oder Motor führen
und das freie Drehen des Propellers verhindern.
Montage der Propeller
Videosender-LEDs
25mW Nordamerika-Version
25mW EU-Version
Kanal Band
1
3
7
56 4
2
Warnung
Ein ferngesteuertes Modell ist kein Spielzeug. Es kann, wenn es falsch eingesetzt wird, zu erheblichen Verletzungen
bei Lebewesen und Beschädigungen an Sachgütern führen. Betreiben Sie Ihr RC-Modell nur auf freien Plätzen und
beachten Sie alle Hinweise der Bedienungsanleitung des Modells wie auch der Fernsteuerung.
Garantiezeitraum
Exklusive Garantie Horizon Hobby LLC (Horizon) garantiert, dass dasgekaufte Produkt frei von Material- und
Montagefehlern ist. Der Garantiezeitraum entspricht den gesetzlichen Bestimmung des Landes, in dem das Produkt
erworben wurde. In Deutschland beträgt der Garantiezeitraum 6 Monate und der Gewährleistungszeitraum 18
Monate nach dem Garantiezeitraum
Einschränkungen der Garantie
(a) Die Garantie wird nur dem Erstkäufer (Käufer) gewährt und kann nicht übertragen werden. Der Anspruch des
Käufers besteht in der Reparatur oder dem Tausch im Rahmen dieser Garantie. Die Garantie erstreckt sich
ausschließlich auf Produkte, die bei einem autorisierten Horizon Händler erworben wurden. Verkäufe an dritte
werden von dieser Garantie nicht gedeckt. Garantieansprüche werden nur angenommen, wenn ein gültiger
Kaufnachweis erbracht wird. Horizon behält sich das Recht vor, diese Garantiebestimmungen ohne Ankündigung
zu ändern oder modi zieren und widerruft dann bestehende Garantiebestimmungen.
(b) Horizon übernimmt keine Garantie für die Verkaufbarkeit des Produktes, die Fähigkeiten und die Fitness des
Verbrauchers für einen bestimmten Einsatzzweck des Produktes. Der Käufer allein ist dafür verantwortlich, zu
prüfen, ob das Produkt seinen Fähigkeiten und dem vorgesehenen Einsatzzweck entspricht.
(c) Ansprüche des Käufers ¬ Es liegt ausschließlich im Ermessen von Horizon, ob das Produkt, bei dem ein
Garantiefall festgestellt wurde, repariert oder ausgetauscht wird. Dies sind die exklusiven Ansprüche des Käufers,
wenn ein Defekt festgestellt wird.
Horizon behält sich vor, alle eingesetzten Komponenten zu prüfen, die in den Garantiefall einbezogen werden können.
Die Entscheidung zur Reparatur oder zum Austausch liegt nur bei Horizon. Die Garantie schließt kosmetische
Defekte oder Defekte, hervorgerufen durch höhere Gewalt, falsche Behandlung des Produktes, falscher Einsatz des
Produktes, kommerziellen Einsatz oder Modi kationen irgendwelcher Art aus.
Die Garantie schließt Schäden, die durch falschen Einbau, falsche Handhabung, Unfälle, Betrieb, Service oder
Reparaturversuche, die nicht von Horizon ausgeführt wurden aus.
Ausgeschlossen sind auch Fälle die bedingt durch (vii) eine Nutzung sind, die gegen geltendes Recht, Gesetze oder
Regularien verstoßen haben. Rücksendungen durch den Käufer direkt an Horizon oder eine seiner Landesvertretung
bedürfen der Schriftform.
Schadensbeschränkung
Horizon ist nicht für direkte oder indirekte Folgeschäden, Einkommensausfälle oder kommerzielle Verluste,
die in irgendeinem Zusammenhang mit dem Produkt stehen verantwortlich, unabhängig ab ein Anspruch im
Zusammenhang mit einem Vertrag, der Garantie oder der Gewährleistung erhoben werden. Horizon wird darüber
hinaus keine Ansprüche aus einem Garantiefall akzeptieren, die über den individuellen Wert des Produktes hinaus
gehen. Horizon hat keinen Ein uss auf den Einbau, die Verwendung oder die Wartung des Produktes oder etwaiger
Produktkombinationen, die vom Käufer gewählt werden. Horizon übernimmt keine Garantie und akzeptiert keine
Ansprüche für in der folge auftretende Verletzungen oder Beschädigungen. Mit der Verwendung und dem Einbau des
Produktes akzeptiert der Käufer alle aufgeführten Garantiebestimmungen ohne Einschränkungen und Vorbehalte.
Wenn Sie als Käufer nicht bereit sind, diese Bestimmungen im Zusammenhang mit der Benutzung des Produktes
zu akzeptieren, werden Sie gebeten, dass Produkt in unbenutztem Zustand in der Originalverpackung vollständig bei
dem Verkäufer zurückzugeben.
Sicherheitshinweise
Dieses ist ein hochwertiges Hobby Produkt und kein Spielzeug. Es muss mit Vorsicht und Umsicht eingesetzt werden
und erfordert einige mechanische wie auch mentale Fähigkeiten. Ein Versagen, das Produkt sicher und umsichtig
zu betreiben kann zu Verletzungen von Lebewesen und Sachbeschädigungen erheblichen Ausmaßes führen.
Dieses Produkt ist nicht für den Gebrauch durch Kinder ohne die Aufsicht eines Erziehungsberechtigten vorgesehen.
Die Anleitung enthält Sicherheitshinweise und Vorschriften sowie Hinweise für die Wartung und den Betrieb des
Produktes. Es ist unabdingbar, diese Hinweise vor der ersten Inbetriebnahme zu lesen und zu verstehen. Nur so kann
der falsche Umgang verhindert und Unfälle mit Verletzungen und Beschädigungen vermieden werden.
Fragen, Hilfe und Reparaturen
Ihr lokaler Fachhändler und die Verkaufstelle können eine Garantiebeurteilung ohne Rücksprache mit Horizon nicht
durchführen. Dies gilt auch für Garantiereparaturen. Deshalb kontaktieren Sie in einem solchen Fall den Händler, der
sich mit Horizon kurz schließen wird, um eine sachgerechte Entscheidung zu fällen, die Ihnen schnellst möglich hilft.
Problem mögliche Ursache Lösung
Keine Reaktion auf Gas Gastrimmung oder Gasknüppel
zu hoch Bringen Sie Gashebel und Trimmung auf die
niedrigste Einstellung
Keine Funktion und
riecht nach Anschluss
des Flugakkus verbrannt
Flugakku ist mit der falschen
Polarität angeschlossen
Ersetzen Sie das 3-in-1 Kontrollboard.
Schließen Sie den Flugakku in richtiger
Polarität an
LED auf dem Empfänger
blinkt schnell , Quad-
copter reagiert wärend
des Bindens nicht auf
Sender
Sender war zu nah am Flugzeug
während des Bindevorganges
Schalten Sie den Sender aus. Stellen Sie den
Sender weiter vom Fluggerät weg. Trennen
und schließen Sie den Akku erneut an den
Quad-Copter an. Folgen Sie den Bindean-
weisungen
Bindeschalter wurde beim
Einschalten des Senders nicht
gedrückt
Schalten Sie den Sender aus und wiederho-
len Sie den Bindeprozess
Das Fluggerät oder der Sender ist
zu nahe an einem Metallkörper,
einer Strahlungsquelle oder einem
anderen Sender
Versuchen Sie den Vorgang noch einmal an
einem anderen Ort
LED auf dem Empfänger
blinkt schnell, Quadcop-
ter reagiert nach dem
Binden nicht auf den
Sender
Sie haben weniger als 5 Sekun-
den gewartet nachdem Sie den
Sender eingeschaltet und den
Flugakku angeschlossen haben
Lassen Sie den Sender eingeschaltet.
Trennen und schließen Sie den Flugakku
erneut an
Der nano QX ist an ein anderen
Modellspeicher gebunden. (Betrifft
nur Sender mit ModelMatch)
Wählen Sie auf dem Sender den richtigen
Modellspeicher. Trennen und schließen Sie
den Flugakku erneut an
Ladung des Flugakkus zu ge-
ring oder Senderbattereien zu
schwach Ersetzen oder laden Sie die Akkus
Das Fluggerät oder der Sender ist
zu nahe an einem Metallkörper,
einer Starhlungsquelle oder einem
anderen Sender
Versuchen Sie den Vorgang noch einmal an
einem anderen Ort
Hebt nicht ab oder stürzt
nach dem Start sofort ab Propeller falsch montiert oder
falscher Flug Mode gewählt Führen Sie die notwendigen Einstellungen
durch
Srtörungen im FPV Bild
Störungen auf dem gewählten
Kanal Wechseln Sie wie im betreffenden Abschnitt
beschrieben den Videokanal
Garantie und Service Informationen
Wartung und Reparatur
Muss Ihr Produkt gewartet oder repariert werden, wenden Sie sich entweder an Ihren Fachhändler oder direkt an
Horizon.
Rücksendungen / Reparaturen werden nur mit einer von Horizon vergebenen RMA Nummer bearbeitet. Diese
Nummer erhalten Sie oder ihr Fachhändler vom technischen Service. Mehr Informationen dazu erhalten Sie im
Serviceportal unter www. Horizonhobby.de oder telefonisch bei dem technischen Service von Horizon.
Packen Sie das Produkt sorgfältig ein. Beachten Sie, dass der Originalkarton in der Regel nicht ausreicht, um
beim Versand nicht beschädigt zu werden. Verwenden Sie einen Paketdienstleister mit einer Tracking Funktion
und Versicherung, da Horizon bis zur Annahme keine Verantwortung für den Versand des Produktes übernimmt.
Bitte legen Sie dem Produkt einen Kaufbeleg bei, sowie eine ausführliche Fehlerbeschreibung und eine Liste aller
eingesendeten Einzelkomponenten. Weiterhin benötigen wir die vollständige Adresse, eine Telefonnummer für
Rückfragen, sowie eine Email Adresse.
Garantie und Reparaturen
Garantieanfragen werden nur bearbeitet, wenn ein Originalkaufbeleg von einem autorisierten Fachhändler beiliegt,
aus dem der Käufer und das Kaufdatum hervorgeht. Sollte sich ein Garantiefall bestätigen wird das Produkt repariert
oder ersetzt. Diese Entscheidung obliegt einzig Horizon Hobby.
Kostenpfl ichtige Reparaturen
Liegt eine kostenp ichtige Reparatur vor, erstellen wir einen Kostenvoranschlag, den wir Ihrem Händler übermitteln.
Die Reparatur wird erst vorgenommen, wenn wir die Freigabe des Händlers erhalten. Der Preis für die Reparatur ist
bei Ihrem Händler zu entrichten. Bei kostenp ichtigen Reparaturen werden mindestens 30 Minuten Werkstattzeit und
die Rückversandkosten in Rechnung gestellt. Sollten wir nach 90 Tagen keine Einverständniserklärung zur Reparatur
vorliegen haben, behalten wir uns vor, das Produkt zu vernichten oder anderweitig zu verwerten.
ACHTUNG: Kostenpfl ichtige Reparaturen nehmen wir nur für Elektronik und Motoren vor.
Mechanische Reparaturen, besonders bei Hubschraubern und RC-Cars sind extrem aufwendig und
müssen deshalb vom Käufer selbst vorgenommen werden. 10/15
FR
Précautions de sécurité lors de l’utilisation
• En tant qu’utilisateur de ce produit, vous êtes
responsable de la sécurité lors de son utilisation, de
ne pas mettre en danger les autres et vous-même
ou des dommages causés à ce produit et aux biens
des autres.
• Utilisez ce produit dans un endroit ouvert à l’écart des
autres et des habitations.
• N’utilisez jamais ce produits avec des composants
électriques endommagés.
• Gardez l’émetteur sous tension quand le modèle est
sous tension.
• Laissez les pièces refroidir avant de les toucher, le
moteur chauffera lors de l’utilisation.
• Débranchez la batterie après utilisation , si applicable.
14 ans et plus. Ceci n’est pas un jouet.
Si vous utilisez ce produit en Amérique du Nord, vous devez détenir la licence de radio
amateur (HAM). Veuillez consulter le site www.arrl.org pour plus d’informations.
Seitenruder
Erklärung der Flugkontrollen
Bitte nehmen Sie sich vor dem Erst ug des Inductrix Quadcopter Zeit um sich mit den Kontrollen
vertraut zu machen.
Gasgeber
Seitenruder
nach links
Nase dreht nach rechts
Nase dreht nach links
Gasgeber
nach oben
Seitenansicht Seitenansicht
Sinken
Aufsteigen Gasgeber
nach unten
Seitenruder
nach rechts
Motor grau auf dem Unterseite = im Uhrzeigersinn
Motor weiß auf dem Unterseite = gegen den Uhrzeigersinn
Garantie und Service Kontaktinformationen
Land des
Kauf Horizon Hobby Telefon/E-mail Adresse Adresse
Europäische
Union
D 22885 Barsbüttel, Germany
Sales: Horizon Hobby GmbH
+49 (0) 4121 2655 100
ATTENTION: Lire et suivre toutes les instructions et mises en garde du manuel avant le réglage et
l’utilisation. Une mauvaise utilisation du produit peut endommager ce dernier, vos biens et/ou entrainer
des blessures.
Ceci est un produit de loisirs sophistiqué. Il doit être manipulé avec prudence et bon sens et requiert des
aptitudes de base en mécanique. N’essayez pas de démonter le produit, de l’utiliser avec des composants
incompatibles ou d’en améliorer les performances sans l’accord d’Horizon Hobby, LLC.
REMARQUE
La totalité des instructions, garanties et autres documents est sujette à modi cation à la seule
discrétion d’Horizon Hobby, LLC. Pour obtenir la documentation à jour, rendez-vous sur le site
horizonhobby.com et cliquez sur l’onglet de support de ce produit.
SIGNIFICATION DE MOTS DE SIGNALISATION DE SÉCURITÉ
Les termes suivants sont utilisés dans l’ensemble du manuel pour indiquer différents niveaux de danger
lors de l’utilisation de ce produit:
REMARQUE: procédures qui, si elles ne sont pas suivies correctement, peuvent entraîner des dégâts
matériels ET éventuellement un faible risque de blessures.
ATTENTION: procédures qui, si elles ne sont pas suivies correctement, peuvent entraîner des dégâts
matériels ET des blessures graves.
AVERTISSEMENT: procédures qui, si elles ne sont pas suivies correctement, peuvent entraîner des
dégâts matériels et des blessures graves OU engendrer une probabilité élevée de blessure super cielle.
LEDs
Kanalauswahl:
1. Kanal1 wird durch die konstant rot leuchtende LED angezeigt.
2. Drücken Sie die Taste, um die Kanäle (1–8) zu durchsuchen.
Die rote LED blinkt jedes Mal, wenn Sie den Kanal wechseln,
einmalig. Drücken Sie die Taste für jeden Kanalwechsel ein-
mal, bis Sie den gewünschten Kanal erreicht haben. Wenn Sie
sich nicht sicher sind, welcher Sendekanal gerade eingestellt
ist, drücken Sie die Kanalwechseltaste so lange, bis Sie wieder
bei Kanal1 (rot leuchtende LED) ankommen, und beginnen
Sie die Suche nach dem gewünschten Kanal erneut.
Bandauswahl:
1. Taste gedrückt halten, um das Band des Videosenders
zu wechseln.
2. Jedes Mal, wenn die Taste gedrückt gehalten wird, zeigt
die blaue Band-LED einen Wechsel zum nächsten ver-
fügbaren Band an. Die blauen LEDs stehen für FS/IRC-
Band, Band E (nur Nordamerika), Band A, Race-Band
und Band B in dieser Reihenfolge – siehe Abbildung.
HINWEIS: Vor Inbetriebnahme von FPV-Ausrüstung müssen die vor Ort geltenden Gesetze und
Verordnungen zur Kenntnis genommen werden. In manchen Regionen ist der Betrieb von FPV-
Ausrüstung unter Umständen beschränkt oder verboten. Sie sind dafür verantwortlich, dass dieses
Produkt ausschließlich auf legale und verantwortliche Weise verwendet wird.
Angaben zum gewünschten Videokanal und Frequenzband nden Sie in der Tabelle der verfügbaren
Frequenzen. Der Videosendekanal und das Frequenzband können mit der Taste an der Oberseite des
Quadrocopters gewechselt werden (siehe Abbildung). An der Sender-Konsole be nden sich sechs LEDs. Bei
der roten LED handelt es sich um die Kanalanzeige. Die restlichen fünf blauen LEDs sind Bandanzeigen.
WICHTIG: Der im Lieferumfang der EU-Version des Inductrix FPV Pro (BLH8570EU) enthaltene
25mW-Videosender hat vier blaue LEDs. Band E ist in dieser Version nicht verfügbar.
Fliegen Sie in weiten offenen Gegenden, weit weg von Menschen, Bäumen, Autos und Gebäuden. Die
Reichweite des Systems kann durch jedes Hinderniss beeinträchtigt oder geblockt werden. So ist es
vollkommen normal dass das Videosignal hinter Bäumen oder anderen Hindernissen abbricht.
Ce produit utilise un logiciel tiers Beta ight pour une partie du codage. Pour plus d'informations sur le
logiciel Beta ight, veuillez consulter le site: https://github.com/beta ight/beta ight/wiki.
LOGICIEL TIERS. Ce produit peut contenir des codes développés par un ou plusieurs tiers ("Logiciel tiers").
Certains logiciels tiers peuvent être soumis à d'autres conditions générales, qui peuvent être téléchargées
avec la documentation du produit. Nonobstant des conditions générales du présent contrat, le logiciel
tiers vous est concédé selon les conditions générales du contrat de licence du logiciel identi é dans les
informations de logiciel libre. Si les conditions générales tiers incluent des licences qui garantissent la
disponibilité du code source (comme la licence GPL, General Public Licence), les informations de logiciel libre
ou les médias sur lesquels le logiciel est livré fourniront des instructions pour pouvoir obtenir ce code source.

4
REMARQUE: Consultez les lois et réglementations locales avant d’utiliser votre équipement FPV.
Dans certaines zones, l’utilisation d’équipement FPV peut être limitée ou interdite. Il est de votre
responsabilité d’utiliser ce produit de manière responsable et en respectant la législation.
Consultez le tableau des fréquences disponibles pour connaitre la fréquence et bande de fréquence
souhaitées. Vous pouvez changer la fréquence et bande de fréquence de l’émetteur vidéo avec le bouton
situé sur la partie supérieure du quadcoptère, comme indiqué sur l’illustration. Il y a 6 DELs sur la platine
de l’émetteur vidéo. La DEL rouge correspond à l’indicateur de fréquence. Les 5 DELs suivantes sont les
indicateurs de bande.
IMPORTANT: L’émetteur vidéo 25mW inclus dans la version européenne du Inductrix FPV Pro
(BLH08570EU) présente 4 DELs bleues. La bande de fréquence E est disponible sur cette version.
Volez dans une zone dégagée à l’écart des personnes, arbres, voitures ou bâtiments. La portée de
votre système peut changer si un obstacle bloque le signal. Il est normal de remarquer des coupures
vidéo lorsque vous passez derrière des arbres ou autres obstacles.
Sélection de la fréquence:
1. La fréquence 1 est indiquée par la DEL rouge xe.
2. Appuyez sur le bouton pour faire dé ler les
fréquences (1-8). La DEL rouge clignotera une fois
lorsque vous faites dé ler chaque fréquence. Ap-
puyez sur le bouton une fois pour chaque fréquence
jusqu’à ce que vous atteignez la fréquence souhai-
tée. Si vous n’êtes pas sûr de la fréquence actuelle
de l’émetteur, appuyez sur le bouton pour faire
dé ler les fréquences jusqu’à ce que vous atteignez
la fréquence 1, indiquée par une DEL rouge xe,
puis faites dé ler jusqu’à la fréquence souhaitée.
Sélection de la bande de fréquence:
1. Pressez et maintenez le bouton pour changer la
bande de fréquence de l’émetteur vidéo.
2. Chaque fois que le bouton est pressé et maintenu,
la DEL bleue de bande indiquera un changement
vers la prochaine bande disponible. Les DELs
bleues indiquent les fréquences FS/IRC, bande E
(Amérique du Nord), bande A et B, dans cet ordre
comme sur l’illustration.
Coupure par tension faible (LVC)
Le CEV (ESC) ne cessera de diminuer la puissance fournie au moteur jusqu’àla coupure complète lorsque
la batterie atteint une tension de 3Vsous charge. Ceci permet d’éviter que la batterie Li-Po ne subisse une
décharge trop «profonde». Posez-vous immédiatement lorsque le CEV active la coupure par tension faible
(LVC). Continuer àvoler après une coupure par tension faible (LVC = Low Voltage Cutoff) peut endommager
la batterie ou entraîner un écrasement au sol, voire les deux. Les dommages suite àun écrasement au sol
et des batteries endommagées suite àune décharge trop profonde ne sont pas couvertes par la garantie.
Une utilisation répétée du quadcoptère jusqu’à l’enclenchement du LVC peut endommager la batterie.
Déconnectez et sortez la batterie Li-Po du quadcoptère après utilisation a n d’éviter une décharge au goutte
àgoutte. Pendant le stockage, assurez-vous que la charge de la batterie ne tombe pas en-deçà de 3Vpar
cellule.
Les DELs sur l’Inductrix indiquent l’avant et l’arrière du quadcoptère. Les DELs blanches sont à l’avant. Les
DELs rouges sont à l’arrière.
Décollage
Démarrez les moteurs en mettant l’interrupteur de bras moteur en position ON. Augmentez progressive-
ment les gaz jusqu’à ce que le modèle soit en stationnaire à environ 60 cm du sol et, à l’aide du manche
des gaz, faites en sorte que le quadcoptère reste en position stationnaire. Dans certains cas, vous devrez
peut-être faire des petits “sauts” d’une altitude de quelques centimètres pour vous familiariser avec les
commandes et les trims nécessaires pour maintenir un vol stationnaire.
Stationnaire
Le quadcoptère Inductrix ne nécessite que de corrections mineures aux gaz pour maintenir une altitude
constante en stationnaire. Ne donnez pas de corrections trop brutales ou importantes qui risqueraient
d’entraîner une perte de contrôle pouvant causer un crash.
Avant de tenter un stationnaire au ras du sol, vous devez véri er que le quadcoptère ne glisse pas, sinon
effectuer les corrections à l’aide des trims. Si vous trouvez que le modèle glisse trop sans agir sur le
manches, faites-le atterrir avant d’effectuer les corrections aux trims.
Vol du quadcoptère
Ailerons
Gouverne de profondeur
Gouverne de direction
Compréhension des commandes de vol de base
Si vous n’avez pas encore bien assimilé les commandes de votre quadcoptère Inductrix, prenez
quelques minutes pour vous familiariser avec elles avant de tenter votre premier vol.
Throttle (Gaz)
Aileron à gauche Aileron à droite
Vue arrière
Vers l’avant Vers l’arrière
Vue latérale Vue latérale
Gouverne de
direction à gauche
Le nez tourne vers la droite
Le nez tourne vers la gauche
Augmenter
les gaz
Vue latérale Vue latérale
Descendre
Monter
Vue arrière
Réduire
les gaz
Gouverne de
direction à droite
Gouverne de
profondeur baissée Gouverne de
profondeur levée
Si vous rencontrez des dif cultés, référez-vous au guide de dépannage. Si nécessaire, contactez votre
revendeur ou le service technique Horizon Hobby. Pour consulter la liste des émetteurs compatibles,
veuillez visiter www.bindnfl y.com.
Procédure d’a ectation
1. Débranchez la batterie du quadcoptère.
2. Sélectionnez dans votre émetteur "Acro" ou "Avion" comme type de modèle.
3. Mettez tous les trims de votre émetteur au neutre.
4. Mettez l'émetteur hors tension et placez le manche des gaz en position basse.
5. Connectez la batterie au quadcoptère. La DEL du module 4 en 1 clignote en rouge durant l'initialisation,
puis clignote en bleu quand il est prêt pour l'affectation.
6. Mettez votre émetteur en mode affectation (Bind) lors de la mise sous tension de l’émetteur.
7. Relâchez le bouton/interrupteur Bind après 2 ou 3 secondes. Le quadcoptère est affecté quand la DEL est xe.
8. Débranchez la batterie et mettez l’émetteur hors tension.
Droite
Gauche
Affectez le quadcoptère à votre émetteur en suivant les instructions suivantes.
Caméra et émetteur vidéo FPV
Avertissements de charge
AVERTISSEMENT: Le non-respect
de ces avertissements peut entrainer
un mauvais fonctionnement du produit, des
problèmes électriques, une surchauffe, INCENDIE
et à terme blessures et dommages matériels.
• NE LAISSEZ JAMAIS LA BATTERIE ET LE
CHARGEUR SANS SURVEILLANCE DURANT
L’UTILISATION.
• NE CHARGEZ JAMAIS LES BATTERIES
DURANT LA NUIT.
• Ne mettez jamais des batteries endommagées en
charge. Si la batterie commence à gon er lors de la
charge ou l’utilisation, débranchez-la immédiatement.
• Utilisez toujours la batterie et le chargeur fournis.
Débranchez la batterie après charge.
• Chargez les batteries à l’écart de matières
in ammables dans un endroit bien aéré.
• Ne chargez, transportez ou stockez jamais dans un
endroit chaud, froid ou très ensoleillé (température
recommandée entre 5 et 49°).
Spécifications
Longueur 83mm
Diamètre du rotor
65mm
Hauteur 28mm Masse 16 g
Pour recevoir les mises à jour produit, les offres spéciales et plus encore, enregistrez votre produit
sur www.bladehelis.com.
Charge de la batterie
REMARQUE: Chargez uniquement des batteries froides au toucher et non endommagées. Contrôlez
l’état de la batterie pour être sûrt qu’elle n’est pas endommagée, gon ée, pliée ou percée.
Insérez le chargeur dans un port USB.
Connectez la batterie au chargeur.
CHARGE (Rouge fi xe)
CHARGE MAX (OFF )
Déconnectez toujours la batterie du chargeur immédiatement après la n de charge.
ATTENTION: Utilisez uniquement des chargeurs spéci quement conçus pour charger la
batterie Li-Po incluse. Le fait de charger la batterie avec un chargeur non-compatible peut
être à l’origine d’un incendie provoquant des blessures corporelles ou des dégâts matériels.
ATTENTION: Ne dépassez jamais l’intensité de charge recommandée.
ATTENTION: Débranchez immédiatement la batterie une fois que la charge est terminée. Ne
jamais laisser une batterie connectée au chargeur.
USB Li-Po
Charger
EFLC1008
SOLID RED LED
–Charging
DC Input:5.0V 350mA
DC Output:4.2V 300mA
LED OFF
–Charge
Complete
Installation de la batterie
ATTENTION: Débranchez toujours la batterie du modèle quand
vous ne l’utilisez pas, a n d’éviter une décharge trop impor-
tante. Des batteries déchargées à un voltage inférieur à celui
recommandé, seront endommagées, elles perdront en performance et
pourront entraîner un risque d’incendie durant la charge.
1 Gaz en bas 2 Mise sous tension
de l’émetteur
3
4
A ectation de l’émetteur et du récepteurPrécautions de sécurité générales du produit
• Gardez toutes les batteries, produits chimiques,
petites pièces et système électriques hors de portée
des enfants.
• Ne mettez pas en contact avec l’eau. Gardez toutes
les pièces sèches.
• Gardez les pièces mobiles propres.
• En mode Angle (interrupteur en position 0), le quadcoptère s'autostabilise et a une limitation de
l'angle d'inclinaison d'enviton 60 degrés.
• En mode Air (interrupteur en position 1), le quadcoptère ne s'autostabilise pas et n'a pas de
limitation d'angle d'inclinaison. Avec les gaz en position basse, le contrôleur de vol continuera de
stabiliser le quadcoptère pour maintenir la dernière assiette demandée. Ce mode est utile pour
exécuter des gures de voltige douces avec un réglage gaz bas ou haut.
• En mode Acro (interrupteur en position 2), le quadcoptère ne s'autostabilise pas et n'a pas de
limitation d'angle d'inclinaison. Avec les gaz en position basse, le contrôleur de vol ne stabilise
pas le quadcoptère. Le pilote doit contrôler le quadcoptère a n de maintenir la bonne assiette. Ce
mode est le plus adapté lors de changement soudain d'assiette, comme en compétition. Utilisez
les débatements et expo pour régler les performances selon votre style de pilotage.
Référez-vous au Paramétrage de l'émetteur pour la sélection des interrupteurs de l'émetteur et des
informations sur le réglage spéci que.
Mode de vol et débattements
• Si le nez du quadcoptère pivote vers la gauche ou la droite, ajustez le trim de dérive.
• Si le quadcoptère glisse vers l’avant ou l’arrière, ajustez le trim de profondeur.
• Si le quadcoptère glisse vers la gauche ou la droite, ajustez le trim d’ailerons.
Continuez d’effectuer de légères corrections aux trims en faisant un stationnaire à basse altitude. Si le
quadcoptère est votre premier quadricoptère, n’hésitez à demander l’aide d’un pilote expérimenté pour
effectuer ces réglages avant votre premier vol.
Avec votre quadcoptère correctement réglé et en stationnaire à basse altitude, entrainez-vous à uti-
liser les commandes de dérive, de profondeur et d’ailerons a n de vous familiariser avec la réponse
du modèle. Effectuez toujours de petits mouvements avec les manches de commande.
L’autonomie de vol moyenne est d’environ 4 minutes.
REMARQUE: les dégâts causés par les crashs ne sont pas couverts par la garantie.
Atterrissage
Pour atterrir, baissez lentement le manche des gaz depuis un vol stationnaire à faible altitude. Après
l’atterrissage, coupez les moteurs en mettant l’interrupteur de bras moteur en position Off, débranchez et
retirez la batterie du modèle a n d’éviter qu’elle ne se décharge trop. Pour éviter une usure trop importante des
moteurs, laissez-les toujours refroidir entre chaque vol.
Pendant le stockage, assurez-vous que la charge de la batterie ne tombe pas en-deçà de 3V par élément.
DELs de l'émetteur vidéo
Version nord-américaine 25mW
Version européenne 25mW
Fréquence Bande
Band CH 1 CH 2 CH 3 CH 4 CH 5 CH 6 CH 7 CH 8
FS/IRC 5740 5760 5780 5800 5820 5840 5860 5880
Band E 5705 5685 5665 5665 5885 5905 5905 5905
Band A 5865 5845 5825 5805 5785 5765 5745 5725
RaceBand 5658 5695 5732 5769 5806 5843 5880 5917
Band B 5733 5752 5771 5790 5809 5828 5847 5866
Band CH 1 CH 2 CH 3 CH 4 CH 5 CH 6 CH 7 CH 8
FS/IRC 5740 5760 5780 5800 5820 5840 5860 5860
Band A 5865 5845 5825 5805 5785 5765 5745 5745
RaceBand 5732 5732 5732 5769 5806 5843 5843 5843
Band B 5733 5752 5771 5790 5809 5828 5847 5866
Fréquences disponibles, Amérique du Nord (mHz)
Fréquences disponibles, Union européenne (mHz)
Si pour une raison quelconque, vous devez changer
une ou plusieurs hélices du quadcoptère, veuillez vous
référer à l'illustration pour connaitre le sens de rotation
de l'hélice à changer. Remplacez l'hélice uniquement par
une hélice avec le même sens de rotation.
Pour installer l'hélice, pressez-la simplement sur l'arbre
moteur. Assurez-vous que l'hélice tourne librement après
installation.
Ne pressez pas l'hélice trop loin sur l'arbre moteur.
Vous risqueriez d'endommager l'hélice ou le moteur et
empêcher l'hélice de tourner librement.
Installation de l'hélice
Vue éclatée
Liste des pièces détachées
Pièces optionnelles
Ref. pièce Description
BLH8506 Inductrix - Hélices jaunes (4)
BLH8510 Inductrix FPV - Portes de course
Ref. pièce Description
SPMVM430 Moniteur vidéo Spektrum 4,3”
Ref. pièce Description
1
BLH8521 Inductrix Pro - Set de moteur Pro (4)
2
BLH8520 Set d’hélices (4), jaunes
3
BLH8515 Fuselage
4
BLH8516 Contrôleur de vol, Beta ight
5
BLH8517 Caméra FPV FX805, 25mW
Ref. pièce Description
6
BLH8517EU Caméra FPV FX805, 25mW
7
BLH8519 Châssis, noir
EFLB2001S45 Batterie Li-Po 1S 200mA
3,7V 45C
EFLC1008 Chargeur USB Li-Po 1S 300mA
Guide de résolution des problèmes
Problème Cause possible Solution
Aucune réponse aux gaz Le manche des gaz et/ou le trim
est également trop haut Baissez le manche des gaz et placez le
trim à la valeur la plus basse
Ne fonctionne pas et dégage
une odeur de brûlé après
avoir branché la batterie
La polarité de la batterie n’a pas
été respectée Remplacez le module 3 en 1. Branchez
la batterie en respectant la polarité
La DEL du récepteur clignote
rapidement et l’appareil ne
répond pas aux commandes
(durant l’affectation)
L’émetteur est trop près de
l’appareil durant l’affectation
Mettez l’émetteur hors tension.
Eloignez-le de l’appareil. Débranchez
puis rebranchez la batterie. Suivez les
instructions d’affectation
Le bouton ou l'interrupteur
d'affectation n'a pas été maintenu
durant la mise sous tension de
l'émetteur
Mettez l'émetteur hors tension et répé-
tez le processus d'affectation
L'appareil ou l'émetteur se trouve
trop proche d'un grand objet
métallique, d'un réseau sans l ou
d'un autre émetteur
Placez le quadcoptère et l'émetteur
à un autre emplacement et retentez
l'affectation
La DEL du récepteur clignote
rapidement et l’appareil ne
répond pas aux commandes
(après l’affectation)
Moins de 5 secondes se sont
écoulées entre l’allumage de
l’émetteur et la connexion de la
batterie de vol sur le quadcoptère
Laissez l’émetteur sous tension.
Débranchez puis rebranchez la batterie
du le quadcoptère
Le quadcoptère est affecté à une
mémoire de modèle différente
(radios ModelMatch uniquement)
Sélectionnez la mémoire de modèle
correcte sur l’emetteur. Débranchez puis
rebranchez la batterie du quadcoptère
Charge des batteries de l’émetteur
trop faible Remplacez ou chargez les batteries
de l’emetteur
L'appareil ou l'émetteur se trouve
trop proche d'un grand objet
métallique, d'un réseau sans l ou
d'un autre émetteur
Placez le quadcoptère et l'émetteur à
un autre emplacement et retentez la
connexion
Chute immédiatement après
le décollage ou ne décolle
pas du tout
Les hélices ne sont pas correcte-
ment placées ou vous n’avez pas
sélectionné la bonne configuration Effectuez les modifications nécessaires
Parasites dans le retour FPV
Interférences sur la voie sélectionnée
Changez de voie pour le transmetteur et
le récepteur vidéo avec la section utilisa-
tion de la micro caméra
Si vous utilisez ce produit en Amérique du Nord, vous devez détenir la licence de radio
amateur (HAM). Veuillez consulter le site www.arrl.org pour plus d’informations.
1
3
7
56 4
2
Moteur à fond gris = sens horaire
Moteur à fond blanc = sens anti-horaire
Paramétrage de l’émetteur
Course des servos
Voie Course
Inversion
Gaz 150/150 Normal
Ailerons 148/148 Normal
Profondeur 148/148 Normal
Dérive 148/148 Normal
Train 100/100 Normal
AUX1 100/100 Normal
VALEURS
D/R & Expo
Voie
Inter. (B)
position D/R Expo
AILE
0 100/100 0
1 100/100 0
2 100/100 0
PROF
0 100/100 0
1 100/100 0
2 100/100 0
LISTE DES PARAMÈTRES
Mode de vol
Interrupteur 1 Inactif
Interrupteur 2 Inactif
Type de modèle
Avion
Assignation voie
Confi guration entrée voie
1 Gaz
2 Ailerons
3 Profondeur
4 Dérive
5 Train Inter. B
6 Aux 1 Inter. H
Taux de rafraîchissement
11ms
DSMX
DX6, DX7 (Gen 2), DX8 (Gen 2), DX9, DX18, DX20
Fonctions des interrupteurs
Interrupteur mode de vol = Interrupteur B
Interrupteur armement moteurs = Interrupteur H
Chronomètre
Mode A rebours
Durée 3:00
Démarrage Manche
des gaz
Seuil 25%
Unique Inactif
DEL

5
Avvertenze e istruzioni per le batterie
AVVERTENZA: Non seguendo le
seguenti avvertenze potrebbero veri carsi
malfunzionamenti del prodotto, problemi elettrici,
un eccessivo sviluppo di calore, INCENDI e in
de nitiva lesioni e danni materiali.
• NON LASCIARE MAI L’ALIMENTATORE, IL
CARICABATTERIE E LA BATTERIA INCUSTODITI
DURANTE L’USO.
• NON CARICARE MAI LE BATTERIE DURANTE LA
NOTTE SENZA SUPERVISIONE.
• Non caricare mai le batterie danneggiate. Se durante
la carica o durante l’uso si forma un rigon amento
della batteria, interrompere direttamente l’uso/la
carica.
• Usare sempre la batteria e il caricabatteria inclusi
nella confezione. Sconnettere la batteria dopo la
carica.
• Caricare sempre le batterie lontano da materiali
in ammabili in un luogo ben ventilato.
• Non caricare, trasportare o conservare mai le
batterie in ambienti estremamente caldi, freddi
o esposti al sole (la temperatura consigliata è
compresa tra 5 e 49 °C).
Precauzioni per la sicurezza durante l’uso
• Come utenti di questo prodotto, siete responsabili
per un utilizzo sicuro del prodotto, non mettendo
in pericolo voi stessi o altri o non danneggiando il
prodotto o le cose di altri.
• Utilizzare il prodotto in spazi aperti, lontano da
persone e cose.
• Non usare mai il prodotto con delle componenti
elettriche danneggiate.
• Lasciare la trasmittente accesa quando il modello
è acceso.
• Lasciare raffreddare le componenti dopo l’uso prima
di toccarle, i motori si scalderanno durante l’uso.
• Rimuovere le batterie dopo l’uso, se possibile.
Precauzioni di sicurezza del prodotto generali
• Tenere tutte le batterie, le sostanze chimiche, le parti
piccole e tutte le componenti elettriche fuori dalla
portata dei bambini.
• Evitare il contatto con l’acqua di questo prodotto.
Mantenere asciutte le componenti.
• Mantenere pulite le parti mobili.
Specifiche
Lunghezza 83mm Diametro elica 65mm
Altezza 28mm Peso in volo 16 g
Per ricevere gli aggiornamenti del prodotto, le offerte speciali e altro, bisogna registrarlo su www.bladehelis.com
Carica della batteria di volo
AVVISO: Caricare solo batterie che siano fredde al tatto e che non siano danneggiate. Controllare la
batteria per veri care che non sia gon a, piegata, rotta o bucata.
Inserire il caricatore in una porta USB.
Connettere la batteria al caricabatteria.
Carica in corso (acceso rosso)
Carica massima (spento)
Scollegare sempre la batteria dal caricatore immediatamente dopo il termine della carica.
ATTENZIONE: usare solo caricatori progettati speci camente per queste batterie LiPo. In caso
contrario si potrebbero incendiare procurando danni.
ATTENZIONE: non superare le correnti di carica raccomandate.
ATTENZIONE: quando la carica è terminata, scollegare subito la batteria dal caricatore.
Taglio di bassa tensione (LVC)
Il controllo elettronico di velocità continuerà ad abbassare la corrente erogata al motore no allo spe-
gnimento completo quando la batteria raggiunge i3Vsotto carico. Questo fa si che si possa evitare
una scarica eccessiva della batteria Li-Po. Effettuare immediatamente l’atterraggio quando il regolato-
re di velocità attiva il taglio di bassa tensione (LVC). Continuare afar volare il modello dopo che ha
raggiunto il taglio di bassa tensione (LVC) può danneggiare la batteria, causare lo schianto del velivolo
oentrambe le cose. Idanni della batteria oquelli dovuti allo schianto in seguito auno scaricamento
eccessivo non sono coperti dalla garanzia.
Far volare l’elicottero no all’attivazione del taglio di bassa tensione (LVC) danneggia la batteria
dell’elicottero.
Dopo l’uso scollegare erimuovere dal velivolo la batteria Li-Po per evitare lo scaricamento passivo.
Durante la conservazione, assicurarsi che la carica della batteria non scenda sotto i3 Vper cella.
I LED dell’Inductrix indicando la parte anteriore e posteriore del quadricoptero. I LED bianchi indicano la
parte anteriore e i LED rossi indicano la parte posteriore.
Decollo
Avviare i motori posizionando l’interruttore per armarli su On. Accelerare nché il modello si trova a circa
60 cm dal suolo in volo stazionario a bassa quota e bilanciare la posizione dello stick del gas in modo che il
quadricoptero mantenga una quota costante. In alcuni casi potrebbe essere necessario alzarsi gradual-
mente di quota di pochi centimetri alla volta, no a quando si acquisisce dimestichezza con i comandi e le
impostazioni dei trim necessari per mantenere il quadricoptero in volo stazionario a una quota costante.
Hovering
Lo Glimpse richiede degli aggiustamenti minimi sul comando motore per mantenere la quota. Bisogna
tenere ben presente che questi aggiustamenti devono essere il più possibile ridotti, perché i comandi
troppo ampi portano a perdere il controllo e, di conseguenza, a causare una caduta.
Mentre si tenta di stabilizzare il volo stazionario a bassa quota, conviene controllare se sono neces-
sarie delle regolazioni sui trim per evitare una deriva costante in varie direzioni. Se si notano queste
derive senza aver dato alcun comando direzionale, conviene far atterrare il modello prima di fare qual-
siasi regolazione con i trim. Altre informazioni sulla posizione e il funzionamento dei trim, si trovano
nella sezione “Capire i controlli primari di volo” su questo manuale.
• Se il naso dello nano QX ruota verso destra o sinistra, regolare il trim del timone.
• Se lo nano QX si sposta continuamente in avanti o indietro, allora bisogna intervenire sul trim
dell’elevatore.
• Se lo nano QX si sposta continuamente a destra o a sinistra, allora bisogna intervenire sul trim
dell’alettone.
Si continui a fare piccole regolazioni sui trim nché il modello resta in volo stazionario con una deriva
minima e controlli ridotti. Se questo è il vostro primo modello di quadricoptero, vi conviene chiedere
l’aiuto di un modellista esperto in questo campo, specialmente per il primo volo.
Quando il quadricoptero è trimmato correttamente e si trova in volo stazionario a bassa altezza,
provare ad usare i controlli di direzionale, elevatore e alettone per familiarizzare con le risposte del
quadricoptero ai vostri comandi. Ricordarsi di usare una quantità di comandi limitata.
Il tempo medio di volo è di circa 4 minuti.
AVVISO: I danni da incidente non sono coperti dalla garanzia.
Per prevenire un’usura eccessiva dei motori, lasciarli raffreddare sempre tra un volo e l’altro.
Atterraggio
Per atterrare, abbassare lentamente lo stick del gas partendo dal volo stazionario a bassa quota. Dopo
l’atterraggio fermare i motori posizionando l’interruttore che li arma su Off; scollegare e rimuovere la batteria
dal velivolo dopo l’uso per evitare la sovrascarica. Per evitare che i motori si usurino eccessivamente, lasciare
sempre che si raffreddino tra un volo e il successivo.
Durante la conservazione, assicurarsi che la carica della batteria non scenda sotto i 3 V per cella.
Volo del Quadricoptero
Alettone
Elevatore
Timone
Informazioni sui comandi di volo principali
Se non avete ancora familiarità con i comandi del vostro quadricoptero Glimpse è necessario dedicare
alcuni minuti per familiarizzarsi con essi prima di tentare il primo volo.
Throttle
Alettone a
sinistra Destra
Avanti Indietro
Vista laterale Vista laterale
Timone
a sinistra
La fusoliera vira a destra
La fusoliera vira a sinistra
Throttle alzato
Vista laterale Vista laterale
Discesa
Salita
Vista posteriore
Throttle abbassato
Timone
a destra
Elevatore
abbassato Elevatore
alzato
Alettone a
destra
Installazione della batteria di volo
ATTENZIONE: scollegare sempre la batteria LiPo dall’aereo
quando non si deve volare, per evitare di sovrascaricarla. Le batterie
scaricate al di sotto della soglia minima approvata, si potrebbero danneggia-
re perdendo capacità o anche incendiarsi quando si tenta di ricaricarle.
1 Stick motore
in basso
2 Posizione ON 3
4
Connessione (binding) fra trasmettitore e ricevitore
Se si incontrassero problemi, osservare le istruzioni per il “binding” e far riferimento alla guida per la soluzione
dei problemi per ulteriori istruzioni. Se necessario contattare il servizio assistenza Horizon. Per un elenco
completo dei trasmettitori DSM compatibili visitare il sito www.bindnfl y.com.
Procedura generale per la connessione (binding)
1. Scollegare la batteria dal quadricoptero.
2. Selezionare "Acro" come tipo di modello nelle impostazioni della trasmittente.
3. Centrare tutti i trim sulla trasmittente.
4. Spegnere la trasmittente e portare lo stick motore completamente in basso.
5. Collegare la batteria di bordo al quadricottero. Il LED dell’unità di controllo 3 in 1 lampeggia in rosso
durante l’inizializzazione, poi lampeggia in blu quando è pronto per la connessione (bind).
6. Mettere il trasmettitore nel modo “bind” e accenderlo.
7. Rilasciare il pulsante/interruttore di “bind” dopo 2-3 secondi. Il quadricoptero è connesso quando il LED
blu sull’unità di controllo resta acceso con luce ssa.
8. Scollegare la batteria dal modello e spegnere il trasmettitore.
USB Li-Po
Charger
EFLC1008
SOLID RED LED
–Charging
DC Input:5.0V 350mA
DC Output:4.2V 300mA
LED OFF
–Charge
Complete
Almeno 14 anni. Non è un giocattolo.
IT
Connettere il quadricottero alla propria trasmittente osservando le indicazioni che seguono:
Garantie et réparations
Durée de la garantie
Garantie exclusive - Horizon Hobby, LLC (Horizon) garantit que le Produit acheté (le « Produit ») sera
exempt de défauts matériels et de fabrication à sa date d’achat par l’Acheteur. La durée de garantie
correspond aux dispositions légales du pays dans lequel le produit aété acquis. La durée de garantie est
de 6 mois et la durée d’obligation de garantie de 18 mois à l’expiration de la période de garantie.
Limitations de la garantie
(a) La garantie est donnée à l’acheteur initial (« Acheteur ») et n’est pas transférable. Le recours de l’acheteur
consiste en la réparation ou en l’échange dans le cadre de cette garan tie. La garantie s’applique
uniquement aux produits achetés chez un revendeur Horizon agréé. Les ventes faites à des tiers ne sont
pas couvertes par cette garantie. Les revendications en garantie seront acceptées sur fourniture d’une
preuve d’achat valide uniquement. Horizon se réserve le droit de modi er les dispositions de la présente
garantie sans avis préalable et révoque alors les dispositions de garantie existantes.
(b) Horizon n’endosse aucune garantie quant à la vendabilité du produit ou aux capacités et à la forme
physique de l’utilisateur pour une utilisation donnée du produit. Il est de la seule responsabilité de l’acheteur
de véri er si le produit correspond à ses capacités et à l’utilisation prévue.
(c) Recours de l’acheteur – Il est de la seule discrétion d’Horizon de déterminer si un produit présentant un
cas de garantie sera réparé ou échangé. Ce sont là les recours exclusifs de l’acheteur lorsqu’un défaut est
constaté.
Horizon se réserve la possibilité de véri er tous les éléments utilisés et susceptibles d’être intégrés dans
le cas de garantie. La décision de réparer ou de remplacer le produit est du seul ressort d’Horizon. La
garantie exclut les défauts esthétiques ou les défauts provoqués par des cas de force majeure, une
manipulation incorrecte du produit, une utilisation incorrecte ou commerciale de ce dernier ou encore
des modi cations de quelque nature qu’elles soient.
La garantie ne couvre pas les dégâts résultant d’un montage ou d’une manipulation erronés, d’accidents
ou encore du fonctionnement ainsi que des tentatives d’entretien ou de réparation non effectuées
par Horizon. Les retours effectués par le fait de l’acheteur directement à Horizon ou à l’une de ses
représentations nationales requièrent une con rmation écrite.
Limitation des dommages
Horizon ne saurait être tenu pour responsable de dommages conséquents directs ou indirects, de
pertes de revenus ou de pertes commerciales, liés de quelque manière que ce soit au produit et ce,
indépendamment du fait qu’un recours puisse être formulé en relation avec un contrat, la garantie ou
l’obligation de garantie. Par ailleurs, Horizon n’acceptera pas de recours issus d’un cas de garantie
lorsque ces recours dépassent la valeur unitaire du produit. Horizon n’exerce aucune in uence sur
le montage, l’utilisation ou la maintenance du produit ou sur d’éventuelles combinaisons de produits
choisies par l’acheteur. Horizon ne prend en compte aucune garantie et n‘accepte aucun recours pour
les blessures ou les dommages pouvant en résulter. Horizon Hobby ne saurait être tenu responsable
d’une utilisation ne respectant pas les lois, les règles ou règlementations en vigueur.
En utilisant et en montant le produit, l’acheteur accepte sans restriction ni réserve toutes les dispositions
relatives à la garantie gurant dans le présent document. Si vous n’êtes pas prêt, en tant qu’acheteur, à
accepter ces dispositions en relation avec l’utilisation du produit, nous vous demandons de restituer au
vendeur le produit complet, non utilisé et dans son emballage d’origine.
Indications relatives à la sécurité
Ceci est un produit de loisirs perfectionné et non un jouet. Il doit être utilisé avec précaution et bon sens
et nécessite quelques aptitudes mécaniques ainsi que mentales. L’incapacité à utiliser le produit de
manière sure et raisonnable peut provoquer des blessures et des dégâts matériels conséquents. Ce produit
n’est pas destiné à être utilisé par des enfants sans la surveillance par un tuteur. La notice d’utilisation
contient des indications relatives à la sécurité ainsi que des indications concernant la maintenance et le
fonctionnement du produit. Il est absolument indispensable de lire et de comprendre ces indications avant
la première mise en service. C’est uniquement ainsi qu’il sera possible d’éviter une manipulation erronée
et des accidents entraînant des blessures et des dégâts. Horizon Hobby ne saurait être tenu responsable
d’une utilisation ne respectant pas les lois, les règles ou règlementations en vigueur.
Questions, assistance et réparations
Votre revendeur spécialisé local et le point de vente ne peuvent effectuer une estimation d’éligibilité à
l’application de la garantie sans avoir consulté Horizon. Cela vaut également pour les réparations sous
garantie. Vous voudrez bien, dans un tel cas, contacter le revendeur qui conviendra avec Horizon d’une
décision appropriée, destinée à vous aider le plus rapidement possible.
Maintenance et réparation
Si votre produit doit faire l’objet d’une maintenance ou d’une réparation, adressez-vous soit à votre
revendeur spécialisé, soit directement à Horizon. Emballez le produit soigneusement. Veuillez noter que
le carton d’emballage d’origine ne suf t pas, en règle générale, à protéger le produit des dégâts pouvant
survenir pendant le transport. Faites appel à un service de messagerie proposant une fonction de suivi
et une assurance, puisque Horizon ne prend aucune responsabilité pour l’expédition du produit jusqu’à
sa réception acceptée. Veuillez joindre une preuve d’achat, une description détaillée des défauts ainsi
qu’une liste de tous les éléments distincts envoyés. Nous avons de plus besoin d’une adresse complète,
d’un numéro de téléphone (pour demander des renseignements) et d’une adresse de courriel.
Garantie et réparations
Les demandes en garantie seront uniquement traitées en présence d’une preuve d’achat originale émanant
d’un revendeur spécialisé agréé, sur laquelle gurent le nom de l’acheteur ainsi que la date d’achat. Si le
cas de garantie est con rmé, le produit sera réparé. Cette décision relève uniquement d’Horizon Hobby.
Réparations payantes
En cas de réparation payante, nous établissons un devis que nous transmettons à votre revendeur. La
réparation sera seulement effectuée après que nous ayons reçu la con rmation du revendeur. Le prix
de la réparation devra être acquitté au revendeur. Pour les réparations payantes, nous facturons au
minimum 30 minutes de travail en atelier ainsi que les frais de réexpédition. En l’absence d’un accord
pour la réparation dans un délai de 90 jours, nous nous réservons la possibilité de détruire le produit ou
de l’utiliser autrement.
ATTENTION: Nous n’effectuons de réparations payantes que pour les composants
électroniques et les moteurs. Les réparations touchant à la mécanique, en particulier
celles des hélicoptères et des voitures radiocommandées, sont extrêmement coûteuses et
doivent par conséquent être effectuées par l’acheteur lui-même. 10/15
Coordonnées de Garantie et réparations
Pays
d’achat Horizon Hobby Numéro de téléphone/E-
mail Adresse
Union
européenne
Horizon Technischer
Service [email protected] Hanskampring 9
D 22885 Barsbüttel, Germany
Sales: Horizon Hobby
GmbH +49 (0) 4121 2655 100
Informations de conformité pour l’Union européenne
Déclaration de conformité de l’Union européenne :
Horizon Hobby, LLC déclare par la présente que ce produit est en conformité avec les
exigences essentielles et les autres dispositions des directives R&TTE, RED, et CEM.
Une copie de la déclaration de conformité européenne est disponible à:
http://www.horizonhobby.com/content/support-render-compliance.
Instructions relatives à l’élimination des D3E pour
les utilisateurs résidant dans l’Union européenne
Ce produit ne doit pas être éliminé avec d’autres déchets. Il relève de la responsabilité de
l’utilisateur d’éliminer les équipements mis au rebut en les remettant à un point de collecte désigné
en vue du recyclage des déchets d’équipements électriques et électroniques. La collecte et le
recyclage séparés de vos équipements au moment de leur élimination aideront à préserver les
ressources naturelles et à garantir que les déchets seront recyclés de manière à protéger la santé
humaine et l’environnement. Pour plus d’informations quant aux lieux de dépôt de vos équipe-
ments mis au rebut en vue du recyclage, veuillez contacter votre mairie, votre service de traitement
des ordures ménagères ou le magasin dans lequel vous avez acheté le produit.
Information IC
IC: 6157A-BLH8516
Le présent appareil est conforme aux CNR d’Industrie Canada applicables aux appareils radio
exempts de licence. L’exploitation est autorisée aux deux conditions suivantes : (1) l’appareil ne doit
pas produire de brouillage, et (2) l’utilisateur de l’appareil doit accepter tout brouillage radioélectrique
subi, même si le brouillage est susceptible d’en compromettre le fonctionnement.
Questo prodotto usa porzioni di codice del software di terze parti Beta ight. Per maggiori informazioni sul
software Beta ight, visitare il sito: https://github.com/beta ight/beta ight/wiki.
SOFTWARE DI TERZE PARTI Questo prodotto può includere un codice sviluppato da una o più terze parti
(di seguito “software di terze parti”). Alcuni software di terze parti potrebbero essere soggetti ad altri termini
e condizioni che sono scaricabili insieme alla documentazione del prodotto. Fermi restando i termini e le
condizioni del presente accordo, il software di terze parti viene concesso in licenza all’utente alle condizioni
e nei termini previsti dal contratto di licenza software indicato negli avvisi di divulgazione del software open
source. Se i termini e le condizioni delle terze parti includono licenze che autorizzano la messa a disposizione
del codice sorgente (ad esempio, la licenza GNU GPL), gli avvisi di divulgazione del software open source o il
supporto su cui viene fornito tale software forniranno le istruzioni su come ottenere una copia di tale codice.
• Quando l’interruttore si trova in posizione 0 (modalità Angle), il quadricoptero si autolivella e
l’angolo di rollio è limitato a circa 60 gradi.
• Quando l’interruttore si trova in posizione 1 (modalità Air ), il quadricoptero non si autolivella
e l’angolo di rollio non è limitato. Se lo stick del gas è abbassato, il ight controller continua a
stabilizzare il quadricoptero per mantenere l’ultimo assetto selezionato. Questa modalità è utile per
effettuare manovre acrobatiche uide con lo stick del gas abbassato e alzato.
• Quando l’interruttore si trova in posizione 2 (modalità Acro), il quadricoptero non si autolivella e
l’angolo di rollio non è limitato. Quando l’interruttore del gas si trova in basso, il ight controller
non stabilizza il quadricoptero. Il pilota deve controllare attivamente il quadricoptero per mantenere
l’assetto desiderato. Questa modalità è ideale per apportare modi che immediate della quota, ad
esempio durante una gara. Usare Dual rates ed Expo per adeguare la prestazione in funzione del
proprio stile di volo.
Per maggiori informazioni sulla con gurazione della trasmittente e sulla scelta degli interruttori,
consultare la sezione Impostazione della trasmittente.
Modalità di volo e scelta delle corse
Vista posteriore
Sinistra
ATTENZIONE: leggere e seguire tutte le istruzioni e avvertenze riportate nel manuale prima
dell’impostazione o dell’uso. Un uso improprio del prodotto può causare danni al prodotto
stesso, alle cose e/o lesioni alle persone.
Questo è un prodotto so sticato per appassionati. Deve essere azionato in maniera attenta e responsabile
e richiede alcune conoscenze basilari di meccanica. Non usare componenti non compatibili o alterare il
prodotto in nessuna maniera al di fuori delle istruzioni fornite da Horizon Hobby LLC.
SIGNIFICATO DELLE AVVERTENZE DI SICUREZZA
Nella documentazione relativa al prodotto vengono utilizzati i seguenti termini per indicare i vari livelli di
pericolo potenziale durante l’uso del prodotto:
AVVISO: indica procedure che, se non debitamente seguite, possono determinare il rischio di danni alle
cose E il rischio minimo o nullo di lesioni alle persone.
ATTENZIONE: indica procedure che, se non debitamente seguite, determinano il rischio di danni alle
cose E di gravi lesioni alle persone.
AVVERTENZA: indica procedure che, se non debitamente seguite, determinano il rischio di danni alle
cose, danni collaterali e gravi lesioni alle persone O il rischio elevato di lesioni super ciali alle persone.
AVVISO
Tutte le istruzioni, le garanzie e gli altri documenti pertinenti sono soggetti a cambiamenti a totale
discrezione di Horizon Hobby, LLC. Per una documentazione aggiornata sul prodotto, visitare il sito
horizonhobby.com e fare clic sulla sezione Support del prodotto.

6
Istruzioni del RAEE per lo smaltimento da parte di utenti dell’Unione Europea
Questo prodotto non deve essere smaltito assieme ai ri uti domestici. Al contrario,
l’utente è responsabile dello smaltimento di tali ri uti che devono essere portati in
un centro di raccolta designato per il riciclaggio di ri uti elettrici e apparecchiatu-
re elettroniche. La raccolta differenziata e il riciclaggio di tali ri uti provenienti da
apparecchiature nel momento dello smaltimento aiuteranno a preservare le risorse
naturali e garantiranno un riciclaggio adatto a proteggere il benessere dell’uomo e
dell’ambiente. Per maggiori informazioni sui centri di raccolta, contattare il proprio
uf cio locale, il servizio di smaltimento ri uti o il negozio presso il quale è stato acquistato il prodotto.
Informazioni sulla conformità per l’Unione Europea
Dichiarazione di Conformità EU:
Horizon Hobby, LLCcon la presente dichiara che il prodotto è conforme ai requisiti
essenziali e ad altre disposizioni rilevanti del R&TTE, RED, e direttiva EMC.
Una copia della dichiarazione di conformità per l’Unione Europea è disponibile a:
http://www.horizonhobby.com/content/support-render-compliance.
Guida alla soluzione dei problemi
Problema Possibile causa Soluzione
Il quadricoptero non
risponde al comando
del gas
Stick e/o trim del motore troppo
in alto Resettare i controlli con stick e trim
completamente in basso
Il quadricoptero non
funziona ed emette odo-
re di bruciato dopo aver
connesso la batteria
Batteria di bordo collegata con
polarità invertita
Sostituire il circuito del 4-in-1. Collegare
la batteria di bordo facendo attenzione alla
polarità
ll LED sulla ricevente
lampeggia velocemente
e il qaudricoptero non
risponde alla trasmitten-
te (durante il “binding”)
Trasmettitore troppo vicino al
modello durante la procedura di
“binding”
Spegnere il trasmettitore. Allontanare il tra-
smettitore all’aereo. Scollegare e ricollegare
la batteria di bordo. Ripetere la procedura di
“binding” seguendo le istruzioni
Il comando per il "bind" non è
stato premuto all'accensione del
trasmettitore
Spegnere il trasmettitore e ripetere la
procedura
Il modello o il trasmettitore sono
troppo vicini a grossi oggetti me-
tallici, sorgenti WiFi o ad un altro
trasmettitore
Spostare il modello e il trasmettitore in un
altro posto prima di ripetere la procedura
Il LED della ricevente
lampeggia rapidamente
ed il quadricoptero non
risponde alla trasmitten-
te (dopo aver effettuato
il “binding)
Non sono passati 5 secondi
dall’accensione del trasmettitore
al collegamento della batteria di
bordo
Lasciare acceso il trasmettitore. Scollegare e
ricollegare la batteria allo quadricottero
Lo quadricottero è connesso ad
una memoria diversa (solo tra-
smettitori con ModelMatch)
Scegliere la memoria giusta sul trasmetti-
tore. Scollegare e ricollegare la batteria allo
quadricottero
Batteria di bordo o del trasmettito-
re quasi scariche Sostituire o ricaricare le batterie
Il modello o il trasmettitore sono
troppo vicini a grossi oggetti me-
tallici, sorgenti WiFi o ad un altro
trasmettitore
Spostare il modello e il trasmettitore in un
altro posto prima di ripetere la procedura
Cade direttamente dopo
il decollo o non decolla Eliche nella posizione sbagliata o
modalità di volo scelta non corretta Effettuare le regolazioni necessarie
Segnale FPV statico Interferenze sul canale selezionato Cambiare il canale del trasmettitore e ricevi-
tore video come indicato nella sezione Usare
la micro videocamera FPV
Uso del trasmettitore video
AVVISO: Prima di usare l’attrezzatura FPV, consultare le leggi e le ordinanze locali. In alcune aree
l’uso dell’apparecchiatura FPV può essere limitato o vietato. L’utente è responsabile dell’uso legale
e responsabile del prodotto.
Consultare la tabella che riporta le frequenze disponibili per trovare il canale e la frequenza video
desiderati. Il canale e la frequenza del trasmettitore video possono essere modi cati usando il
pulsante posto nella parte superiore del quadricoptero, come illustrato nella gura. Sulla scheda del
trasmettitore video sono presenti sei LED. Il LED rosso indica il canale. I cinque LED blu successivi
indicano la frequenza.
IMPORTANTE: il trasmettitore video da 25 mW in dotazione con la versione del Inductrix FPV Pro
(BLH08570EU) destinata all’Unione europea dispone di quattro LED blu. La frequenza E non è
disponibile in questa versione.
Si raccomanda di volare in aree aperte, lontano da persone, alberi, auto, edi ci. La portata del sistema
viene limitata da qualsiasi ostacolo che possa bloccare il segnale. È normale vedere interruzioni del video
quando si passa dietro ad alberi o ad altri ostacoli.
Selezione del canale:
1. Il canale 1 è indicato dal LED rosso sso.
2. Premere il pulsante per passare da un canale
all’altro (1-8). Il LED rosso lampeggia una
volta quando si passa da un canale all’altro.
Premere il pulsante una volta per ogni canale
no a individuare il canale desiderato. In caso
di dubbi in merito al canale corrente della
trasmittente, premere il pulsante per spostarsi
tra i canali no a visualizzare il canale 1,
indicato da un LED rosso sso, quindi spostarsi sul canale desiderato.
Selezione della frequenza:
1. Tenere premuto il pulsante per modi care la
frequenza del trasmettitore video.
2. Ogni volta che si tiene premuto il pulsante,
il LED blu della frequenza indica che è stata
selezionata la frequenza successiva disponibile.
I LED blu indicano la frequenza FS/IRC, la
frequenza E (solo Nord America), la frequenza
A, la frequenza R (race band) e la frequenza B,
nell’ordine illustrato nella gura.
LED del trasmettitore video
Versione da 25 mW per il Nord America
Versione da 25 mW
per l'Unione europea
Canale Frequenza
LEDs
Band CH 1 CH 2 CH 3 CH 4 CH 5 CH 6 CH 7 CH 8
FS/IRC 5740 5760 5780 5800 5820 5840 5860 5880
Band E 5705 5685 5665 5665 5885 5905 5905 5905
Band A 5865 5845 5825 5805 5785 5765 5745 5725
RaceBand 5658 5695 5732 5769 5806 5843 5880 5917
Band B 5733 5752 5771 5790 5809 5828 5847 5866
Band CH 1 CH 2 CH 3 CH 4 CH 5 CH 6 CH 7 CH 8
FS/IRC 5740 5760 5780 5800 5820 5840 5860 5860
Band A 5865 5845 5825 5805 5785 5765 5745 5745
RaceBand 5732 5732 5732 5769 5806 5843 5843 5843
Band B 5733 5752 5771 5790 5809 5828 5847 5866
Se per qualsiasi ragione fosse necessario sostituire
una o più eliche del quadricoptero, attenersi alla
gura qui a anco per installare l’elica in modo che
ruoti nella direzione corretta. Sostituire un’elica solo
con una che ruota nello stesso verso.
Per installare l’elica, è suf ciente inserirla sull’albero
motore e spingere. Accertarsi che l’elica ruoti libera-
mente dopo l’installazione.
Non spingere troppo l’elica contro l’albero motore.
L’inosservanza di questa indicazione può causare
danni all’elica o al motore e non consente all’elica di
ruotare liberamente.
Montaggio dell’elica
Teil # Beschreibung
1
BLH8521 Pro Motor Set (4): Inductrix Pro
2
BLH8520 Set eliche (4), nero
3
BLH8515 Capottina
4
BLH8516 Flight Control, Beta ight
5
BLH8517 Camera FX805 FPV, 25mW
Teil # Beschreibung
6
BLH8517EU Camera FX805 FPV, 25mW
7
BLH8519 Telaio principale, nero
EFLB2001S45
Batteria LiPo 1S, 3,7V 200mAh
EFLC1008 Caricatore LiPo USB 1S 200 mA
Elenco delle parti
Vista esplosa
Componenti opzionali
Teil # Beschreibung
BLH8506 Set eliche (4), giallo
BLH8510 Inductrix FPV Race Gates
Teil # Beschreibung
SPMVM430 11 cm monitor video
1
3
7
56 4
2
Garanzia
Periodo di garanzia
Garanzia esclusiva - Horizon Hobby, LLC (Horizon) garantisce che il prodotto acquistato (il “Prodotto”) sarà privo di
difetti relativi ai materiali e di eventuali errori di montaggio alla data di acquisto. Il periodo di garanzia è conforme
alle disposizioni legali del paese nel quale il prodotto è stato acquistato. Tale periodo di garanzia ammonta a 6 mesi
e si estende ad altri 18 mesi dopo tale termine.
Limiti della garanzia
(a) La garanzia è limitata all’acquirente originale (Acquirente) e non è cedibile a terzi. L’acquirente ha il diritto a
far riparare o a far sostituire la merce durante il periodo di questa garanzia. La garanzia copre solo quei prodotti
acquistati presso un rivenditore autorizzato Horizon. Altre transazioni di terze parti non sono coperte da questa
garanzia. La prova di acquisto è necessaria per far valere il diritto di garanzia. Inoltre, Horizon si riserva il diritto di
cambiare o modi care i termini di questa garanzia senza alcun preavviso e di escludere tutte le altre garanzie già
esistenti.
(b) Horizon non si assume alcuna garanzia per la disponibilità del prodotto, per l’adeguatezza o l’idoneità del prodotto
a particolari previsti dall’utente. È sola responsabilità dell’acquirente il fatto di veri care se il prodotto è adatto agli
scopi da lui previsti.
(c) Richiesta dell’acquirente – spetta soltanto a Horizon, a propria discrezione riparare o sostituire qualsiasi prodotto
considerato difettoso e che rientra nei termini di garanzia. Queste sono le uniche rivalse a cui l’acquirente si può
appellare, se un prodotto è difettoso.
Horizon si riserva il diritto di controllare qualsiasi componente utilizzato che viene coinvolto nella rivalsa di garanzia.
Le decisioni relative alla sostituzione o alla riparazione sono a discrezione di Horizon. Questa garanzia non copre dei
danni super ciali o danni per cause di forza maggiore, uso errato del prodotto, un utilizzo che viola qualsiasi legge,
regolamentazione o disposizione applicabile, negligenza, uso ai ni commerciali, o una qualsiasi modi ca a qualsiasi
parte del prodotto.
Questa garanzia non copre danni dovuti ad un’installazione errata, ad un funzionamento errato, ad una manutenzione
o un tentativo di riparazione non idonei a cura di soggetti diversi da Horizon. La restituzione del prodotto a cura
dell’acquirente, o da un suo rappresentante, deve essere approvata per iscritto dalla Horizon.
Limiti di danno
Horizon non si riterrà responsabile per danni speciali, diretti, indiretti o consequenziali; perdita di pro tto o di
produzione; perdita commerciale connessa al prodotto, indipendentemente dal fatto che la richiesta si basa
su un contratto o sulla garanzia. Inoltre la responsabilità di Horizon non supera mai in nessun caso il prezzo
di acquisto del prodotto per il quale si chiede la responsabilità. Horizon non ha alcun controllo sul montaggio,
sull’utilizzo o sulla manutenzione del prodotto o di combinazioni di vari prodotti. Quindi Horizon non accetta
nessuna responsabilità per danni o lesioni derivanti da tali circostanze. Con l’utilizzo e il montaggio del prodotto
l’utente acconsente a tutte le condizioni, limitazioni e riserve di garanzia citate in questa sede.
Qualora l’utente non fosse pronto ad assumersi tale responsabilità associata all’uso del prodotto, si suggerisce
di restituire il prodotto intatto, mai usato e immediatamente presso il venditore.
Indicazioni di sicurezza
Questo è un prodotto so sticato di hobbistica e non è un giocattolo. Esso deve essere manipolato con cautela,
con giudizio e richiede delle conoscenze basilari di meccanica e delle facoltà mentali di base. Se il prodotto
non verrà manipolato in maniera sicura e responsabile potrebbero risultare delle lesioni, dei gravi danni a
persone, al prodotto o all’ambiente circostante. Questo prodotto non è concepito per essere usato dai bambini
senza una diretta supervisione di un adulto. Il manuale del prodotto contiene le istruzioni di sicurezza, di
funzionamento e di manutenzione del prodotto stesso. È fondamentale leggere e seguire tutte le istruzioni e
le avvertenze nel manuale prima di mettere in funzione il prodotto. Solo così si eviterà un utilizzo errato e si
preverranno incidenti, lesioni o danni.
Domande, assistenza e riparazioni
Il vostro negozio locale e/o luogo di acquisto non possono fornire garanzie di assistenza o riparazione senza
previo colloquio con Horizon. Questo vale anche per le riparazioni in garanzia. Quindi in tale casi bisogna
interpellare un rivenditore, che si metterà in contatto subito con Horizon per prendere una decisione che vi
possa aiutare nel più breve tempo possibile.
Manutenzione e riparazione
Se il prodotto deve essere ispezionato o riparato, si prega di rivolgersi ad un rivenditore specializzato o
direttamente ad Horizon. Il prodotto deve essere imballato con cura. Bisogna far notare che i box originali
solitamente non sono adatti per effettuare una spedizione senza subire alcun danno. Bisogna effettuare una
spedizione via corriere che fornisce una tracciabilità e un’assicurazione, in quanto Horizon non si assume
alcuna responsabilità in relazione alla spedizione del prodotto. Inserire il prodotto in una busta assieme ad una
descrizione dettagliata degli errori e ad una lista di tutti i singoli componenti spediti. Inoltre abbiamo bisogno di
un indirizzo completo, di un numero di telefono per chiedere ulteriori domande e di un indirizzo e-mail.
Garanzia e riparazione
Le richieste in garanzia verranno elaborate solo se è presente una prova d’acquisto in originale proveniente da un
rivenditore specializzato autorizzato, nella quale è ben visibile la data di acquisto. Se la garanzia viene confermata,
allora il prodotto verrà riparato o sostituito. Questa decisione spetta esclusivamente a Horizon Hobby.
Riparazioni a pagamento
Se bisogna effettuare una riparazione a pagamento, effettueremo un preventivo che verrà inoltrato al vostro
rivenditore. La riparazione verrà effettuata dopo l’autorizzazione da parte del vostro rivenditore. La somma per
la riparazione dovrà essere pagata al vostro rivenditore. Le riparazioni a pagamento avranno un costo minimo
di 30 minuti di lavoro e in fattura includeranno le spese di restituzione. Qualsiasi riparazione non pagata e non
richiesta entro 90 giorni verrà considerata abbandonata e verrà gestita di conseguenza.
ATTENZIONE: Le riparazioni a pagamento sono disponibili solo sull’elettronica e sui motori. Le
riparazioni a livello meccanico, soprattutto per gli elicotteri e le vetture RC, sono molto costose
e devono essere effettuate autonomamente dall’acquirente. 10/15
Garanzia e Assistenza - Informazioni per i contatti
Stato
di acquisto Horizon Hobby Telefono/Indirizzo e-mail Indirizzo
Unione
Europea
Horizon Technischer
Service [email protected] Hanskampring 9
D 22885 Barsbüttel, Germany
Sales: Horizon Hobby
GmbH +49 (0) 4121 2655 100
Motore grigio sul fondo = in senso orario
Motore bianco sul fondo = in senso antiorario
© 2017 Horizon Hobby, LLC. Blade, Inductrix, E- ite, Bind-N-Fly, BNF, DSM, ModelMatch and the Horizon Hobby Logo are trademarks
or registered trademarks of Horizon Hobby, LLC. The Spektrum trademark is used with permission of Bachmann Industries, Inc. All other
trademarks, service marks and logos are property of their respective owners.
Created 02/2017 54710 BLH8570
Frequenze disponibili nel Nord America (mHz)
Frequenze disponibili nell’Unione europea (mHz)
-
 1
1
-
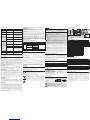 2
2
-
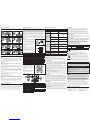 3
3
-
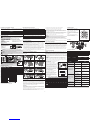 4
4
-
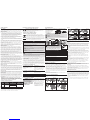 5
5
-
 6
6


Horizon Hobby BLH8570 Manuale utente
- Categoria
- Giocattoli telecomandati
- Tipo
- Manuale utente
in altre lingue
- English: Horizon Hobby BLH8570 User manual
- français: Horizon Hobby BLH8570 Manuel utilisateur
- Deutsch: Horizon Hobby BLH8570 Benutzerhandbuch