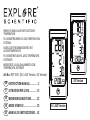
Explore Scientific RGT1001 Manuale utente
- Tipo
- Manuale utente

EN INSTRUCTION MANUAL ............. 2
IT ISTRUZIONI PER L’USO ............ 12
DE BEDIENUNGSANLEITUNG ......... 22
FR MODE D‘EMPLOI ..................... 32
ES MANUAL DE INSTRUCCIONES .. 42
Art.No.: RGT1001 (EU / AUS Version, US Version)
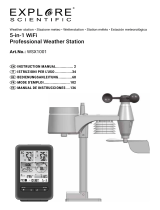
WIRELESS RAIN GAUGE WITH OUTDOOR
TEMPERATURE
PLUVIOMETRO WIRELESS CON TEMPERATURA
ESTERNA
KABELLOSES REGENMESSGERÄT MIT
AUSSENTEMPERATUR
PLUVIOMÈTRE SANS FIL AVEC TEMPÉRATURE
EXTÉRIEUR
MEDIDOR DE LLUVIA INALÁMBRICO CON
TEMPERATURA EXTERIOR
EU / AUS Version
US Version

2
ABOUT THIS INSTRUCTION MANUAL
These operating instructions are to be considered a
component of the device.
Please read the safety instructions and the operating
instructions carefully before use.
Keep these instructions for renewed use at a later date. When
the device is sold or given to someone else, the instruction
manual must be provided to the new owner/user of the
product. The device is intended only for indoor use.
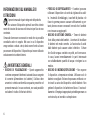
GENERAL WARNINGS
• Risk of electric shock — This device contains electronic
components. Only use the device as described in the
manual; otherwise, you run the risk of an electric shock.
• Choking hazard — Children should only use the device
under adult supervision. Keep packaging material,
like plastic bags and rubber bands, out of the reach of
children, as these materials pose a choking hazard.
• Risk of chemical burn — Keep batteries out of the reach
of children! Make sure you insert the batteries correctly.
Leaking battery acid can lead to chemical burns. Avoid
contact of battery acid with skin, eyes and mucous
membranes. In the event of contact, rinse the affected
region immediately with a plenty of water and seek
medical attention.
• Risk of re/explosion — Do not expose the device to high
temperatures. Use only the recommended batteries. Do
not short-circuit the device or batteries, or throw them
into a re. Excessive heat or improper handling could
trigger a short-circuit, a re, or an explosion.
• Do not disassemble the device. In the event of a defect,
please contact your dealer. The dealer will contact the
Service Centre and can send the device in to be repaired,
if necessary.
• Use only the recommended batteries. Always replace
weak or empty batteries with a new, complete set of
batteries at full capacity. Do not use batteries from
different brands or with different capacities. The
batteries should be removed from the unit if it has not
been used for a long time.

3
EN
IT
DE
FR
ES
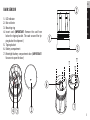
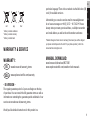
SCOPE OF DELIVERY
Main station, rain sensor, operating instructions, 3 x screws
BEFORE YOU BEGIN
• We recommend using alkaline batteries. If temperatures
regularly fall below 0°C (32°F), we recommend using
lithium batteries.
• Avoid using rechargeable batteries. (Rechargeable
batteries cannot maintain correct power requirements.)
• Insert batteries before rst use, matching the polarity in
the battery compartment. 3x AA Batteries are required for
the station and 2x AA Batteries are required for the sen-
sor.

4
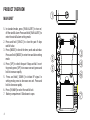
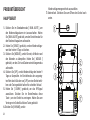
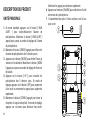
PRODUCT OVERVIEW
MAIN UNIT
1. In standard mode, press [ RAIN ALERT ] to turn on/
off the rainfall alarm.Press and hold [ RAIN ALERT ] to
enter the rainfall alarm setting mode.
2. Press and hold [ SINCE ] to clear the past 9 days
rainfall value.
3. Press [ MODE ] to check the time, week and calendar.
Press and hold [ MODE ] to enter time and date setting
mode.
4. Press [ UP ] to check the past 9 days rainfall. In set-
ting mode, press [ UP ] to increase one unit, press and
hold to increase rapidly.
5. Press and hold [ DOWN ] to initiate RF signal. In
setting mode, press to decrease one unit. Press and
hold to decrease rapidly.
6. Press [ IN/MM ] to select the rainfall unit.
7. Battery compartment. Slide down to open.
h

5
EN
IT
DE
FR
ES
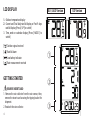
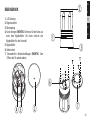
RAIN SENSOR
1. LED indicator
2. Rain collector
3. Mounting ring
4. Insert card (IMPORTANT: Remove the card from
below the tipping bucket. The card secured the tip-
ping bucket for shipment.)
5. Tipping bucket
6. Battery compartment
7. Watertight battery compartment door (IMPORTANT:
Unscrew to open the door)
d
h
c
g
ec
f

6
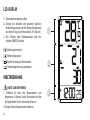
LCD DISPLAY
1. Outdoor temperature display
2. Current and Total daily rainfall display or Past 9 days
rainfall display (Press [ UP ] to switch)
3. Time, week or calendar display (Press [ MODE ] to
switch)
[] Outdoor signal received
[ ] Rainfall alarm
[ ] Low battery indicator
[] Rain measurement received
GETTING STARTED
REMOVE INSERT CARD
1. Remove the rain collector from the rain sensor, then,
remove the insert card securing the tipping bucket for
shipment.
2. Reattach the rain collector.
EU / AUS Version US Version

7
EN
IT
DE
FR
ES
INSERT BATTERIES
1. Remove the mounting ring at the bottom of the rain
sensor and unscrew the watertight battery door.
2.Remove the battery compartment cover of the main unit.
3. Insert 3x AA and 2xAA (LR03)/1.5V batteries into main
unit and rain sensor respectively. Please ensure the
polarities (+/-) of the batteries match upon installation.
4. Reattach the battery covers and mounting ring.
NOTE:
- Ensure the watertight O-ring is properly aligned in place to
ensure water-resistant.
- Replace batteries when [ ] displays, or when the
display is dim.
RAIN SENSOR INSTALLATION
The base station and rain gauge should be positioned
within an effective range: about 100 meters (328 feet) in an
open area. The rain gauge should be mounted horizontally
in an open area away from trees or other obstructions to
allow rain to fall naturally for an accurate reading. You may
insert the three mounting screws (included) through the
holes in the base of the rain sensor.
CLOCK
In standard mode, press [ MODE ] button to check the time,
week and calendar.
SET THE CLOCK MANUALLY
1. Press and hold [ MODE ] button to enter time and date
setting.
2. The setting parameter will ash.
3. Press [ UP ] button once, the gure will increase 1 unit.
Press and hold the [ UP ] button, the gures will increase
rapidly.
4. Press [ DOWN ] button once, the gure will decrease 1
unit. Press and hold the [ DOWN ] button, the gures will
decrease rapidly.
5.Press [ MODE ] button to conrm setting and enter to next
parameter.
6.Sequence of setting: 12/24Hr Hour Minute Year
Date format (Month/Date or Date/Month) Month
Date Language Exit
LANGUAGE
Sequence of setting language:
English (E)German (D)French (F)Italian (I)

8
Spanish (S).
RAINFALL SETTING
1. The device will register RF signal for 4 minutes
automatically when power on.
2. In standard mode, press and hold [ DOWN ] for 2 seconds
to manually receive the value.
Current rainfall value: 0 mm ~ 99.96 in (0 ~ 2539mm)
Total rainfall value: 0 mm ~ 999.96 in (0 ~ 25399mm)
Rainfall unit: mm or inch
3.Press [ IN/MM ] button to select the rainfall unit in mm or
inch.
4. The rainfall default displays the amount of daily rainfall.
You can press [ UP ] to check the past 9 days rainfall. And
press and hold the [ SINCE ] to clear the value.
RAIN ALERT
SETTING/ADJUSTING RAINFALL ALARM
1. Press and hold [ RAIN ALERT ] button, enter rainfall alarm
setting.
2. Press [ UP ] button once to increase by 1 or press
[ DOWN ] once to decrease by 1. Alternatively, press and
hold the button to change the gures rapidly.
3. Press [ RAIN ALERT ] button to conrm setting.
NOTE:
When today's rainfall value is more than the alarm value,
the alarm will bleep for 60 seconds, press any button to
stop the alarm.
TURN ON/OFF RAINFALL ALARM
1. In standard mode, press the [ RAIN ALERT ] button once to
turn on/off the rainfall alarm.
2. When display the rainfall alarm value, do not press any but-
ton. The alarm will be turned on after 6 seconds.
3. When display"----", do not press any button. The alarm will
be turned off after 6 seconds.
SPECIFICATIONS
MAIN UNIT:
Dimensions:
94x50x172mm (L x W x H)

9
EN
IT
DE
FR
ES
Weight:
200 g (Exclude batteries)
Power:
3x AA (LR03) 1.5V batteries
Current rainfall range:
0 mm - 99.96 in (0 ~ 2539mm)
Total rainfall range:
0 mm - 999.96 in (0 ~ 25399mm)
RAIN SENSOR:
Dimensions:
117x117x164 mm (L x W x H)
Weight:
280 g (Exclude batteries)
Outdoor temperature measuring range:
-40°C to +70°C (-40°F to 158°F)
Transmission range:
433 MHz
Power:
2x AA (LR03) 1.5V batteries
RCM DECLARATION OF CONFORMITY
The product complies with electrical safety, EMC
and radio spectrum regulatory requirements for
products supplied to the Australia or New
Zealand market.
FCC COMPLIANCE STATEMENT
FCC Supplier’s Declaration of Conformity
Rain Gauge / SR3001
This device complies with part 15 of the FCC Rules. Operation
is subject to the following two conditions: (1) This device may
not cause harmful interference, and (2) this device must accept
any interference received, including interference that may cause
undesired operation.
Suppliers Name : Explore Scientific, LLC
Suppliers Address :1010 S. 48th Street, Springdale, AR 72762
Suppliers phone number : 866.252.3811
Warning: Changes or modifications not expressly approved by the

10
party responsible for compliance could void the user’s authority to
operate the equipment.
NOTE: This equipment has been tested and found to com- ply
with the limits for a Class B digital device, pursuant to Part 15 of
the FCC Rules. These limits are designed to pro- vide reasonable
protection against harmful interference in a residential
installation. This equipment generates, uses and can radiate radio
frequency energy and, if not installed and used in accordance
with the instructions, may cause harmful interferenceto radio
communications. However, there is no guarantee that int-
erference will not occur in a particular installation.
If this equipment does cause harmful interference to radio or tel-
evision reception, which can be determined by turning the equip-
ment off and on, the user is encouraged to try to correct the inter-
ference by one or more of the following measures:
-- Reorient or relocate the receiving antenna.
-- Increase the separation between the equipment and receiver.
-- Connect the equipment into an outlet on a circuit different from
that to which the receiver is conne cted.
-- Consult the dealer or an experienced radio/TV technician for
help.
NOTES ON CLEANING
• Remove the batteries before cleaning.
• Only use a dry cloth to clean the exterior of the device. To avoid
damaging the electronics, do not use any cleaning uid.
• Protect the device from dust and moisture.
DISPOSAL
Dispose of the packaging materials properly, according to
their type, such as paper or cardboard. Contact your local
waste-disposal service or environmental authority for
information on the proper disposal.
Do not dispose of electronic devices in the household
garbage!
As per the Directive 2002/96/EC of the European
Parliament on waste electrical and electronic equipment
and its adaptation into German law, used electronic devices
must be collected separately and recycled in an environmentally
friendly manner.
In accordance with the regulations concerning batteries
and rechargeable batteries, disposing of them in the
normal household waste is explicitly forbidden. Please
make sure to dispose of your used batteries as required by law —
at a local collection point or in the retail market. Disposal in
domestic waste violates the Battery Directive. Batteries that
contain toxins are marked with a sign and a chemical symbol.

11
EN
IT
DE
FR
ES
Cd¹ Hg² Pb³
1 battery contains cadmium
2 battery contains mercury
3 battery contains lead
WARRANTY & SERVICE
WARRANTY:
EU www.bresser.de/warranty_terms
USA
www.explorescientic.com/warranty
- EU VERSION -
The regular guarantee period is 2 years and begins on the day
of purchase. You can consult the full guarantee terms as well as
information on extending the guarantee period and details of our
services at www.bresser.de/warranty_terms.
Would you like detailed instructions for this product in a
particular language? Then visit our website via the link below (QR
code) for available versions.
Alternatively you can also send an email to manuals@bresser.
de or leave a message on +49 (0) 28 72 – 80 74-220*. Please
always state your name, precise address, a valid phone number
and email address, as well as the article number and name.
*Number charged at local rates in Germany (the amount you will be charged
per phone call will depend on the tariff of your phone provider); calls from
abroad will involve higher costs.
MANUAL DOWNLOAD:
www.bresser.de/download/RGT1001
www.explorescientic.com/weather-clock-manuals

12
INFORMAZIONI SUL MANUALE DI
ISTRUZIONI
Il presente manuale è parte integrante del prodotto.
Non azionare il dispositivo prima di aver letto attenta-
mente le istruzioni di sicurezza e le istruzioni per l'uso in esso
contenute.
Il manuale deve essere conservato in modo che sia possibile
consultarlo anche in seguito. Nel caso in cui il dispositivo
venga venduto o ceduto a terzi, dovrà essere fornito al nuovo
possessore del dispositivo. Il dispositivo può essere utilizzato
esclusivamente in ambienti interni.
AVVERTENZE GENERALI
• RISCHIO DI FOLGORAZIONE — Questo apparecchio
contiene componenti elettronici azionati da una sorgente
di corrente (alimentatore e/o batterie). L’utilizzo deve
avvenire in stretta conformità con quanto prescritto nel
presente manuale. In caso contrario, non sarà possibile
escludere il rischio di infortuni elettrici.
• PERICOLO DI SOFFOCAMENTO — I bambini possono
utilizzare il dispositivo solo sotto la vigilanza di un adul-
to. I materiali di imballaggio, i sacchetti di plastica e le
fasce in gomma possono causare soffocamento e, per-
tanto, devono essere conservati in modo che i bambini
non riescano a raggiungerli.
• RISCHIO DI USTIONE CHIMICA — Tenere le batterie
fuori dalla portata dei bambini. Accertarsi di installare
le batterie nel modo corretto. La fuoriuscita di acido
dalle batterie può causare ustioni chimiche. Evitare
che l’acido venga a contatto con pelle, occhi e mucose.
In caso, lavare immediatamente le parti interessate
con un’abbondante quantità di acqua e rivolgersi a un
medico.
• RISCHIO DI INCENDIO/ESPLOSIONE — Non esporre
il dispositivo a temperature elevate. Utilizzare solo le
batterie consigliate. Evitare che possano vericarsi cor-
to-circuiti a carico del dispositivo o delle batterie. Non
gettare il dispositivo o le batterie nel fuoco. Il surriscal-
damento o l’impiego inappropriato potrebbe generare un
cortocircuito, un incendio o un'esplosione.

EN
IT
DE
FR
ES
13
• Non smontare il dispositivo. Qualora dovesse rilevarsi
difettoso, rivolgersi al proprio rivenditore autorizzato. Il
rivenditore provvederà a contattare il Centro assistenza
e, se necessario, spedirà il dispositivo in riparazione.
• Utilizzare solo le batterie consigliate. Le batterie scariche
o esaurite devono essere sempre sostituite con una serie
completa di batterie nuove di capacità massima. Non
utilizzare batterie di marche o capacità diverse. Rimuovere
le batterie dall’unità se questa rimarrà inutilizzata per un
periodo prolungato.
CONTENUTO DELLA CONFEZIONE
Unità principale, pluviometro, istruzioni per l’uso, 3x Vite
PRIMA DI INIZIARE
• Si consiglia l'uso di batterie alcaline. Se le temperature
tendono regolarmente a scendere sotto 0 °C (32 °F),
tuttavia, potrebbe essere preferibile l’impiego di batterie
al litio.
• Evitare di utilizzare batterie ricaricabili (le batterie ricari-
cabili non soddisfano i requisiti di alimentazione appro-
priati).
• Al primo utilizzo, avere cura di inserire le batterie in modo
da rispettare la polarità indicata nel relativo vano. La
stazione richiede 3 batterie AA, e il sensore richiede 2
batterie AA.

14
INFORMAZIONI GENERALI SUL PRO-
DOTTO
UNITÀ PRINCIPALE
1. In modalità standard, premere [ RAIN ALERT ] per
accendere l’allarme precipitazioni. Tenere premuto il
pulsante [ RAIN ALERT ] per accedere alla modalità
di impostazione dell’allarme precipitazioni.
2. Tenere premuto [ SINCE ] per azzerare i valori di
precipitazioni degli ultimi 9 giorni.
3. Premere [ MODE ] per controllare l’ora, la settimana e
il calendario. Tenere premuto [ MODE ] per accedere
alla modalità di impostazione dell’ora e della data.
4. Premere [ UP ] per controllare le precipitazioni degli
ultimi 9 giorni. In modalità di impostazione, premere
[ UP ] per aumentare il valore visualizzato di un’unità;
tenerlo premuto per aumentarlo rapidamente.
5. Tenere premuto [ DOWN ] per attivare il segnale RF.
In modalità impostazione, premere per diminuire di
un'unità, tenere premuto per diminuire rapidamente.
6. Premere [ IN/MM ] per selezionare l’unità di misura delle
precipitazioni.
7. Vano batterie. Scorrere verso il basso per aprire.
h

EN
IT
DE
FR
ES
15
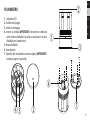
PLUVIOMETRO
1. Indicatore LED
2. Collettore di pioggia
3. Anello di montaggio
4. Inserire la scheda (IMPORTANTE: rimuovere la scheda da
sotto la benna ribaltabile. La carta ha assicurato il secchio
ribaltabile per la spedizione.)
5. Benna ribaltabile
6. Vano batteria
7. Sportello del vano batteria a tenuta stagna (IMPORTANTE:
svitare per aprire lo sportello)
d
h
c
g
ec
f

16
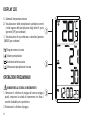
DISPLAY LCD
1. Gamma di temperatura esterna
2. Visualizzazione delle precipitazioni quotidiane correnti
e totali oppure delle precipitazioni degli ultimi 9 giorni
(premere [ UP ] per cambiare)
3. Visualizzazione di ora, settimana o calendario (premere
[ MODE ] per cambiare)
[] Segnale esterno ricevuto
[ ] Allarme precipitazioni
[ ] Indicatore batteria scarica
[] Misurazione precipitazioni ricevuta
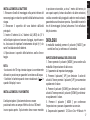
OPERAZIONI PRELIMINARI
RIMUOVERE LA SCHEDA DI INSERIMENTO
1. Rimuovere il collettore di pioggia dal sensore pioggia,
quindi, rimuovere la scheda di inserimento che ssa il
secchio ribaltabile per la spedizione.
2. Riattaccare il collettore di pioggia.

EN
IT
DE
FR
ES
17
INSTALLAZIONE DELLE BATTERIE
1. Rimuovere l'anello di montaggio nella parte inferiore del
sensore pioggia e svitare lo sportello della batteria a tenuta
stagna.
2. Rimuovere il coperchio del vano batterie dall'unità
principale.
3. Inserire 3 batterie AA e 2 batterie AA (LR03) da 1,5 V
nell’unità principale e nel sensore di pioggia, rispettivamen-
te. Assicurarsi di rispettare l'orientamento dei poli (+/-) du-
rante l'installazione delle batterie.
4. Riposizionare i coperchi delle batterie e anello di mon-
taggio.
NOTA:
- Assicurarsi che l'O-ring a tenuta stagna sia correttamente
allineato in posizione per garantire la resistenza all'acqua.
- Sostituire le batterie quando viene visualizzato [ ] o
quando il display è scuro.
INSTALLAZIONE DEL PLUVIOMETRO
L’unità principale e il pluviometro devono essere
posizionati entro un campo effettivo di circa 100 metri
in uno spazio aperto. Il pluviometro deve essere montato
in posizione orizzontale, a circa 1 metro dal terreno, in
uno spazio aperto, lontano da alberi e da altre ostruzioni,
così da consentire alla pioggia di cadere in modo naturale,
garantendo una rilevazione precisa. È possibile inserire le
tre viti di montaggio (incluse) attraverso i fori nella base
del pluviometro.
OROLOGIO
In modalità standard, premere il pulsante [ MODE ] per
controllare l’ora, la settimana e il calendario.
IMPOSTAZIONE MANUALE DELL'OROLOGIO
1. Tenere premuto il pulsante [ MODE ] per accedere alla
modalità di impostazione di data e ora.
2. Il parametro da impostare lampeggia.
3. Premere il pulsante [ UP ] per diminuire il valore di
un’unità. Tenere premuto il pulsante [ UP ] per aumentare
rapidamente il valore.
4. Premere il pulsante [ DOWN ] per diminuire il valore di
un’unità. Tenere premuto il pulsante [ DOWN ] per diminui-
re rapidamente il valore.
5. Premere il pulsante [ MODE ] per confermare
l'impostazione e passare al parametro successivo.
6. Sequenza dei parametri: 12/24 ore Ora Minuto

18
anno Formato data (mese/data o data/mese) Mese
DataLingua Esci
LINGUA
Sequenza dei parametri:
Inglese (E) Tedesco (D) Francese (F) Italiano
(I) Spagnolo (S).
IMPOSTAZIONE DELLE PRECIPITAZIONI
1. Il dispositivo registra il segnale RF automaticamente per
4 minuti all’accensione.
2. In modalità standard, tenere premuto [ DOWN ] per 2
secondi per ricevere manualmente il valore.
Valore di precipitazioni corrente: 0 mm ~ 99,96 in (0 ~ 2539
mm)
Valore di precipitazioni totale: 0 mm ~ 999,96 in (0 ~ 25399
mm)
Unità di misura precipitazioni: mm o pollici
3. Premere il pulsante [ IN/MM ] per selezionare l’unità di
misura delle precipitazioni in mm o pollici.
4. In base all’impostazione predefinita, viene visualizzata
la quantità di precipitazioni quotidiana. Premere [ UP ] per
controllare le precipitazioni degli ultimi 9 giorni. Tenere
premuto [ SINCE ] per azzerare il valore.
ALLARME PIOGGIA
IMPOSTAZIONE/REGOLAZIONE DELL’ALLARME
PIOGGIA
1. Tenere premuto il pulsante [ RAIN ALERT ] per accedere
alla modalità di impostazione dell’allarme precipitazioni.
2. Premere una volta il pulsante [ UP ] per aumentare di 1
oppure premere [ DOWN ] per diminuire di 1. In alternativa,
tenere premuto il pulsante per cambiare rapidamente i valori.
3. Premere il pulsante [ RAIN ALERT ] per confermare
l'impostazione.
NOTA: Quando il valore di precipitazioni di oggi è superiore
al valore di allarme, l’allarme suona per 60 secondi. Premere
qualsiasi pulsante per spegnerlo.
ATTIVAZIONE/DISATTIVAZIONE DELL’ALLARME
PIOGGIA
1. In modalità standard, premere [ RAIN ALERT ] per attivare/
disattivare l’allarme precipitazioni.
2. Durante la visualizzazione del valore di allarme pioggia,
non premere alcun pulsante. L’allarme si attiverà dopo 6

EN
IT
DE
FR
ES
19
secondi.
3. Quando è visualizzato "----", non premere alcun pulsante.
L’allarme si disattiverà dopo 6 secondi.
SPECIFICHE
UNITÀ PRINCIPALE
Dimensioni
94x50x172mm (L x P x H)
Peso
200 g (batterie escluse)
Alimentazione
3 batterie AA (LR03) da 1,5 V
Intervallo di precipitazioni corrente:
0 mm ~ 99,96 in (0 ~ 2539 mm)
Intervallo di precipitazioni totale:
0 mm ~ 999,96 in (0 ~ 25399 mm)
SENSORE ESTERNO
Dimensioni
117x117x164 mm (L x P x H)
Gamma di misurazione della temperatura
-40°C to +70°C (-40°F to 158°F)
Peso
280 g (batterie escluse)
Portata di trasmissione
30 m (98 ft)
Frequenza del segnale
433 MHz
Alimentazione
2 batterie AA (LR03) da 1,5 V
DICHIARAZIONE DI CONFORMITÀ CE
Con la presente Folux GmbH dichiara che il tipo di
apparecchiatura identicato con il codice
RGT1001 è conforme alla direttiva 2014/53/UE. Il
testo integrale della dichiarazione di conformità UE è dispo-
nibile all’indirizzo Internet:
www.bresser.de/download/RGT1001/CE/RGT1001_CE.pdf

20
NOTE SULLA PULIZIA
• Prima di pulire il dispositivo, rimuovere le batterie.
• Per pulire le superci esterne del dispositivo, servirsi
solo di un panno asciutto. Per evitare di danneggiare i
componenti elettronici, non utilizzare alcun tipo di uido
detergente.
• Tenere il dispositivo al riparo da polvere e umidità.
SMALTIMENTO
I materiali di imballaggio devono essere smaltiti nel
modo appropriato, a seconda del tipo, ad esempio
carta o cartone. Contattare il servizio di smaltimen-
to riuti locale o l’autorità ambientale per informazioni su
come eseguire correttamente lo smaltimento.
Non smaltire gli apparecchi elettronici nei riuti do-
mestici. Ai sensi della direttiva 2002/96/CE del Par-
lamento europeo sullo smaltimento di apparecchiature elet-
triche ed elettroniche, così come recepita nelle legislazioni
locali, i dispositivi elettronici usati devono essere smaltiti
separatamente e riciclati nel rispetto dell’ambiente.
Le normative riguardanti le batterie e le batterie ri-
caricabili ne vietano espressamente lo smaltimen-
to tra i normali riuti domestici. Assicurarsi di
smaltire le batterie usate in accordo alle disposizioni vi-
genti, servendosi di un punto di raccolta locale o avvalen-
dosi del canale commerciale al dettaglio. Lo smaltimento
nei riuti domestici viola la direttiva sulle batterie. Le bat-
terie in cui sono inclusi elementi tossici sono contraddistinte
da un segno e un simbolo chimico.
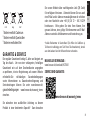
Cd¹ Hg² Pb³
1 Batteria contenente cadmio
2 Batteria contenente mercurio
3 Batteria contenente piombo
GARANZIA E ASSISTENZA
Il normale periodo di garanzia è di due anni con
La pagina si sta caricando...
La pagina si sta caricando...
La pagina si sta caricando...
La pagina si sta caricando...
La pagina si sta caricando...
La pagina si sta caricando...
La pagina si sta caricando...
La pagina si sta caricando...
La pagina si sta caricando...
La pagina si sta caricando...
La pagina si sta caricando...
La pagina si sta caricando...
La pagina si sta caricando...
La pagina si sta caricando...
-
 1
1
-
 2
2
-
 3
3
-
 4
4
-
 5
5
-
 6
6
-
 7
7
-
 8
8
-
 9
9
-
 10
10
-
 11
11
-
 12
12
-
 13
13
-
 14
14
-
 15
15
-
 16
16
-
 17
17
-
 18
18
-
 19
19
-
 20
20
-
 21
21
-
 22
22
-
 23
23
-
 24
24
-
 25
25
-
 26
26
-
 27
27
-
 28
28
-
 29
29
-
 30
30
-
 31
31
-
 32
32
-
 33
33
-
 34
34


Explore Scientific RGT1001 Manuale utente
- Tipo
- Manuale utente
in altre lingue
Documenti correlati
Altri documenti
-
Bresser Weather Center Wireless Weather Station, white/silver Manuale del proprietario
-
Oregon Scientific RGR202 Manuale utente
-
Oregon Scientific RGR126 Manuale utente
-
TFA Digital Wireless Rain Gauge RAINMAN Manuale utente
-
-
-