Philips WAS6050/05 Manuale utente
- Categoria
- Apparecchiature musicali supplementari
- Tipo
- Manuale utente

Register your product and get support at
WAS6050/05
WAS6050/12
EN User manual 1
Contact information 40

ii
Music follows me 16
Wirelessly stream music from a PC
16
Install Windows Media Player 11
16
Congure a PC to share music
16
More play options
17
Repeat play
17
Shufe play
17
Play by artist
17
Play by genre
17
7 Radio 18
FM radio
18
Listen to FM radio
18
Change frequency
18
Manual search
18
Automatic channel search
18
Automatic channel search
19
Select preset channels
19
Internet radio
19
First-time Internet radio registration
19
Register users for Internet radio
20
Listen to Internet radio
20
Place bookmarks for radio stations
20
Listen to Favorite Stations
21
Manually add Internet radio stations
21
Add URL address on the Music Station
21
Add URL address on the PC
21
Listen to My Media
22
8 Searchforaudioles(music) 23
Scroll at high speed
23
Alphanumeric search
23
9 Settings 24
Change sound settings
24
Adjust volume
24
Mute 24
Adjust Equalizer (EQ)
24
Activate Smart EQ
24
Deactivate Smart EQ
24
Adjust bass / treble
24
Set Dynamic Bass Boost (DBB)
25
Adjust display
25
Switch backlight on/off
25
Change display contrast
25
Clock / alarm settings
25
Contents
1 Important 2
Safety 2
Notice 4
Disposal of product and packing
material 4
2 Your Wireless Music Station 6
What you can do with the Wireless Music
Station 6
Overview 6
Top panel
6
Rear panel
7
Remote control
7
3 Prepare 9
Install remote control batteries
9
Position your Music Station
9
Mount the Music Station to a wall
9
Attach the support for table top
installation 10
4 Connect 11
Connect AC power
11
Connect a portable audio device (AUX)
11
Connect a PC
11
Install WADM
11
Create wired connection
11
Create wireless connection
12
Launch WADM
12
5 First-time installation 13
Select language
13
Set-up with a Center (sold separately)
13
Turn on / switch to standby
14
6 Play 15
Play HD music from a Center
15
Playlists 15
Create a playlist
15
Add audio les to a playlist
15
Play from a portable audio device (AUX)
15
EN

iii
Set the clock 25
Change the time format
25
Set the alarm time
25
Set the alarm repeat
26
Automatic time update
26
Synchronize with RDS
26
Synchronize with NTP
26
Set standby timer
26
Change language
27
10 Maintenance 28
Cleaning
28
Update 28
Restore the default settings
28
11 Technical data 29
Supported audio le formats
29
Supplied accessories
30
PC connection requirements
30
12 Troubleshooting 31
13 Glossary 32
14 Index 40
Contents
Eng lish
EN

2
g Do not block any ventilation openings.
Install in accordance with the
manufacturer’s instructions.
h Do not install near any heat sources such
as radiators, heat registers, stoves, or
otherapparatus(includingampliers)that
produce heat.
i For countries with a polarized mains,
do not defeat the safety purpose of
the polarized or grounding-type plug.
A polarized plug has two blades with
one wider than the other. A grounding
type plug has two blades and a third
grounding prong. The wide blade or the
third prong are provided for your safety.
Iftheprovidedplugdoesnottinto
your outlet, consult an electrician for
replacement of the obsolete outlet.
Caution: To prevent electric shock, match
the wide blade of the plug to the wide
slot, fully insert.
j Protect the power cord from being
walked on or pinched, particularly at
plugs, convenience receptacles, and the
point where they exit from the apparatus.
k Only use attachments/accessories
speciedbythemanufacturer.
l Use only with the cart, stand, tripod,
bracket,ortablespeciedbythe
manufacturer or sold with the apparatus.
When a cart is used, use caution when
moving the cart/apparatus combination to
avoid injury from tip-over.
1 Important
Safety
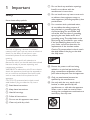
Know these safety symbols
This ‘bolt of lightning’ indicates uninsulated
material within your unit may cause an electrical
shock. For the safety of everyone in your
household, please do not remove product
covering.
The ‘exclamation point’ calls attention to
features for which you should read the enclosed
literature closely to prevent operating and
maintenance problems.
WARNING: To reduce the risk of re or electric
shock, this apparatus should not be exposed to
rain or moisture and objects lled with liquids,
such as vases, should not be placed on this
apparatus.
CAUTION: To prevent electric shock, match
wide blade of plug to wide slot, fully insert.
a Read these instructions.
b Keep these instructions.
c Heed all warnings.
d Follow all instructions.
e Do not use this apparatus near water.
f Clean only with dry cloth.
EN

3
Warning
Never remove the casing of this Music Station.
Never lubricate any part of this Music Station.
Place this Music Station on a at, hard and stable
surface.
Never place this Music Station on other electrical
equipment.
Only use this Music Station indoors. Keep this Music
Station away from water, moisture and liquid-lled
objects.
Keep this Music Station away from direct sunlight, naked
ames or heat.
•
•
•
•
•
•
How to connect a plug
The wires in the mains lead are coloured with
the following code: blue = neutral (N), brown
= live (L).
As these colours may not correspond with the
colour markings identifying the terminals in your
plug, proceed as follows:
Connect the blue wire to the terminal
marked N or coloured black.
Connect the brown wire to the terminal
marked L or coloured red.
Do not connect either wire to the earth
terminal in the plug, marked E (or e) or
coloured green (or green and yellow).
Before replacing the plug cover, make
certain that the cord grip is clamped over
the sheath of the lead - not simply over
the two wires.
Mains plug
This apparatus is tted with an approved 13
Amp plug. To change a fuse in this type of plug
proceed as follows:
a Remove fuse cover and fuse.
b Fix new fuse which should be a BS13625
Amp, A.S.T.A. or BSI approved type.
c Retthefusecover.
If the tted plug is not suitable for your socket
outlets, it should be cut off and an appropriate
plug tted in its place.
If the mains plug contains a fuse, this should
have a value of 5 Amp. If a plug without a fuse
is used, the fuse at the distribution board should
not be greater than 5 Amp.
•
•
•
m Unplug this apparatus during lightning
storms or when unused for long periods
of time.
n Referallservicingtoqualiedservice
personnel. Servicing is required when
the apparatus has been damaged in any
way, such as power-supply cord or plug
is damaged, liquid has been spilled or
objects have fallen into the apparatus, the
apparatus has been exposed to rain or
moisture, does not operate normally, or
has been dropped.
o Battery usage CAUTION – To prevent
battery leakage which may result in bodily
injury, property damage, or damage to the
unit:
Install all batteries correctly, + and - as
marked on the unit.
Do not mix batteries (old and new or
carbon and alkaline, etc.).
Remove batteries when the unit is not
used for a long time.
p Apparatus shall not be exposed to
dripping or splashing.
q Do not place any sources of danger on
theapparatus(e.g.liquidlledobjects,
lightedcandles).
r This product may contain lead and
mercury. Disposal of these materials
may be regulated due to environmental
considerations. For disposal or recycling
information, please contact your local
authorities or the Electronic Industries
Alliance: www.eiae.org.
•
•
•
Important
Engli sh
EN

4
Regulations of the Canadian Department of
Communications. This Class B digital apparatus
complies with Canadian ICES-003.
This product complies with the radio
interference requirements of the European
Community.
This product complies with the requirements of
the following directives and guidelines: 73/23/
EEC + 89/336/EEC + 93/68/EEC
Class II equipment symbol
This symbol indicates that the unit has a double
insulation system.
Disposal of product and packing
material
Your product is designed and manufactured
with high quality materials and components,
which can be recycled and reused.
When this crossed-out wheeled bin symbol is
attached to a product, it means the product is
covered by the European Directive 2002/96/EC.
Please be informed about the local separate
collection system for electrical and electronic
products.
Please act according to your local rules and
do not dispose of your old product with your
normal household waste. The correct disposal
of your old product will help prevent potential
The severed plug must be disposed off to avoid
a possible shock hazard should it be inserted
into a 13 Amp socket elsewhere.
Norge
Typeskilt nnes på apparatens bakside.
Observer: Nettbryteren er sekundert innkoplet.
Den innebygde netdelen er derfor ikke
fraktoplet nettet så lenge apparatet er tilsluttet
nettkontakten.
For å redusere faren for brann eller elektrisk
støt, skal apparatet, ikke utsettes for regn eller
fuktighet.
Notice
Notice of compliance
For USA:
This equipment has been tested and found
to comply with the limits for a Class B digital
device, pursuant to Part 15 of the FCC Rules.
These limits are designed to provide reasonable
protection against harmful interference in a
residential installation. This equipment generates,
uses and can radiate radio frequency energy
and, if not installed and used in accordance with
the instructions, may cause harmful interference
to radio communications. However, there is
no guarantee that interference will not occur
in a particular installation. If this equipment
does cause harmful interference to radio or
television reception, which can be determined
by turning the equipment off and on, the user is
encouraged to try to correct the interference
by one or more of the following measures:
Reorient or relocate the receiving antenna.
Increase the separation between the
equipment and receiver.
Connect the equipment into an outlet on
a circuit different from that to which the
receiver is connected.
Consult the dealer or an experienced
radio/TV technician for help.
For Canada:
This digital apparatus does not exceed the Class
B limits for radio noise emissions from digital
apparatus as set out in the Radio Interference
•
•
•
•
EN

5
negative consequences to the environment and
human health.
All redundant packing material has been
omitted. We have done our utmost to make the
packaging easily separable into mono materials.
Please observe the local regulations regarding
the disposal of packing materials.
Environmental information
All unnecessary packaging has been omitted.
We have tried to make the packaging easy to
separate into three materials: cardboard (box),
polystyrene foam (buffer) and polyethylene
(bags, protective foam sheet.)
Your system consists of materials which can
be recycled and reused if disassembled by
a specialized company. Please observe the
local regulations regarding the disposal of
packaging materials, exhausted batteries and old
equipment.
Battery disposal information
Batteries (including built-in rechargeable
batteries) contain substances that may pollute
the environment. Always hand the appliance
in at an ofcial collection point to remove
any built-in batteries before you discard the
appliance. All batteries must be disposed of at
an ofcial collection point.
Important
Engli sh
EN

6
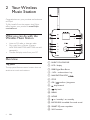
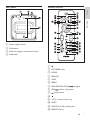
a MUSIC FOLLOWS ME
b LCD / display
c DBB Digital Bass Boost
d + VOL - volume down / up
e NAVIGATION KEYS
f STOP
g OK / conrm/playpause
h skip forward
i skip back
j MENU
k HOME
l on / standby / eco standby
m INCR.SURR. Incredible Surround sound
n SMART EQ smart equalizer
o Wi-Fi antenna
2 Your Wireless
Music Station
Congratulations on your purchase and welcome
to Philips!
To fully benet from the support that Philips
offers, register your product at www.Philips.
com/welcome.
What you can do with the
Wireless Music Station
Listen to FM radio or Internet radio.
Play music from a Center (Centers
WAC3500, WAC7000, WAC7500 are sold
separately).
Transfer and play music from your PC.
Overview
Top panel
The top panel features sensor buttons that are
sensitive to touch and moisture.
•
•
•
EN

7
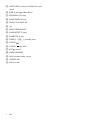
Remote control
a
b FM TUNER radio
c HOME
d SEARCH
e VIEW
f MENU
g NAVIGATION KEYS navigate
h OK/ conrm/playpause
i skip forward
j
k - VOL + volume down / up
l MUTE
m SHUFFLE(3def)randomplay
n REPEAT(2abc)
Rear panel
a Power supply socket
b FM antenna
c Holes for support attachment screws
d Subwoofer
Rear panel
Engli sh
EN

8
o INCR.SURR.(6mno)IncredibleSurround
sound
p DBB(5jkl)DigitalBassBoost
q RDS/NEWS(9wxyz)
r SAMEGENRE(8tuv)
s MUSIC FOLLOWS ME
t (0)
u MUSIC BROADCAST
v SAMEARTIST(7pqrs)
w SMARTEQ(4ghi)
x SLEEP(1.,?!’@-_:;/)standbytimer
y SCROLL
z CLEAR / skip back
{ REC record
| MARK/UNMARK
} AUX portable audio source
~ CD/MP3-CD
HD hard disk
EN

9
Position your Music Station
Caution
Risk of product damage! Place the Music Station on a
surface that is level, at, and strong enough to support
the Music Station.
Risk of interference! Keep the Music Station away from
TVs, VCRs, and other radiation sources.
•
•
Mount the Music Station to a wall
Caution
Risk of product damage! Always consult professional
personnel to safely mount the product to a wall.
•
Warning
Risk of injury! Ensure that no supply ducts such as gas,
water or electricity are harmed when you drill the
holes.
•
Items you need to mount the Music Station to
a wall (not supplied):
electric drill
two suitable wall mounting pegs and
screws
screwdriver
pencil
1 Hold the support (note the direction of
angle) against the wall where you want to
mount the Music Station.
•
•
•
•
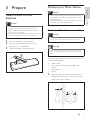
3 Prepare
Install remote control
batteries
Caution
Risk of explosion! Keep batteries away from heat,
sunshine or re. Never discard batteries in re.
Risk of decreased battery life! Never mix different
brands or types of batteries.
Risk of product damage! When the remote control is
not used for long periods, remove the batteries.
•
•
•
1 Open the battery compartment.
2 Insert 2 AAA batteries with correct
polarity (+/-) as indicated.
3 Close the battery compartment.
3
1
2
3
1
2
Prepare
Engli sh
EN

10
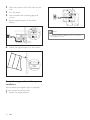
Note
The angle direction is different when you mount the
Music Station to a wall.
•
2 Mark the position of the drill holes on the
wall.
3 Drill the holes.
4 Insert suitable wall mounting pegs and
screws.
5 Attach angled support to the Music
Station.
6 Fasten the angled support on the screws.
Attach the support for table top
installation
You can attach the angled support (supplied)
for easy access to the top panel.
1 Attach the angled support:
EN

11
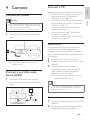
Connect a PC
Before you connect the Music Station to a PC:
Ensure that the PC meets the minimum
requirements. (see ‘PC connection
requirements’ on page 30)
Install the WADM (Philips Wireless Audio
Device Manager) on the PC. (see ‘Install
WADM’ on page 11)
You can choose among two different
modes of connection:
Wired connectio
n (see ‘Create wired
connection’ on page 11)
Wireless connectio
n (see ‘Create wireless
connection’ on page 12)
Install WADM
This chapter shows you how to install the
WADM (Philips Wireless Audio Device
Manager) software. The WADM is necessary to
search and download software updates for the
Music Station.
1 Insert the PC Suite CD into the PC.
2 Follow the instructions on the PC to install
WADM.
3 When the security alert message
(Microsoft Windows Firewall) pops up,
press ‘Unblock’ to allow the WADM
application to run on the PC.
The rewall is still effective and only
allows the WADM to run.
Tip
You can also consult the user manual of the PC and
manually add the WADM application to your list of
programs that are safe to run.
•
Create wired connection
1 Ensure that the Ethernet port on the PC is
enabled.
2 Ensure that the WADM (Philips Wireless
Audio Device Manager) software is
•
•
•
•
È
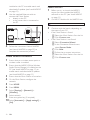
4 Connect
Connect AC power
Warning
Risk of product damage! Ensure that the power supply
voltage corresponds to the voltage printed on the back
or the underside of the Music Station.
The type plate is located on the rear of the product.
•
•
1 Connect the Music Station to the power
supply
Your Music Station turns on and is
ready for use.
Connect a portable audio
device(AUX)
1 Connect an audio cable (not supplied)
from the AUX jack to the portable audio
device.
È
Connect
Engli sh
EN

12
Launch WADM
1 Before you try to launch the WADM,
ensure you have installed the WADM
software on the PC. (see ‘Install WADM’
on page 11)
2 On the PC, double click the WADM icon
3 Continue with the launch, depending on
the status of your PC:
If the Music Station is found:
A Select the Music Station from the list.
B Click Connect now.
If the Music Station is not found:
A Select Connection Wizard.
B In the Connection Wizard menu,
select
Express Mode.
C Click Next.
D Follow the on-screen instructions.
E Select the Music Station from the list.
F Click Connect now.
•
•
installed on the PC to enable search and
download of updates
. (see ‘Install WADM’
on page 11)
3 Use the supplied Ethernet cable to
connect the Music Station
directly to the PC.
to the router that is connected to
the PC.
4 Follow the instructions ‘Launch WADM
(see ‘Launch WADM’ on page 12)’ to
complete the connection process.
Create wireless connection
1 Ensure that your wireless access point or
wireless router is enabled.
2 Ensure that the WADM (Philips Wireless
Audio Device Manager) is installed on the
PC (see ‘Install WADM’ on page 11) to
enable search and download of updates.
(see ‘Install WADM’ on page 11)
3 Ensure that the Music Station is turned on.
4 On the Music Station, congure the
network:
5 Press HOME.
6 Press MENU.
7 Select [Settings] > [Network] >
[Wireless].
8 Select network.
9 Enter encryption key (if required).
10 Select [Automatic] > [Applysettings?] >
[Yes].
•
•
EN

13
2 Complete the set-up process: Consult the
user manual of the Center how to add a
Station to the Center.
3 Position the Music Station in a suitable
location (within reach of a power socket).
4 Position the Music Station where it is
separated from the Center by no more
than one wall.
Note
Connections that include a router require that the
router is switched on at all times.
•
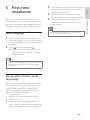
5 First-time
installation
When you connect the Music Station to the
power supply, the automatic installation process
starts. You must select the languag
e (see ‘Select
language’ on page
13) before you can continue.
Select language
1 When you connect the Music Station to
the power supply for the rst time, wait for
the language selection menu to select your
language.
2 Press to select, then press .
After you set the language, the Music
Station starts the search for a Center
(sold separately).
Tip
After the rst-time language set-up, you can change the
language in the Settings menu (see ‘Change language’
on page 999).
•
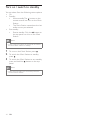
Set-up with a Center (sold
separately)
You can stream your audio to the Music Station
from a Philips Center of the WAC series, such
as WAC3500D, WAC7000, or WAC7500.
You can connect the Music Station to the
Center in two different modes:
Infrastructure
Ad-hoc (if you do not have an Internet
connection / PC)
1 Place the Music Station and the Center
side by side on a at and level surface that
is strong enough to support the two units.
È
•
•
First-time installation
Engli sh
EN

14
Turn on / switch to standby
You can select from the following status options:
On
Standby
Active standby. The button on the
remote control can turn on the Music
Station.
The Music Station remembers the last
audio source you selected.
Eco standby
Passive standby. Only the button on
the top panel can turn on the Music
Station.
Note
In stop mode, if no buttons are pressed for 20 minutes,
the Music Station switches to standby.
•
1 To turn on the Music Station, press .
2 To switch the Music Station to standby,
press
.
3 To switch the Music Station to eco standby,
press and hold the button on the top
panel.
Note
When the Music Station is in eco standby mode, the
remote control is inactive.
•
•
•
•
•
•
•
EN

15
turned on.
switched to standby (active).
3 Ensure that the Music Station is turned on.
4 Press HOME.
5 Select [HD].
6 Press MENU to enter the HD menu.
7 Press to select [Create playlist], then
press
.
A new playlist with a default album
name, such as Playlist_001, is created.
To return to the Home menu, press
HOME.
Addaudiolestoaplaylist
You can add up to 300 audio les to a playlist.
1 Ensure the Music Station is connected to a
Center (sold separately). (see ‘Set-up with
a Center (sold separately)’ on page 13)
2 Ensure that the Center is
turned on.
switched to standby (active).
3 Ensure that the Music Station is turned on.
4 Press HOME.
5 Select [HD].
6 Press MENU to enter the HD menu.
7 Press to select [Playlists], then press .
8 Press to select audio le, then press .
9 Select [Add to playlist].
10 Press MENU to enter the playlist menu.
The added audio les are displayed.
To return to the Home menu, press
HOME.
Play from a portable audio
device(AUX)
If you connect a portable audio device (AUX)
to the Music Station (see ‘Connect a portable
•
•
È
È
•
•
È
È
6 Play
Play HD music from a Center
You can wirelessly stream music to the Music
Station from a connected Center. The HD play
feature offers the following options:
[Playlists]: Customizable collection of
audio les sorted by playlist name in
alphanumeric order.
[Artists]: Collection of albums sorted by
artist name in alphanumeric order.
[Albums]: Collection of albums sorted by
album name in alphanumeric order.
[Genres]: Collection of albums sorted
by music style (if album information is
available).
[All tracks]: All audio les sorted by name
in alphanumeric order.
1 Ensure that the Center is
turned on.
switched to standby (active).
2 Ensure that the Music Station is turned on.
3 Press HOME.
The display shows the options.
4 Press to select, then press .
To return to the Home menu, press
HOME.
Playlists
When you connect the Music Station to a
Center you can sort audio les on the HD
(hard disk) of the Center into playlists.
Create a playlist
You can create up to 99 playlists on the hard
disk of a connected Center.
1 Ensure the Music Station is connected to a
Center (sold separately). (see ‘Set-up with
a Center (sold separately)’ on page 13)
2 Ensure that the Center is
•
•
•
•
•
•
•
È
•
Play
Engli sh
EN

16
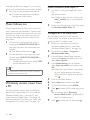
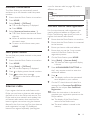
Install Windows Media Player 11
1 On the PC, insert the supplied PC Suite
CD.
Autorun starts.
If Autorun does not start, click on the
WAC_Installer icon in your Explorer
program.
2 Follow the instructions on the PC to install
the Windows Media Player 11.
CongureaPCtosharemusic
You can share music from a PC with the
Music Station. This chapter shows you how to
congure the PC to share music.
1 Follow the instructions to install the
Windows Media Player 1
1 (see ‘Install
Windows Media Player 11’ on page 16).
2 On the PC, click Start > Programs >
Windows Media Player.
3 In the Windows Media Player interface,
click on the Library pull-down menu and
select
More Options....
4 In the Media Sharing pop-up window,
check Share my media, then conrm with
OK.
When the Music Station is connected
to your home network, the display
shows the Music Station with an alert
icon:
5 Click on the Music Station.
6 Select Allow, then conrm with OK.
7 On the Music Station, press HOME.
8 Press to select UPnP mode, then press
.
The display shows [Searching
for<br>UPnP servers…], followed by
the list of media servers.
9 Press to select the PC, then press .
È
È
È
È
audio device (AUX)’ on page 11), you can play
the music from the device on the Music Station.
1 Start play on the portable audio device.
You hear the audio from the device
through the Music Station.
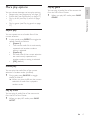
Music follows me
As you move around at home, you can let the
music move with you between a Center (sold
separately) and the Music Station. You can start
to listen to a song in one room, the move to
the next room and continue to listen to the
song there.
1 On the source unit where the music is
playing, press MUSIC FOLLOWS ME to
stop play from that unit and activate the
function.
The display shows the icon .
2 On the destination unit, where you want
to listen, press MUSIC FOLLOWS ME to
continue the play.
To deactivate the function press STOP
on the destination unit.
Tip
Any selected play modes such as repeat or shufe are
retained on the destination unit.
•
Wirelessly stream music from
a PC
You can wirelessly stream music to the Music
Station from a connected PC, if you install the
Windows Media Player 11 on the PC (see
‘Install Windows Media Player 11’ on page 16)
and
congure the PC to share your music (see
‘Congure a PC to share music’ on page 16).
È
È
•
EN

17
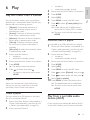
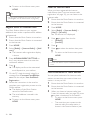
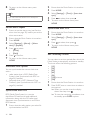
Play by genre
You can play all audio les of the same artist
from the HD of the Center.
1 When you play HD audio, press SAME
GENRE.
More play options
You can choose between various play options:
Repeat pla
y (see ‘Repeat play’ on page 17)
Shufe play (see ‘Shufe play’ on page 17)
Play by artis
t (see ‘Play by artist’ on page
17)
Play by genre (see ‘Play by genre’ on page
17)
Repeat play
You can repeat one or all audio les of the
current selection.
1 In play mode, press REPEAT to toggle the
repeat function as follows:
[Repeat 1]
The current audio le is continuously
repeated until another mode or
setting is selected.
[Repeat all]
All audio les of the current selection
are continuously repeated until
another mode or setting is selected.
[Off] (default)
Shufeplay
You can play the audio les of the current
selection in random order (shufed).
1 During play, press SHUFFLE to toggle
shufe on and off.
When you turn shufe on, the current
selection of audio les is played in
random order.
Play by artist
You can play all audio les of the same artist
from the HD of the Center.
1 When you play HD audio, press SAME
ARTIST.
•
•
•
•
•
•
•
•
•
È
More play options
Engli sh
EN

18
Tip
You can store channel frequencies under a preset
channel number (see ‘Manual search 999).
•
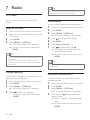
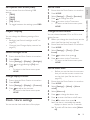
Manual search
You can manually search and store channels.
1 Ensure that the Music Station is turned on.
2 Press HOME.
3 Select [Radio] > [FM Tuner].
The current frequency is displayed.
4 Press to change the frequency.
5 Press MENU.
6 Select [Save to preset].
7 Press to select, then press .
The frequency is stored under the
selected preset number.
To return to the Home menu, press
HOME.
Tip
You can overwrite preset channel numbers with new
frequencies.
•
Automatic channel search
The Music Station can automatically search
available channels.
1 Ensure that the Music Station is turned on.
2 Press HOME.
3 Select [Radio] > [FM Tuner]
The current frequency is displayed.
4 Press and hold to start automatic
search function.
When a channel is found, the search
stops.
To return to the Home menu, press
HOME.
È
È
È
È
È
È
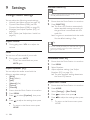
7 Radio
FM radio
You can listen to FM radio with the Music
Station.
Listen to FM radio
1 Ensure that the Music Station is turned on.
2 Ensure that you fully extend the connected
FM antenna.
3 Press HOME.
4 Select [Radio] > [FM Tuner].
The current frequency is displayed.
To return to the Home menu, press
HOME.
Tips
You can optimize the reception when you rotate the
FM antenna.
You can use the automatic search & store function
(see ‘Automatic channel search 999) to store channels
under presets.
•
•
Change frequency
To ne tune the reception of a channel, you can
adjust the channel frequency.
1 Ensure that the Music Station is turned on.
2 Press HOME.
3 Select [Radio] > [FM Tuner].
The current frequency is displayed.
4 Press to adjust the frequency.
To return to the Home menu, press
HOME.
È
È
È
•
EN
La pagina si sta caricando...
La pagina si sta caricando...
La pagina si sta caricando...
La pagina si sta caricando...
La pagina si sta caricando...
La pagina si sta caricando...
La pagina si sta caricando...
La pagina si sta caricando...
La pagina si sta caricando...
La pagina si sta caricando...
La pagina si sta caricando...
La pagina si sta caricando...
La pagina si sta caricando...
La pagina si sta caricando...
La pagina si sta caricando...
La pagina si sta caricando...
La pagina si sta caricando...
La pagina si sta caricando...
La pagina si sta caricando...
La pagina si sta caricando...
La pagina si sta caricando...
La pagina si sta caricando...
La pagina si sta caricando...
-
 1
1
-
 2
2
-
 3
3
-
 4
4
-
 5
5
-
 6
6
-
 7
7
-
 8
8
-
 9
9
-
 10
10
-
 11
11
-
 12
12
-
 13
13
-
 14
14
-
 15
15
-
 16
16
-
 17
17
-
 18
18
-
 19
19
-
 20
20
-
 21
21
-
 22
22
-
 23
23
-
 24
24
-
 25
25
-
 26
26
-
 27
27
-
 28
28
-
 29
29
-
 30
30
-
 31
31
-
 32
32
-
 33
33
-
 34
34
-
 35
35
-
 36
36
-
 37
37
-
 38
38
-
 39
39
-
 40
40
-
 41
41
-
 42
42
-
 43
43


Philips WAS6050/05 Manuale utente
- Categoria
- Apparecchiature musicali supplementari
- Tipo
- Manuale utente
in altre lingue
- English: Philips WAS6050/05 User manual
Documenti correlati
Altri documenti
-
ONKYO MS-100 HCP and Manuale utente
-
ONKYO TX-NR 717 Manuale utente
-
ONKYO HT-RC440 Manuale del proprietario
-
ONKYO TX-NR727 Manuale del proprietario
-
ONKYO TX-NR515 Manuale utente
-
Yamaha MCX-2000 Manuale del proprietario
-
Yamaha RX V3900 - AV Network Receiver Manuale utente
-
ONKYO TX-NR 616 Manuale utente
-
-
Bose Personal Music Center III Manuale del proprietario