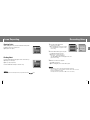
Samsung YP-T6VG Manuale utente
- Categoria
- Lettori MP3 / MP4
- Tipo
- Manuale utente
Questo manuale è adatto anche per

Samsung Electronics America, Inc.
400 Valley Road, Suite 201 Mount Arlington, NJ 07856
1-800-SAMSUNG (1-800-726-7864)
www.samsung.com
YP-T7J

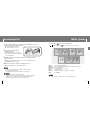
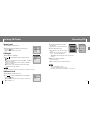
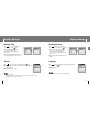
Features
2 3
Features
ENG
DNSe Surround Sound
● The 3D surround feature adds spaciousness to the sound.
USB 2.0 High Speed Data Transfer
● Maximum data speed transfer of 25 Mbps.
Built-in Rechargeable Li-polymer Battery
● The built-in rechargeable lithium battery provides up to 10 hours of play time.
Upgradable Firmware
● You can upgrade the built-in programs when available.
Please check the home page (www.samsung.com) for upgrades.
MP3 and WMA Playback
● Your player supports playback of MP3 and WMA.
Image Viewer
● The player can be used as an image viewer to view saved pictures.
Color TFT LCD
● You can enjoy high quality image files.
Direct MP3 Recording
● You can convert music from CDs, cassettes, and radio into MP3 files without a PC.
Voice Recording Function
● You can make high quality voice recordings.
FM Reception
● Listening to an FM program is made easy with Auto Search and Frequency
Memory functions.

5
ENG
Contents
4
Contents
I
Chapter 1 Preparations
Features.......................................................2
Safety Instructions .......................................6
Components.................................................8
Location of Controls .....................................9
Charging the Battery ..................................11
Easy Start CD Overview ............................12
I
Chapter 2 Connection to Computer
Connecting the player to your PC ..............13
● Connecting the player to your PC with the
USB cable ...............................................13
Using the Storage Device ..........................14
Uploading Recorded Files..........................15
I
Chapter 3 Using Your Player
Playing Music ...........................................16
● Turning Power On and Off..........................16
● Playing Music...........................................16
● Pausing Music..........................................16
● Adjusting the Volume.................................16
● Hold Function...........................................16
Searching for Music/Voice Files.................17
● To search for specific parts during play.........17
● To change tracks during play ......................17
● To change tracks when stopped/paused .......17
Loop Repeating..........................................18
● Starting Point ...........................................18
● Ending Point ............................................18
Recording Voice.........................................19
Recording MP3s ........................................20
MENU Options ...........................................21
Using Navigation........................................22
Setting Favorites ........................................23
● Setting Favorites.......................................23
● Playing Favorites ......................................23
Setting FM Radio .......................................24
● Listening to FM Radio................................24
● Manual Storage of a Frequency...................25
● Searching Stored Frequencies ....................25
● Automatic Storage of a Frequency ...............25
● Delete Preset ...........................................26
● FM Region...............................................26
● FM Search Level.......................................26
Recording FM ............................................27
Viewing an Image ......................................28
Setting the Advanced Funtions ..................29
Selecting the Play mode ............................30
Setting Sound Effect ..................................31
● DNSe......................................................31
● 3D User Set .............................................31
● Street Mode .............................................32
● User EQ Set.............................................32
I
Chapter 3 Using Your Player
Display Settings .........................................33
● Scroll ......................................................33
● Visualizer ................................................34
● Backlight Time..........................................34
● Tag Info...................................................34
● Clock Screen Saver...................................35
● Language. ...............................................35
Record Settings .........................................36
● Bit Rate...................................................36
● Auto Sync................................................36
● VOR (Voice Operation Recording) ...............37
System Settings .........................................37
● Play Speed ..............................................37
● Skip Interval.............................................38
● Search Speed ..........................................38
● Auto Off Time...........................................38
● Sleep ......................................................39
● Time Set .................................................39
● Resume ..................................................39
● Beep.......................................................40
● Intro Time ................................................40
● Default Set...............................................40
● Format ....................................................41
● About......................................................41
To Upgrade Firmware ..............................42
I
Chapter 4 Appendix
MENU Table.............................................44
I
Chapter 5 Customer Support
Troubleshooting .......................................45
Specifications...........................................47
Safety Information....................................50
Warranty...................................................52

7
ENG
Safety Instructions
6
Read and understand all the instructions to avoid injury to yourself and damage to the equipment.
✽
Please be aware that we claim no responsibility for damage from data loss due to breakdown, repair or other causes.
Do not let any foreign
matter spill into the
device.
Do not expose to
chemicals such as
benzene and thinners.
Do not subject the player to
severe impact.
Do not place heavy objects
on the player.
Do not store in dusty areas.
Do not expose to direct
sunlight or heat sources.
Be careful not to subject the
player to excessive pressure
when wearing it round your
neck.
Do not drop the player into
water. If you have dropped
the player into water or the
player is wet, do not turn the
player on, contact a Samsung
service center.
Do not try to disassemble
and repair the device
yourself.
Do not expose to extreme
temperatures (above 95°F
or below 23°F). Do not
expose to moisture.
Safety Instructions
I Earphones
Follow Traffic Safety Instructions
● Do not use the earphones while driving an automobile or riding a bicycle.
It’s not only dangerous, but also against the law.
● It may cause an accident if you turn up the volume of the earphones while walking,
especially when crossing intersections.
Protect your ears
● Do not turn up the volume too high. Doctors warn against prolonged exposure to high volume.
● Stop using the device or turn the volume down if you have ringing in your ears.
● Take care so that the earphone cable is not caught by your arm or other objects while walking or
exercise.
I Ambient operating conditions
● Ambient temperature : 5°C ~ 35°C (41°F ~ 95°F)
Humidity : 10 ~ 75%
I Environmental Information
● Follow local guidelines for waste disposal when discarding packages, batteries, and old electronic
appliances.
● Your player is packaged with cardboard, polyethylene etc., and does not use any unnecessary materials.

9
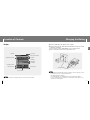
Location of Controls
ENG
Components
8
● The capacity of the useable built-in memory is less than indicated as the internal firmware uses
part of the memory as well.
● Design of accessories is subject to change for the purpose of improvement, without notice.
Player Earphones
AH30-00089D
USB Cable
AH39-00692A
Easy Start CD
AH80-00124A
Line-In Cable
AH39-00488A
Model
Built-in memory
YP-T7J X
512MB
YP-T7J Z
1GB
YP-T7J Q
2GB
Neck strap Hook
Display
Earphone Jack
MENU/
Navigation button
Move to Track/
Speed Search
Hold Switch
Play/Pause Button
Loop Repeating Button
Recording Button
Volume Button
ENC Jack
USB Cable Connection Port
RESET Hole
Microphone

11
Charging the Battery
ENG
Location of Controls
10
I
Display
Play Mode
Lock Indicator
Play/Stop/Pause indicator
Track Number indicator
Elapsed Track Time
Progress Indicator
Remaining Time
Battery remaining indicator
Track display
Album display
Artist display
EQ Indicator
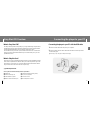
1Connect the USB cable to the USB port of your computer.
2Connect the other end of the USB cable to the USB cable connection port located
on the bottom of the player.
▲ When recharging is complete, “Fully Charged” is shown in the display window.
▲ Battery recharge time in normal operation is approximately 3 hours.
NN
NN
oo
oo
tt
tt
ee
ee
- Fully charge the rechargeable battery if using for the first time or after several months of non-use.
- To avoid the risk of fire, do not charge longer than 12 hours.
- Overcharging will reduce the battery life.
- The rechargeable battery is a consumable item and its capacity will decrease gradually.
- If you connect the player through a USB hub, the connection may be unstable. Please connect
the player to the computer directly.
✍
NN
NN
oo
oo
tt
tt
ee
ee
- The screen pictures are for illustration purposes only. The actual screen may differ.
✍
PC
USB Cable
Player

13
Connecting the player to your PC
ENG
Easy Start CD Overview
12
❑ System Requirements.
The PC system must meet the following minimum specifications:
● Windows XP ● CD-ROM drive(double speed or greater)
● Windows Media Player 10 ● USB port (2.0) supported
● Pentium 200MHz or greater ● DirectX 9.0 or above
● 50MB of available hard disk space ● Internet Explorer 6.0 or above
The Easy Start CD provides a simple way for you to get started using a PlaysForSure
TM
‚
portable music device by quickly and easily installing any necessary software needed
including Windows Media Player 10 and support for online music stores.
This CD will also show you how to rip CDs, download new music from an online store,
manage your music with Windows Media Player 10 and take it with you on your new
portable music device.
I
What is Easy Start CD?
PlaysForSure is a logo and testing program that ensures content compatibility of online
music stores and portable music devices. When you see the PlaysForSure logo on the
product box of a music device, you can know it will work with content from the widest
range of online stores and services that also carry this logo.
I
What is PlaysForSure?
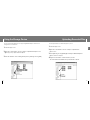
1Connect the USB cable to the USB port on your computer.
2Connect the other end of the USB cable to the USB cable connection port on the
bottom of the player.
● "Samsung YP-T7J" will appear in the [Device Manager].
I
Connecting the player to your PC with the USB cable
PC
USB Cable
Player

15
Uploading Recorded Files
ENG
Using the Storage Device
14
You can upload the files recorded in the player to your PC.
1Connect the player to PC.
2Right click on the Start button, then choose Explore to Open Windows
Explorer on PC.
3
Select [Samsung YP-T7J]-[Media]-[Recorded] from Windows Explorer.
● The recorded files are displayed.
You can easily download data files to the player using Windows Explorer and use it as a
storage device to store data files.
1Connect the player to PC.
2Right click on the Start button, then choose Explore to Open Windows Explorer on PC.
● [Samsung YP-T7J] is displayed in Windows Explorer.
3
Select the data file to save and drag-and-drop it into [Samsung YP-T7J]-[Data].
4
Drag the recorded files to a desired folder of your PC.
The selected file is transmitted to the specified folder of the PC.

17
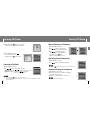
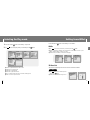
Searching for Music/Voice Files
ENG
Playing Music
16
In Hold mode, all buttons are disabled. This function is useful when you are walking or jogging.
Slide the switch in the direction of the arrow.
● When the button is pressed, the “HOLD” message will appear on the display.
I Hold Function
I To search for specific parts during play
● Press and hold the , button during playback to search for the part you
want to listen to.
● Release the button to resume play normally.
● Press the button briefly during playback to play the next track.
● Press the button briefly within 5 seconds after playback starts to move to and
play the previous track. Press the button briefly after 5 seconds to play the
current track from the beginning.
I To change tracks during play
N
N
o
o
t
t
e
e
- VBR(Variable Bit Rate) file: A file that constantly changes the compression rate according to the type of
sounds, such as their pitch, in the file.
- When playing a VBR file, you cannot move to and play the previous track even if you press the within
5 seconds after playback starts.
- Files that were downloaded in MP2 or MP1 and had their file extension changed to MP3 may not play.
✍
● Press the , button in Stop/Pause mode to move to the previous/next track.
I To change tracks when stopped/paused
I Turning Power On and Off
Power On : Press and hold the button to turn on the power.
Power Off : Press and hold the button to turn off the power.
I Adjusting the Volume
Press , to adjust the volume from 00 to 40.
I Playing Music
Press the button.
● Playback starts.
I Pausing Music
Press the button to pause playback.
● If no buttons are pressed within 1 minute (changes depending on settings shown on page 38),
the player automatically powers off.
● While in Pause mode, press the button again to resume playback.
Make sure the player is fully charged and the earphones are connected.
N
N
o
o
t
t
e
e
- If the file name is not displayed correctly, move to [Settings] ➔ [Display] ➔ [Language] and then
change the language setting.
- WMA files can only be played as music files with a compression rate of 48Kbps-192Kbps.
- The power off time can be set in the menu. See page 38.
✍

19
Recording Voice
ENG
Loop Repeating
18
NN
NN
oo
oo
tt
tt
ee
ee
- Loop Repeat is automatically released if you Speed Search with the , button.
While playing music files, press the A↔B button briefly at the
beginning of the loop you want to set.
● A↔ appears in the display.
I Starting Point
Press the A↔B button briefly again to set the end of the loop.
● A↔B appears in the display.
● The loop is played repeatedly.
Press the A↔B button briefly to cancel the loop.
I Ending Point
✍
1
Press and hold the REC button
to start voice recording.
● Press the √» button to pause the recording.
Press the
√» button once again to resume
the recording.
2 Press the REC button again to stop the
recording and save the voice file.
● The files are recorded in the order of
V001,V002..., and saved as MP3 files
in the [RECORDED] folder in the Navigation menu of the
player after recording.
3 When the Confirm screen appears,
select [OK] or [Cancel].
● When selecting [OK], the recorded file will be played.
NN
NN
oo
oo
tt
tt
ee
ee
- If the Memory is full, Voice Recording will be disabled automatically.
- Voice recording does not work in FM mode or when the line in cable is connected.
- Beeps are disabled while recording.
- Recording is allowed only when there is 1MB or more of free memory.
✍
128kbps
022/455
-00:02:5300:01:41
Artist
Album
Track_Miclejack
128kbps
022/455
-00:02:5300:01:41
Artist
Album
Track_Miclejack
V001.MP3
128kbps
01:42:5000:00:15
Play recorded file?

21
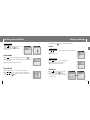
MENU Options
ENG
Recording MP3s
20
NN
NN
oo
oo
tt
tt
ee
ee
- Bit Rates can be set within the range of 32Kbps~192Kbps(see page 36).
- Beeps are disabled while recording.
- Recording is allowed only when there is 1MB or more of free memory.
✍
1 Connect the Audio OUT port (or Line OUT) on the external audio source to the
ENC port on the YP-T7J with the Line cable.
● Press the play button on the external
device to play the music to record.
2 Press and hold the REC button to
start MP3 recording.
● If the √» button is pressed, recording is
paused and if the
√» button is pressed again,
the recording resumes.
3 If the REC button is pressed during recording, the recording stops and an
MP3 file is created.
● The files are recorded in the order of L001, L002.... and saved as MP3 files in the
[RECORDED] folder after recording.
4 When the Confirm screen appears, select [OK] or [Cancel].
● When selecting [OK], the recorded file will be played.
CC
CC
aa
aa
uu
uu
tt
tt
ii
ii
oo
oo
nn
nn
- Do not disconnect the Line in cable during recording.
- If the battery is not sufficiently charged, the player will not completely record the file.
- Adjust the volume of the external audio source to a suitable level and record it.
If the volume level is too high or low, the sound quality may be poor.
✍
● Music : To view the file currently playing.
● Navigation : To move to Navigation Mode and browse files and folders on the player.
● FM Radio : To listen to FM radio.
● Favorites : To play back only the files you want.
● Photo : To view image files.
● Settings : To adjust the settings on the player. (refer to page 29)
● Exit : To exit MENU.
Press and hold the button to switch to MENU mode.
Use , to move and press the button briefly to select the menu you want.
NN
NN
oo
oo
tt
tt
ee
ee
- Menu mode will be cancelled if no buttons are pressed within a minute.
✍
Music Navigation FM Radio
Photo
Settings Exit
Favorites

23
Setting Favorites
ENG
Using Navigation
22
1 Press the button to enter Navigation mode or press and hold the button
to move to Menu and then select Navigation in Menu.
2 Move to the folder or file that you want to play.
When you send music files to the player, the files are automatically classified into the
categories on the basis of their tag information. You can find a file without tag information
in the [Unknown] folder.
● Select All : All files or folders at the same directory will be played.
● Artists: You can search for music files by artists.
● Albums: You can search for music files by albums.
● Tracks: You can search for music files by track names.
● Favorites: You can search for marked music files.
● Genres: You can search for music files by genres.
● Years: You can search for music files by the year the album was released.
● Playlists: You can search for a playlist that was sent through Window Media Player 10.
For instructions on how to send a playlist, refer to the descriptions on Using
Window Media Player 10 included in the Ez Start CD-ROM.
● Recorded: You can search for recorded files.
● Photo: You can search for image files.
3 Press the √» button.
● The selected folder or file will be played.
● You can easily search for files or switch modes using the Navigation function.
Navigation
Select All
Artist
Album
Track
Favorites
Navigation
Genre
Years
Playlist
Recorded
Photo
I Setting Favorites
I Playing Favorites
1
Select Favorites in the Menu.
● The Favorites you previously set will be displayed.
2Move to the file you want to play and press the button.
● “ ” mark appears and the selected file will be played.
- Select a file while in Navigation mode and press the A↔B button.
● The selected file will be marked and added to Favorites.
● To remove a file from Favorites, move to the marked file in Navigation mode and
press the A↔B button again.
Aquarius
Select All
Cartoon Heroes
Aquarius
Select All
Cartoon Heroes
Favorites
Select All
N’sync-it’s gonna b
Aqua - Cartoon her
Dinele Vidal - Les
128kbps
022/455
-00:02:5300:01:41
N’sync
No Strings Att..
N’sync-it’s gonna

NN
NN
oo
oo
tt
tt
ee
ee
- Press the button in normal FM mode to move to the Preset screen.
✍
1
Select FM Radio → Normal.
2 Use , to move to the frequency
to save, and then press the A↔B button.
3 Use , to select the number you
want to assign to save the frequency,
and then press the button.
● The selected frequency will be saved.
25
Setting FM Radio
ENG
Setting FM Radio
24
1 Press and hold the button to move to Menu
and then select the FM Radio from the menu.
1 Select FM Radio → Normal.
2 Use , to move to the frequency you want.
● Manual Search : Press , to change the frequency up or down.
● Automatic Search : Press and hold , to automatically
search for receiving frequencies.
2 In the FM Radio menu, use ,
to move to the function you want,
and then press the button to select.
I Listening to FM Radio
NN
NN
oo
oo
tt
tt
ee
ee
- Press and hold the button to return to the menu screen.
- Press the
√» button while listening to FM radio to mute the sound. Press the √» button once again
to listen to FM radio.
✍
FM Radio
91.9
NORMAL
MHz
91.9
NORMAL
MHz
FM Radio
Normal
Preset
Auto Preset
Delete Preset
FM Region
87.5 MHz 108.0 MHz
87.5 MHz 108.0 MHz
I Manual Storage of a Frequency
1 Select FM Radio → Preset.
2 Use , to move to the desired frequency.
I Searching Stored Frequencies
Select FM Radio → Auto Preset.
● Frequencies within the range of 87.5MHz to 108.0MHz are
automatically selected and stored.
● Frequencies are automatically stored, starting from 1.
I Automatic Storage of a Frequency
NN
NN
oo
oo
tt
tt
ee
ee
- You can store up to 30 frequencies.
✍
91.9
NORMAL
MHz
91.9
NORMAL
MHz
SAVED!
91.9
PRESET
MHz
91.9
PRESET
MHz
Auto Searching...

27
Recording FM
ENG
Setting FM Radio
26
1 Select FM Radio → FM Region.
2 Use , to select FM Tuner region, and then press the
button.
● Korea/US : Search FM frequencies between 87.5MHz to 108.0MHz in
increments of 100 KHz.
● Japan : Search FM frequencies between 76.0MHz to 108.0MHz in
increments of 100 KHz.
● Other Countries : Search FM frequencies between 87.50MHz to
108.00MHz in increments of 50 KHz.
1 Select FM Radio → Delete Preset.
2 After moving to the preset number you want to delete,
press the button.
● The saved preset number will be deleted.
I FM Region
I Delete Preset
1 Select FM Radio → FM Search Level.
2 Use , to select the desired FM Search Level, and then
press the button.
●
The higher the FM search level, the more frequencies can be received.
● High → Middle → Low
I FM Search Level
89.1MHz
91.9MHz
93.1MHz
95.1MHz
98.1MHz
Delete Preset
Other Country
Korea/US
Japan
Return
FM Region
High
Middle
Low
Return
FM Search Level
NN
NN
oo
oo
tt
tt
ee
ee
- The default FM region setting may vary depending on the target region of the player.
✍
1 Press and hold the REC button while
receiving FM.
●
Recording of the current FM frequency begins.
2 Press the REC button again.
● A recording file is created and the recording
stops.
● The files are recorded in the order of F001,
F002.... and saved as MP3 files in the
[RECORDED] folder in the Navigation menu of the player after
recording.
3 When the Confirm screen appears,
select [Yes] or [No].
● When selecting [Yes], the recorded file will be played.
128kbps
01:42:50
RECORD
00:00:15
NN
NN
oo
oo
tt
tt
ee
ee
- Beeps are disabled while recording.
- You can record FM broadcasts only at 128kbps.
- Recording is allowed only when there is 1MB or more of free memory.
✍
107.9
F001.MP3
MHz
Play recorded file?

2 In Settings, use , to move to the function you want and press the button to
select.
● To move to a previous menu, use or select Return.
29
Setting the Advanced Functions
ENG
1 Select Settings in the menu. (refer to “MENU Options”)
Settings
Settings
Play Mode
Sound Effect
Display
Record
System
Settings Settings
Settings
Settings
Play Mode
Sound Effect
Display
Record
System
Play Mode
Sound Effect
Display
Record
System
Play Mode
Sound Effect
Display
Record
System
Play Mode
Sound Effect
Display
Record
System
Viewing an Image
28
1 Press and hold the button to move
to menu and select Photo.
● The photo screen appears.
Navigation
PHOTO
Island_1.jpg
Island_2.jpg
Island_3.jpg
Island_4.jpg
Photo
You can select an image file to view while listening to music.
2 Press the button briefly to move
to the image selection screen.
Move to the image you want and
press the button.
● The selected image file will be displayed.
● Press the button to return to the
MENU screen.
NN
NN
oo
oo
tt
tt
ee
ee
- The optimal image size for the unit is 128X128. Too large images may take longer to display.
- Unsupported JPG file is not displayed. To check the supported file formats, refer to page 47.
✍

● Use , to move to the sound mode you want and press the button.
● 3D-User
→ 3D-Studio → 3D-Stage → 3D-Club → Normal → Rock → House → Dance → Jazz →
Ballad → Rhythm & Blues → Classical → User EQ
● Select User EQ to set the EQ as desired (see next page).
31
Setting Sound Effect
ENG
Selecting the Play mode
30
Press and hold the button. Select Settings → Sound Effect.
I DNSe
● Use , to move to the 3D level you want
and press the button.
● 3D level can be set within the range of 0 to 5.
I 3D User Set
3D
DNSe
3D-User
3D-Studio
3D-Stage
3D-Club
Normal
Rock
House
Dance
Jazz
Ballad
Rhythm & Blues
Classical
User EQ
Return
3D
3
Bass Enhance
Return
3D User Set
3D
DNSe DNSe
3D-User Set is applied only when 3D sound mode is selected from DNSe.
1 Press and hold the button. Select Settings → Play Mode.
2 Use , to move to the play mode you want and press the button.
● Normal : To play all the tracks in order one time.
● Repeat One : To repeat one file.
● Repeat All : To repeat all files.
● Shuffle All : To play files at random.
● Intro : To play the first few seconds of a music file. (Refer page 40)
● Return : To move to a previous menu.
Play Mode
Normal
Repeat One
Repeat All
Shuffle All
Intro
Return
Play Mode Play Mode Play Mode
Play Mode
Normal
Repeat One
Repeat All
Shuffle All
Intro
Normal
Repeat One
Repeat All
Shuffle All
Intro
Normal
Repeat One
Repeat All
Shuffle All
Intro
Play Mode
Normal
Repeat One
Repeat All
Shuffle All
Intro

33
Display Settings
ENG
Setting Sound Effect
32
I Scroll
Press and hold the button. Select Settings → Display.
● Use , to set the scroll speed to adjust the speed of the track title
movement.
● High
→ Middle → Low.
Scroll Speed
● Use , to select one of the scroll types below.
● Horizontal : Music title moves horizontally.
● Vertical : Music title moves vertically.
Scroll Type
I Visualizer
● Use , to move to the Visualizer screen
you want and press the button.
● If you select a visualizer, the background
of the music mode is changed to the selected
visualizer screen.
Return
Middle
Low
High
Scroll Speed
Vertical
Return
Horizontal
Scroll Type
Visualizer
Off
Enlarged EQ
Graphic EQ 1
Graphic EQ 2
Graphic EQ 3
Graphic EQ 4
Graphic EQ 5
Return
Visualizer
● Use , to move to Street Mode On or Off and press the button.
● On: You can hear the sound with better quality when you listen to music
in the street.
● Off: Tracks are played in the set sound mode.
● Use , to move to the bass Enhance level
you want and press the button.
● Bass Enhance level can be set within the
range of 0 to 3.
Bass Enhance
I Street Mode
I User EQ Set
Return
Off
On
Street Mode
User EQ Set
3D
2
Bass Enhance
Return
3D User Set
Bass Enhance
● You can adjust the EQ to your preference in the User EQ Set.
● Press , to move left or right to select the desired EQ, and
press , to adjust the level. After the setting is completed, move to
[OK] and press the button.

35
Display Settings
ENG
Display Settings
34
● Use , to select the language for displaying Tag information and
menu and press the button.
● English → français
I Clock Screen Saver
● Use , to move to the Clock Screen
Saver time you want and press the button.
● You can set the time to wait to Off, or
between 10 seconds and 5 minutes. If no
button is pressed during playback, the
clock screen appears automatically after the
time you set.
● When set to Off, the normal playback screen
displays.
I Language
NN
NN
oo
oo
tt
tt
ee
ee
- The supported languages can be changed or added.
✍
Clock Screen Saver
Off
10 sec
30 sec
1 min
3 min
5 min
Return
Language
English
français
Clock Screen Saver
I Backlight Time
● Use , to move to the Backlight Time
you want and press the button.
●
You can set the Backlight Time between
3 seconds and 1 minute, or On.
● When set to On, the backlight stays on
continuously.
● When the backlight disappears from the screen,
it will not reappear until a button is pressed.
I Tag Info.
● Use , to move to Tag Info. On or Off and press the button.
● On : The title and artist contained in the file tag information are displayed
during playback.
● Off : Display the name of music file.
Backlight Time
3 sec
5 sec
15 sec
30 sec
1 min
On
Return
Backlight Time
Off
Return
On
Tag Info.
NN
NN
oo
oo
tt
tt
ee
ee
- What is an ID3 Tag ?
This is what is attached to an MP3 to carry information relevant to the file, such as the title,
artist, album, year, genre and a comment field.
✍

● Use , to move to the Play Speed you want
and press the button.
● The higher the number, the faster the speed of play, and the lower
the number, the slower the speed of play.
37
Record Settings
ENG
Record Settings
36
I VOR (Voice Operation Recording)
● Use , to move to VOR On or Off and press the button.
● On : Recording stops if there is no sound.
● Off : Recording continues regardless of voice volume.
Off
Return
On
VOR (Voice Ope..
Press and hold the button. Select Settings → System.
I Play Speed
0
Play Speed
System Settings
I Bit Rate
Press and hold the button. Select Settings → Record.
● Use , to move to the recording bit rate
you want and press the button.
● When recording music into an MP3 file, you
can select one of the following bit rates :
32kbps, 64kbps, 96kbps, 128kbps, 160kbps
and 192kbps.
I Auto Sync
● Use , to move to the Auto Sync you want
and press the button.
● Auto Sync Time is a function for separating
and saving MP3 files when there is no sound
for a set time during MP3 recording.
● Auto Sync Time can be set to Off, Sync 1,
2 seconds, 3 seconds, 4 second, or 5 seconds.
● In SYNC 1 setting, recording stops when there is
no sound for over 2 seconds during recording.
● If Auto Sync Time is set to Off, recording
keeps going even if there is no sound, and then
it is saved as one file.
Bit Rate
32 Kbps
64 Kbps
96 Kbps
128 Kbps
160 Kbps
192 Kbps
Return
Bit Rate
Auto Sync
Off
Sync 1
2 sec
3 sec
4 sec
5 sec
Return
Auto Sync

39
System Settings
ENG
System Settings
38
I Resume
● Use , to move to Resume On or Off and press the button.
● On: Playback will resume from the point it was previously stopped.
● Off: Playback will resume from the beginning of the file/track
that was playing when stopped.
Off
Return
On
Resume
I Sleep
● Use , to move to the Sleep time you
want and press the button.
● Sleep time can be set to Off, 15~120 minutes.
The player will automatically turn off after the
time you set.
● When set to Off, the function is disabled.
Sleep
Off
15 min
30 min
60 min
90 min
120 min
Return
Sleep
You can set the current time.
1 Use , to set the time and press the button.
2 After the setting is completed, move to [OK] and press the
button.
I Time Set
Time Set
AM 03: 38
2005 - -06 21
I Skip Interval
● Use , to move to the Skip Interval
you want and press the button.
● You can set the Skip Interval Time to Track
or between 5 seconds and 10 minutes.
● If you set the Skip Interval to Track, then
press the , button, the previous or next
track will be selected.
I Search Speed
● Use , to move to the Search Speed
you want and press the button.
● You can set the Search Speed to skip
1 second to 1 minute sections within a song.
Skip Interval
Track
5 sec
10 sec
15 sec
30 sec
1 min
3 min
5 min
10 min
Return
Skip Interval
Search Speed
1 sec
3 sec
5 sec
10 sec
15 sec
20 sec
30 sec
1 min
Return
Search Speed
NN
NN
oo
oo
tt
tt
ee
ee
- For a VBR file, the Skip Interval may not be exact.
✍
NN
NN
oo
oo
tt
tt
ee
ee
- The current time is automatically set when you download files to your player.
If your time region has been changed relocation, please set the time again.
You cannot set the minute and the second.
✍
NN
NN
oo
oo
tt
tt
ee
ee
- For a VBR file, the Search Speed may not be exact.
✍
I Auto Off Time
● Use , to move to the Auto Off Time
you want and press the button.
● You can set the Auto Off Time to Off or
between 5 seconds and 3 minutes.
If no button is pressed after play stops,
the player will automatically turn off after
the time you set.
● When set to Off, the function is disabled.
Auto Off Time
Off
5 sec
10 sec
15 sec
30 sec
1 min
3 min
Return
Auto Off Time
La pagina si sta caricando...
La pagina si sta caricando...
La pagina si sta caricando...
La pagina si sta caricando...
La pagina si sta caricando...
La pagina si sta caricando...
La pagina si sta caricando...
La pagina si sta caricando...
-
 1
1
-
 2
2
-
 3
3
-
 4
4
-
 5
5
-
 6
6
-
 7
7
-
 8
8
-
 9
9
-
 10
10
-
 11
11
-
 12
12
-
 13
13
-
 14
14
-
 15
15
-
 16
16
-
 17
17
-
 18
18
-
 19
19
-
 20
20
-
 21
21
-
 22
22
-
 23
23
-
 24
24
-
 25
25
-
 26
26
-
 27
27
-
 28
28


Samsung YP-T6VG Manuale utente
- Categoria
- Lettori MP3 / MP4
- Tipo
- Manuale utente
- Questo manuale è adatto anche per
in altre lingue
- English: Samsung YP-T6VG User manual
Documenti correlati
Altri documenti
-
Polaroid PMP85BL Guida Rapida
-
ZTE Imperial Max US Cellular Manuale utente
-
ZTE Axon Pro Manuale utente
-
ZTE Z818L Manuale utente
-
Eclipse AVN726EE Manuale del proprietario
-
ZTE ZMax Champ LTE Manuale utente
-
-
Kenwood DNX 317 DABS Istruzioni per l'uso
-
Philips KEY015 Manuale utente
-
iRiver CLIX Manuale del proprietario