
WAP3205
Wireless N Access Point
Quick Start Guide
Version: 1.00
Wireless N Access PointWireless N Access Point
Copyright © 2009 ZyXEL Communications Corp. All rights reserved. ZyXEL, ZyXEL logo are registered
trademarks of ZyXEL Communications Corp. All other brands, product names, or trademarks mentioned
are the property of their respective owners. All specifications are subject to change without notice.
This product is designed for the 2.4 GHz WLAN network throughout the EC region.
http://www.zyxel.com/index.php
A6 105(W) x 150(H) mm

A6 105(W) x 150(H) mm


ENGLISH
4
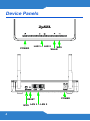
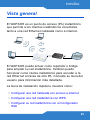
Device Panels
RESET
LAN 1 ~ LAN 2
POWER
WPS
WPS
POWER
WLAN
LAN 1 ~ LAN 2

ENGLISH
5
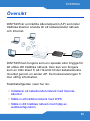
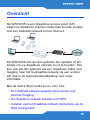
Overview
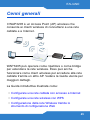
The WAP3205 is a wireless access point (AP) that
allows wireless clients to connect to a wired network
and the Internet.
The WAP3205 can act as a repeater or bridge to extend
your wireless network. It can also work as a wireless
client to access the wired network through another AP.
See your User’s Guide for detailed information.
The Quick Start Guide shows you how to:
• Set Up a Wired Network with Internet Access
• Set Up a Wireless Network with WPS
• Set Up Your Wireless Network using the Web
Configurator
ENGLISH

6
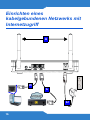
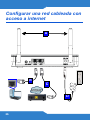
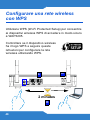
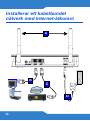
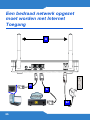
Set Up a Wired Network with
Internet Access
D
B
A
C

ENGLISH
7
1. Make the following hardware connections to set up
your WAP3205:
• Connect the antennas (A) to the antenna sockets,
ensuring they are screwed in firmly and angled
upwards.
• Connect the Ethernet port on your computer to a LAN
port (B) on the WAP3205 using an Ethernet cable.
• Connect another LAN port (C) on your WAP3205 to
the Ethernet port on the device with which you are
accessing the Internet (for example, a modem) using
an Ethernet cable.
• Use the power adapter (D) from the package to
connect the POWER socket to an appropriate power
source.
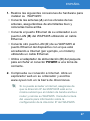
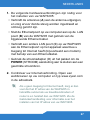
2. Check your Internet connection. Open a web
browser on your computer and enter www.zyxel.com
in the address bar.
If you cannot access the Internet, make sure the
WAP3205’s IP address is in the same subnet as
your broadband modem or router and restart your
WAP3205. See the User’s Guide for information
on setting up the WAP3205’s IP address.

8
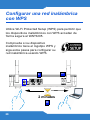
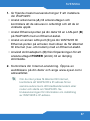
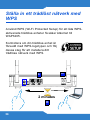
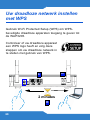
Set Up a Wireless Network with
WPS
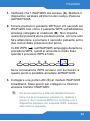
Use Wi-Fi Protected Setup (WPS) to let WPS-enabled
wireless devices securely access the WAP3205.
Check if your wireless device has the
WPS logo and follow these steps to set
up your wireless network using WPS.
2 minutes
A
B
C

ENGLISH
9
1. Make sure your WAP3205 is turned on (A). Place
your wireless device within range of the WAP3205.
2. Press the WPS button for two to three seconds on
the WAP3205 as well as the WPS button on the
wireless adapter connected to your notebook (B). It
doesn’t matter which button is pressed first. You
must press the second button within two minutes of
pressing the first one.
The WPS LED ( ) on the WAP3205 blinks during the
WPS process, then shines steadily when the WPS
process is finished.
If your WPS connection is successful, you should
now be able to access the WAP3205.
3. Connect a LAN port (C) on your WAP3205 to your
broadband modem. You are now ready to connect to
the Internet wirelessly through your WAP3205.
If your wired Internet connection is fine but your
wireless connection is not, repeat step 3. If WPS
is not working or your wireless device does not
support WPS, go to the next section.

10
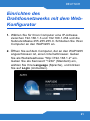
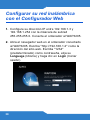
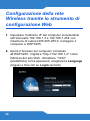
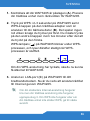
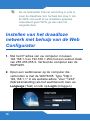
Set Up Your Wireless Network
using the Web Configurator
1. Set your computer’s IP address to be between
192.168.1.3 and 192.168.1.254 with subnet mask
255.255.255.0. Connect the computer to the
WAP3205.
2. Open a web browser on the computer connected to
the WAP3205. Type "http://192.168.1.2" as the
website address. Enter "1234" (default) as the
password, choose your Language and click Login.

ENGLISH
11
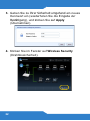
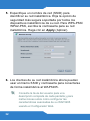
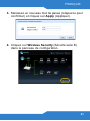
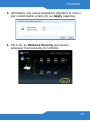
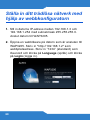
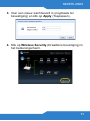
3. Enter a new password (retype it to confirm) and click
Apply.
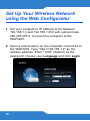
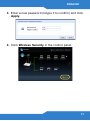
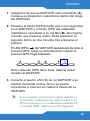
4. Click Wireless Security in the control panel.

12
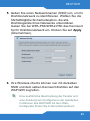
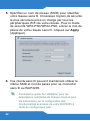
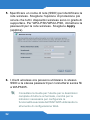
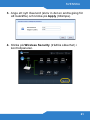
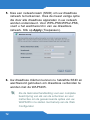
5. Specify a network name (SSID) to identify your
wireless network. Choose the most secure security
option that all wireless devices in your network can
support. For WPA-PSK/WPA2-PSK, type in the
password for your wireless network. Click Apply.
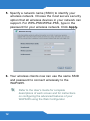
6. Your wireless clients now can use the same SSID
and password to connect wirelessly to the
WAP3205.
Refer to the User’s Guide for complete
descriptions of each screen and for instructions
on configuring the advanced features of your
WAP3205 using the Web Configurator.

ENGLISH
13
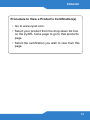
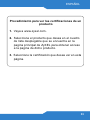
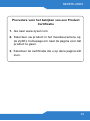
Procedure to View a Product’s Certification(s)
• Go to www.zyxel.com.
• Select your product from the drop-down list box
on the ZyXEL home page to go to that product's
page.
• Select the certification you wish to view from this
page.

14

DEUTSCH
15
Übersicht
Der WAP3205 ist ein drahtloser AP(Access Point), mit
dem Wireless-Clients auf kabelgebundene Netzwerke
und auf das Internet zugreifen können.
Der WAP3205 kann Ihr Drahtlosnetzwerk als Repeater
oder Bridge erweitern. Er kann auch als Wireless-Client
über einen anderen AP auf das kabelgebundene
Netzwerk zugreifen. Ausführliche Informationen dazu
finden Sie im Benutzerhandbuch.
Diese Kurzanleitung enthält die folgenden Anleitungen:
• Einrichten eines kabelgebundenen Netzwerks mit
Internetzugriff
• Einrichten eines Drahtlosnetzwerks mittels WPS
• Einrichten des Drahtlosnetzwerks mit dem Web-
Konfigurator
DEUTSCH

16
Einrichten eines
kabelgebundenen Netzwerks mit
Internetzugriff
D
B
A
C

DEUTSCH
17
1. Nehmen Sie für die Installation des WAP3205
folgende Hardwareverbindungen vor:
• Schließen Sie die Antennen (A) an die
Antennenanschlüsse an. Stellen Sie sicher, dass diese
fest eingedreht und möglichst senkrecht ausgerichtet
sind.
• Schließen Sie ein Ethernet-Kabel an den Computer
und an den LAN-Port (B) des WAP3205 an.
• Verbinden Sie einen anderen LAN-Port (C) des
WAP3205 mit einem Ethernet-Kabel mit dem Ethernet
Port des Geräts, mit dem Sie auf das Internet
zugreifen möchten (z.B. einem DSL Modem).
• Schließen Sie den Netzadapter (D) des Geräts an die
Netzanschlussbuchse POWER und an eine geeignete
Stromquelle an.
2. Prüfen Sie Ihre Internetverbindung. Öffnen Sie auf
Ihrem Computer einen Internetbrowser, und geben
Sie in die Adresszeile die Adresse www.zyxel.de
ein.

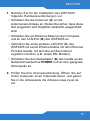
18
Wenn Sie nicht auf das Internet zugreifen
können, stellen Sie sicher, dass die IP-Adresse
des WAP3205 im selben Subnetz liegt wie Ihr
Breitbandmodem oder Router, und starten Sie
Ihren WAP3205 neu. Informationen zum
Einrichten der IP-Adresse des WAP3205 finden
Sie im Benutzerhandbuch.
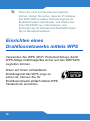
Einrichten eines
Drahtlosnetzwerks mittels WPS
Verwenden Sie WPS (Wi-Fi Protected Setup), damit
WPS-fähige Drahtlosgeräte sicher auf den WAP3205
zugreifen können.
Wenn auf Ihrem vorhandenen
Drahtlosgerät das WPS-Logo zu
sehen ist, können Sie Ihr
Drahtlosnetzwerk einfach mittels WPS
Tastendruck einrichten.

DEUTSCH
19
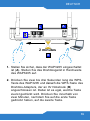
1. Stellen Sie sicher, dass der WAP3205 eingeschaltet
ist (A). Stellen Sie das Drahtlosgerät in Reichweite
des WAP3205 auf.
2. Drücken Sie zwei bis drei Sekunden lang die WPS-
Taste des WAP3205 und danach die WPS-Taste des
Drahtlos-Adapters, der an Ihr Notebook (B)
angeschlossen ist. Dabei ist es egal, welche Taste
zuerst gedrückt wird. Drücken Sie innerhalb von
zwei Minuten, nachdem Sie auf die erste Taste
gedrückt haben, auf die zweite Taste.
2 minutes
A
B
C

20
Während des WPS-Vorgangs blinkt die WPS LED ()
am WAP3205. Sobald der WPS-Vorgang
abgeschlossen ist, leuchtet diese dauerhaft.
Sobald die WPS-Verbindung erfolgreich hergestellt
wurde, haben Sie Zugriff auf den WAP3205.
3. Schließen Sie Ihr Breitbandmodem an einen LAN-
Port (C) Ihres WAP3205 an. Sie können jetzt über
den WAP3205 drahtlos eine Verbindung zum
Internet herstellen.
Funktioniert die kabelgebundene
Internetverbindung einwandfrei, die
Drahtlosverbindung dagegen nicht, wiederholen
Sie Schritt 3. Wenn WPS auf Ihrem Drahtlosgerät
nicht funktioniert, oder wenn Ihr bereits
vorhandenes Gerät WPS nicht unterstützt, gehen
Sie zum nächsten Abschnitt.
La pagina si sta caricando...
La pagina si sta caricando...
La pagina si sta caricando...
La pagina si sta caricando...
La pagina si sta caricando...
La pagina si sta caricando...
La pagina si sta caricando...
La pagina si sta caricando...
La pagina si sta caricando...
La pagina si sta caricando...
La pagina si sta caricando...
La pagina si sta caricando...
La pagina si sta caricando...
La pagina si sta caricando...
La pagina si sta caricando...
La pagina si sta caricando...
La pagina si sta caricando...
La pagina si sta caricando...
La pagina si sta caricando...
La pagina si sta caricando...
La pagina si sta caricando...
La pagina si sta caricando...
La pagina si sta caricando...
La pagina si sta caricando...
La pagina si sta caricando...
La pagina si sta caricando...
La pagina si sta caricando...
La pagina si sta caricando...
La pagina si sta caricando...
La pagina si sta caricando...
La pagina si sta caricando...
La pagina si sta caricando...
La pagina si sta caricando...
La pagina si sta caricando...
La pagina si sta caricando...
La pagina si sta caricando...
La pagina si sta caricando...
La pagina si sta caricando...
La pagina si sta caricando...
La pagina si sta caricando...
La pagina si sta caricando...
La pagina si sta caricando...
La pagina si sta caricando...
La pagina si sta caricando...
La pagina si sta caricando...
La pagina si sta caricando...
La pagina si sta caricando...
La pagina si sta caricando...
La pagina si sta caricando...
La pagina si sta caricando...
La pagina si sta caricando...
La pagina si sta caricando...
La pagina si sta caricando...
La pagina si sta caricando...
La pagina si sta caricando...
La pagina si sta caricando...
La pagina si sta caricando...
La pagina si sta caricando...
-
 1
1
-
 2
2
-
 3
3
-
 4
4
-
 5
5
-
 6
6
-
 7
7
-
 8
8
-
 9
9
-
 10
10
-
 11
11
-
 12
12
-
 13
13
-
 14
14
-
 15
15
-
 16
16
-
 17
17
-
 18
18
-
 19
19
-
 20
20
-
 21
21
-
 22
22
-
 23
23
-
 24
24
-
 25
25
-
 26
26
-
 27
27
-
 28
28
-
 29
29
-
 30
30
-
 31
31
-
 32
32
-
 33
33
-
 34
34
-
 35
35
-
 36
36
-
 37
37
-
 38
38
-
 39
39
-
 40
40
-
 41
41
-
 42
42
-
 43
43
-
 44
44
-
 45
45
-
 46
46
-
 47
47
-
 48
48
-
 49
49
-
 50
50
-
 51
51
-
 52
52
-
 53
53
-
 54
54
-
 55
55
-
 56
56
-
 57
57
-
 58
58
-
 59
59
-
 60
60
-
 61
61
-
 62
62
-
 63
63
-
 64
64
-
 65
65
-
 66
66
-
 67
67
-
 68
68
-
 69
69
-
 70
70
-
 71
71
-
 72
72
-
 73
73
-
 74
74
-
 75
75
-
 76
76
-
 77
77
-
 78
78


in altre lingue
- English: ZyXEL WAP3205 Owner's manual
- français: ZyXEL WAP3205 Le manuel du propriétaire
- español: ZyXEL WAP3205 El manual del propietario
- Deutsch: ZyXEL WAP3205 Bedienungsanleitung
- Nederlands: ZyXEL WAP3205 de handleiding
- svenska: ZyXEL WAP3205 Bruksanvisning
Documenti correlati
-
ZyXEL WAP3205 Manuale del proprietario
-
-
ZyXEL WAP6804 Guida utente
-
ZyXEL P-660HNU-F1 Guida Rapida
-
-
-
ZyXEL P-661HNU-F1 Guida Rapida
-
-
ZyXEL Dimension ES-108S Manuale utente
-
ZyXEL WRE6505 Manuale utente
