Motorola XTL446 Manuale utente
- Categoria
- Radio a due vie
- Tipo
- Manuale utente

1
English
CONTENTS
PRODUCT SAFETY AND RF EXPOSURE
FOR PORTABLE TWO-WAY RADIOS
Information and Operational Instructions for
Occupational Use . . . . . . . . . . . . . . . . . . . . . . . . 2
Federal Communication Commission (FCC)
Regulations (US markets only) . . . . . . . . . . . . . . 3
RF Exposure Compliance and Control Guidelines
and Operating Instructions . . . . . . . . . . . . . . . . . . 4
Use of Communication Devices While Driving . . 5
Operational Warnings . . . . . . . . . . . . . . . . . . . . . 6
Operational Cautions . . . . . . . . . . . . . . . . . . . . . . 6
Charger Safety Instructions . . . . . . . . . . . . . . . . . 7
GETTING STARTED
Your New Radio . . . . . . . . . . . . . . . . . . . . . . . . . . 8
Batteries and Battery Charging . . . . . . . . . . . . . . 8
Turning Your Radio On and Off . . . . . . . . . . . . . . 9
Setting the Battery Type . . . . . . . . . . . . . . . . . . . 9
Battery Meter and Battery Alert . . . . . . . . . . . . . . 9
Belt Clip . . . . . . . . . . . . . . . . . . . . . . . . . . . . . . . . 9
TALKING AND LISTENING
Talk Range . . . . . . . . . . . . . . . . . . . . . . . . . . . . 10
Monitor/Signal Strength Indicator . . . . . . . . . . . 10
Setting the Volume . . . . . . . . . . . . . . . . . . . . . . 10
Simple Menu Mode . . . . . . . . . . . . . . . . . . . . . . 11
Selecting a Radio Channel . . . . . . . . . . . . . . . . 11
Interference Eliminator Code . . . . . . . . . . . . . . . 11
Keypad Tones . . . . . . . . . . . . . . . . . . . . . . . . . .11
Scan . . . . . . . . . . . . . . . . . . . . . . . . . . . . . . . . . . 11
Scan List Editing . . . . . . . . . . . . . . . . . . . . . . . .12
Voice Scrambling . . . . . . . . . . . . . . . . . . . . . . . . 12
Hands Free Use (VOX) . . . . . . . . . . . . . . . . . . .12
Vibrate . . . . . . . . . . . . . . . . . . . . . . . . . . . . . . . . 14
Auto Power Off . . . . . . . . . . . . . . . . . . . . . . . . . . 14
Time-out Timer . . . . . . . . . . . . . . . . . . . . . . . . . . 14
Keypad Lock . . . . . . . . . . . . . . . . . . . . . . . . . . . 14
Backlight . . . . . . . . . . . . . . . . . . . . . . . . . . . . . . 14
Restore Factory Defaults . . . . . . . . . . . . . . . . . . 14
ALERTS
Channel Busy Indicator . . . . . . . . . . . . . . . . . . .15
Call Tone . . . . . . . . . . . . . . . . . . . . . . . . . . . . . . 15
Talk Confirmation Tone . . . . . . . . . . . . . . . . . . . 15
FURTHER INFORMATION
Troubleshooting . . . . . . . . . . . . . . . . . . . . . . . . . 16
Use and Care . . . . . . . . . . . . . . . . . . . . . . . . . . . 17
Specifications . . . . . . . . . . . . . . . . . . . . . . . . . . .17
Warranty Information . . . . . . . . . . . . . . . . . . . . . 18
Copyright Information . . . . . . . . . . . . . . . . . . . . . 18
APPROVED ACCESSORIES LIST
6864225V01_O_EN.fm Page 1 Thursday, September 16, 2004 3:50 PM

English
2
PRODUCT SAFETY AND RF EXPOSURE
FOR PORTABLE TWO-WAY RADIOS
The information provided in this document supersedes
information contained in user guides published prior to
February 2002.
RF Energy Exposure Awareness and Control
Information and Operational Instructions for
Occupational Use
Note: This radio is intended for use in occupational/
controlled conditions where users have full
knowledge of their exposure and can exercise
control over their exposure to meet the
occupational limits in FCC/ICNIRP and
International standards. This radio device is
NOT authorized for general population
consumer use
This two-way radio uses electromagnetic energy in the
radio frequency (RF) spectrum to provide
communications between two or more users over a
distance. It uses radio frequency (RF) energy or radio
waves to send and receive calls. RF energy is one form
of electromagnetic energy. Other forms include, but are
not limited to, sunlight and
x-rays. RF energy, however, should not be confused
with these other forms of electromagnetic energy,
which when used improperly, can cause biological
damage. Very high levels of x-rays, for example, can
damage tissues and genetic material.
Experts in science, engineering, medicine, health, and
industry work with organizations to develop standards
for safe exposure to RF energy. These standards
provide recommended levels of RF exposure for both
workers and the general public. These recommended
RF exposure levels include substantial margins of
protection.
All Motorola two-way radios are designed,
manufactured, and tested to ensure they meet
government-established RF exposure levels. In
addition, manufacturers also recommend specific
operating instructions to users of two-way radios.
BEFORE USING THIS RADIO, READ
THIS BOOKLET WHICH CONTAINS
IMPORTANT OPERATING
INSTRUCTIONS FOR SAFE USAGE AND
RF ENERGY AWARENESS AND
CONTROL INFORMATION AND OPERATIONAL
INSTRUCTIONS FOR COMPLIANCE WITH RF
ENERGY EXPOSURE LIMITS IN APPLICABLE
NATIONAL AND INTERNATIONAL STANDARDS.
ALSO READ THE OPERATIONAL INSTRUCTIONS
FOR SAFE USAGE.
!
C a u t i o n
6864225V01_O_EN.fm Page 2 Thursday, September 16, 2004 3:50 PM

3
English
These instructions are important because they inform
users about RF energy exposure and provide simple
procedures on how to control it.
Please refer to the following websites for more
information on what RF energy exposure is and how to
control your exposure to assure compliance with
established RF exposure limits:
http://www.fcc.gov/oet/rfsafety/rf-faqs.html
http://www.osha.gov/SLTC/radiofrequencyradiation/
index.html
Federal Communication Commission (FCC)
Regulations (US markets only)
The FCC rules require manufacturers to comply with
the FCC RF energy exposure limits for portable two-
way radios before they can be marketed in the U.S.
When two-way radios are used as a consequence of
employment, the FCC requires users to be fully aware
of and able to control their exposure to meet
occupational requirements. Exposure awareness can
be facilitated by the use of a product label directing
users to specific user awareness information. Your
Motorola two-way radio has a RF Exposure Product
Label.
Do not remove this RF Exposure Label from
the device.
Also, your Motorola user manual, or
separate safety booklet includes information and
operating instructions required to control your RF
exposure and to satisfy compliance requirements.
Compliance with RF Exposure Standards
Your Motorola two-way radio is designed and tested to
comply with a number of national and International
standards and guidelines (listed below) for human
exposure to radio frequency electromagnetic energy.
This radio complies with the IEEE (FCC) and
ICNIRP exposure limits for occupational/controlled
RF exposure environments at operating duty
factors of up to 50% talk-50% listen and is
authorized by the IEEE/ICNIRP for occupational
use only.
In terms of measuring RF energy for compliance with
these exposure guidelines, your radio generates
measurable RF energy only while it is transmitting
(during talking), not when it is receiving (listening)
or in standby mode.
Note: The approved batteries, supplied with this radio,
are rated for a 5-5-90 duty cycle (5% talk–5%
listen–90% standby), even though this radio
complies with IEEE/ICNIRP occupational
exposure limits at usage factors of up to 50%
talk.
Your Motorola two-way radio complies with the
following RF energy exposure standards and
guidelines:
• United States Federal Communications Commission,
Code of Federal Regulations; 47 CFR part 2 sub-part J
• American National Standards Institute (ANSI) / Institute
of Electrical and Electronic Engineers (IEEE) C95. 1-
1992
• Institute of Electrical and Electronic Engineers (IEEE)
C95.1-1999 Edition
• International Commission on Non-Ionizing Radiation
Protection (ICNIRP) 1998
• Ministry of Health (Canada) Safety Code 6. Limits of
Human Exposure to Radiofrequency Electromagnetic
Fields in the Frequency Range from 3 kHz to 300 GHz,
1999
• Australian Communications Authority
Radiocommunications (Electromagnetic Radiation –
Human Exposure) Standard, 2003
6864225V01_O_EN.fm Page 3 Thursday, September 16, 2004 3:50 PM

English
4
• ANATEL ANNEX to Resolution No. 303 of July 2, 2002
"Regulation of limitation of exposure to electrical,
magnetic and electromagnetic fields in the radio
frequency range between 9 KHz and 300 GHz" and
"Attachment to resolution # 303 from July 2, 2002"
RF Exposure Compliance and Control
Guidelines and Operating Instructions
To control your exposure and ensure compliance with
the occupational/controlled environment exposure
limits, always adhere to the following procedures:
Guidelines:
• User awareness instructions should accompany device
when transferred to other users.
• Do not use this device if the operational requirements
described herein are not met.
Operating Instructions
• Transmit no more than the rated duty factor of 50% of
the time. To transmit (talk), push the Push-To-Talk (PTT)
button. To receive calls, release the PTT button.
Transmitting 50% of the time, or less, is important
because this radio generates measurable RF energy
exposure only when transmitting (in terms of measuring
for standards compliance).
•
When worn on the body, always place the radio in a
Motorola-approved clip, holder, holster, case, or body
harness for this product. Using approved body-worn
accessories is important because the use of
non-Motorola-approved accessories may result in
exposure levels, which exceed the IEEE/ICNIRP
occupational/controlled environment RF exposure
limits.
• If you are not using a body-worn accessory and are not
using the radio in the intended use position, in front of
the face in the hand held mode, then ensure the
antenna and the radio are kept 2.5 cm (one inch) from
the body when transmitting.
Keeping the radio at a
proper distance is important because RF exposures
decrease with increasing distance from the antenna.
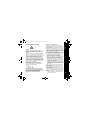
• Hold the radio in a vertical position in
front of the face with the microphone
(and other parts of the radio including
the antenna) at least 2.5 cm (one inch)
away from the nose or lips. Antenna
should be kept away from the eye.
Keeping the radio at a proper distance is important
since RF exposures decrease with increasing
distance from the antenna.
Approved Accessories
• Use only Motorola-approved supplied or replacement
antennas, batteries, and accessories. Use of non–
Motorola - approved antennas, batteries and
accessories may exceed IEEE/ICNIRP RF exposure
guidelines.
For a list of Motorola-approved antennas, batteries, and
other accessories please see your dealer or local
Motorola contact. Your nearest dealer can be found at
the following web site:
http://www.motorola.com/cgiss/emea/
dealerlocator.html
Additional Information
For additional information on exposure requirements or
other training information, visit:
http://www.motorola.com/rfhealth.
6864225V01_O_EN.fm Page 4 Thursday, September 16, 2004 3:50 PM

5
English
Electromagnetic Interference/Compatibility
Note: Nearly every electronic device is susceptible to
electromagnetic interference (EMI) if
inadequately shielded, designed or otherwise
configured for electromagnetic compatibility.
Facilities
To avoid electromagnetic interference and/or
compatibility conflicts, turn off your radio in any facility
where posted notices instruct you to do so. Hospitals
or health care facilities may be using equipment that is
sensitive to external RF energy.
Aircraft
When instructed to do so, turn off your radio when on
board an aircraft. Any use of a radio must be in
accordance with applicable regulations per airline crew
instructions.
Medical Devices
Pacemakers
The Advanced Medical Technology Association
(AdvaMed) recommends that a minimum separation of
15 cms (6 inches) be maintained between a handheld
wireless radio and a pacemaker.These
recommendations are consistent with those of the U.S.
Food and Drug Administration.
Persons with pacemakers should:
• ALWAYS keep the radio more than 15 cms from their
pacemaker when the radio is turned ON.
• Not carry the radio in the breast pocket.
• Use the ear opposite the pacemaker to minimize the
potential for interference.
• Turn the radio OFF immediately if you have any reason
to suspect that interference is taking place.
Hearing Aids
Some digital wireless radios may interfere with some
hearing aids. In the event of such interference, you may
want to consult your hearing aid manufacturer to
discuss alternatives.
Other Medical Devices
If you use any other personal medical device, consult
the manufacturer of your device to determine if it is
adequately shielded from RF energy. Your physician
may be able to assist you in obtaining this information.
Use of Communication Devices While
Driving
Always check the laws and regulations on the use of
radios in the areas where you drive.
• Give full attention to driving and to the road.
• Use hands-free operation, if available.
• Pull off the road and park before making or answering a
call, if driving conditions or regulations so require.
6864225V01_O_EN.fm Page 5 Thursday, September 16, 2004 3:50 PM

English
6
OPERATIONAL WARNINGS
For Vehicles With Air Bags
Refer to vehicle manufacturer's manual prior to
installation of electronic equipment to avoid
interference with air bag wiring.
Do not place a portable radio in the area over an air bag
or in the air bag deployment area. Air bags inflate with
great force. If a portable radio is placed in the air bag
deployment area and the air bag inflates, the radio may
be propelled with great force and cause serious injury
to occupants of the vehicle.
Potentially Explosive Atmospheres
(Explosive atmospheres refers to hazard classified
locations that may contain hazardous gas, vapors,
or dusts.)
Turn off your radio prior to entering any area with a
potentially explosive atmosphere, unless it is a radio
type especially qualified for use in such areas as
"Intrinsically Safe" (for example, Factory Mutual, CSA,
UL, CENELEC or ATEX Approved). Do not remove,
install, or charge batteries in such areas. Sparks in a
potentially explosive atmosphere can cause an
explosion or fire resulting in bodily injury or even death.
The areas with potentially explosive atmospheres
referred to above include fuelling areas such as below
decks on boats, fuel or chemical transfer or storage
facilities, areas where the air contains chemicals or
particles, such as grain, dust or metal powders. Areas
with potentially explosive atmospheres are often but
not always posted.
Blasting Caps And Blasting Areas
To avoid possible interference with blasting operations,
turn off your radio when you are near electrical blasting
caps, in a blasting area, or in areas posted:
"Turn off two-way radio". Obey all signs and
instructions.
OPERATIONAL CAUTIONS
Antennas
Do not use any portable radio that has a damaged
antenna. If a damaged antenna comes into contact with
your skin, a minor burn can result.
Batteries
All batteries can cause property damage and/or bodily
injury such as burns if a conductive material such as
jewellery, keys, or beaded chains touch exposed
terminals. The conductive material may complete an
electrical circuit (short circuit) and become quite hot.
Exercise care in handling any charged battery,
particularly when placing it inside a pocket, purse, or
other container with metal objects.
!
W A R N I N G
!
!
C a u t i o n
6864225V01_O_EN.fm Page 6 Thursday, September 16, 2004 3:50 PM

7
English
Charger Safety Instructions
Before using the battery charger, read all instructions
and cautionary markings on:
• the battery
• the battery charger, and
• the radio using the battery.
To reduce the risk of injury, only charge the
Motorola approved rechargeable battery for this
product. Other types of batteries may burst,
causing personal injury and damage.
SAVE THESE INSTRUCTIONS
1.Do not expose the charger to rain or snow.
2.Do not operate or disassemble the charger if it has
received a sharp blow, or has been dropped or dam-
aged in any way.
3.Never alter the AC cord or plug provided with the
unit. If the plug will not fit the AC outlet, have the
proper outlet installed by a qualified electrician. An
improper condition can result in a risk of electric
shock.
4.To reduce the risk of damage to the cord or plug, pull
the plug rather than the cord when disconnecting the
charger from the AC outlet
5.To reduce the risk of electric shock, unplug the
charger from the AC outlet before attempting any
maintenance or cleaning.
6.Use of an attachment not recommended or sold by
Motorola may result in a risk of fire, electric shock, or
personal injury.
7.Make sure the cord is located so it will not be
stepped on, tripped over, or subjected to damage or
stress.
8.An extension cord should not be used unless abso-
lutely necessary. Use of an improper extension cord
could result in a risk of fire and/or electric shock. If
an extension cord must be used, make sure:
• That the pins on the plug of the extension cord are the
same number, size, and shape as those on the plug of the
charger.
• That the extension cord is properly wired and in good
electrical condition, and
• That the cord size is 18 AWG (1 mm
2
) for lengths up to
100 feet (30 metres) and 16 AWG (1.3 mm
2
) for lengths
up to 150 feet (45 metres).
9.The supply cord of this charger cannot be replaced.
If the cord is damaged please return to your place
of purchase.
!
C a u t i o n
6864225V01_O_EN.fm Page 7 Thursday, September 16, 2004 3:50 PM

English
8
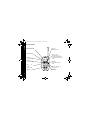
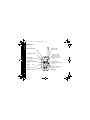
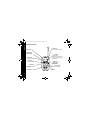
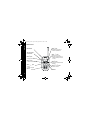
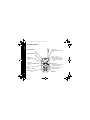
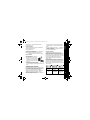
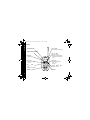
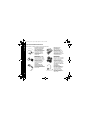
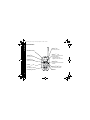
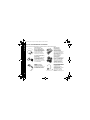
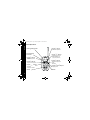
GETTING STARTED
PUSH
TALK
TO
MENU
Use
j
to:
• Turn radio on/off
Use
k
to:
• Transmit call tone
Use
H
to:
• Scroll through menus
• Lock and unlock the keypad
(when held down and not in a
menu)
LED Indicator Light
Use
G
to:
• Talk
• Save a setting
Accessory Jack
Use
J
to:
• Monitor channel activity
• Scan
Use
l
and
D
to:
• Adjust volume
Microphone
Speaker
Use
C
to
:
• Backlight the LCD
6864225V01_O_EN.fm Page 8 Thursday, September 16, 2004 3:50 PM

9
English
Your New Radio
The Motorola XTL446 two-way radio operates on
PMR446 frequencies, and can be used in any country
where PMR446 frequencies are authorized, subject to
applicable regulations. This license-free, two-way radio
service is for family and group recreational use. Use of
this radio outside the country where it was intended to
be distributed is subject to government regulations and
may be prohibited. Read this manual carefully and
make sure you know how to operate the radio properly
before use.
Please retain your original dated sales receipt for your
records. For warranty service of your Motorola two-way
radio you will need to provide a copy of your dated
sales receipt to confirm warranty status.
Batteries and Battery Charging
The XTL446 radio operates with 3 AA Alkaline batteries
or a Nickel -Metal Hydride (NiMH) rechargeable battery
pack. A rechargeable upgrade kit can be purchased
separately from your supplier.
Caution: Do not disassemble the (NiMH) battery
pack.
Note: Remove batteries before storing your radio for
extended periods. Batteries corrode over time
and may cause permanent damage to your
radio. Exercise caution when handling batteries
that are leaking. Dispose of exhausted batteries
at a designated battery disposal unit and not in
the household waste.
Installing the Batteries
1.Turn off the radio if
necessary, by pressing
j.
2.Push latch up on back
cover.
3.Lift back cover off.
4.Insert 3 AA batteries as
shown by the markings
inside the battery compart-
ment. Alternatively insert the NiMH pack so that the
charge contacts are facing outwards to connect with
contacts on the battery cover.
5.Reposition battery cover and press down until it
clicks into place.
Charging the NiMH Battery
The NiMH battery can be charged while in the radio or
on its own in the charger adaptor cover. Charge the
NiMH battery overnight (16 hours) before using it for
the first time. Subsequent charges will only require four
hours of charging time.
1.Turn the radio off or place the NiMH battery in the
charger adaptor cover.
2.Plug the charger into an AC wall socket.
6864225V01_O_EN.fm Page 9 Thursday, September 16, 2004 3:50 PM

English
10
3.Position the charger connector with the large hook
over the large slot to the right of the three battery
contacts.
4.Place the small hook on the other end of the charger
connector over the small slot and snap it into place.
5.The solid red light indicator shows that NiMH battery
is charging and will flash green when the battery is
approximately 90% charged. The green light will be
illuminated constantly when the battery is fully
charged
6.To remove the adapter connector after charging,
push the large hook on the end of adapter connector
lightly, and then pull the small hook up.
Turning Your Radio On and Off
1.Press and hold j to turn your radio on.
2.The radio chirps and the display temporarily displays
every image. The red light above
j flashes every
three seconds. The display will show the channel
number 1-8, the interference eliminator code 0--
38 and the battery meter.
3.Press
j again to turn your radio off.
Setting the Battery Type
This feature allows the battery meter to recognize and
display the power usage for either alkaline or
rechargeable batteries.
1.Press
j to turn the radio on.
2.Press
H until the battery meter symbol c is
displayed.
3.Press
l or D to select either A (alkaline) or n
(NiMH).
4.Press
G to set.
Battery Meter and Battery Alert
The battery meter located in the top left hand corner of
the display indicates how much battery power you have
remaining. The radio will power off when the voltage
drops below a predetermined level, to protect the
rechargeable battery. When the battery meter displays
c, the radio chirps every 10 minutes.
Battery Life
The approximate (typical) battery life for:
• AA Alkaline batteries is 35 hours
• NiMH batteries is 12 hours
This is based on a 5% transmit, 5% receive and 90%
standby cycle.
Note: Battery life will be reduced if you regularly use
Hands-Free (VOX) accessories.
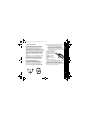
Belt Clip
Your radio comes with a swivel belt
clip.
1.To attach, align belt clip post with
hole in the radio back and gently
push until it clicks into place.
2.To remove, push release tab on top
of belt clip down to release catch
and pull belt clip from the radio
back.
O
6864225V01_O_EN.fm Page 10 Thursday, September 16, 2004 3:50 PM

11
English
TALKING AND LISTENING
Your radio has 8 channels and 38 interference
eliminator codes. If you are in a group and you wish to
talk to each other, all radios must be set to the same
channel and code. If you experience interference and
need to change channel, ensure that you change the
channel and code of all radios in your group.
1.For maximum clarity, hold radio 5 to 7 centimetres
from mouth.
2.Press and hold
G and speak into the micro-
phone. The LED indicator light glows continuously
when transmitting.
3.To receive messages, release
G.
Talk Range
Your radio has been designed to maximize
performance and improve transmission range in the
field. It is recommended that you do not use the radios
closer than 1.5 meters apart, to avoid interference.
Talk range depends on the terrain. It will be affected by
concrete structures, heavy foliage and by operating
radios indoors or in vehicles.
Optimal range occurs in flat, open areas, with up to 5
kilometres of coverage. Medium range occurs when
buildings and trees are in the way. Minimal range
occurs when dense foliage and mountains obstruct the
communication path.
Monitor/Signal Strength Indicator
It is good radio etiquette to monitor the channel for
activity before you transmit, to ensure that you do not
interrupt other users already on the channel. Pressing
and holding
J allows you to monitor your channel for
activity. If you hear static, the channel is clear for use.
This button can also help you determine when a radio
is moving out of range by displaying a receive signal
strength value next to the w while you press and hold
J. This value from 1 (weakest) to 6 (strongest)
indicates the relative signal strength of the incoming
signal.
Note: Obstacles that block the signal path may affect
the strength of the incoming signal.
Setting the Volume
1.Press D to increase or l to decrease the vol-
ume. The display will show V and the volume set-
ting (1-20).
2.Press
G to set.
Optimal Range
Outdoors
Medium Range
Outdoors
Minimal Range
Outdoors
Flat, open areas Buildings or trees.
Also near
residential
buildings
Dense foliage or
mountains. Also
inside some
buildings
6864225V01_O_EN.fm Page 11 Thursday, September 16, 2004 3:50 PM

English
12
Simple Menu Mode
Simple Menu mode allows you to limit the number of
menus displayed (Channel, Code and call tones) to
allow for simpler radio operation.
1.To enable Simple Menu mode press
H as you turn
on the radio. The radio chirps and the display tempo-
rarily displays only 6 images.
2.To turn off Simple Menu mode press
H as you
turn on the radio.
Selecting a Radio Channel
1.Press H. The channel number will begin to flash.
2.Use
D or l to change channel.
3.Briefly press
G to set new channel or press and
hold
H for 3 seconds to exit menu.
Interference Eliminator Code
Interference eliminator codes help minimize
interference by providing you with a choice of code
combinations.You can specify a different code for each
channel.
1.Press
H until the code number begins to flash.
2.Use
D or l to change the code.To hear every-
one on your channel, select code 0.
3.Press
G to set new code.
You can specify a different code for each channel:
1.To set a channel and code combination, press
H
and then press
D or l to select the channel.
2.Press
H again and then press D or l to
select a code.
3.Press
Gor press and hold H to exit the menu
and to save the channel and code combination.
Keypad Tones
Every time you press a button on your radio, it beeps
unless you turn this function off. Your radio is
programmed at the factory with keypad tones turned
on.
1.To disable the tones, hold down
l while switching
on your radio. When you press any button on the
keypad you will no longer hear the tone.
2.To enable tones, hold down
l while switching on
your radio.
Scan
Use this facility to monitor other transmitting radios. It
allows you to listen and talk back without having to
change channels.
1.To start scanning, briefly press
J. The scan indica-
tor h will be displayed and the radio scrolls through
available channels. When the radio detects activity, it
stops on that channel and displays the channel num-
ber and code.
6864225V01_O_EN.fm Page 12 Thursday, September 16, 2004 3:50 PM

13
English
2.To respond to the transmission, press G.If no
transmission occurs within five seconds, scanning
will resume.
3.To resume scanning for the next active channel
briefly press
D or l.
4.To stop scanning, briefly press
J.
5.To scan channels without Interference Eliminator
Codes, change the code for your set channel to 0
before you briefly press
J.
Note: If you press
G while the radio is scanning,
the radio will transmit on the channel you
selected before you activated Scan.
Scan List Editing
You can select the channels you want to scan by
putting those channels in a scan list.
1.To edit the scan list press
H until h is displayed.
2.Press
D or l to scroll through the list of available
channels. When you see a channel you want to add
to the list, press
H until Y is displayed to add it or
until
n is displayed to remove it.
3.Press
G to save the setting.
Voice Scrambling
This feature gives you additional privacy. Anyone who
is listening on the same channel and code will hear
distorted speech, unless they have a voice scrambling
code that matches yours. Ensure that all radios in your
group have voice scrambling enabled.
1.To turn the voice scrambling feature on, press
H
until
e is displayed, then select Y.
2.Press
G. The display will show a e.
3.To turn the Voice Scrambling feature off, press
H
until
e is displayed, then select n.
4.Press
G to exit the menu.
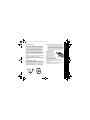
Hands Free Use (VOX)
VOX allows you to talk "hands
free" when used withoptional
accessories connected to the
radio.
Note: When using audio
accessories with your
radio, turn the volume of
your radio down before
you place the accessory
on your head or in your ear.
How To Use The VOX Feature
1.Switch off your radio.
2.Insert the plug of the audio accessory into the acces-
sory jack.
3.Switch on your radio. The flashing
g icon will
6864225V01_O_EN.fm Page 13 Thursday, September 16, 2004 3:50 PM

English
14
appear in the display to indicate that the VOX feature
is active.
4.To transmit, speak into the accessory microphone.
To receive, stop talking.
5.Pressing
G or removing audio accessory will dis-
able VOX operation.
Note: There is a short delay after you start talking,
before the radio transmits.
Setting the Sensitivity Level
Adjusting the VOX and/or microphone sensitivity level
helps to minimize the possibility of unintended noises
triggering a transmission, or enhances the ability to pick
up quiet voices.
If an accessory is fitted to your radio these instructions
will help you to adjust the VOX sensitivity. If no
accessory is fitted the microphone sensitivity will be
adjusted.
1.Press
H until g and a flashing number appear in
the display.
2.Select sensitivity level of 1, 2 or 3 by using
D or
l.
1 - If you speak loudly, or are in a noisy environment.
2 - Suitable for most applications.
3 - If you speak softly, or are in a quiet environment.
Note: When you connect a VOX accessory, the radio
will automatically be set to the last chosen VOX
sensitivity level.
The XTL446 also has a built in Internal Voice Operated
Transmission capability. This is a similar function to the
VOX because the sound of your voice activates
transmission, but no external accessories are needed.
Selecting the Internal VOX Feature
Either:
1.Press
H until the flashing g icon appears in the
display and the channel number is replaced with
Y
(enabled) or
n (disabled).
2.Use the up
D or down l button to select Y for
enable.
3.Press
G to select.
or:
1.Ensure radio is turned off.
2.Press and hold down
G and switch on the radio
using
j. The g icon will be shown on the display.
To Use the Internal VOX Feature
1.Quickly press and release G and the g icon will
begin to flash. Your radio will now transmit every
time you talk.
2.To disable the Internal VOX feature, press
H until
the flashing
g icon appears in the display and use
the up
D or down l button to select n for dis-
able. Or switch the radio off and then back on again.
6864225V01_O_EN.fm Page 14 Thursday, September 16, 2004 3:50 PM

15
English
Selecting Internal VOX Sensitivity
1.Ensure that the g icon is showing on the display.
2.Press
H until g and a flashing number appear in
the display
3.Select sensitivity level of 1, 2 or 3 by using
D or
l.
Vibrate
Your radio can be set to vibrate when it receives a call.
Vibrate is then suspended until 30 seconds after
channel activity has finished.
1.Press
H until B or i is displayed and then
press
D and l to select the desired setting.
Auto Power Off
You can program your radio to turn itself off after a
certain period of inactivity. This helps save battery life.
1.To set the auto power off feature press
H until
O is displayed.
2.Press
D or l to set the number of hours 1 - 8,
after which the power shuts off.
After you exit the menu,
O is displayed on the
screen. Five minutes before the radio shuts off, an alert
beep sounds followed by an alert beep every minute.
O flashes continuously during this five minute
period.
3.Select
- to turn off the auto power off feature.
Time-out Timer
The Time-out Timer feature helps extend battery life by
preventing the radio from accidentally transmitting. The
radio will emit a continuous warning tone after
G is
pressed for 60 continuous seconds and will stop
transmitting.
Keypad Lock
The keypad lock disables the H, D and l
buttons. This allows use of the J, G , k and C
buttons and to turn the radio on and off.
1.To lock or unlock the keypad press and hold the H
button for three seconds. When the radio is locked
f will show in the display.
Backlight
Your radio has a backlight which turns on when a
button is pressed and turns off automatically 4 seconds
after you last pressed a button. Backlighting can be
turned on manually by pressing
C.
Restore Factory Defaults
This returns radio to its original factory settings.
1.Hold down
G and H while switching on your
radio.
6864225V01_O_EN.fm Page 15 Thursday, September 16, 2004 3:50 PM

English
16
ALERTS
Channel Busy Indicator
The red LED will flash twice per second to indicate that
the channel is in use.
Call Tone
Your radio can transmit different call tones to other
radios, alerting users on the same channel and code
that you are about to talk. Your radio has 10 call tones
to choose from.
1.To set your call tone press
H until ^ Is displayed.
2.Press
D or l to change and hear call tones
while the setting number is flashing.
3.Press
G to set new call tone.
4.To use your call tone, press
k to transmit it to oth-
ers. The
^ will be displayed next to the channel
number.
Talk Confirmation Tone
When you turn on this feature, your two-way radio
transmits a chirp when you finish transmitting and
release the
G. It's like saying 'Roger' or 'Over', and
lets others know you've finished talking.
1.To enable or disable this tone, press and hold
D as
you turn your radio on.
6864225V01_O_EN.fm Page 16 Thursday, September 16, 2004 3:50 PM

17
English
FURTHER INFORMATION
Troubleshooting
No power or erratic display
• Reposition, replace or recharge batteries.
Message not transmitted
• Make
G
button is completely pressed while you transmit.
• Reposition, replace or recharge batteries.
• Shared channel may be in use, try another channel.
Message not received
• Confirm radios have same channel settings and interference eliminator codes
(helps minimize interference).
• Make sure
G
is not inadvertently being pressed.
• Reposition, replace or recharge batteries.
• Obstructions, and operating indoors or in vehicles may interfere with
communication. Change your location.
• Check to make sure volume is turned up.
Hearing other conversation or
noise on a Channel
• Shared channel may be in use, try another.
Limited talk range
• Steel or concrete structures, heavy foliage and use in buildings and in vehicles will
decrease range. Check for clear line of sight to improve transmission.
• Wearing radio close to body such as in a pocket or on a belt will decrease range.
Heavy static or interference
• Radios too close. Radios must be at least 1.5 metres apart.
• Radios too far apart. Obstacles interfere with transmission
6864225V01_O_EN.fm Page 17 Thursday, September 16, 2004 3:50 PM

English
18
Use and Care
To clean your radio:
• Use a soft damp cloth.
• Do not immerse in water.
• Do not use alcohol or cleaning solutions.
If your radio gets wet:
• Turn it off and remove batteries.
• Dry with soft cloth.
• Battery contacts may be wiped with a dry, lint-free cloth.
• Do not use until completely dry.
Specifications
Channels 8
Codes 38
Operating Frequency 446.00625-446.09375 MHz
Talk Range Up to 5 kilometres
Power Source
NiMH battery pack or 3 AA
alkaline batteries
Type Designation XTL446
Transmitter Power
(Watts)
0.5 ERP
Modulation Type Phase (Angle)
Channel Spacing (kHz) 12.5
6864225V01_O_EN.fm Page 18 Thursday, September 16, 2004 3:50 PM

19
English
Warranty Information
The authorized Motorola dealer or retailer where you
purchased your Motorola two-way radio and/or original
accessories will honour a warranty claim and/or
provide warranty service.
Please return your radio to your dealer or retailer to
claim your warranty service. Do not return your radio to
Motorola.
In order to be eligible to receive warranty service, you
must present your receipt of purchase or a comparable
substitute proof of purchase bearing the date of
purchase. The two-way radio should also clearly
display the serial number. The warranty will not apply if
the type or serial numbers on the product have been
altered, deleted, removed, or made illegible.
What Is Not Covered By The Warranty
• Defects or damage resulting from use of the Product in
other than its normal and customary manner or by not
following the instructions in this user manual.
• Defects or damage from misuse, accident or neglect.
• Defects of damage from improper testing, operation,
maintenance, adjustment, or any alteration or
modification of any kind.
• Breakage or damage to aerials unless caused directly
by defects in material or workmanship.
• Products disassembled or repaired in such a manner as
to adversely affect performance or prevent adequate
inspection and testing to verify any warranty claim.
• Defects or damage due to range.
• Defects or damage due to moisture, liquid or spills.
• All plastic surfaces and all other externally exposed
parts that are scratched or damaged due to normal use.
• Products rented on a temporary basis.
• Periodic maintenance and repair or replacement of
parts due to normal usage, wear and tear.
Copyright Information
The Motorola products described in this manual may
include copyrighted Motorola programs, stored
semiconductor memories or other media. Laws in the
United States and other countries preserve for
Motorola, certain exclusive rights for copyrighted
computer programs, including the exclusive right to
copy or reproduce in any form, the copyrighted
Motorola programs.
Accordingly, any copyrighted Motorola computer
programs contained in the Motorola products described
in this manual may not be copied or reproduced in any
manner without express written permission of
Motorola. Furthermore, the purchase of Motorola
products shall not be deemed to grant either directly or
by implication, estoppel, or otherwise, any license
under the copyrights, patents or patent applications of
Motorola, except for the normal non-exclusive royalty
free license to use that arises by operation of law in the
sale of a product.
6864225V01_O_EN.fm Page 19 Thursday, September 16, 2004 3:50 PM

English
20
MOTOROLA, the Stylized M Logo and all other
trademarks indicated as such herein are trademarks of
Motorola, Inc. ® Reg. U.S. Pat. & Tm. Off.
© Motorola, Inc. 2004
For use in:
Austria, Belgium, Czech Republic, Denmark, Estonia,
Finland, France, Germany, Greece, Hungry, Iceland,
Ireland, Italy, Latvia, Lithuania, Luxembourg, Malta,
Netherlands, Norway, Poland, Portugal, Slovakia,
Slovenia, Spain, Sweden, Switzerland, United
Kingdom.
@6864225V01@
6864225V01
6864225V01_O_EN.fm Page 20 Thursday, September 16, 2004 3:50 PM
La pagina sta caricando ...
La pagina sta caricando ...
La pagina sta caricando ...
La pagina sta caricando ...
La pagina sta caricando ...
La pagina sta caricando ...
La pagina sta caricando ...
La pagina sta caricando ...
La pagina sta caricando ...
La pagina sta caricando ...
La pagina sta caricando ...
La pagina sta caricando ...
La pagina sta caricando ...
La pagina sta caricando ...
La pagina sta caricando ...
La pagina sta caricando ...
La pagina sta caricando ...
La pagina sta caricando ...
La pagina sta caricando ...
La pagina sta caricando ...
La pagina sta caricando ...
La pagina sta caricando ...
La pagina sta caricando ...
La pagina sta caricando ...
La pagina sta caricando ...
La pagina sta caricando ...
La pagina sta caricando ...
La pagina sta caricando ...
La pagina sta caricando ...
La pagina sta caricando ...
La pagina sta caricando ...
La pagina sta caricando ...
La pagina sta caricando ...
La pagina sta caricando ...
La pagina sta caricando ...
La pagina sta caricando ...
La pagina sta caricando ...
La pagina sta caricando ...
La pagina sta caricando ...
La pagina sta caricando ...
La pagina sta caricando ...
La pagina sta caricando ...
La pagina sta caricando ...
La pagina sta caricando ...
La pagina sta caricando ...
La pagina sta caricando ...
La pagina sta caricando ...
La pagina sta caricando ...
La pagina sta caricando ...
La pagina sta caricando ...
La pagina sta caricando ...
La pagina sta caricando ...
La pagina sta caricando ...
La pagina sta caricando ...
La pagina sta caricando ...
La pagina sta caricando ...
La pagina sta caricando ...
La pagina sta caricando ...
La pagina sta caricando ...
La pagina sta caricando ...
La pagina sta caricando ...
La pagina sta caricando ...
La pagina sta caricando ...
La pagina sta caricando ...
La pagina sta caricando ...
La pagina sta caricando ...
La pagina sta caricando ...
La pagina sta caricando ...
La pagina sta caricando ...
La pagina sta caricando ...
La pagina sta caricando ...
La pagina sta caricando ...
La pagina sta caricando ...
La pagina sta caricando ...
La pagina sta caricando ...
La pagina sta caricando ...
La pagina sta caricando ...
La pagina sta caricando ...
La pagina sta caricando ...
La pagina sta caricando ...
La pagina sta caricando ...
La pagina sta caricando ...
La pagina sta caricando ...
La pagina sta caricando ...
La pagina sta caricando ...
La pagina sta caricando ...
La pagina sta caricando ...
La pagina sta caricando ...
La pagina sta caricando ...
La pagina sta caricando ...
La pagina sta caricando ...
La pagina sta caricando ...
La pagina sta caricando ...
La pagina sta caricando ...
La pagina sta caricando ...
La pagina sta caricando ...
La pagina sta caricando ...
La pagina sta caricando ...
La pagina sta caricando ...
La pagina sta caricando ...
La pagina sta caricando ...
La pagina sta caricando ...
La pagina sta caricando ...
La pagina sta caricando ...
La pagina sta caricando ...
La pagina sta caricando ...
La pagina sta caricando ...
La pagina sta caricando ...
La pagina sta caricando ...
La pagina sta caricando ...
La pagina sta caricando ...
La pagina sta caricando ...
La pagina sta caricando ...
La pagina sta caricando ...
La pagina sta caricando ...
La pagina sta caricando ...
La pagina sta caricando ...
La pagina sta caricando ...
La pagina sta caricando ...
La pagina sta caricando ...
La pagina sta caricando ...
La pagina sta caricando ...
La pagina sta caricando ...
La pagina sta caricando ...
La pagina sta caricando ...
La pagina sta caricando ...
La pagina sta caricando ...
La pagina sta caricando ...
La pagina sta caricando ...
La pagina sta caricando ...
La pagina sta caricando ...
La pagina sta caricando ...
La pagina sta caricando ...
La pagina sta caricando ...
La pagina sta caricando ...
La pagina sta caricando ...
La pagina sta caricando ...
La pagina sta caricando ...
La pagina sta caricando ...
La pagina sta caricando ...
La pagina sta caricando ...
La pagina sta caricando ...
La pagina sta caricando ...
La pagina sta caricando ...
La pagina sta caricando ...
La pagina sta caricando ...
La pagina sta caricando ...
La pagina sta caricando ...
La pagina sta caricando ...
La pagina sta caricando ...
La pagina sta caricando ...
La pagina sta caricando ...
La pagina sta caricando ...
La pagina sta caricando ...
La pagina sta caricando ...
La pagina sta caricando ...
La pagina sta caricando ...
La pagina sta caricando ...
-
 1
1
-
 2
2
-
 3
3
-
 4
4
-
 5
5
-
 6
6
-
 7
7
-
 8
8
-
 9
9
-
 10
10
-
 11
11
-
 12
12
-
 13
13
-
 14
14
-
 15
15
-
 16
16
-
 17
17
-
 18
18
-
 19
19
-
 20
20
-
 21
21
-
 22
22
-
 23
23
-
 24
24
-
 25
25
-
 26
26
-
 27
27
-
 28
28
-
 29
29
-
 30
30
-
 31
31
-
 32
32
-
 33
33
-
 34
34
-
 35
35
-
 36
36
-
 37
37
-
 38
38
-
 39
39
-
 40
40
-
 41
41
-
 42
42
-
 43
43
-
 44
44
-
 45
45
-
 46
46
-
 47
47
-
 48
48
-
 49
49
-
 50
50
-
 51
51
-
 52
52
-
 53
53
-
 54
54
-
 55
55
-
 56
56
-
 57
57
-
 58
58
-
 59
59
-
 60
60
-
 61
61
-
 62
62
-
 63
63
-
 64
64
-
 65
65
-
 66
66
-
 67
67
-
 68
68
-
 69
69
-
 70
70
-
 71
71
-
 72
72
-
 73
73
-
 74
74
-
 75
75
-
 76
76
-
 77
77
-
 78
78
-
 79
79
-
 80
80
-
 81
81
-
 82
82
-
 83
83
-
 84
84
-
 85
85
-
 86
86
-
 87
87
-
 88
88
-
 89
89
-
 90
90
-
 91
91
-
 92
92
-
 93
93
-
 94
94
-
 95
95
-
 96
96
-
 97
97
-
 98
98
-
 99
99
-
 100
100
-
 101
101
-
 102
102
-
 103
103
-
 104
104
-
 105
105
-
 106
106
-
 107
107
-
 108
108
-
 109
109
-
 110
110
-
 111
111
-
 112
112
-
 113
113
-
 114
114
-
 115
115
-
 116
116
-
 117
117
-
 118
118
-
 119
119
-
 120
120
-
 121
121
-
 122
122
-
 123
123
-
 124
124
-
 125
125
-
 126
126
-
 127
127
-
 128
128
-
 129
129
-
 130
130
-
 131
131
-
 132
132
-
 133
133
-
 134
134
-
 135
135
-
 136
136
-
 137
137
-
 138
138
-
 139
139
-
 140
140
-
 141
141
-
 142
142
-
 143
143
-
 144
144
-
 145
145
-
 146
146
-
 147
147
-
 148
148
-
 149
149
-
 150
150
-
 151
151
-
 152
152
-
 153
153
-
 154
154
-
 155
155
-
 156
156
-
 157
157
-
 158
158
-
 159
159
-
 160
160
-
 161
161
-
 162
162
-
 163
163
-
 164
164
-
 165
165
-
 166
166
-
 167
167
-
 168
168
-
 169
169
-
 170
170
-
 171
171
-
 172
172
-
 173
173
-
 174
174
-
 175
175
-
 176
176
-
 177
177
-
 178
178


Motorola XTL446 Manuale utente
- Categoria
- Radio a due vie
- Tipo
- Manuale utente
in altre lingue
- français: Motorola XTL446 Manuel utilisateur
- español: Motorola XTL446 Manual de usuario
- Deutsch: Motorola XTL446 Benutzerhandbuch
- Nederlands: Motorola XTL446 Handleiding
- português: Motorola XTL446 Manual do usuário
- polski: Motorola XTL446 Instrukcja obsługi
Documenti correlati
-
Motorola PMR446 Manuale utente
-
-
-
-
-
-
Motorola XTR446 Manuale utente
-
-
-