
Wireless Door / Window Contact
ASA-60


EN
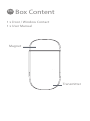
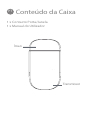
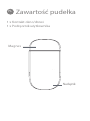
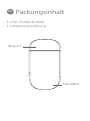
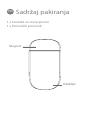
Box Content
1 x Door / Window Contact
1 x User Manual
Transmitter
Magnet

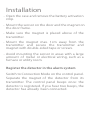
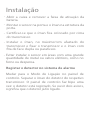
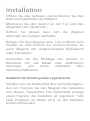
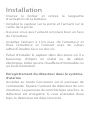
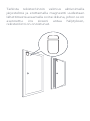
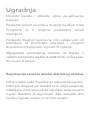
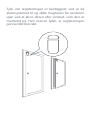
Installation
-
Open the case and remove the battery activation
strip.
Mount the sensor on the door and the magnet on
the door frame.
-
-
-
-
Register the detector in the alarm system
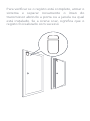
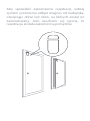
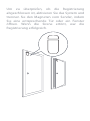
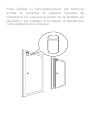
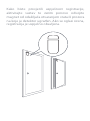
Make sure the magnet is placed above of the
transmitter.
Mount the magnet max. 1cm away from the
transmitter and secure the transmitter and
magnet with double-sided tape or screws.
Avoid mounting the sensor in areas with a large
amount of metal or electrical wiring, such as a
furnace or utility room.
Switch to Connection Mode on the control panel.
Separate the magnet of the detector from its
transmitter. The control panel beeps once: the
detector is registered. If you hear two beeps, the
detector has already been connected.

To check if the registration is complete, arm the
system and separate the magnet from the
transmitter again by opening the door or
window on which it is installed. If the siren
rings out, the registration is successful.

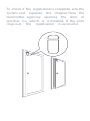
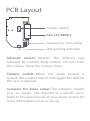
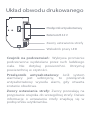
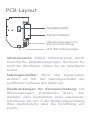
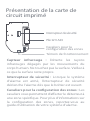
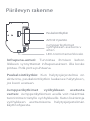
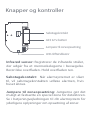
PCB Layout
LED working indicator
Jumpers for zone setup
Tamper switch
Infrared sensor: Detects the infrared rays
released by human body motion. Do not touch
the surface. Keep the surface clean.
Tamper switch: When the alarm system is
armed, the tamper switch will trigger the alarm if
the case is opened.
Jumpers for Zone setup: The jumpers enable
you to assign the detector to a specic zone.
Refer to the user manual of your alarm system for
more information on zone set up.

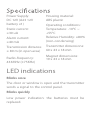
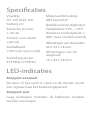
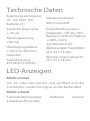
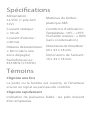
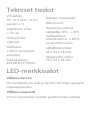
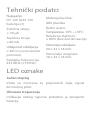
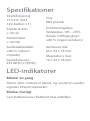
Power Supply:
DC 12V (A23 12V
battery x1)
Static current:
≤30 uA
Alarm current:
≤40 mA
Transmission distance
≤ 80 m (in open area)
Radio-frequency:
433MHz (±75KHz)
Housing material:
ABS plastic
Operating conditions:
Temperature: -10°C ~
+55°C
Relative Humidity: ≤80%
(non-condensing)
Transmitter dimensions:
60 x 43 x 18 mm
Magnet dimensions:
19 x 43 x 18 mm
LED indications
Blinks once
Blinks quickly
The door or window is open and the transmitter
sends a signal to the control panel.
Low power indication: the batteries must be
replaced.

Standards
Electric and electronic equipment and included
batteries contains materials, components and
substances that can be hazardous to your health
and the environment, if the waste material
(discarded electric and electronic equipment and
batteries) is not handled correctly.
Electric and electronic equipment and batteries is
marked with the crossed out trash can symbol,
seen below. This symbol signies that electric and
electronic equipment and batteries should not be
disposed of with other household waste, but
should be disposed of separately.
As the end user it is important that you submit
your used batteries to the approriate and
designated facility. In this manner you make sure
that the batteries are recycled in accordance with
legislature and will not harm the environment.
ALL RIGHTS RESERVED, COPYRIGHT DENVER
ELECTRONICS A/S

Imported by:
DENVER ELECTRONICS A/S
Omega 5A, Soeften
DK-8382 Hinnerup
Denmark
facebook.com/denverelectronics
All cities have established collection points, where
electric and electronic equipment and batteries
can either be submitted free of charge at recycling
stations and other collection sites, or be collected
from the households. Additional information is
available at the technical department of your city.
Hereby, Inter Sales A/S declares that the radio
equipment type ASA-60 is in compliance with
Directive 2014/53/EU. The full text of the EU
declara
tion of conformity is available at the
following internet address: http://www.den-
ver-electronics.com/denver-asa-60/

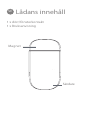
NL
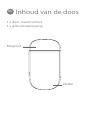
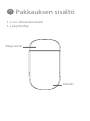
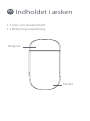
Inhoud van de doos
1 x deur-/raamcontact
1 x gebruiksaanwijzing
Zender
Magneet

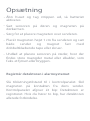
Open de behuizing en verwijder de strip om de
batterij te activeren.
Monteer de sensor op de deur en de magneet op
het kozijn.
Installatie
-
-
-
-
-
De detector in het alarmsysteem registreren
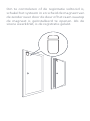
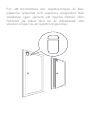
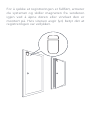
Zorg ervoor dat de magneet boven de zender
geplaatst is.
Monteer de magneet op max. 1cm afstand van
de zender en zet de zender en magneet vast met
dubbelzijdige tape of schroeven.
Plaats geen sensor in gebieden met een grote
hoeveelheid metaal of elektrische bedrading zoals
een oven of wasruimte.
Schakel op Verbindingsmodus op het
bedieningspaneel. Haal de magneet van de
detector van zijn zender af. Het bedieningspaneel
piept eenmaal: de detector is geregistreerd. Als u
twee pieptonen hoort, dan is de detector al
verbonden.

Schakel op Verbindingsmodus op het
bedieningspaneel. Haal de magneet van de
detector van zijn zender af. Het bedieningspaneel
piept eenmaal: de detector is geregistreerd. Als u
twee pieptonen hoort, dan is de detector al
verbonden.
Om te controleren of de registratie voltooid is,
schakel het systeem in en scheid de magneet van
de zender weer door de deur of het raam waarop
de magneet is geïnstalleerd te openen. Als de
sirene weerklinkt, is de registratie gelukt.

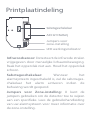
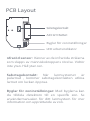
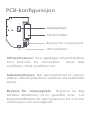
Printplaatindeling
LED werkingsindicator
Jumpers voor
zone-instelling
Sabotageschakelaar
Infraroodsensor: Detecteert de infrarode stralen
vrijgegeven door menselijke lichaamsbeweging.
Raak het oppervlak niet aan. Houd het oppervlak
schoon.
Sabotageschakelaar:
Wanneer het
alarmsysteem ingeschakeld is, zal de sabotages-
chakelaar het alarm activeren indien de
behuizing wordt geopend.
Jumpers voor Zone-instelling: U kunt de
jumpers gebruiken om de detector toe te wijzen
aan een specieke. Lees de gebruikshandleiding
van uw alarmsysteem voor meer informatie over
de zone-instelling.

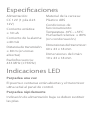
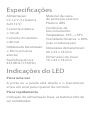
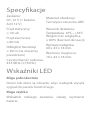
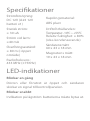
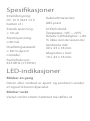
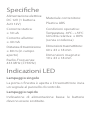
Specicaties
Voeding:
DC 12V (A23 12V
batterij x1)
Statische stroom:
≤ 30 uA
Stroom voor alarm:
≤40 mA
Zendafstand
≤ 80 m (in open veld)
Radiofrequentie:
433MHz (±75KHz)
Materiaal Behuizing:
ABS kunststof
Bedrijfsomstandigheden:
Temperatuur: -10°C ~ +55°C
Relatieve Vochtigheid: ≤
80% (niet-condenserend)
Afmetingen van de zender:
60 x 43 x 18 mm
Afmetingen van de
magneet:
19 x 43 x 18 mm
LED-indicaties
Knippert eenmaal
Knippert snel
De deur of het raam is open en de zender stuurt
een signaal naar het bedieningspaneel.
Laag vermogen indicatie: de batterijen moeten
worden vervangen.

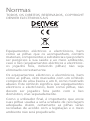
Normen
Elektrische en elektronische apparatuur en de
inbegrepen batterijen bevatten materialen,
componenten en stoen die schadelijk kunnen
zijn voor uw gezondheid en het milieu, indien de
afvalproducten (afgedankte elektrische en
elektronische apparatuur en batterijen) niet
correct worden verwerkt.
Elektrische en elektronische apparatuur en
batterijen zijn gemarkeerd met een doorgekruist
kliko-symbool, zoals hieronder afgebeeld. Dit
symbool is bestemd de gebruiker er op te wijzen
dat elektrische en elektronische apparatuur en
batterijen dient als normaal huishoudelijk afval
afgedankt dienen te worden, maar gescheiden
moeten worden ingezameld.
Als eindgebruiker is het belangrijk dat u uw
verbruikte batterijen inlevert bij een geschikte en
speciaal daarvoor bestemde faciliteit. Op deze
manier is het gegarandeerd dat de batterijen
worden hergebruikt in overeenstemming met de
wetgeving en het milieu niet aantasten.
ALLE RECHTEN VOORBEHOUDEN,
AUTEURSRECHT DENVER ELECTRONICS A/S

Importeur:
DENVER ELECTRONICS A/S
Omega 5A, Soeften
DK-8382 Hinnerup
Denmark
facebook.com/denverelectronics
Alle steden hebben speci eke inzamelpunten,
waar elektrische of elektronische apparatuur en
batterijen kosteloos ingeleverd kunnen worden
op recyclestations of andere inzamellocaties. In
bepaalde gevallen kan het afval ook aan huis
worden opgehaald. Vraag om meer informatie bij
uw plaatselijke autoriteiten.

ES
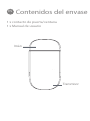
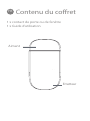
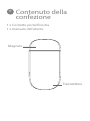
Contenidos del envase
1 x contacto de puerta/ventana
1 x Manual de usuario
Transmisor
Imán

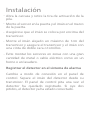
Abra la carcasa y retire la tira de activación de la
pila.
Monte el sensor en la puerta y el imán en el marco
de la puerta.
Instalación
-
-
-
-
-
Registrar el detector en el sistema de alarma
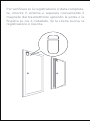
Asegúrese que el imán se coloca por encima del
transmisor.
Monte el imán alejado un máximo de 1cm del
transmisor y asegure el transmisor y el imán con
una cinta de doble cara o tornillos.
Evite montar los sensores en zonas con una gran
cantidad de metal o cable eléctrico como en un
horno o un lavadero.
Cambie a modo de conexión en el panel de
control. Separe el imán del detector desde su
transmisor. El panel de control pita una vez: el
detector ha quedado registrado. Si oye dos
pitidos, el detector ya ha estado conectado.

Para comprobar si el registro está complete,
arme el sistema y vuelva a separar el imán del
transmisor abriendo la puerta o ventana en el
que esté instalado. Si suena la sirena, el registro
se ha completado con éxito.

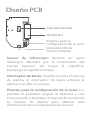
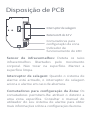
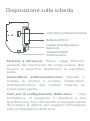
Diseño PCB
Indicador LED de
funcionamiento
Puentes para la
Interruptor de bucle
Pila A23 12 V
Sensor de infrarrojos: Detecta los rayos
infrarrojos liberados por el movimiento del
cuerpo humano. No toque la supercie.
Mantenga la supercie limpia.
Interruptor de bucle: Cuando se arma el sistema
de alarma, el interruptor de bucle activará la
alarma si se abre la carcasa.
Puentes para la conguración de la zona: Los
puentes le permiten asignar el detector a una
zona especíca. Remítase al manual de usuario de
su sistema de alarma para obtener más
información de la conguración de la zona.
La pagina si sta caricando...
La pagina si sta caricando...
La pagina si sta caricando...
La pagina si sta caricando...
La pagina si sta caricando...
La pagina si sta caricando...
La pagina si sta caricando...
La pagina si sta caricando...
La pagina si sta caricando...
La pagina si sta caricando...
La pagina si sta caricando...
La pagina si sta caricando...
La pagina si sta caricando...
La pagina si sta caricando...
La pagina si sta caricando...
La pagina si sta caricando...
La pagina si sta caricando...
La pagina si sta caricando...
La pagina si sta caricando...
La pagina si sta caricando...
La pagina si sta caricando...
La pagina si sta caricando...
La pagina si sta caricando...
La pagina si sta caricando...
La pagina si sta caricando...
La pagina si sta caricando...
La pagina si sta caricando...
La pagina si sta caricando...
La pagina si sta caricando...
La pagina si sta caricando...
La pagina si sta caricando...
La pagina si sta caricando...
La pagina si sta caricando...
La pagina si sta caricando...
La pagina si sta caricando...
La pagina si sta caricando...
La pagina si sta caricando...
La pagina si sta caricando...
La pagina si sta caricando...
La pagina si sta caricando...
La pagina si sta caricando...
La pagina si sta caricando...
La pagina si sta caricando...
La pagina si sta caricando...
La pagina si sta caricando...
La pagina si sta caricando...
La pagina si sta caricando...
La pagina si sta caricando...
La pagina si sta caricando...
La pagina si sta caricando...
La pagina si sta caricando...
La pagina si sta caricando...
La pagina si sta caricando...
La pagina si sta caricando...
La pagina si sta caricando...
La pagina si sta caricando...
La pagina si sta caricando...
La pagina si sta caricando...
La pagina si sta caricando...
La pagina si sta caricando...
La pagina si sta caricando...
La pagina si sta caricando...
La pagina si sta caricando...
La pagina si sta caricando...
La pagina si sta caricando...
La pagina si sta caricando...
La pagina si sta caricando...
La pagina si sta caricando...
La pagina si sta caricando...
La pagina si sta caricando...
La pagina si sta caricando...
La pagina si sta caricando...
La pagina si sta caricando...
La pagina si sta caricando...
La pagina si sta caricando...
La pagina si sta caricando...
-
 1
1
-
 2
2
-
 3
3
-
 4
4
-
 5
5
-
 6
6
-
 7
7
-
 8
8
-
 9
9
-
 10
10
-
 11
11
-
 12
12
-
 13
13
-
 14
14
-
 15
15
-
 16
16
-
 17
17
-
 18
18
-
 19
19
-
 20
20
-
 21
21
-
 22
22
-
 23
23
-
 24
24
-
 25
25
-
 26
26
-
 27
27
-
 28
28
-
 29
29
-
 30
30
-
 31
31
-
 32
32
-
 33
33
-
 34
34
-
 35
35
-
 36
36
-
 37
37
-
 38
38
-
 39
39
-
 40
40
-
 41
41
-
 42
42
-
 43
43
-
 44
44
-
 45
45
-
 46
46
-
 47
47
-
 48
48
-
 49
49
-
 50
50
-
 51
51
-
 52
52
-
 53
53
-
 54
54
-
 55
55
-
 56
56
-
 57
57
-
 58
58
-
 59
59
-
 60
60
-
 61
61
-
 62
62
-
 63
63
-
 64
64
-
 65
65
-
 66
66
-
 67
67
-
 68
68
-
 69
69
-
 70
70
-
 71
71
-
 72
72
-
 73
73
-
 74
74
-
 75
75
-
 76
76
-
 77
77
-
 78
78
-
 79
79
-
 80
80
-
 81
81
-
 82
82
-
 83
83
-
 84
84
-
 85
85
-
 86
86
-
 87
87
-
 88
88
-
 89
89
-
 90
90
-
 91
91
-
 92
92
-
 93
93
-
 94
94
-
 95
95
-
 96
96


in altre lingue
- français: Denver ASA-60 Manuel utilisateur
- español: Denver ASA-60 Manual de usuario
- Deutsch: Denver ASA-60 Benutzerhandbuch
- Nederlands: Denver ASA-60 Handleiding
- português: Denver ASA-60 Manual do usuário
- dansk: Denver ASA-60 Brugermanual
- svenska: Denver ASA-60 Användarmanual
Documenti correlati
-
Denver ASA-50 Manuale utente
-
-
-
Denver SHA-150 Manuale utente
-
Denver WAS-18110M Manuale utente
-
-
Denver LED-1031 Manuale utente
-
-
 Denver Electronics DAB-11 Manuale utente
-
Denver BTH-205PINKMK2 Manuale utente
