Candy CDH32/1C Manuale utente
- Categoria
- Piani cottura
- Tipo
- Manuale utente
Questo manuale è adatto anche per

PIANO COTTURA DOMINO VETROCERAMICO
Installazione - Uso - Manutenzione
DOMINO COOKING HOBS VITROCERAMIC
Installation - Use - Maintenance
TABLES DE CUISSON DOMINO
VITROCÉRAMIQUE
Installation - Emploi - Entretien
KOCHFELD DOMINO GLASKERAMIK
Installation - Gebrauch - Wartung
PLACA DE COCCIÓN DOMINÓ
VITROCERÁMICA
Instalación - Uso - Mantenimiento
DOMINO INBOUW-KOOKPLAAT
VERGLAASD KERAMIEK
Installatie - Gebruik - Onderhoud
PLANO DE COZEDURA DOMINÓ
VIDROCERÂMICA
Instalação - Uso - Manutenção
IT
GB
FR
DE
ES
PT
NL
TOUCH CONTROL

IT GB FR
Caro Cliente,
sentitamente La ringra-
ziamo e ci congratuliamo
per la scelta da Lei fatta.
Questo nuovo prodotto,
accuratamente progettato e
costruito con materiali di
primissima qualità, è stato
accuratamente collaudato
per poter soddisfare tutte
le Sue esigenze di una
perfetta cottura.
La preghiamo pertanto di
leggere e rispettare le facili
istruzioni che Le permet-
teranno di raggiungere
eccellenti risultati sin dalla
prima utilizzazione.
Con questo moderno ap-
parecchio Le formuliamo i
nostri più vivi auguri.
IL COSTRUTTORE
Dear customer,
We thank you and con-
gratulate you on your
choice.
This new carefully de-
signed product, manu-
factured with the high-
est quality materials, has
been carefully tested to
satisfy all your cooking
demands.
We would therefore re-
quest you to read and
follow these easy in-
structions which will al-
low you to obtain ex-
cellent results right from
the start.
May we wish you all the
very best with your mo-
dern appliance!
THE
MANUFACTURER
Cher client,
merci et sincères félici-
tations pour le choix que
vous avez fait.
Ce nouveau produit,
développé avec soin et
fabriqué avec des matières
de toute première qualité, a
été soigneusement rodé
pour satisfaire toutes Vos
exigences d’une cuisson
parfaite.
Veuillez lire attentivement
les instructions simples
portées sur cette notice qui
vous permettront d’obtenir
d’excellents résultats dès la
première utilisation.
Nous vous souhaitons une
entière et pleine
satisfaction quant à
l’utilisation de cet appareil
moderne.
LE CONSTRUCTEUR
Indice
Istruzioni
per l’utente
installazione 4
uso 4
manutenzione
l’installatore
installazione
posizionamento
collegamento elettrico
Index
Instructions
for use
installation 4
use 4
maintenance
Instructions for the
installation technician
installation
positioning
Index
Notice
d’emploi
installation 4
emploi 4
entretien
Modalités
d’installation
installation
positionnement
2
26 26 26
Istruzioni per
30
30 30
electrical connection 30
30
branchement électrique 30
30 30 30
THIS APPLIANCE IS CONCEIVED
FOR DOMESTIC USE ONLY. THE
MANUFACTURER SHALL NOT IN
ANY WAY BE HELD RESPONSIBLE
FOR WHATEVER INJURIES OR DAMAGES ARE
CAUSED BY INCORRECT INSTALLATION OR
BY UNSUITABLE, WRONG OR ABSURD USE.
THIS APPLIANCE IS NOT
INTENDED FOR USE BY
PERSONS (INCLUDING
CHILDREN) WITH REDUCED
PHYSICAL, SENSORY OR MENTAL
CAPABILITIES, OR LACK OF
EXPERIENCE AND KNOWLEDGE,
UNLESS THEY HAVE BEEN GIVEN
SUPERVISION OR INSTRUCTION
CONCERNING USE OF THE APPLIANCE
BY A PERSON RESPONSIBLE FOR
THEIR SAFETY. CHILDREN SHOULD BE
SUPERVISED TO ENSURE THAT THEY
DO NOT PLAY WITH THE APPLIANCE.
QUESTO PRODOTTO È STATO
CONCEPITO PER UN IMPIEGO DI
TIPO DOMESTICO. IL COSTRUTTORE
DECLINA OGNI RESPONSABILITÀ
NEL CASO DI EVENTUALI DANNI A COSE O
PERSONE DERIVANTI DA UNA NON CORRETTA
INSTALLAZIONE O DA USO IMPROPRIO,
ERRONEO OD ASSURDO.
L’APPARECCHIO NON DEVE
ESSERE USATO DA PERSONE
(COMPRESI BAMBINI) CON
RIDOTTE CAPACITÀ FISICHE,
SENSORIALI O MENTALI, O DA PERSONE
CHE MANCANO DELL’ESPERIENZA E DELLE
CONOSCENZE NECESSARIE SE NON SOTTO
LA SUPERVISIONE O DIETRO ISTRUZIONI
SULL’USO DELL’APPARECCHIO DA PARTE
DI UNA PERSONA RESPONSABILE PER LA
LORO SICUREZZA. I BAMBINI DEVONO
ESSERE CONTROLLATI PER ASSICURARSI
CHE NON GIOCHINO CON L’APPARECCHIO.
CE PRODUIT EST CONÇU
EXCLUSIVEMENT POUR USAGE
DOMESTIQUE. LE CONSTRUCTEUR
DÉCLINE TOUTE RESPONSABILITÉ
POUR DOMMAGES ET BLESSURES CAUSÉES
PAR UNE INSTALLATION INCORRECTE OU PAR
UN USAGE IMPROPRE, ERRONÉ OU ABSURDE.
L’APPAREIL NE DOIT PAS ÊTRE
UTILISÉ PAR DES PERSONNES
(ENFANTS INCLUS) DISPOSANT DE
CAPACITÉS PHYSIQUES,
SENSORIELLES OU MENTALES RÉDUITES, OU
PAR DES PERSONNES N’AYANT PAS
L’EXPÉRIENCE OU LES CONNAISSANCES
REQUISES, SI CE N’EST SOUS LA SURVEILLANCE
D’UNE PERSONNE RESPONSABLE DE LEUR
SÉCURITÉ OU APRÈS AVOIR REÇU DE CELLE-CI
LES INSTRUCTIONS RELATIVES À L’UTILISATION
DE L’APPAREIL. LES ENFANTS DOIVENT ÊTRE
SURVEILLÉS, AFIN DE S’ASSURER QU’ILS NE
JOUENT PAS AVEC L’APPAREIL.

DE ES NL PT
Inhaltsverzeichnis
Anweisungen
für den Benutzer
Installation 5
Anwendung 5
Instandhaltung
Anweisungen
für den Installateur
Installation
Aufstellung
Indice
Instrucciones
para el usuario
instalación 5
utilización 5
mantenimiento
Instrucciones
para el instalador
instalación
colocación
conexión eléctrica
Index
Instructies
voor de gebruiker
installatie 5
gebruik 5
onderhoud
Instructies
voor de installateur
installatie
plaatsing
Índice
Instruções
para o utilizador
instalação 5
utilização 5
manutenção
Instruções
para o instalador
instalação
posicionamento
conexão eléctrica
Sehr geehrter Kunde,
wir danken Ihnen und
beglückwünschen uns
für Ihre Wahl.
Dieses neue Produkt,
sorgfältig entworfen
und mit erstklassigen
Materialien hergestellt,
wurde genau geprüft
um alle Ihre Forderung-
en an ein perfektes Ko-
chen zu erfüllen.
Wir bitten Sie deshalb
die einfachen Anweis-
ungen zu lesen und ein-
zuhalten, damit von der
ersten Anwendung an
ausgezeichnete Ergeb-
nisse erreicht werden
können.
Mit diesem modernen
Apparat wünschen wir
Ihnen das Beste.
DER HERSTELLER
Estimado Cliente,
le agradecemos mucho y le
felicitamos por su elección.
Este nuevo producto,
cuidadosamente estudiado
y construido con ma-
teriales de primera calidad,
ha sido probado esmera-
damente para poder sa-
tisfacer todas sus exigen-
cias de una perfecta coc-
ción.
Por lo tanto le rogamos lea
y respete las fáciles in-
strucciones que le permi-
tirán llegar a resultados
excelentes desde la primera
utilización.
Con este moderno aparato
le expresamos nuestras
mejores felicitaciones.
EL CONSTRUCTOR
Geachte klant,
wij danken u en felici-
teren ons met de door u
gedane keuze.
Dit nieuwe produkt,
zorgvuldig ontworpen
en geconstrueerd uit
materialen van de aller-
beste kwaliteit, is ge-
degen uitgetest om al
uw eisen voor een per-
fect kookresultaat te
kunnen bevredigen.
Wij verzoeken u daarom
de eenvoudige instruc-
ties te lezen en te res-
pecteren, dewelke het u
toe zullen staan om al
vanaf het eerste gebruik
uitstekende resultaten te
bereiken.
Met dit moderne ap-
paraat doen wij u onze
welgemeende geluk-
wensen toekomen.
DE FABRIKANT
Ex.mo. Sr. Cliente,
Agradecemos, muito since-
ramente a sua escolha, e
aproveitamos da ocasião
para o felicitar.
Este novo produto, que foi
projectado com grande
atenção e construído com
os melhores materiais, foi
verificado e aprovado, de
maneira a dar-lhe imensa
satisfação para um co-
zinhado perfeito.
Por conseguinte, pedimos
que leia e siga as fáceis
instruções que lhe per-
mitirão de alcançar ex-
celentes resultados desde o
início da sua utilização.
Juntamente com este mo-
derno aparelho, apro-
veitamos para lhe enviar os
nossos melhores cum-
primentos.
O FABRICANTE
3
27
27 27 27
31
elektrischer Anschluß
31
31
31
31
elektrische aansluiting
31
31
31
31
31 31 31
DIT PRODUKT IS ALS
HUISHOUDELIJK APPARAAT
GEDACHT. VOOR BESCHADIGINGEN
AAN SPULLEN OF PERSONEN DIE
AAN VERKEERDE INSTALLATIE, MISBRUIK OF
VERKEERDE GEBRUIK ZIJN TE WIJTEN, NEEMT
DE FABRIKANT GEEN
VERANTWOORDELIJKHEID OP ZICH.
DIT APPARAAT IS NIET BEDOELD
VOOR GEBRUIK DOOR PERSONEN
(MET INBEGRIP VAN KINDEREN) MET
VERLAAGDE FYSIEKE, SENSORISCHE
OF MENTALE VERMOGENS, OF MET GEBREK
AAN ERVARING EN KENNIS, TENZIJ ZIJ LEIDING
OF INSTRUCTIES HEBBEN ONTVANGEN
BETREFFENDE HET GEBRUIK VAN HET APPARAAT
DOOR MIDDEL VAN EEN PERSOON DIE VOOR
HUN VEILIGHEID VERANTWOORDELIJK IS.
KINDEREN MOETEN WORDEN GECONTROLEERD
OM TE GARANDEREN DAT ZIJ NIET MET HET
APPARAAT SPELEN.
ESTE PRODUCTO FUE CONCEBIDO
PARA UN USO DE TIPO DOMÉSTICO.
EL CONSTRUCTOR DECLINA
CUALQUIER RESPONSABILIDAD EN
EL CASO DE DAÑOS EVENTUALES A COSAS O
PERSONAS QUE DERIVEN DE UNA
INSTALACIÓN INCORRECTA O DE UN USO
IMPROPIO, ERRADO O ABSURDO.
NO PUEDEN UTILIZAR EL APARATO
PERSONAS (INCLUIDOS NIÑOS) CON
CAPACIDADES FÍSICAS, SENSORIALES
O MENTALES REDUCIDAS, NI
PERSONAS QUE NO DISPONGAN DE LA
EXPERIENCIA Y DE LOS CONOCIMIENTOS
NECESARIOS, A MENOS QUE ESTÉN BAJO LA
SUPERVISIÓN DE UNA PERSONA RESPONSABLE
DE SU SEGURIDAD O HAYAN RECIBIDO LAS
INSTRUCCIONES NECESARIAS SOBRE LA
UTILIZACIÓN DEL APARATO. LOS NIÑOS TIENEN
QUE ESTAR CONTROLADOS PARA ASEGURARSE
DE QUE NO JUEGAN CON EL APARATO.
ESTE PRODUTO FOI CONCEBIDO
PARA UMA UTILIZAÇÃO DE TIPO
DOMÉSTICA. O FABRICANTE
DECLINA TODAS AS
RESPONSABILIDADES NO CASO DE EVENTUAIS
DANOS A COISAS OU PESSOAS DERIVADOS DE
UMA INSTALAÇÃO INCORRECTA OU DE USO
IMPRÓPRIO, ERRÓNEO OU ABSURDO.
O APARELHO NÃO DEVE SER USADO
POR PESSOAS (INCLUSIVE
CRIANÇAS) COM CAPACIDADES
FÍSICAS, SENSORIAIS OU MENTAIS
REDUZIDAS, OU POR PESSOAS QUE NÃO
TENHAM EXPERIÊNCIAS NEM CONHECIMENTO
NECESSÁRIO A NÃO SER QUE SEJAM
SUPERVISIONADAS E INSTRUÍDAS, SOBRE O
USO DO APARELHO, POR UMA PESSOA
RESPONSÁVEL PELA SEGURANÇA DAS MESMAS.
AS CRIANÇAS DEVEM SER CONTROLADAS PARA
CONTROLADAS PARA SE TER CERTEZA DE QUE
NÃO BRINQUEM COM O APARELHO.
DIESES PRODUKT IST ALS
HAUSHALTSGERÄT GEDACHT. FÜR
SCHADEN AN SACHEN ODER
PERSONEN, DIE AUF FALSCHE
INSTALLATION BZW. UNGEEIGNETEN
GEBRAUCH ODER MISSBRAUCH
ZURÜCKZUFÜHREN SIND, ÜBERNIMMT DER
HERSTELLER KEINERLEI VERANTWORTUNG.
DAS GERÄT DARF NICHT VON
PERSONEN (EINSCHLIESSLICH
KINDERN) MIT EINGESCHRÄNKTER
KÖRPERLICHER ODER GEISTLICHER
KAPAZITÄT ODER PERSONEN OHNE
ERFAHRUNG UND DIE NOTWENDIGEN
KENNTNISSE BENUTZT WERDEN, ES SEI DENN,
DIES GESCHIEHT UNTER DER AUFSICHT ODER
NACH UNTERWEISUNG IM GEBRAUCH DES
GERÄTS DURCH EINER FÜR DEREN SICHERHEIT
VERANTWORTLICHEN PERSON. KINDER SIND
ZU BEAUFSICHTIGEN, UM SICHERZUSTELLEN,
DASS SIE NICHT MIT DEM GERÄT SPIELEN.

+6 )$ (4
,VWUX]LRQL
SHUO·XWHQWH
,QVWDOOD]LRQH
7XWWHOHRSHUD]LRQLUHODWLYH
DOO·LQVWDOOD]LRQH
DOODFFLDPHQWRHOHWWULFR
GHYRQRHVVHUHHVHJXLWHGD
SHUVRQDOHTXDOLÀFDWR
VHFRQGROHQRUPHYLJHQWL
3HUOHLVWUX]LRQLVSHFLÀFKH
YHGLODSDUWHULVHUYDWD
DOO·LQVWDOODWRUH
121),66$5(
/$03$'$$/2*(1$
,17(16$0(17(/$
8VR
&RPDQGL
)LJJ
,OFRQWUROORGHOSLDQRFRWWXUD
YLHQHUHDOL]]DWRGDXQDVFKHGD
HOHWWURQLFDDPLFURSURFHVVRUH
SURYYLVWDGLVHQVRULDUDJJL
LQIUDURVVL,OVRIWZDUHGL
FRQWUROORFRQVHQWHVLDGL
ULOHYDUHLFRPDQGLIRUQLWLFKH
GLLQGLYLGXDUHODSUHVHQ]D
G·HYHQWXDOLFRQGL]LRQLGL
IXQ]LRQDPHQWRDQRPDOH
FDGXWDGLOLTXLGLRDOWUL
RJJHWWLVXOSLDQRFRPDQGL
HFFHVVLYDOXPLQRVLWjVXO
SLDQRFRPDGL
SUHVHQ]DGLFRQGHQVD
DOO·LQWHUQRGHOSLDQR
FRWWXUD
1HOFDVRLQFXLVLYHULÀFKL
XQDTXDOVLDVLGHOOHFRQGL]LRQi
VRSUDHOHQFDWHLOVLVWHPD
HQWUDLQDOODUPHVLFXUH]]DOH
SLDVWUHDFFHVHYHQJRQR
LPPHGLDWDPHQWHVSHQWH
YLHQHYLVXDOL]]DWDODVFULWWD
´$/µVXLGLVSOD\
SUHVHQWLHYLHQHHPHVVRXQ
´EHHSµ
,OIXQ]LRQDPHQWRGHO
GLVSRVLWLYRYLHQHULSULVWLQDWR
XQDYROWDULPRVVDOD
FRQGL]LRQHGLIXQ]LRQDPHQWR
DQRPDOD6HLOIXQ]LRQDPHQWR
QRQYLHQHULSULVWLQDWRSXz
HVVHUHQHFHVVDULRVWDFFDUH
O·DOLPHQWD]LRQHGLUHWHHG
+PUVTWEVKQPU
RGTVCKPKPIVQWUGT
+PUVCNNCVKQP
$OORSHUDWLRQVUHODWLYH
WRLQVWDOODWLRQHOHFWULF
FRQQHFWLRQVKRXOGEH
FDUULHGRXWE\VNLOOHG
SHUVRQQHOLQFRQIRUPLW\
ZLWKWKHUXOHVLQIRUFH
$VIRUWKHVSHFLILF
LQVWUXFWLRQVVHHSDUW
SHUWDLQLQJWRLQVWDOOHU
&101656#4'#66*'
*#.1)'0.#/2
1RGTCVKQP
%QPVTQNU )LJ
7KHFRRNLQJKRELV
FRQWUROOHGE\DQHOHF
WURQLFPLFURSURFHVVRU
ZLWKLQIUDUHGUD\VHQ
VRUV7KHFRQWUROVRIW
ZDUHGHWHFWVERWK
FRQWUROVDQGWKHSUHV
HQFHRIDQ\DEQRUPDO
RSHUDWLQJFRQGLWLRQV
VXFKDV
WKHVSLOOLQJRIOLTXLGVRU
SUHVHQFHRIRWKHUREMHFWV
RQWKHFRQWUROSDQHO
H[FHVVLYHOLJKWLQJRQ
WKHFRQWUROSDQHO
SUHVHQFHRIFRQGHQVDWH
LQVLGHWKHKRE
,QWKHHYHQWRIDQ\RI
WKHDERYHFRQGLWLRQV
WKHV\VWHPVHWVWR
VDIHW\DODUPVWDWXV
DQ\KRWSODWHVRQDUH
LPPHGLDWHO\
VZLWFKHGRIIWKHPHV
VDJH³$/´LVGLV
SOD\HGDQGDEHHSLV
HPLWWHG
6WDQGDUGRSHUDWLRQLV
UHVXPHGRQFHWKH
FDXVHRIWKHDODUP
FRQGLWLRQKDVEHHQ
UHPRYHG,IQRUPDO
RSHUDWLRQLVQRWUH
VXPHGLWPD\EHQHF
HVVDU\WRGLVFRQQHFW
WKHSRZHUVXSSO\DQG
,QVWUXFWLRQV
SRXUO·XWLOLVDWHXU
,QVWDOODWLRQ
7RXWHVOHVRSpUDWLRQVUHODWLYHV
jO·LQVWDOODWLRQUDFFRUGHPHQW
pOHFWULTXHGRLYHQWrWUHIDLWHV
SDUXQSHUVRQQHOTXDOLÀpHQ
FRQIRUPLWpDYHFOHVQRUPHVHQ
YLJXHXU
(QFHTXLFRQFHUQHOHV
LQVWUXFWLRQVVSpFLÀTXHVYRLU
ODSDUWLHUpVHUYpHj
O·LQVWDOODWHXU
1(3$6),;(5,17(16e0(17
/$/$03(+$/2*Ë1(
8WLOLVDWLRQ
&RPPDQGHV)LJ
/HFRQWU{OHGHODWDEOHGH
FXLVVRQHVWDVVXUpSDUXQH
FDUWHpOHFWURQLTXHjPLFUR
SURFHVVHXUHWFDSWHXUVj
UD\RQVLQIUDURXJHV/H
ORJLFLHOGHFRQWU{OHSHUPHW
GHUHSpUHUOHVFRPPDQGHV
IRXUQLHVHWODSUpVHQFH
G·pYHQWXHOOHVFRQGLWLRQVGH
IRQFWLRQQHPHQWDQRUPDO
&KXWHGHOLTXLGHVRXDXWUHV
REMHWVVXUOHEDQGHDXGH
FRPPDQGHV
/XPLQRVLWpH[FHVVLYHVXUOH
EDQGHDXGHFRPPDQGHV
3UpVHQFHGHFRQGHQVDWLRQj
O·LQWpULHXUGHODWDEOHGHFXLVVRQ
6LXQHGHVFRQGLWLRQV
PHQWLRQQpHVFLGHVVXVVH
SUpVHQWHOHV\VWqPHGpFOHQFKH
XQHDODUPHGHVpFXULWp OHV
SODTXHVDOOXPpHVV·pWHLJQHQW
LPPpGLDWHPHQWODPHQWLRQ
´ $/´ DSSDUDvWVXUOHV
DIÀFKHXUVHWXQ´ ELS µ
V·pPHW
/HIRQFWLRQQHPHQWGX
GLVSRVLWLIVHUpWDEOLWGqVTXH
ODFRQGLWLRQD\DQWSURYRTXp
ODFDXVHGXIRQFWLRQQHPHQW
DQRUPDOHVWpOLPLQpH6LOH
IRQFWLRQQHPHQWQHVHUpWDEOLW
SDVLOSHXWV·DYpUHU
QpFHVVDLUHGHFRXSHU
O·DOLPHQWDWLRQpOHFWULTXHHW
4

&' '5 0. 26
#PYGKUWPIGP
H×TFGP$GPWV\GT
,QVWDOODWLRQ
$OOH2SHUDWLRQHQKLQ
VLFKWOLFKGHU,QVWDOODWLRQ
HOHNWULVFKHU$QVFKOX
PVVHQYRP]XJHODVVHQHQ
)DFKSHUVRQDOJHPlGHQ
JHOWHQGHQ%HVWLPPXQJHQ
DXVJHIKUWZHUGHQ
)UGLHVSH]LÀVFKHQ$QZHL
VXQJHQVLHKHGLHGHP,QVWDO
NCVGWTXQTDGJCNVGPG5GKVG
%HGLHQXQJ
%HGLHQXQJVHLQ
ULFKWXQJHQ $EE
'LH6WHXHUXQJGHV.RFK
IHOGHVHUIROJWPLWHLQHUHOHN
WURQLVFKHQ0LNURSUR]HVVRU
NDUWHPLW,QIUDURWVHQVRUHQ
'LH6WHXHUVRIWZDUHYHUZDO
WHWGLHHUWHLOWHQ%HIHKOHXQG
VWHOOWIHVWREHLQHGHUIRO
JHQGHQYRQGHU1RUPDE
ZHLFKHQGHQ%HGLQJXQJHQ
YRUOLHJW
)OVVLJNHLWRGHU
)UHPGN|USHUDXIGHP
%HGLHQIHOG
+HOOLJNHLWDXIGHP
%HGLHQIHOGLVW]XVWDUN
.RQGHQVZDVVHULP
.RFKIHOG
/LHJWHLQHGHURD%HGLQ
JXQJHQYRUZLUGHLQ
6LFKHUKHLWVDODUPDXVJHO|VW
GLHHLQJHVFKDOWHWHQ.RFKVW
HOOHQZHUGHQVRIRUWDEJH
VFKDOWHWHVHUVFKHLQWGLH
0HOGXQJ´$/µDXI
GHQYRUKDQGHQHQ'LVSOD\V
XQGHLQ´3LHSVWRQ´HUW|QW
8PGLH)XQNWLRQV
WFKWLJNHLWGHV*HUlWHV
ZLHGHUKHU]XVWHOOHQ
PXVVGLH6W|UXQJEHKR
EHQZHUGHQ
(VNDQQDOOHUGLQJVHU
IRUGHUOLFKVHLQGDVV
DXFKGHU1HW]VWHFNHU
JH]RJHQXQGGLH3DUD
,QVWUXFFLRQHV
SDUDHOXVXDULR
,QVWDODFLyQ
4ODASLASOPERACIONESRELA
TIVASALAINSTALACIØNCO
NEXIØNELÏCTRICATIENEN
QUESEREFECTUADASPORPER
SONALCUALIFICADOSEGÞNLAS
NORMASVIGENTES
0ARALASINSTRUCCIONESE
SPECÓFICASVÏASELAPARTE
RESERVADAALINSTALADOR
8VR
0DQGRV &IGSY
%LCONTROLDELAPLACADECOCCIØN
ESEFECTUADOMEDIANTEUNA
TARJETAELECTRØNICADE
MICROPROCESADORPROVISTADE
SENSORESDERAYOSINFRARROJOS%L
SOFTWAREDECONTROLPERMITETANTO
VERIFICARLOSMANDOSLANZADOS
COMOINDIVIDUARLAPRESENCIADE
EVENTUALESSITUACIONESDE
FUNCIONAMIENTOANØMALO
CAÓDADELÓQUIDOSUOTROSOBJETOS
SOBREELPANELDEMANDOS
LUMINOSIDADEXCESIVAENEL
PANELDEMANDOS
PRESENCIADECONDENSACIØNENEL
INTERIORDELAPLACADECOCCIØN
%NCASODEVERIFICARSEUNA
CUALQUIERADELASSITUACIONES
ARRIBAINDICADASELSISTEMAENTRA
ENESTADODEALARMADESEGURIDAD
ESTOESLASPLACASENCENDIDASSE
APAGANDEINMEDIATOENELDIS
PLAYAPARECEELMENSAJEh!,
vYSEACTIVAUNhBEEPvCOMO
AVISOSONORO
%LFUNCIONAMIENTODEL
DISPOSITIVOSERESTABLECE
UNAVEZELIMINADALA
CAUSADELAANOMALÓA%N
CASODENOOBTENERSELA
REACTIVACIØNPODRÉSER
NECESARIODESCONECTARLA
ALIMENTACIØNDEREDY
EFECTUARUNANUEVA
+PUVTWEVKGUXQQT
FGIGDTWKMGT
,QVWDOODWLH
$OOHKDQGHOLQJHQPHW
EHWUHNNLQJWRWGHLQVWDOODWLH
HOHNWULVFKHYHUELQGLQJ
PRHWHQZRUGHQXLWJHYRHUG
GRRUJHNZDOLÀFHHUG
SHUVRQHHOYROJHQVGH
JHOGHQGHQRUPHQ=LHYRRU
GHVSHFLÀHNHLQVWUXFWLHVKHW
JHGHHOWHJHUHVHUYHHUGYRRU
FGKPUVCNNCVGWT
*HEUXLN
%HGLHQLQJHQ $IE
'HNRRNSODDWZRUGW
EHVWXXUGGRRUHHQ
HOHNWURQLVFKHNDDUWPHW
PLFURSURFHVVRUPHW
LQIUDURRGVHQVRUHQ0HW
GHVRIWZDUHNXQQHQ
]RZHOGHJHJHYHQ
EHGLHQLQJVRSGUDFKWHQ
DOVHYHQWXHOHVWRULQJHQ
ZRUGHQJHGHWHFWHHUG
PRUVHQYDQYORHLVWRIIHQ
RIDQGHUHYRRUZHUSHQ
RSKHWEHGLHQLQJVSDQHHO
WHKRJHOLFKWVWHUNWHRS
KHWEHGLHQLQJVSDQHHO
FRQGHQVLQGHNRRNSODDW
$OV]LFKppQYDQERYHQVWDDQGH
FRQGLWLHVYRRUGRHWWUHHGWHHQ
YHLOLJKHLGVDODUPLQZHUNLQJ
GHLQJHVFKDNHOGHSODWHQ
ZRUGHQRQPLGGHOOLMN
XLWJHVFKDNHOGKHWEHULFKW´
$/µYHUVFKLMQWRSGHGLV
SOD\VHQHUNOLQNWHHQ
´SLHSWRRQµ
'HZHUNLQJYDQKHW
DSSDUDDWZRUGWKHUYDW
]RGUDGHVWRULQJLV
YHUKROSHQ$OVGH
ZHUNLQJQLHWZRUGW
KHUYDWNDQKHW
QRRG]DNHOLMN]LMQGH
YRHGLQJVVSDQQLQJDIWH
VOXLWHQHQGHSDUDP
,QVWUXo}HVSDUD
RXWLOL]DGRU
,QVWDODomR
4ODASASOPERA¥ÜESRE
LATIVASÌINSTALA¥ÎOCO
NEXÎOELÏCTRICATERÎODE
SEREFECTUADASPORPESSOAL
QUALIFICADOSEGUNDOAS
NORMASEMVIGOR
0ARAINSTRU¥ÜESESPECÓFICAS
VEJASEAPARTERESERVADA
PARAOTÏCNICOINSTALADOR
',(+$/2*(1/$03(1,&+7
=8)(67%()(67,*(1
01(+,#4.#./2#4#
*#.¦)'0#+06'05#/'06'
.,-.1,(7,1'(
+$/2*((1/$03
01(+:#4%1/+06'05+&#&'
#./2#&#&'*#.1)0'1
8WLOL]DomR
&RPDQGRV &IG
/CONTROLODOPLANODECOZEDURA
ÏFEITOATRAVÏSDEUMAPLACA
ELECTRØNICACOM
MICROPROCESSADOREQUIPADACOM
SENSORESDERAIOSINFRAVERMELHOS
/SOFTWAREDECONTROLOPERMITE
DETECTAROSCOMANDOSFORNECIDOS
EIDENTIFICARAPRESEN¥ADE
EVENTUAISCONDI¥ÜESDE
FUNCIONAMENTOANØMALAS
QUEDADELÓQUIDOSOUOUTROS
OBJECTOSSOBREOPLANODE
COMANDOS
EXCESSIVALUMINOSIDADENO
PLANODECOMANDOS
PRESEN¥ADECONDENSA¥ÎONO
INTERIORDOPLANODECOZEDURA
#ASOSEVERIFIQUEQUALQUER
UMADASCONDI¥ÜESACIMA
INDICADASOSISTEMAENTRA
EMALARMEDESEGURAN¥AAS
PLACASLIGADASSÎO
IMEDIATAMENTEDESLIGADASÏ
VISUALIZADAAMENSAGEMh
!,vNOSVISORESPRESENTES
EÏEMITIDOUMhBIPv
/FUNCIONAMENTODO
DISPOSITIVOÒRESTABELECIDO
DEPOISDEELIMINADAA
CONDI¥ÎODE
FUNCIONAMENTOANØMALA
3EOFUNCIONAMENTONÎO
FORRESTABELECIDOPODERÉ
SERNECESSÉRIODESLIGARA
ALIMENTA¥ÎODEREDEE
5

IT GB FR
Fig. 1 - Abb. 1 - Afb. 1
eseguire di nuovo la
calibrazione dei parametri
(vedi prima installazione).
calibrate the param-
eters again (see first
installation).
d’exécuter de nouveau la con-
figuration des paramètres
(voir première installation).
6

Fig. 1a - Abb. 1a - Afb. 1a
7

DE ES NL PT
Fig. 2 - Abb. 2 - Afb. 2
2 FUOCHI + 1 ESTENSIONE
2 PLATES + 1 EXTENSION
2 FOYERS + 1 EXTENSION
2 KOCHZONEN + 1 ERWEITERUNG
2 FUEGOS + 1 EXTENSIÓN
2 KOOKZONES + 1 UITBREIDING
2 DISCOS + 1 EXTENSÃO
TRIPLOCIRCUITO
TRIPLE CIRCUIT
TRIPLE CIRCUIT
DREIKREIS
CIRCUITO TRIPLE
DRIEVOUDIG CIRCUIT
TRIPLO CIRCUITO
1 FUOCO
1 PLATE
1 FOYER
1 KOCHZONE
1 FUEGO
1 KOOKZONE
1 DISCO
1 FUOCO + ESTENSIONE
1 PLATE + EXTENSION
1 FOYER + EXTENSION
1 KOCHZONE + ERWEITERUNG
1 FUEGO + EXTENSIÓN
1 KOOKZONE + UITBREIDING
1 DISCOS + EXTENSÃO
Legenda - Key - Légende - LEGENDE - Leyenda - Legenda - Legenda:
1 - accensione / spegnimento - ON / OFF - marche/arrêt - Ein / Aus - encendido / apagado - aan / uit - ligar / desligar
2 - zona cottura - cooking area - zone de cuisson - Kochzone - zona cocción - kookzone - zona de cozedura
3 - display potenza - power display - afficheur de puissance - Display für Leistungsanzeige - display potencia - display vermogen - visor de potência
4 - meno / più - higher / lower - moins / plus - - / + - menos/más - min / plus - menos / mais
5 -
doppio circuito (estensione) - twin circuit (extension) - double circuit (extension) - Zweikreis (Erweiterung) - doble circuito (extensión) - dubbel circuit (uitbreiding) - duplo circuito (extensão)
6 - timer - timer - minuteur - Zeitschaltuhr - temporizador - timer - temporizador
7 - display timer - timer display - afficheur minuteur - Display f. Zeitschaltuhr - display temporizador - display timer - visor do temporizador
8 -
blocco comandi (chiave) - control lock (key) - blocage des commandes (clé) - Inbetriebnahme-/Kindersperre (Schlüssel) - bloqueo mandos (llave) - blokkering bedieningen (sleutel) - bloqueio dos comandos (chave)
9 - led doppio circuito - twin circuit LED - del double circuit - LED zweiter Heizkreis - led doble circuito - led dubbel circuit - led do duplo circuito
10 - led timer - timer LED - del minuteur - LED Zeitschaltuhr - led temporizador - led timer - led do temporizador
11 - led blocco - lock LED - del blocage - LED Sperre - led bloqueo - led blokkering - led de bloqueio
12 - punto decimale - decimal point - point décimal - Leuchtpunkt - punto sexagesimal - decimaalpunt - ponto decimal
meter neu eingestellt
werden müssen (siehe
Installation).
calibración de los
parámetros (véase
Primera instalación).
eters opnieuw in te
stellen (zie de eerste
installatie).
efectuar novamente a
calibragem dos parâmetros
(vide primeira instalação).
11
8
3
6
7
10
3
9
12
1
2
4
2
5
2
5
2
2/1
2/2
2/3
8

2 FUOCHI + 1 ESTENSIONE
2 PLATES + 1 EXTENSION
2 FOYERS + 1 EXTENSION
2 KOCHZONEN + 1 ERWEITERUNG
2 FUEGOS + 1 EXTENSIÓN
2 KOOKZONES + 1 UITBREIDING
2 DISCOS + 1 EXTENSÃO
TRIPLOCIRCUITO
TRIPLE CIRCUIT
TRIPLE CIRCUIT
DREIKREIS
CIRCUITO TRIPLE
DRIEVOUDIG CIRCUIT
TRIPLO CIRCUITO
1 FUOCO
1 PLATE
1 FOYER
1 KOCHZONE
1 FUEGO
1 KOOKZONE
1 DISCO
1 FUOCO + ESTENSIONE
1 PLATE + EXTENSION
1 FOYER + EXTENSION
1 KOCHZONE + ERWEITERUNG
1 FUEGO + EXTENSIÓN
1 KOOKZONE + UITBREIDING
1 DISCOS + EXTENSÃO
Legenda - Key - Légende - LEGENDE - Leyenda - Legenda - Legenda:
1 - accensione / spegnimento - ON / OFF - marche/arrêt - Ein / Aus - encendido / apagado - aan / uit - ligar / desligar
2 - zona cottura - cooking area - zone de cuisson - Kochzone - zona cocción - kookzone - zona de cozedura
3 - display potenza - power display - afficheur de puissance - Display für Leistungsanzeige - display potencia - display vermogen - visor de potência
4 - meno / più - higher / lower - moins / plus - - / + - menos/más - min / plus - menos / mais
5 -
doppio circuito (estensione) - twin circuit (extension) - double circuit (extension) - Zweikreis (Erweiterung) - doble circuito (extensión) - dubbel circuit (uitbreiding) - duplo circuito (extensão)
6 - timer - timer - minuteur - Zeitschaltuhr - temporizador - timer - temporizador
7 - display timer - timer display - afficheur minuteur - Display f. Zeitschaltuhr - display temporizador - display timer - visor do temporizador
8 -
blocco comandi (chiave) - control lock (key) - blocage des commandes (clé) - Inbetriebnahme-/Kindersperre (Schlüssel) - bloqueo mandos (llave) - blokkering bedieningen (sleutel) - bloqueio dos comandos (chave)
9 - led doppio circuito - twin circuit LED - del double circuit - LED zweiter Heizkreis - led doble circuito - led dubbel circuit - led do duplo circuito
10 - led timer - timer LED - del minuteur - LED Zeitschaltuhr - led temporizador - led timer - led do temporizador
11 - led blocco - lock LED - del blocage - LED Sperre - led bloqueo - led blokkering - led de bloqueio
12 - punto decimale - decimal point - point décimal - Leuchtpunkt - punto sexagesimal - decimaalpunt - ponto decimal
Fig. 2a - Abb. 2a - Afb. 2a
5
2
6
4
2
1
9
12
3
10
7
3
11
8
5
2
2
2/3
2/2
2/1
9

IT GB FR
Accensione del
dispositivo
1 -Toccare il tasto (1) per
attivare il controllo: gli
indicatori del livello di
regolazione (3) ed i display
timer (7) mostrano “0” ed i
punti decimali (12)
lampeggiano;
2 -Eseguire la successiva
operazione entro 10 secondi,
altrimenti il dispositivo si
spegne automaticamente;
Controllo della
Potenza e del Timer
attraverso i tasti
“+” e “-”
I tasti “+” e “-” (4) vengono
utilizzati per controllare sia la
potenza delle piastre che il
tempo impostato nel Timer/
Contaminuti (7). Essendo i
comandi “+” e “-” (4) comuni
ad entrambe le funzionalità, se
si desidera controllare la
potenza delle piastre occorrerà,
dapprima, selezionare la zona
interessata tramite il tasto (2) e
il relativo livello di potenza con
i tasti “+” e “-” (4) quindi
selezionare la funzione timer,
mediante il tasto (6) e poi
regolare il tempo con il “+” o
“-” (4).
Accensione della
zona di cottura:
Una volta acceso il dispositivo,
l’accensione di una zona di
cottura deve avvenire entro i
10 secondi, nel seguente modo:
1 - Premere uno dei tasti (2) per
selezionare la zona di cottura
che interessa pilotare. Sul
display relativo (3) compare
uno “0” e si accende il punto
decimale (12), per evidenziare
che la zona di cottura che
interessa è attiva;
2 - Toccare i tasti “+” e “-” (4) per
regolare il livello di potenza (da
1 a 9). Tali tasti sono dotati di
funzione di ripetizione. La
Switching on the
device
1. Press the key (1) to acti-
vate the control: the ad-
justment level indicators
(3) and the timer display
(7) are set to “0” while
the decimal points (12)
flash.
2. Perform the next opera-
tion within 10 seconds,
otherwise the device will
switch off automatically.
Adjusting power
and the timer by
means of the “+”
and “-” keys
Use the “+” and “-” keys
(4) to adjust the setting of
the plates and the required
time on timer/minute
counter (7). The “+” and “-
” controls (4) are common
to both functions. Accord-
ingly, to regulate the power
of the hob, first select the
zone with key (2), then ad-
just the relative power
level using the “+” and “-”
keys (4); this done, select
the timer function with key
(6) and proceed to set the
duration, likewise using
the “+” or “-” key (4).
Switching on the
cooking area
Once the device has been
activated, switch on the
cooking area (within 10
seconds) as follows:
1. Press one of the keys
(2) to select the cook-
ing area required. The
relative display (3) will
indicate a “0” and the
decimal point (12) will
illuminate to show
that the cooking area
has been activated.
2. Use the “+” and “-”
keys (4) to adjust the
heat level (from 1 to 9).
Mise en marche du
dispositif
1 – Toucher la touche (1) pour
activer le contrôle : les
indicateurs du niveau de
réglage (3) et les afficheurs
minuteur (7) indiquent
“ 0 ” et les points
décimaux (12) clignotent.
2 – Effectuer l’opération
suivante dans les 10
secondes, sinon le dispositif
s’éteint automatiquement.
Contrôle de la puis-
sance et du minuteur
à l’aide des touches
“+” et “-”
Les touches “+” et “-” (4) sont
utilisées pour contrôler la puis-
sance des plaques et le temps
réglé dans le minuteur/compte-
minutes (7). Les commandes
“+” et “-” (4) sont communes
aux deux fonctions. Pour
contrôler la puissance des
plaques, sélectionner d’abord le
foyer avec la touche (2) et la
puissance correspondante avec
les touches “+” et “-” (4). Sé-
lectionner ensuite la fonction
minuteur avec la touche (6).
Régler le temps de cuisson avec
les touches “+” ou “-” (4).
Allumage de la
zone de cuisson :
Lorsque le dispositif est allumé,
l’allumage d’une zone de cuisson
doit avoir lieu en l’espace de 10
secondes comme suit :
1 – Appuyer sur une des touches
(2) pour sélectionner la zone de
cuisson que l’on souhaite
piloter. Un “ 0 ” apparaît sur
l’afficheur correspondant et le
point décimal (12) s’allume
pour signaler que la zone de
cuisson qui intéresse est active.
2 – Toucher les touches “+” et “-”
(4) pour régler le niveau de
puissance (de 1 à 9). Ces
touches ont une fonction de
10

DE ES NL PT
Einschalten des
Gerätes
1 - Berühren Sie die Taste (1), um
die Steuerung zu aktivieren:
die Einstellungsanzeigen (3)
und die Displays der
Zeitschaltuhr (7) zeigen “0”
an und die Leuchtpunkte (12)
blinken.
2 - Damit sich die Vorrichtung
nicht automatisch abschaltet,
müssen Sie innerhalb der
nächsten 10 Sekunden die
nächste Taste berühren.
Einstellen von
Leistung und
Zeitschaltuhr mit den
Tasten “+” und “-”
Mit den Tasten “+” und “-” (4)
können Sie die Leistung der
Kochstellen und die auf der
Zeitschaltuhr/Küchenuhr (7)
eingestellte Zeit regeln.
Da die Tasten “+” und “-“ (4)
für beide Funktionen
verwendet werden, wählt man
zum Einstellen der Heizleistung
der Platten zuerst mit der Taste
(2) die betreffende Zone und
mit den Tasten “+” und “-” (4)
die Leistungsstufe, dann mit
der Taste (6) die Zeitschaltuhr-
Funktion und stellt mit “+”
oder “-” (4) die Zeit ein.
Einschalten der
Kochzone:
Nach dem Einschalten
des Gerätes haben Sie 10
Sekunden Zeit, eine
Kochzone einzuschalten:
1 - Dazu wählen Sie durch Drücken
einer der Tasten (2) die
gewünschte Kochzone aus. Auf
dem dieser Zone entsprechenden
Display (3) erscheint eine “0” und
der Leuchtpunkt (12) leuchtet auf,
was bedeutet, dass die betreffende
Kochzone nun eingeschaltet ist.
2 - Mit Hilfe der Tasten “+” und “-”
(4) stellen Sie nun die gewünschte
Leistungsstufe (1 bis 9) ein. Diese
Tasten sind mit
Encendido del
dispositivo
1 - Pulsar la tecla (1) para activar
el control: los indicadores del
nivel de regulación (3) y los
displays temporizador (7)
muestran “0”, mientras que los
puntos sexagesimales (12) se
encienden de modo intermitente.
2 - La operación sucesiva deberá
ser ejecutada dentro de los
sucesivos 10 segundos ya que de
lo contrario el aparato se apaga
de modo automático.
Control de la Potencia
y del Temporizador
mediante las teclas
“+” y “-”
Las teclas “+” y “-” (4) se
utilizan para controlar tanto la
potencia de las placas como el
tiempo programado mediante el
Temporizador/Cuentaminutos
(7). Puesto que los mandos “+”
y “-” (4) son comunes a las dos
funciones, si se desea regular la
potencia de las placas es preciso,
antes que nada, seleccionar la
zona interesada mediante la
tecla (2) y el correspondiente
nivel de potencia con las teclas
“+” y “-” (4), luego seleccionar
la función temporizador con la
tecla (6) y, por último, ajustar el
tiempo con “+” o “-” (4).
Encendido de la
zona de cocción:
Una vez encendido el dispositivo, el
encendido de una zona de cocción
debe efectuarse dentro de los
sucesivos 10 segundos, procediendo
para ello de la siguiente forma:
1 - Presionar una de las teclas (2) para
seleccionar la zona de cocción que
se desea activar. En el respectivo
display (3) aparece un “0” y se
enciende el punto sexagesimal (12)
para indicar que la respectiva zona
de cocción ha sido activada.
2 - Pulsar las teclas “+” y “-” (4) para
regular el nivel de potencia (entre 1
y 9). Estas teclas cuentan con
función de repetición. Manteniendo
Inschakelen van
het toestel
1 -Raak de toets (1) aan om
de controle te activeren:
de lampjes van het
regelniveau (3) en de
timer displays (7) geven
“0” aan en de
decimaalpunten (12)
knipperen;
2 -Verricht de volgende
handeling binnen 10
seconden, anders gaat het
apparaat automatisch uit;
Regeling van het
vermogen en van
de timer met de
toetsen “+” en “-”
De toetsen “+” en “-” (4) worden
gebruikt om zowel het
vermogen van de platen als de
ingestelde tijd in de Timer/
Kookwekker (7) te regelen. De
bedieningen “+” en “-” (4)
worden voor beide functies
gebruikt. Daarom moet voor de
controle van het vermogen van
de platen eerst de zone worden
geselecteerd met de toets (2) en
het vermogen met de toetsen “+”
en “-” (4). Selecteer daarna de
timerfunctie met de toets (6) en
stel de tijd in met “+” of “-” (4).
Inschakelen van de
kookzone:
Zodra het apparaat is
ingeschakeld, moet een
kookzone binnen 10 seconden
als volgt worden ingeschakeld:
1 – Druk op één van de toetsen (2)
om de kookzone te selecteren
die u wilt bedienen. Op het
desbetreffende display (3)
verschijnt een “0” en gaat de
decimaalpunt (12) branden om
aan te geven dat de kookzone
in kwestie actief is;
2 – Raak de toetsen “+” en “-” (4)
aan om het vermogensniveau
te regelen (van 1 tot 9). Deze
toetsen zijn uitgerust met een
Ligação do
dispositivo
1 – Prima a tecla (1) para
activar o controlo: os
indicadores do nível de
regulação (3) e os visores do
temporizador (7) mostram
“0” e os pontos decimais
(12) começam a piscar;
2 – Efectue a operação
seguinte dentro de 10
segundos, caso contrário o
dispositivo desliga-se
automaticamente;
Controlo da Potência
e do Temporizador
através das teclas
“+” e “-”
As teclas “+” e “-” (4) são
utilizadas para controlar quer a
potência das placas quer o tempo
definido no Temporizador/Conta-
minutos (7). Sendo os comandos
“+” e “-” (4) comuns às duas
funções, se pretender verificar a
potência das placas, deve
primeiramente seleccionar a zona
desejada através da tecla (2) e o
respectivo nível de potência com
as teclas “+” e “-” (4); de
seguida, seleccione a função do
temporizador através da tecla (6)
e, por fim, regule o tempo com as
teclas “+” ou “-” (4).
Activação da zona
de cozedura:
Ligado o dispositivo, a
activação de uma zona de
cozedura deve ocorrer dentro de
10 segundos, do seguinte modo:
1 – Prima uma das teclas (2)
para seleccionar a zona de
cozedura que pretende ligar.
No respectivo visor (3) aparece
um “0” e acende-se o ponto
decimal (12), para assinalar
que a zona de cozedura
pretendida está activa;
2 – Prima as teclas “+” e “-” (4)
para regular o nível de
potência (de 1 a 9). Estas teclas
possuem uma função de
11

IT GB FR
Spegnimento della
zona di cottura:
1 - La zona di cottura richiesta
deve essere attivata ed il
punto decimale
corrsopondente (12) deve
essere acceso;
2 -Portare il valore impostato a
“0” mediante il tasto “-”
(4). Dopo 3 secondi la zona
di cottura si spegna
automaticamente;
Spegnimento
rapido della zona
di cottura:
1 - La zona di cottura richiesta
deve essere attivata ed il
punto decimale
corrsopondente (12) deve
essere acceso;
2 -Per spegnere
automaticamente la zona di
cottura selezionata si
toccano
contemporaneamente i tasti
“+” e “-” (4);
Indicatore di calore
residuo (“H”):
Una volta spenta la zona di
cottura, se la temperatura di
quest’ultima è ancora elevata,
al punto tale da causare
ustioni, il display (3) relativo a
quella zona mostra il simbolo
“H” (calore residuo).
L’indicazione scompare solo
quando non vi è più alcun
pericolo (a 60
°
C).
Spegnimento
dell’apparato:
L’apparecchio può essere
spento in qualsiasi momento
mediante il tasto di accensione/
spegnimento (1).
Switching off the
cooking area
1. The relevant cooking
area must already be
activated with relative
decimal point (12) illu-
minated.
2. Return the setting to “0”
by means of the key “-”
(4). After three seconds,
the cooking area will
automatically switch off.
Rapid shutdown of
the cooking area
1. The relevant cooking
area must already be
activated with rela-
tive decimal point
(12) illuminated.
2. To shut down the
selected cooking
area immediately,
press the “+” and “-”
keys (4) at the same
time.
Residual heat indi-
cator (“H”)
If the temperature of the
cooking area is still high
(and a burn risk still
present) after it has been
switched off, the display (3)
for the area will indicate the
letter “H” (residual heat).
The letter will only switch
off when the burn risk is no
longer present (at 60°C).
Switching off the
hob
The hob can be switched
off at any time by means
of the ON / OFF switch
(1).
Arrêt de la zone de
cuisson :
1 – La zone de cuisson requise
doit être activée et le point
décimal correspondant (12)
doit être allumé.
2 – Mettre la valeur
configurée sur “0” à l’aide
de la touche “-” (4). Après
4 secondes, la zone de
cuisson s’éteint
automatiquement.
Arrêt rapide de la
zone de cuisson :
1 – La zone de cuisson
requise doit être activée
et le point décimal
correspondant (12) doit
être allumé.
2 – Pour éteindre
automatiquement la zone
de cuisson sélectionnée,
il faut toucher simulta-
nément les touches “+”
et “-” (4).
Indicateur de chaleur
résiduelle (“ H ”) :
Une fois la zone de cuisson
éteinte, si la température de
cette dernière est encore élevée,
au point de provoquer des
brûlures, l’afficheur (3) relatif
à cette zone montre le symbole
“ H ” (chaleur résiduelle).
Cette indication disparaît
seulement lorsqu’il n’y a plus
aucun danger (à 60
°
C).
Arrêt de l’appareil :
L’appareil peut être
éteint à tout moment à
l’aide de la touche
marche/arrêt (1).
pressione continua di uno di
questi tasti determina
l’aumento o la diminuzione del
valore impostato.
Press and hold down
these keys to increase
or decrease the setting.
répétition. La pression continue
d’une de ces touches provoque
l’augmentation ou la diminu-
tion de la valeur configurée.
12

DE ES NL PT
Ausschalten der
Kochzone:
1 - Die Kochstelle muss akti-
viert sein und deshalb
muss auch der entspre-
chende Leuchtpunkt (12)
leuchten.
2 - Setzen Sie den eingestell-
ten Wert mit der Taste “-”
(4) auf “0”. Nach 3 Sekun-
den schaltet sich die
Kochzone automatisch ab.
Sofortiges Aus-
schalten der Koch-
zone:
1 - Die Kochzone muss
eingeschaltet sein und
deshalb muss auch der
entsprechende
Leuchtpunkt (12)
leuchten.
2 - Zum automatischen
Abschalten der gewähl-
ten Kochzone berühren
Sie nun gleichzeitig die
Tasten “+” und “-” (4).
Restwärmeanzeige
(“H”):
Ist die abgeschaltete Koch-
zone noch so heiß, dass
man sich daran verbren-
nen könnte, wird auf dem
Display (3) dieser Kochst-
elle das Restwärme-Sym-
bol “H” angezeigt.
Diese Anzeige erlischt
erst, wenn die Temperatur
auf 60 °C gesunken ist.
Ausschalten des
Gerätes:
Das Gerät kann
jederzeit mit der Taste
Ein/Aus (1) abge-
schaltet werden.
Apagado de la zona
de cocción:
1 - La zona de cocción requerida
debe estar activada y el
respectivo punto sexagesimal
(12) debe estar encendido.
2 - Operar con la tecla “-” (4)
para disponer el valor
programado en “0”. Después
de tres segundos la zona de
cocción se apagará de modo
automático.
Apagado rápido de
la zona de cocción:
1 - La zona de cocción
requerida debe estar
activada y el respectivo
punto sexagesimal (12)
debe estar encendido.
2 - Para apagar
automáticamente la
zona de cocción
seleccionada se deben
pulsar simultáneamente
las teclas “+” y “-” (4).
Indicador de calor
residual (“H”):
Una vez apagada la zona de
cocción, si su temperatura es
aún elevada como para poder
causar quemaduras, en el
respectivo display (3)
aparecerá el símbolo “H”
(calor residual).
Esta indicación desaparecerá
sólo al desaparecer el peligro
(a 60
°
C).
Apagado del
aparato:
El aparato puede ser
apagado en cualquier
momento mediante la
tecla de encendido/
apagado (1).
Uitschakelen van
de kookzone:
1 – De gewenste kookzone
moet zijn ingeschakeld en
de overeenstemmende
decimaalpunt (12) moet
branden;
2 – Breng de ingestelde
waarde op “0” met de
toets “-” (4). Na 3
seconden gaat de
kookzone automatisch uit;
Snel uitschakelen
van de kookzone:
1 – De gewenste kookzone
moet zijn ingeschakeld
en de overeenstemmende
decimaalpunt (12) moet
branden;
2 – Om de geselecteerde
kookzone automatisch
uit te schakelen moeten
de toetsen “+” en “-” (4)
tegelijk worden
aangeraakt;
Restwarmte-
indicatie (“H”):
Zodra de kookzone is
uitgeschakeld en de
temperatuur ervan nog zo
hoog is dat men zich eraan
kan branden, toont het dis-
play (3) van die zone het
symbool “H” (restwarmte).
De aanduiding verdwijnt
pas als er geen gevaar
meer is (bij 60°C).
Uitschakelen van
het apparaat:
Het apparaat kan op
elk moment worden
uitgeschakeld met de
aan/uit toets (1).
Desactivação da
zona de cozedura:
1 - A zona de cozedura
pretendida deve estar
activada e o ponto decimal
correspondente (12) deve
estar aceso;
2 – Coloque o valor programado
em “0” através da tecla “-”
(4). Passados 3 segundos, a
zona de cozedura desliga-se
automaticamente;
Desactivação
rápida da zona de
cozedura:
1 – A zona de cozedura
pretendida deve estar
activada e o ponto deci-
mal correspondente
(12) deve estar aceso;
2 - Para desactivar
automaticamente a
zona de cozedura
seleccionada, prima
simultaneamente as
teclas “+” e “-” (4);
Indicador de calor
residual (“H”):
Desligada a zona de
cozedura, se a temperatura
desta última ainda estiver
elevada, a ponto de provocar
queimaduras, o visor (3)
relativo a essa zona mostra o
símbolo “H” (calor residual).
A indicação só desaparece
quando não já não existir
nenhum perigo (a 60 °C).
Desactivação do
aparelho:
O aparelho pode ser
desligado a qualquer
momento através da
tecla de activação/
desactivação (1).
Wiederholfunktion ausgestattet.
Wenn Sie eine dieser beiden
Tasten gedrückt halten, wird der
eingestellte Wert erhöht bzw.
reduziert.
presionada de modo continuo una
de estas teclas, se obtiene el
aumento o la reducción del valor
que se está programando.
herhaalfunctie. Door continu
op één van deze toetsen te
drukken neemt de ingestelde
waarde toe of af.
repetição. A pressão contínua
de uma destas teclas determina
o aumento ou a diminuição do
valor programado.
13

IT GB FR
Zone di cottura a
doppio circuito
A seconda del modello una o
due zone possono essere dotate
di un secondo circuito. Tali
zone possono esere di due tipi:
TONDA: formata da un disco
centrale e di una corona
esterna;
OVALE: formata da un disco
laterale e di una semicorona.
E’ possibile accendere una sola
zona a disco oppure entrambe
(disco + corona o semicorona).
Accensione di una
zona a doppio
circuito:
1 - La zona a doppio circuito
deve essere attivata e quindi
deve essere acceso il punto
decimale (12) sul display
relativo alla zona
interessata;
2 -Selezionare il livello di
regolazione desiderato (1:9);
3 -Accendere il secondo
circuito toccando il tasto di
doppio circuito (5). Il led (9)
relativo all azona
selezionata si accende e si
accende anche il secondo
circuito, assieme a quello
primario.
Spegnimento del
secondo circuito di
una zona di
cottura:
1 - La zona a doppio circuito
deve essere attivata e quindi
deve essere acceso il punto
decimale (12) sul display
relativo alla zona interessata;
2 - Toccare il tasto di soppio
circuito (5). Il led (9) relativo
alla zona selezionata si
spegne e si spegna anche il
circuito secondario della zona
di cottura;
Twin circuit cook-
ing areas
Depending on the model,
one or two areas may have
a second circuit. There are
two types:
ROUND: comprising a
central disk and external
crown;
OVAL: comprising a lat-
eral disk and half-crown.
One disk zone or both
(disco + crown/half-
crown) can be switched on.
Switching on a
twin circuit zone:
1. The twin circuit
zone must already
be activated with
relative decimal
point (12) illumi-
nated.
2. Select the required
setting (1 - 9).
3. Press the twin circuit
key (5) to switch it
on. The LED (9) for
the selected zone
will light up; the sec-
ond circuit will be
activated together
with the first.
Switching off the
second circuit
1. The twin circuit zone
must already be acti-
vated with relative
decimal point (12)
illuminated.
2. Press the twin circuit
key (5). The LED (9)
for the selected zone
will go out to indi-
cate deactivation of
the second circuit.
Zones de cuisson à
double circuit
Selon le modèle, une ou deux
zones peuvent avoir un
deuxième circuit. Ces zones
peuvent être de deux types :
RONDE : formée d’un
disque central et d’une
couronne extérieure.
OVALE : formée d’un disque
latéral et d’une demie couronne.
Il est possible d’allumer une seule
zone à disque ou les deux (disque
+ couronne ou demie couronne).
Allumage d’une
zone à double cir-
cuit :
1 – La zone à double circuit
doit être activée et le
point décimal (12) doit
donc être allumé sur
l’afficheur relatif à la
zone concernée.
2 – Sélectionner le niveau
de réglage voulu (1:9).
3 – Allumer le deuxième
circuit en touchant la
touche de double circuit
(5). La del (9) relative à
la zone sélectionnée
s’allume ; le deuxième
circuit s’allume en même
temps que le primaire.
Arrêt du deuxième
circuit d’une zone
de cuisson :
1 – La zone à double circuit
doit être activée et le point
décimal (12) doit donc être
allumé sur l’afficheur relatif
à la zone concernée.
2 – Toucher la touche de double
circuit (5). La del (9) rela-
tive à la zone sélectionnée
s’éteint et le circuit
secondaire de la zone de
cuisson s’éteint également.
14

DE ES NL PT
Zweikreis-Koch-
zonen
Je nach Modell können eine oder
zwei Kochzonen einen zweiten
Heizkreis haben. Diese Koch-
zonen können wie folgt aussehen:
KREISRUND, mit einer in der Mitte
angeordneten Scheibe und einem um
diese herum liegenden Heizkranz
OVAL, mit einer seitlich an-
geordneten Scheibe und ei-
nem Halbkranz (Bräterzone).
Sie können von einer Zweikreis-
Zone nur die Scheibe einschal-
ten oder auch die Scheibe und
den zweiten Heizkreis (Kranz
bzw. Halbkranz) zusammen.
Einschalten einer
Zweikreis-Koch-
zone:
1 - Die entsprechende Zweikreis-
Kochzone muss aktiviert sein;
der entsprechende
Leuchtpunkt (12) auf dem
Display der betreffenden
Kochzone muss also leuchten.
2 - Stellen Sie die gewünschten
Leistungsstufe ein (1:9).
3 - Schalten Sie dann durch Be-
rühren der Zweikreistaste (5)
den zweiten Heizkreis zu. Die
LED (9) der gewählten Koch-
zone leuchtet auf und es
schaltet sich zu dem ersten
Heizkreis auch der zweite
Heizkreis zu.
Abschalten des
zweiten Heiz-
kreises einer Zwei-
kreis-Kochzone:
1 - Die Zweikreis-Kochzone muss
eingeschaltet sein und damit
muss auch der entsprechende
Leuchtpunkt (12) auf dem
Display der Kochzone leuch-
ten.
2 - Berühren Sie die Zweikreistaste
(5). Die LED (9) der gewählten
Kochzone erlischt und der
zweite Heizkreis dieser Koch-
zone wird abgeschaltet.
Zonas de cocción de
doble circuito
En función del modelo, una o dos
zonas pueden estar equipadas
con un segundo circuito. Estas
zonas pueden ser de dos tipos:
REDONDA: formada
por un disco central y
una corona externa.
OVAL: constituida por
un disco lateral y una
semicorona.
Es posible encender una
sola zona de disco o bien
ambas (disco + corona o
semicorona).
Encendido de una
zona de doble
circuito:
1 - La zona de doble circuito
debe ser activada y, por lo
tanto, debe estar encendido
el punto sexagesimal (12)
en el display
correspondiente a la
respectiva zona.
2 - Seleccionar el nivel de
regulación preferido (1:9).
3 - Encender el segundo
circuito pulsando la tecla de
doble circuito (5). Se
enciende el led (9) relativo a
la zona seleccionada y junto
al primario se enciende
también el segundo circuito.
Apagado del
segundo circuito de
una zona de
cocción:
1 - La zona de doble circuito debe
estar activada y por lo tanto
debe estar encendido el punto
sexagesimal (12) en el display
relativo a la respectiva zona.
2 - Pulsar la tecla de doble
circuito (5). Se apaga el led
(9) relativo a la zona
seleccionada y se apaga
también el circuito secundario
de la zona de cocción.
Kookzones met
dubbel circuit
Afhankelijk van het model kunnen
één of twee zones zijn uitgerust
met een tweede circuit. Deze zones
kunnen uit twee soorten bestaan:
ROND: gevormd door
een centrale schijf en
een buitenring;
OVAAL: gevormd
door een zijdelingse
schijf en een halve ring.
U kunt slechts één
schijf inschakelen of
beiden (schijf + ring
of halve ring).
Inschakelen van
een zone met
dubbel circuit:
1 – De zone met dubbel circuit
moet zijn ingeschakeld en
dus moet de decimaalpunt
(12) op het display van de
zone in kwestie branden;
2 – Selecteer het gewenste
niveau (1:9);
3 – Schakel het tweede circuit
in door de toets van het
dubbele circuit (5) aan te
raken. De led (9) van de
geselecteerde zone gaat
branden en ook het tweede
circuit wordt samen met
het primaire circuit
ingeschakeld.
Uitschakelen van
het tweede circuit
van een kookzone:
1 – De zone met dubbel circuit
moet zijn ingeschakeld en
dus moet de decimaalpunt
(12) op het display van de
zone in kwestie branden;
2 – Raak de toets van het
dubbele circuit (5) aan. De
led (9) van de geselecteerde
zone gaat uit en ook het
secundaire circuit van de
kookzone gaat uit;
Zonas de cozedura
com duplo circuito
Conforme o modelo, uma ou duas
zonas podem estar equipadas com
um segundo circuito. Estas zonas
podem ser de dois tipos
REDONDA: formada
por um disco central e
uma coroa externa;
OVAL: formada por um
disco lateral e uma
semi-coroa.
É possível ligar uma
única zona com disco ou
ambas (disco + coroa ou
semi-coroa).
Activação de uma
zona com duplo
circuito:
1 - A zona com duplo circuito
deve estar activada e, de
seguida, deve acender-se o
ponto decimal (12) no vi-
sor relativo à zona
pretendida;
2 - Seleccione o nível de
regulação que deseja (1:9);
3 – Ligue o segundo circuito
premindo a tecla de duplo
circuito (5). O led (9)
relativo à zona seleccionada
acende-se e acende-se
também o segundo circuito,
juntamente com o
primário.
Desactivação do
segundo circuito de
uma zona de
cozedura:
1 – A zona com duplo circuito
deve estar activada e o
ponto decimal (12) no visor
relativo à zona pretendida
deve estar aceso;
2 – Prima a tecla de duplo
circuito (5). O led (9)
relativo à zona seleccionada
apaga-se e o circuito
secundário da zona de coze-
dura desliga-se;
15

IT GB FR
Blocco
dell’apparato o
della zona di
cottura (chiave)
L’intero apparato può essere
bloccato con il tasto di blocco o
chiave (8), al fine di impedire
operazioni non intenzionali. La
funzione serve anche come
sicurezza per i bambini.
Fintanto che la funzione di
blocco è attiva, l’azione sui
tasti non ha alcun effetto salvo
lo spegnimento (1).
Spegnimento di
sicurezza
Se una o più zone di cottura
rimangono inavvertitamente
accese, il sistema di controllo,
trascorso il tempo limite
d’accensione, provvede a
spegnerle automaticamente. In
questo caso viene visualizzato
il simbolo “H”.
Preriscaldamento
automatico
Quest’automatismo semplifica
il processo di cottura in quanto
non è richiesta la presenza
umana durante tutto il ciclo di
cottura. La funzione determina
un preriscaldamento della zona
di cottura alla massima
potenza, in modo da portare
velocemente la zona
temperatura di regime. Dopo
un certo tempo, il livello di
potenza ritorna
spontanemaente a quello
impostato.
Attivazione del
preriscaldamento
automatico
Selezionare la zona di cottura
interessata tramite il tsto (2).
Selezionare il livello di potenza
9 con il tsto “+” (4) e premere
ancora una volta il tasto “+”
(4), per inserire la modalità di
preriscaldamento (accensione
del simbolo “A” sul display
Shutting down the
unit or the cooking
area (key)
To shut down the unit
to prevent operation
(e.g. by children), use
the lock key (8).
While the lock is en-
gaged, all operation
of the keys is disa-
bled, with the excep-
tion of the OFF key
(1).
Safety shutdown
In the event that one or
more cooking areas is inad-
vertently left on, the safety
system will shut the zones
down automatically after a
certain time has elapsed,
after which the letter “H”
will be displayed.
Automatic
preheating
This function is designed
to facilitate cooking,
given that the cooking
cycle may be carried out
without the need for hu-
man supervision. The
function uses maximum
power to preheat the
cooking area to bring it
to the required operating
temperature. After a time
interval, the power level
automatically returns to
the original setting.
Using the auto-
matic preheating
function
Select the required cooking
area by means of the key (2).
Select power level 9 by
means of key “+” (4), then
press the “+” key (4) again
to activate preheating. The
letter “A” will be shown on
the relative display.
Blocage de
l’appareil ou de la
zone de cuisson
(clé)
Tout l’appareil peut être
bloqué avec la touche de
blocage ou la clé (8) afin
d’empêcher de fausses
manœuvres. Cette fonction
sert aussi de sécurité pour les
enfants. Tant que la fonction
de blocage est active, l’action
sur les touches n’a aucun
effet sauf l’arrêt (1).
Arrêt de sécurité
Si une ou plusieurs zones
de cuisson restent
allumées par inadvertance,
le système de contrôle les
éteint automatiquement
passé le temps limite
d’allumage. Dans ce cas, le
symbole “ H ” est affiché.
Préchauffage
automatique
Cet automatisme simplifie le
processus de cuisson car la
présence humaine n’est pas
requise pendant tout le cycle
de cuisson. Cette fonction
détermine un préchauffage de
la zone de cuisson à la puis-
sance maximum de façon à
porter rapidement la zone à la
température de régime.
Après un certain laps de
temps, le niveau de puissance
retourne spontanément à
celui configuré.
Activation du
préchauffage
automatique
Sélectionner la zone de cuisson
concernée à l’aide de la touche
(2). Sélectionner le niveau de
puissance 9 avec la touche “+”
(4) et appuyer encore une fois
sur la touche “+” (4) pour
entrer le mode de préchauffage
(le symbole “ A ” s’allume sur
16

DE ES NL PT
Sperre des Gerätes
oder der Kochzone
(Schlüssel)
Sie können das ganze Gerät
mit der Sperrtaste (8) vor
unbefugter oder unbeabsich-
tigter Benutzung schützen.
Diese Funktion dient auch
als Kindersicherung. Bei
eingeschalteter Sperre sind
alle Funktionen gesperrt,
das Kochfeld kann lediglich
ausgeschaltet werden (1).
Sicherheitsab-
schaltung
Sollten Sie vergessen, eine
oder mehrere Kochstellen
nach dem Benutzen abzu-
schalten, wird dies nach
Ablauf der maximalen Ein-
schaltzeit automatisch be-
sorgt. In einem solchen Fall
erscheint das Symbol “H”.
Ankochautomatik
Die Ankochautomatik er-
leichtert das Kochen, da Sie
nicht die gesamte Kochzeit
am Herd stehen müssen.
Mit dieser Funktion heizt
die Kochstelle mit maxima-
ler Leistung an und erreicht
dadurch schneller die ein-
gestellte Fortkochstufe.
Nach einer gewissen Zeit
wird automatisch auf die
eingestellte Leistungsstufe
(=Fortkochstufe) zurückge-
schaltet.
Aktivierung der
Ankochautomatik
Wählen Sie mit der Taste (2)
die gewünschte Kochzone.
Stellen Sie mit der Taste “+”
(4) die Leistungsstufe 9 ein
und drücken Sie nochmals die
Taste “+” (4), um die Ankoch-
automatik einzuschalten (auf
dem entsprechenden Display
erscheint das Symbol “A”).
Bloqueo del aparato
o de la zona de
cocción (llave)
El aparato puede ser bloqueado con
la tecla de bloqueo o llave (8) a fin
de impedir la ejecución accidental
de operaciones. Esta función sirve
también como dispositivo de
seguridad para los niños. Mientras
la función de bloqueo se encuentre
activada, la presión ejercida sobre
las teclas no produce ningún efecto
salvo el apagado del aparato (1).
Apagado de
seguridad
En caso de que una o más de una
zona de cocción permanezca
inadvertidamente
encendida, el sistema de control,
una vez transcurrido el tiempo
límite de encendido, se encarga de
apagarla/s automáticamente. En
este caso aparecerá el símbolo “H”.
Precalentamiento
automático
Este automatismo simplifica el
proceso de cocción, ya que no se
requiere la presencia humana
durante el ciclo de cocción. Esta
función determina un
precalentamiento de la zona de
cocción a la máxima potencia, a
fin de aumentar rápidamente la
temperatura de dicha zona
hasta alcanzar el valor de
régimen. Después de un cierto
lapso el nivel de potencia asume
espontáneamente el valor
programado.
Activación del
precalentamiento
automático
Operar con la tecla (2) para
seleccionar la zona de cocción
que interesa. Seleccionar el nivel
de potencia 9 mediante la tecla
“+” (4) y presionar nuevamente
la tecla “+” (4) para activar la
modalidad de precalentamiento
(encendido del símbolo “A” en
el respectivo display).
Blokkering van het
apparaat of van de
kookzone (sleutel)
Het hele apparaat kan worden
geblokkeerd met de
blokkeertoets of sleutel (8) om
onbedoelde handelingen te
voorkomen. De functie dient
ook als kinderbeveiliging.
Zolang de blokkeerfunctie
actief is, heeft een druk op de
toetsen geen enkel effect,
behalve de uitschakeling (1).
Veiligheidsuitschakeling
Als één of meerdere
kookzones per ongeluk aan
blijven, schakelt het
controlesysteem ze auto-
matisch uit als de
tijdslimiet is verstreken. In
dit geval wordt het
symbool “H” weergegeven.
Boosterfunctie
Dit automatisme maakt
het kookproces
eenvoudiger, omdat er
tijdens de hele kookcyclus
geen personen aanwezig
hoeven te zijn. De functie
verwarmt de kookzone
voor op vol vermogen,
zodat de zone snel op
temperatuur wordt
gebracht. Na een bepaalde
tijd keert het vermogens-
niveau vanzelf terug naar
het ingestelde niveau.
Inschakelen van de
boosterfunctie
Selecteer de kookzone met
de toets (2). Selecteer het
vermogensniveau 9 met de
toets “+” (4) en druk
nogmaals op de toets “+”
(4) om de voorverwarming
in te schakelen (het symbool
“A” op het desbetreffende
display gaat branden).
Bloqueio do
aparelho ou da zona
de cozedura (chave)
Todo o aparelho pode ser
bloqueado com a tecla de
bloqueio ou a chave (8), a fim de
impedir operações não
intencionais. A função serve
ainda como segurança para as
crianças. Enquanto a função de
bloqueio estiver activa, a acção
nas teclas não tem qualquer
efeito, excepto a desactivação (1).
Desactivação de
segurança
Se uma ou mais zonas de
cozedura permanecerem
inadvertidamente acesas, o
sistema de controlo, decorrido
o tempo limite de
acendimento, desliga-as
automaticamente. Neste caso,
è visualizado o símbolo “H”.
Pré-aquecimento
automático
Esta função simplifica o
processo de cozedura, uma vez
que não é necessária a presença
humana durante todo o ciclo de
cozedura. A função determina
um pré-aquecimento da zona
de cozedura à potência
máxima, de modo a colocar
rapidamente a zona na
temperatura de regime.
Passado um certo período de
tempo, o nível de potência
regressa espontaneamente ao
nível programado.
Activação do pré-
aquecimento
automático
Seleccione a zona de cozedura
pretendida através da tecla (2).
Seleccione o nível de potência
9 com a tecla “+” (4) e prima
mais uma vez a tecla “+” (4),
para activar a modalidade de
pré-aquecimento (o símbolo
“A” acende-se no visor
correspondente).
17

IT GB FR
relativo). Per realizzare un
preriscaldamento con deriva
spontanea verso il livello di
potenza desiderato (ad esempio
(“6”) utilizzare il tasto “-” (4)
e portare la potenza a 6.
Terminata quest’ultima
operazione il sistema entrerà in
modalità di preriscaldamento
automatico ed il display
visualizzerà alternativamente
il livello di potenza impostato
(“6”) ed il simbolo di
preriscaldamento automatico
(“A”).
Disattivazione
della funzione
preriscaldamento
automatico
Una volta che la zona di
cottura è in preriscaldamento
(simbolo “A” mostrato sul
display) per disattivare tale
funzione occorre toccare il
tasto “-” (4) dopo almeno 10
secondi dall’attivazione.
Funzione Timer
Anche questa funzione
semplifica il processo di cottura
permettendo di fare a meno
della presenza umana durante
tutto il ciclo di cottura.
Impostato il timer, una volta
trascorso il tempo impostato, la
zona di cottura verrà spenta
automativamente. Se nessuna
zona viene esplicitamente
programmata, allora la
funzione timer funziona
semplicemente come
contaminuti (si veda il
capotolo specifico “funzione
timer come contaminuti”).
To preheat the unit with
spontaneous movement
towards the required
power level (e.g. “6”),
set the power to 6 by
means of the “-” key (4).
After the system has set
to automatic preheating
mode, the display panel
will alternate the set
power level (“6”) and
the automatic
preheating function (in-
dicated by the letter
“A”).
Switching off the
automatic
preheating func-
tion
To deactivate the
preheating function (in-
dicated by the letter “A”
on the display), press
the “-” key (4) at least 10
seconds since the func-
tion has been activated.
Timer function
This function too sim-
plifies operation by
not requiring human
supervision during
the cooking cycle.
Once the set time on
the timer has elapsed,
the cooking area is au-
tomatically switched
off. If no zone has
been programmed,
the timer simply oper-
ates as a minute coun-
ter (see the section
“Using the timer as a
minute counter”).
l’afficheur correspondant).
Pour un préchauffage avec
dérive spontanée vers le
niveau de puissance voulu
(par exemple, “6”), utiliser
la touche “-” (4) et porter
la puissance à 6. Une fois
cette opération terminée, le
système entrera en mode
préchauffage automatique
et l’afficheur montrera
alternativement le niveau
de puissance réglé (“6”) et
le symbole de préchauffage
automatique (“A”).
Désactivation de la
fonction de
préchauffage
automatique
Une fois que la zone de
cuisson est en préchauffage
(symbole “ A ” montré sur
l’afficheur), il faut toucher la
touche “-” (4) 10 secondes au
moins après l‘activation pour
désactiver cette fonction. Si
aucune zone n’est
manifestement programmée,
la fonction minuteur
fonctionne simplement comme
un compte-minutes (voir le
chapitre “ fonction minuteur
comme compte-minutes).
Fonction Minuteur
Cette fonction simplifie elle
aussi le processus de
cuisson en permettant de se
passer de la présence
humaine pendant tout le
cycle de cuisson. Lorsque le
minuteur est programmé, la
zone de cuisson s’éteint
automatiquement à
l’expiration du temps pro-
grammé. Si aucune zone
n’est explicitement
programmée, la fonction
minuteur fera simplement
office de compte-minutes
(voir le paragraphe
“ fonction minuteur comme
compte-minutes).
18

DE ES NL PT
Für das Ankochen mit
automatischem Zurück-
schalten auf die ge-
wünschte Fortkochstufe
(z. B. (“6”) benutzen Sie
die Taste “-” (4) und set-
zen die Leistungsstufe
auf 6. Nun führt das Sys-
tem die Anheiz-
automatikfunktion aus
und das Display zeigt ab-
wechselnd die eingestell-
te Heizstufe (“6”) und das
Symbol (“A”) für die An-
kochautomatik an.
Ausschalten der
Ankochautomatik
Zum Ausschalten der
Ankochautomatik
(Symbol “A” auf dem
Display) berühren Sie
die Taste “-” (4);
allerdings muss zwi-
schen Ein- und Aus-
schalten mindestens
10 Sekunden Zeit ver-
streichen.
Zeitschaltuhr
Auch diese Funktion
erleichtert das Kochen,
da Sie nicht mehr die
ganze Zeit am Herd
stehen müssen.
Nach Ablauf der auf
der Zeitschaltuhr ein-
gestellten Zeit wird
die Kochzone automa-
tisch abgeschaltet.
Wird keine Kochzone
programmiert, fun-
giert die Zeitschaltuhr
wie eine normale
Kücheuhr (siehe Kapi-
tel “Funktion Zeit-
schaltuhr als Küchen-
uhr”). Aktivierung der
Para obtener un
precalentamiento con
derivación espontánea hacia el
nivel de potencia elegido (por
ejemplo (“6”) se debe utilizar la
tecla “-” (4) y situar la potencia
en 6. Al concluirse esta última
operación el sistema entrará en
modalidad de precalentamiento
automático y en el display se
visualizará alternativamente el
nivel de potencia programado
(“6”) y el símbolo de
precalentamiento automático
(“A”).
Desactivación de la
función de
precalentamiento
automático
Una vez que la zona de
cocción ha quedado en
precalentamiento
(símbolo “A” en el dis-
play), para desactivar
esta función se debe pul-
sar la tecla “-” (4)
después de al menos 10
segundos a contar de la
activación.
Función Temporizador
También esta función
simplifica el proceso de
cocción ya que permite
ejecutar un ciclo completo
de cocción sin presencia
humana. Una vez
transcurrido el tiempo
programado mediante el
temporizador, la zona de
cocción será apagada de
modo automático. En
caso de no programarse
explícitamente ninguna
zona, la función
temporizador opera
simplemente como
cuentaminutos (véase el
respectivo capítulo
“función temporizador
como cuentaminutos”).
Druk voor een
voorverwarming met
spontane terugkeer naar het
gewenste vermogensniveau
(bijvoorbeeld “6”) op de
toets “-” (4) en breng het
vermogen op 6. Na deze
laatste handeling
treedt de boosterfunctie in
werking en op het display
worden afwisselend het
ingestelde vermogens-
niveau (“6”) en het symbool
van de boosterfunctie
(“A”) weergegeven.
Uitschakelen van
de boosterfunctie
Om de boosterfunctie
van de kookplaat tijdens
de werking (het symbool
“A” wordt op het dis-
play weergegeven) uit te
schakelen, moet
minstens 10 seconden na
de inschakeling op de
toets “-” (4) worden
gedrukt.
Timerfunctie
Ook deze functie
maakt het kookproces
eenvoudiger, omdat
tijdens de hele
kookcyclus geen per-
sonen aanwezig
hoeven te zijn. Als de
timer de ingestelde
tijd bereikt, wordt de
kookzone automatisch
uitgeschakeld. Als
geen enkele zone
uitdrukkelijk wordt
geprogrammeerd,
werkt de timerfunctie
eenvoudig als
kookwekker (zie het
specifieke hoofdstuk
“timerfunctie als
kookwekker”).
Para realizar um pré-
aquecimento com regresso
automático ao nível de
potência desejado (por
exemplo (“6”), utilize a tecla
“-” (4) e coloque a potência
em 6.
Terminada esta última
operação, o sistema entra no
modo de pré-aquecimento
automático e o visor mostra
alternadamente o nível de
potência programado (“6”) e
o símbolo de pré-aquecimento
automático (“A”).
Desactivação da
função de pré-
aquecimento
automático
Quando a zona de
cozedura está em pré-
aquecimento (símbolo
“A” no visor), para
desactivar essa função
basta premir a tecla “-”
(4) pelo menos 10
segundos após a
activação.
Função Temporizador
Também esta função
simplifica o processo de
cozedura, permitindo
prescindir ao máximo da
presença humana durante
todo o ciclo de cozedura.
Programado o
temporizador e decorrido
o tempo definido, a zona
de cozedura desliga-se
automaticamente. Se
nenhuma zona for
explicitamente
programada, a função do
temporizador funcionará
simplesmente como
conta-minutos (consulte
o capítulo correspondente
“função temporizador
como conta-minutos”).
19

IT GB FR
Attivazione della
funione timer:
1 - La zona di cottura deve
essere attivata, ossia il
punto decimale (12)
relativo alla zona in
questione deve essere
acceso;
2 -Selezionare, se già non lo
si è fatto, un livello di
potenza compreso tra 1 e 9;
3 -Toccare il tasto timer (6): il
display del timer
visualizza “00” e la spia
(10), corrispondente alla
zona da programmare
s’illumina;
4 -Selezionare il tempo di
cottura (da 0 a 99 minuti)
per mezzo dei tasti “+” e
“-” (4). La funzione timer
si avvia automaticamente
entro pochi secondi.
Tenendo costantemente
premuto il tasto “+” o “-”
(4) è possibile impostare
rapidamente il tempo di
cottura. La funzione timer
si applica alla zona di
cottura selezionata.
Spegnimento
rapido della zona
di cottura e del
timer relativo:
Toccando simultaneamente i
tasti “+” e “-” (4) la zona di
cottura viene spenta
immediatamente. In tal
modo viene anche disattivata
la funzione timer.
La funzione Timer
usata come
contaminuti
Se la funzione non viene
utilizzata per una zona
di cottura specifica, essa
può essere impiegata
come contaminuti. In tal
modo, quando scatta il
contaminuti la zona di
cottura non viene spenta.
Using the timer
function
1. The cooking area
must already be acti-
vated with relative
decimal point (12) il-
luminated.
2. Select a power level
between 1 and 9.
3. Press the timer key
(6); the timer display
shows “00” and the
indicator (10) relative
to the zone being pro-
grammed lights up.
4. Select the cooking
time (between 0 to 99
minutes) by means of
the “+” and “-” keys
(4). The timer will
start up automatically
in a few seconds.
Press and hold down
the “+” or “-” key (4)
to scroll the time set-
ting. Note that the
timer function applies
to the selected cook-
ing area only.
Rapid shutdown of
the cooking area
and relative timer
Press the “+” and “-” keys
(4) at the same time to shut
down the relative cooking
area immediately. Note
that the timer function will
also be deactivated.
Using the timer as
a minute counter
When the timer function
is not programmed, the
timer display can be
used simply to count
down minutes (i.e. when
the displayed time
elapses, the cooking area
is not deactivated).
Activation de la
fonction minuteur :
1- La zone de cuisson doit être
activée, à savoir que le point
décimal (12) relatif à la zone
en question doit être allumé.
2- Sélectionner, si cela n’a pas
été déjà fait, un niveau de
puissance compris entre 1 et
9.
3- Toucher la touche minuteur
(6) ; l’afficheur du minuteur
indique “ 00 ” et le témoin
(10) correspondant à la zone
à programmer s’allume.
4- Sélectionner le temps de
cuisson (de 0 à 99 minutes)
à l’aide des touches “+” et
“-” (4). La fonction
minuteur démarre
automatiquement en
l’espace de quelques secon-
des. En appuyant
constamment sur la touche
“+” ou “-” (4), il est possi-
ble de régler rapidement le
temps de cuisson. La
fonction minuteur
s’applique à la zone de cuis-
son sélectionnée.
Arrêt rapide de la
zone de cuisson et du
minuteur respectif :
En touchant simultanément
les touches “+” et “-” (4),
la zone de cuisson s’éteint
immédiatement. La fonction
minuteur se désactive
également ainsi.
La fonction Minuteur
utilisée comme
compte-minutes
Si la fonction n’est pas
utilisée pour une zone de
cuisson spécifique, elle
peut être utilisée comme
compte-minutes. Ainsi,
lorsque le compte-minutes
se déclenche, la zone de
cuisson ne s’éteint pas.
20
La pagina si sta caricando...
La pagina si sta caricando...
La pagina si sta caricando...
La pagina si sta caricando...
La pagina si sta caricando...
La pagina si sta caricando...
La pagina si sta caricando...
La pagina si sta caricando...
La pagina si sta caricando...
La pagina si sta caricando...
La pagina si sta caricando...
La pagina si sta caricando...
La pagina si sta caricando...
La pagina si sta caricando...
La pagina si sta caricando...
La pagina si sta caricando...
-
 1
1
-
 2
2
-
 3
3
-
 4
4
-
 5
5
-
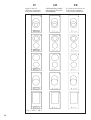 6
6
-
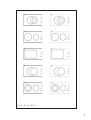 7
7
-
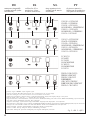 8
8
-
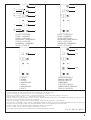 9
9
-
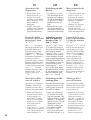 10
10
-
 11
11
-
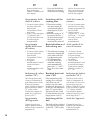 12
12
-
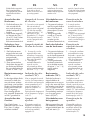 13
13
-
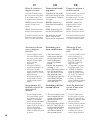 14
14
-
 15
15
-
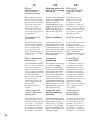 16
16
-
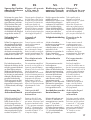 17
17
-
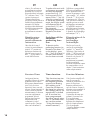 18
18
-
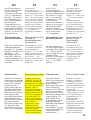 19
19
-
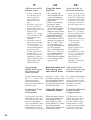 20
20
-
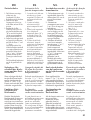 21
21
-
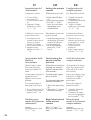 22
22
-
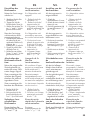 23
23
-
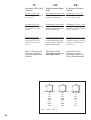 24
24
-
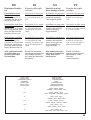 25
25
-
 26
26
-
 27
27
-
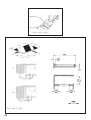 28
28
-
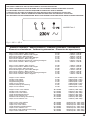 29
29
-
 30
30
-
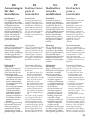 31
31
-
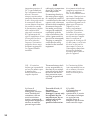 32
32
-
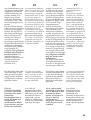 33
33
-
 34
34
-
 35
35
-
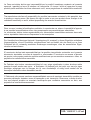 36
36


Candy CDH32/1C Manuale utente
- Categoria
- Piani cottura
- Tipo
- Manuale utente
- Questo manuale è adatto anche per
Documenti correlati
Altri documenti
-
Groupe Brandt 2MFT-2S Manuale del proprietario
-
Whirlpool B 20 L 2 VTC F Manuale del proprietario
-
ROSIERES RDH32 Manuale del proprietario
-
Omega OC95TXA Manuale utente
-
Franke FRSM 603 C TD Manuale utente
-
-
Cata TF 2003 SD Manuale utente
-