SWITEL DFT157x Operating Instructions Manual
- Categoria
- Smartwatch
- Tipo
- Operating Instructions Manual

Low−radiation cordless DECT/GAP telephone
with answering machine
Operating Intructions
DFT157x

Safety Information
2
1 Safety Information
Please read this operating instruction manual thoroughly.
Intended use
The telephone is suitable for telephoning within a public telephone network system. Any
other use is considered unintended use. Unauthorised modification or reconstruction is not
permitted. Under no circumstances open the device or complete any repair work yourself.
Installation location
Prevent excessive exposure to smoke, dust, vibration, chemicals, moisture, heat and direct
sunlight.
Do not use the handset in potentially explosive areas.
Power adapter plug
Attention: Only use the power adapter plug supplied because other power sup-
plies could damage the telephone. Ensure access to the power adapter plug is
not obstructed by furniture or such.
Rechargeable battery pack
Attention: Never throw batteries into a fire. Only use batteries of the same type.
Pay attention to correct polarity. Incorrect polarity of the batteries represents a
risk of explosion during charging.
Power failure
The telephone cannot be used to make calls in the event of a power failure. Always keep a
wired telephone which operates without an external power supply available in case of
emergency situations.
Medical equipment
Attention: Never use the telephone in the vicinity of medical equipment. Effects
on such equipment cannot be fully ruled out.
DECT
1
telephones can cause an unpleasant humming sound in hearing aids.
1
DECT: Digital Enhanced Cordless Telecommunication = Standard for cordless telepho-
nes.

1
Preparing the Telephone
3
Disposal
In order to dispose of your device, take it to a collection point provided by your
local public waste authorities (e.g. recycling centre). According to laws on the
disposal of electronic and electrical devices, owners are obliged to dispose of old
electronic and electrical devices in a separate waste container. The adjacent
symbol indicates that the device must not be disposed of in normal domestic
waste!
Risks to health and the environment from batteries!
Never open, damage or swallow batteries or allow them to pollute the envi-
ronment. They could contain toxic and ecologically harmful heavy metals.
You are legally obliged to dispose of power packs and batteries at the point
of sale or in the corresponding containers provided at collection points by
local public waste authorities. Disposal is free of charge. The above sym-
bols indicate that the batteries must not be disposed of in domestic waste
and that they must be disposed of at an authorised collection point.
Packaging materials must be disposed of according to local regulations.
2 Preparing the Telephone
Safety information
Attention: It is essential to read the Safety Information in Chapter 1 before start-
ing up.
Checking the package contents
The package contains:
Content
Model DFT157x
1571 1572
1
1573
1
1574
1
Base station with power adapter plug 1 1 1 1
Charging station with power adapter plug − 1 2 3
Handset 1 2 3 4
Telephone connection cable 1 1 1 1
Rechargeable battery pack 1 2 3 4
Operating instructions 1 1 1 1
1
Visit www.switel.com to find out whether the telephone/telephone set is already available.

Preparing the Telephone
4
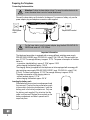
Connecting the base station
Attention: Position the base station at least 1 m away from other electronic de-
vices, otherwise there is a risk of mutual disturbance.
Connect the base station as illustrated in the diagram. For reasons of safety, only use the
power adapter plug and telephone connection cable supplied.
Mains power
outlet
Telephone line socket
For the base station, use the power adapter plug labelled SSA−5AP−09 EU
060050 and rated at 6 V DC, 500mA.
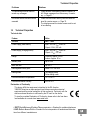
Important information
The telephone base station is equipped with an energy−efficient switching power supply
SSA−5AP−09 EU 060050 (input 100~240 V
AC
, output 6 V
DC
, 500 mA). The zero load is ap-
prox. 0.11 W. The average efficiency is approx. 72.7%. The power consumption of the base
station is:
− in operation (standby/talking): approx. 0.74 W, approx. 0.9 W
− when charging the handset: approx. 1.24 W
The charging station(s) supplied with the telephone set is/are equipped with an energy−effi-
cient switching power supply SSA−5AP−09 EU 060021 (input 100~240 V
AC
, output 6 V
DC
,
210 mA). The zero load is approx. 0.11 W. The average efficiency is approx. 65.2%.
The power consumption of the charging station is:
− without handset: approx. 0.11 W
− when charging the handset: approx. 0.4 W
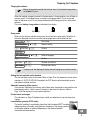
Inserting the battery pack
Slide the battery compartment cover downwards and
then remove it. Connect the plug on the battery pack
in the socket in the battery compartment. Insert the
battery pack in the battery compartment. Only use
the battery pack supplied. Pay attention that the
cable is not jammed. Replace the cover back on the
battery compartment and slide it upwards until it
snaps into place.

2
Preparing the Telephone
5
Charging the batteries
Before the handset is used for the first time, insert it in the base/charging station
for at least 15 hours.
When the handset is properly inserted in the base station / charging station, you will hear an
acoustic signal. The handset warms up during the charging process. This is normal and
does not represent a risk. Do not charge the handset with charging units from other manu-
facturers.
The current battery charge status is indicated in the display:
Full Half empty Low Empty
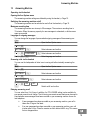
Setup mode
When you first start up and after every reset, the unit will be in setup mode. Follow the in-
structions displayed to choose a country and language and to set the date and time.
WELCOME G Start Setup
SET COUNTRY K/L Select a country
G,
CONFIRM? G Confirm
WAITING...
SET LANGUAGE K/L Select a language
G Confirm
Set Date Ë G Set date and confirm
SET TIME Ë G Set time and confirm
In setup mode, the language of display texts will change as you select a country.
Setting the time and date on the handset
The time and date are set via the menu. Refer to Page 14 for the sequence of menu option
selections. If AUTO CLOCK ADJ is enabled, the CLIP function will automatically receive
and update both date and time.
Automatic answering (Auto answer)
If this function is activated, an incoming call is taken when the handset is removed from the
base/charging station. Use the menu to activate or deactivate this function. Refer to
Page 14 for the sequence of menu option selections.
Private branch exchanges
The information on Page 16 explains how to install your telephone in a private branch ex-
change.
Low−radiation operation (ECO mode)
The level of radiation is considerably lower than that of standard DECT cordless
telephones when in Standby mode (when the handset is in the charging station).
In talk mode, radiation is reduced (depending on the distance between
the handset and base station).

Operating Elements
6
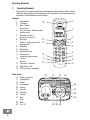
3 Operating Elements
The buttons in this operating manual are subsequently depicted with a uniform contour.
Therefore, slight deviations in the appearance of the symbols on the telephone buttons
compared to those depicted here are possible.
Handset
1 Loudspeaker
2 LC display
3 Back / delete /
internal calls
4 On−hook button / Standby mode /
handset on/off
5 Navigation buttons /
phone book / calls list
6 Digit keys
7 # button / ringing tone on/off /
dialling pause
8 Redialling
9 Microphone
10 Handsfree button
11 Muting button /
answering machine menu
12 * button
Key lock
13 Call button / R−button
14 Menu button / OK
15 LED: new calls / messages
Base station
16 Charging contacts
17 Paging button
18 Delete
19 Loudspeaker
20 Display
21 Volume +
22 Forwards
23 Volume −
24 Play /
Stop
25 Back
26 On / Off
2
1
3
4
5
6
7
8
9
10
11
12
13
14
15
23
22
16
17
18 19
20
21
2526
24

3
Preliminary Information
7
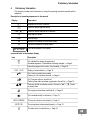
4 Preliminary Information
This chapter provides basic information on using the operating instruction manual and the
telephone.
Description of operating sequences in the manual
Display Description
e Displays the contour of buttons
g Press the button depicted briefly
3 sec. # Press the button depicted for 3 seconds
ë Enter digits or letters
{í} Handset rings
è Remove the handset from the base station
é Place the handset in the base station
BS SETTINGS
Texts which appear in the display
Icons and texts in the handset display
Icon Description
v
On: Indicates the battery charge status.
Animated segments: The batteries are being charged; Page 5.
1 Internally assigned call number of the handset; Page 18.
12:03 01/01 Display of time and date; Page 14.
q
On: A call is currently being made.
Flashing: A call has been received; Page 11.
u
On: There are calls on the calls list.
Flashing: New calls have been registered in the call list; Page 10.
XY
There are further items/menu options. Press the K / L button
to display them.
S
The ringing tone has been switched off; Page 13.
r
The handsfree facility is activated; Page 13.
KEYS LOCKED
The key lock function is activated; Page 13.
MUTE ON
The microphone is deactivated (muted); Page 13.
w
The alarm clock is switched on; Page 14.

4
5
6
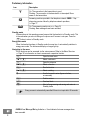
Preliminary Information
8
Icon Description
P
On: The connection to the base station is good.
Flashing: The connection to the base station is interrupted. Move
nearer to the base station.
t
Answering machine provided in the telephone network. VMWI
1
− Sup-
plementary service offered by telephone network providers;
Page 17.
z
On: The answering machine is on Page 19.
Flashing: New messages have been recorded.
Standby mode
All descriptions in this operating manual assume that the handset is in Standby mode. This
is the case when you are not talking on the phone and if a menu is not open. Press the
F button to return to Standby mode.
Energy−save mode
When the handset has been in Standby mode for some time, it automatically switches to
energy−save mode. The buttons and display no longer light up.
Navigating in the menu
All the functions can be accessed via the various menus. Refer to the Menu Structure
Page 14 for information on how to access each respective function.
G Open the main menu
K / L Select a submenu
g Open the submenu
K / L Select a function
G Run the function
K / L Select a setting
ë Use the keypad to enter figures or letters,
as necessary
G Confirm entries
H One level back
F Abort all programming and saving and return to
Standby mode
Every process is automatically cancelled if there is no input within 30 seconds.
1
VMWI: Visual Message Waiting Indication = Visual indicator that new messages have
been recorded.

7
Phone Book
9
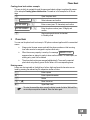
Creating phone book entries − example
The way in which to navigate through the menus and select settings is explained by means
of the example Creating phone book entries. Proceed as in this example for all the set-
tings.
I Open the phone book
g
NEW ENTRY
, G Select submenu and confirm
ENTER NAME
, G Enter a name (max. 12 characters) and confirm
ENTER NUMBER
, G Enter the phone number (max. 24 digits) and
confirm
F Aborts saving and returns the handset
to Standby mode
5 Phone Book
You can use the phone book to store up to 100 phone numbers together with the associated
names.
Always enter the area access code with the phone numbers so that incoming
local calls can also be assigned to a phone book entry.
When the memory capacity is used up, the message
MEMORY FULL!
appears when an attempt is made to store another number. To create space, an
existing entry must first be deleted.
The phone book entries are arranged alphabetically. To access the required
phone book entry directly, press the first letters of the corresponding name.
Entering names
Letters are also imprinted on the digit keys. Letters, digits and special characters are en-
tered by pressing the relevant key the respective number of times.
1 Enter a space
0 Enter a special character
H Delete
I / J Move the cursor
# Upper/lower case
To enter the same letter twice, press the button to enter the letter. Wait until the
cursor skips one position forwards. Enter the letter again.

8
9
Calls List
10
Editing phone book entries
I Open the phone book
K / L Select an entry
G Open the menu
K/L
EDIT ENTRY
, G Select submenu and confirm
ENTER NAME
, G Edit the name (max. 12 characters) and confirm
ENTER NUMBER
, G Edit the phone number (max. 24 digits) and
confirm
Deleting phone book entries
Deleting a single entry
I Open the phone book
K / L Select an entry
G Open the menu
K/L
DELETE
, G Select submenu and confirm
CONFIRM? , G or H Confirm or cancel deletion
Deleting all entries
I Open the phone book
G Open the menu
K/L
DELETE ALL
, G Select the submenu and confirm
CONFIRM? , G or H Confirm or cancel deletion
6 Calls List
A total of 30 phone numbers are stored in a calls list.
The caller number display (CLIP
1
) is a supplementary service offered by your
telephone network provider. The caller’s number appears in the display if the ser-
vice is offered by your telephone network provider. Contact your network pro-
vider for further information.
Displaying numbers in the calls list
J Open the calls list
K / L Select an entry
1
CLIP: Calling Line Identification Presentation = Displays the caller’s phone number.

10
Telephoning
11
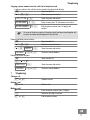
Copying a phone number from the calls list to the phone book
A phone number in the calls list can be stored in the phone book directly.
J Open the calls list
K / L, G Select an entry and confirm
COPY TO PB , G Open the menu and confirm
ENTER NAME
, G Enter a name (max. 12 characters) and confirm
ENTER NUMBER
, G Edit the phone number (max. 24 digits) and
confirm
As soon as the phone number in the phone book has been saved together with
a name, the name entered appears in the calls list.
Deleting individual phone numbers
J Open the calls list
K / L, G Select an entry and confirm
K/L
DELETE
, G Open the menu and confirm
CONFIRM? , G or H Confirm or cancel deletion
Deleting all phone numbers
J Open the calls list
G, K / L
DELETE ALL
, G Open the menu and confirm
CONFIRM? , G or H Confirm or cancel deletion
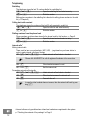
7 Telephoning
Taking a call
E or C Answers the call
Ending a call
F or É Ends the call
Making a call
ë Enter the phone number (max. 24 digits)
H Delete the last digit if incorrect
E or C Dial the phone number

11
Telephoning
12
Redialling
The telephone stores the last 10 numbers dialled in a redialling list.
D, K / L Open the redialling list and select an entry
E or C Dials the number
Editing phone numbers in the redialling list is identical to editing phone numbers in the calls
list ( Chapter 6).
Calling back calls received
The telephone stores the numbers of the last 30 calls received in a calls list.
J, K / L Open the calls list and select an entry
E or C Dials the number
Dialling numbers from the phone book
Phone numbers must have been stored in the phone book for this function; Page 9.
I, K / L Open the phone book and select an entry
E or C Dials the number
Internal calls
1
Making internal calls
There must be two or more handsets (HS1, HS2, ...) registered on your base station in
order to make internal calls free of charge.
HS1: h, K / L G Initiate internal call and select a handset
Choose ALL HANDSETS to call all registered handsets at the same time.
HS2: E Other handset answers the call
HS1 / HS2: F End the internal call
Forwarding external calls internally
HS1: H, K / L G Initiate internal call and select a handset
HS2: E Other handset answers the internal call
HS1: F Forwards the call
In case the other handset does not answer, take the external call back by pres-
sing H.
1
Internal calls are only possible when at least two handsets are registered in the system
Checking the contents of the package" on Page 3.

12
13
14
15
Telephoning
13
Holding a call / brokering
While a call is in progress, it is possible to dial another handset in order to consult with
someone. The external caller is put on hold while you converse with the second, internal
person called. You can repeat this procedure as often as required.
HS1: H, K / L G Initiate internal call and select a handset
HS2: E Other handset answers the internal call
HS1: H Switch between callers
Making conference calls
An external call can be transferred to another internal handset for a conference call. This re-
quires the CONFERENCE option to be enabled in the menu Page 15.
HS1: H, K / L G Initiate internal call and select a handset
HS2: e Other handset answers internal call
HS1: 3 sec. H Start conference
HS1 / HS2: F End the conference
Setting the receiver volume
The volume can be adjusted to one of 5 levels during a call.
K or L Select a volume
Displaying the duration of a call
The duration of the call you are making is shown on the display.
Handsfree
This function is used to listen to the caller via the loudspeaker.
C Activate handsfree talking
C Deactivate handsfree talking
Muting the handset microphone
The microphone in the handset can be turned off / on while making a call.
A Turns off (mutes) the microphone
a Turns on the microphone
Key lock
The key lock feature prevents functions assigned to buttons being activated accidentally.
3 sec. * Activate the key lock function
3 sec. * Deactivate the key lock function
Ringing melody of the handset
The handset’s ringing melody can be turned off.
3 sec. # Switch off the ringing tone
3 sec. # Switch on the ringing tone

16
17
Menu Structure
14
Searching for the handset (Paging)
If you have mislaid your handset, you can sound a paging tone to find it.
At the base station %, Start the paging tone
% or F Stop the paging tone
Switching the handset off and on
You can switch the handset off to save the batteries.
3 sec. F Switch off the handset
3 sec. F Switch on the handset
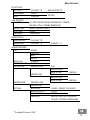
8 Menu Structure
Main menu
Press G to display the main menu. Then press K / L to select an entry and
G to confirm. Further information on the menu and operation: Chapter 4.
HS SETTINGS
HANDSET NAME
ENTER NAME Ë
HANDSET TONES
RING VOLUME LEVEL 1 − 5, OFF
RING TONES MELODY 1 − 7
KEY BEEP ON/OFF
RANGE TONE ON/OFF
BATTERY TONE ON/OFF
CHARGE TONE ON/OFF
LANGUAGE
ENGLISH / DEUTSCH / FRANCAIS/
ITALIANO / ESPAÑOL/ NEDERLANDS
AUTO ANSWER ON/OFF
VOICEMAIL
ENTER NUMBER
CLOCK & ALARM
SET DATE&TIME SET DATE SET TIME
SET FORMAT
TIME FORMAT 12 HOURS
24 HOURS
DATE FORMAT DD/MM / MM/DD
ALARM OFF
ONCE SET TIME
DAILY SET TIME
ALARM TONE MELODY 1−7
AUTO CLOCK ADJ ON/OFF

18
19
Menu Structure
15
BS SETTINGS
PIN CODE
PIN CODE
1
NEW PIN CODE
CONFERENCE
ON/OFF
RESET CONFIRM?
WAITING...
LINE SETTINGS
COUNTRY UK / ÉIRE / DEUTSCHLAND/ SWITZERLAND / FRANCE /
BELGIUM / ITALIA / ESPAÑA/ NEDERLAND
RECALL TIME
SHORT / MEDIUM / LONG
FIRST RING ON/OFF
DIAL MODE TONE/PULSE
REGISTRATION
REGISTRATION
PIN CODE
1
UNREGISTER
PIN CODE
1
HANDSET 1 − 5
ANSWER MACHINE
PLAY REPEAT
PREVIOUS
NEXT
DELETE
DELETE ALL CONFIRM?
ANSWER ON/OFF ON/OFF
RECORD OGM ANSWER & REC. PLAY
RECORD OGM
DELETE OGM
CONFIRM?
ANSWER ONLY PLAY
RECORD OGM
DELETE OGM
CONFIRM?
ANSWER MODE
ANSWER & REC.
ANSWER ONLY
SETTINGS RING DELAY 3 RINGS − 8 RINGS, TOLL SAVER
REMOTE ACCESS ON/OFF
CALL SCREEN ON/OFF
LANGUAGE ENGLISH / DEUTSCH / FRANCAIS /
ITALIANO / ESPAÑOL/ NEDERLANDS
1
The default PIN code is 0000".

Special Functions
16
Phone book I
NEW ENTRY
ENTER NAME ENTER NUMBER
EDIT ENTRY
ENTER NAME ENTER NUMBER
DELETE CONFIRM?
DELETE ALL CONFIRM?
Calls list J, Redialling D
COPY TO PB
ENTER NAME ENTER NUMBER
DELETE
CONFIRM?
DELETE ALL CONFIRM?
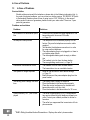
9 Special Functions
Dialling mode
Your telephone supports both analogue branch exchanges (PULSE) and the new digital
branch exchanges (TONE). The dialling mode is controlled via the menu. Refer to Page 15
for the sequence of menu option selections.
First ring (FIRST RING)
If this function is enabled, your telephone will ring before the CLIP details are transferred.
Refer to Page 15 for the sequence of menu option selections.
Alarm clock
The Alarm clock" function can be used so that you are alerted by the handset at a specific
time.
10 PABX Systems / Supplementary Services
R−functions on private branch exchanges
If your telephone is connected to a private branch exchange (PABX), functions such as call
forwarding or automatic call back can be used via the E button. Refer to the operating
manual provided with your private branch exchange as to which Flash time must be set in
order to use these functions. The sales outlet where you purchased the exchange can pro-
vide information as to whether the telephone will work properly with the exchange. The
Flash time is set using the menu. Refer to Page 15 for the sequence of menu option selec-
tions.
R−functions and supplementary services
Your telephone supports supplementary services provided by your telephone network pro-
vider, such as brokering or conference calls. Press the E button to use these supple-
mentary services. Please contact your telephone network provider regarding which Flash
time must be set to use the supplementary services. Also contact your telephone network
provider with regard to enabling supplementary services. The Flash time is set using the
menu. Refer to Page 15 for the sequence of menu option selections.

20
PABX Systems / Supplementary Services
17
Dialling pause
When using private branch exchanges, it is necessary to dial an access code to obtain the
dialling tone for an outside line. When using some older private branch exchanges, it takes
a little time before the dialling tone becomes audible. In the case of such private branch ex-
changes, a dialling pause can be inserted after the number for an outside line in order to
continue dialling directly without having to wait for the dialling tone.
3 sec. # Insert a dialling pause
The actual phone number is dialled a certain time after the number for an outside line.
The dialling pause can also be entered with the phone numbers in the phone
book.
Caller number display (CLIP
1
)
The caller number display (CLIP) is a supplementary service offered by your
telephone network provider. Contact your network provider for further informa-
tion.
If this function is available with your telephone line, the number of the caller appears in the
display when the phone rings. If the caller has suppressed transmission of their phone num-
ber, the corresponding message appears in the display. The phone number is not displayed
and, as a result, is not stored in the calls list.
Answering machine in the telephone network
An answering machine in the telephone network is a supplementary service offered by
many telephone network providers. If your telephone network provider offers an answering
machine in the telephone network for you, an icon on the display informs you of new mess-
ages received (VMWI
2
). This function can only be used when your telephone network pro-
vider actually offers the service. Contact your network provider for further information.
1
CLIP: Calling Line Identification Presentation = Displays the caller’s phone number.
2
VMWI: Visual Message Waiting Indication = Visual indicator that new messages have
been recorded.

Extending the Telephone System
18
11 Extending the Telephone System
The internationally approved GAP
1
standard regulates the compatibility of handsets and
base stations from different manufacturers. As a result, it is possible to integrate SWITEL
devices and devices from other manufacturers together in one telephone system. It is poss-
ible, however, that some functions are not available.
Multiple handsets
Up to 5 handsets can be registered on the base station.
Registering handsets
Before starting to register a handset, switch the base station to Registration mode.
5 sec. % Enable Registration mode
Now register the handset Page 15. The currently valid PIN code is used for registration
purposes; Page 15.
The handset is automatically assigned an internal call number following registration. The in-
ternal call number appears in the display.
To register handsets from other manufacturers, please refer to the operating
manual supplied with them.
Deregistering handsets
Each handset can deregister itself and other handsets registered on the base
station. Following deregistration, SEARCHING... will be displayed by the dere-
gistered handset.
Handsets are deregistered via the menu. Refer to Page 15 for the sequence of menu option
selections.
1
GAP: Generic Access Profile = Standard for the interoperation of handsets and base
stations from different manufacturers.

21
Answering Machine
19
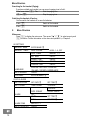
12 Answering Machine
Operating via the handset
Opening the Ans System menu
The answering machine settings are defined by using the handset, Page 15.
Switching the answering machine on/off
The answering machine can be switched on and off via the handset Page 15.
Maximum recording time
The answering machine can store up to 59 messages. The maximum recording time is
15 minutes. When the memory capacity for new messages is exhausted, no further mess-
ages are recorded.
Language of outgoing messages
You can change the language of pre−recorded outgoing messages of the answering ma-
chine.
A Open the Ans System menu
K / L
SETTINGS
, G Select submenu and confirm
K / L
LANGUAGE
, G Select submenu and confirm
K / L, G Select language and confirm
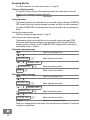
Screening calls via the handset
You can use the loudspeaker to listen to an incoming call without actually answering the
call.
A Open the Ans System menu
K / L
SETTINGS
, G Select submenu and confirm
K / L
CALL SCREEN
, G Select submenu and confirm
K / L
ON
/
OFF
,
G Switch on/off and confirm
Delaying answering a call
You can select from 3 to 8 rings. In addition, the TOLL SAVER setting is also available for
pre−remote access free of charge. The toll−saving pre−remote access feature can be used to
check whether new messages have been received on your answering machine from a dis-
tant telephone.
If new messages have been recorded on your answering machine, your call is
taken after 2 rings at the latest.
If no new messages have been recorded on your answering machine, your call
is taken after 6 rings. Place the receiver on−hook before the 6th ring. This means
that no charges ensue.

Answering Machine
20
For further information on remote access, refer to Page 22.
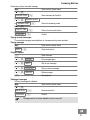
Taking a call being recorded
It is possible to take a call even if the answering machine has already begun to record it.
Recording of the message is stopped in this case.
E Take the call
Answering modes
The answering machine is provided with two, pre−recorded outgoing messages. ANSWER &
REC. means that after the outgoing message has played, the caller can leave a message. If
you select ANSWER ONLY, the message played is purely informative and no message can
be left.
Selecting the answering mode
Select the outgoing message required Page 15.
Recording your own outgoing message
The answering machine is provided with two, pre−recorded outgoing messages (OGM).
Both pre−recorded outgoing messages can be replaced by ones of your own. When the
answering machine’s memory is full, the ANSWER ONLY message without recording is
automatically played; Page 15.
Playing the outgoing message
A Open the Ans System menu
K / L
RECORD OGM
, G Select submenu and confirm
K / L
ANSWER & REC.
or
ANSWER ONLY
, G Select the answering mode
PLAY
, G Select a function and confirm
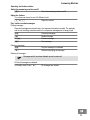
Recording outgoing messages
A Open the Ans System menu
K / L
RECORD OGM
, G Select submenu and confirm
K / L
ANSWER & REC.
or
ANSWER ONLY
, G Select the answering mode
K / L
RECORD OGM
, G Select a function and confirm
Ð, G Speak your message and confirm
Speak your message clearly and precisely in the microphone on the handset. On ending the
message, it is played back.
La pagina si sta caricando...
La pagina si sta caricando...
La pagina si sta caricando...
La pagina si sta caricando...
La pagina si sta caricando...
La pagina si sta caricando...
La pagina si sta caricando...
La pagina si sta caricando...
-
 1
1
-
 2
2
-
 3
3
-
 4
4
-
 5
5
-
 6
6
-
 7
7
-
 8
8
-
 9
9
-
 10
10
-
 11
11
-
 12
12
-
 13
13
-
 14
14
-
 15
15
-
 16
16
-
 17
17
-
 18
18
-
 19
19
-
 20
20
-
 21
21
-
 22
22
-
 23
23
-
 24
24
-
 25
25
-
 26
26
-
 27
27
-
 28
28


SWITEL DFT157x Operating Instructions Manual
- Categoria
- Smartwatch
- Tipo
- Operating Instructions Manual
in altre lingue
- English: SWITEL DFT157x
Documenti correlati
-
SWITEL DFT9271 Manuale del proprietario
-
SWITEL DFT9971 Manuale del proprietario
-
-
SWITEL DF921 Manuale del proprietario
-
-
-
SWITEL Vita DCT 5007x Combo Manuale utente
-
-
SWITEL DCT7071 Manuale del proprietario
-