
Senior Phone
GSP-110
www.facebook.com/denverelectronics
User Guide
English, Deutsch, Dansk,
Suomalainen, Svenska,
Français, Nederlands,
Español, Italiano


English-1
Start to Use-----------------------------------------------2
Put in/Take out battery------------------------------2
Insert/Take out SIM card---------------------------5
Battery Charging-------------------------------------6
Your Phone------------------------------------------------8
Stand by Mode------------------------------------- 8
Key Functions----------------------------------------11
Voice Dial-------------------------------------------------13
Emergency Dial-------------------------------------13
Make an International Call--------
----------------15
Dial extension No. of a Fixed line---------------15
Speed Dial--------------------------------------------16

English-2
Start to Use
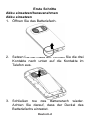
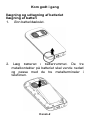
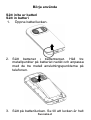
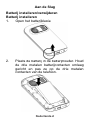
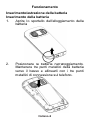
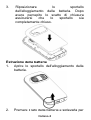
Put in/Take out battery
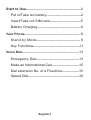
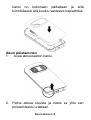
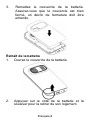
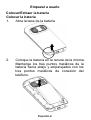
Put in battery
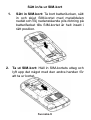
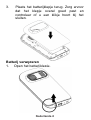
1. Open the battery cover
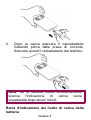
2. Put battery into the battery slot. Keep three
metal points of battery facing downward and
matching with the three metal connection
points on phone.

English-3
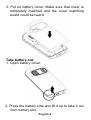
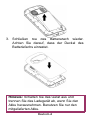
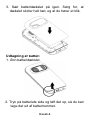
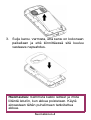
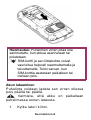
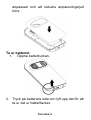
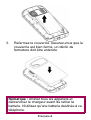
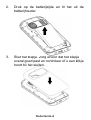
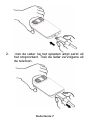
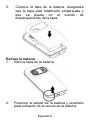
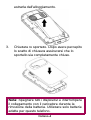
3. Put on battery cover. Make sure that cover is
completely matched and the cover matching
sound could be heard.
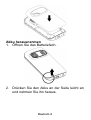
Take battery out
1. Open battery cover.
2. Press the battery side and lift it up to take it out
from battery slot.

English-4
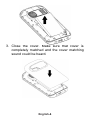
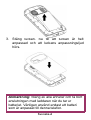
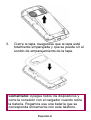
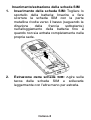
3. Close the cover. Make sure that cover is
completely matched and the cover matching
sound could be heard.

English-5
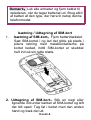
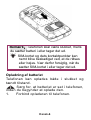
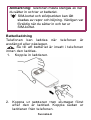
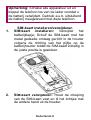
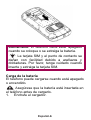
Remark:Shut down all devices and cut the
connection with charger when removing
battery. Please use battery which is matched
with this phone only.
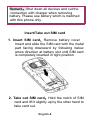
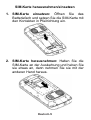
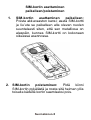
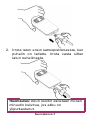
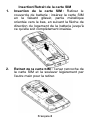
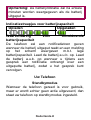
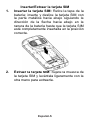
Insert/Take out SIM card
1. Insert SIM card:
Remove battery cover;
Insert and slide the SIM card with the metal
part facing downward by following below
arrow direction at battery slot until SIM card
is completely inserted in right position.
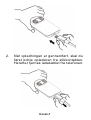
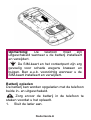
2. Take out SIM card:
Hold the notch of SIM
card and lift it slightly up by the other hand to
take card out.

English-6
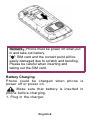
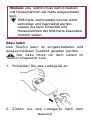
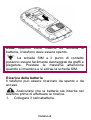
Remark:Phone must be power off when put
in and take out battery.
SIM card and the contact point will be
easily damaged due to scratch and bending.
Please be careful when inserting and
taking out the SIM card.
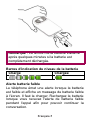
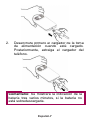
Battery Charging
Phone could be charged when phone is
power off or power on.
Make sure that battery is inserted in
phone before charging.
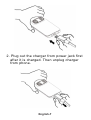
1. Plug in the charger.

English-7
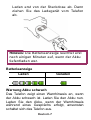
2. Plug out the charger from power jack first
after it is charged. Then unplug charger
from phone.

English-8
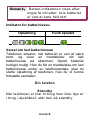
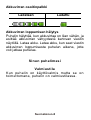
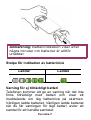
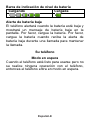
Remark: Battery indication will be
displayed after several minutes if
battery is over-discharged.
Battery Level Indication Bar
Charging
Charged
Not enough battery alert
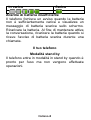
Phone will give alert when battery is not enough
and display a message of low battery on screen.
Please charge battery. Please charge battery
when you receive the alert of low battery during
calling in order to keep the calling.
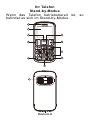
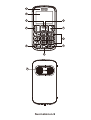
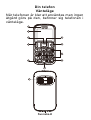
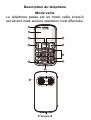
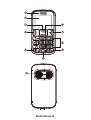
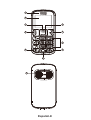
Your Phone
Stand by Mode
When phone is ready to use but no operation
is done on phone, then phone is under stand
by mode.

English-9
11
1
2
3
4
8
10
5
6
7
9

English-10
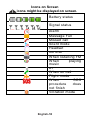
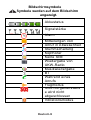
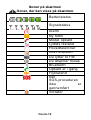
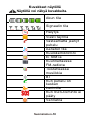
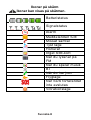
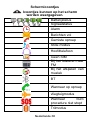
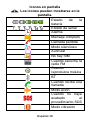
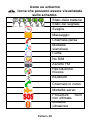
Icons on Screen
Icons might be displayed on screen.
Battery status
Signal status
Alarm
Message Full
Missed call
Silent mode
Headset
No SIM
When listening FM
When playing
music
BT
When on call
Flight mode
When SOS
procedure does
not finish
Vibration mode

English-11
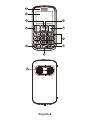
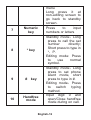
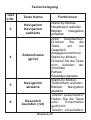
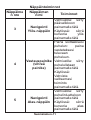
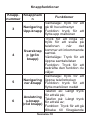
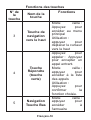
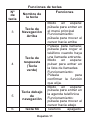
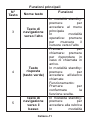
Key Functions
Key
No
Key Name
Functions
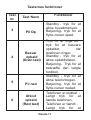
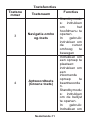
3
Navigation
Up key
Standby mode:press
to enter main menu
Operating : press to
move cursor up
4
Answer Key
(Green
key)
Press to call out:
press to pick up
phone when there is
incoming call.
Standby mode:press
to enter call list
Operating : Press to
confirm the function
you choose.
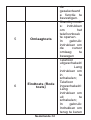
5
Navigation
Down key
Standby mode:press
to enter phonebook
Operating : press to
move cursor down
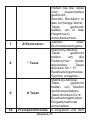
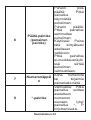
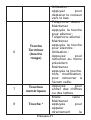
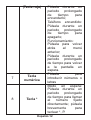
6
End Key
(Red Key)
Phone Off : Long
press to switch on;
Phone On : Long
press to switch off;
Operating : Press to
go back to previous

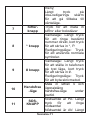
English-12
menu
Long press it at
non-editing screen to
go back to standby
screen.
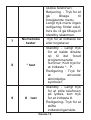
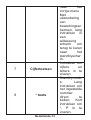
7
Numeric
key
Press to input
numbers or letters
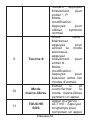
8 * key
Standby mode:Long
press to call the set
number directly;
Short press to type in
*,P.
Editing mode: Press
to use normal
symbol.
9 # key
Standby mode:Long
press to set phone
silent mode, short
press to type in #.
Editing mode:Press
to switch typing
method.
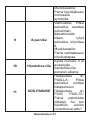
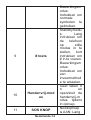
10
Handfree
mode
Input digit 0 and
open/Close handfree
mode during on call.

English-13
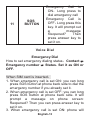
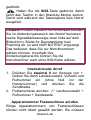
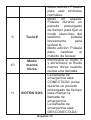
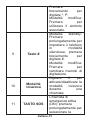
11
SOS
BUTTON
Emergency Call is
ON:Long press to
dial emergency call
Emergency Call is
OFF:Long press this
key. It will prompt out
a message
Reopened? Then
press answer key to
set it on.
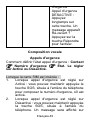
Voice Dial
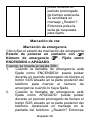
Emergency Dial
How to set emergency dialing status:Contact
Emergency number Status. Set it as ON or
OFF.
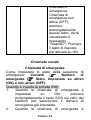
When SIM card is inserted:
1. When emergency call is set ON: you can long
press SOS button at phone back side to dial the
emergency number if you already set it.
2. When emergency call is set OFF: you can long
press SOS button at phone back side. It will
prompt a message on phone screen:
Reopened? Then you can press answer key to
set it on.
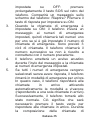
3. When emergency call is set ON: phone will

English-14
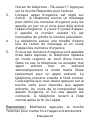
send a message to set emergency numbers
and then call those numbers one by one if you
already set the emergency call number. There
will be 3 calling cycles. It will call next number
if previous number is failed to connect.
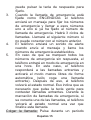
4. Phone will send out alerting sound when it is
sending message and calling to set emergency
numbers.
5. If all emergency numbers are dialed but without
answering, then phone will be in emergency
mode within one hour. In this case, phone will
pick up incoming call and activate hand free
mode automatically (only pick up one incoming
call). After that, phone will go back to normal
status. That means you need to press green
key to pick up incoming calls. During dialing
emergency calls, if one of calls is connected,
then phone will return to normal status after this
call is end.
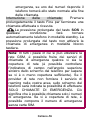
Hang up the call:Long press End button to hang
up the call during calling out or in.
Long pressing SOS button at any condition
will let phone return to standby mode
automatically. Long pressing the button will not
activate the emergency call during Keypad lock
mode .

English-15
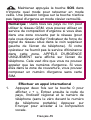
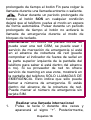
Remark: In every country where it can use GSM
network, you can use emergency dialing service if
you are in network covering range (you can check
the network strength indicator on left upside of
phone screen to know whether you are in the
range or not). If your network provider doesn’t
provide roaming service at that area, then it will
show EMERGENCY CALLS ONLY on phone
screen. That means you can only call emergency
numbers. If you are in the range of network
covering, you can dial emergency number without
SIM card.
Make an International Call
1. Press 0 key for twice times and sign “+ ” will
come out. Then enter country code, area code
and phone number (without a zero in front of
mobile phone number) Press Send key to enter
voice dial to call out.
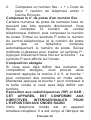
2. Dial a fixed line: “+”country code + entire
phone number + Send key.
Dial extension No. of a Fixed line
Some extension numbers of fixed line couldn’t be
dialed directly. You need to dial telephone
exchange first and then dial the extension number.
Ty
pe in a P symbol between telephone exchange
number and extension number, this phone will

English-16
dial the extension number automatically. Follow
below method to make a symbol P: short press *
key for twice times. Then it will display a P symbol
on screen.
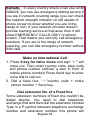
Speed Dial
If you already set the speed dial numbers, then
you can long press number key 2 to 9,* key to
dial set numbers out under standby mode. Long
pressing number key 1 is to dial to voice mailbox
if you already set the mailbox number.
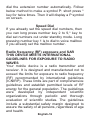
Radio frequency (RF) exposure and SAR
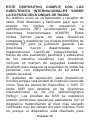
THIS DEVICE MEETS INTERNA
TIONAL
GUIDELINES FOR EXPOSURE TO RADIO
WAVES
Your mobile device is a radio transmitter and
receiver. It is designed and manufactured not to
exceed the limits for exposure to radio frequency
(RF) recommended by international guidelines
(ICNIRP). These limits are part of comprehensive
guidelines and establish permitted levels of RF
energy for the general population. The guidelines
were developed by independent scientific
organizations through periodic and thorough
evaluation of scientific
studies. The guidelines
include a substantial safety margin designed to
assure the safety of all persons, regardless of age
and health.

English-17
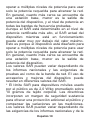
The exposure standard for mobile devices
employs a unit of measurement known as the
Specific Absorption Rate, or SAR. The SAR limit
stated in the international guidelines is 2.0
watts/kilogram (W/kg)*. Tests for SAR are
conducted using standard operating positions
with the device transmitting at its highest certified
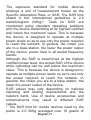
well below the maximum value. This is because
the device is designed to operate at multiple
power levels so as to use only the power required
t
o reach the network. In general, the closer you
are to a base station, the lower the power output
of the device. power level in all tested frequency
bands.
Although the SAR is determined at the highest
certified power level, the actual SAR of the device
while operating can be well below the maximum
value. This is because the device is designed to
operate at multiple power levels so as to use only
the power required to reach the network. In
general, the closer you ar
e to a base station, the
lower the power output of the device.
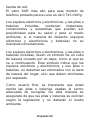
SAR values may vary depending on national
reporting and testing requirements and the
network band. Use of device accessories and
enhancements may result in different SAR
values.
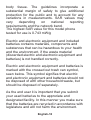
* The SAR limit for mobile devices used by the
public is 2.0 W/kg averaged over 10 grams of

English-18
body tissue. The guidelines incorporate a
substantial margin of safety to give additional
protection for the public and to account for any
variations in measurements. SAR values may
vary depending on national reporting
requirements and the network band.
The highest SAR value for this model phone
tested for use is 0.743 mW/g
Electric and electronic equipment and included
batteries contains materials, components and
substances that can be hazardous to your health
and the environment, if the wast
e material
(discarded electric and electronic equipment and
batteries) is not handled correctly.
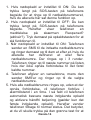
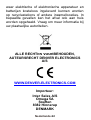
Electric and electronic equipment and batteries is
marked with the crossed out trash can symbol,
seen below. This symbol signifies that electric
and electronic equipment and batteries should not
be disposed of with other household waste, but
should be disposed of separately.
As the end user it is important that you submit
your used batteries to the approriate and
designated facility. In th
is manner you make sure
that the batteries are recycled in accordance with
legislature and will not harm the environment.
La pagina si sta caricando...
La pagina si sta caricando...
La pagina si sta caricando...
La pagina si sta caricando...
La pagina si sta caricando...
La pagina si sta caricando...
La pagina si sta caricando...
La pagina si sta caricando...
La pagina si sta caricando...
La pagina si sta caricando...
La pagina si sta caricando...
La pagina si sta caricando...
La pagina si sta caricando...
La pagina si sta caricando...
La pagina si sta caricando...
La pagina si sta caricando...
La pagina si sta caricando...
La pagina si sta caricando...
La pagina si sta caricando...
La pagina si sta caricando...
La pagina si sta caricando...
La pagina si sta caricando...
La pagina si sta caricando...
La pagina si sta caricando...
La pagina si sta caricando...
La pagina si sta caricando...
La pagina si sta caricando...
La pagina si sta caricando...
La pagina si sta caricando...
La pagina si sta caricando...
La pagina si sta caricando...
La pagina si sta caricando...
La pagina si sta caricando...
La pagina si sta caricando...
La pagina si sta caricando...
La pagina si sta caricando...
La pagina si sta caricando...
La pagina si sta caricando...
La pagina si sta caricando...
La pagina si sta caricando...
La pagina si sta caricando...
La pagina si sta caricando...
La pagina si sta caricando...
La pagina si sta caricando...
La pagina si sta caricando...
La pagina si sta caricando...
La pagina si sta caricando...
La pagina si sta caricando...
La pagina si sta caricando...
La pagina si sta caricando...
La pagina si sta caricando...
La pagina si sta caricando...
La pagina si sta caricando...
La pagina si sta caricando...
La pagina si sta caricando...
La pagina si sta caricando...
La pagina si sta caricando...
La pagina si sta caricando...
La pagina si sta caricando...
La pagina si sta caricando...
La pagina si sta caricando...
La pagina si sta caricando...
La pagina si sta caricando...
La pagina si sta caricando...
La pagina si sta caricando...
La pagina si sta caricando...
La pagina si sta caricando...
La pagina si sta caricando...
La pagina si sta caricando...
La pagina si sta caricando...
La pagina si sta caricando...
La pagina si sta caricando...
La pagina si sta caricando...
La pagina si sta caricando...
La pagina si sta caricando...
La pagina si sta caricando...
La pagina si sta caricando...
La pagina si sta caricando...
La pagina si sta caricando...
La pagina si sta caricando...
La pagina si sta caricando...
La pagina si sta caricando...
La pagina si sta caricando...
La pagina si sta caricando...
La pagina si sta caricando...
La pagina si sta caricando...
La pagina si sta caricando...
La pagina si sta caricando...
La pagina si sta caricando...
La pagina si sta caricando...
La pagina si sta caricando...
La pagina si sta caricando...
La pagina si sta caricando...
La pagina si sta caricando...
La pagina si sta caricando...
La pagina si sta caricando...
La pagina si sta caricando...
La pagina si sta caricando...
La pagina si sta caricando...
La pagina si sta caricando...
La pagina si sta caricando...
La pagina si sta caricando...
La pagina si sta caricando...
La pagina si sta caricando...
La pagina si sta caricando...
La pagina si sta caricando...
La pagina si sta caricando...
La pagina si sta caricando...
La pagina si sta caricando...
La pagina si sta caricando...
La pagina si sta caricando...
La pagina si sta caricando...
La pagina si sta caricando...
La pagina si sta caricando...
La pagina si sta caricando...
La pagina si sta caricando...
La pagina si sta caricando...
La pagina si sta caricando...
La pagina si sta caricando...
La pagina si sta caricando...
La pagina si sta caricando...
La pagina si sta caricando...
La pagina si sta caricando...
La pagina si sta caricando...
La pagina si sta caricando...
La pagina si sta caricando...
La pagina si sta caricando...
La pagina si sta caricando...
La pagina si sta caricando...
La pagina si sta caricando...
La pagina si sta caricando...
La pagina si sta caricando...
La pagina si sta caricando...
La pagina si sta caricando...
La pagina si sta caricando...
La pagina si sta caricando...
La pagina si sta caricando...
La pagina si sta caricando...
La pagina si sta caricando...
La pagina si sta caricando...
La pagina si sta caricando...
La pagina si sta caricando...
La pagina si sta caricando...
La pagina si sta caricando...
La pagina si sta caricando...
La pagina si sta caricando...
La pagina si sta caricando...
La pagina si sta caricando...
La pagina si sta caricando...
La pagina si sta caricando...
La pagina si sta caricando...
La pagina si sta caricando...
La pagina si sta caricando...
La pagina si sta caricando...
La pagina si sta caricando...
La pagina si sta caricando...
La pagina si sta caricando...
La pagina si sta caricando...
La pagina si sta caricando...
La pagina si sta caricando...
La pagina si sta caricando...
La pagina si sta caricando...
La pagina si sta caricando...
La pagina si sta caricando...
La pagina si sta caricando...
La pagina si sta caricando...
La pagina si sta caricando...
La pagina si sta caricando...
La pagina si sta caricando...
La pagina si sta caricando...
La pagina si sta caricando...
La pagina si sta caricando...
La pagina si sta caricando...
La pagina si sta caricando...
La pagina si sta caricando...
La pagina si sta caricando...
La pagina si sta caricando...
La pagina si sta caricando...
La pagina si sta caricando...
La pagina si sta caricando...
-
 1
1
-
 2
2
-
 3
3
-
 4
4
-
 5
5
-
 6
6
-
 7
7
-
 8
8
-
 9
9
-
 10
10
-
 11
11
-
 12
12
-
 13
13
-
 14
14
-
 15
15
-
 16
16
-
 17
17
-
 18
18
-
 19
19
-
 20
20
-
 21
21
-
 22
22
-
 23
23
-
 24
24
-
 25
25
-
 26
26
-
 27
27
-
 28
28
-
 29
29
-
 30
30
-
 31
31
-
 32
32
-
 33
33
-
 34
34
-
 35
35
-
 36
36
-
 37
37
-
 38
38
-
 39
39
-
 40
40
-
 41
41
-
 42
42
-
 43
43
-
 44
44
-
 45
45
-
 46
46
-
 47
47
-
 48
48
-
 49
49
-
 50
50
-
 51
51
-
 52
52
-
 53
53
-
 54
54
-
 55
55
-
 56
56
-
 57
57
-
 58
58
-
 59
59
-
 60
60
-
 61
61
-
 62
62
-
 63
63
-
 64
64
-
 65
65
-
 66
66
-
 67
67
-
 68
68
-
 69
69
-
 70
70
-
 71
71
-
 72
72
-
 73
73
-
 74
74
-
 75
75
-
 76
76
-
 77
77
-
 78
78
-
 79
79
-
 80
80
-
 81
81
-
 82
82
-
 83
83
-
 84
84
-
 85
85
-
 86
86
-
 87
87
-
 88
88
-
 89
89
-
 90
90
-
 91
91
-
 92
92
-
 93
93
-
 94
94
-
 95
95
-
 96
96
-
 97
97
-
 98
98
-
 99
99
-
 100
100
-
 101
101
-
 102
102
-
 103
103
-
 104
104
-
 105
105
-
 106
106
-
 107
107
-
 108
108
-
 109
109
-
 110
110
-
 111
111
-
 112
112
-
 113
113
-
 114
114
-
 115
115
-
 116
116
-
 117
117
-
 118
118
-
 119
119
-
 120
120
-
 121
121
-
 122
122
-
 123
123
-
 124
124
-
 125
125
-
 126
126
-
 127
127
-
 128
128
-
 129
129
-
 130
130
-
 131
131
-
 132
132
-
 133
133
-
 134
134
-
 135
135
-
 136
136
-
 137
137
-
 138
138
-
 139
139
-
 140
140
-
 141
141
-
 142
142
-
 143
143
-
 144
144
-
 145
145
-
 146
146
-
 147
147
-
 148
148
-
 149
149
-
 150
150
-
 151
151
-
 152
152
-
 153
153
-
 154
154
-
 155
155
-
 156
156
-
 157
157
-
 158
158
-
 159
159
-
 160
160
-
 161
161
-
 162
162
-
 163
163
-
 164
164
-
 165
165
-
 166
166
-
 167
167
-
 168
168
-
 169
169
-
 170
170
-
 171
171
-
 172
172
-
 173
173
-
 174
174
-
 175
175
-
 176
176
-
 177
177
-
 178
178
-
 179
179
-
 180
180
-
 181
181
-
 182
182
-
 183
183
-
 184
184
-
 185
185
-
 186
186
-
 187
187
-
 188
188
-
 189
189
-
 190
190
-
 191
191
-
 192
192
-
 193
193
-
 194
194
-
 195
195
-
 196
196
-
 197
197
-
 198
198
-
 199
199
-
 200
200


in altre lingue
- français: Denver GSP-110 Manuel utilisateur
- español: Denver GSP-110 Manual de usuario
- Deutsch: Denver GSP-110 Benutzerhandbuch
- Nederlands: Denver GSP-110 Handleiding
- dansk: Denver GSP-110 Brugermanual
- eesti: Denver GSP-110 Kasutusjuhend
- svenska: Denver GSP-110 Användarmanual