
HAVG7
EN - FR - IT - DE - ES - GR - NL - PT

EN
DE
FR
IT
ES
PT
NL
GR
Instrucciones de uso
PLACAS
User Instructions
HOBS
Bedienungsanleitung
KOCHMULDEN
Mode d'emploi
PLAQUE DE CUISSON
Istruzioni per l'uso
PIANI COTTURA
14
25
36
3
47
Instruções para o utlzador
PLACAS
58
EN - FR - IT - DE - ES - GR - NL - PT
Handleiding
KOOKPLATEN
69
Οδηγίες χρήσης
ΕΣΤΙΕΣ
80

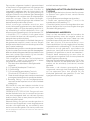
We recommend you keep the instructions for installation and use for
later reference, and before installing the hob, note its serial number in
case you need to get help from the after sales service.
WARNING: the appliance and its accessible parts become hot during
use. Care should be taken to avoid touching heating elements.
Children under 8 years of age must be kept away from the appliance
unless they are continuously supervised.
Children should not play with the appliance.
The appliance can be used by those aged 8 or over and by those with
limited physical, sensorial or mental capacities, without experience or
knowledge of the product, only if supervised or provided with instruction
as to the operation of the appliance, in a safe way with awareness of the
possible risks.
Cleaning and maintenance should not be carried out by unsupervised
children.
WARNING: the appliance and accessible parts become hot during use.
Be careful not to touch any hot parts.
WARNING: the accessible parts may become hot during use. Young
children should be kept away.
WARNING: in order to avoid any danger caused by the accidental
resetting of the thermal interruption device, the appliance should not be
powered by an external switching device, such as a timer, or be
connected to a circuit that is regularly switched on and off.
Children under 8 should be kept at a safe distance from the appliance if
not continuously supervised.
Do not use a steam cleaner or high pressure spray for cleaning operations.
Disconnect the appliance from the mains electricity supply before
carrying out any work or maintenance on it.
Connect a plug to the supply cable that is able to bear the voltage,
current and load indicated on the tag and having the earth contact.
The socket must be suitable for the load indicated on the tag and must
have ground contact connected and in operation. The earth conductor
is yellow-green in colour. This operation should be carried out by a
Safety instructions
•
•
•
•
•
•
•
•
•
•
•
EN 3

suitably qualified professional. ln case of incompatibility between the
socket and the appliance plug, ask a qualified electrician to substitute
the socket with another suitable type. The plug and the socket must be
conformed to the current norms of the installation country. Connection
to the power source can also be made by placing an omnipolar breaker,
with contact separation compliant to the requirements for overvoltage
category III, between the appliance and the power source that can bear
the maximum connected load and that is in line with current legislation.
The yellow-green earth cable
should not be interrupted by the breaker. The socket or omnipolar
breaker used for the connection should be easily accessible when the
appliance is installed.
The disconnection may be achieved by having the plug accessible or by
incorporating a switch in the fixed wiring in accordance with the wiring
rules.
WARNING: use only hob guards designed by the Manufacturer of the
cooking appliance or indicated by the Manufacturer of the appliance in
the instructions for use as suitable or hob guards incorporated in the
appliance. The use of inappropriate guards can cause accidents.
WARNING: unattended cooking on a hob with fat or oil can be dangerous
and may result in fire. NEVER try to extinguish a fire with water, but switch
off the appliance and then cover flame e.g. with a lid or a fire blanket.
WARNING: danger of fire: do not store items on the cooking surfaces.
CAUTION: the cooking process must be supervised.Ashort term
cooking process has to be supervised continuously.
If present do not to stare into halogen lamp hob elements.
Do not put metallic objects such as knives, forks, spoons or lids on the
hob. They could heat up.
Aluminum foil and plastic pans must not be placed on heating zones.
After every use, some cleaning of the hob is necessary to prevent the
build-up of dirt and grease. If left, this is recooked when the hob is used
and burns giving off smoke and unpleasant smells, not to mention the
risks of fire propagation.
Do not touch the heat zones during operation or for a while after use.
•
•
•
•
•
•
•
•
•
•
EN 4

Always use the appropriate cookware.
Always place the pan in the center of the unit that you are cooking on.
Do not place anything on control panel.
Do not use the hob as a working surface.
Do not use the surface as a cutting board.
Do not store heavy items above the hob. If they drop onto the hob, they
may cause damage.
Do not use the hob for storage of any items.
Do not slide cookware across the hob.
Do not use rough or abrasive materials or sharp metal scrapers to clean
the glasses, as they can scratch the surface and cause the glass to
shatter.
If the supply cord is damaged, it must be replaced by Manufacturer, its
service agent or similarly qualified persons in order to avoid a hazard.
The earth conductor (yellow-green) must be longer than 10 mm on the
terminal block side. The internal conductors section should be
appropriate to the power absorbed by the hob (indicated on the tag).
The type of power cable must be H05GG-F.
No additional operation/setting is required in order to operate the
appliance at the rated frequencies.
This appliance is not intended to be operated by means of an external
timer or separate remote control system.
•
•
•
•
•
•
•
•
•
•
•
•
EN 5

Safety Instructions
Instructions for the installer
Connections
Use of hob - user instructions
Maintenance and cleaning
After care
Protection of the environment
Technical information
3
7
8
10
12
13
13
91
Summary
Thank you for purchasing the Haier gas hob. Please read this instruction manual carefully before
using the hob and keep it in safe place for future reference.
EN 6

Instructions for the installer
Installing a domestic appliance can be a
complicated operation which if not carried
out correctly, can seriouslyaffect consumer
safety. It is for this reason that the task
should be undertaken by a professionally
qualifiedperson who will carry it out in
accordance with the technical regulations in
force. In the event that this advice isignored
and the installation is carried out by an
unqualified person, the manufacturer
declines all responsibility for any technical
failure of the product whether or not it
results in damage to goods or injury to
individuals.
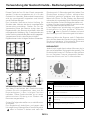
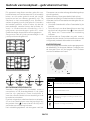
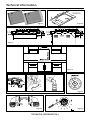
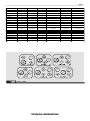
BUILDING IN
The hob may be installed in any worktop which is
heat resistant to a temperature of 100°C, and
has a thickness of 25-45 mm. The dimensions
of the insert to be cut out of the worktop are in
shown in Figure 2*.
When there is an accessible space between the
built-in hob and the cavity below, a dividing wall
made of insulating material should be inserted
(wood or a similar material) (Figure 3*).
If the hob is fitted next to a cabinet on either
side, the distance between the hob and the
cabinet must be at least 15 cm; while the
distance between the cut out and the rear wall
must be at least 7 cm; while the distance
between the hob and the rear wall must be at
least 70 mm for frontal control hobs and 50 mm
for lateral control hobs.
The distance between the hob and any other
unit or appliance above it (e.g. An extractor hood)
must be no less than 700 mm (Figure 4*).
Metal objects in the drawer may reach high
temperatures due to air recirculation. It is
therefore recommended to use an intermediate
wood panel.
Important - The diagram in Figure 1* shows
how the sealant should be applied.
The Hob unit is fitted by attaching the Fixing
Clamps supplied, using the holes at the base of
the unit.
When a 75 cm hob is fitted over a built in oven,
the latter must be fan cooled.
When a 60 cm hob is fitted over a built in oven,
the latter must be fan cooled.
SUITABLE LOCATION
This appliance must be installed in accordance
with the regulations in force and only used in a
well ventilated space. Read the instructions
before installing or using this appliance.
A gas-powered cooking appliance produces
heat and humidity in the area in which it is
installed. For this reason you should ensure
good ventilation either by keeping all natural air
passages open or by installing an extractor
hood with an exhaust flue. Intensive and
prolonged use of the appliance may require
extra ventilation, such as the opening of a
window or an increase in speed of the electric
fan, if you have one.
If a hood can not be installed, an electric fan
should be fitted to an outside wall or window to
ensure that there is adequate ventilation.
The electric fan should be able to carry out a
complete change of air in the kitchen 3-5 times
every hour. The installer should follow the
relevant national standards.
*See “Technical information” section at the end of this manual.
EN 7

Connections
ELECTRICAL CONNECTION (FOR U.K. ONLY)
Warning - this appliance must be earthed
This appliance is designed for domestic use
only. Connection to the main supply must be
made by a competant electrician, ensuring that
all current regulations concerning such
installations are observed. The appliance must
only be connected to a suitably rated spur point,
a 3 pin 13 amp plug/socket is not suitable. A
double pole switch must be provided and the
circuit must have appropriate fuse protection.
Further details of the power requirement of the
individual product will be found in the users’
instruction and on the appliance rating plate. In
the case of built-in product you are advised,
should you wish to use a longer cable than the
one supplied, that a suitably rated heat
resistant type must be used.
The wiring must be connected to the mains
supply as follows:
Note: We do not advocate the use of earth
leakage devices with electric cooking
appliances installed to spur points because of
the «nuisance tripping» which may occur. You
are again reminded that the appliance must be
correctly earthed, the manufacturer declines
any responsibility for any event occurring as a
result of incorrected electrical installation.
ELECTRICAL CONNECTION
Check the data on the rating plate, located on
the outside of the unit, to ensure that the supply
and input voltage are suitable.
Before connection, check the earthing system.
By Law, this appliance must be earthed. If this
regulation is not complied with, the manufacturer
will not be responsible for any damage caused to
persons or property. If a plug is not already
attached, fit a plug appropriate to the load
indicated on the rating plate. The earth wire is
coloured yellow/green. The plug should always
be accessible. Where the Hob is connected
direct to the electricity supply, a circuit breaker
must be fitted. If the power supply cord is
damaged this is to be replaced by a qualified
engineer so as to prevent any potential risk. The
earth wire (green and yellow coloured) must be at
least 10 mm longer than the live and neutral
wires. The section of the cable used must be of
the correct size in relation to the absorbed power
of the hob. Please check rating plate for the
power details and ensure that the power supply
cord is of the type 3x0.75 mm² H05GG-F
If an appliance is not fitted with a supply cord and
a plug, or with other means for disconnection
from the supply mains having a contact
separation in all poles that provide full
disconnection under overvoltage category III
conditions, the instructions shall state that
means for disconnection must be incorporated
in the fixed wiring in accordance with the wiring
rules.
GAS CONNECTION
These instructions are for qualified personnel,
installation of equipment must be in line with
the relevant national standard. (For U.K. only: by
law the gas installation\commissioning must be
carried out by a “Gas Safe” installer).
All work must be carried out with the electricity
supply disconnected. The rating plate on the
hob shows the type of gas with which it is
designed to be used. Connection to the mains
gas supply or gas cylinder should be carried out
after having checked that it is regulated for the
type of gas with which it will be supplied. If it is
not correctly regulated see the instructions in
the following paragraphs to change gas setting.
For liquid gas (cylinder gas) use pressure
regulators which comply with the relevant
national standards. Use only pipes,washers and
sealing washers which comply with the relevant
national standards.
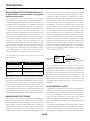
LIVE
EARTH
NEUTRAL
L
N
Power Cable
Mains Supply
Brown Wre
Green/Yellow Wre
Blue Wre
EN 8

For some models a conic link is furnished to
outfit for the installation in the countries where
this type of link is obligatory; in picture 8 it is
pointed out how to recognize the different
types of links (CY = cylindrical, CO = conic). In
every case the cylindrical part of the link has to
be connected to the hob.
When connecting the hob to the gas supply via
use offlexible hoses please ensure that the
maximum distance covered by the hose does
not exceed 2 metres.
The flexible tube shall be fitted in such a way that
it cannot come into contact with a moveable
part of the housing unit (e.g. a drawer) and does
not pass through any space where it may
become crushed/ kinked or damaged in any
way.
To prevent any potential damage to the hob
please carry out the installation following this
sequence (Figure 6*):
1. As illustrated, assemble parts in sequence:
A: 1/2 Male Adaptor Cylindirical
B: 1/2 Seal
C: 1/2 Female Gas Adaptor Conical-Cylindirical
or Cylindirical-Cylindirical
2. Tighten the joints with the spanner, remembering
to twist the pipes into position.
3. Attach fitting C to mains gas supply using rigid
copper pipe or flexible steel pipe.
IMPORTANT: carry out a final check for leaks on
the pipe connections using a soapy solution.
NEVER USE A FLAME. Also, make sure that the
flexible pipe cannot come into contact with a
moving part of the cabinet (eg.adrawer) and that
it is not situated where it could be damaged.
Warning: If gas can be smelt in the vicinity of this
appliance turn off the gas supply to the
appliance and call the engineer directly. Do not
search for a leak with a naked flame.
ADAPTING THE HOB TO DIFFERENT TYPE
OF GAS
To adapt the Hob for use with different types of
gas, carry out the following instructions:
• Remove the grids and burners
• Insert on hexagonal spanner (7 mm) into the
burner support (Figure 7*)
• Unscrew the injector and replace it with one
suitable for the gas to be used (see gas type
table)
REGULATING THE MINIMUM FLAME
After lighting the burners, turn the control knob
to the minimum setting and then remove the
knob (this can easily be removed by applying
gentle pressure).
Using a small «Terminal» type screwdriver the
regulating screw can be adjusted as in Figure 9*.
Turning the screw clockwise reduces the gas
flow, whilst turning it anticlockwise increases
the flow – Use this adjustment to obtain a flame
of approximately 3 to 4 mm in length and then
replace the control knob.
When the gas supply available is LPG - the
screw to set the idle flame must be turned
(clockwise) to the end stop.
When you have carried out the new gas
regulation, replace the old gas rating plate on your
appliance with one (supplied with hob) suitable for
the type of gas for which it has been regulated.
*See “Technical information” section at the end of this manual.
EN 9

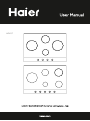
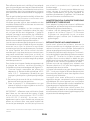
Use of hob - user instructions
This appliance must only be used for the
purpose for which it is intended, domestic
cooking, and any other use will be considered
improper and could therefore be dangerous.
The Manufacturer will not be responsible for any
damage or loss resulting from improper use.
Before using burner, be sure, grid perimeters
center the burner as below figure. If you are
using Cast Iron Grids; underneath the grid,
position of it is stated. Be sure for the exact grid
is used in correct position.
USING THE GAS BURNER
Prior to switching on the gas hob ensure that
the burner caps are correctly placed within their
position. This hob is fitted with electronic
ignition to ignite the burner.
To ignite the burners carry out the following:
• Push in and turn anticlockwise to the larger
flame symbol or in position 9 and keep
pushed 5 seconds after ignition. The ignition
system will continue to generate sparks as
long as the control knob is being pressed
Warning: If there is no electricity on appliance
to ignite the burner a match or a lighter should
be used carrying out the out the following:
• Place a lighted match or lighter close to the
burner
• Push in and turn the knob anticlockwise to the
larger flame symbol or in position 9 and keep
pushed 5 seconds after ignition Warning: In any
case if after 5 seconds the burner has not lit,
stop operating the device and wait at least 1 min
before attempting a further ignition of the
burner.
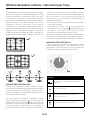
KNOBS CONTROL
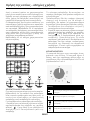
Each knob controls each burner as showed in
the serigraphy. The knobs have 9 steps from
highest flame to lowest flame. Never try to
switch from ° to 1
Indicators
Burner controlled by control knob
Switched-off burner
Highest power setting and electric ignition
Lowest power setting
EN 10

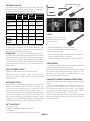
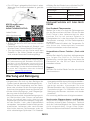
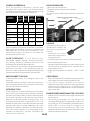
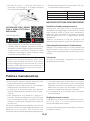
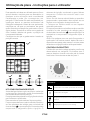
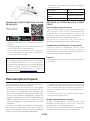
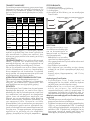
PRECI PROBE & LADLE
Intelligent Wireless Food Thermometer
Before using it please read the following
instruction and safety notes included in the
user manual.
INTRODUCTION
Preci Probe is a wireless food thermometer that
gives home chefs real-time status inside the
food to avoid undercook or overcook and
ensuring the perfect result every time. It
connects directly to the hOn app. Details and the
real-time status of the food can be read from
your phone, giving you the best result at your
fingertips. For further information on pairing and
use tips, please refer to the instructions below.
GETTING START
1. Ceramic Cap
2. Recommended immersion range
3. Sensor
4. Ladle with different positionof Preci Probe
LADLE
Use the ladle with the
probe to stir food during
your cooking.
- Clean the ladle before the first use.
- Do not use the ladle on an open flame.
- Do not cut the ladle.
- Do not put the ladle in direct contact with the
hot accessible parts of the hob.
- Tolerated temperature range : -40 °C + 220°C
PRECI PROBE
• The Preci Probe can be cleaned and washed
but do not immerse it long in water
• Make sure the mobile phone is within the range
of monitoring distance during cooking. The
distance of operation is dependent on the
actual cooking environment.
CHARGE THE PRECI PROBE BEFORE USING
• Put Preci Probe into the charger and close the
cover.
• Connect the charger to a USB power source,
such as USB adapter or USB socket of
PC/notebook with the USB cable. The charger
may not be working properly with power bank
because of its auto switch-off function
• LED of the charger will turn on and is flashing
during charging. It will turn off when Preci Probe
is fully charged.
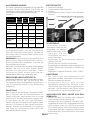
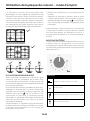
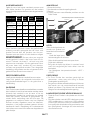
GENERAL ADVICE
For best results, use cooking vessels with a flat
surface. The size of the surface should match
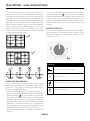
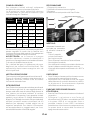
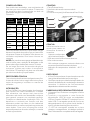
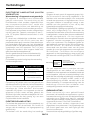
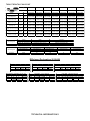
the gas burner side as follows. Table A:
Burner type Ø pan/
pot (cm)
Power
(kW)
G20/20
mbar
(methane)
G 30/28-30
mbar (LPG)
AUX Auxiliary
SR Semi Rapid
1.5 kW
R Rapid 2.5 kW
DC 4,2 kW
MONO
DC 5 kW
MONO
10-18
12-22
16-26
16-26
16-26
1,00
1,50
2,50
4,2 NG
4 LPG
5 NG
4,6 LPG
95 l/h
143 l/h
257 l/h
400 l/h
476 l/h
73 g/h
109 g/h
196 g/h
291 g/h
334 g/h
For smaller containers the gas burner should be
regulated so that the flame does not over-lap
the base of the pan. Vessels with a concave or
convex base should not be used.
WARNING: If a flame is accidentally extin-
guished, turn the knob to the off position and do
not attempt to re-ignite if for at least 1 minute.If
over the years the gas taps become stiff to turn
it is necessary to lubricate them.Such operation
must be carried out only by qualified Service
Engineers.
SR Semi Rapid
1.75 kW
12-22 1,75 167 l/h 127 g/h
R Rapid 2.75 kW
16-26 2,70 257 l/h 196 g/h
EN 11
EN - FR - IT - DE - ES - GR - NL - PT

COOKING METHODS WITH THE PRECI
PROBE
Preci Probe as thermomether
Set in the hOn App the target temperature you
want to reach, insert the Preci Probe inside the
food or with its accessory inside liquids and you
will see the temperature raising from the app
until reaching the target temperature.
It will help you to accurately maintain the
temperature for all kind of food.
Assisted Cooking: “Cook with me” function
Choose from the hOn App your favourite
recipes, follow step by step the preparation and
then the app will indicate you the parameters to
set on the cooktop.
Support
If necessary, contact the authorized service
center
Maintenance and cleaning
• Before cleaning the hob, ensure the appliance
has cooled down.
•Remove the plug from the socket or (if
connected directly) switch off the electricity
supply.
• Cleaning and user maintenance shall not be
made by children without supervision
• Never use abrasives, corrosive detergents,
bleaching agents or acids. Avoid any acid or
alkaline substances (lemon, juice, vinegar etc.)
on the enamelled, varnished or stainless steel
sections.
•When cleaning the enamelled, varnished or
chrome sections, use warm soapy water or a
non caustic detergent. For stainless steel use
an appropriate cleaning solution.
• The burners can be cleaned with soapy water.
To restore their original shine, use a household
stainless steel cleaner. After cleaning, dry the
burners and replace.
• It is important the Burners are replaced
correctly.
Chromed grids and burners
Chromed grids and burners have a tendency to
discolour with use. This does not jeopardize the
functionality of the hob
Our After Sales Service Centre can provide spare
parts if required.
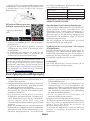
PAIR THE PRECI PROBE WITH THE INDUCTION
HOB
Download hOn app
• Go on the hOn APP from your portable device
• Go on hompage and press on “Accessory” &
press “Add new accessory”
• The app will start to search the accessory
nearby, as soon as it will be detected the name
of the probe will be shown
Hereby, Candy Hoover Group Srl declares that
the radio equipment is in compliance with
Directive 2014/53/EU and with the relevant
Statutory Requirements (for the UKCA
market). The full text of the declaration of
conformity is available at the following internet
address: www.candy-group.com
• Select the accessory, press “Ok” and the
enrollment will be completed
EN 12

After care
Before calling out a Service Engineer please
check the following:
• That the plug is correctly inserted and fused
• That the gas supply is not faulty
If the fault cannot be detected:
• Switch off the appliance and call the After
Service Centre. DO NOT TAMPER WITH THE
APPLIANCE.
The manufacturer will not be responsible for any
inaccuracy resulting from printing or transcript
errors contained in this brochure. We reserve the
right to carry out modifications to products as
requires, including the interests of consumption
without prejudice to characteristics relating to
safety or function.
EN 13
Protection of the environment
By placing the mark on the appliance, we
are confirming compliance to all relevant
European safety, health and environmental
requirements which are applicable in legislation
for this product.
The appliance complies with European
Directive 2009/142/EC (GAD) and starting
from 21/04/2018 with Gas Appliances
Regulation 2016/426 (GAR).
Waste management and environmental
protection
This appliance is labelled in
accordance with European
Directive 2012/19/EU regarding
electric and electronic appliances
(WEEE). The WEEE contain both
polluting substances (that can
have a negative effect on the
environment) and base elements
(that can be reused).
It is important that the WEEE undergo specific
treatments to correctly remove and dispose of
the pollutants and recover all the materials.
Individuals can play an important role in ensuring
that the WEEE do not become an environmental
problem; it is essential to follow a few basic rules:
• The WEEE should not be treated as domestic
waste;
• The WEEE should be taken to dedicated
collection areas managed by the town council
or a registered company.
ln many countries, domestic collections may be
available for large WEEEs. When you buy a new
appliance, the old one can be returned to the
vendor who must accept it free of charge as a
one-off, as long as the appliance is of an
equivalent type and has the same functions as
the purchased appliance.
SAVING AND RESPECTING THE
ENVIRONMENT
Where possible use lid to cover the pan.
Regulate the flame to not overlap the diameter
of the pan.
“Vald only for Cyprus”

DE 14
Wir empfehlen Ihnen, die Installations- und Bedienungsanleitungen für
einen späteren Gebrauch aufzubewahren und vor der Installation der
Gaskochmulde die Seriennummer zu notieren, falls Sie einmal die Hilfe
des Kundendienstes anfordern müssen.
WARNUNG: Das Gerät und die zugänglichen Teile können während des
Betriebs heiß werden. Die Heizelemente nicht berühren. Kinder unter 8
Jahren müssen vom Gerät ferngehalten werden, wenn sie nicht ständig
beaufsichtigt werden.
Dieses Gerät ist kein Spielzeug für Kinder.
Dieses Gerät darf nicht von körperlich oder geistig behinderten bzw. in
ihrer Sinneswahrnehmung beeinträchtigten Personen (einschließlich
Kindern ab 8 Jahren) oder von Personen mit unzureichender
Produktkenntnis benutzt werden, es sei denn, sie werden von einer für
ihre Sicherheit verantwortlichen Person überwacht und eingewiesen.
Kinder dürfen Reinigungs- und Pflegeaufgaben nur unter Aufsicht
ausführen.
WARNUNG: Das Gerät und zugängliche Teile können während des
Betriebs heiß werden. Darauf achten, dass keine heißen Bestandteile
berührt werden.
WARNUNG: Zugängliche Teile können während des Betriebs heiß
werden. Kleine Kinder nicht in die Nähe des Geräts gelangen lassen.
WARNUNG: Um Gefahren durch das versehentliche Zurücksetzen der
thermischen Schutzeinrichtung zu verhindern, sollte das Gerät nicht
über eine externe Schaltquelle, beispielsweise eine Zeitschaltuhr,
betrieben oder an einen Stromkreislauf angeschlossen werden, der
regelmäßig ein- und ausgeschaltet wird.
Kinder unter acht Jahren nur unter ständiger Aufsicht an das Gerät
lassen.
Verwenden Sie keinen Dampfreiniger oder Hochdruckspray für die
Reinigung.
Trennen Sie das Gerät von der Stromversorgung, bevor Sie Arbeiten
oder Wartung an dem Gerät vornehmen.
Sicherheitshinweise
•
•
•
•
•
•
•
•
•
•

DE 15
Verbinden Sie das Versorgungskabel mit einem Stecker, dessen
Auslegung hinsichtlich Spannung, Strom und Last den Angaben auf dem
Typenschild entspricht, und der über einen Erdungskontakt verfügt. Die
Steckdose muss der auf dem Schild angegebenen Last entsprechen,
funktionsfähig und geerdet sein. Der Erdleiter hat ist grün/gelb. Dieser
Vorgang darf nur durch einen geschulten Elektriker ausgeführt werden.
Passen Steckdose und Stecker nicht zueinander, muss die Steckdose
durch einen qualifizierten Elektriker gegen eine geeignete ausgetauscht
werden. Stecker und Steckdose müssen den aktuellen Gesetzgebungen
des Landes entsprechen. Der Anschluss an die Stromversorgung kann
auch mittels eines allpoligen Schalters, der die gesetzlich zugelassenen
maximalen Anschlusswerte tragen kann, mit Unterbrechung der
Kontakte gemäß Überspannungskategorie III zwischen Gerät und
Stromquelle erfolgen. Das gelb/grüne Erdungskabel darf nicht vom
Schalter unterbrochen werden. Bei der Installation des Geräts darauf
achten, dass die für den Anschluss verwendete Steckdose oder der
allpolige Schalter gut zugänglich ist.
Die Trennung von der Stromversorgung kann entweder durch einen
zugänglichen Stecker oder durch einen Poltrenner erfolgen, der gemäß
den geltenden VDE-Vorschriften an den Stromkreis angeschlossen wird.
WARNUNG: Verwenden Sie nur Herdschutzvorrichtungen, die der
Hersteller des Kochgerätes in den Bedienungsanleitungen als geeignet
empfiehlt, bzw. solche Schutzvorrichtungen für die Kochmulde, die ein
Bestandteil des Gerätes sind. Die Verwendung ungeeigneter
Schutzeinrichtungen kann Unfälle verursachen.
WARNING: Unbeaufsichtigtes Kochen mit Fett oder Öl auf der
Gaskochmulde kann gefährlich sein und zu einem Brand führen.
Löschen Sie ein Feuer NIEMALS mit Wasser, sondern schalten Sie das
Gerät aus und decken Sie die Flammen dann ab, z. B. mit einem Deckel
oder einer Löschdecke.
WARNUNG: Keine Gegenstände auf Kochflächen ablegen.
VORSICHT: Der Garvorgang muss überwacht werden. Die Gardauer des
Kochvorgangs muss laufend überwacht werden.
Wenn vorhanden, nicht in die Halogenlampen der Herdelemente schauen.
Legen Sie keine metallischen Gegenstände wie Messer, Gabeln, Löffel
oder Deckel auf der Gaskochmulde ab. Diese könnten sich erhitzen.
•
•
•
•
•
•
•
•

Aluminiumfolie und Plastikpfannen dürfen nicht auf Heizzonen
abgelegt/aufgestellt werden.
Nach jedem Gebrauch ist eine Reinigung der Gaskochmulde
erforderlich, um Schmutz- und Fettbildung zu vermeiden. Andernfalls
brennen solche Rückstände bei der erneuten Verwendung der
Gaskochmulde an. Rauch und Gerüche breiten sich aus, zudem besteht
Brandgefahr.
Die Heizzonen während der Benutzung und danach (für eine Weile) nicht
berühren.
Verwenden Sie immer geeignetes Kochgeschirr.
Stellen Sie den Topf immer in die Mitte des Feldes, auf dem Sie garen
möchten.
Stellen Sie nichts auf dem Bedienfeld ab.
Verwenden Sie die Kochmulde nicht als Arbeitsfläche.
Verwenden Sie die Kochmulde nicht als Schneidbrett.
Keine schweren Gegenstände über der Kochmulde aufbewahren. Wenn
diese herabfallen, können sie die Kochmulde beschädigen.
Verwenden Sie die Kochmulde nicht für die Aufbewahrung von Teilen.
Das Kochgeschirr nicht über die Kochmulde schieben.
Für die Reinigung der Glasbestandteile keine Scheuermaterialien oder
scharfkantigen Metallschaber verwenden, da diese die Oberfläche
zerkratzen und das Glas zerspringen kann.
Wenn das Stromkabel beschädigt ist, muss es vom Hersteller, von
dessen Kundendienstmitarbeiter oder einer gleichwertig qualifizierten
Person ausgetauscht werden, um jegliches Risiko zu vermeiden. Der
Erdleiter (gelb/grün) muss auf der Seite des Klemmblocks länger als 10
mm sein. Der Abschnitt für interne Leiter sollte der von der Kochmulde
absorbierten Leistung (siehe Angabe auf dem Etikett) entsprechen. Das
Kabel muss vom Typ H05GG-F.
Weitere Vorgänge/Einstellungen sind nicht erforderlich, um das Gerät
mit den Nennfrequenzen zu betreiben.
Das Gerät ist nicht dazu bestimmt, über eine externe Zeitschaltuhr oder
eine gesonderte Fernsteuerung betrieben zu werden.
•
•
•
•
•
•
•
•
•
•
•
•
•
•
•
DE 16

Sicherheitshinweise
Anweisungen für den Installateur
Anschlüsse
Verwendung der Gaskochmulde - Bedienungsanleitungen
Wartung und Reinigung
Kundendienst
Umweltschutz
Technische Daten
14
18
19
21
23
24
24
91
Zusammenfassung
Vielen Dank, dass Sie sich für den Kauf einer Gaskochmulde von Haier entschieden haben. Lesen
Sie diese Bedienungsanleitung vor der Verwendung sorgfältig durch und bewahren Sie sie für
spätere Referenzzwecke auf.
DE 17

Anweisungen für den Installateur
Bei der Installation eines Haushaltsgerätes
kann es sich um einen komplizierten Vorgang
handeln, der, wenn er nicht korrekt
ausgeführt wird, sich nachteilig auf die
Sicherheit der Verbraucher auswirken kann.
Aus diesem Grund sollte diese Aufgabe
einem Fachmann überlassen werden, der sie
entsprechend den geltenden technischen
Vorschriften durchführt. Für den Fall, dass
dieser Ratschlag ignoriert wird und die
Installation von einer nicht qualifizierten
Person durchgeführt wird, lehnt der
Hersteller jegliche Verantwortung für
technische Fehler des Produktes ab,
unabhängig davon, ob ein solcher Fehler zu
Sachschäden oder zu Personenschäden
führt.
EINBAU
Die Gaskochmulde kann auf jeder Arbeitsfläche
mit einer Hitzebeständigkeit von bis zu 100 °C
und einer Dicke von 25-45 mm eingebaut
werden. Die Maße der aus der Arbeitsfläche
herauszuschneidenden Fläche sind in Abb. 2*
dargestellt. Wenn zwischen der Einbau-
Gaskochmulde und dem darunter liegenden
Garraum ein zugänglicher Raum vorhanden ist,
sollte eine aus Dämmmaterial bestehende
Trennwand eingefügt werden (Holz oder
ähnliches Material) (Abb. 3*). Wenn die
Kochmulde beidseitig neben einem Schrank
montiert ist, muss der Abstand zwischen Wenn
das Kochfeld neben einem Schrank angebracht
wird, muss der Abstand zwischen Schrank und
Kochfeld mindestens 15 cm betragen,
wohingegen der Abstand zwischen Ausschnitt
und Rückwand mindestens 7 cm betragen muss.
Der Abstand zwischen Herd und Rückwand
muss für Kochmulden mit Frontregelung
mindestens 70 mm und für jene mit seitlichen
Regelknöpfen mindestens 50 mm betragen. Der
Abstand zwischen der Kochmulde und anderen
Geräten oder Elementen darüber (z. B. eine
Abzugshaube) muss mindestens 700 mm
betragen (Abb. 4*). Metallgegenstände in der
Schublade können aufgrund der Luftzirkulation
hohe Temperaturen erreichen. Es wird daher
empfohlen, eine Zwis-chenwand aus Holz zu
verwenden.
Wichtig - Das Diagramm in Abb. 1* zeigt an, wie
das Dichtmittel angewendet werden soll. Die
Kochmuldeneinheit wird mit den mitgelieferten
Befestigungsklammern an den Löchern im
Sockel des Gerätes befestigt.
Wenn eine 75-cm Kochmulde über einem
Backofen installiert ist, muss dieser mit einem
Gebläse gekühlt werden.
Wenn eine 60-cm-Kochmulde über einem
Backofen installiert ist, muss dieser lüftergekühlt
werden.
GEEIGNETE STELLE
Dieses Gerät muss gemäß den geltenden
Vorschriften eingebaut werden. Es darf nur in
gut belüfteten Räumen verwendet werden.
Lesen Sie diese Anweisungen vor dem Einbau
des Gerätes sorgfältig durch. Eine mit Gas
betriebene Kochmulde erzeugt Wärme und
Feuchtigkeit in dem Bereich, in dem sie
eingebaut ist. Aus diesem Grund sollten Sie für
eine gute Belüftung sorgen, indem Sie alle
natürlichen Luftdurchgänge offen halten oder
es sollte eine Ablufthaube mit einem
Abluftabzug montiert werden. Bei intensiver
und längerer Nutzung des Geräts ist ggf.
zusätzliche Belüftung erforderlich, zum
Beispiel durch das Öffnen eines Fensters oder
ggf. die Erhöhung der Drehzahl eines
elektrischen Lüfters.
Wenn der Einbau einer Abzugshaube nicht
möglich ist, sollte ein elektrischer Lüfter an
einer Außenwand oder einem Fenster
angebracht werden, um sicherzustellen, dass
eine ausreichende Belüftung vorhanden ist.
Der elektrische Lüfter sollte in der Lage sein, 3-
5 Mal pro Stunde einen kompletten Luftwechsel
in der Küche durchzu-führen. Der Installateur
muss die geltenden nationalen Normen
befolgen.
DE 18
* Siehe Abschnitt "Technische Informationen" am Ende dieser
Anleitung.

DE 19
Anschlüsse
ELEKTRISCHER ANSCHLUSS (NUR FÜR
GROSSBRITANNIEN) Warnung - Dieses Gerät
muss geerdet werden
Dieses Gerät ist nur für den privaten Gebrauch
bestimmt. Der Anschluss an die Hauptversorgung
muss von einem kompetenten Elektriker
durchgeführt werden, der gewährleistet, dass alle
geltenden Einbauvorschriften eingehalten
werden. Das Gerät darf nur an eine Unterputzdose
geeigneter Schutzart angeschlossen werden; eine
3-Stift-/13-A-Stecker-/Steckdosenkombination
ist nicht ausreichend. Ein Doppelpolschalter und
ein geeigneter Sicherungsschutz müssen
vorhanden sein. Weitere Details zum
Stromverbrauch der einzelnen Produkte finden Sie
in der Bedienungsan-leitung und auf dem
Typenschild des Geräts. Bei einem Einbauprodukt
können Sie das mitgelieferte Kabel ggf. gegen ein
längeres Kabel desselben hitzebeständigen Typs
austauschen. Die Verkabelung muss wie folgt an
die Stromversorgung angeschlossen werden:
Hinweis: Wir raten nicht dazu, Fehlerstrom-
schutzvorrichtungen für elektrische Kochgeräte
zu verwenden, die Unterputz angeschlossen
sind, weil damit «Fehlauslösungen» möglich
sind. Wir erinnern noch einmal daran, dass das
Gerät richtig geerdet werden muss. Der
Hersteller lehnt jegliche Verantwortung für alle
Ereignisse ab, die aufgrund einer fehlerhaften
elektrischen Installation auftreten.
ELEKTRISCHER ANSCHLUSS
Überprüfen Sie die Daten auf dem Typenschild an
der Außenseite des Gerätes, um sicherzustellen,
dass Versorgungs- und Eingangsspannung
ausreichend sind. Vor dem Anschluss das
Erdungssystem prüfen. Die Erdung dieses
Gerätes ist gesetzlich vorgeschrieben. Wenn
diese Vorschrift nicht eingehalten wird,
übernimmt der Hersteller keine Haftung für
Sach- oder Personenschäden. Sofern nicht
bereits ein Stecker befestigt ist, einen Stecker
anbringen, der der auf dem Typenschild
angegebenen Last entspricht. Der Erdleiter ist
gelb/grün. Der Stecker muss immer zugänglich
sein. Wenn die Kochmulde direkt an die
Stromversor-gung angeschlossen ist, muss ein
Trennscha lter eingebaut werden. Ei n
beschädigtes Netzkabel muss von einem
qualifizierten Techniker ausgetauscht werden,
um mögliche Gefahren zu vermeiden. Der
Erdleiter (grün/gelb) muss mindestens 10 mm
länger sein als die Phasen- und Nullleiter. Der
Querschnitt des Kabels muss hinsichtlich der
absorbierten Leistung der Gaskochmulde
ausreichend bemessen sein. Angaben zur
Spannung entnehmen Sie bitte dem Typenschild.
Stellen Sie sicher, dass es sich um ein Stromkabel
vom Typ 3x0,75 mm handelt2 H05GG-F
Falls ein Gerät nicht mit einem Stromkabel und -
stecker ausgestattet sein sollte bzw. nicht mit
anderen Mi tteln für da s Trennen des
Kontaktstroms, d.h. mit einer Trennung an allen
Polen für die vollständige Trennung gemäß
Überspannungskategorie III, muss aus den
Anleitungen hervorgehen, dass die Trennvorrich-
tungen gemäß den Anschlussvorschriften ein
Bestandteil der festen Verkabelung sein muss.
GASANSCHLUSS
Diese Anweisungen gelten für qualifiziertes
Personal; die Installation der Geräte muss den
geltenden nationalen Normen entsprechen. (Nur
für GB: Die Gasinstallation \Inbetriebnahme muss
gemäß den gesetzlichen Vorschriften durch
einen „Gas Safe"-Installateur durchgeführt
werden). Alle Arbeiten müssen ausgeführt
werden während die Spannungsversorgung
getrenn t i st. Das Typenschild an der
Gaskochmulde informiert über den zu
verwendenden Gastyp. Der Anschluss an die
Gaszuleitung oder die Gasflasche darf erst
hergestellt werden, nachdem sichergestellt
wurde, dass es sich um einen geeigneten,
geregelten Gastyp handelt. Sollte es sich nicht um
einen geregelten Gastyp handeln, beachten Sie
SPANNUNGS-
FÜHREND
ERDE
NEUTRAL
L
N
Stromkabel
Netzver-
sorgung
Brauner Draht
Grün/gelber Draht
Blauer Draht
Zum
Unterputzanschluss
Anschluss
Grün/gelber Draht Erdungsanschluss
Blauer Draht Neutral Anschluss
Brauner Draht Spannungsanschluss

Die Anweisungen für die Änderung der
Gaseinstellung in den folgenden Absätzen. Für
Flüssiggas (Flaschengas) sind Druckregler zu
verwenden, die den geltenden nationalen Normen
entsprechen. Nur Leitungen, Unterlegscheiben
und Dichtungsscheiben verwenden, die den
geltenden nationalen Normen entsprechen.
Einige Modelle sind mit konischen Verbindungen
für die Installation in jenen Ländern ausgestattet,
in welchen ein solcher Verbindungstyp
vorgeschrieben ist. Abbildung 8 erläutert, wie Sie
die unterschiedlichen Anschluss-/Verbindungs-
typen erkennen (CY = zylindrisch, CO = konisch). In
jedem Fall muss der zylindrische Teil der
Verbindung mit der Gaskochmulde verbunden
werden.
Beim Anschließen der Gaskochmulde an die
Gasversorgung über elastische Schläuche
müssen Sie sicherstellen, dass die maximale
Entfernung des Schlauchs 2 Meter nicht
überschreitet.
Der elastische Schlauch muss so montiert
werden, dass er keinen Kontakt mit einem
beweglichen Teil des Gehäuses (z. B. einer
Schublade) hat, und er darf nicht durch Bereiche
geführt werden, in welchen er geknickt/
gequetscht oder anderweitig beschädigt werden
kann.
Um mögliche Schäden an der Gaskochmulde
zu vermeiden, führen Sie bitte die Installation
gemäß dieser Reihenfolge durch (Abb. 6*):
1. Montieren Sie die Teile, gemäß der Abbildung,
in dieser Reihenfolge:
A: 1/2 Adapterstecker, zylindrisch
B: 1/2 Dichtung
C: 1/2 Buchsenadapter, konisch-zylindrisch
oder zylindrisch-zylindrisch
2. Die Verbindungen mit dem Spannschlüssel
festziehen und darauf achten, dass die
Leitungen in ihrer Stellung verdreht werden.
3. Verbinden Sie den Anschluss „C" mit einem
starren Kupfer- oder flexiblen Stahlrohr mit
der Gasversorgung.
WICHTIG: Prüfen Sie die Rohrverbindung
abschließend mithilfe einer Seifenlösung auf
Leckagen. KEINE OFFENEN FLAMMEN! Stellen
Sie zudem sicher, dass das flexible Rohr keinen
Kontakt mit einem beweglichen Teil des
Schranks hat (z. B. eine Schublade) und dass es so
angeordnet ist, dass es vor Beschädigungen
geschützt ist. Warnung: Bei Gasgeruch in der
Nähe dieses Gerätes schalten Sie die
Gaszuführung zum Gerät unverzüglich ab. Rufen
Sie sofort einen Techniker herbei. Suchen Sie
niemals mit einer offenen Flamme nach einem
Leck.
ANPASSUNG DER GASKOCHMULDE AN
UNTERSCHIEDLICHE GASTYPEN
Gehen Sie bitte folgendermaßen vor, um die
Gaskochmulde an die Verwendung der
unterschiedlichen Gastypen anzupassen:
• Rippenrahmenroste und Brenner entfernen.
• Einen Sechskantschüssel (7 mm) in den
Brennerträger einsetzen (Abbildung 7*).
Die Düse abschrauben und gegen eine Düse
austauschen, die für das zu verwendende Gas
geeignet ist (siehe Gastyp-Tabelle)
REGELUNG DER MINDESTFLAMME
Nach dem Zünden der Brenner drehen Sie den
Regler auf die Mindeststellung. Entfernen Sie
den Reglerknopf dann (er lässt sich einfach
durch leichten Druck abziehen).
Die Schraube lässt sich mit einem kleinen
«Terminal»-Schraubendreher einfach regulieren;
siehe Abbildung 9*.
Durch Drehen der Schraube im Uhrzeigersinn
verringert sich der Gasfluss, während die
Drehung entgegen dem Uhrzeigersinn den
Fluss erhöht - Mit dieser Einstellung wird eine
Flamme von etwa 3 bis 4 mm Länge erreicht.
Tauschen Sie den Reglerknopf dann aus.
Bei der Versorgung mit Flüssiggas (LPG) muss
die Schraube für die Einstellung der Standflamme
(im Uhrzeigersinn) bis zum Endanschlag gedreht
werden.
Sobald Sie das Gas neu geregelt haben,
tauschen Sie das alte Gastypenschild an Ihrem
Gerät gegen das neue (das der Gaskochmulde
beiliegt) mit Angaben zu dem geregelten
Gastyp aus.
DE 20
* Siehe Abschnitt "Technische Informationen" am Ende dieser
Anleitung.
La pagina si sta caricando...
La pagina si sta caricando...
La pagina si sta caricando...
La pagina si sta caricando...
La pagina si sta caricando...
La pagina si sta caricando...
La pagina si sta caricando...
La pagina si sta caricando...
La pagina si sta caricando...
La pagina si sta caricando...
La pagina si sta caricando...
La pagina si sta caricando...
La pagina si sta caricando...
La pagina si sta caricando...
La pagina si sta caricando...
La pagina si sta caricando...
La pagina si sta caricando...
La pagina si sta caricando...
La pagina si sta caricando...
La pagina si sta caricando...
La pagina si sta caricando...
La pagina si sta caricando...
La pagina si sta caricando...
La pagina si sta caricando...
La pagina si sta caricando...
La pagina si sta caricando...
La pagina si sta caricando...
La pagina si sta caricando...
La pagina si sta caricando...
La pagina si sta caricando...
La pagina si sta caricando...
La pagina si sta caricando...
La pagina si sta caricando...
La pagina si sta caricando...
La pagina si sta caricando...
La pagina si sta caricando...
La pagina si sta caricando...
La pagina si sta caricando...
La pagina si sta caricando...
La pagina si sta caricando...
La pagina si sta caricando...
La pagina si sta caricando...
La pagina si sta caricando...
La pagina si sta caricando...
La pagina si sta caricando...
La pagina si sta caricando...
La pagina si sta caricando...
La pagina si sta caricando...
La pagina si sta caricando...
La pagina si sta caricando...
La pagina si sta caricando...
La pagina si sta caricando...
La pagina si sta caricando...
La pagina si sta caricando...
La pagina si sta caricando...
La pagina si sta caricando...
La pagina si sta caricando...
La pagina si sta caricando...
La pagina si sta caricando...
La pagina si sta caricando...
La pagina si sta caricando...
La pagina si sta caricando...
La pagina si sta caricando...
La pagina si sta caricando...
La pagina si sta caricando...
La pagina si sta caricando...
La pagina si sta caricando...
La pagina si sta caricando...
La pagina si sta caricando...
La pagina si sta caricando...
La pagina si sta caricando...
La pagina si sta caricando...
La pagina si sta caricando...
La pagina si sta caricando...
La pagina si sta caricando...
-
 1
1
-
 2
2
-
 3
3
-
 4
4
-
 5
5
-
 6
6
-
 7
7
-
 8
8
-
 9
9
-
 10
10
-
 11
11
-
 12
12
-
 13
13
-
 14
14
-
 15
15
-
 16
16
-
 17
17
-
 18
18
-
 19
19
-
 20
20
-
 21
21
-
 22
22
-
 23
23
-
 24
24
-
 25
25
-
 26
26
-
 27
27
-
 28
28
-
 29
29
-
 30
30
-
 31
31
-
 32
32
-
 33
33
-
 34
34
-
 35
35
-
 36
36
-
 37
37
-
 38
38
-
 39
39
-
 40
40
-
 41
41
-
 42
42
-
 43
43
-
 44
44
-
 45
45
-
 46
46
-
 47
47
-
 48
48
-
 49
49
-
 50
50
-
 51
51
-
 52
52
-
 53
53
-
 54
54
-
 55
55
-
 56
56
-
 57
57
-
 58
58
-
 59
59
-
 60
60
-
 61
61
-
 62
62
-
 63
63
-
 64
64
-
 65
65
-
 66
66
-
 67
67
-
 68
68
-
 69
69
-
 70
70
-
 71
71
-
 72
72
-
 73
73
-
 74
74
-
 75
75
-
 76
76
-
 77
77
-
 78
78
-
 79
79
-
 80
80
-
 81
81
-
 82
82
-
 83
83
-
 84
84
-
 85
85
-
 86
86
-
 87
87
-
 88
88
-
 89
89
-
 90
90
-
 91
91
-
 92
92
-
 93
93
-
 94
94
-
 95
95


in altre lingue
- français: Haier HAVG75HPBPB Manuel utilisateur
- español: Haier HAVG75HPBPB Manual de usuario
- Deutsch: Haier HAVG75HPBPB Benutzerhandbuch
- Nederlands: Haier HAVG75HPBPB Handleiding
- português: Haier HAVG75HPBPB Manual do usuário