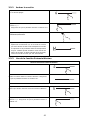
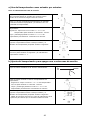
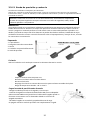
Haier HAMTP64MC Manuale utente
- Categoria
- Misurazione, test
- Tipo
- Manuale utente

1 1
1:1
K
项目
库
文件名
A
1
2
4
6
3
5
1
2
4
6
3
5
B
C
D
E
F
G
H
A
B
C
D
E
F
G
H
技术要求(版本号: A , 2018-01)
广东美的生活电器制造有限公司
会 签
材料:80G双胶纸
彭娟 卢灿飞制 图
设 计
校 对
审 核
标准化
审 定
日 期
标记
处数 更改文件号 签 字 日 期
多头电磁炉
使用说明书
重点
校对项
1.版面尺寸
2.材质标注
3.物料编码
4.颜色标注
5.客户型号
6.产品名称
7.重量标注
8.电压功率
古广君
古广君
-----
-----
-----
20210413
1、印刷颜色:胶装,单色;
2、说明书幅面大小为:210*290mm;
3、1:1图纸在第二页;
4、警语部分首字母高度≥3MM;
PN:**
HAIER-MC-IF7242H2C-W HAMTP54MB1

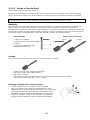
Thank you for purchasing the HAIER induction hob. Please read this instruction manual
carefully before using the hob and keep it in a safe place for future reference.
Instruction Manual For Induction Hob
Manual de Instrucciones para placa de inducción
Manuel d 'instruction pour plaque à induction
Manuale di istruzioni per il piano cottura a induzione
Manual de Instruções para Placa de Indução
PORTUGUÊS
ENGLISH
ESPAÑOL
FRANÇAIS
ITALIANO
HAMTP54MB1

Power Board: TP3-HD4-02
Main Control Board: TM-HD4-01ST / TM-HD2-01ST
Display Board: D-IF7242C
WIFI Module: ESP32-SOLO-1
Frequency bands: 2.412-2.472GHz
Maximum output power: +20dBm
Importer:
Candy Hoover Group s.r.l.
Via Eden Fumagalli 20861 Brugherio(MB), Branza, Italy
Manufacturer:
Candy Hoover Group s.r.l.
Via Eden Fumagalli 20861 Brugherio(MB), Branza, Italy

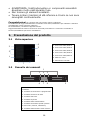
Content
1. Foreword ........................................................................................ 4
1.1 Safety Warnings .......................................................................... 4
1.2 Installation ................................................................................. 4
1.2.1 Electrical Shock Hazard ................................................... 4
1.2.2 Cut Hazard ................................................................... 4
1.2.3 Important safety instructions ........................................... 4
1.3 Operation and maintenance .......................................................... 5
1.3.1 Electrical Shock Hazard ................................................... 5
1.3.2 Health Hazard ............................................................... 6
1.3.3 Hot Surface Hazard ........................................................ 6
1.3.4 Cut Hazard ................................................................... 6
1.3.5 Important safety instructions ........................................... 6
2. Product Introduction ....................................................................... 8
2.1 Top View .................................................................................... 8
2.2 Control Panel .............................................................................. 8
2.3 Working Theory ........................................................................... 9
2.4 Before using your New Induction Hob ............................................. 9
2.5 Technical Specification .................................................................. 9
3. Operation of Product ....................................................................... 9
3.1 Touch Controls ............................................................................ 9
3.2 Choosing the right Cookware ....................................................... 10
3.3 How to use ............................................................................... 11
3.3.1 Start cooking .............................................................. 11
3.3.2 Finish cooking ............................................................. 12
3.3.3 Using the Boost function ............................................... 12
3.3.4 FLEXIBLE AREA ........................................................... 13
3.3.5 FRENCH PLAQUE .......................................................... 13
3.3.6 Locking the Controls ..................................................... 14
3.3.7 Pause Mode ................................................................. 14
3.3.8 Power Management Function ......................................... 14
3.3.9 Timer control............................................................... 15
3.3.10 Default working times ................................................. 17
3.3.11 Cook with me function .................................................. 18
3.3.12 Special functions. ....................................................... 19
3.3.13 Preci probe & Ladle .................................................... 20
4. Cooking Guidelines ........................................................................ 22
4.1 Cooking Tips ............................................................................. 22
4.1.1 Simmering, cooking rice ............................................... 22
4.1.2 Searing steak .............................................................. 22
4.1.3 For stir-frying .............................................................. 22
4.2 Detection of Small Articles .......................................................... 23
5. Heat Settings ................................................................................ 23
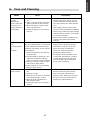
6. Care and Cleaning ......................................................................... 24

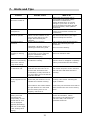
7. Hints and Tips ............................................................................... 25
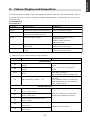
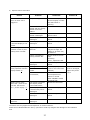
8. Failure Display and Inspection ...................................................... 26
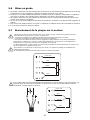
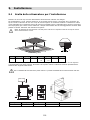
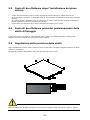
9. Installation ................................................................................... 28
9.1 Selection of installation equipment ............................................... 28
9.2 Before installing the hob, make sure that ...................................... 29
9.3 After installing the hob, make sure that ........................................ 30
9.4 Before locating the fixing brackets ............................................... 30
9.5 Adjusting the bracket position ..................................................... 30
9.6 Cautions ................................................................................... 31
9.7 Connecting the hob to the mains power supply .............................. 31

4
Hereby, Candy Hoover Group Srl declares that the radio equipment is in compliance
with Directive 2014/53/EU. The full text of the EU declaration of conformity is available
at the following internet address: www.candy-group.com
1.
Foreword
1.1 Safety Warnings
Your safety is important to us. Please read this information
before using your cooktop.
1.2 Installation
1.2.1 Electrical Shock Hazard
Disconnect the appliance from the mains electricity supply
before carrying out any work or maintenance on it.
Connection to a good earth wiring system is essential and
mandatory.
Alterations to the domestic wiring system must only be
made by a qualified electrician.
Failure to follow this advice may result in electrical shock
or death.
1.2.2 Cut Hazard
Take care - panel edges are sharp.
Failure to use caution could result in injury or cuts.
1.2.3 Important safety instructions
Read these instructions carefully before installing or using
this appliance.
No combustible material or products should be placed on
this appliance at any time.
Please make this information available to the person
responsible for installing the appliance as it could reduce
your installation costs.
In order to avoid a hazard, this appliance must be installed
according to these instructions for installation.
This appliance is to be properly installed and earthed only
by a suitably qualified person.
This appliance should be connected to a circuit which
incorporates an isolating switch providing full
disconnection from the power supply.
ENGLISH

5
Failure to install the appliance correctly could invalidate
any warranty or liability claims.
This appliance can be used by children aged from 8 years
and above and persons with reduced physical, sensory or
mental capabilities or lack of experience and knowledge if
they have been given supervision or instruction concerning
use of the appliance in a safe way and understand the
hazards involved.
Children shall not play with the appliance. Cleaning and
user maintenance shall not be made by children without
supervision.
If the supply cord is damaged, it must be replaced by the
manufacturer, its service agent or similarly qualified
persons in order to avoid a hazard.
Warning: If the surface is cracked, switch off the appliance
to avoid the possibility of electric shock, for hob surfaces
of glass-ceramic or similar material which protect live parts
Metallic objects such as knives, forks, spoons and lids
should not be placed on the hob surface since they can get
hot
A steam cleaner is not to be used.
Do not use a steam cleaner to clean your cooktop.
The appliance is not intended to be operated by means of
an external timer or separate remote-control system.
WARNING: Danger of fire: do not store items on the
cooking surfaces.
The cooking process has to be supervised. A short term
cooking process has to be supervised continuously.
WARNING: Unattended cooking on a hob with fat or oil can
be dangerous and may result in fire. NEVER try to
extinguish a fire with water, but switch off the appliance
and then cover flame e.g. with a lid or a fire blanket.
1.3 Operation and maintenance
1.3.1 Electrical Shock Hazard
Do not cook on a broken or cracked cooktop. If the
cooktop surface should break or crack, switch the
appliance off immediately at the mains power supply (wall

6
switch) and contact a qualified technician.
Switch the cooktop off at the wall before cleaning or
maintenance.
Failure to follow this advice may result in electrical shock
or death.
1.3.2 Health Hazard
This appliance complies with electromagnetic safety
standards.
However, persons with cardiac pacemakers or other
electrical implants (such as insulin pumps) must consult
with their doctor or implant manufacturer before using this
appliance to make sure that their implants will not be
affected by the electromagnetic field.
Failure to follow this advice may result in death.
1.3.3 Hot Surface Hazard
During use, accessible parts of this appliance will become
hot enough to cause burns.
Do not let your body, clothing or any item other than
suitable cookware contact the Induction glass until the
surface is cool.
Keep children away.
Handles of saucepans may be hot to touch. Check
saucepan handles do not overhang other cooking zones
that are on. Keep handles out of reach of children.
Failure to follow this advice could result in burns and
scalds.
1.3.4 Cut Hazard
The razor-sharp blade of a cooktop scraper is exposed
when the safety cover is retracted. Use with extreme care
and always store safely and out of reach of children.
Failure to use caution could result in injury or cuts.
1.3.5 Important safety instructions
Never leave the appliance unattended when in use.
Boilover causes smoking and greasy spillovers that may
ignite.
Never use your appliance as a work or storage surface.
Never leave any objects or utensils on the appliance.
ENGLISH

7
Do not place or leave any magnetisable objects (e.g. credit
cards, memory cards) or electronic devices (e.g.
computers, MP3 players) near the appliance, as they may
be affected by its electromagnetic field.
Never use your appliance for warming or heating the
room.
After use, always turn off the cooking zones and the
cooktop as described in this manual (i.e. by using the
touch controls). Do not rely on the pan detection feature to
turn off the cooking zones when you remove the pans.
Do not allow children to play with the appliance or sit,
stand, or climb on it.
Do not store items of interest to children in cabinets above
the appliance. Children climbing on the cooktop could be
seriously injured.
Do not leave children alone or unattended in the area
where the appliance is in use.
Children or persons with a disability which limits their
ability to use the appliance should have a responsible and
competent person to instruct them in its use. The
instructor should be satisfied that they can use the
appliance without danger to themselves or their
surroundings.
Do not repair or replace any part of the appliance unless
specifically recommended in the manual. All other
servicing should be done by a qualified technician.
Do not place or drop heavy objects on your cooktop.
Do not stand on your cooktop.
Do not use pans with jagged edges or drag pans across
the Induction glass surface as this can scratch the glass.
Do not use scourers or any other harsh abrasive cleaning
agents to clean your cooktop, as these can scratch the
Induction glass.
This appliance is intended to be used in household and
similar applications such as: -staff kitchen areas in shops,
offices and other working environments; -farm houses; -by
clients in hotels, motels and other residential type
environments; -bed and breakfast type environments.
WARNING: The appliance and its accessible parts become

8
hot during use.
Care should be taken to avoid touching heating elements.
Children less than 8 years of age shall be kept away unless
continuously supervised.
Congratulations on the purchase of your new Induction Hob.
We recommend that you spend some time to read this Instruction / Installation Manual in order to fully
understand how to install correctly and operate it.
For installation, please read the installation section.
Read all the safety instructions carefully before use and keep this Instruction / Installation Manual for
future reference.
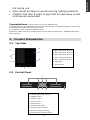
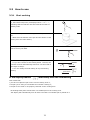
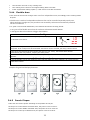
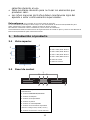
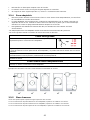
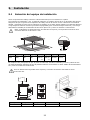
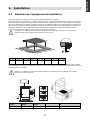
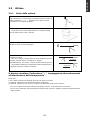
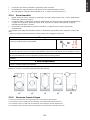
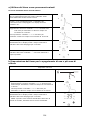
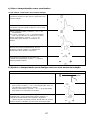
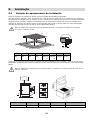
2.1 Top View
6
2
3
5
4
1
7
2.2 Control Panel
1. Max. 2000/3200 W zone
2. Max. 2000/3200 W zone
3. Max. 2200/3200 W zone
4. Max. 1400/2000 W zone
5. Max. 3000/3600 W zone
6. Glass plate
7. Control panel
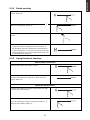
2. Product Introduction
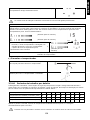
ENGLISH
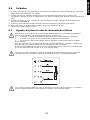
2876
543
1
1. Heating zone power controls
2. ON/OFF control
3. Keylock control
4. Timer control
5. Pause control
6. Flexible Area control
7. Special function control
(Simmering, Melting, Boiling)
8. Cook with me function control

9
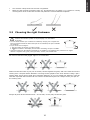
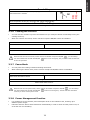
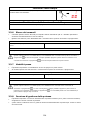
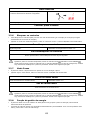
2.3 Working Theory
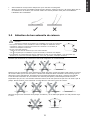
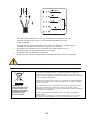
Induction cooking is a safe, advanced, efficient, and economical cooking technology. It works by
electromagnetic fields generating heat directly in the pan, rather than indirectly through heating the
glass surface. The glass becomes hot only because the pan eventually warms it up.
2.4 Before using your New Induction Hob
Read this guide, taking special note of the ‘Safety Warnings’ section.
Remove any protective film that may still be on your Induction hob.
2.5 Technical Specification
Weight and Dimensions are approximate. Because we continually strive to improve our products we
may change specifications and designs without prior notice.
The above may vary according to the size of the pan and the material it is made from.
3.
Operation of Product
3.1 Touch Controls
The controls respond to touch, so you don’t need to apply any pressure.
Use the ball of your finger, not its tip.
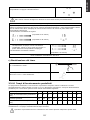
The base diameter of induction cookware
Cooking zone Minimum Maximum
1 & 2 80 200
3 100 210
4 80 140
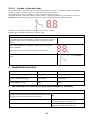
Flexing zone 80 200*400
iron pot
magnetic circuit
ceramic glass plate
induction coil
induced currents
Cooking Hob
HAMTP54MB1
Cooking Zones
4 Zones
Supply Voltage
220-240V~ 50Hz or 60Hz
Installed Electric Power
7200W
Product Size (mm)
650X520X56
Building-in Dimensions (mm)
560X480

10
You will hear a beep each time a touch is registered.
Make sure the controls are always clean, dry, and that there is no object (e.g. a utensil or a cloth)
covering them. Even a thin film of water may make the controls difficult to operate.
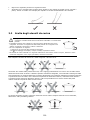
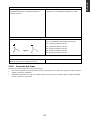
3.2 Choosing the right Cookware
• Only use cookware with a base suitable for induction cooking.
Look for the induction symbol on the packaging or on the bottom
of the pan.
• You can check whether your cookware is suitable by carrying out a magnet test.
Move a magnet towards the base of the pan. If it is attracted, the pan is suitable
for induction.
• If you do not have a magnet:
1. Put some water in the pan you want to check.
2. If does not flash in the display and the water is heating, the pan is suitable.
• Cookware made from the following materials is not suitable: pure stainless steel, aluminium or copper
without a magnetic base, glass, wood, porcelain, ceramic, and earthenware.
Do not use cookware with jagged edges or a curved base.
Make sure that the base of your pan is smooth, sits flat against the glass, and is the same size as the
cooking zone. Use pans whose diameter is as large as the graphic of the zone selected. Using a pot a
slightly wider energy will be used at its maximum efficiency. If you use smaller pot efficiency could be
less than expected. Pot less than 80 mm could be undetected by the hob. Always centre your pan on
the cooking zone.
Always lift pans off the Induction hob – do not slide, or they may scratch the glass.
ENGLISH

11
3.3 How to use
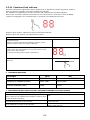
3.3.1 Start cooking
Touch the ON/OFF control for three seconds. After power
on, the buzzer beeps once, all displays show “–” or “– –”,
indicating that the induction hob has entered the state of
standby mode.
Place a suitable pan on the cooking zone that you wish to
use.
• Make sure the bottom of the pan and the surface of the
cooking zone are clean and dry.
Touching the heating zone slider control , and a indicator
next to the key will flash.
Select a heat setting by touching the slider control
• If you don’t choose a heat setting within 1 minute, the
Induction hob will automatically switch off. You will need to
start again at step 1.
• You can modify the heat setting at any time during
cooking.
If the display flashes alternately with the heat setting
This means that:
• you have not placed a pan on the correct cooking zone or,
• the pan you’re using is not suitable for induction cooking or,
• the pan is too small or not properly centered on the cooking zone.
No heating takes place unless there is a suitable pan on the cooking zone.
The display will automatically turn off after 2 minutes if no suitable pan is placed on it.
power up
power down

12
3.3.2 Finish cooking
Touching the heating zone selection control that you
wish to switch off.
Turn the cooking zone off by touching the slider to “ ”.
Make sure the display shows “0”.
Turn the whole cooktop off by touching the ON/OFF
control.
Beware of hot surfaces
H will show which cooking zone is hot to touch. It
will disappear when the surface has cooled down to
a safe temperature. It can also be used as an energy
saving function if you want to heat further pans, use
the hotplate that is still hot.
3.3.3 Using the Boost function
Activate the boost function
Touching the heating zone slider control
Touching the slider to the right end . Make sure the
display shows “P”.
Cancel the Boost function
Touching the heating zone slider control that you wish
to cancel the boost function.
Turn the cooking zone off by touching the slider to “ ”.
Make sure the display shows “0”.
ENGLISH

13
The function can work in any cooking zone.
The cooking zone returns to its original setting after 5 minutes.
If the original heat setting equals 0, it will return to 14 after 5 minutes.
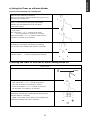
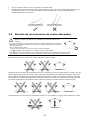
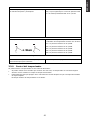
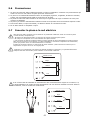
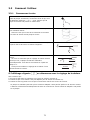
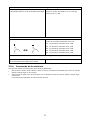
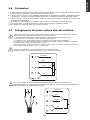
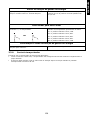
3.4.4 Flexible Area
• This area can be used as a single zone or as four independent zones, accordingly to the cooking needs
anytime.
• Flexible area is made of 4 independent inductors that can be controlled separately two by two.
When working as a single zone, the part that is not covered by cookware is automatically switched
off after one minute.
• To grant a correct heat distribution, the cookware should be correctly placed:
-
In any part of the flexible zone when the cookware is between 80 and 200mm.
-
In the big area when the cookware is bigger than 200mm.
As big zone
To activate the flexible area as a single big zone, simply press
the Flexible Area control.
The power setting works as any other normal area.
The power level is unique for all the flexible area and it can be selected just using a slider control
If the pot is moved from the front to the rear part (or vice versa), the flexible area detects
automatically the new position, keeping the same power.
To add a further pot, deactivate the Flexible area pressing the dedicated button, in order to detect the
cookware.
As four independent zones
To use the flexible area as four different zones with two different power settings, do not activate the
Flexible Area control
Examples for good and bad pot placement
3.4.5 French Plaque
• This area can set the power according to the position of the pot.
• If the pot is on the bottom of flexible area, the power is set to Level 1.
• If the pot is on the middle of flexible area, the power is set to Level 10.
• If the pot is on the top of flexible area, the power is set to Level 14.

14
French Plaque
To activate the French Plaque area, simply press the Flexible
Area control for 2 second
Move the position of the pot, the power will change automatically
Cancel French Plaque
Press the Flexible Area control to turn off the cooking zone.
3.3.6 Locking the Controls
You can lock the controls to prevent unintended use (for example children accidentally turning the
cooking zones on).
When the controls are locked, all the controls except the ON/OFF control are disabled.
To lock the controls
Touch and hold the Lock control for a while. The timer indicator will show “ Lo ”
To unlock the controls
Touch and hold the Lock control for a while.
When the hob is in the lock mode, all the controls are disable except the ON/OFF , you can always
turn the induction hob off with the ON/OFF control in an emergency, but you shall unlock the hob first
in the next operation.
3.3.7 Pause Mode
You can pause the heating instead of shutting the hob off.
When entering the Pause mode, all the controls except the ON/OFF control are disabled.
To enter pause mode
Short touch the Pause control
All the indicator will show “ 11“
To exit pause mode
Short touch Pause control.
When the hob is in the pause mode, all the controls are disable except the ON/OFF , you can always
turn the induction hob off with the ON/OFF control in an emergency. The hob will shut down after
10min if you don’t exit the pause mode.
3.3.8 Power Management Function
it is possible to set a maximum power absorption level for the induction hob, choosing up to
different power ranges.
induction hobs are able to limit themselves automatically in order to work at lower power level, to
avoid the risk of overloading.
ENGLISH

15
To enter Power Management Function
Turn on the hob, then Press at the same time
the Pause control and Lock control.
The timer indicator will show “ P5“ which means
To switch to another level
press +/- of the timer
or
There are 5 power levels, from “P1” to “p5”. The
timer indicator will show one of them.
Confirmation and Exit Power Management Function
Press at the same time Pause control and Lock
control for confirmation.
Then the hob will be turned off.
3.3.9 Timer control
You can use the timer in two different ways:
You can use it as a minute minder. In this case, the timer will not turn any cooking zone off when
the set time is up.
You can set it to turn one or more cooking zones off after the set time is up.
The timer of maximum is 99min.
power level 5。The default mode is on 7.2kW。
“P1” : the maximum power is 2.5kW.
“P3” : the maximum power is 4.5kW.
“P5” : the maximum power is 7.2kW.
“P2” : the maximum power is 3.5kW.
“P4” : the maximum power is 5.5kW.

16
a) Using the Timer as a Minute Minder
If you are not selecting any cooking zone
Make sure the cooktop is turned on.
Note: you can use the minute minder even if you’re not
selecting any cooking zone.
Touch “+” the controls of the timer. The minder
indicator will start flashing and “10” will show
in the timer display.
Set the time by touching the “-” or “+” control
of the timer
Hint: Touch the “-” or “+” control of the timer
once to decrease or increase by 1 minute.
Touch and hold the “-” or “+” control of the timer to
decrease or increase by 10 minutes.
When the time is set, it will begin to count down
immediately. The display will show the remaining
time and the timer indicator will flash for 5 seconds.
Buzzer will beep for 30 seconds and the timer
indicator shows “- - “ when the setting time finished.
b) Setting the timer to turn one or more cooking zones off
Set one zone
Touching the heating zone slider control
Set the time by touching the or control of the timer
Hint: Touch the “-“ or “+” control of the timer
once will decrease or increase by 1 minute.
Touch and hold the ”-“ or “+”control of the timer
will decrease or increase by 10 minutes.
When the time is set, it will begin to count down immediately.
The display will show the remaining time and the timer
indicator flash for 5 seconds.
NOTE: The red dot next to power level indicator will
illuminate indicating that zone is selected.
ENGLISH

17
When cooking timer expires, the corresponding cooking zone
will be switched off automatically.
Other cooking zone will keep operating if they are turned on previously.
set more zones:
The steps for setting more zones are similar to the steps of setting one zone;
When you set the time for several cooking zones simultaneously, decimal dots of the relevant cooking
zones are on. The minute display shows the min. timer. The dot of the corresponding zone flashes.
The shown as below:
(set to 15 minutes)
(set to 45 minutes)
Once the countdown timer expires, the corresponding
zone will switch off. Then it will show the new min.
timer and the dot of corresponding zone will flash.
The shown as right:
(set to 30 minutes)
Touch the heating zone selection control, the corresponding timer will be shown in the timer
indicator.
c) Cancel the timer
Touching the heating zone slider control that you want
to cancel the timer
Touch and hold the timer control “ - ”, the timer
decreases to “00” and the timer is cancelled.
3.3.10 Default working times
Auto shut down is a safety protection function for your induction hob. It shut down automatically if
ever you forget to turn off your cooking. The default working times for various power levels are shown
in the below table:
Power level
1
2
3
4
5
6
7
8
9
Default working timer (hour)
8
8
8
8
6
6
6
6
4
Power level
10 11 12 13 14
Default working timer (hour)
4
4
4
2
2
When the pot is removed, the induction hob can stop heating immediately and the hob automatically
switch off after 2 minutes.
People with a heart pace maker should consult with their doctor before using this unit.

18
3.3.11 Cook with me function
First of all, you should download hOn app and install to your portable device. Then enroll your
induction hob following the instructions directly from the App.
To make the pairing between Hob and APP use the following process:
Press 4 seconds the Cook with me button. Once the 4 seconds have passed, the digit of the TIMER
starts to blink with PA written on it and start the pairing process.
When wi-fi ON: one dot will appear on the right side of the LED.
When WIFI OFF: No dot will appear
How to set " Cook with me" Function
Choose from the hOn App recipes menu or special programs menu.
Follow step by step the indications on the App and when you have
finished send the parameters to the hob that will cook for you.
When the hob receives the command from the app, the hob will beep for
2 times and blink for one second to indicate that the instructions have
been received.
To start the recipe, press the “Cook with me” button.
If you want to get out of "Cook with me" function change the power
level of the zone.
a. WIRELESS PARAMETERS
Technology Wi-Fi BLE
Standard
IEEE 802.11b/n/g Bluetooth v4.2, BR/EDR, BLE
Frequency Band(s) [MHz]
2402-2480 2402-2480
Maximum Power [mW]
1500 1500
b. PRODUCT INFORMATION FOR NETWORKED EQUIPMENT
Product information for networked equipment
Power consumption of the product in networked standby if
all wired network ports are connected and all wireless
network ports are activated:
NA
How to activate wireless network port:
For WIFI activation, press 4 seconds the
“Cook with me” button
How to deactivate wireless network port:
For WIFI de-activation, press 4 seconds the
“Cook with me” button
ENGLISH
La pagina si sta caricando...
La pagina si sta caricando...
La pagina si sta caricando...
La pagina si sta caricando...
La pagina si sta caricando...
La pagina si sta caricando...
La pagina si sta caricando...
La pagina si sta caricando...
La pagina si sta caricando...
La pagina si sta caricando...
La pagina si sta caricando...
La pagina si sta caricando...
La pagina si sta caricando...
La pagina si sta caricando...
La pagina si sta caricando...
La pagina si sta caricando...
La pagina si sta caricando...
La pagina si sta caricando...
La pagina si sta caricando...
La pagina si sta caricando...
La pagina si sta caricando...
La pagina si sta caricando...
La pagina si sta caricando...
La pagina si sta caricando...
La pagina si sta caricando...
La pagina si sta caricando...
La pagina si sta caricando...
La pagina si sta caricando...
La pagina si sta caricando...
La pagina si sta caricando...
La pagina si sta caricando...
La pagina si sta caricando...
La pagina si sta caricando...
La pagina si sta caricando...
La pagina si sta caricando...
La pagina si sta caricando...
La pagina si sta caricando...
La pagina si sta caricando...
La pagina si sta caricando...
La pagina si sta caricando...
La pagina si sta caricando...
La pagina si sta caricando...
La pagina si sta caricando...
La pagina si sta caricando...
La pagina si sta caricando...
La pagina si sta caricando...
La pagina si sta caricando...
La pagina si sta caricando...
La pagina si sta caricando...
La pagina si sta caricando...
La pagina si sta caricando...
La pagina si sta caricando...
La pagina si sta caricando...
La pagina si sta caricando...
La pagina si sta caricando...
La pagina si sta caricando...
La pagina si sta caricando...
La pagina si sta caricando...
La pagina si sta caricando...
La pagina si sta caricando...
La pagina si sta caricando...
La pagina si sta caricando...
La pagina si sta caricando...
La pagina si sta caricando...
La pagina si sta caricando...
La pagina si sta caricando...
La pagina si sta caricando...
La pagina si sta caricando...
La pagina si sta caricando...
La pagina si sta caricando...
La pagina si sta caricando...
La pagina si sta caricando...
La pagina si sta caricando...
La pagina si sta caricando...
La pagina si sta caricando...
La pagina si sta caricando...
La pagina si sta caricando...
La pagina si sta caricando...
La pagina si sta caricando...
La pagina si sta caricando...
La pagina si sta caricando...
La pagina si sta caricando...
La pagina si sta caricando...
La pagina si sta caricando...
La pagina si sta caricando...
La pagina si sta caricando...
La pagina si sta caricando...
La pagina si sta caricando...
La pagina si sta caricando...
La pagina si sta caricando...
La pagina si sta caricando...
La pagina si sta caricando...
La pagina si sta caricando...
La pagina si sta caricando...
La pagina si sta caricando...
La pagina si sta caricando...
La pagina si sta caricando...
La pagina si sta caricando...
La pagina si sta caricando...
La pagina si sta caricando...
La pagina si sta caricando...
La pagina si sta caricando...
La pagina si sta caricando...
La pagina si sta caricando...
La pagina si sta caricando...
La pagina si sta caricando...
La pagina si sta caricando...
La pagina si sta caricando...
La pagina si sta caricando...
La pagina si sta caricando...
La pagina si sta caricando...
La pagina si sta caricando...
La pagina si sta caricando...
La pagina si sta caricando...
La pagina si sta caricando...
La pagina si sta caricando...
La pagina si sta caricando...
La pagina si sta caricando...
La pagina si sta caricando...
La pagina si sta caricando...
La pagina si sta caricando...
La pagina si sta caricando...
La pagina si sta caricando...
La pagina si sta caricando...
La pagina si sta caricando...
La pagina si sta caricando...
La pagina si sta caricando...
La pagina si sta caricando...
La pagina si sta caricando...
La pagina si sta caricando...
La pagina si sta caricando...
La pagina si sta caricando...
La pagina si sta caricando...
La pagina si sta caricando...
La pagina si sta caricando...
La pagina si sta caricando...
La pagina si sta caricando...
La pagina si sta caricando...
La pagina si sta caricando...
La pagina si sta caricando...
La pagina si sta caricando...
-
 1
1
-
 2
2
-
 3
3
-
 4
4
-
 5
5
-
 6
6
-
 7
7
-
 8
8
-
 9
9
-
 10
10
-
 11
11
-
 12
12
-
 13
13
-
 14
14
-
 15
15
-
 16
16
-
 17
17
-
 18
18
-
 19
19
-
 20
20
-
 21
21
-
 22
22
-
 23
23
-
 24
24
-
 25
25
-
 26
26
-
 27
27
-
 28
28
-
 29
29
-
 30
30
-
 31
31
-
 32
32
-
 33
33
-
 34
34
-
 35
35
-
 36
36
-
 37
37
-
 38
38
-
 39
39
-
 40
40
-
 41
41
-
 42
42
-
 43
43
-
 44
44
-
 45
45
-
 46
46
-
 47
47
-
 48
48
-
 49
49
-
 50
50
-
 51
51
-
 52
52
-
 53
53
-
 54
54
-
 55
55
-
 56
56
-
 57
57
-
 58
58
-
 59
59
-
 60
60
-
 61
61
-
 62
62
-
 63
63
-
 64
64
-
 65
65
-
 66
66
-
 67
67
-
 68
68
-
 69
69
-
 70
70
-
 71
71
-
 72
72
-
 73
73
-
 74
74
-
 75
75
-
 76
76
-
 77
77
-
 78
78
-
 79
79
-
 80
80
-
 81
81
-
 82
82
-
 83
83
-
 84
84
-
 85
85
-
 86
86
-
 87
87
-
 88
88
-
 89
89
-
 90
90
-
 91
91
-
 92
92
-
 93
93
-
 94
94
-
 95
95
-
 96
96
-
 97
97
-
 98
98
-
 99
99
-
 100
100
-
 101
101
-
 102
102
-
 103
103
-
 104
104
-
 105
105
-
 106
106
-
 107
107
-
 108
108
-
 109
109
-
 110
110
-
 111
111
-
 112
112
-
 113
113
-
 114
114
-
 115
115
-
 116
116
-
 117
117
-
 118
118
-
 119
119
-
 120
120
-
 121
121
-
 122
122
-
 123
123
-
 124
124
-
 125
125
-
 126
126
-
 127
127
-
 128
128
-
 129
129
-
 130
130
-
 131
131
-
 132
132
-
 133
133
-
 134
134
-
 135
135
-
 136
136
-
 137
137
-
 138
138
-
 139
139
-
 140
140
-
 141
141
-
 142
142
-
 143
143
-
 144
144
-
 145
145
-
 146
146
-
 147
147
-
 148
148
-
 149
149
-
 150
150
-
 151
151
-
 152
152
-
 153
153
-
 154
154
-
 155
155
-
 156
156
-
 157
157
-
 158
158
-
 159
159
-
 160
160
-
 161
161


Haier HAMTP64MC Manuale utente
- Categoria
- Misurazione, test
- Tipo
- Manuale utente
in altre lingue
- English: Haier HAMTP64MC User manual
- français: Haier HAMTP64MC Manuel utilisateur
- español: Haier HAMTP64MC Manual de usuario
- português: Haier HAMTP64MC Manual do usuário
Documenti correlati
-
Haier HAMTP64MC Manuale utente
-
-
Haier HAIPSJ64MC Manuale utente
-
Haier H6 ID23B3YTX Manuale utente
-
-
-
-
-
-
Altri documenti
-
Candy CIES642MCTT Manuale utente
-
Hoover HIES430B Manuale utente
-
Candy CIS633SCTT Manuale utente
-
-
-
-
ROSIERES RMCJS642DKTT Manuale utente
-
-
Hoover HIS642MCTT Manuale utente
-
Hoover HIFS954SC Manuale utente