I-GO EVERYWHERE CHARGER Manuale del proprietario
- Tipo
- Manuale del proprietario

Install . . . . . . . . . . . . . . . . . . . . . . . .Page 2
Installation . . . . . . . . . . . . . . . . . . . .Page 3
Instalar . . . . . . . . . . . . . . . . . . . . . . .Page 4
Installation . . . . . . . . . . . . . . . . . . . .Page 5
Installazione . . . . . . . . . . . . . . . . . . .Page 6
Instalar . . . . . . . . . . . . . . . . . . . . . . .Page 7
Installatie . . . . . . . . . . . . . . . . . . . . .Page 8
© 2002-2008 Mobility Electronics, Inc. Mobility Electronics and iGo are registered trademarks and one charger. all
your gadgets. simply switch the tip is a trademark of Mobility Electronics, Inc. All other brand names and logos are
trademarks of their respective owners. Specifications are subject to change without notice. Protected under one or
more of the following patents: 5,347,211; 6,064,177; 6,643,158; 6,650,560; 6,700,808; 6,751,109; 6,775,163;
6,791,853; 6,920,056; 6,937,490, 6,976,885 and 7,153,169. Other United States and foreign patents pending. Made in
China. P/N 8040406-01 Rev. A.
A/W P/N: 8330406-01
Rev:A
Material 80g art paper
User Guide
Congratulations on your iGo
®
power purchase! Universally compatible with
today’s most popular brands, the iGo everywhere power solution allows you
to power and charge from any standard wall or in-car outlet. Lose the
clutter of all those model-specific chargers and power your mobile phone,
Bluetooth
®
headset, smartphone/PDA, MP3 player, portable gaming device,
GPS device and more from this convenient power solution (iGo chargers
and power tips sold separately).
AC Unit
Input Voltage: 100-240 VAC
Dimensions 82.55 x 50.80 x 25.40mm
In-car Unit
Input Voltage: 11.0-16.5 VDC
Dimensions: 92.20 x 25.40 x 25.40mm
Retractable Cable
Case Dimensions: 55.10 x 66.04 x 23.62mm
Cord Length: 1.52m
Specifications:
Package Contents
• AC unit
• EU and UK plugs
• Retractable cable
• In-car unit
• Travel organizer
• User Guide
www.iGo.com
5WShizzle_UG_EMEA_rA:Layout 1 9/11/2008 10:16 AM Page 1

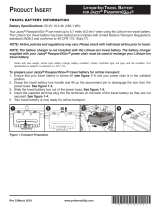
2
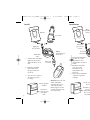
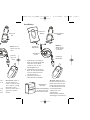
AC unit
In-car unit
Retractable
cable
Pockets for
power tips and
retractable
cable
Note:
Pull cable from
both sides.
Travel organizer
included
(light grey
end of cable)
(black end
of cable)
1. Connect the retractable
light grey cable end to
either the AC or in-car
unit.
2. Plug the retractable
black cable end to
the appropriate iGo
power tip.
3. You can now connect to
the device you wish
to charge.
Caution: Hold one end
of the cable while
retracting. Do not let
cable retract freely.
Cable may jam on reel
or whip back and forth
and cause injury.
Bloc
d'alimentati
en CA
Installation
Install
Cordon
rétractable
Pochettes p
les tips
d'alimentat
et le cordo
rétractabl
Kit de voya
inclus
(extrémité
gris clair du
cordon)
1. Connectez l'extrémité
gris clair du cordon
rétractable au bloc
d'alimentation en CA ou
en CC
2. Branchez l'extrémité
noire du cordon
rétractable au tip
d'alimentation iGo
approprié
3. Vous pouvez maintenant
connecter l'appareil à
recharger
5WShizzle_UG_EMEA_rA:Layout 1 9/11/2008 10:16 AM Page 2

3
In-car unit
for
and
ble
Note:
Pull cable from
both sides.
nizer
d
black end
of cable)
Caution: Hold one end
of the cable while
retracting. Do not let
cable retract freely.
Cable may jam on reel
or whip back and forth
and cause injury.
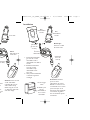
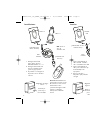
Bloc
d'alimentation
en CA
Installation
Bloc
d'alimentation
en CC
Cordon
rétractable
Pochettes pour
les tips
d'alimentation
et le cordon
rétractable
Remarque :
Tirez sur le câble
des deux côtés.
Kit de voyage
inclus
(extrémité
gris clair du
cordon)
(extrémité
noire du
cordon)
1. Connectez l'extrémité
gris clair du cordon
rétractable au bloc
d'alimentation en CA ou
en CC
2. Branchez l'extrémité
noire du cordon
rétractable au tip
d'alimentation iGo
approprié
3. Vous pouvez maintenant
connecter l'appareil à
recharger
Précaution: Tenez la
prise lors de la
rétractation du cordon.
Guidez le cordon lors de
sa rétractation. Le cordon
peut se bloquer sur le
dévidoir. Il peut également
vous blesser s’il génère
des mouvements rapides
incontrôlés.
5WShizzle_UG_EMEA_rA:Layout 1 9/11/2008 10:16 AM Page 3

4
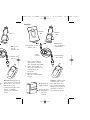
Instalar
Unidad de
CA
Unidad de
CC
Cable
retráctil
Cavidades para
power tips y
cable retráctil
Nota: Tire de
ambos lados del
cable.
Se incluye un
organizador de
viaje
(extremo gris
claro del cable)
(extremo
negro del
cable)
1. Conecte el extremo gris
claro del cable retráctil
a la unidad de CA o CC
2. Conecte el extremo del
cable negro retráctil en
el power tip iGo adecuado
3. Ahora puede conectarse
al dispositivo que desea
cargar
Precaución: Sujete el
enchufe mientras se
retrae el cable. No deje
que el cable se retraiga
libremente; podría
atascarse en la bobina o
golpearle y causarle
heridas.
Netzstrom
-Einheit
Aufrollbares
Kabel
Aufbewahrun
für Power-T
aufrollbares
Mitgeliefe
Reiseet
(hellgraues
Kabelende)
1. Schließen Sie das hellgraue
Ende des aufrollbaren Kabels
entweder an eine Netz-
steckdose oder an eine
Fahrzeugbatterie an
2. Schließen Sie das schwarze
Ende des aufrollbaren Kabels
an einen entsprechen-den
iGo-Power-Tip an
3. Jetzt können Sie das zu
ladende Gerät anschließen
Installation
5WShizzle_UG_EMEA_rA:Layout 1 9/11/2008 10:16 AM Page 4

5
e
Unidad de
CC
s para
ips y
ráctil
Nota: Tire de
ambos lados del
cable.
ye un
or de
e
(extremo
negro del
cable)
Precaución: Sujete el
enchufe mientras se
retrae el cable. No deje
que el cable se retraiga
libremente; podría
atascarse en la bobina o
golpearle y causarle
heridas.
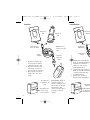
Netzstrom
-Einheit
Fahrzeugbatterie
-Einheit
Aufrollbares
Kabel
Aufbewahrungshüllen
für Power-Tips und
aufrollbares Kabel
Hinweis:
Ziehen Sie an
beiden Enden
des Kabels.
Mitgeliefertes
Reiseetui
(hellgraues
Kabelende)
(schwarzes
Kabelende)
1. Schließen Sie das hellgraue
Ende des aufrollbaren Kabels
entweder an eine Netz-
steckdose oder an eine
Fahrzeugbatterie an
2. Schließen Sie das schwarze
Ende des aufrollbaren Kabels
an einen entsprechen-den
iGo-Power-Tip an
3. Jetzt können Sie das zu
ladende Gerät anschließen
Vorsicht: Halten Sie den
Stecker beim Einrollen des
Kabels fest. Lassen Sie das
Kabel beim Einrollen nicht
los. Das Kabel könnte sich
sonst beim Einrollen
verklem-men oder
unkontrolliert
umherwirbeln und dabei
Verletzungen verursachen.
Installation
5WShizzle_UG_EMEA_rA:Layout 1 9/11/2008 10:16 AM Page 5

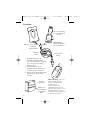
6
Unità c.a.
Unità c.c.
Cavo
retrattile
Tascabili per
power tips e
cavo retrattile
N.B. Tirare il
cavo da
entrambi i lati.
Organizer da viaggio
incluso
(estremità grigio
chiaro del cavo)
(estremità nera
del cavo)
1. Collegare l'estremità
grigio chiaro del cavo
retrattile all'unità c.a. o c.c.
2. Collegare l'estremità nera
del cavo retrattile al iGo
power tip appropriato
3. È possibile ora collegarsi al
dispositivo che si desidera
caricare
Attenzione: Mantenere la
spina mentre si ritrae il cavo.
Non lasciare il cavo ritrarsi
liberamente. Il cavo
potrebbe imbrogliarsi sulla
bobina o volteggiare
all'improvviso causando
lesioni.
Installazione
Unidade
CA
Cabo
retráctil
Bolsas p
de alimen
para c
retrá
Organiza
viagem in
(extremidade do cabo
cinzento-claro)
1. Ligue a extremidade do
cabo retráctil cinzento-
claro à unidade CA ou CC
2. Ligue a extremidade do
cabo preto retráctil ao tip
de alimentação iGo
apropriado
3. Agora pode ligar o
dispositivo que pretende
carregar
Instalar
5WShizzle_UG_EMEA_rA:Layout 1 9/11/2008 10:16 AM Page 6

7
Unità c.c.
N.B. Tirare il
cavo da
entrambi i lati.
aggio
(estremità nera
del cavo)
Attenzione: Mantenere la
spina mentre si ritrae il cavo.
Non lasciare il cavo ritrarsi
liberamente. Il cavo
potrebbe imbrogliarsi sulla
bobina o volteggiare
all'improvviso causando
lesioni.
Unidade
CA
Unidade
CC
Cabo
retráctil
Bolsas para tips
de alimentação e
para cabo
retráctil
Nota: Puxe o
cabo de ambas as
extremidades.
Organizador de
viagem incluído
(extremidade do cabo
cinzento-claro)
(extremidade do
cabo preto)
1. Ligue a extremidade do
cabo retráctil cinzento-
claro à unidade CA ou CC
2. Ligue a extremidade do
cabo preto retráctil ao tip
de alimentação iGo
apropriado
3. Agora pode ligar o
dispositivo que pretende
carregar
Atenção: Segure a ficha
enquanto puxa o cabo.
Não deixe deixe que o
cabo recolha livremente.
O cabo pode prender-se
na bobina ou soltar-se
provocando ferimentos.
Instalar
5WShizzle_UG_EMEA_rA:Layout 1 9/11/2008 10:16 AM Page 7

8
Netstroomvoorziening
Stroomvoorziening
voor gebruik binnen
de auto
Intrekbare
kabel
Zakken voor
stroomadapters
en intrekbare
kabel
Opmerking:
Verwijder de kabel
aan beide kanten
Inclusief
reisorganiser
(lichtgrijze
uiteinde kabel)
(zwart uiteinde
kabel)
1. Sluit het uiteinde van de
intrekbare lichtgrijze kabel
aan op de netstroomvoorziening
of op de stroomvoorziening
binnen de auto
2. Sluit het uiteinde van de
intrekbare zwarte kabel aan op
de juiste iGo-stroomadapter
3. U kunt nu een verbinding maken
met het apparaat dat u wilt
opladen.
Waarschuwing:
zorg ervoor
dat u de stekker vasthoudt
wanneer u de kabel intrekt.
De kabel mag niet
ongecontroleerd worden
ingetrokken. Hierdoor kan de
kabel in de knoop raken op de rol.
Daarnaast bestaat er de kans op
lichamelijk letsel als gevolg van het
rondzwiepen van de kabel.
Installatie
5WShizzle_UG_EMEA_rA:Layout 1 9/11/2008 10:16 AM Page 8
-
 1
1
-
 2
2
-
 3
3
-
 4
4
-
 5
5
-
 6
6
-
 7
7
-
 8
8


I-GO EVERYWHERE CHARGER Manuale del proprietario
- Tipo
- Manuale del proprietario
in altre lingue
- français: I-GO EVERYWHERE CHARGER Le manuel du propriétaire
- Deutsch: I-GO EVERYWHERE CHARGER Bedienungsanleitung
- Nederlands: I-GO EVERYWHERE CHARGER de handleiding
Documenti correlati


Altri documenti
-
Philips SCE4420 Manuale utente
-
Philips SCE4430 Manuale utente
-
Thrustmaster T-X3 BATTERY GRIP Manuale del proprietario
-
 Pride Mobility Jazzy Passport Manuale del proprietario
-
GYS STARTPACK TRUCK Manuale del proprietario
-
Targus Notebook Mouse Manuale utente
-
BaByliss D171E Manuale del proprietario
-
Altec Lansing iM4 Manuale utente
-
Drive 306DS-C Manuale del proprietario
