
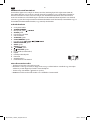
OCR 100
RadiOweCkeR Cd // CLOCk RadiO Cd //
RadiO deSPeRTadOR // RadiO-ReVeiL
de
GEBRAUCHSANWEISUNG 3
NL
GEBRUIKSAANWIJZING 52
eN
USER MANUAL 10
PL
INSTRUKCJA OBSŁUGI 59
eS
MANUAL DE INSTRUCCIONES 17
PT
MANUAL DE UTILIZAÇÃO 66
FR
MODE D’EMPLOI 24
RU
73
GR
ΟΗΓIΕΣ ΧΡΗΣΗΣ 31
Se
BRUKSANVISNING 80
HU
FELHASZNÁLÓI KÉZIKÖNYV 38
TR
KULLANIM KILAVUZU 87
iT
MANUALE DELL’UTENTE 45
IM_OCR 100_170907_V03
www.ok-online.com
Imtron GmbH
Wankelstraße 5
85046 Ingolstadt
Germany
www.imtron.eu
AUX IN
XBASS
REP1 ALL AM
FM
MHz
kHz
INTRO RAND MP3 NAP SNOOZE
Z
Z
MEMORY
AL2AL1
S T.
USB
CLOCK/
MEMORY
VOL
TUNE
+
–
SLEEP/NAPALARM
REPEAT/
RANDOM
SCAN/AMS
/ SOURCE
ST/MONOXBASS
9
2
1
10
AUX IN
XBASS
REP1 ALL AM
FM
MHz
kHz
INTRO RAND MP3 NAP SNOOZE
Z
Z
MEMORY
AL2AL1
S T.
USB
CLOCK/
MEMORY
VOL
TUNE
+
–
SLEEP/NAPALARM
REPEAT/
RANDOM
SCAN/AMS
/ SOURCE
ST/MONOXBASS
AUX IN
XBASS
REP1 ALL AM
FM
MHz
kHz
INTRO RAND MP3 NAP SNOOZE
Z
Z
MEMORY
AL2AL1
S T.
USB
CLOCK/
MEMORY
VOL
TUNE
+
–
SLEEP/NAPALARM
REPEAT/
RANDOM
SCAN/AMS
/ SOURCE
ST/MONOXBASS
2 Sec
AUX IN
XBASS
REP1 ALL AM
FM
MHz
kHz
INTRO RAND MP3 NAP SNOOZE
Z
Z
MEMORY
AL2AL1
S T.
USB
CLOCK/
MEMORY
VOL
TUNE
+
–
SLEEP/NAPALARM
REPEAT/
RANDOM
SCAN/AMS
/ SOURCE
ST/MONOXBASS
11
2 Sec
CLOCK/
MEMORY
VOL
TUNE
+
–
REPEAT/
RANDOM
SCAN/AMS
/ SOURCE
12
CLOCK/
MEMORY
VOL
TUNE
+
–
REPEAT/
RANDOM
SCAN/AMS
/ SOURCE
13
SNOOZE
DIMMER
CLOCK/
MEMORY
VOL
TUNE
+
–
SLEEP/NAPALARM
REPEAT/
RANDOM
SCAN/AMS
/ SOURCE
ST/MONOXBASS
AUX IN
14
SNOOZE
DIMMER
CLOCK/
MEMORY
VOL
TUNE
+
–
SLEEP/NAPALARM
REPEAT/
RANDOM
SCAN/AMS
/ SOURCE
ST/MONOXBASS
AUX IN
15
16
AUX IN
XBASS
REP1 ALL AM
FM
MHz
kHz
INTRO RAND MP3 NAP SNOOZE
Z
Z
MEMORY
AL2AL1
S T.
USB
CLOCK/
MEMORY
VOL
TUNE
+
–
SLEEP/NAPALARM
REPEAT/
RANDOM
SCAN/AMS
/ SOURCE
ST/MONOXBASS
AUX IN
XBASS
REP1 ALL AM
FM
MHz
kHz
INTRO RAND MP3 NAP SNOOZE
Z
Z
MEMORY
AL2AL1
S T.
USB
CLOCK/
MEMORY
VOL
TUNE
+
–
SLEEP/NAPALARM
REPEAT/
RANDOM
SCAN/AMS
/ SOURCE
ST/MONOXBASS
2 Sec
IM_OCR100_170907_V03_HR.indb 1 7/9/17 3:04 pm

SNOOZE
DIMMER
CLOCK/
MEMORY
VOL
TUNE
+
–
SLEEP/NAPALARM
REPEAT/
RANDOM
SCAN/AMS
/ SOURCE
ST/MONOXBASS
AUX IN
1
OPEN
2
OPEN
3
AUX IN
XBASS
REP1 ALL AM
FM
MHz
kHz
INTRO RAND MP3 NAP SNOOZE
Z
Z
MEMORY
AL2AL1
S T.
USB
CLOCK/
MEMORY
VOL
TUNE
+
–
SLEEP/NAPALARM
REPEAT/
RANDOM
SCAN/AMS
/ SOURCE
ST/MONOXBASS
4
5
AUX IN
XBASS
REP1 ALL AM
FM
MHz
kHz
INTRO RAND MP3 NAP SNOOZE
Z
Z
MEMORY
AL2AL1
S T.
USB
CLOCK/
MEMORY
VOL
TUNE
+
–
SLEEP/NAPALARM
REPEAT/
RANDOM
SCAN/AMS
/ SOURCE
ST/MONOXBASS
FM
MHz
AUX IN
XBASS
REP1 ALL AM
FM
MHz
kHz
INTRO RAND MP3 NAP SNOOZE
Z
Z
MEMORY
AL2AL1
S T.
USB
CLOCK/
MEMORY
VOL
TUNE
+
–
SLEEP/NAPALARM
REPEAT/
RANDOM
SCAN/AMS
/ SOURCE
ST/MONOXBASS
6
7
AUX IN
XBASS
REP1 ALL AM
FM
MHz
kHz
INTRO RAND MP3 NAP SNOOZE
Z
Z
MEMORY
AL2AL1
S T.
USB
CLOCK/
MEMORY
VOL
TUNE
+
–
SLEEP/NAPALARM
REPEAT/
RANDOM
SCAN/AMS
/ SOURCE
ST/MONOXBASS
AUX IN
XBASS
REP1 ALL AM
FM
MHz
kHz
INTRO RAND MP3 NAP SNOOZE
Z
Z
MEMORY
AL2AL1
S T.
USB
CLOCK/
MEMORY
VOL
TUNE
+
–
SLEEP/NAPALARM
REPEAT/
RANDOM
SCAN/AMS
/ SOURCE
ST/MONOXBASS
1
2
8
AUX IN
XBASS
REP1 ALL AM
FM
MHz
kHz
INTRO RAND MP3 NAP SNOOZE
Z
Z
MEMORY
AL2AL1
S T.
USB
CLOCK/
MEMORY
VOL
TUNE
+
–
SLEEP/NAPALARM
REPEAT/
RANDOM
SCAN/AMS
/ SOURCE
ST/MONOXBASS
OPEN
SNOOZE
DIMMER
USB
AUX IN
XBASS
REP1 ALL AM
FM
MHz
kHz
INTRO RAND MP3 NAP SNOOZE
Z
Z
MEMORY
AL2AL1
S T.
CLOCK/
MEMORY
VOL
TUNE
+
–
SLEEP/NAPALARM
REPEAT/
RANDOM
SCAN/AMS
/ SOURCE
ST/MONOXBASS
T
S
R
C
A
B
N
P
O
Q
D M
G I KE LF H J
IM_OCR100_170907_V03_HR.indb 2 7/9/17 3:04 pm

3
DE
HERZLICHEN GLÜCKWUNSCH
Vielen Dank, dass Sie sich für ein Produkt von ok. entschieden haben.
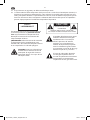
WICHTIGE SICHERHEITSANWEISUNGEN. BITTE AUFMERKSAM DURCHLESEN UND FÜR
SPÄTEREN GEBRAUCH AUFBEWAHREN.
1. Beachten Sie alle Sicherheitshinweise, um Schäden durch nicht sachgemäßen Gebrauch zu
vermeiden! Beachten Sie alle Warnhinweise auf dem Produkt sowie in dieser Gebrauchsanweisung.
2. Bewahren Sie die Gebrauchsanweisung für den weiteren Gebrauch auf. Sollte dieses Produkt an
Dritte weitergegeben werden, muss diese Gebrauchsanweisung mit ausgehändigt werden.
3. Im Falle von unsachgemäßem Gebrauch oder falscher Handhabung kann keine Haftung für
eventuell auftretende Schäden übernommen werden.
4. Verwenden Sie das Produkt nur für den vorgesehenen Zweck. Das Produkt ist nicht für
kommerziellen Gebrauch geeignet. Dieses Produkt ist für den Innengebrauch und ausschließlichen
Gebrauch im Haushalt konzipiert.
5. Das Produkt ist nur für die Verwendung in gemäßigten Breitengraden geeignet. Verwenden Sie es
nicht in den Tropen oder unter feuchten Klimabedingungen.
6. Versuchen Sie nie, das Produkt selbst zu reparieren. Lassen Sie das Produkt im Falle von Störungen
nur von qualizierten Fachleuten reparieren.
7. Warnung! Tauchen Sie elektrische Teile des Produkts während des Reinigens oder des Betriebs nie
in Wasser oder andere Flüssigkeiten. Halten Sie das Produkt nie unter ießendes Wasser.
8. Önen Sie unter keinen Umständen das Gehäuse. Führen Sie keine Gegenstände in das Innere des
Gehäuses ein.
9. Verbinden Sie den Netzstecker mit einer gut erreichbaren Steckdose, um im Notfall das Produkt
schnell von der Netzversorgung trennen zu können. Ziehen Sie den Netzstecker aus der Steckdose,
um das Produkt vollständig auszuschalten. Benutzen Sie den Netzstecker als Trennvorrichtung.
10. Überprüfen Sie regelmäßig den Netzstecker und das Netzkabel auf Beschädigungen. Ist die
Anschlussleitung dieses Produktes beschädigt, muss sie durch eine spezielle Anschlussleitung, die
beim Hersteller oder seinem Kundendienst erhältlich ist, ersetzt werden.
11. Verhindern Sie eine Beschädigung des Kabels durch Quetschen, Knicken oder Scheuern an scharfen
Kanten. Halten Sie es von heißen Oberächen und oenen Flammen fern.
12. Verlegen Sie das Kabel so, dass ein unbeabsichtigtes Ziehen bzw. ein Stolpern über das Kabel nicht
möglich ist. Halten Sie sowohl das Produkt als auch das Netzkabel außerhalb der Reichweite von
Kindern.
13. Die Benutzung von Zubehörteilen, die vom Hersteller nicht ausdrücklich empfohlen werden, kann
Verletzungen und Beschädigungen verursachen. Verwenden Sie deshalb nur Originalzubehör.
14. Stellen Sie keine schweren Gegenstände auf das Produkt. Stellen Sie keine Gegenstände mit
oenen Flammen, wie z.B. Kerzen auf oder neben das Produkt. Stellen Sie keine mit Flüssigkeit
gefüllten Gegenstände, wie z.B. Vasen, auf oder neben das Produkt.
15. Halten Sie das Produkt von allen heißen Flächen und oenen Flammen fern. Betreiben Sie das
Produkt immer auf einer ebenen, stabilen, sauberen und trockenen Fläche. Schützen Sie das
Produkt vor extremer Hitze und Kälte, Staub, direkter Sonneneinstrahlung, Feuchtigkeit sowie
Tropf- und Spritzwasser.
16. Decken Sie die Lüftungsönungen des Produkts nicht ab. Achten Sie auf eine ausreichende
Belüftung. Stellen Sie das Produkt nicht in einen Schrank. Lassen Sie mindestens 10 cm in allen
Richtungen um das Produkt Platz, um eine ausreichende Belüftung zu gewährleisten.
17. Die Belüftung darf nicht durch Abdecken der Lüftungsönungen mit Gegenständen behindert
werden, wie z.B. Zeitungen, Tischdecken, Vorhänge usw.
18. Das Produkt ist nur für die Verwendung in gemäßigten Breitengraden geeignet. Verwenden Sie es
nicht in den Tropen oder unter feuchten Klimabedingungen.
19. Achtung! Sollte das Produkt infolge der elektrostatischen Entladung und kurzer Überspannung
fehlerhaft funktionieren, trennen Sie es von der Netzversorgung und schließen Sie es erneut an..
20. Vorsicht! Benutzen Sie nur gleiche Batterietypen mit den entsprechenden technischen Daten zum
Ersatz. Explosionsgefahr!!
21. Setzen Sie Batterien keinen extremen Temperaturen, wie etwa direkter Sonneneinstrahlung oder
Feuer, aus.
22. Setzen Sie Batterien immer gemäß der korrekten Polarität (+ und –), wie im Batteriefach und auf
den Batterien abgebildet, ein.
IM_OCR100_170907_V03_HR.indb 3 7/9/17 3:04 pm

4
DE
23. Erlauben Sie Kindern nicht, Batterien ohne Aufsicht eines Erwachsenen zu wechseln.
24. Entfernen Sie die Batterien, wenn Sie das Produkt eine längere Zeit nicht verwenden.
25. Entfernen Sie verbrauchte Batterien sofort aus dem Produkt und entsorgen Sie diese
bestimmungsgemäß.
26. Batterien: Lesen Sie die Sicherheitsanweisungen des Batterieherstellers.
27. Dieses Produkt ist kein Spielzeug. Es darf nicht von Kindern verwendet werden.
28. Die Informationen auf der CD wird von einem Laser durch eine optische Linse eingelesen (nicht
berühren). Wenn das Produkt von einem kalten in einen warmen Raum gebracht wird, kann
Feuchtigkeit auf der Linse kondensieren und dadurch die Wiedergabe behindern. In diesem
Fall lassen Sie das Produkt vor dem Gebrauch eine Stunde bei Raumtemperatur akklimatisieren.
Entfernen Sie eine eingelegte CD aus dem Produkt. Sollte das Problem bestehen bleiben, lassen Sie
das Produkt von einem Fachmann überprüfen.
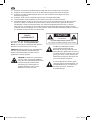
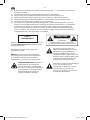
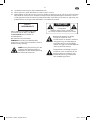
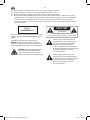
CLASS I
LASER PRODUCT
Das Etikett auf dem Produkt informiert den
Benutzer, dass dies ein Laserprodukt der
Klasse 1 ist und eine Laserkomponente enthält.
Berühren Sie nicht die Linse im CD-Fach.
VORSICHT! Die Verwendung von Steuer elemen-
ten oder das Vornehmen von Ein stellungen,
die hier nicht beschrieben werden, kann zu
gefährlicher Strahlung führen.
GEFAHR! Unsichtbare Laserstrahlung
tritt aus, wenn das Produkt geönet
wird oder die Sicherheitsmechanismen
außer Kraft gesetzt wurden bzw.
beschädigt sind. Vermeiden Sie
direkten Kontakt mit dem Strahl.
Berühren Sie nicht die Linse.
CAUTION
RISK OF ELECTRIC SHOCK
DO NOT OPEN
WARNING: SHOCK HAZARD - DO NOT OPEN
AVIS: RISQUE DE CHOC ÉLECTRIQUE-NE PAS OUVRIR
Der Blitz mit Pfeilspitze in einem
gleichseitigen Dreieck soll den
Benutzer auf das Vorhandensein von
nicht isolierter „gefährlicher Spannung”
im Gehäuse dieses Produktes, die stark
genug sein kann, um die Gefahr eines
elektrischen Schlags für Personen und
Tiere zu bedeuten, hinweisen.
Das Ausrufezeichen in einem gleich-
seitigen Dreieck soll den Benutzer auf
wichtige Bedienungs- und Wartungs-
hinweise hinweisen, die diesem
Produkt beiliegen.
IM_OCR100_170907_V03_HR.indb 4 7/9/17 3:04 pm

5
de
BESTIMMUNGSGEMÄSSE VERWENDUNG
Dieses Produkt ist für die Tonwiedergabe via CD, UKW-Radio (FM), USB-Speicher oder Audi-Eingang (AUX
IN) vorgesehen. Das Produkt ausschließlich gemäß diesen Anweisungen verwenden. Das Produkt ist
konzipiert für die Verwendung im privaten Haushalt und nicht für gewerblichen Gerbauch geeignet.
Die Imtron GmbH übernimmt keine Haftung für Schäden am Produkt, Sachschaden, oder Verletzung
von Personen aufgrund von unachtsamer, unsachgemäßer, falscher oder nicht dem vom Hersteller
angegebenen Zweck entsprechender Verwendung des Produkts.
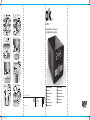
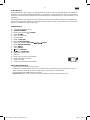
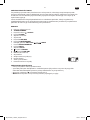
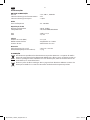
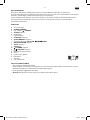
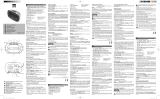
KOMPONENTEN
A. CD-Player Deckel
B. SNOOZE/DIMMER
C. Ein-/Aus-Taste
/ SOURCE
D. Taste ALARM
E. Kopfhörerbuchse
F. USB-Anschluss
G. Taste SLEEP/NAP
H. Taste CLOCK/MEMORY
I. Lautstärkeregler VOL/TUNE / /MODE
J. Taste REPEAT/RANDOM
K. Taste XBASS
L. AUX IN Buchse
M. Taste ST/MONO
N. Taste SCAN/AMS
O. Lautsprecher (beidseitig)
P. Display
Q. Deckelönungsmulde
R. Batteriefach
S. Wurfantenne
T. Netzkabel mit Netzstecker
VOR DEM ERSTEN GEBRAUCH
• Entfernen Sie alle Verpackungsmaterialien.
• Überprüfen Sie den Lieferumfang auf Vollständigkeit und eventuelle Transport schä den. Sollten
Transportschäden vorhanden oder der Lieferumfang unvollständig sein, so kontaktieren Sie Ihre
Verkaufsstelle.
• Reinigen Sie das Produkt ( Reinigung und Pege).
• Wichtig! Entnehmen Sie vor dem ersten Gebrauch die Schutzabdeckung aus dem CD-Fach.
IM_OCR100_170907_V03_HR.indb 5 7/9/17 3:04 pm

6
dede
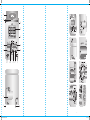
INSTALLATION
1
Stellen Sie das Produkt auf einen ebenen, waagerechten und festen Untergrund.
2
Wenn gewünscht können 2 Batterien eingelegt werden, damit im Falle eines Stromausfalles
Einstellungen erhalten bleiben. Önen Sie dazu das Batteriefach, indem Sie den Deckel abnehmen.
Legen Sie 2 Batterien des Typs AAA/LR03 ein (nicht im Lieferumfang enthalten). Achten Sie
dabei auf die korrekte Polarität (+/-) gemäß dem Aufdruck im Batteriefach. Schließen Sie den
Batteriefachdeckel.
3
Befestigen Sie das Ende der Wurfantenne soweit wie möglich oben für besten Radioempfang.
Stecken Sie den Netzstecker in eine geeignete Steckdose.
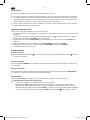
UHRZEIT EINSTELLEN
Sie können die Uhrzeit nur im Standby Modus einstellen.
1. Wenn das Gerät zum ersten mal mit dem Stromnetz verbunden ist, wird im Standby Modus 0:00 auf
dem Display angezeigt.
2. Halten Sie ggf. die Ein-/Aus-Taste
für ca. 2 Sekunden gedrückt, um das Radio auszuschalten. Halten
Sie die Taste CLOCK 2 Sekundenlang gedrückt.
3. Stellen Sie mit dem Lautstärkeregler VOL/TUNE das Stundenformat 12H oder 24H ein und bestätigen
Sie die Auswahl mit der Taste CLOCK.
4. Stellen Sie nun die Stunden mit dem Lautstärkeregler VOL/TUNE ein und bestätigen Sie die Auswahl
mit der Taste CLOCK.
5. Stellen Sie nun die Minuten mit dem Lautstärkeregler VOL/TUNE ein und bestätigen Sie die Auswahl
mit der Taste CLOCK.
6. Die Einstellung wurde damit abgeschlossen.
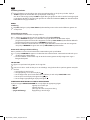
BEDIENUNG
Ein- und Ausschalten
4
Drücken Sie die Ein-/Aus-Taste
, um das Produkt einzuschalten. Zum Ausschalten drücken Sie die
Ein-/Aus-Taste für mind. 2 Sekunden.
Funktion auswählen
5
Drücken Sie die Taste SOURCE um eine Funktion in der Reihenfolge UKW-Radio, AUX (AUX IN
Audioeingang), CD. USB (USb) auszuwählen.
Lautstärkeregelung
6
Die Lautstärke kann einfach durch Drehen des Lautstärkereglers VOL/TUNE an der Hi-Anlage. Die
eingestellte Lautstärke wird für einen Moment im Display angezeigt.
XBASS -Funktion
Drücken Sie die Taste XBASS um die Tiefen anzuheben. Durch erneutes Drücken wird die Funktion
wieder abgestellt.
7
Timer- oder Kurzschlaunktion
• Diese Funktion steht nur zur Verfügungen wenn das Radio ausgeschaltet ist.
• Drücken Sie die Taste NAP. Die voreingestellte Zeit beträgt 10 Minuten. Stellen Sie ggf. mit dem
Lautstärkeregler die Zeit in Minuten ein. Bestätigen Sie die eingestellte Zeit und aktivieren Sie
den Timer durch erneutes Drücken der Taste NAP. Ist die eingestellte Zeit abgelaufen ertönt ein
Alarmton. Drücken Sie die Taste NAP oder Ein/Aus
um den Alarm abzustellen.
IM_OCR100_170907_V03_HR.indb 6 7/9/17 3:04 pm

7
de
Abschaltfunktion SLEEP
8
Diese Funktion steht nur zur Verfügung wenn eine Wiedergabe oder Radioempfang stattndet.
Drücken Sie die Taste SLEEP bis 90 Minuten im Display erscheint. Durch ggf. mehrmaliges Drücken
der Taste SLEEP stellen Sie die gewünschte Abschaltzeit 90, 60, 45, 30 oder 15 Minuten ein. Durch
ein weiteres Drücken deaktivieren Sie die Funktion wieder (OFF). Ist die voreingestellte Zeit
abgelaufen, wird das Gerät ausgeschalten.
RADIO - MODUS
Radiosender manuell einstellen
9
Wählen Sie den UKW-Radiomodus (FM). Drücken Sie den Lautstärkeregler VOL/TUNE und stellen
Sie danach durch Drehen desselben die gewünschte Frequenz ein.
Programmspeicher
20 Radiostationen kann ein individueller Programmspeicherplatz zugewiesen werden.
10
1. Wählen Sie einen Radiosender wie im Absatz Radiosender einstellen beschrieben.
2. Drücken Sie Taste MEMORY für 2 Sekunden. Die Programmanzeige P-01 oder P-XX blinkt.
Wählen Sie einen Programmspeicherplatz von P-01 bis P-20 durch Drehen des Lautstärkereglers
VOL/TUNE. Bestätigen Sie den eingestellten Programmspeicherplatz durch erneutes Drücken
der Taste MEMORY.
3. Haben Sie Ihre Radiosender wie gewünscht abgespeichert, können Sie diese durch Drücken
der Taste MEMORY und Drehen des Lautstärkereglers VOL/TUNE können Sie abgespeicherte
Sender von P-01 bis P-20 auswählen.
Automatischer Sendersuchlauf und Programmspeicherplatzzuweisung
Das Gerät ist ausgestattet mit automatischer Sendersuchlauunktion und speichert die empfangenen
Radiosender selbständig ab.
11
1. Drücken und halten Sie die SCAN/AMS und lassen Sie sie dann los. für 2 Sekunden. Der
automatische Sendersuchlauf startet und die empfangenen Radiosender werden automatisch
abgespeichert.
2. Ist der Vorgang beendet, können Sie die abgespeicherten Radiosender wie im vorherigen Kapitel
angegeben auswählen.
CD - MODUS
12
Önen Sie den Deckel des CD-Players durch Aufziehen der Deckelöungsmulde. Entfernen Sie
beim ersten Mal die Transportsicherung, indem Sie die Pappscheibe einfach nach oben entnehmen.
13
Legen Sie eine CD ein. Stellen Sie sicher, dass diese korrekt auf der Zentrierung einrastet. Schließen
Sie den Deckel durch herunterdrücken.
1. Wählen Sie den CD-Playermodus (Cd).
2. Zum Abspielen der CD drücken Sie die Wiedergabetaste
.
3. Zum Überspringen oder Auswählen einzelner Titel oder zurückspringen drücken Sie den VOL/
TUNE -Regler und drehen Sie ihn dann.
4. Zum Pausieren eines Titels drücken Sie die Wiedergabetaste .
5. Zum Stoppen (Beenden) der Wiedergabe drücken Sie die Taste .
WIEDERHOLFUNKTION UND ZUFALLSWIEDERGABE
Drücken Sie die Taste REPEAT/RANDOM um folgende Optionen zu wählen:
• REP 1 Den aktuellen Track wiederholen
• REP ALL Alle Tracks wiederholen
• RAND Alle Titel werden in zufälliger Reihenfolge wiedergegeben.
• (Anzeige erlischt) Normale Wiedergabe
IM_OCR100_170907_V03_HR.indb 7 7/9/17 3:04 pm

8
dede
USB Modus
14
Verbinden Sie ein USB-Laufwerk am USB-Anschluss.
1. Wählen Sie den USB-Modus (USb).
2. Die Daten des USB-Laufwerks werden eingelesen und die Wiedergabe beginnt automatisch mit
dem ersten Titel.
3. Die Wiedergabe kann wie im CD-Playermodus bedient werden. Alle Basisfunktionen wie
Wiedergabe/Pause
, Titelsprung vor/zurück oder sind verfügbar.
Alle Titel, die Sie abspielen sich in einem Ordner auf dem USB-Laufwerk benden. Titel in
Unterordnern werden nicht abgespielt. Die Reihenfolge beim Abspielen wird durch die Reihenfolge
im Ordner vorgegeben.
Hinweis: Verbinden Sie das USB-Gerät direkt mit dem USB-Port Ihres Gerätes. Die Verwendung
eines Verlängerungskabels wird nicht empfohlen und kann zu Funkstörungen und fehlerhaftem
Datentransfer führen. Dieses Produkt unterstützt USB 1.1 und 2.0.
AUX IN MODUS
15
Verbinden Sie Ihr Wiedergabegerät und das Produkt mit einem passenden Audiokabel mit 3,5mm
Klinken.
1. Haben Sie beide Geräte verbunden starten Sie die Wiedergabe.
2. Bedienen Sie die Wiedergabe über Ihr Wiedergabegerät.
3. Die Lautstärke können Sie mit Lautstärkeregler VOL/TUNE am Produkt ändern.
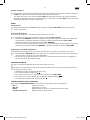
ALARM EINSTELLEN UND AKTIVIEREN
16
Der Alarm lässt sich nur bei ausgeschaltetem Produkt, d.h. im Standby-Modus einstellen:
Alarm 1 und 2
1. Drücken Sie die Taste ALARM für ca. 2 Sekunden und wählen Sie Alarm 1 (AL 1) oder Alarm 2
(AL 2) aus.
2. Drücken Sie erneut die Taste ALARM, stellen Sie mit dem Lautstärkeregler VOL/TUNE die
Stunden ein und bestätigen Sie durch Drücken der Taste ALARM. Stellen Sie nun genauso
die Minuten ein und bestätigen Sie durch Drücken der Taste ALARM. Wählen Sie nun die
Alarmfunktion Alarmsignal
, CD oder Radio mit dem Lautstärkeregler VOL/TUNE aus
und bestätigen Sie erneut durch Drücken der Taste ALARM. Damit ist die Einstellung beendet.
3. Die Einstellung von Alarm 1 (AL 1) oder Alarm 2 (AL 2) erfolgt auf die gleiche Weise.
4. Die Alarmzeiten Alarm 1 (AL 1) oder Alarm 2 (AL 2) können bei ein- und ausgeschaltetem
Produkt durch mehrmaliges Drücken der Taste ALARM aktiviert und deaktiviert werden.
5. Ertönt ein Alarm können Sie diesen durch Drücken der Ein-/Aus-Taste abstellen.
REINIGUNG UND PFLEGE
• Vor dem Reinigen das Produkt vom Netz trennen. Das Produkt mit einem weichen, feuchten Tuch und
mildem Reinigungsmittel reinigen. Anschliesend trocken nachreiben. Zum Reinigen des Produktes
keinen Alkohol, Aceton, Benzol, scheuernde Reinigungsmittel usw. verwenden. Keine harten Bürsten
oder Metallgegenstände verwenden.
• Warnung! Tauchen Sie elektrische Teile des Produktes während des Reinigens nie in Wasser oder
andere Flüssigkeiten. Halten Sie es nie unter ießendes Wasser.
• Warnung! Verwenden Sie zur Reinigung keinesfalls Lösungs- und Scheuermittel, harte Bürsten,
metallische oder scharfe Gegenstände. Lösungsmittel sind gesundheitsschädlich und greifen die
Plastikteile an; scheuernde Reiniger und Hilfsmittel zerkratzen die Oberäche.
IM_OCR100_170907_V03_HR.indb 8 7/9/17 3:04 pm

9
de
TECHNISCHE DATEN
STROMVERSORGUNG
Eingang : 110 - 240 V~, 50/60 Hz
Leistungsaufnahme im Betrieb : 9 W
Stromverbrauch im Stand-by : <1,0 W
Radio
Frequenzbereich : 88 - 108 MHz
CD-Wiedergabe
Frequenzgang : 20 Hz - 20 KHz
Kompatibilität : CD/CDR/CDRW/MP3/WMA
USB : USB 1,1 und 2,0
AUX : 3,5 mm
Lautsprecher
Ausgangsleistung (Eektivwert) : 2 x 1,5 W
Klangverstärkung : Amplier IC: CS4863
Klangsystem : 2 x 2,5" Lautsprecher
Abmessung
Hauptgerät (B x H x T) : 150 x 123 x 195 mm
Gewicht (Hauptgerät und zwei Lautsprecher) : 1,1 kg
ENTSORGUNG
Das Produkt nicht im Hausmüll entsorgen. Das Produkt ist an den ausgewiesenen
Sammelstellen für elektrische und elektronische Geräte zu entsorgen. Für weitere Informationen
wenden Sie sich bitte an Ihren Händler oder die zuständige Behörde am Ort.
Bitte entsorgen Sie die Batterien umweltgerecht. Werfen Sie Batterien nicht in den Hausmüll.
Benutzen Sie bitte die Rückgabeund Sammelsysteme in Ihrer Gemeinde oder wenden Sie sich
an den Händler, bei dem das Produkt gekauft wurde.
IM_OCR100_170907_V03_HR.indb 9 7/9/17 3:04 pm

10
EN
CONGRATULATIONS
Thanks for your purchase of this ok. product.
IMPORTANT SAFETY INSTRUCTIONS. READ CAREFULLY AND KEEP FOR FUTURE REFERENCE.
1. Observe all safety instructions to avoid damage through improper use! Follow all safety warnings
on the product and in this instruction manual.
2. Keep this instruction manual for future use. Should this product be passed on to a third party, then
this instruction manual must be included.
3. No liability will be accepted for damage resulting from improper use or non-compliance with these
instructions.
4. Only use this product for its intended use. The product is not suitable for commercial use. This
product is only suitable for indoor and household use.
5. Before connecting the product to the power supply, check that the power supply voltage and
current rating corresponds with the power supply details shown on the product rating label.
6. Do not attempt to repair the product yourself. In case of malfunction, repairs are to be conducted
by qualied personnel only.
7. Warning! During cleaning or operation do not immerse the electrical parts of the product in water
or other liquids. Never hold the product under running water.
8. Do not open the product casing under any circumstances. Do not insert any foreign objects into
the inside of the casing.
9. Connect the power plug to an easily reachable electrical outlet so that in case of an emergency
the product can be unplugged immediately. Pull the power plug out of the electrical outlet to
completely switch o the product. Use the power plug as the disconnection device.
10. Regularly check the power plug and power cord for damage. If the supply cord is damaged, it must
be replaced by a special cord or assembly available from the manufacturer or its service agent.
11. To avoid damaging the cord, do not squeeze, bend or chafe it on sharp edges. Keep it away from
hot surfaces and open ames as well.
12. Lay out the cord in such a way that no unintentional pulling or tripping over it is possible. Keep the
product and its cord out of reach of children.
13. Never use accessories which are not recommended by the manufacturer. They could pose a safety
risk to the user and might damage the product. Only use original parts and accessories.
14. Do not place heavy objects on top of the product. Do not place objects with open ames, e.g.
candles, on top of or beside the product. Do not place objects lled with water, e.g. vases, on or
near the product.
15. Keep the product away from any hot surfaces and open ames. Always operate the product on a
level, stable, clean and dry surface. Protect the product against heat and cold, dust, direct sunlight,
moisture, dripping and splashing water.
16. Do not cover the product’s air vents. Ensure that there is sucient ventilation. Keep a minimum
distance of 10 cm between the product and other objects or walls.
17. The ventilation should not be impeded by covering the ventilation openings with items, such as
newspapers, table-cloths, curtains, etc.
18. The product is only suitable for use at moderate degrees of latitude. Do not use it in the tropics or in
particularly humid climates.
19. Attention! In the event of a malfunction as a result of electrostatic discharge and momentary
electrical surges, unplug the product and plug it in again.
20. Caution! Danger of explosion if battery is incorrectly replaced. Replace only with the same or
equivalent type.
21. Batteries shall not be exposed to excessive heat such as sunshine, re or the like.
22. Always insert batteries correctly with regard to the polarities (+ and –) marked on the battery and
the battery compartment.
23. Do not allow children to replace batteries without adult supervision.
24. Remove the batteries if you will not be using the product for an extended period of time.
25. Exhausted batteries should be immediately removed from equipment and properly disposed of.
26. Please refer to the safety instructions provided by the battery manufacturer.
27. This product is not a toy and should not be used by children.
IM_OCR100_170907_V03_HR.indb 10 7/9/17 3:04 pm

11
EN
28. The information on the compact disc is read by a laser through an optical lens (do not touch). If
you take the product from a cold to a warm room, moisture may condense on the lens, and the
playback may be hampered. In this case leave the product for one hour at room temperature before
use. Take the disc out of the product. Should the problem persist, have the product checked by
qualied personnel.
CLASS I
LASER PRODUCT
This label on the product informs the user that
this is a class 1 laser product containing a laser
component.
Do not touch the lens inside the disc
compartment.
CAUTION! Use of controls or adjustments of
procedures other than those specied herein may
result in hazardous radiation exposure.
DANGER! Invisible laser radiation
when open and safety interlock failed
or defeated. Avoid direct exposure to
the beam. Do not touch the lens.
CAUTION
RISK OF ELECTRIC SHOCK
DO NOT OPEN
WARNING: SHOCK HAZARD - DO NOT OPEN
AVIS: RISQUE DE CHOC ÉLECTRIQUE-NE PAS OUVRIR
The lightning ash with arrowhead
within an equilateral triangle is
intended to alert the user to the
presence of uninsulated “dangerous
voltage” inside the enclosure of this
product, which may be of sucient
magnitude to constitute a risk of
electric shock to persons and animals.
The exclamation point within an
equilateral triangle is intended to
alert the user to the presence of
important operating and maintenance
instructions in the literature
accompanying this product.
IM_OCR100_170907_V03_HR.indb 11 7/9/17 3:04 pm

12
eN
INTENDED USE
This product is intended for audio playback via CD, FM-Radio USB storage and audio input (AUX IN). Any
other use may result in damage to product or injuries. This product is designed for household use only
and not intended for commercial use.
The Imtron GmbH assumes no liability for damage to the product, for property damage or for personal
injury due to careless or improper usage of the product, or usage of product which does not meet the
manufacturer’s specied purpose.
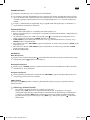
COMPONENTS
A. CD player lid
B. SNOOZE/DIMMER
C. Power button
/ SOURCE
D. ALARM button
E. Headphone jack
F. USB jack
G. SLEEP/NAP button
H. CLOCK/MEMORY button
I. Volume knob VOL/TUNE / / MODE
J. REPEAT/RANDOM button
K. XBASS button
L. AUX IN jack
M. ST/MONO button
N. SCAN/AMS button
O. Speakers (both sides)
P. Display
Q. Cover opening recess
R. Battery compartment
S. Wire aerial
T. Power cord with plug
BEFORE FIRST TIME USE
• Remove all packaging materials.
• Check for completeness and transport damage. In case of damages or incomplete delivery please
contact your dealer.
• Clean the product ( Cleaning and care).
• Important! Before rst use, remove the protective sheet from the disc compartment.
IM_OCR100_170907_V03_HR.indb 12 7/9/17 3:04 pm

13
eN
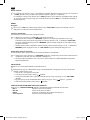
INSTALLATION
1
Place the product on an even, horizontal and steady surface.
2
If desired, two batteries can be inserted so that in the event of a power failure, settings are
maintained. Open the battery compartment by removing the cover. Insert 2 batteries type AAA/
LR03 (not included). Pay attention to the correct polarity (+/-) according to the imprint in the
battery compartment. Close the battery compartment cover.
3
Put the end of wire aerial up to receive at best signal strength. Connect the power plug to the
mains.
CLOCK SETUP
Clock setting is only possible in Standby/ OFF mode.
1. When product is connected with mains the rst time, 0:00 will be shown on the display in standby
mode.
2. If needed turn o the radio by pushing power button
for approx. 2 seconds. Press and hold CLOCK
for 2 seconds.
3. Use the VOL/TUNE volume control to set the 12H or 24H hour format and press CLOCK to conrm.
4. Now set the hours with the volume control VOL/TUNE and conrm with CLOCK.
5. Now set the minutes with the volume control VOL/TUNE and conrm with CLOCK.
6. The setting has now been completed.
OPERATION
Switching ON and OFF
4
Press power button
to switch on. For switching o, press power button for at least 2 seconds.
Mode selection
5
Press the SOURCE button to select mode in order FM radio, AUX (Audio in), CD and USB (USb).
Volume control
6
The loudspeaker volume can be easily controlled by turning the volume control VOL/TUNE. The
volume is shown in display for a moment.
XBASS function
Press the XBASS button to raise the bass. Press again to stop the function.
7
Timer or short-circuit function
• This function is only available when the radio is switched o.
• Press the NAP button. The default time is 10 minutes. If necessary, use the volume control to set
the time in minutes. Conrm the set time and activate the timer by pressing the NAP button
again. When the set time has elapsed, an alarm sound turns on. Press the NAP or power button
to stop the alarm.
IM_OCR100_170907_V03_HR.indb 13 7/9/17 3:04 pm

14
eN
Sleep function
8
This function is only available during playback or listening radio. Press the SLEEP button until 90
minutes shows on display. Move to step 7.
If necessary press the SLEEP key several times to set the desired shutdown time 90, 60, 45, 30 or 15
minutes. Press again to deactivate the function (OFF). If the preset time has elapsed, the product
turns o.
Radio mode
Tuning
9
Select FM radio mode. Press the VOL/TUNE volume control, then adjust the desired frequency by
turning it.
Memory preset
20 radio stations can be preset to a program list.
10
1. Set a station by tuning according to chapter Tuning.
2. Press the MEMORY button for 2 seconds. In display P-01 or P-XX ashes. Select a program
memory location from P-01 to P-20 by turning the VOL/TUNE volume control. Conrm the
program memory by pressing the MEMORY button again.
3. Once all the stations were preset, you can select any preset station from P-01 to P-20 by pressing
the MEMORY button and turning the VOL/TUNE volume control.
Auto scan and preset
This product is equipped with automatic station search and saving function.
11
1. Press the SCAN/AMS button for 2 seconds. The FM-radio will auto search and save all available
radio stations.
2. Once all the stations are preset, select your desired station by following steps as given in
previous chapter.
CD Player mode
12
Open the CD-player lid by pulling it up.
13
Insert a CD. Make sure it ts correctly on the arbor. Close the CD-player lid by pushing down.
1. Select CD-player mode (Cd).
2. For playback CD press
.
3. For skipping tracks for-/backward: rst press and then turn the VOL/TUNE knob.
4. For pausing a song press button Play again.
5. To stop playback press button.
REPEAT AND RANDOM FUNCTION
Press REPEAT/RANDOM button to select the following repeat modes:
• REP 1 repeat current track
• REP ALL repeat all tracks
• RAND Playback of all songs in random order
• (no indication) Playback in normal mode
IM_OCR100_170907_V03_HR.indb 14 7/9/17 3:04 pm

15
eN
USB mode
14
Connect a USB drive to the USB socket.
1. Select USB mode (USb).
2. The system is scanning the USB drive and starts playing the rst song automatically.
3. The playback can be controlled in the same way as for CD player. All basic functions as play/
pause
, skipping songs forward or are available.
Note: All songs to be played shall be in one folder on USB drive. Music which is saved in subfolders
cannot be played. The order of playing is given by the order of songs in folder.
Note: Connect the USB device directly to the USB port of the unit. Using an extension cable is not
recommended and may cause interference and failure of data transfer. This product supports USB
1.1 and 2.0.
AUX IN mode
15
Connect your music player and the product by audio cable with 3.5 mm-stereo jacks.
1. Once both devices are connected you can start playback at your music player.
2. Use the controls of your external audio device to control the playback.
3. The volume can be controlled by VOL/TUNE on the product.
ALARM SET AND ACTIVATE
16
The alarm can only be activated when the product is switched o, i. e. standby mode:
Alarms 1 and 2
1. Press the ALARM button for approx. 2 seconds and select Alarm 1 (AL 1) or Alarm 2 (AL 2).
2. Press ALARM again, adjust the hours with the VOL/TUNE volume control and press ALARM to
conrm. Set the minutes as well and conrm by pressing the ALARM button. Select the Alarm
signal
, CD or Radio with the VOL/TUNE volume control and conrm again by
pressing the ALARM button. This completes the setting.
3. The setting of Alarm 1 (AL 1) or Alarm 2 (AL 2) is done in the same way.
4. The alarm times Alarm 1 (AL 1) or Alarm 2 (AL 2) can be activated and deactivated by pressing
the ALARM key several times no matter the device is switched on or o.
5. If alarm starts, press the power button to turn it o.
CLEANING AND CARE
• Disconnect the product from the power supply before cleaning it. Clean the product with a soft, damp
cloth and a mild cleaning agent. Finish by wiping it with a dry cloth. Do not use alcohol, acetone,
benzene, scouring cleansers etc. to clean the product. Do not use hard brushes or metal objects.
• Warning! Never immerse electrical parts of the product in water during cleaning or operation. Never
hold the product under running water.
• Warning! When cleaning, never use solvents or abrasive materials, hard brushes, metallic or sharp
objects. Solvents are harmful to human health and can attack plastic parts, while abrasive cleaning
mechanisms and tools may scratch the surface(s).
IM_OCR100_170907_V03_HR.indb 15 7/9/17 3:04 pm

16
eN
SPECIFICATION
POWER SUPPLY
Input : 110 - 240 V~, 50/60 Hz
Operation power consumption : 9W
Standby power consumption : <1.0 W
Radio
Frequency range : 88 - 108 MHz
CD Playback
Frequency response : 20 Hz - 20 KHz
Compatibility : CD/CDR/CDRW/MP3/WMA
USB : USB 1.1 and 2.0
AUX : 3.5 mm
Speaker
Output power (RMS) : 2 x 1.5 W
Sound Enhancement : Amplier IC: CS4863
Sound System : 2 x 2.5" speaker
Dimension
Main unit (W x H x D) : 150 x 123 x 195 mm
Weight (Main unit and two speakers) : 1.1 kg
DISPOSAL
Do not dispose of this product as unsorted municipal waste. Return it to a designated collection
point for the recycling of WEEE. By doing so, you will help to conserve resources and protect the
environment. Contact your retailer or local authorities for more information.
Please dispose of batteries in an environmentally friendly manner. Do not put batteries into the
household waste. Please use the return and collection systems in your community or contact
the dealer where you purchased the product.
IM_OCR100_170907_V03_HR.indb 16 7/9/17 3:04 pm

17
ES
FELICIDADES
Gracias por adquirir este producto ok..
INSTRUCCIONES DE SEGURIDAD IMPORTANTES. LÉALAS CUIDADOSAMENTE Y CONSÉRVELAS
PARA FUTURAS CONSULTAS.
1. ¡Observe todas las instrucciones de seguridad para evitar daños provocados por un uso
inadecuado! Siga todas las advertencias de seguridad del dispositivo y de este manual de
instrucciones.
2. Guarde este manual de instrucciones para su posterior uso. Si este aparato pasa a manos de un
tercero, entréguele también este manual de instrucciones.
3. No se asumirá ninguna responsabilidad por daños provocados por un uso impropio o por el
incumplimiento de estas instrucciones.
4. Utilice este aparato sólo para la nalidad que se le ha designado. Este dispositivo no es apto para el
uso comercial. Este dispositivo sólo es apto para el uso doméstico y en espacios interiores.
5. Antes de conectar el aparato al suministro de alimentación, compruebe que el voltaje del
suministro y la corriente nominal corresponden a los detalles del suministro de alimentación que se
muestran en la etiqueta del aparato.
6. No intente reparar el aparato usted mismo. En caso de mal funcionamiento, las reparaciones sólo
deben ser llevadas a cabo por personal cualicado.
7. ¡Advertencia! Durante la limpieza o uso, no sumerja las piezas eléctricas del dispositivo en agua u
otros líquidos. Nunca sostenga el aparato bajo el agua corriente.
8. En ningún caso abra la cubierta del aparato. No inserte ningún objeto extraño en el interior de la
cubierta.
9. Conecte el enchufe a una toma de corriente de fácil acceso para que, en caso de emergencia, el
aparato pueda desenchufarse de inmediato. Retire el enchufe de la toma de corriente para apagar
por completo el dispositivo. Utilice el enchufe como dispositivo de desconexión.
10. Compruebe con regularidad si el enchufe y el cable están dañados. Si el cable está dañado, deberá
ser reemplazado por un cable especial o ensamblaje puesto a disposición por su fabricante o
agente de servicios.
11. Para evitar que se dañe el cable, no lo presione, doble o arrastre por cantos alados. Manténgalo
alejado tanto de supercies calientes como del fuego.
12. A ser posible, coloque el cable de manera que no pueda ser presionado accidentalmente o que no
se pueda tropezar con él. Mantenga el aparato y su cable fuera del alcance de los niños.
13. Nunca utilice accesorios no recomendados por el fabricante. Éstos podrían presentar un riesgo de
seguridad para el usuario y podrían dañar el aparato. Utilice sólo piezas y accesorios originales.
14. No coloque objetos pesados sobre la supercie del aparato. No sitúe objetos que estén en contacto
con el fuego, p.ej. velas, encima o junto al aparato. No coloque objetos que contengan agua,
p.ej. :vasos, encima o cerca del aparato.
15. Mantenga el dispositivo alejado de supercies calientes o llamas. Use siempre el producto sobre
una supercie estable, limpia y seca. Proteja el dispositivo del calor y del frío, del polvo, de la luz del
sol directa, de la humedad y de los goteos y salpicaduras del agua.
16. No cubra las ventilaciones de aire del producto. Asegúrese de que existe una ventilación suciente.
Mantenga una distancia mínima de 10 cm entre el aparato y otros objetos o paredes.
17. La ventilación no debe impedirse cubriendo las aberturas de ventilación con objetos, como p.ej.,
periódicos, manteles, cortinas etc.
18. El producto es apto solo para un uso a grados de latitud moderados. No utilizar en los trópicos ni en
climas particularmente húmedos.
19. ¡Atención! En caso de mal funcionamiento como resultado de una descarga electrostática y
sobrecargas eléctricas momentáneas, desconecte el producto y vuelva a conectarlo.
20. ¡Precaución! Si la batería no se coloca correctamente existe un peligro de explosión. Reemplácela
solamente por otra del mismo tipo o similar.
21. Las baterías no deben exponerse al calor en exceso, así como al sol, fuego o similares.
22. Inserte siempre las baterías con la polaridad correcta (+ y –) marcada en ella y en su
compartimiento.
23. No deje que los niños cambien las baterías sin la supervisión de un adulto.
24. Saque la batería si no utilizará el producto durante un periodo de tiempo extendido.
25. Las baterías agotadas debieran extraerse inmediatamente y eliminarse correctamente.
26. Consulte las instrucciones de seguridad del fabricante de la batería.
IM_OCR100_170907_V03_HR.indb 17 7/9/17 3:04 pm

18
ES
27. El aparato no es un juguete y no debe ser utilizado por niños.
28. La información del disco compacto es leída por un láser a través de una lente óptica (no tocar). Si
desplaza el aparato de una habitación fría a otra caliente, la humedad podría condensarse en la
lente, y ello podría dicultar la reproducción. En este caso, antes de utilizarlo deje que el aparato
descanse durante una hora a temperatura ambiente. Retire el disco del aparato. Si el problema
persiste, deje que personal cualicado compruebe el dispositivo.
CLASS I
LASER PRODUCT
Esta etiqueta situada en el producto informa al
usuario de que éste es un producto láser de
clase 1, que contiene un componente láser.
No toque las lente situada en el interior del
compartimento del disco.
¡PRECAUCIÓN! Utilice únicamente los controles
o adaptaciones de los procedimientos aquí
mencionados, de lo contrario, ello podría derivar
en una exposición a la radiación peligrosa.
¡PELIGRO! Existe una radiación láser
invisible al estar abierto o al fallar el
interruptor de seguridad. Evite una
exposición directa a los rayos del sol.
No toque la lente.
CAUTION
RISK OF ELECTRIC SHOCK
DO NOT OPEN
WARNING: SHOCK HAZARD - DO NOT OPEN
AVIS: RISQUE DE CHOC ÉLECTRIQUE-NE PAS OUVRIR
El símbolo del relámpago con punta
de echa dentro de un triángulo
equilátero indica al usuario que
existe la presencia de "tensión
peligrosa" sin aislamiento en el
interior del dispositivo que puede
tener la suciente magnitud como
para constituir un riesgo de descarga
eléctrica en personas y animales.
El signo de admiración dentro de
un triángulo equilátero alerta al
usuario de que existen instrucciones
de operación y mantenimiento
importantes en esta guía del usuario.
IM_OCR100_170907_V03_HR.indb 18 7/9/17 3:04 pm

19
eS
USO PREVISTO
Este producto está diseñado para la reproducción de audio a través de CD, Radio FM, almacenamiento
USB y entrada de audio (ENTRADA AUXILIAR). Cualquier otro uso puede provocar daños en el producto
o lesiones personales. Este producto está diseñado solo para uso doméstico y no está pensado para uso
comercial.
Imtron GmbH no asume ninguna responsabilidad por daños producidos al producto, a la propiedad o
por lesiones personales debidas al uso inadecuado del producto o por su utilización para una nalidad
distinta a la especicada por el fabricante.
COMPONENTES
A. Tapa del reproductor de CD
B. SNOOZE/DIMMER
C. Botón de encendido
/ SOURCE
D. Botón ALARM
E. Toma de auriculares
F. Conector USB
G. Botón SLEEP/NAP
H. Botón CLOCK/MEMORY
I. Mando de volumen VOL/TUNE / / MODE
J. Botón REPEAT/RANDOM
K. Botón XBASS
L. Toma AUX IN
M. Botón ST/MONO
N. Botón SCAN/AMS
O. Altavoces (ambos lados)
P. Pantalla
Q. Receso de la apertura de la cubierta
R. Compartimento de baterías
S. Antena de cable
T. Cable de alimentación con enchufe
ANTES DEL PRIMER USO
• Saque todos los materiales de empaque.
• Compruebe la integridad del suministro y si existen daños originados por el transporte. En caso de
daños o entrega incompleta, por favor, póngase en contacto con su distribuidor.
• Limpie el dispositivo ( Limpieza y cuidado).
• Importante! Antes de su uso, retire la lámina protectora del compartimento del disco.
IM_OCR100_170907_V03_HR.indb 19 7/9/17 3:04 pm

20
eS
INSTALACIÓN
1
Coloque el producto en una supercie horizontal, plana y rme.
2
Si lo desea puede introducir dos baterías de forma que, en caso de corte de corriente, se mantenga
la conguración. Abra el compartimiento de batería retirando la cubierta. Introduzca 2 baterías de
tipo AAA / LR03 (no incluidas). Preste atención a la correcta polaridad (+/-) según la indicación del
compartimiento de baterías. Cierre la tapa del compartimento de baterías.
3
Ponga arriba el extremo de la antena de cable para recibir la mejor intensidad de la señal. Conecte
el enchufe de corriente a la red eléctrica.
CONFIGURACIÓN DEL RELOJ
La hora solo se puede establecer si la radio está apagada:
1. Cuando el producto está conectado a la red por primera vez, 0:00 se mostrará en la pantalla en modo
de espera.
2. Si es necesario apague la radio pulsando el botón de encendido
aproximadamente 2 segundos.
Mantenga pulsado el botón CLOCK durante 2 segundos.
3. Use el mando de volumen VOL/TUNE para establecer formato de 12H o 24H y pulse CLOCK para
conrmar.
4. Establezca las horas con el mando de volumen VOL/TUNE y conrme con CLOCK.
5. Establezca los minutos con el mando de volumen VOL/TUNE y conrme con CLOCK.
6. La conguración habrá terminado.
FUNCIONAMIENTO
Encender y apagar
4
Pulse el botón de encendido
para encender. Para apagar, pulse el botón de encendido durante
al menos 2 segundos.
Selección de modo
5
Pulse el botón SOURCE para seleccionar el modo en orden de radio FM, AUX (entrada audio), CD y
USB (USb).
Control de volumen
6
El volumen del altavoz puede controlarse fácilmente girando el mando de volumen VOL/TUNE. El
volumen se muestra en la pantalla durante un momento.
Función XBASS
Pulse el botón XBASS para aumentar los graves. Pulse de nuevo para detener la función.
7
Temporizador o función de cortocircuito
• Esta función solamente está disponible con la radio apagada.
• Pulse el botón NAP. El tiempo por defecto es de 10 minutos. Si es necesario, use el control
de volumen para establecer el tiempo en minutos. Conrme el tiempo establecido y active el
temporizador pulsando de nuevo el botón NAP. Cuando haya transcurrido el tiempo establecido
se activará un sonido de alarma. Pulse el botón NAP o de encendido
para detener la alarma.
IM_OCR100_170907_V03_HR.indb 20 7/9/17 3:04 pm
La pagina si sta caricando...
La pagina si sta caricando...
La pagina si sta caricando...
La pagina si sta caricando...
La pagina si sta caricando...
La pagina si sta caricando...
La pagina si sta caricando...
La pagina si sta caricando...
La pagina si sta caricando...
La pagina si sta caricando...
La pagina si sta caricando...
La pagina si sta caricando...
La pagina si sta caricando...
La pagina si sta caricando...
La pagina si sta caricando...
La pagina si sta caricando...
La pagina si sta caricando...
La pagina si sta caricando...
La pagina si sta caricando...
La pagina si sta caricando...
La pagina si sta caricando...
La pagina si sta caricando...
La pagina si sta caricando...
La pagina si sta caricando...
La pagina si sta caricando...
La pagina si sta caricando...
La pagina si sta caricando...
La pagina si sta caricando...
La pagina si sta caricando...
La pagina si sta caricando...
La pagina si sta caricando...
La pagina si sta caricando...
La pagina si sta caricando...
La pagina si sta caricando...
La pagina si sta caricando...
La pagina si sta caricando...
La pagina si sta caricando...
La pagina si sta caricando...
La pagina si sta caricando...
La pagina si sta caricando...
La pagina si sta caricando...
La pagina si sta caricando...
La pagina si sta caricando...
La pagina si sta caricando...
La pagina si sta caricando...
La pagina si sta caricando...
La pagina si sta caricando...
La pagina si sta caricando...
La pagina si sta caricando...
La pagina si sta caricando...
La pagina si sta caricando...
La pagina si sta caricando...
La pagina si sta caricando...
La pagina si sta caricando...
La pagina si sta caricando...
La pagina si sta caricando...
La pagina si sta caricando...
La pagina si sta caricando...
La pagina si sta caricando...
La pagina si sta caricando...
La pagina si sta caricando...
La pagina si sta caricando...
La pagina si sta caricando...
La pagina si sta caricando...
La pagina si sta caricando...
La pagina si sta caricando...
La pagina si sta caricando...
La pagina si sta caricando...
La pagina si sta caricando...
La pagina si sta caricando...
La pagina si sta caricando...
La pagina si sta caricando...
La pagina si sta caricando...
-
 1
1
-
 2
2
-
 3
3
-
 4
4
-
 5
5
-
 6
6
-
 7
7
-
 8
8
-
 9
9
-
 10
10
-
 11
11
-
 12
12
-
 13
13
-
 14
14
-
 15
15
-
 16
16
-
 17
17
-
 18
18
-
 19
19
-
 20
20
-
 21
21
-
 22
22
-
 23
23
-
 24
24
-
 25
25
-
 26
26
-
 27
27
-
 28
28
-
 29
29
-
 30
30
-
 31
31
-
 32
32
-
 33
33
-
 34
34
-
 35
35
-
 36
36
-
 37
37
-
 38
38
-
 39
39
-
 40
40
-
 41
41
-
 42
42
-
 43
43
-
 44
44
-
 45
45
-
 46
46
-
 47
47
-
 48
48
-
 49
49
-
 50
50
-
 51
51
-
 52
52
-
 53
53
-
 54
54
-
 55
55
-
 56
56
-
 57
57
-
 58
58
-
 59
59
-
 60
60
-
 61
61
-
 62
62
-
 63
63
-
 64
64
-
 65
65
-
 66
66
-
 67
67
-
 68
68
-
 69
69
-
 70
70
-
 71
71
-
 72
72
-
 73
73
-
 74
74
-
 75
75
-
 76
76
-
 77
77
-
 78
78
-
 79
79
-
 80
80
-
 81
81
-
 82
82
-
 83
83
-
 84
84
-
 85
85
-
 86
86
-
 87
87
-
 88
88
-
 89
89
-
 90
90
-
 91
91
-
 92
92
-
 93
93


in altre lingue
- English: OK. OCR 100 User manual
- français: OK. OCR 100 Manuel utilisateur
- español: OK. OCR 100 Manual de usuario
- Deutsch: OK. OCR 100 Benutzerhandbuch
- русский: OK. OCR 100 Руководство пользователя
- Nederlands: OK. OCR 100 Handleiding
- português: OK. OCR 100 Manual do usuário
- polski: OK. OCR 100 Instrukcja obsługi
- svenska: OK. OCR 100 Användarmanual
- Türkçe: OK. OCR 100 Kullanım kılavuzu
Documenti correlati
Altri documenti
-
MPMan CSU70R Manuale del proprietario
-
-
-
-
-
Blaupunkt JOHN DEERE MP36 Manuale del proprietario
-
Silvercrest SRWK 800 A1 Operating Instructions Manual
-
 NEW ONE CR128 UK Manuale del proprietario
-
-
Sharp CD-XP300H specificazione
