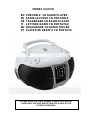
MPMan CSU70R Manuale del proprietario
- Categoria
- Lettore CD
- Tipo
- Manuale del proprietario

MODEL CSU70R
EN PORTABLE CD RADIO PLAYER
FR RADIO-LECTEUR CD PORTABLE
GE TRAGBARER CD RADIO PLAYER
IT LETTORE RADIO CD PORTATILE
DU DRAAGBARE CD RADIO SPELER
PT PLAYER DE RÁDIO E CD PORTÁTIL
PLEASE READ THIS USER MANUAL COMPLETELY BEFORE
OPERATING THIS UNIT AND RETAIN THIS BOOKLET FOR
FUTURE REFERENCE.

E-1
WARNING
TO PREVENT FIRE OR SHOCK HAZARD, DO NOT USE THIS PLUG WITH AN
EXTENSION CORD, RECEPTACLE OR OTHER OUTLET UNLESS THE BLADES CAN
BE FULLY INSERTED TO PREVENT BLADE EXPOSURE. TO PREVENT FIRE OR
SHOCK HAZARD, DO NOT EXPOSE THIS APPLIANCE TO RAIN OR MOISTURE.
The Caution Marking is located at the bottom enclosure of the apparatus.
IMPORTANT SAFETY INSTRUCTIONS
1. Read these instructions.
2. Keep these instructions.
3. Heed all warnings.
4. Follow all instructions.
5. Do not use this apparatus near water.
6. Cleaning-Unplug this product from the wall outlet before cleaning. Do not use liquid
cleaners or aerosol cleaners. Clean only with dry cloth.
7. Do not block any ventilation openings. Install in accordance with the manufacturer’s
instructions.
8. Do not place this product on an unstable cart, stand, tripod,
bracket, or table. The product may fall, causing serious injury to
a child or adult, and serious damage to the product. Use only
with a cart, stand, tripod, bracket, or table recommended by the
manufacturer, or sold with the product. Any mounting of the
product should follow the manufacturer’s instructions, and should use a mounting
accessory recommended by the manufacturer. A product and cart combination
should be moved with care-quick stops, excessive force and uneven surfaces may
cause the product and cart combination to overturn.
9. Do not install near any heat sources such as radiators, heat registers, stoves, or
other apparatus (including amplifiers) that product heat.

E-2
10. Do not defeat the safety purpose of the polarized or grounding-type plug. A polarized
plug has two blades with one wider than the other. A grounding type plug has two
blades and a third grounding prong. The wide blade or the third prong is provided for
your safety. If the provided plug does not fit into your outlet, consult an electrician for
replacement of the obsolete outlet.
11. Protect the power cord from being walked on or pinched particularly at plugs,
convenience receptacles, and the point where they exit from the apparatus.
12. Only use attachments/accessories specified by the manufacturer.
13. Unplug this apparatus during lightening storms or when unused for a long periods of
time.
14. Refer all servicing to qualified service personnel. Servicing is required when the
apparatus has been damaged in any way, such as power-supply cord or plug is
damaged, liquid has been spilled or objects have fallen into the apparatus, the
apparatus has been exposed to rain or moisture, does not operate normally, or has
been dropped.
15. This appliance shall not be exposed to dripping or splashing water and that no object
filled with liquids such as vases shall be placed on the apparatus.
16. Do not overload wall outlet. Use only power source as indicated.
17. Use replacement part as specified by the manufacturer.
18. The product may be mounted to a wall only if recommended by the manufacturer.
19. Upon completion of any service or repairs to this product, ask the service technician
to perform safety checks.
20. Power Sources - This product should be operated only from the type of power source
indicated on the marking label. If you are not sure of the type of power supply to your
home, consult your product dealer or local power company. For products intended to
operate from battery power, or other sources, refer to the operating instruction.
21. Object and Liquid Entry - Never push objects of any kind into this product through
openings as they may touch dangerous voltage points or short-out parts that could
result in a fire or electric shock. Never spill liquid of any kind on the product.
22. Damage Requiring Service - Unplug this product from the wall outlet and refer
servicing to qualified service personnel under the following conditions:
a) When the power-supply cord or plug is damaged,
b) If liquid has been spilled, or objects have fallen into the product,
c) If the product has been exposed to rain or water,
d) If the product does not operate normally by following the operating instructions.
Adjust only those controls that are covered by the operating instructions as an
improper adjustment of other controls may result in damage and will often require
extensive work by a qualified technician to restore the product to its normal
operation.
e) If the product has been dropped or damaged in any way, and
f) When the product exhibits a distinct change in performance - this indicates a need
for service.

E-3
SAVE THESE INSTRUCTIONS
CAUTION
Follow the advice below for safe operations.
ON PROTECTION AGAINST LASER ENERGY EXPOSURE
• As the laser beam used in this compact disc player is harmful to the eyes, do not
attempt to disassemble the casing.
• Stop operation immediately if any liquid or solid object should fall into the cabinet.
• Do not touch the lens or poke at it. If you do, you may damage the lens and the player
may not operate properly.
• Do not put anything in the safety slot. If you do, the laser diode will be ON when the
CD door is still open.
• If the unit is not to be used for a long period of time, make sure that all power sources
are disconnected from the unit. Remove all batteries from the battery compartment.
• This unit employs a laser. The use of controls or adjustment or performance of
procedures other than those specified here may result in exposure to hazardous
radiation.
Should any trouble occur, remove the power source and refer servicing to qualified
personnel.

E-4
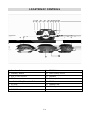
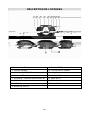
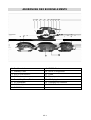
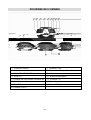
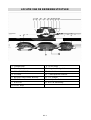
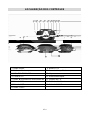
LOCATION OF CONTROLS
1. Function Button 9. STOP Button
2. Standby Button 10. HIGH quality sound
3. VOL-/CLOCK/VOL+ 11. Handles
4. CD Door 12. Telescopic Antenna
5. Button/ Play/Pause/ Button 13. CD Mirror
6. SD Slot 14. Speaker Net
7. USB Slot 15. AUX-IN jack
8. SLEEP Button

E-5
IMPORTANT NOTES
Avoid installing the unit in locations described below:
• Places exposed to direct sunlight or close to heat radiating appliances such as electric
heaters.
• Dusty places.
• Places subject to constant vibration.
• Humid or moist places.
POWER SOURCES
This unit operates on 120V 60Hz or 230V 50Hz or 6 x DC1.5V “C” (UM-2) batteries. Do
not attempt to operate the radio on any other power source. You could cause damage to
the unit and void your warranty.
Please be sure the power outlet you plug this unit into is working and receives constant
(unswitched) power.
AC OPERATION
1. When the AC power cord (included) is connected to the AC Power Socket on the back
of the unit and the other end is plugged into a 230V AC~ 50Hz wall outlet, the unit will
disconnect the batteries automatically, and operate on AC Power only.
2. Press the STANDBY BUTTON to power on,press the STANDBY again to power off!
3. Press the FUNCTION SWITCH to “FM” or “CD” or “USB” or “CARD” or “AUX”
BATTERY OPERATION
1. Remove the BATTERY DOOR.
2. Install 6 x DC1.5V “C” (UM-2) batteries (not included) according to the polarity diagram
inside the battery compartment.
3. Close the BATTERY DOOR.
IMPORTANT
: Be sure that the batteries are installed correctly.
Wrong polarity may damage the unit and void the warranty.
For best performance and longer operating time, we recommend the use of
good quality alkaline-type batteries.
CAUTION
1. Do not mix old and new batteries.
2. Do not mix alkaline, standard (carbon-zinc) or rechargeable (nickel-cadmium) batteries.
3. If the unit is not to be used for an extended period of time, remove the battery. Old or
leaking battery can cause damage to the unit and may void the warranty.
4. Do not dispose of batteries in fire, batteries may explode or leak.
BATTERY REPLACEMENT
When the output sound of this unit becomes distorted or the CD player operation appears
unstable, the batteries are weak. You need to replace all the exhausted batteries at the
same time as soon as possible to avoid battery leakage.

E-6
FM OPERATION
1. Press the STANDBY BUTTON to power on,.and the FM indicator will light and sound
noise.
2. Long press the “ Button” for 2-3 s,and the low side of FM will seeking channel
automatically and fix the channel.
3. Long press the “
Button” for 2-3 S,and the high side of FM will seeking channel
automatically and fix the channel.
4. During FM reception,always keep the FM TELESCOPIC ANTENNA fully extended for
best performance.However,if FM receiption is weak,try repositioning the unit near an
open window until you get the best reception.
5. Press the “VOL+” or “VOL-“ to up and reduce the volume.
6. Press the STANDBY BUTTON to power off.
CD OPERATION
NOTE: This unit not only plays commercial compact discs but also self-complied CD-RW
discs.
• Because of non-standardized format definition/production of CD-R/RW, playback
quality & performance is not guaranteed.
• Manufacturer is not responsible for the playability of CD-R/RW due to recording
conditions such as PC performance, writing software, media properties etc.
• Do not attach a label or seal to either side of the CD-R/RW disc. It may cause a
malfunction.
PLAY MODE
1. Press the FUNCTION BUTTON to the “CD” position.
2. Open the CD DOOR, load a CD with the label side facing upward and then close the
CD door.
3. The unit will display “CD READ” ,and read the disc information
4. After read out the total number of tracks, the unit will play the CD automatically!
5. Press the “
Button”, the CD will play the last track, press the “ Button”, the CD will
play the next track, press PLAY/PAUSE BUTTON to pause ,press again to play
6. Press the “VOL+” or “VOL-“ to up and reduce the volume
7. Press the STANDBY to power off
NOTE: If skipping occurs during CD play, try turning the volume down.
Do not open the CD DOOR when a CD is playing.

E-7
USB OPERATION
1. Press the STANDBY BUTTON to power on
2. Press the FUNCTION BUTTON to “USB “ position
3. Insert a USB key inside the connector, the unit will display “USB READ”, the USB
indicator light will blink.
4. After read out the total number of tracks, the unit will play the USB automatically
5. Press the “
Button” ,the USB will play the last track, press the “ Button”, the USB
will play the next track, press PLAY/PAUSE BUTTON to pause ,press again to play
6. Press the “VOL+” or “VOL-“ to up and reduce the volume
7. Press the STANDBY to power off
The unit cannot read my USB device.
- Once you have plugged your device to the unit, you may need to switch on the USB
device before it can operate.
- This unit does not support a direct USB connection with a computer. You need to use a
USB device, or a MP3 player.
- If you are using a USB external hard disk: you need to connect your device
simultaneously to an external power source and to the unit. If you are using a self-
powered PMP, make sure that the battery is sufficiently loaded.
- Check that the files system of your USB device is formatted into the FAT or FAT 32
format. USB device formatted into NTFS are not compatible with this unit. Caution: if
you attempt to modify your file system, formatting your device will erase all data.
Please refer to your USB device’s instruction manual first.
SD CARD OPERATION
1. Press the STANDBY BUTTON to power on
2. Press the FUNCTION BUTTON to “CARD “ position
3. Insert a SD CARD inside the connector, the unit will display “CARD READ”, the SD
indicator light will blinking
4. After read out the total number of tracks, the unit will play the SD CARD automatically
5. Press the “
Button” ,the SD CARD will play the last track, press the “ Button”, the
SD CARD will play the next track, press PLAY/PAUSE BUTTON to pause, press
again to play.
6. Press the “VOL+” or “VOL-“ to up and reduce the volume
7. Press the STANDBY to power off
The unit cannot read my memory card.
Check firstly that your memory card is compatible with the unit. Supported memory cards
are SD, SDHC, MMC formats. We have tested this unit with most of the market’s
memory cards ; we cannot however guarantee a full compatibility with all the cards in the
market because of the multiple technology standards in use. Should you have a
compatibility problem: please use a memory card with a lower capacity (2GB or lower) or
else connect the unit through a USB device.

E-8
CLOCK OPERATION
1. Press the CLOCK button for 2-3 seconds to display the COLOCK symbol, at this time
“24” will flash on the display.
2. Press. “ Button” or “ Button” to select “12” or “24” hours style, then press
CLOCK button again to keep it. At this time, the “hour “on the display will flash, press.
“
Button” or “ Button” to select your desired hour, then press clock button to
keep it
3. At this time, the “minute” on the display will flash, press. “
Button” or “ Button” to
select your desired minute, then press clock button to keep it
4. At this time, the “date” on the display will flash, press. “ Button” or “ Button” to
select your desired date, then press clock button to keep it
ALARM OPERATION
1. Press the “AL1” on the remote control to open and close the ALRAM function
2. Long press the “AL1” for 2-3 seconds to display the ALRAM symbol, at this time the
“hour” will flash on the display, press. “
Button” or “ Button” to select your
desired hour, then press the “AL1” to keep it
3. At this time the “minute” will flash on the display, press “ Button” or “ Button” to
select your desired minute, then press the “AL1” to keep it
4. Select “ZZ” or “Radio” or “CD” for ALARM, press the “AL1” to keep it
5. Adjust the volume to your desired volume, then press the “AL1” to keep it!
The ALRAM function for “AL2” is same as the “AL1”
AUX IN OPERATION
This CD features an aux line-in jack for connecting your iPod, MP3 player or other digital
music player.
1. Connect the headphone jack of your external device to the AUX IN jack located on
the left side of this CD player (The connection cable is not included).
2. Turn on the CD player and it will enter the AUX function mode once an external
device is plugged into the AUX IN jack.
3. Start to play your iPod, MP3 player or other external audio device.
4. Slowly adjust both volume controls on your CD player and the external device.
5. Turn off your iPod, MP3 player and etc. when finish listening. Turn the CD player off
and unplug the AUX IN jack.
Remark: Once the AUX IN jack is plugged, the CD player will automatically enter the AUX
mode no matter the Function Selector is in CD or Radio mode. Remember to disconnect
the cable from the CD player after use in order to be able to listen to the radio or CD
player again.

E-9
SLEEP OPERATION
1. Press the STANDBY BUTTON to power off
2. Press the SLEEP BUTTON to set the time (90Sǃ80Sǃ70Sǃ60Sǃ50Sǃ40Sǃ
30Sǃ20Sǃ10S) for sleep
SPECIFICATIONS
General
Power Supply: AC100V - 230V~ 50/60Hz
DC: 6 x 1.5V ‘C’ (UM-2) Batteries (Not included)
Power Consumption: 15 W
Output Power (RMS): 0.6 W * 2
Unit Dimensions: 289.5 x 220.5 X 148.5 MM
Unit Weight: 1.36 kg
MP3
Bit Rate: 128 kbps
Radio
Tuning Frequency: FM: 87.5 -108MHz
CARE AND MAINTENANCE
1. Children should be supervised when using this appliance.
2. Never wrap the earphone lead around any animal or person. Special care should be
taken with long wires.
3. Clean your unit with a damp (never wet) cloth. Solvent or detergent should never be
used.
4. Avoid leaving your unit in direct sunlight or in hot, humid or dusty places.
5. Keep your unit away from heating appliances and sources of electrical noise such as
fluorescent lamps or motors.
6. If drop-outs or interruptions occur in the music during CD play,
or if the CD fails to play at all, its bottom surface may require
cleaning. Before playing, wipe the disc from the center
outwards with a good soft cleaning cloth.

E-10
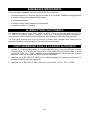
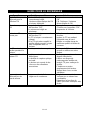
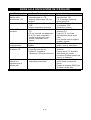
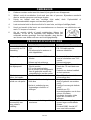
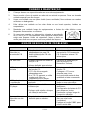
TROUBLESHOOTING GUIDE
Symptom Possible Cause Solution
Noise or sound
distorted on FM
broadcast
- Station not tuned properly for
FM.
- FM telescopic antenna is not
extended.
- Retune the FM broadcast
station.
- FM: Extend FM telescopic
antenna.
FM no sound - Unit not in “FM” function mode.
- Volume set at minimum
- Press Function Switch to “FM”
position.
- Increase Volume.
CD player will not
play
- Unit not in CD function mode.
- CD is not loaded properly.
- If the CD is self-compiled, the
media used may not be
compatible with the player.
- Select CD function mode.
- Load CD with label side
up.
- Use better quality blank media
and retest.
CD skips while
playing
- Disc is dirty or scratched. - Wipe CD with clean cloth or
use another disc.
Intermittent sound
from CD player
- Dirty or defective disc
- Dirty pick up lens
- Player is subject to excessive
shock or vibration
- Clean or replace the defective
disc.
- Use a CD lens cleaning disc to
clean the lens.
- Relocate the player away
from shock or vibration.
Sound appears
distorted at high
volume setting
- Volume control is set to
maximum.
- Adjust Volume Control to a
lower comfortable level.
- Turn off DBBS function for
very loud music.

This is to certify that CSU70R is in conformity with
Council directive 89/336/EEC(EMC direction)
Applicable standards:
EN55013:2001+A1+A2
EN61000-3-2:2006+A1+A2
EN61000-3-3:2008
EN55020:2007
For more information please visit our website
www.mpmaneurope.com

FR-1
AVERTISSEMENT
POUR EVITER LES RISQUES D'INCENDIE OU DE CHOC, N'UTILISEZ PAS CETTE
FICHE AVEC UNE RALLONGE, MULTIPRISE OU AUTRE CONNECTEUR A MOINS
QUE LES LAMES PUISSENT ETRE ENTIEREMENT INSEREES POUR EVITER
L'EXPOSITION DE LAME. POUR EVITER LES RISQUES D'INCENDIE OU DE CHOC
N'EXPOSEZ PAS CET APPAREIL A LA PLUIE OU A L'HUMIDITE.
Les instructions sur l’emballage se trouvent sur le boîtier en bas de l'appareil.
CONSIGNES DE SECURITE
IMPORTANTES
1. Lisez ces instructions.
2. Gardez ces instructions.
3. Observez tous les avertissements.
4. Suivez toutes les instructions.
5. N’utilisez pas cet appareil près de l’eau.
6. Avant le nettoyage, débrancher l'appareil de la prise secteur. N'utilisez pas de
détergents liquides ni en aérosol. Nettoyez cet appareil uniquement avec un chiffon
sec.
7. Ne bloquez aucune ouverture d’aération. Installez-le selon les instructions du
fabricant.
8. Ne placez pas cet appareil sur un chariot, un guéridon, un
trépied, un support ou une table. L’appareil pourrait tomber, ce
qui provoquerait des blessures graves sur un enfant ou un adulte
et abîmerait sérieusement l’appareil. N’utilisez cet appareil
qu’avec un chariot, guéridon, trépied, support ou table
recommandé par le fabricant ou bien vendu avec l’appareil. Tout montage de
l’appareil sur des supports doit se faire en suivant les instructions du fabricant et en
utilisant les accessoires de montage recommandés par le fabricant. La combinaison

FR-2
appareil-chariot doit être déplacée avec d’extrême précaution des arrêts brutaux,
une trop forte poussée ou des surfaces inégales peuvent faire renverser l’ensemble
appareil-chariot.
9. Eloignez l'appareil de toutes sources de chaleur telles que les radiateurs, les
bouches d'air chaud, les appareils régénérateurs de vent chaud ou tout autre
appareil (y compris les amplificateurs) produisant de la chaleur.
10. Ne détériorez pas la sécurité de la fiche polarisée ou de la fiche de terre. Une fiche
polarisée comporte deux lames dont l'une est plus large que l'autre. Une fiche de
terre comporte deux lames et une troisième broche de mise à la terre. La lame la
plus large ou la troisième broche assure la sécurité de l'utilisateur. Si la fiche fournie
ne s'adapte pas à la prise de secteur, demandez à un électricien de remplacer la
prise hors normes.
11. Protégez le cordon d'alimentation afin que personne ne marche dessus et que rien
ne le pince, en particulier au niveau des fiches, des prises de courant et du point de
sortie de l'appareil.
12. N'utilisez uniquement que des accessoires spécifiés par le fabricant.
13. Débranchez cet appareil pendant les orages ou lorsqu’il n‘est pas utilisé pendant
longtemps.
14. Confiez toute réparation au personnel qualifié. Des réparations sont nécessaires si
l'appareil est endommagé de quelque façon que ce soit, comme par exemple :
cordon ou prise d'alimentation endommagé, liquide renversé ou objet tombé à
l'intérieur de l'appareil, exposition de l'appareil à la pluie ou à l'humidité, appareil qui
ne marche pas normalement ou que l'on a fait.
15. Cet appareil ne devrait pas être exposé aux égouttures et aux éclaboussements de
l'eau et il ne faut pas poser sur l'appareil des objets contenant de l'eau comme des
vases.
16. Ne surchargez pas les prises murales. Utilisez seulement une source d'alimentation
comme indiqué.
17. N'utiliser que des pièces de rechange recommandées par le fabricant.
18. L'appareil ne peut être monté sur le mur uniquement si cela a été recommandé par le
fabricant.
19. Lors de toute réparation ou entretien de cet appareil, demandez à un technicien de
procéder à une vérification de l'appareil.
20. Alimentation électrique – Ce produit ne doit fonctionner qu’avec le type d’alimentation
électrique indiqué sur l’étiquette. Si vous n’êtes pas sûr du type d’alimentation
électrique de votre maison, consultez votre fournisseur ou votre compagnie
d’électricité. Pour les produits qui doivent fonctionner avec des piles ou avec d’autres
sources d’alimentation, consultez le mode.
21. Introduction de liquides et d’objets – Ne jamais introduire des objets de toute sorte à
l’intérieur de cet appareil par les ouvertures car ils pourraient toucher des points de
haut voltage ou court-circuiter les pièces et provoquer un incendie ou une décharge
électrique. Ne jamais déverser toute sorte de liquide sur cet appareil.
22. Dommages nécessitant réparation - Débranchez l'appareil de la prise secteur et
confiez la réparation au personnel qualifié dans les situations suivantes:

FR-3
a) Si le cordon d'alimentation ou la prise a été endommagé,
b) Si des objets ou des liquides ont été introduit à l'intérieur de l'appareil,
c) Si l'appareil a été exposé à la pluie ou à l'eau,
d) Si l'appareil ne fonctionne pas normalement en suivant le mode d'emploi.
Ajustez uniquement les commandes qui sont dites dans le mode d'emploi car
un mauvais réglage des autres commandes peut entraîner des dommages et
nécessitera souvent un travail extensif par un technicien qualifié pour
restaurer le produit à son fonctionnement normal.
e) Si l'appareil a subi une chute ou bien son boîtier a été endommagé de
quelque façon, et
f) Si l'appareil présente un changement nette de fonctionnement - ce qui indique
un besoin de service.
CONSERVER CES INSTRUCTIONS
PRECAUTION
Suivez les conseils ci-dessous pour une utilisation sécurisée.
POUR LA PROTECTION CONTRE L'EXPOSITION A L'ENERGIE DU LASER
• Comme le rayon laser utilisé dans ce lecteur disque compact est dangereux pour
les yeux, ne tentez pas de démonter le boîtier.
• Arrêtez immédiatement le fonctionnement de l'appareil si un objet solide ou un
liquide y tombe dedans.
• Ne touchez pas ou ne pousser pas avec le doigt la lentille. Si vous le faites, vous
risquez d'endommager la lentille et le lecteur peut ne pas fonctionner correctement.
• Ne mettez pas du n'importe quoi dans la fente de sécurité. Si vous le faites, la
diode du laser sera ACTIVEE tant que la porte du CD est toujours ouverte.
• Si l'appareil ne doit pas être utilisé pendant une longue période de temps, assurez-
vous que toutes les sources d'alimentation sont débranchées de l'appareil. Retirez
les piles de leur compartiment.
• Cet appareil utilise un laser. L'utilisation de commandes ou de réglages ou
d'exécution de procédures autres que celles spécifiées ici peut entraîner une
exposition à des radiations dangereuses.
En cas de problème, débrancher la source d'alimentation et consultez un personnel
qualifié pour la maintenance.

FR-4
DESCRIPTION DE L’APPAREIL
1. Bouton des Fonctions 9. Bouton STOP
2. Bouton Standby 10. Son de HAUTE qualité
3. VOL-/HORLOGE/VOL+ 11. Poignées
4. Porte de CD 12. Antenne Télescopique
5. Bouton / Lecture/Pause/ Bouton 13. Miroir du CD
6. SD Adaptateur 14. Grille de haut-parleur
7. USB Adaptateur 15. Prise AUX-IN
8. Bouton de VEILLE

FR-5
REMARQUES IMPORTANTES
Evitez d'installer l'appareil dans les endroits décrits ci-dessous :
• Endroits exposés à la lumière directe du soleil ou à proximité d'appareils dégageant de
la chaleur tels que les radiateurs électriques.
• Endroits poussiéreux.
• Endroits soumis à des vibrations permanentes.
• Endroits humides ou mouillés.
ALIMENTATIONS ELECTRIQUES
Cet appareil fonctionne sous 120V 60Hz ou 230V 50Hz ou avec des piles 6 x DC1.5V
“C” (UM-2). Ne jamais essayer d’utiliser la radio sous d’autres alimentations électriques.
Vous pouvez entrainer des endommagements des l’appareil et annuler votre garantie.
S'il vous plaît assurez-vous que la prise de courant dans laquelle vous branchez cet
appareil travaille et reçoit de tension constante (non commutée).
FONCTIONNEMENT SOUS LE COURANT ALTERNATIF
1. Lorsque le cordon d'alimentation du courant alternatif (inclus) est branché dans la prise
d'alimentation CA à l'arrière de l'appareil et l'autre extrémité est branché dans la prise
murale de 230V CA ~ 50Hz, l'appareil sera automatiquement déconnecter du courant
des piles, et ne fonctionnera que sous le courant alternatif.
2. Appuyez sur le BOUTON STANDBY pour allumer l'appareil, et appuyez encore sur le
bouton STANDBY éteindre l'appareil!
3. Appuyez sur le BOUTON FONCTION pour choisir entre "FM" ou "CD" ou "AUX”

FR-6
FONCTIONNEMENT SOUS LES PILES
1. Ouvrez la PORTE DES PILES.
2. Insérez les piles 6 x DC1.5V “C” (UM-2) (non inclus) conformément au schéma de
polarité à l'intérieur du compartiment de piles.
3. Fermez la PORTE DES PILES.
IMPORTANT
: Assurez-vous que les piles sont correctement insérées.
L'inversion de polarité peut endommager l'appareil et annuler la garantie.
Pour de meilleures performances et pour plus de temps d'utilisation, nous
recommandons l'utilisation de piles de bonne qualité de type alcalin.
PRECAUTION
1. N'utilisez pas conjointement des piles usagées et des piles neuves.
2. N'utilisez pas conjointement les piles alcalines, standard (carbone-zinc) ou rechargeable
(nickel-cadmium).
3. Si l'appareil n'est pas utilisé pendant une longue période de temps, il faut enlever les
piles. Une pile usagée ou une pile qui fuit peut causer des dommages à l'appareil et
annuler la garantie.
4. Ne jetez pas les piles dans le feu, elles peuvent exploser ou fuir.
REMPLACEMENT DES PILES
Lorsque le son de sortie de cet appareil est déformé ou que le fonctionnement du lecteur
CD devient instable, les piles sont donc faibles. Vous devez remplacer, le plus tôt possible,
toutes les piles usagées en même temps pour éviter la fuite des piles.
FONCTIONNEMENT EN FM
1. Appuyez sur le BOUTON STANDBY pour allumer l'appareil, et l'indicateur de FM
s'allumera et produira de son
2. Appuyer longuement sur le "bouton " pendant 2-3 s, et la partie inferieure de FM
effectuera une recherche automatiquement de stations et les fixera.
3. Appuyer longuement sur le "bouton
" pendant 2-3 s, et la partie supérieure de FM
effectuera une recherche automatiquement de stations et les fixera.
4. Pendant la réception FM, gardez toujours l'antenne télescopique de FM
complètement déployée pour de meilleure réception. Cependant, si la réception FM
est faible, essayez de repositionner l'appareil à proximité d'une fenêtre ouverte
jusqu'à ce que vous obteniez une meilleure réception.
5. Appuyez sur les boutons "VOL +" ou "VOL-" pour augmenter ou réduire le volume
6. Appuyez sur le BOUTON STANDBY pour éteindre l'appareil

FR-7
FONCTIONNEMENT EN CD
REMARQUE: Cet appareil ne lu pas uniquement les disques compacts commerciaux
mais il lu également les disques CD-RW auto-compilés.
• En raison de définition de format non-normalisé/de gravage de CD-R/RW, la qualité
de lecture et de performance n'est pas garantie.
• Le fabricant n'est pas responsable de la jouabilité de CD-R/RW causé par les
conditions d’enregistrements tels que les performances de l'ordinateur, le logiciel de
gravage, les propriétés de médias etc.
• Ne collez pas d'étiquette ou de sceau sur aucune des côtés du disque CD-R/RW. Il
peut entrainer un dysfonctionnement.
MODE DE LECTURE
1. Appuyez le BOUTON DE FONCTION sur la position "CD”.
2. Ouvrez LA PORTE DE CD, insérez-y un CD avec l'étiquette vers le haut, puis fermez
la porte de CD.
3. L'appareil affichera " LECTURE DE CD/CD READ ", et lu les informations sur le
disque
4. Après la lecture du nombre total de toutes les pistes, l'appareil effectuera
automatiquement la lecture du CD!
5. Appuyez sur le "bouton
", le CD jouera la dernière piste, appuyez sur le "bouton ",
le CD jouera la piste suivante, appuyez sur le BOUTON LECTURE/PAUSE pour
mettre en pause, appuyez-le à nouveau pour continuer de jouer le CD
6. Appuyez sur les boutons "VOL +" ou "VOL-" pour augmenter ou réduire le volume
7. Appuyez sur le bouton STANDBY pour éteindre l'appareil.
REMARQUE: Si le saut de pistes se produit pendant la lecture de CD, essayez
diminuer le volume.
N’ouvrez pas la porte de CD pendant la lecture d'un CD.

FR-8
FONCTIONNEMENT AVEC L’USB
1. Appuyez le BOUTON STANDBY pour allumer
2. Définissez le BOUTON FUNCTION sur la position "USB"
3. Insérer une clé USB dans le connecteur, l'appareil affichera "USB READ" et le voyant
USB clignotera.
4. Après avoir lu le nombre total de pistes, l'appareil jouera automatiquement l'USB
5. Appuyez le "Bouton
" et l'USB jouera la dernière piste, appuyez le "Bouton" et
l'USB jouera la piste suivante, appuyez le bouton LECTURE/PAUSE pour mettre en
pause, appuyez-le
i nouveau pour continuer à jouer
6. Appuyez sur la touche "VOL +" ou "VOL-" pour augmenter ou diminuer le volume
7. Appuyez le bouton STANDBY pour éteindre
L’appareil ne peut pas lire mon périphérique USB.
- Une fois que vous avez connectée votre périphérique à l'unité, vous devrez d'abord
activer votre périphérique USB avant qu'il soit opérationnel.
- Cet appareil ne supporte pas la connexion directe d'USB avec un ordinateur. Vous
devez utiliser un périphérique USB, ou un lecteur MP3.
- Si vous utilisez un disque dur externe d’USB: vous avez besoin de brancher à la fois
votre périphérique à une source d'alimentation externe et à l'unité. Si vous utilisez un
PMP autoalimenté, assurez-vous que la batterie est suffisamment chargée.
- Vérifier que le système de fichiers de votre périphérique USB est formaté en format
FAT ou FAT 32. Le périphérique USB formaté en NTFS n'est pas compatible avec cet
appareil. Attention: si vous essayez de modifier votre système de fichiers, le formatage
de votre périphérique effacera toutes les données. S'il vous plaît référez-vous d'abord
au manuel d'instructions de votre périphérique USB.
La pagina sta caricando ...
La pagina sta caricando ...
La pagina sta caricando ...
La pagina sta caricando ...
La pagina sta caricando ...
La pagina sta caricando ...
La pagina sta caricando ...
La pagina sta caricando ...
La pagina sta caricando ...
La pagina sta caricando ...
La pagina sta caricando ...
La pagina sta caricando ...
La pagina sta caricando ...
La pagina sta caricando ...
La pagina sta caricando ...
La pagina sta caricando ...
La pagina sta caricando ...
La pagina sta caricando ...
La pagina sta caricando ...
La pagina sta caricando ...
La pagina sta caricando ...
La pagina sta caricando ...
La pagina sta caricando ...
La pagina sta caricando ...
La pagina sta caricando ...
La pagina sta caricando ...
La pagina sta caricando ...
La pagina sta caricando ...
La pagina sta caricando ...
La pagina sta caricando ...
La pagina sta caricando ...
La pagina sta caricando ...
La pagina sta caricando ...
La pagina sta caricando ...
La pagina sta caricando ...
La pagina sta caricando ...
La pagina sta caricando ...
La pagina sta caricando ...
La pagina sta caricando ...
La pagina sta caricando ...
La pagina sta caricando ...
La pagina sta caricando ...
La pagina sta caricando ...
La pagina sta caricando ...
La pagina sta caricando ...
La pagina sta caricando ...
La pagina sta caricando ...
La pagina sta caricando ...
La pagina sta caricando ...
La pagina sta caricando ...
La pagina sta caricando ...
La pagina sta caricando ...
La pagina sta caricando ...
La pagina sta caricando ...
La pagina sta caricando ...
-
 1
1
-
 2
2
-
 3
3
-
 4
4
-
 5
5
-
 6
6
-
 7
7
-
 8
8
-
 9
9
-
 10
10
-
 11
11
-
 12
12
-
 13
13
-
 14
14
-
 15
15
-
 16
16
-
 17
17
-
 18
18
-
 19
19
-
 20
20
-
 21
21
-
 22
22
-
 23
23
-
 24
24
-
 25
25
-
 26
26
-
 27
27
-
 28
28
-
 29
29
-
 30
30
-
 31
31
-
 32
32
-
 33
33
-
 34
34
-
 35
35
-
 36
36
-
 37
37
-
 38
38
-
 39
39
-
 40
40
-
 41
41
-
 42
42
-
 43
43
-
 44
44
-
 45
45
-
 46
46
-
 47
47
-
 48
48
-
 49
49
-
 50
50
-
 51
51
-
 52
52
-
 53
53
-
 54
54
-
 55
55
-
 56
56
-
 57
57
-
 58
58
-
 59
59
-
 60
60
-
 61
61
-
 62
62
-
 63
63
-
 64
64
-
 65
65
-
 66
66
-
 67
67
-
 68
68
-
 69
69
-
 70
70
-
 71
71
-
 72
72
-
 73
73
-
 74
74
-
 75
75


MPMan CSU70R Manuale del proprietario
- Categoria
- Lettore CD
- Tipo
- Manuale del proprietario
in altre lingue
- English: MPMan CSU70R Owner's manual
- français: MPMan CSU70R Le manuel du propriétaire
- Deutsch: MPMan CSU70R Bedienungsanleitung
- Nederlands: MPMan CSU70R de handleiding
- português: MPMan CSU70R Manual do proprietário