
FRONT VIEW
BACK VIEW
TOP VIEW
REMOTE CONTROL
Lire attentivement les instructions avant de faire
fonctionner l’appareil.
Please read the instruction carefully before operating
the unit.
Leia este manual com atenção antes de qualquer
utilização.
Bitte lesen sie dieses handbuch vor dem gebrauch des
gerätes sorgfältig durch.
Antes de utilizar este aparato, lea atentamente las
siguientes instrucciones.
Leggere attentamente questo manuale prima di utilizzare
l’apparecchio.
Lees deze handleiding aandachtig voor u het toestel
gebruikt.
FR
GB
PT
DE
ES
IT
NL
FR Manuel de l’utilisateur
GB User Manual
PT Manual do Utilizador
Benutzerhandbuch
DE
ES Manual de instrucciones
Manuale di istruzioni
IT
NL Handleiding M-50 DBT
ALIMENTATION
ALIMENTAÇÃO
STROMVERSORGUNG
POWER SUPPLY
MINUTERIE
TEMPORIZADOR
TIMER
TIMER
RÉGLAGE HEURE ET DATE
CONFIGURAÇÃO DE DATA E HORA
DATUM UND UHRZEITEINSTELLUNG
SETTING DATE AND TIME
RÉGLAGE DE L’ALARME ET DU MODE DE RÉVEIL
REGULAÇÃO DOS ALARMES E DOS MODOS DE DESPERTAR
ALARM UND ALARMMODUS EINSTELLEN
SETTING THE ALARM AND THE ALARM MODE
CONNEXION DES HAUT-PARLEURS
SPEAKER CONNECTION
Télécommande
Telecomando
Fernbedienung
Remote control
La télécommande fonctionne avec une pile au lithium de type CR2025 (fournie). Pour
alimenter la télécommande, retirez l’onglet d’isolation situé à l’arrière de l’appareil.
REMPLACEMENT DE LA PILE DE LA TÉLÉCOMMANDE
1. Poussez le verrou vers la droite.
2. Sortez le tiroir à pile.
3. Installez une pile «CR2025» en dirigeant la borne
positive de la pile (+) vers le haut.
4. Replacez le couvercle du compartiment à pile.
O telecomando funciona com uma pilha de lítio “CR2025” (incluída). Para accionar a
alimentação do telecomando, retire a patilha de isolamento da parte de trás do aparelho.
SUBSTITUIÇÃO DA PILHA DO TELECOMANDO
1. Empurre o botão para a direita.
2. Puxe o carregador da pilha para fora.
3. Insira uma pilha de tamanho “CR2025” com o lado
positivo (+) virado para cima.
4. Volte a colocar a tampa.
Die Fernbedienung wird über die mitgelieferte Lithium-Batterie (1 Batterie, Typ CR 2025)
betrieben. Um die Fernbedienung einzuschalten, entfernen Sie den Isolierungsstreifen auf
der Rückseite des Gerätes.
DIE BATTERIE DER FERNBEDIENUNG ERSETZEN
1. Drücken Sie den Knopf nach rechts.
2. Ziehen Sie das Batteriefach heraus.
3. Legen Sie eine Batterie vom Typ “CR2025” derart
ein, dass ihre positive Seite (+) nach oben zeigt.
4. Setzen Sie den Batteriefachdeckel wieder ein.
The remote control operates on 1pc “CR2025” lithium battery (included). To power up the
remote control, remove the insulation tab from the back of unit.
REPLACING BATTERY FOR THE REMOTE CONTROL
1. Push the button toward right.
2. Pull the battery loader out.
3. Insert one “CR2025” size battery with the positive
side (+) facing up.
4. Replace the cover.
REMARQUES:
- Avant de jeter les piles, consultez votre revendeur car celui-ci peut les reprendre pour
les recycler.
- En cas de non-utilisation prolongée de la télécommande, retirez les piles an d’éviter tout
dommage provoqué par une corrosion due à un écoulement de celles-ci.
- Veillez au respect de l’environnement lorsque vous vous débarrassez des piles usagées.
- Ne jetez pas les piles dans le feu !
- N’exposez pas les piles à une chaleur excessive, comme les rayons du soleil, le feu ou
d’autres sources de chaleur similaires.
ATTENTION: Risque d’explosion si les piles n’ont pas été insérées correctement.
Remplacez-les uniquement par des piles identiques ou de type équivalent.
OBSERVAÇÕES:
- Antes de eliminar as pilhas, consulte o seu revendedor pois este pode retomá-las para
reciclagem.
- No caso de não utilização prolongada do telecomando, retire a pilha de modo a evitar
quaisquer danos causados pela corrosão originada pelo líquido vertido da referida pilha.
- Certique-se de que respeita o ambiente quando eliminar pilhas gastas.
- Não deite as pilhas no fogo!
- Não exponha as pilhas a calor excessivo, como raios do sol, fogo ou outras fontes de
calor semelhantes.
ATENÇÃO:
Risco de explosão se a pilha não for inserida correctamente. Substitua-a apenas por uma
pilha idêntica ou de tipo equivalente.
HINWEISE:
- Werfen Sie leere Batterien nicht in den Hausmüll, sondern geben Sie sie bei einer
Sammelstelle oder bei Ihrem Händler ab.
- Wenn Sie die Fernbedienung während längerer Zeit nicht verwenden, entfernen Sie ihre
Batterie, um Schäden durch Ausießen der Batterie zu vermeiden.
- Entsorgen Sie leere Batterien umweltgerecht.
- Werfen Sie Batterien nicht ins Feuer!
- Batterien dürfen keiner übermäßigen Hitze ausgesetzt werden (wie zum Beispiel praller
Sonne, Feuer oder anderen ähnlichen Hitzequellen).
ACHTUNG:
Wenn die Batterie nicht richtig eingelegt wird, besteht die Gefahr, dass die Batterie explodiert.
Ersetzen Sie eine leere Batterie nur mit einer identischen oder gleichwertigen Batterie.
NOTES:
- Before throwing any batteries away, consult your distributor who may be able to take them
back for specic recycling.
- If the remote control is not going to be used for a long time, remove the battery to avoid
damage caused by battery leakage corrosion.
- Attention should be drawn to the environmental aspects of battery disposal.
- Do not throw batteries in re!
- Battery shall not be exposed to excessive heat such as sunshine, re or the like.
CAUTION: Danger of explosion if battery is incorrectly replaced. Replace only with the
same or equivalent type.
Branchez les cordons des enceintes DROITE / GAUCHE dans les prises d'entrée à
l'arrière des enceintes.
LIGAÇÃO DAS COLUNAS
LAUTSPRECHERANSCHLUSS
Ligue o cabo dos altifalantes DIREITO / ESQUERDO nas entradas do altifalante na parte
traseira da unidade.
Schließen Sie das RECHTE / LINKE Lautsprecherkabel an die Eingangsbuchsen an der
Rückseite des Geräts an.
Plug the RIGHT / LEFT speakers’ cord into the speaker input sockets at the rear of the unit.
Cet appareil fonctionne sur courant alternatif 230V AC 50Hz.
Branchez le cordon d'alimentation CA à une prise de courant CA standard.
Conecte o o de energia em uma fonte de 230V AC 50Hz.
Conecte o o de energia em uma tomada convencional de parede de corrente alternada.
Schließen Sie das Netzkabel an eine AC 230V 50Hz Stromversorgung.
Schließen Sie das Netzkabel in eine Standardsteckdose an.
This set operates on AC 230V 50Hz.
Connect the power cord to a convenient AC wall outlet.
1. En mode veille, maintenez enfoncée la touche TIMER sur la télécommande pendant
quelques secondes. Les chires des heures clignoteront.
2. Appuyez sur ou/et pour activer l'heure de la minuterie.
3. Appuyez sur le bouton TIMER puis appuyez sur ou/et pour sélectionner la
source du mode de la minuterie: FM, DAB, CD, USB.
4. Appuyez sur la touche TIMER, puis appuyez sur ou/et ou pour régler l'heure
de la minuterie.
5. Appuyez à nouveau sur la touche TIMER pour conrmer. L'unité va s'éteindre. Elle se
mettra en lecture automatiquement dans la plage d’heure que vous avez dénie.
1. No modo de espera, prima continuamente no comando o botão TIMER durante alguns
segundos, os dígitos das horas piscam.
2. Pressione e/ou para acertar a hora do temporizador.
3. Pressione o botão TIMER e depois pressione ou para selecionar a fonte do
modo temporizador: FM, DAB, CD, USB.
4. Pressione o botão TIMER e depois pressione e/ou para ajustar a hora do
temporizador.
5. Pressione novamente o botão TIMER para conrmar. A unidade será desligada. Ele irá
reproduzir automaticamente no intervalo que você deniu.
1. Halten Sie im Standby-Modus die Taste TIMER auf der Fernbedienung einige Sekunden
lang gedrückt; die Stundenziern blinken.
2. Stellen Sie mit den Tasten und/oder den Timer entsprechend ein.
3. Drücken Sie die Taste TIMER und anschließend oder zur Auswahl des Timer-
Modus: UKW, DAB, CD, USB.
4. Drücken Sie die Taste TIMER und anschließend oder zum Einstellen des
Timers für die Abschaltung des Geräts.
5. Drücken Sie TIMER erneut zum Bestätigen. Das Gerät schaltet sich aus und wird nach
Ablauf des Timers wieder eingeschaltet.
1. In standby mode, press and hold TIMER button on remote control for a few seconds,
the hour digits ash.
2. Press and / or to set the time of timer on.
3. Press TIMER button then press or to select the source of timer mode: FM,
DAB, CD, USB.
4. Press TIMER button then and/ or to set the time of timer o.
5. Press TIMER button again to conrm. The unit will turn o. It will play automatically in
the range you set.
La première fois que vous écoutez la radio DAB, l'heure et la date de votre produit seront
synchronisées automatiquement à celles diusées par le service DAB en mode 24 heures,
ce qui correspond à l'heure d'été.
Si vous souhaitez régler l'heure et la date manuellement, suivez les étapes ci-dessous:
1. Tenez la touche CLOCK pour passer en mode de réglage de la date et de l'heure. Les
chires du format de l'heure (achage 24 ou 12 heures) clignotent.
2. Appuyez sur / pour sélectionner «24» ou «12» format d'horloge, appuyez sur
CLOCK pour conrmer et les chires des heures clignotent.
3. Appuyez sur / pour régler l'heure (HH:MM) et la date (JJ/MM/AAAA). Appuyez
sur le bouton CLOCK pour conrmer.
4. «Heure Enregistré» sera aché après que le réglage de l’année est terminé.
REMARQUE: Dans un format d'horloge 12H, assurez-vous de bien respecter l'indicateur
AM ou PM pour régler l'heure correctement.
A primeira vez que escutar o rádio em DAB/DAB+, a hora e a data do seu produto será
sincronizada automaticamente com aquela transmitida pelo serviço DAB no modo 24 horas,
e com a hora de Verão, portanto, não há necessidade de denir manualmente a hora e a data.
Se desejar denir manualmente a hora e a data, siga os passos abaixo:
1. Prima e mantenha premido CLOCK para entrar no modo de conguração da data e hora.
O formato da hora (exibição de 24 ou 12 horas) pisca.
2. Pressione / para selecionar “24” ou “12” e prima CLOCK para conrmar o formato
do relógio.
3. Pressione / para para denir a hora (HH:MM) e a data (DD/MM/AAAA). Depois
prima o botão CLOCK para conrmar.
4. “Time saved” (data e hora guardada) será exibido após o ano estar denido.
NOTA: No formato do relógio de 12H, certique-se que escolhe AM ou PM no indicador para
congurar a hora corretamente.
Das erste Mal, wenn Sie das DAB/ DAB+-Radio einschalten, werden das Datum und die
Uhrzeit des Geräts automatisch mit den Einstellungen der übertragenden DAB-Sendeanstalt
synchronisiert (24-Stundenformat). Dies geschieht im Einklang mit der Sommerzeit oder
Winterzeit, d.h., Sie müssen das Datum und die Uhrzeit nicht manuell einstellen.
Falls Sie Datum und Uhrzeit dennoch manuell einstellen möchten, gehen Sie wie folgt vor:
1. Halten Sie die Taste CLOCK dedrückt, um den Modus zur Einstellung von Datum un
Uhrzeit umzuschalten. Die Anzeige für das Zeitformat (24- oder 12-Stundenformat) blinkt.
2. Drücken Sie die Tasten / zur Auswahl von „12H“ oder „24H“ und drücken Sie
CLOCK zum Bestätigen des Uhrzeitformats.
3. Drücken Sie die Tasten / zur Auswahl das die Uhrzeit (HH:MM) und Datum (TT/
MM/JJJJ) ein. Drücken Sie CLOCK, um diese Option zu bestätigen.
4. “Uhrzeit Gespeichert” wird nach der Einstellung des Jahres angezeigt.
HINWEIS: Achten Sie im 12-Stundenformat auf die Anzeigen AM und PM für richtige
Einstellung der Stunden.
The rst time you listen to DAB/ DAB+ radio, the time and date of the unit will synchronize
automatically to the broadcast by the DAB service in 24 hour mode, which is in line with
daylight saving.
If you want to set the time and date manually, follow the steps as below:
1. Press and hold CLOCK to enter into date and time setting mode. The clock format (24
hours or 12 hours display) digits ash.
2. Press / button to select 12H or 24H clock format. Press CLOCK button to
conrm.
3. Press / button repeatedly to adjust (HH:MM) and the date (DD/MM/YYYY)
setting. Then press CLOCK button to conrm.
4. “Time saved” will be displayed after year is set.
Note: In 12H clock format, be sure to observe the AM or PM indicator to set the hour
correctly.
1. Appuyez et maintenez sur le bouton ALARM 1 pour accéder au mode de réglage de
l’alarme 1.
2. Appuyez sur et / ou pour sélectionner une option et / ou régler le paramètre, puis
appuyez sur le bouton ALARM 1 pour conrmer.
- Réveils 1 Assist: pour régler l'heure de l'alarme
- Durée: 15> 30> 45> 60> 90
- Source: pour dénir la source de réveil: Buzzer (sonnerie), DAB, FM, CD ou USB.
- Mémorisé: sélectionnez la dernière station de radio écoutée ou la station de radio
présélectionnée souhaitée. Cette option est uniquement disponible lorsque le mode de
réveil est réglé sur DAB ou FM.
- Cycle: Tous les jours, Une fois, Week end, Semaine
** Tous les jours: l’alarme sonne tous les jours.
** Une fois: l'alarme ne sonne qu'une fois.
** Week end: l’alarme sonne le week-end uniquement. (Samedi et dimanche)
** Semaine: l’alarme sonne les jours de semaine uniquement. (Du lundi au vendredi)
- Volume: pour régler le volume de l'alarme
Remarque: le volume minimum de l’alarme est limité à 8.
- Réveils Marche/ Arrêt: appuyez plusieurs fois sur le bouton ALARM 1 pour activer/
désactiver le mode alarme 1.
3. Appuyez sur ALARM 1 pour conrmer tous les paramètres ci-dessus. «Réveils Enregistr»
apparaîtra pendant quelques secondes. L'indicateur d'alarme 1 « » apparaîtra sur
l’écran ainsi que le temps de l’alarme.
Remarque:
- La même procédure s'applique pour l'alarme 2 avec le bouton ALARM 2. L'indicateur
d'alarme 2 « » apparaîtra sur l’écran ainsi que le temps de l’alarme.
- En format d'horloge 12 heures, observez-bien l'indicateur AM/ PM pour régler correctement.
- Certains CD ou périphériques USB peuvent être incompatibles avec la fonction d'alarme.
Réglez la source d'alarme sur buzzer, FM ou DAB si votre CD ou périphérique USB est
incompatible.
Arrêt de l'alarme
1 - Répétition de l'alarme
Appuyez sur SNOOZE pour arrêter l’alarme temporairement. L'appareil passera en mode
veille. «Endormiss.» apparaîtra sur l’écran ainsi que le temps de répétition restant. L’alarme
s’arrête et retentira 9 minutes plus tard.
2 - Arrêt de l'alarme
Appuyez sur ALARM 1 ou pour arrêter l'alarme.
Remarque:
- Lorsque le paramètre est réglé sur «Tous les jours», l’alarme sonnera à nouveau le
lendemain à la même heure.
- Lorsque le paramètre est réglé sur «Une fois», l'alarme ne sonnera plus. L'indicateur
d'alarme s'éteindra.
- Lorsque le paramètre est réglé sur «Week end», l’alarme sonnera à nouveau le samedi ou
le dimanche suivant à la même heure.
- Lorsque le paramètre est réglé sur «Semaine», l’alarme sonnera à nouveau le jour suivant
de la semaine (du lundi au vendredi).
3 - Annuler l'alarme
En mode veille, appuyez sur la touche ALARM 1 à plusieurs reprises jusqu'à ce que «
Arrêt» (Réveil Désactivé) s’ache pour annuler l'alarme 1.
Remarque: La même procédure s’applique pour l’alarme 2 avec la touche ALARM 2.
1. Prime continuamente no comando o botão ALARM 1 durante alguns segundos, para
aceder o modo de conguração de alarme. Prima o botão ALARM 1 para conrmar.
2. Pressione e / ou para selecionar uma opção e / ou ajuste a conguração e prima
ALARM 1 para conrmar.
- Alarm 1 Wizard: para denir a hora do alarme
- Duration (duração): 15> 30> 45> 60> 90
- Source (fonte): para denir a fonte de ativação: Besouro (Buzzer), DAB, FM, CD ou USB.
- Preset (predenido): selecione a estação de rádio ouvida pela última vez ou a estação de
rádio predenida desejada. Esta opção está disponível apenas quando o modo de ativação
está denido para DAB ou FM.
- Cycle: Daily (Diário), Once (Uma vez), Weekends (Fins-de-semana), Weekdays (Dias de
trabalho)
** Daily (Diário): O alarme irá tocar todos os dias.
** Once (Uma vez): O alarme irá tocar apenas uma vez.
** Weekends (Fins-de-semana): O alarme irá tocar apenas aos ns de semana. (sábado
e domingo)
** Weekdays (Dias de trabalho): O alarme irá tocar apenas nos dias da semana. (segunda
a sexta)
- Volume (volume): para denir o volume do alarme
Nota: O nível mínimo de volume do alarme é limitado a 8.
- AlarmOn/O: prima repetidamente o botão ALARM 1 para escolher o modo de alarme
ativado/ desativado.
3. Pressione o botão ALARM 1 para memorizar o ajuste do alarme. “Alarm Saved” (guardado)
irá aparecer por alguns segundos. O ecrã irá exibir indicador de alarme 1 " " e a hora
do alarme.
Nota:
- O mesmo procedimento se aplica para Alarme 2 com o botão ALARM 2. O ecrã irá exibir
indicador de alarme 2 " " e a hora do alarme.
- No formato de 12 horas do relógio, que certique-se de que o indicador AM/PM tenha sido
congurado corretamente.
- Alguns CDs ou dispositivos USB podem ser incompatíveis com a função de alarme.
Dena a fonte do alarme para despertador, FM ou DAB se o seu CD ou dispositivo USB
for incompatível.
DESACTIVAÇÃO DO ALARME
1 - Paragem momentânea do alarme
Prima SNOOZE para parar o alarme temporariamente. A unidade irá entrar no modo de
espera. O ecrã irá exibir "Snooze" (suspender) e o tempo restante da suspenção. O alarme
para e volta a tocar novamente 9 minutos depois.
2 - Paragem do alarme
Pressione ALARM 1 ou para desligar o alarme.
Nota:
- Quando “Daily” (Diário) estiver denido, o alarme irá tocar novamente no dia seguinte, há
mesma hora.
- Quando “Once” (Uma vez) estiver denido, o alarme não irá tocar novamente. O indicador
de alarme irá acender.
- Quando “Weekends” (Fins-de-semana) estiver denido, o alarme irá tocar novamente no
sábado ou no domingo seguinte, há mesma hora.
- Quando “Weekdays” (Dias de trabalho) estiver denido, o alarme irá tocar novamente no
próximo dia da semana (segunda a sexta-feira), há mesma hora.
3 - Desactivação do alarme
No modo de espera, pressione o botão ALARM 1 repetidamente até “ O” para cancelar
o alarme1 permanentemente.
Nota: O mesmo procedimento se aplica para Alarme 2 com o botão ALARM 2.
Hinweis:
- Dasselbe Verfahren gilt für Alarm 2 mit ALARM 2 -Taste. Die Alarm 2-Anzeige " " und die
Alarmzeit werden im Display angezeigt.
- Im 12-Stundenformat müssen Sie beim Einstellen der Uhrzeit auf die AM/PM-Anzeige
achten.
- Einige CDs oder USB-Geräte werden möglicherweise nicht von der Weckruunktion
unterstützt. Falls dem so ist, stellen Sie bitte den Buzzer, UKW oder DAB als Weckrufmodus
ein.
WECKFUNKTION DEAKTIVIEREN
1 - Alarmwiederholung
Drücken Sie aste SNOOZE, um den Weckruf vorübergehend auszuschalten. Das Gerät
aktiviert den Standby-Modus. Im Display werden „Schlummern“ und die verbleibende Dauer
der Schlummerfunktion angezeigt. Der Weckruf wird unterbrochen und ertönt 9 Minuten
später erneut.
2 - Alarm beenden
Drücken Sie ALARM 1 oder , um den Weckruf auszuschalten.
Hinweis:
- Bei der Einstellung „Täglich“ ertönt der Weckruf am nächsten Tag erneut zur gleichen Zeit.
- Bei der Einstellung „Einmal“ ertönt der Weckruf nicht erneut und die Weckrufanzeige erlischt.
- Bei der Einstellung „Wochenende“ ertönt der Weckruf erneut am nächsten Samstag bzw.
Sonntag zur gleichen Zeit.
- Bei der Einstellung „ Werktage “ ertönt der Weckruf erneut am nächsten Werktag (Montag
bis Freitag) zur gleichen Zeit.
3 - Alarm deaktivieren
Drücken Sie im Standby-Modus wiederholt die Taste ALARM 1, bis im Display „ Aus“
erscheint; Alarm 1 ist dann permanent deaktiviert.
Hinweis: Dasselbe Verfahren gilt für Alarm 2 mit ALARM 2 -Taste.
1. Halten Sie die Taste ALARM 1 auf der Fernbedienung, um das Menü mit den Weckruf 1
einstellungen zu önen. Drücken Sie dann ALARM 1 zum Bestätigen.
2. Drücken Sie oder zur Auswahl einer Option und/oder zum Ändern der Einstellung
und drücken Sie ALARM 1 zum Bestätigen.
- Wecker 1 Assiste: Einstellung der Weckrufzeit.
- Dauer: 15> 30> 45> 60> 90.
- Quelle: Einstellung des Weckrufmodus: Summer, DAB, UKW, CD oder USB.
- Programm: Auswahl des zuletzt gehörten Radiosenders oder eines bestimmten
gespeicherten Radiosenders. Diese Option ist nur verfügbar, wenn DAB oder UKW als
Weckrufmodus eingestellt wurden.
- Zyklus:Täglich, Einmal, Wochenende, Werktage
** Täglich: Der Weckruf ertönt täglich.
** Einmal: Der Weckruf ertönt nur einmal.
** Wochenende: Der Weckruf ertönt nur am Wochenende (Samstag und Sonntag)
** Werktage: Der Weckruf ertönt nur an Werktagen (Montag bis Freitag).
- Lautstärke: Einstellung der Weckruautstärke.
Hinweis: Einstellung 8ist die Mindestlautstärke für den Weckruf.
- Wecker Ein/ Aus: Drücken Sie den ALARM 1 wiederholt, um den Weckruf 1 modus ein-
oder auszuschalten.
3. Drücken Sie ALARM 1 um den Alarm 1 Einstellung zu bestätigen. Im Display erscheint
einige Sekunden lang die Anzeige „Wecker Gespeichert“ und die Alarm 1-Anzeige " "
und die Alarmzeit werden im Display angezeigt.
1. Press and hold ALARM 1 button on remote control to access alarm 1 setting menu. Then
press ALARM 1 button again to conrm.
2. Press and / or to select an option and/ or adjust the setting, then press ALARM
1 to conrm.
- Alarm 1 Wizard: to set the alarm time
- Duration: 15> 30> 45> 60> 90.
- Source: To set the wake-up source: Buzzer, DAB, FM, CD or USB.
- Preset: Select the last-listened radio station or desired preset radio station. This option is
only available when wake-up mode is set to DAB or FM.
- Cycle: Daily, Once, Weekends, Weekdays
** Daily: The alarm will sound every day.
** Once: The alarm will sound one time only.
** Weekends: The alarm will sound on weekend only. (Saturday and Sunday)
** Weekdays: The alarm will sound on weekday only. (Monday to Friday)
- Volume: To set the alarm volume
Note: minimum alarm volume level is limited to 8.
- AlarmOn/O: repeatedly press ALARM 1 button to choose alarm 1 mode on/ o.
3. Press ALARM 1 button again to save the alarm 1 setting. “Alarm Saved” will appear for a
few seconds. Then the alarm 1 indicator and alarm time show on display.
Note:
- Same procedure applies for alarm 2 with ALARM 2 button. The alarm 2 indicator
“ ” and alarm time will display.
- In 12 hour clock format, be sure to observe the AM/PM indicator to set the alarm time
correctly.
- Some CDs or USB devices may be incompatible with the alarm function. Set the alarm
source to buzzer, FM or DAB if your CD or USB device is incompatible.
Stopping the Alarm
1 - Alarm repetition
Press SNOOZE to stop the alarm temporally. The unit will go to standby mode. The display
will show “Snooze” and the remaining snooze time. The alarm stops and will sound again
9 minutes later.
2 - Alarm stop
Press ALARM 1 or to stop the alarm.
Note:
- When “Daily” is set, the alarm will sound again the next day at the same time.
- When “Once” is set, the alarm will not sound again. The alarm indicator will light o.
- When “Weekends” is set, the alarm will sound again the following Saturday or Sunday
at the same time.
- When “Weekdays” is set, the alarm will sound again on next weekday (Monday to Friday)
at the same time.
3 - Alarm Cancellation
In standby mode, press ALARM 1 button repeatedly to select “ O” to cancel the
alarm1 permanently.
Note: Same procedure applies for Alarm2 with ALARM 2 button.
DESCRIPTION DE L’APPAREIL
DESCRIÇÃO DO APARELHO
BESCHREIBUNG DES GERÄTS
LOCATION OF CONTROLS
MICRO-CHAINE BLUETOOTH AVEC
RADIO DAB+/ FM, CD ET PORT USB
SISTEMA MICRO BLUETOOTH COM
RÁDIO DAB+/FM, CD E CONEXÃO USB
BLUETOOTH MICRO SYSTEM MIT
DAB+/ UKW-RADIO, CD UND USB-ANSCHLUSS
MICRO SYSTEM CD/MP3 WITH BLUETOOTH
FR
PT
DE
GB
1. Achage TFT
2. Indicateur Bluetooth
3. Capteur pour télécommande
4. / SOURCE: Veille/ Marche; Permet de
sélectionner le mode de fonctionnement: FM,
DAB, CD, USB, Bluetooth ou AUX IN.
5. Port USB pour la lecture MP3
6. / ENTER/ CLOCK: Lecture/ Pause;
Conrmer la sélection / les réglages; permet
de régler l'heure et la date
7. / MENU: Arrête la lecture; Pour entrer dans
le menu principal; Pour revenir au réglage
précédent
8. VOLUME: Réglage du volume
9. PRE+/ ALBUM: Préréglage radio; permet de
sélection le dossier de votre choix
10. EQ/ INFO: Sélection des eets sonores
de votre choix: PLAT/ ROCK/ POP/ JAZZ/
CLASSIQUE/ BASSE; Pour vérier les
informations transmises par la station de radio
1. Ecrã TFT
2. Indicador Bluetooth
3. Sensor para o telecomando
4. Botão / SOURCE: Para ligar e desligar
o aparelho; Para selecionar o modo de
funcionamento: FM, DAB, CD, USB, Bluetooth,
AUX IN
5. Conexão USB para reprodução de MP3
6. Botão / ENTER/ CLOCK: Leitura/ Pausa;
Conrmar a seleção/ denições; para acertar a
data e hora
7. Botão / MENU: Parar reprodução; Entrar no modo
Menu Principal; Voltar para a conguração anterior
8. VOLUME controle: aumentar o volume/ abaixar
o volume
9. Botão PRE+/ ALBUM: Estações de rádio
predenidas; para selecionar a pasta desejada; para
ajustar os efeitos de som
10. Botão EQ/ INFO: Para selecionar a equalização
desejada: FLAT/ ROCK/ POP/ JAZZ/ CLASSIC
(CLÁSSICA) / BASS; Analisar as informações
transmitidas pela estação de rádio
1. TFT-Farbdisplay
2. Bluetooth-Anzeige
3. Infrarotsensor für die Fernbedienung
4. / SOURCE: Gerät ein-/ausschalten;
Funktionsmodus auswählen: FM, DAB,
CD, USB, Bluetooth oder AUX IN.
5. USB-Port für MP3-Wiedergabe
6. Taste / ENTER/ CLOCK: Wiedergabe/
pause; Bestätigen und Optionen-Menü
önen; Einstellung von Datum und Uhrzeit
7. Taste / MENU: Wiedergabe beenden;
Hauptmenü önen; Rückkehr zur
vorherigen Einstellung
8. VOLUME: Lautstärke erhöhen / verringern
9. Taste PRE+/ ALBUM: Speicher vor;
Auswahl des gewünschten Ordners
10. Taste EQ/ INFO: Toneekt auswählen:
EBEN/ ROCK/ POP/ JAZZ/ KLASSISCH/
BASS; Anzeige der vom Radiosender
übermittelten Informationen
1. TFT display
2. Bluetooth indicator
3. Remote sensor
4. / SOURCE button: To turn unit on/ o; To
select function mode: FM, DAB, CD, USB,
Bluetooth and AUX IN.
5. USB port for MP3 playback
6. / ENTER/ CLOCK: Play/Pause; To conrm
the selection/ settings; To set the date and time
7. / MENU: Stop playback; To access the
setting menu; Return to previous step
8. VOLUME control: volume up/ down
9. PRE+/ ALBUM: Radio preset up; to select the
desired folder
10. EQ/ INFO: To select desired sound eects:
FLAT/ ROCK/ POP/ JAZZ/ CLASSIC/ BASS;
To review the information transmitted by the
radio station
R1. Touche : Veille / Marche
R2. Touche SOURCE: Permet de sélectionner le mode de fonctionnement: FM, DAB, CD,
USB, Bluetooth ou AUX IN
R3. Touche EQ: Sélection des eets sonores de votre choix: PLAT/ ROCK/ POP/ JAZZ/
CLASSIQUE/ BASSE
R4. Touche CLOCK: Permet de régler l'heure et la date
R5. Touche TIMER: Permet de régler la fonction de minuterie
R6. Touche SLEEP: Réglage de la fonction SLEEP
R7. Touche ALARM 1: Réglage de l'heure de l'alarme 1
R8. Touche ALARM 2: Réglage de l'heure de l'alarme 2
R9. Touche SNOOZE: Répétition de l’alarme
R10. Touche MENU: Pour entrer dans le menu principal; Pour revenir au réglage précédent
R11. Touche INFO: Pour vérier les informations transmises par la station de radio
R12. Touche ENTER: Conrmer la sélection/ les réglages
R13. Touche : Arrête la lecture
R14. Touche : Lecture/ Pause
R15. Touches VOL+/-: Volume descendant
R16. Touches , : Saut/ recherche rapide/ Syntonisation
R17. Touche AMS/ MODE: Scan automatique des stations en mode radio; Pour programmer
des séquences de lecture/pour régler le mode de lecture en mode CD/ USB; couplage
en mode Bluetooth
R18. Touche MUTE: Activation / désactivation du son
R19. Touche PRE+/ ALBUM: Préréglage radio; permet de sélection le dossier de votre choix
R1. Botão : Para ligar e desligar o aparelho
R2. Botão SOURCE: Para selecionar o modo de funcionamento: FM, DAB, CD, USB,
Bluetooth, AUX IN.
R3. Botão EQ: Para selecionar a equalização desejada: FLAT/ ROCK/ POP/ JAZZ/ CLASSIC
(CLÁSSICA )/ BASS
R4. Botão CLOCK: para acertar a data e hora
R5. Botão TIMER: Para denir a função de temporizador
R6. Botão SLEEP: Para selecionar o tempo da função Dormir
R7. Botão ALARM 1: alarme 1
R8. Botão ALARM 2: alarme 2
R9. Botão SNOOZE: Intervalo de repetição do alarme
R10. Botão MENU: Entrar no modo Menu Principal; Voltar para a conguração anterior
R11. Botão INFO: Entrar no modo Menu Principal; Voltar para a conguração anterior
R12. Botão ENTER: Conrmar a seleção / denições
R13. Botão : Parar reprodução
R14. Botão : Leitura/ Pausa
R15. VOL+ /-: Regulação do volume
R16. , : Pular/ Buscar/ Sintonizar
R17. AMS/ MODE: Sintonizar automaticamente estações no modo de rádio; Para programar
sequências de reprodução/ para ajustar o modo de reprodução no modo CD/ USB;
emparelhamento no modo Bluetooth
R18. Botão MUTE: Activação/ desactivação do som
R19. Botão PRE+/ ALBUM: Estações de rádio predenidas; para selecionar a pasta desejada;
para ajustar os efeitos de som
R1. Taste : Gerät ein-/ ausschalten
R2. Taste SOURCE: Funktionsmodus auswählen: FM, DAB, CD, USB, Bluetooth oder
AUX IN.
R3. Taste EQ: Toneekt auswählen: EBEN/ ROCK/ POP/ JAZZ/ KLASSISCH/ BASS
R4. Taste CLOCK: Einstellung von Datum und Uhrzeit
R5. Taste TIMER: Einstellung der Timer-Funktion
R6. Taste SLEEP: Zeit für Schlummerfunktion auswählen
R7. Taste ALARM 1: Alarm 1
R8. Taste ALARM 2: Alarm 2
R9. Taste SNOOZE: Zeitintervall für die Alarmwiederholung
R10. Taste MENU: Hauptmenü önen; Rückkehr zur vorherigen Einstellung
R11. Taste INFO: Anzeige der vom Radiosender übermittelten Informationen
R12. Taste ENTER: Bestätigen und Optionen-Menü önen
R13. Taste : Wiedergabe beenden
R14. Taste : wiedergabe/ pause
R15. Tasten VOL+ /-: Einstellen der Lautstärke
R16. / : Überspringen/ Suche/ Frequenz
R17. Taste AMS/ MODE: Automatische Sendersuche im Radiomodus; Programmierung
von Titeln für die Wiedergabe/ Einstellung des Wiedergabemodus im CD/USB-Modus;
Kopplung im Bluetooth-Modus
R18. Taste MUTE: Aktivieren/ Deaktivieren des Tons
R19. Taste PRE+/ ALBUM: Speicher vor; Auswahl des gewünschten Ordners
R1. button: To turn unit on/ o
R2. SOURCE button: To select function mode: FM, DAB, CD, USB, Bluetooth and AUX IN.
R3. EQ button: To select desired sound eects: FLAT/ ROCK/ POP/ JAZZ/ CLASSIC/ BASS
R4. CLOCK button: to set the date and time
R5. TIMER button: To set timer function
R6. SLEEP button: To select sleep time
R7. ALARM 1 button: To set alarm 1 time
R8. ALARM 2 button: To set alarm 2 time
R9. SNOOZE button
R10. MENU button: To access the setting menu; Return to previous step
R11. INFO button: To review the information transmitted by the radio station
R12. ENTER button: To conrm the selection/ settings
R13. button: Stop playback
R14. button: Play/ Pause
R15. VOL+ /- buttons: To adjust volume
R16. , buttons: Skip/ Search/ Tuning
R17. AMS/ MODE: auto scan the station in radio mode; To program playback sequences/ to
adjust the playback mode in CD/ USB mode; pairing in Bluetooth mode
R18. MUTE button: To mute or restore sound
R19. PRE+/ ALBUM button: Radio preset up; to select the desired folder
MISE EN GARDE
Ne pas ingérer de la pile, il y a un risque de brûlure chimique
(La télécommande est incluse dans la livraison) Ce produit contient une pile-
bouton. Si la pile-bouton est avalée, il peut causer de graves brûlures internes en
seulement 2 heures et peut être mortel.
Gardez les piles neuves et usagées hors de portée des enfants.
Si le compartiment des piles ne se ferme pas correctement, cessez d’utiliser le produit et
gardez-le éloigné des enfants.
Si vous pensez que les batteries ont été avalées ou placées à l’intérieur de n’importe quelle
partie du corps, chercher une assistante médicale immédiate.
ADVERTÊNCIA
Não ingira as pilhas, Perigo de Queimadura Química
(Fornecidas com o Comando). Este produto contém uma caixa de pilhas com
célula de moeda metálica/ botão. Se a caixa de pilhas com célula de moeda
metálica/ botão for engolida, pode causar queimaduras internas graves em apenas 2
horas, podendo levar à morte.
Mantenha as pilhas novas e usadas fora do alcance das crianças.
Se o compartimento das pilhas não fechar bem, deixe de usar o aparelho e mantenha-o
fora do alcance das crianças.
Se achar que as pilhas podem ter sido engolidas ou colocadas dentro de qualquer parte
do corpo, procure imediatamente assistência médica.
WARNUNG
Batterien nicht verschlucken; Gefahr von Verätzungen
Die (mitgelieferte) Fernbedienung dieses Produkts enthält eine Knopfbatterie.
Wird diese Knopfbatterie verschluckt, kann dies innerhalb von nur 2 Stunden
schwerwiegende innere Verätzungen oder sogar Tod verursachen.
Halten Sie alte und neue Batterien von Kindern fern.
Falls sich das Batteriefach nicht sicher verschließen lässt, beenden Sie den Gebrauch des
Produkts und bewahren Sie es für Kinder unzugänglich auf.
Falls Sie vermuten, dass eine Batterie verschluckt oder in Körperönungen eingeführt
wurde, suchen Sie umgehend einen Arzt auf.
WARNING
Do not ingest the battery, Chemical Burn Hazard (The remote control supplied
with). This product contains a coin/ button cell battery. If the coin/ button cell
battery is swallowed, it can cause severe internal burns in just 2 hours and can
lead to death.
Keep new and used batteries away from children.
If the battery compartment does not close securely, stop using the product and keep it
away from children.
If you think batteries might have been swallowed or placed inside any part of the body, seek
immediate medical attention.
11. AMS/ MODE: Scan automatique
des stations en mode radio; Pour
programmer des séquences de
lecture/ pour régler le mode de
lecture en mode CD/ USB; couplage
en mode Bluetooth
12. Touches , : Saut/ recherche
rapide/ Syntonisation
13. Haut-parleurs
14. Sortie pour haut-parleur droit
15. Antenne FM/ DAB
16. Sortie pour haut-parleur gauche
17. Prise casque
18. Entrée auxiliaire (3,5MM)
19. Cordon secteur
20. Câble des haut-parleurs
21. Touche SNOOZE/ SLEEP:
Répétition de l’alarme; Réglage de la
fonction SLEEP
22. Compartiment disque
11. AMS/ MODE: Sintonizar
automaticamente estações no
modo de rádio; Para programar
sequências de reprodução/ para
ajustar o modo de reprodução no
modo CD/USB; emparelhamento
no modo Bluetooth
12. , : Pular/ Buscar/
Sintonizar
13. Altifalantes
14. Saída para altifalante direito
15. Antena de o FM/ DAB
16. Saída para altifalante esquerdo
17. Ficha dos auscultadores
18. Tomada de entrada Aux (3.5mm)
19. Cabo de alimentação de rede
20. Fio da caixa de som
21. Botão SNOOZE/ SLEEP:
Intervalo de repetição do alarme;
Para selecionar o tempo da
função Dormir
22. Compartimento para disco
11. Taste AMS/ MODE: Automatische
Sendersuche im Radiomodus;
Programmierung von Titeln für
die Wiedergabe/ Einstellung des
Wiedergabemodus im CD/USB-
Modus; Kopplung im Bluetooth-Modus
12. / : Überspringen/ Suche/
Frequenz
13. Lautsprecher
14. Rechter Lautsprecher Buchse
15. FM/DAB-drahtantenne
16. Linker Lautsprecher Buchse
17. Ohrhörerbuchse
18. AUX-Eingang (3.5mm)
19. Netzkabel
20. Lautsprecherkabel
21. Taste SNOOZE/ SLEEP: Zeitintervall
für die Alarmwiederholung; Zeit für
Schlummerfunktion auswählen
22. Disk-Fach
11. AMS/ MODE: auto scan the
station in radio mode; To
program playback sequences/
to adjust the playback mode
in CD/ USB mode; pairing in
Bluetooth mode
12. , buttons: Skip/
Search/ Tuning
13. Speaker box
14. Right speaker jack
15. FM/ DAB antenna
16. Left speaker jack
17. Phones jack
18. AUX IN jack (3.5mm)
19. AC cord
20. Speaker cord
21. SNOOZE/ SLEEP button
22. Disc compartment
RADIO
RÁDIO
RADIO HÖREN
RADIO
CONNEXION D’UNE SOURCE AUXILIAIRE
UTILIZAÇÃO DA ENTRADA AUXILIAR
MUSIKHÖREN ÜBER DEN AUX-EINGANG
CONNECTING AUXILIARY SOURCE
UTILISATION D’UN CASQUE / D’ÉCOUTEURS
UTILIZAÇÃO DE AURICULARES/AUSCULTADORES
USING HEADPHONES / EARPHONES
FONCTION SOMMEIL
FUNÇÃO DE ADORMECER
EINSCHLAFFUNKTION
SLEEP FUNCTION
COMMANDES AUDIO
CONTROLES DE ÁUDIO
AUDIO-BEDIENELEMENTE
AUDIO CONTROLS
ÉCOUTE DES DISQUES
REPRODUÇÃO DE UM DISCO
WIEDERGABE VON DISCS
DISC OPERATION
ÉCOUTE D’UN PERIPHERIQUE USB
UTILIZANDO O USB
USB-BETRIEB
USB OPERATION
MODES DE LECTURE (CD/MP3)
MODOS DE REPRODUÇÃO (CD/MP3)
WIEDERGABE-MODUS (CD/MP3)
PLAY MODES (CD/MP3 ONLY)
INFORMATIONS AFFICHÉES LORS DE LA LECTURE
INFORMAÇÃO DA REPRODUÇÃO ATUAL
NOW PLAYING INFORMATION
ERROR MESSAGES
MENSAGENS DE ERRO
ERROR MESSAGES
CARACTÉRISTIQUES
CARACTERÍSTICAS TÉCNICAS
SPECIFICATION
RÉSOLUTION DES PROBLÈMES
GUIA DE RESOLUÇÃO DE PROBLEMAS
TROUBLESHOOTING GUIDE
MAINTENANCE
MANUTENÇÃO
MAINTENANCE
FONCTION BLUETOOTH
FUNÇÃO DE BLUETOOTH
BLUETOOTH-FUNKTION
BLUETOOTH FUNCTION
CONSIGNES DE SÉCURITÉ
INSTRUÇÕES DE SEGURANÇA
MORE INFORMATION
ATTENTION: pour réduire le risque de choc électrique, ne
démontez pas l’appareil. L’appareil ne contient aucune pièce
réparable par l’utilisateur. Conez tout entretien à un technicien
qualié.
ATENÇÃO: Para reduzir o risco de choque eléctrico, não
desmonte o aparelho. O aparelho não contém qualquer peça
passível de ser reparada pelo utilizador. Cone todas as
operações de manutenção a um técnico qualicado.
CAUTION: To reduce the risk of electric shock, do not remove
the cover (or back). There are no user serviceable parts inside
the unit. Refer all servicing to qualify personnel.
Le symbole de l'éclair terminé par une èche à l'intérieur d'un triangle avertit
l'utilisateur de la présence d’une «tension dangereuse» dans l'appareil.
O símbolo do relâmpago com uma seta e situado no interior de um triângulo
destina-se a alertar o utilizador para a presença de uma “tensão perigosa” no
aparelho.
The lightening ash with arrowhead symbol within the triangle is a warning sign
alerting the user of “dangerous voltage” inside the unit.
Le point d’exclamation à l’intérieur d’un triangle avertit l’utilisateur de la présence
d’importantes instructions dans le manuel accompagnant l’appareil.
O ponto de exclamação no interior de um triângulo destina-se a alertar o utilizador
para a presença de instruções importantes no manual que acompanha o aparelho.
The exclamation point within the triangle is a warning sign alerting the user of
important instructions accompanying the product.
Nos emballages peuvent faire l’objet d’une consigne de tri, pour en savoir
plus: www.quefairedemesdechets.fr
Si vous souhaitez vous débarrasser de cet appareil, pensez à le recycler dans
une décharge pour appareils ménagers électriques. Renseignez-vous pour
connaître votre centre de recyclage le plus proche. Informez-vous auprès des
autorités locales ou de votre revendeur pour de plus amples détails. (Directive sur
les Déchets des équipements électriques et électroniques)
Caso pretenda descartar-se deste aparelho, proceda à sua reciclagem num
centro de recolha para electrodomésticos. Procure obter informações sobre o
centro de reciclagem mais próximo. Informe-se junto das autoridades locais ou do
seu revendedor local para a obtenção de pormenores adicionais (Directiva sobre
os Resíduos dos Equipamentos Eléctricos e Electrónicos).
If in the future, you need to get rid of this product, please note that Waste
electrical products should not be disposed of with household waste. Recycling
facilities exist. Check with your municipality or ask your dealer for advice.
(Directive for Waste Electrical and Electronic Equipment)
Remarque: les caractéristiques et les spécications sont sujettes à modication sans
préavis.
Nota: O desenho e as especicações estão sujeitas a mudanças sem aviso prévio.
Note: Design and specication are subject to change without notice.
ATTENTION
- Utilisez cet appareil sous un climat tempéré.
- La plaque signalétique se trouve à l’arrière de cet appareil.
- Veillez à respecter une distance minimale de 5 cm autour de votre appareil an de
permettre une ventilation susante.
- Veillez à assurer une ventilation correcte de l’appareil et ne couvrez pas les orices de
ventilation avec des objets tels que journaux, nappes, rideaux, etc.
- Ne placez pas de sources de ammes nues, telles que des bougies allumées sur
l'appareil.
- Ne pas exposer l'appareil à des gouttes d'eau ou éclaboussures.
- Ne placez pas d'objets remplis de liquides, tels que verre, vase ou objets similaires sur
l'appareil.
- Ne pas jeter les piles dans le feu! Respectez l'environnement lors de la disposition des
piles usagées.
- Les piles ne doivent pas être exposées à une chaleur excessive comme le soleil, le feu
ou autre source de chaleur similaire.
- La che du cordon d'alimentation est utilisée comme dispositif de débranchement et
doit rester facilement accessible. Pour être totalement déconnecté, cette che doit être
débranchée du réseau complètement. La prise de courant ne doit pas être obstruée et
doit être facilement accessible lors de son utilisation.
- Sous l'inuence du phénomène transitoire rapide et / ou phénomène électrostatique
électrique, le produit pourrait présenter des dysfonctionnements et l'utilisateur devra faire
une réinitialisation de l'appareil.
ATENÇÃO
- Utilize este aparelho num clima temperado.
- A placa de características situa-se na parte de trás deste aparelho.
- Certique-se de que respeita uma distância mínima de 5 cm à volta do aparelho de modo
a permitir uma ventilação suciente.
- Certique-se de que garante uma ventilação correcta do aparelho e que não tapa os
orifícios de ventilação com objectos como jornais, toalhas, cortinas, etc.
- Não coloque qualquer fonte de calor, como uma vela acesa, sobre ou na proximidade
do aparelho.
- Não exponha o aparelho a salpicos ou a humidade.
- Não coloque objectos que contenham líquido, como uma jarra, sobre ou na proximidade
do aparelho.
- Não deite as pilhas no fogo! Certique-se de que respeita o ambiente quando eliminar
pilhas gastas.
- Não exponha as pilhas a calor excessivo, como raios do sol, fogo ou outras fontes de
calor semelhantes.
- A cha de alimentação de rede permite desligar o aparelho e deve car facilmente
acessível. Para cortar a alimentação do aparelho, desligue de vez a cha de alimentação
de rede da tomada de rede. A cha de alimentação de rede não pode estar tapada e deve
ser facilmente acessível durante a utilização.
- Sob o efeito de fenómenos electrostáticos e/ou eléctricos transitórios, o produto
pode apresentar anomalias e pode acabar por ser necessário proceder-se a uma
reinicialização.
IMPORTANT
- The use of apparatus in moderate climates.
- The Marking plate is located at the back of the device.
- Make sure to have a minimum distance of 5cm around the unit for sucient ventilation.
- Ensure that the ventilation openings are not covered with items such as newspapers,
tablecloths, curtains, etc.
- No naked ame sources, such as lighted candles, should be placed on the apparatus.
- Do not expose this appliance to dripping or splashing water.
- Do not place objects lled with liquids, such as glass, vases on the device.
- Do not throw batteries into re! Respect the environment when disposing of used
batteries.
- Batteries should not be exposed to excessive heat such as sunshine, re or other similar
heat source.
- The power plug is used as a disconnect device and must be easily accessible. To
be completely disconnected from the power, the plug of the appliance should be
disconnected completely. The socket must not be obstructed and should be easily
accessible during intended use.
- Under the inuence of fast transient and / or electrostatic electric phenomenon, the
product may malfunction and the user must perform a power reset of the device.
Réglage audio
Pour sélectionner entre "Stéréo admis" et "Stations mono" pour la radio FM.
Système
Permet de sélectionner les options de conguration système: Heure, Langue, Régl. en
usine (Réglage d'usine), Version logiciel.
• Heure
** Réglage de l'heure
Réglage de la date (JJ-MM-AAAA) et de l’heure. Reportez-vous aux opérations sous
«RÉGLAGE DE L'HEURE ET DE LA DATE».
** MAJ Automatique
Toute MAJ: mise à jour de l'heure depuis FM ou DAB.
MAJ via DAB: mise à jour de l'heure depuis le DAB
MAJ via FM: mise à jour de l'heure depuis le FM
Pas de MAJ: ache l'heure du réglage du système.
** Régl. 12h / 24 h
Réglage du format 12/24 heures.
** Régl. Format date:
Réglage du format de date: JJ-MM-AAAA ou MM-JJ-AAAA
• Langue
Pour sélectionner la langue souhaitée du menu de l’appareil: Français, English, Deutsch,
ou Nederlands.
• Régl. en usine (Réglage d'usine)
Pour restaurer les paramètres par défaut.
• Version logiciel
Pour consulter la version actuelle du logiciel.
Menu de paramètres DAB
Recherche totale
Cette fonction vous permet de numériser automatiquement et de créer une liste des
émissions DAB/DAB+ recevables.
Réglage manuel
Cette fonction peut être utilisée pour faciliter le positionnement de l'antenne ou de l'appareil,
an d'améliorer la capacité spécique de réception de la chaîne ou de la fréquence.
Appuyez sur la touche ou pour sélectionner «Réglage manuel» dans le menu
des Paramètres et appuyez sur ENTER pour conrmer. Appuyez sur la touche ou
pour sélectionner la fréquence souhaitée, puis sur ENTER pour syntoniser vers la station
de la fréquence sélectionnée.
DRC (Compression de la gamme dynamique)
Le DRC permet d’obtenir des sons plus doux plus agréables à écouter lorsque votre radio
est utilisée dans un environnement bruyant.
Appuyez sur la touche ou pour sélectionner votre niveau de DRC: o, high, low.
Appuyez sur la touche ENTER pour conrmer
DRC o - pas de compression. Ce sont les paramètres par défauts.
DRC high - compression maximale.
DRC Low - compression moyenne.
Remarque: Le DRC n'est eectif que pour les programmes de compression de portée
dynamique.
Prune (Rafraîchissement)
Supprimez les stations répertoriées mais indisponibles. Cette fonction peut supprimer
toutes les stations non valides indiquées dans la liste des stations avec un "?" devant le
nom de la station.
Appuyez sur ou pour sélectionner "No" (Non) ou "Yes" (Oui), puis appuyez sur la
touche ENTER pour conrmer ou annuler la suppression de toutes les stations invalides.
System (Système)
Reportez-vous aux opérations sous "Menu de réglage FM"
ECOUTER LA RADIO DAB/DAB+
Lorsque l'appareil est allumé, appuyez plusieurs fois sur le bouton SOURCE pour
sélectionner l'icône DAB.
La première fois que vous utilisez la radio ou si la liste des stations est vide, la radio
eectuera automatiquement une recherche complète des stations disponibles. L'achage
passe à "Recherche ......". Une barre de progression montrera la progression de l'analyse
et le nombre de stations trouvées pendant, la recherche sera également achée. Les
stations sont listées par ordre numérique et par ordre alphabétique par défaut.
Vous devrez peut-être également lancer une recherche manuellement pour mettre à jour la
liste des stations pour l'une des raisons suivantes:
- Des nouvelles stations peuvent devenir disponibles avec le temps.
- Des stations fermées ou qui ne peuvent plus être reçues (dans la liste des stations, les
stations non valides sont signalées par un point d'interrogation devant leur nom).
- Si la réception n'était pas correcte lors de la recherche initiale (par exemple, l'antenne
n'était pas en position), cela pourrait entraîner une liste vide ou incomplète lors de la
recherche des stations disponibles.
- Si la réception de certaines stations est médiocre et que le son est interrompu, vous
souhaiterez peut-être ne répertorier que les stations dont le signal est de bonne qualité.
Pour eectuer une recherche complète, appuyez sur le bouton MENU pour accéder au
menu de conguration, appuyez sur les touches / pour sélectionner <Recherche
totale> et appuyez sur ENTER pour lancer la recherche.
Une fois la recherche terminée, la radio reprendra la lecture de la station précédemment
sélectionnée ou de la première station de la liste.
Sélectionnez une station avec / , puis appuyez sur ENTER pour conrmer la
sélection.
Remarque:
- Si aucun programme n'est trouvé avec la recherche DAB/DAB+, «Pas de ch. DAB» (Pas
de station DAB) apparaitra sur l'écran.
- Pour une meilleure réception, étendez l'antenne ou procédez de nouveau à une
recherche totale à un autre endroit.
- Pendant l'opération de recherche, le niveau de son est automatiquement coupé.
ECOUTER LA RADIO FM
En mode radio FM, appuyez sur la touche ou pour le réglage manuel. Maintenez
enfoncée la touche ou pour eectuer une recherche automatique.
Remarque: pour une meilleure réception, déployez l'antenne «queue de cochon».
PRÉRÉGLAGE DES STATIONS
Cette unité peut enregistrer 30 stations FM et 30 stations DAB/DAB+.
1. En mode FM ou DAB, sélectionnez la station de radio souhaitée.
2. Appuyez sur AMS appuyée pour passer en mode de sauvegarde de présélection.
3. Appuyez sur la touche ou pour sélectionner un canal. Appuyez ensuite sur
ENTER pour conrmer. “Mémor. X prérégl.” sera aché («X» correspond au numéro
de la présélection)
Remarque: Si vous choisissez une station qui n’a pas été allouée, «Vide» s'achera. Si
la station a déjà été attribuée, la fréquence FM ou le nom de la station DAB s’achera.
4. Répétez les étapes 1 à 3 pour sauvegarder d'autres stations.
ECOUTER LA RADIO PRESETS
Appuyez brièvement sur SOURCE à plusieurs reprises pour sélectionner la bande FM ou
DAB. Appuyez sur PRE+ sur l'appareil pour sélectionner votre station souhaitée. Réglez le
volume à l'aide des touches de volume VOL+ / VOL-.
MENU DE CONFIGURATION
Naviguez dans le menu de conguration.
En mode FM ou DAB/DAB+, appuyez sur la touche MENU enfoncée pour accéder au
menu de réglage. Appuyez sur la touche ou pour sélectionner une option et / ou
réglez les paramètres. Appuyez sur la touche ENTER pour conrmer.
Remarque: Lorsque vous eectuez le réglage dans le menu, appuyez sur le bouton MENU
pour revenir à l'étape précédente.
Menu de paramètres FM
Régl. recherche (Réglage recherche)
Toutes chaînes: La recherche automatique détecte toutes les stations disponibles.
Stations fortes: La recherche automatique ne détecte que les recherches au signal fort.
ESCUTANDO RÁDIOS DAB/DAB+
Quando a unidade estiver ligada, prima repetidamente o botão SOURCE para selecionar
o ícone DAB.
Quando utilizar pela primeira vez o rádio, ou a lista de estações estiver vazia, o rádio
irá automaticamente fazer uma sintonização completa para ver quais estações estão
disponíveis. O visor mudará para “Scanning……” (Sintonizar ......). Uma barra de progresso
mostrará o progresso de sintonização e o número de estações encontradas durante a
sintonização também será exibido.
Pode também precisar de sintonizar manualmente para atualizar a lista de estações por um
dos seguintes motivos:
- Novas estações podem estar disponíveis de tempos em tempos.
- As estações fecham ou não podem ser mais recebidas (na lista de estações, as estações
inválidas são indicadas com um ponto de interrogação à frente do nome).
- Se a receção não foi boa durante a sintonização original (por exemplo, a antena não estava
esticada), isso pode resultar numa lista vazia ou incompleta de estações disponíveis.
- Se tiver má receção em algumas das estações, fazendo com que o áudio que cortado,
pode listar apenas as estações com boa intensidade de sinal.
Para fazer uma sintonização completa, prima o botão MENU para entrar no menu de
congurações, prima ou para selecionar <Full Scan> (sintonização completa) e
prima ENTER para iniciar a sintonização.
Quando a sintonização estiver concluída, o rádio irá reproduzir a estação anteriormente
selecionada ou a primeira estação na lista de estações.
Selecione uma estação com botões / e prima ENTER na unidade para conrmar.
Observação:
- Caso nenhuma transmissão seja encontrada pela sintonia de DAB/DAB+, a frase “No DAB
Station” (Nenhuma estação DAB) será exibida na tela.
- Para ter uma melhor recepção, estique a antena ou realize uma busca completa novamente
depois de mudar de lugar.
- Durante o processo de busca, o volume será automaticamente colocado em mudo.
ESCUTANDO RÁDIO FM
No modo de rádio FM, prima o botão ou para efetuar a sintonização manual.
Pressione e segure / para a busca automática.
Nota: Para uma melhor recepção, estique a antena.
DAB/DAB+ RADIOSENDER ANHÖREN
Drücken Sie bei eingeschaltetem Gerät die SOURCE -Taste, um das DAB-Icon auszuwählen.
ESTAÇÕES PRÉ-INSTALADAS
Este aparelho pode armazenar até 30 estações de rádio FM e 30 estações DAB/DAB+.
1. No modo FM ou DAB, sintonize a estação de rádio desejada.
2. Prima o botão AMS para entrar no modo de armazenagem na memória.
3. Prima o botão ou para selecionar uma estação. Pressione ENTER para
armazená-la. “Preset X saved” (Guardar X memória) será exibido (X é para o número
onde foi armazenada).
Observação: Caso você escolha uma estação que ainda não tenha sido armazenada, a
frase “EMPTY” (Vazia) será exibida. Se a estação tiver sido armazenada antes, a frequência
FM ou o nome da estação DAB será exibido.
4. Repita os passos de 1 a 3 para armazenar outras estações.
ESCUTANDO PRÉMISSÕES DE RÁDIO
Pressione o botão SOURCE para selecionar uma banda FM ou DAB/DAB+. Pressione
PRE+ no dispositivo para selecionar a sua estação desejada. Utilize o botão VOL+ ou VOL-
para regular o volume.
MENU DE CONFIGURAÇÕES
No modo FM ou DAB/DAB+, pressione o botão MENU para entrar no menu de congurações.
Pressione o botão ou para selecionar uma opção e ajustar as congurações e
pressione ENTER para conrmar.
Nota: Quando zer a conguração no menu, pressione o botão MENU para voltar ao passo
anterior.
MenudeConguraçõesFM
Scansetting(ConguraçõesdeSintonia)
All stations (Todas as estações): a busca automática listará todas as estações disponíveis.
Strong station only (Apenas estações potentens): a busca automática listará apenas
estações com sinal potente.
Audiosetting(Conguraçõesdeáudio)
Para selecionar entre "Stereo allowed" e "Forced mono" para o rádio FM.
System (Sistema)
Para selecionar as opções de congurações do sistema: Time (Hora), Language (idioma),
Factory Reset (Congurações de Fábrica), SW version (Versão do Sistema).
• Time (hora)
** Set Time/ Date (Denir hora/data)
Dena a data (DD/MM/AAAA) e a hora. Consulte as operações de funcionamento na seção
“CONFIGURAÇÃO DE DATA E HORA”.
** Auto update (Atualização automática)
Update from Any (Atualizar a partir de Qualquer Origem): Atualiza a hora a parir do FM ou
DAB/DAB+.
Update from DAB (Atualizar a partir de DAB): Atualiza a hora a parir do DAB/DAB+
Update from FM (Atualizar a partir da rádio FM): Atualiza a hora a partir do FM.
No update (Não atualizar): exibe a hora denida nas congurações de sistema.
** Set 12 /24 hour (Denir hora como 12 ou 24)
Denir formato da hora: relógio de 12/24 horas
** Set date format (denir o formato da data)
Dena o formato da data: DD-MM-AAAA ou MM-DD-AAAA.
• Language (idioma)
Para selecionar o idioma desejado no menu da unidade: Français, English, German, Dutch
• Factory Reset (Congurações de Fábrica)
Para restaurar as congurações padrão de fábrica.
• SW version (Versão do Sistema)
Para vericar a versão atual do software.
MenudeconguraçõesDAB
Full Scan (Sintonia Completa)
Esta função permite sintonizar e criar automaticamente uma lista de transmissões DAB a
receber.
Manual Tune (Sintonia Manual)
Esta função pode ser usada para auxiliar o posicionamento da antena ou da unidade, para
melhorar a capacidade especíca de receção de canais ou frequências.
Pressione o botão ou para selecionar <Manual Tune> e prima ENTER para
conrmar. Pressione o botão ou para selecionar a frequência desejada e prima
ENTER para sintonizar a estação na frequência selecionada.
DRC (Compressão Dinâmica de Amplitude)
DRC pode fazer com que sons mais baixos sejam ouvidos melhor quando o aparelho estiver
sendo utilizado em áreas com muito barulho ambiente.
Pressione o botão ou para selecionar o nível de DRC desejado: o (desligado),
high, low. Pressione o botão ENTER para conrmar.
DRC o – sem compressão. Esta é a conguração padrão.
DRC high – máxima compressão.
DRC low – média compressão.
Observação: O DRC só funcionará em transmissões com compressão dinâmica de
amplitude.
Prune (Remover)
Remova as estações que estão listadas mas não estão disponíveis. Esta função pode
remover todas as estações inválidas indicadas na lista de estações com um "?" na frente
do nome da estação.
Prima ou para selecionar "No" (não) ou "Yes" (sim) e, em seguida, prima o botão
ENTER para conrmar ou cancelar a remoção de todas as estações inválidas.
System (Sistema)
Consulte as operações em "Menu de conguração de FM".
LISTEN TO DAB/DAB+ RADIO
When the unit is ON, repeatedly press SOURCE button to select DAB mode.
The rst time you use the unit, or if the station list is empty, the unit automatically performs
a full scan to see what stations are available. The display will change to “Scanning……”.
A progress bar will show the progress of the scan and the number of stations found during
the scan will also be displayed. Stations are listed in numerical and then alphabetical order
by default.
You may also need to start a scan manually to update the list of stations for one of the
following reasons:
- New stations may become available from time to time.
- Stations close or can no longer be received (In the station list, invalid stations are
indicated with a question mark in front of their name).
- If reception was not good for the original scan (for example the antenna was not up), this
may result in an empty or incomplete list of available stations.
- If you have poor reception of some stations causing the audio to break up, you may wish
to list only stations with good signal strength.
To do a full scan, press MENU button to enter setting menu, press or button to
select <Full Scan> and press ENTER to start a scan.
Once the scan is complete, the radio returns to play the previously selected station or rst
station on the station list.
Select a station with / , then press ENTER button to conrm.
Note:
- If no broadcasts are found by DAB/DAB+ scan, “No DAB Station” appears in the display.
- For a better reception, extend the antenna cable or do the full scan again in another place.
- During the search operation, the sound level is automatically muted.
LISTEN TO FM RADIO
In FM radio mode, Press or button to manual tuning. Press and hold /
button to automatic search.
Note: For a better reception, extend the pigtail antenna.
PRESET STATION
This unit can store 30 FM and 30 DAB/DAB+ stations.
1. In FM or DAB mode, tune to a desired radio station.
2. Press AMS button to enter preset store mode.
3. Press or button to select a preset channel, then press ENTER to conrm.
“Preset X stored” will appear for a few seconds. (X = preset channel nr)
Note: If you choose a station that hasn’t been allocated, “Empty” will be displayed. If the
station has been allocated before, the frequency will be showed.
4. Repeat step 1-3 to store other stations.
Listening to station presets
Press SOURCE button to select FM or DAB mode. Then press PRE+ and repeat the
operation as many times as necessary to select your station. Press VOL+ or VOL- to
adjust the sound level.
SETUP MENU
Navigating the setup menu.
In FM or DAB mode, press MENU button to access setting menu. Press or button
to select an option and/ or adjust the setting. Press ENTER button to conrm.
Note: When do the setting in the menu, press the MENU button to return back to previous
step.
FM Setting Menu
Scan setting
To select all stations or Strong stations only
All stations: the automatic search locates at any available station.
Strong station only: the automatic search only locates at strong stations.
Audio setting
To select Stereo allowed or Forced mono.
System
To select the system setting options: Time, Language, Factory Reset, SW version.
• Time
** Set Time/ Date
Set date (DD/MM/YYYYY) and time. Refer to the operations in section “SETTING THE
TIME AND DATE”
** Auto update
Update from Any: Auto update the time from DAB signal or FM signal
Update from DAB: Auto update the time from the DAB signal
Update from FM: Auto update the time from the FM signal
No Update: show the time from system setting.
** Set 12/ 24 hour
Set time format:12/24 hour clock display
** Set date format
Select the date format: DD-MM-YYYY or MM-DD-YYYY
• Language
To select the desired language of the unit’s menu: Français, English, German, Dutch
• Factory Reset
To restore to factory default settings.
• SW version (software version)
To review the current software version.
DAB Setting Menu
Full Scan
This function allows you to automatically scan and create a list of receivable DAB/DAB+
broadcasts.
Manual Tune
This function can be used to assist the positioning of the antenna or the unit to obtain the
optimum reception for a specic channel or frequency.
Press or button to select <Manual Tune> and press ENTER to conrm. Press
or button to select your desired frequency and press ENTER to tune to the station for
the selected frequency.
DRC (Dynamic range compression)
DRC can make quieter sounds easier to hear when the unit is used in a noisy environment.
Press or button to select your desire DRC level: o, high, low. Press ENTER
button to conrm.
DRC o – no compression. This is the default setting.
DRC high- maximum compression.
DRC low- medium compression.
Note: DRC is eective only in dynamic range compression broadcast.
Prune (remove stations that are listed but unavailable)
Remove stations that are listed but unavailable.
This function can remove all invalid stations indicated in the station list with a “?” in front
of the station name.
Press or to select “No” or “Yes”, then press ENTER button to conrm or cancel
removing all invalid stations.
System
Please refer to the system of FM Setting Menu
1. Branchez votre source auxiliaire (par exemple un lecteur MP3) à la prise AUX IN. (Câble
non fourni).
2. Appuyez plusieurs fois sur SOURCE pour sélectionner le mode AUX in. L’écran achera
“Aux”.
3. Commencez la lecture de votre source auxiliaire.
4. Réglez le volume au niveau souhaité.
5. Pour arrêter la lecture, débranchez votre source auxiliaire de la prise AUX IN.
1. Conecte a sua origem auxiliar (ex: aparelho de mp3) na conexão AUX IN (cabo não incluso).
2. Pressione SOURCE várias vezes para selecionar o modo de Fio de Entrada. A tela exibirá
“AUX”.
3. Arranque a reprodução na sua fonte auxiliar.
4. Ajuste o volume sonoro para o nível pretendido.
5. Para parar a reprodução, desligue a fonte áudio externa com ligação à tomada AUX IN.
1. Schließen Sie Ihr externes Gerät (z.B. MP3-Player) an den AUX IN Eingang (Kabel
nicht enthalten).
2. Drücken Sie die Taste SOURCE wiederholt, um den Aux-Modus auszuwählen. Im
Display erscheint die Anzeige „AUX“.
3. Starten Sie die Wiedergabe auf dem angeschlossenen Audiogerät.
4. Stellen Sie die Lautstärke auf den gewünschten Lautstärkepegel.
5. Trennen Sie das Audiogerät vom AUX IN - Eingang ab.
1. Connect your auxiliary source (e.g.mp3 player) to the Aux in jack. (Cable not included).
2. Press SOURCE repeatedly to select Aux in mode. The display will show “AUX”.
3. Start playback from your auxiliary source.
4. Adjust the volume to desired level.
5. To stop playback, disconnect your auxiliary source from the Aux in jack.
Tensiondesortiemaximum≤150mV
Tensioncaractéristiquelargebande≥75mV
MISE EN GARDE SUR LE NIVEAU DE VOLUME DU CASQUE
Diminuez le volume avant de connecter un casque et augmentez-le ensuite si nécessaire.
L’utilisation prolongée d’un casque à un volume élevé peut endommager votre système
auditif. Lorsqu’un casque ou des écouteurs sont connectés, les haut-parleurs du lecteur
sont désactivés.
Attention: Évitez les niveaux sonores élevés pouvant nuire à votre système auditif.
Tensãomáximadesaída≤150mV
Tensãoespecícadeamplitudedebanda≥75mV
PRECAUÇÕES RELATIVAS AO NÍVEL DO VOLUME DOS AURICULARES
Diminua o volume antes de ligar os auriculares e aumente-o de seguida, se necessário. A
utilização prolongada de auriculares com um volume alto pode causar lesões no sistema
auditivo. Quando se ligam auriculares ou auscultadores, os altifalantes do leitor são
desactivados.
Atenção: Evite níveis sonoros altos pois podem danicar o sistema auditivo.
Maximumoutputvoltage≤150mV.
WideBandCharacteristicVoltage≥75mV
HEADPHONE VOLUME WARNING
Connect earphones with the volume set low and increase it if required. Prolonged listening
through some earphones at high volume settings can result in hearing damage. When
headphones / earphones are connected, no sound will be emitted from the unit’s speaker.
Caution: Avoid listening to sound at levels which may be harmful to your ears.
Lorsque l'appareil est allumé, pour vous endormir en écoutant de la musique, appuyez
plusieurs fois sur SLEEP pour choisir entre 120-110-100-90-80-70-60-50-40-30-20-10-05
minutes d'écoute. L'unité s'éteindra automatiquement après le délai spécié. Pour annuler
la fonction Sleep, appuyez plusieurs fois sur le bouton SLEEP jusqu'à ce que l'icône de
mise en veille disparaisse.
Quando a unidade estiver ligada. Para adormecer com música, pressione várias vezes
SLEEP para selecionar entre 120-110-100-90-80-70-60-50-40-30-20-10-05 minutos. O
aparelho se desligará automaticamente depois da quantidade de tempo especicada.
Para cancelar a função adormecer, pressione várias vezes o botão SLEEP áté que o
ícone de suspensão desaparece.
Wenn das Gerät eingeschaltet ist, Wenn Sie mit Musik einschlafen möchten, drücken Sie
die Taste gefolgt von SLEEP, um den Sleep-Timer mit 120-110-100-90-80-70-60-50-40-
30-20-10-05 Minuten einzustellen. Nach Ablauf der programmierten Zeit schaltet sich das
Gerät automatisch aus. Um den Sleep-Timer zu löschen, drücken Sie wiederholt die Taste
SLEEP, bis das Sleep-Icon erlischt.
When the unit is on, to fall asleep with the music, repeatedly press SLEEP to select 120-
110-100-90-80-70-60-50-40-30-20-10-05 minutes of listening. The unit will automatically
turn o after the specied time. To cancel the sleep function, repeatedly press SLEEP
button until sleep icon disappears.
1. Appuyez sur la touche pour mettre l’appareil en marche.
2. Appuyez longuement sur la touche de l’appareil ou appuyez brièvement sur la touche
de la télécommande pour éteindre l'unité.
3. La fonction (FM/ DAB/ CD/ USB/ BLUETOOTH/ AUX IN) est sélectionnée en appuyant
sur le bouton SOURCE de manière répétée.
Dans un souci d'économie d’énergie, à la n de la lecture ou bien encore si le volume
d'écoute est réglé à un niveau très bas et qu’aucune opération n'est eectuée sur l'appareil
pendant une période de 15 minutes celui-ci se mettra automatiquement en mode veille.
VOLUME
Tournez le bouton de volume sur l'appareil ou appuyez sur les boutons VOL+/- sur la
télécommande pour régler le son à un niveau confortable. Le niveau sonore s’achera
pendant quelques secondes.
COUPER LE SON
Lorsque l’unité est allumée, appuyez sur MUTE pour couper le son. Appuyez de nouveau
pour remettre le son.
ÉGALISEUR
Appuyez de manière répétée sur la touche EQ pour sélectionner un mode égaliseur: PLAT,
ROCK, POP, JAZZ, CLASSIQUE et BASSE. La sélection s’achera sur l’écran pendant
quelques secondes.
1. Prima o botão para pôr o aparelho a funcionar.
2. Mantenha o botão pressionado no aparelho ou pressione uma vez no controle
remoto para desligar o aparelho.
3. A função (FM/ DAB/ CD/ USB/ BLUETOOTH/ AUX IN) é selecionada ao pressionar o
botão SOURCE várias vezes.
No interesse de economizar energia, quando uma reprodução terminar ou o nível de
volume for denido como muito baixo e nenhuma operação for realizada por um período
de 15 minutos, o aparelho entrará automaticamente no modo de Espera.
VOLUME
Gire o botão Volume na unidade ou pressione no comando os botões VOL +/- para ajustar
o som a um nível confortável. O nível do volume será exibido na tela por alguns segundos.
COLOCANDO O SOM NO MUDO
Com o aparelho ligado, pressione o botão MUTE para colocar o som no mudo. Pressione
o botão novamente para voltar ao normal.
Equalizador
Prima continuamente na unidade o botão EQ ou prima no comando repetidamente o botão
EQ para alternar entre os diferentes efeitos sonoros FLAT, ROCK, POP, JAZZ, CLASSIC
(CLÁSSICO) e BASS. A escolha continuará a ser exibida na tela por alguns segundos.
1. Drücken Sie auf die Taste , um das Gerät einzuschalten.
2. Halten Sie die Taste am Gerät gedrückt oder drücken Sie kurz die Taste auf der
Fernbedienung, um das Gerät auszuschalten.
3. Wählen Sie einen Modus (FM/ DAB/ CD/ USB/ BLUETOOTH/ AUX IN) aus, indem Sie
die Taste SOURCE wiederholt.
Aus Energiespargründen aktiviert das Gerät automatisch den Standby-Modus, wenn das
Ende der Wiedergabe erreicht oder eine sehr geringe Lautstärke eingestellt ist und 15
Minuten lang keine Eingabe am Gerät erfolgt.
LAUTSTÄRKEREGELUNG
Drehen Sie den Lautstärkeregler oder verwenden Sie die Tasten VOL+/- auf der
Fernbedienung, um die Lautstärke entsprechend einzustellen. Im Display erscheint einige
Sekunden lang die Lautstärkestufe.
STUMMSCHALTEN DER TONAUSGABE
Wenn das Gerät eingeschaltet ist, betätigen Sie die MUTE-Taste, um die Tonausgabe
auszuschalten. Betätigen Sie die Taste erneut, um die Tonausgabe wieder zu zu aktivieren.
Equalizer
Halten Sie die Taste EQ am Gerät gedrückt oder drücken Sie wiederholt die Taste EQ auf
der Fernbedienung, um einen der Sound-Eekte auszuwählen: EBEN, ROCK, POP, JAZZ,
KLASSISCH oder BASS. Die Auswahl wird für einige Sekunden angezeigt.
1. Press button on unit or remote control to turn on the unit.
2. Press and hold button on unit or press button on remote control to turn o the unit.
3. The function (FM/ DAB/ CD/ USB/ BLUETOOTH/ AUX IN) is selected by pressing
SOURCE button repeatedly.
In a concern of saving energy, when playback has reached to the end or listening volume is
set at a very low level and no control is operated on the device for a period of 15 minutes,
the unit will automatically switch to Standby mode.
VOLUME
Rotate volume knob on unit or press VOL+/- buttons on remote control to adjust the sound
to comfortable level. The volume level will be displayed for a few seconds.
MUTING THE SOUND
When the unit is on, press MUTE button to mute the sound. Press again to restore.
EQ
Press and hold EQ button on unit or press EQ button repeatedly on remote control to select
dierent sound eects: FLAT, ROCK, POP, JAZZ, CLASSIC and BASS. The selection will
show on display for few seconds.
1. Appuyez sur la touche pour mettre l’appareil en marche.
2. Appuyez sur la touche SOURCE pour sélectionner le mode CD.
3. Soulevez le plateau du disque.
4. Placez le CD avec l'étiquette vers l'extérieur du compartiment CD et fermer le compartiment.
5. La lecture commence automatiquement après quelques secondes.
FONCTIONS DE BASE
Lecture/ Pause
Pour interrompre la lecture temporairement, appuyez sur la touche .
Pour reprendre la lecture, appuyez sur cette touche de nouveau.
STOP
Appuyez sur la touche sur l'unité pour arrêter la lecture. Le nombre total de pistes
s'achera sur l'écran.
Sélectiond’unchier
1. Appuyez une fois sur la touche pour passer à la plage suivante ou appuyez plusieurs
fois pour sauter plusieurs plages.
2. Appuyez une fois sur la touche pour revenir au début de la plage en cours ou appuyez
plusieurs fois pour revenir aux plages précédentes.
Recherche rapide arrière/ avant
Tenez la touche / appuyée. Le disque/ USB recherchera à grande vitesse dans la
direction avant ou arrière. La lecture normale reprendra lorsque vous relâcherez la touche.
Sélectionner un répertoire (MP3 seulement)
Appuyez sur la touche ALBUM pour lire la première piste du répertoire suivant (du disque
ou clé USB).
Remarque: les icônes lumineuses du MP3 s'allument lors de la lecture de chiers MP3.
1. Prima o botão para pôr o aparelho a funcionar.
2. Prima o botão SOURCE do telecomando para selecionar a função de CD.
3. Levante a bandeja do CD.
4. Insira o disco no compartimento, com a face impressa virada para cima e feche o
compartimento do CD
5. A reprodução começa automaticamente após alguns segundos.
LEITURA DE BASE
Reproduzir/ Pausar
Para interromper temporariamente, pressione o botão . Para restaurar a reprodução,
pressione esse botão novamente.
PARAR
Prima brevemente o botão para parar a reprodução. O número total de faixas será exibido
na tela.
Selecçãodeumcheiro
1. Prima uma vez o botão para passar para a faixa seguinte ou prima várias vezes para
saltar várias faixas.
2. Prima uma vez o botão para voltar ao início da faixa em curso ou prima várias vezes
para voltar às faixas anteriores.
Avanço e retorno acelerado
Mantenha o botão PULAR ( / ) pressionado. O disco/ USB avançará ou retornará em
alta velocidade. A reprodução normal será restaurada quando você soltar o botão.
SELECIONANDO UMA PASTA (APENAS PARA MP3)
Prima o botão ALBUM para selecionar a primeira faixa da pasta seguinte do seu disco ou
aparelho USB atual.
Nota: O ícone do MP3 acende durante a reprodução dos cheiros mp3.
1. Drücken Sie auf die Taste , um das Gerät einzuschalten.
2. Drücken Sie auf die Taste SOURCE um den CD- Modus auszuwählen.
3. Önen Sie das CD-Laufwerk.
4. Legen Sie eine CD mit der beschrifteten Seite nach oben in das Ladefach und schließen
Sie es.
5. Die Wiedergabe startet nach einigen Sekunden automatisch.
Normale Wiedergabe
Wiedergabe/ Pause
Um die Wiedergabe vorübergehend zu unterbrechen, betätigen Sie die Taste . Zum
Fortfahren der Wiedergabe betätigen Sie diese Taste bitte erneut.
STOPP
Drücken Sie die Taste um die Wiedergabe zu beenden. Gesamtzahl der Titel wird in
der Anzeige angezeigt.
Auswahl Einer Datei
1. Einmal auf die Taste drücken, um zum nächsten Titel zu springen, oder mehrmals,
um mehrere Titel zu überspringen.
2. Einmal auf die Taste drücken, um zum Beginn des laufenden Titels zurückzukehren,
mehrmals drücken, um zu den vorhergehenden Titeln zurückzukehren.
Schneller Suchlauf vorwärts/ rückwärts
Halten Sie die Taste / gedrückt. Die CD-/ USB-Wiedergabe aktiviert dann den
schnellen Suchlauf vorwärts oder rückwärts. Sobald Sie die Taste loslassen, setzt das
Gerät die normale Wiedergabe fort.
Verzeichnisauswahl (nur MP3)
Betätigen Sie die Taste ALBUM zur Auswahl des ersten Titels des nächsten Verzeichnisses
Ihrer eingelegten Disc oder USB-Mediums.
Hinweis: Während der Wiedergabe von MP3-Dateien erscheint das MP3-Icon.
1. Press button on unit or remote control to turn on the unit.
2. Press SOURCE button repeatedly to select CD function.
3. Lift up the CD door.
4. Place the CD with label side up inside the CD compartment and close the CD compartment.
5. Playback starts automatically after a few seconds.
BASIC OPERATION
PLAY/ PAUSE
To temporarily stop playing, press button. To resume play, press this button again.
STOP
Press button to cease to play. Total number of tracks will show on display.
Select a track
1. Press to skip forward to the next track or repeatedly to skip several tracks.
2. Press to skip backward to previous track, or repeatedly to skip backwards several
tracks.
Fast search backward/ forward
Press and hold the / button. The disc/ USB will search at high speed in the forward
or backward direction. Normal play will continue when you release the button.
Select a folder (mp3 only)
Press ALBUM to select the rst track of next folder of your current disc or USB.
Note: The MP3 icon lights up during playback for mp3 les.
1. Appuyez sur la touche pour mettre l’appareil en marche.
2. Connectez le périphérique USB au port USB de l’appareil.
3. Appuyez sur la touche SOURCE pour sélectionner le mode USB. La lecture démarre
automatiquement.
Remarques:
- Le nombre total de chiers MP3 sur l'appareil USB ne doit pas dépasser 999.
- L'appareil USB ne peut pas contenir plus de 99 répertoires.
- La durée de lecture prend quelques secondes ou plus en fonction de la quantité de
chiers MP3 et de dossiers USB sur l'appareil.
- N’insérez rien d’autre qu’un périphérique USB dans le port prévu à cet eet. Vous
risqueriez d’abîmer l’appareil.
- Le port USB ne doit pas être directement connecté à un ordinateur: cela pourrait
endommager l’appareil.
- Il existe sur le marché de nombreux modèles de clefs USB et de lecteurs MP3. Nous
ne pouvons garantir une compatibilité avec tous les formats. Merci d’utiliser un autre
périphérique USB si le vôtre ne fonctionne pas.
REPRODUÇÃO DE USB
1. Prima o botão para pôr o aparelho a funcionar.
2. Ligue o periférico USB à porta USB do aparelho.
3. Prima o botão SOURCE para seleccionar o modo USB. Depois de alguns segundos. A
reprodução começará imediatamente.
Observação:
- O número total de arquivos de MP3 no dispositivo USB não deverá ser maior que 999.
- O dispositivo USB não poderá ter mais que 99 diretórios.
- O tempo de leitura poderá ser de alguns segundos ou mais, dependendo da quantidade
de arquivos de MP3 e pastas no dispositivo USB.
- Não insira mais nada a não ser um periférico USB na porta prevista para este efeito.
Corre o risco de danicar o aparelho.
- A porta USB não deve ser directamente ligada a um computador: tal pode danicar o
aparelho.
- Existem no mercado inúmeros modelos de chaves USB e de leitores de MP3. Não
podemos garantir uma compatibilidade com todos os formatos. Utilize um outro periférico
USB se o seu não funcionar.
1. Drücken Sie auf die Taste um das Gerät einzuschalten.
2. Schließen Sie den USB-Stick an den USB-Port des Geräts an.
3. Drücken Sie auf die Taste SOURCE um zum USB-Betrieb zu wechseln. Die Wiedergabe
startet automatisch.
Anmerkungen:
- Auf dem USB-Gerät dürfen nicht mehr als 999 MP3-Dateien gespeichert sein.
- Das USB-Gerät darf nicht mehr als 99 Verzeichnisse enthalten.
- Je nach Anzahl der MP3-Dateien und Ordner auf dem USB-Gerät benötigt der
Lautsprecher einige Sekunden oder länger zum Lesen der Dateien.
- Stecken Sie nur ein USB-Gerät in den dazu vorgesehenen USB-Port. Sie könnten das
Gerät ansonsten beschädigen.
- Der USB-Port darf nicht direkt an einen PC angeschlossen werden: Dadurch könnte das
Gerät beschädigt werden.
- Auf dem Markt sind zahlreiche USB-Sticks und MP3-Player erhältlich. Die Kompatibilität
mit allen Formaten kann daher nicht gewährleistet werden. Benutzen Sie bitte einen
anderen USB-Stick, falls der Ihre nicht funktionieren sollte.
1. Press button on unit or remote control to turn on the unit.
2. Connect an USB device to the USB port on unit.
3. Press SOURCE button to select USB mode. After a few seconds, playback starts
automatically.
Notes:
- The total number of MP3 les on the USB device should not exceed 999.
- The device may not contain more than 99 directories.
- The reading time takes about a few seconds or more depending on the amount of MP3
les and folders on USB device.
- Do not put anything other than a USB device to the port of this unit. Other objects may
damage the USB mechanism.
- The USB socket must not be connected to the computer directly, for that may damage
the unit.
- There are many USB devices in the market. We cannot guarantee to support all dierent
models. Please try another USB device if your device is not supported.
Appuyez sur la touche MODE à plusieurs reprises pour choisir diérentes sortes de modes
de lecture dans l'ordre suivant.
Pour les CD audio: Répéter un Répéter Tout Aléatoire Normal
Pour les chiers MP3: Répéter un Répéter tout Répéter le dossier Aléatoire
Normal
Repeat one (Répéter un) – Pour répéter la piste en cours de lecture.
Repeat All (Répéter tout) – Pour répéter toutes les pistes.
Repeat Album (Répéter l'album) – Pour répéter toutes les pistes de l'album/ du dossier entier.
Random (Aléatoire) – toutes les pistes seront jouées de manière aléatoire.
Normal – lit les pistes dans l'ordre.
Lecture programmée (mode CD/MP3 uniquement)
1. En mode arrêt, appuyez sur la touche AMS. L’écran achera “ 01”.
2. Appuyez sur la touche ALBUM pour sélectionner le dossier de votre choix et appuyez sur
les touches / pour sélectionner la piste de votre choix.
3. Appuyez sur la touche AMS pour conrmer
4. Répétez les étapes ci-dessus pour programmer jusqu'à 20 pistes pour les CD et 99 pistes
pour les MP3.
5. Appuyez sur la touche pour commencer la lecture programmée.
6. Appuyez sur la touche pour arrêter la lecture.
7. Pour annuler un programme de lecture: appuyez sur la touche deux fois, l'indicateur
« » s'éteindra.
Pressione o botão MODE várias vezes para selecionar entre os diferentes tipos de modo
de reprodução na seguinte sequência.
Para CDs de áudio: Repetir uma Repetir Todas Aleatória Normal
Para arquivos de MP3: Repetir uma Repetir Todas Repetir pasta Aleatória
Normal
Repeat one (Repetir uma) – Para repetir a faixa atualmente em reprodução.
Repeat All (Repetir Todas) – Repete todas as faixas.
Repeat Album (Repetir Álbum) – Para repetir todas as faixas de um álbum ou pasta.
Random (Aleatória) – todas as faixas serão reproduzidas em ordem aleatória.
Normal – reproduz as faixa na sequência normal.
Reprodução programada (apenas modo CD/ MP3)
1. Quando a reprodução estiver parada, prima o botão AMS. “ 01” será exibido na tela.
2. Prima o botão ALBUM para selecionar a pasta desejada e prima / para
selecionar a faixa desejada.
3. Prima o botão AMS para conrmar.
4. Repita os passos acima para programar até 20 faixas de CDs e 99 faixas de MP3.
5. Prima o botão para iniciar a reprodução programada.
6. Prima o botão para parar a reprodução do programa.
7. Para cancelar a reprodução do programa, prima o botão duas vezes. O indicador
“ ” desliga.
Drücken Sie die Taste MODE wiederholt, um nacheinander folgende Wiedergabemodi
auszuwählen.
Audio-CDs: Titel wiederholen Alle Wiederholen Willkürliche Wiedergabe Normal
MP3-Dateien: Titel wiederholen Alle Wiederholen Ordner wiederholen Willkürliche
Wiedergabe Normal
Repeat one (Titel wiederholen) – Aktuell wiedergebenden Titel wiederholt abspielen.
Repeat All (Alle wiederholen) – Alle Titel wiederholt abspielen.
Repeat Album (Album wiederholen) – Alle Titel des gesamten Albums/ Ordners wiederholt
abspielen.
Random (Willkürliche Wiedergabe) – Alle Titel werden in willkürlicher Reihenfolge abgespielt.
Normal – Alle Titel in normaler Reihenfolge abspielen.
Programmierte wiedergabe (nur im CD/ MP3-Modus)
1. Wenn die Wiedergabe angehalten ist, drücken Sie auf die Taste AMS. In der Anzeige
erscheint " 01".
2. Drücken Sie die Taste ALBUM zur Auswahl des gewünschten Ordners und drücken Sie
dann / zur Auswahl eines Titels.
3. Betätigen Sie die AMS -Taste zur Bestätigung.
4. Wiederholen Sie die oben genannten Schritte, um bis zu 20 CD-Titel oder 99 MP3-Titel
zu programmieren.
5. Drücken Sie auf die Taste , um die programmierte Wiedergabe zu beginnen.
6. Drücken Sie einmal die Taste um die Wiedergabe zu beenden.
7. Um die programmierte Wiedergabe zu beenden, drücken Sie die Taste zweimal
gedrückt. Die Anzeige „ “ erlischt.
Press the MODE button repeatedly to select dierent kinds of play mode with the following
sequence.
For Audio CDs: Repeat one Repeat All Random Normal
For MP3 Files: Repeat one Repeat All Repeat Album Random Normal
Repeat one - To repeat the track currently playing.
Repeat All - To repeat all tracks
Repeat Album - To repeat all tracks in the entire album/folder.
Random - all the tracks will be played in random.
Normal - play the tracks in sequence.
Program playback (only CD/MP3 mode)
1. In stop mode, press AMS button. The display will show “ 01”.
2. Press ALBUM button to select desired folder and press / to select a desired track.
3. Press AMS button to conrm.
4. Repeat above steps to program up to 20 tracks for CD and 99 tracks for MP3.
5. Press to start program playback.
6. Press button once to stop the program playback.
7. To cancel program playback, press button twice. “ ” indicator disappears.
Pendant la lecture d’une station, l’écran indiquera son nom et les informations DLS (Dynamic
Label Segment) transmises par la station de radio, telles que le nom du programme, le titre
de la piste et les coordonnées. Lorsque vous appuyez brièvement à chaque fois sur INFO, le
groupe d’informations suivant s’achera:
En mode DAB:
Texte radio, taux d'erreur du signal/ intensité du signal, PTY (Programme Type), nom de
l'ensemble, fréquence du canal, débit binaire/ codec/ Stéréo ou Mono, Jours
En mode FM:
Texte radio, PTY (Programme Type), Nom, Stéréo ou Mono, Jours
Enquanto uma estação estiver a ser reproduzida, o visor exibe o nome e as informações DLS
(Dynamic Label Segment) transmitidas pela estação de rádio, como nome do programa,
título da faixa e detalhes de contacto. Cada vez que premir o botão INFO, o próximo conjunto
de informações será exibido, passando por:
Modo DAB:
Texto da Rádio, taxa de erro do sinal/ intensidade do sinal, PTY(Tipo de Programa), nome do
conjunto, frequência do canal, taxa de bits/ codec/ Estéreo e Mono, Data
Modo FM:
Texto da Rádio / PTY(Tipo de Programa), Nome , Estéreo e Mono, Data
While a station is playing, the display shows its name and DLS (Dynamic Label Segment)
information transmitted by the radio station such as program name, track title and contact
details. When you short press INFO each time, the next set of information is displayed,
cycling through:
DAB mode:
Radio text, Signal error rate/ Signal strength, PTY (Program Type), Ensemble name,
frequency, Bit rate/ Codec/ Stereo or Mono, Date.
FM mode:
Radio Text, PTY (Program Type), Name, Stereo or Mono, Date.
‘Pas de ch. DAB’:
‘Non disponible’:
(Pas de nom):
‘Aucune station trouvée’:
‘Pas de texte’:
‘Pas d'info’:
‘No DAB station’:
‘Service not available’:
(Sem nome):
‘No stations found’:
‘No Radio Text’:
‘No PTY’:
‘No DAB station’:
‘Service not available’:
(No name):
‘No stations found’:
‘No Radio Text’:
‘No PTY’:
Aucune réception DAB
La station listée est introuvable.
La station en cours ne diuse aucune information d’identité.
Aucune station DAB n'est disponible, vériez/ déplacez
l'antenne
Aucune information textuelle RDS n'est disponible sur cette
station.
Aucune information de type de programme RDS n'est
disponible.
Nenhuma receção DAB
A estação listada não pode ser encontrada.
A estação atual não transmite um nome de identicação.
Não existem estações DAB disponíveis, verique/mova a antena
Nenhuma informação de texto RDS está disponível nesta
estação.
Nenhuma informação do tipo de programa RDS está disponível.
No DAB reception
The listed station cannot be found.
The current station does not broadcast an identify name.
No DAB stations are available, check/ extend the antenna
No RDS text information is available on this station.
No RDS program type information is available.
Alimentation: AC 230V 50Hz
Consommation: 14W
Haut-parleur: 4 ohms
RADIO
FM: 87.5-108MHz
DAB/DAB+: 174.928-239.200 MHz
BLUETOOTH
Version du Bluetooth: V5.0
Bluetooth: 2.402-2.48GHz
Puissance de sortie des RF (fréquences radios): 3.69 dBm
Distance de fonctionnement: Jusqu'à 10 mètres mesurés en espace ouvert (les murs et les
structures peuvent aecter la portée de l'appareil)
Les caractéristiques et les spécications sont sujettes à modication sans préavis.
Alimentação: AC 230V 50Hz
Consumo: 14W
Altifalante: 4 ohms
RÁDIO
FM: 87.5-108MHz
DAB/DAB+: 174.928 -239.200 MHz
BLUETOOTH
Versão do Bluetooth: V5.0
Bluetooth: 2.402-2.48GHz
Potência de saíde de RF (Rádio Frequência): 3.69 dBm
Distância de Funcionamento: Até 10 metros, medido em espaço aberto (paredes e
estruturas poderão afetar a distância de funcionamento do dispositivo).
O desenho e as especicações estão sujeitas a mudanças sem aviso prévio.
Power supply: AC 230V 50Hz
Power consumption: 14W
Speaker: 4 ohms
RADIO
FM: 87.5-108MHz
DAB/DAB+: 174.928-239.200 MHz
BLUETOOTH
Bluetooth Version: V5.0
Bluetooth: 2.402-2.48GHz
RF Output Power: 3.69 dBm
Working Distance: Up to 10 meters measured in open space (wall and structures may
aect range of device)
Specications are subject to change without notice.
En cas de problème avec cette unité, vériez ce qui suit avant de demander une réparation:
Pas de courant
• Assurez-vous que l’unité est connectée sur une alimentation secteur.
Pas de son - général
• Le volume de l'appareil externe est réglé au minimum, augmentez le volume.
• Le volume du M-50 DBT est réglé au minimum, augmentez le volume.
L'appareil Bluetooth ne peut pas se coupler ou se connecter à l'unité.
• Vous n'avez pas activé la fonction Bluetooth de votre appareil. Consultez le manuel
d'utilisation de votre appareil pour activer la fonction Bluetooth.
• L’unité n’est pas en mode couplage. Appuyez sur la touche AMS/MODE jusqu'à ce que
l'indicateur Bluetooth clignote rapidement.
• L'unité est déjà connectée à un autre appareil Bluetooth; déconnectez cet appareil et
réessayez.
Caso este aparelho apresente um problema, verique as seguintes soluções antes de
contactar um técnico:
Não funciona
• Certique-se de que o aparelho esteja conectado à uma tomada.
Sem som - Geral
• O nível de volume do dispositivo externo está no mínimo; aumente o volume.
• O nível de volume to M-50 DBT está no mínimo; aumente o volume.
O dispositivo Bluetooth não consegue parear ou conectar ao aparelho.
• Você não ativou a função de Bluetooth do seu dispositivo. Consulte o manual de
instruções do seu dispositivo para ativar a função de Bluetooth.
• O aparelho não está no modo de pareamento. Pressione o botão AMS/MODE
pressionado até que o indicador comece a piscar rapidamente.
• O aparelho já está conectado a outro dispositivo com Bluetooth; desconecte esse
dispositivo e tente novamente.
Should this unit exhibit a problem, check the following before seeking service:
No Power
• Make sure unit is connected to AC power.
No Sound – General
• External device’s volume is set to minimum; raise volume.
• The M-50 DBT’s volume is set to minimum; raise volume.
The Bluetooth device cannot pair or connect with the unit.
• You have not activated the Bluetooth function of your device. Refer to the user manual of
your device to activate Bluetooth function.
• The unit is not in pairing mode. Press the AMS/MODE button until the Bluetooth indicator
blink fast.
• The unit is already connected with another Bluetooth device; disconnect that device and
then try again.
Nettoyage
ATTENTION: Déconnectez cet appareil de toute source d’alimentation avant de le
nettoyer.
• Utilisez un chion doux, propre et sec. Dépoussiérez régulièrement les orices de ventilation
à l'arrière ou sur les côtés de l'appareil.
• L'utilisation de solvants ou de produits abrasifs ou à base d'alcool peut endommager l'appareil.
• Si un objet ou un liquide entre dans l'appareil, débranchez immédiatement ce dernier et faites-
le contrôler par un technicien agréé.
Remarques sur les disques
• N’utilisez pas de disques de forme irrégulière (exemple: en forme de cœur, octogonaux).
L’appareil pourrait présenter des dysfonctionnements.
• Ne placez pas plusieurs disques dans le compartiment.
• N’essayez pas d’ouvrir le compartiment du disque pendant la lecture.
• Ne touchez pas la lentille. Vous pourriez provoquer un dysfonctionnement.
• Si le disque est rayé, sale ou maculé de traces de doigts, l’appareil peut ne pas fonctionner.
Avant la lecture, essuyez le disque avec un chion. Procédez du centre vers l’extérieur. Ne
rangez pas les disques dans des endroits présentant des températures élevées ou une
humidité importante. Ils pourraient se déformer. Après la lecture, replacez vos disques dans
leur boîtier.
• La capacité de lecture des CD-Rs ou CD-RWs de ce lecteur peut varier en fonction de la
qualité du contenu, du graveur de CD, de la vitesse de gravure et du logiciel d'application.
Remarque importante
• Retirez le disque du compartiment si l’appareil doit être transporté.
Limpeza
ATENÇÃO: Desligue este aparelho de qualquer fonte de alimentação antes de
proceder à sua limpeza.
• Utilize um pano macio, limpo e seco. Limpe regularmente os orifícios de ventilação na parte
de trás ou nos lados do aparelho para eliminar as partículas de pó.
• A utilização de solventes ou de produtos abrasivos ou à base de álcool pode danicar o
aparelho.
• Se um objecto ou líquido entrar no aparelho, desligue-o de imediato e solicite a sua
inspecção por um técnico autorizado.
Observaçõesrelativasaosdiscos
• Não utilize discos de forma irregular (exemplo: em forma de coração, octogonais). O
aparelho pode car avariado.
• Não coloque mais do que um disco no compartimento.
• Não tente abrir o compartimento do disco durante a reprodução.
• Não toque na lente dado que pode causar uma avaria no aparelho.
• Se o disco estiver riscado, sujo ou marcado com dedadas, o aparelho pode não funcionar.
Antes da reprodução, limpe o disco com um pano. Proceda do centro para fora. Não
arrume os discos em locais com temperaturas altas ou uma humidade signicativa. Podem
car deformados. Após a reprodução, volte a colocar os discos nas respectivas caixas.
• A reprodução de CD-Rs ou CD-RWs neste aparelho poderá variar dependendo da
qualidade de mídia, Gravador de CD, velocidade na qual ele foi gravado e aplicativo de
gravação utilizado.
Observação importante
• Retire o disco do compartimento se o aparelho tiver de ser transportado.
Cleaning
WARNING: Disconnect the unit from the mains supply before cleaning.
• Use a soft, dry, clean cloth. Regularly dust the vents at the back or sides.
• Using solvents, abrasive or alcohol-based products risks damaging the appliance.
• If an object or liquid enters inside the appliance, unplug it immediately and have it
checked by an authorized engineer.
Notes on disc
• Do not use irregular shape CDs (example: heart-shaped, octagonal ones). It may result
in malfunctions.
• Do not place more than one disc in the disc compartment.
• Do not try to open the disc compartment during playing.
• Do not touch the lens. Doing so may cause malfunction.
• If there is a scratch, dirt or ngerprints on the disc, it may cause tracking error. Before
playing, clean the disc with a cleaning cloth. Wipe the disc from the center out. Don't store
discs in places with high temperatures or high humidity, they can become warped. After
playing, store the disc in its case.
• CD-Rs or CD-RWs playback capability at this player may vary depending on quality of
media, CD-Burner, speed of burning and application software.
Important Note
• Before transporting the unit, remove the disc from the disc compartment.
Le mot Bluetooth® ainsi que les marques et logo sont des marques commerciales déposées
détenues par Bluetooth SIG, Inc. et l'utilisation de ces marques par New One S.A.S se fait dans
le cadre d'une autorisation. Les autres marques et noms commerciaux sont les propriétés de
leurs titulaires respectifs.
1. Lorsque l’unité est allumée, appuyez sur la touche SOURCE à plusieurs reprises pour choisir
le mode Bluetooth. L'écran achera “Bluetooth” et l'indicateur Bluetooth commencera à
clignoter rapidement.
2. Sur l'appareil Bluetooth, activez le Bluetooth et sélectionnez «M-50 DBT» dans la liste des
appareils. (consultez le manuel d'instruction de l'appareil pour les détails de connexion).
Si l'appareil Bluetooth vous demande un mot de passe, utilisez '0000'. Certains appareils
Bluetooth vous demanderont d'accepter la connexion. L'indicateur Bluetooth s’arrête de
clignoter lorsque le couplage a réussi.
Astuce: Si vous souhaitez connecter votre enceinte Bluetooth à un autre appareil Bluetooth,
vous devez déconnecter l'appareil actuellement connecté avant de pouvoir suivre les étapes
ci-dessus pour établir une nouvelle connexion.
Appuyez sur le bouton AMS/ MODE jusqu'à ce que l'indicateur Bluetooth clignote rapidement
pour passer en mode de couplage. Sur l'appareil Bluetooth, activer le Bluetooth et sélectionnez
'M-50 DBT' dans la liste des appareils (voir l'étape 2 plus haut)
• Sur certains appareils, comme les ordinateurs, une fois couplé, vous devrez sélectionner
l'unité dans le menu Bluetooth et choisir «utiliser comme un dispositif audio (Stéréo)» ou
une phrase similaire.
• Le couplage reste intact lorsque l’unité et/ ou l’appareil Bluetooth sont amenés hors de la
portée de liaison. Une connexion active sera rétablie lorsque votre appareil Bluetooth
reviendra dans la portée.
• Lorsque vous rallumez l'unité, elle essayera automatiquement de se reconnecter avec le
dernier appareil Bluetooth connecté.
Utiliser un appareil Bluetooth
1. Avec une unité couplée, (voir la section précédente), faites fonctionner votre appareil
Bluetooth et il diusera du son par le biais de l'enceinte M-50 DBT.
2. Appuyez sur la touche pour mettre la lecture en pause. Touchez à nouveau pour
reprendre la lecture.
3. Sélectionnez la piste de votre choix avec / .
4. Réglez le volume à l'aide des touches de volume VOL+ / VOL-. Vous pouvez également
régler le volume sur l'appareil avec lequel vous êtes couplé.
Par la présente, NEW ONE S.A.S déclare que l'appareil "MUSE M-50 DBT" est conforme
aux exigences essentielles et autres dispositions pertinentes de la directive 2014/53/EU.
La déclaration de conformité peut être consultée sur le site www.muse-europe.com
O nome Bluetooth® e logotipos são marcas registradas de propriedade da Bluetooth SIG, Inc.
e quaisquer usos destas marcas pela New One S.A.S estão licenciados. Outras marcas e
nomes registrados pertencem aos seus respectivos proprietários.
1. Quando esse aparelho estiver LIGADO, pressione o botão SOURCE no aparelho várias
vezes para selecionar o modo de Bluetooth. A tela exibirá “Bluetooth”. O indicador do
Bluetooth piscará rapidamente.
2. No dispositivo com Bluetooth, ative o Bluetooth e selecione "M-50 DBT" na Lista de
Dispositivos. (Consulte o manual de instruções do dispositivo que estiver sendo conectado
para mais detalhes). Caso o dispositivo com bluetooth solicite uma senha, utilize "0000".
Alguns dispositivos com Bluetooth solicitarão que você aceite a conexão. Indicador
Bluetooth para de piscar quando o aparelhamento é conseguido.
Dica: Caso você queira conectar a sua caixa de som Bluetooth a outro dispositivo com
Bluetooth, você precisará desconectar o dispositivo atualmente conectado primeiro, e então
seguir os passos acima para realizar a nova conexão.
Caso o pareamento falhe, faça o seguinte:
Prima o botão AMS/ MODE até que o indicador Bluetooth comece a piscar rapidamente,
entrando assim no modo de Pareamento. No dispositivo com Bluetooth, ative o Bluetooth e
selecione "M-50 DBT" na lista de dispositivos (consulte o passo 2 acima).
• Em alguns dispositivos, como computadores, uma vez pareado, você precisará selecionar
o aparelho em um Menu Bluetooth e escolher "Utilizar como Dispositivo de Áudio (estéreo)"
ou semelhante.
• O pareamento permanecerá intacto quando o aparelho ou o seu dispositivo com Bluetooth
for retirado da área de comunicação. Uma conexão ativa será restabelecida quando o
dispositivo com Bluetooth voltar à área de alcance.
• Quando o aparelho for ligado novamente, ele tentará automaticamente se reconectar ao
dispositivo de Bluetooth com o qual ele tenha sido mais recentemente pareado.
Utilizando um dispositivo com Bluetooth
1. Com o aparelho pareado (veja seção anterior), utilize o seu dispositivo com Bluetooth e o
seu som poderá ser escutado através das caixas de som do M-50 DBT.
2. Pressione o botão para pausar uma reprodução. Pressione novamente para continuar
uma reprodução.
3. Selecione a faixa desejada com / .
4. Ajuste o volume através dos botões de Volume VOL+ / VOL-. Você também poderá ajustar
o volume através do dispositivo com o qual você estiver pareado.
A NEW ONE S.A.S aqui declara que este produto «MUSE M-50 DBT» cumpre os requisitos
essenciais e outras disposições relevantes da Norma 2014/53/EU. A declaração de
conformidade pode ser consultada em www.muse-europe.com
Der Bluetooth®-Markenname und damit verbundene Logos sind Eigentum der Firma Bluetooth
SIG, Inc. Jegliche Benutzung dieser Marken durch die Firma New One S.A.S stehen unter
Lizenz. Alle anderen Produkt- und Markennamen sind Eigentum ihrer der jeweiligen Besitzer.
1. Wenn das Gerät EINGESCHALTET ist, drücken Sie die Taste SOURCE wiederholt um
den Bluetooth-Modus auszuwählen. In der Anzeige erscheint "Bluetooth". Die Bluetooth-
Anzeige beginnt schnell zu blinken.
2. Aktivieren Sie die Bluetooth-Funktion auf Ihrem Bluetooth-Gerät, und wählen Sie
"M-50 DBT" in der Geräteliste. (Lesen Sie bitte die Bedienungsanleitung des jeweiligen
Geräts für detaillierte Bedienungsschritte zum Verbindungsaufbau.) Wenn das Bluetooth-
Gerät Sie zur Eingabe eines Schlüssels auordert, geben Sie bitte "0000" ein. Manche
Bluetooth-Geräte erfordern es zudem, dass die Verbindung bestätigt wird. Nach der
erfolgreichen Kopplung hört die Anzeige auf zu blinken.
Tipp: Wenn Sie Ihren Bluetooth-Lautsprecher mit einem anderen Bluetooth-Audio-Gerät
verbinden möchten, müssen Sie das zurzeit verbundene Gerät zunächst trennen und die
oben beschriebenen Schritte erneut ausführen, um eine neue Verbindung herzustellen.
Wenn der Verbindungsaufbau nicht erfolgreich war, führen Sie die folgenden Schritte aus:
Drücken Sie auf die Taste AMS/ MODE bis die Bluetooth-Anzeige anfängt schnell zu blinken,
um in den Verbindungsmodus zu gelangen. Aktivieren Sie die Bluetooth-Funktion auf Ihrem
Bluetooth-Gerät, und wählen Sie "M-50 DBT" in der Geräteliste (siehe Schritt 2 weiter oben).
• Auf einigen Geräten wie z. B. Computern müssen Sie bei bestehender Verbindung das Gerät
aus dem Bluetooth-Menü wählen und als Audiogerät aktivieren.
• Die Verbindung bleibt bestehen, wenn das Bluetooth-Gerät außer Reichweite bzw.
ausgeschaltet ist. Eine aktive Verbindung wird dann wieder hergestellt, wenn das Bluetooth-
Gerät sich wieder in Reichweite bendet.
• Wird das Gerät erneut eingeschaltet, versucht es automatisch, sich mit dem zuletzt
gekoppelten Bluetooth-Gerät zu verbinden.
Verwenden eines Bluetooth-Geräts
1. Bei bestehender Verbindung (siehe voriger Abschnitt), können Sie das Bluetooth-Gerät
bedienen und den Ton über das M-50 DBT wiedergeben.
2. Betätigen Sie die Taste , um die Wiedergabe vorübergehend anzuhalten. Betätigen Sie
die Taste ein weiteres Mal, um mit der Wiedergabe fortzufahren.
3. Wählen Sie mit den Tasten / einen Titel aus.
4. Stellen Sie die Lautstärke mithilfe der Lautstärketasten ein VOL+ / VOL-. Sie können die
Lautstärke auch direkt auf dem Gerät, mit dem die Verbindung hergestellt wurde, einstellen.
NEW ONE S.A.S erklärt hiermit, dass dieser „MUSE M-50 DBT“ den wesentlichen
Anforderungen und anderen geltenden Vorgaben der Richtlinie 2014/53/EU entspricht. Die
Konformitätserklärung lässt sich unter www.muse-europe.com herunterladen.
The Bluetooth® word mark and logos are registered trademarks owned by Bluetooth SIG,
Inc. and any use of such marks by New One S.A.S is under license. Other trademarks and
trade names are those of their respective owners.
1. When the unit is ON, press SOURCE button repeatedly to select Bluetooth mode. The
display will show “Bluetooth”. The Bluetooth indicator will start to blink rapidly.
2. On the Bluetooth device, enable Bluetooth and select “M-50 DBT” from the Device List.
(Refer to the user manual of the device to be connected for detailed operations.) If the
Bluetooth device prompts for a passcode, use “0000”. Some Bluetooth devices will ask
you to accept the connection. Bluetooth indicator stop to blink when pairing is successful.
Tip: If you want to connect your Bluetooth speaker to another Bluetooth audio device, you
need to disconnect current device rst and make a new connection.
If the pairing fails, perform the following:
Press AMS/ MODE button once, the Bluetooth indicator blinks quickly to enter the pairing
mode. On the Bluetooth device, enable Bluetooth and select “M-50 DBT” from the Device
List (see step 2 above).
• On some devices such as computers, once paired you must select the unit from the
Bluetooth menu and choose “Use as Audio Device (stereo)” or similar.
• Pairing remains intact when the unit and/or your Bluetooth device is taken out of
communication range. An active connection will be re-established when your Bluetooth
device returns within range.
• When the unit is turned on again, it will automatically try to reconnect with the most
recently paired Bluetooth device.
Using a Bluetooth Device
1. With a unit paired (see previous section), operate your Bluetooth device and its sound
will be heard through the M-50 DBT’s speakers.
2. Press button to pause playback. Press again to resume playback.
3. Select desired track with / .
4. Adjust the volume using VOL+ / VOL- volume buttons. You can also adjust the volume
on the device to which you are paired.
Hereby, NEW ONE S.A.S, declares that this MUSE M-50 DBT is in compliance with
the essential requirements and other relevant provisions of Directive 2014/53/EU. The
declaration of conformity may be consulted at www.muse-europe.com
An de réduire les risques de lésions auditives, n’écoutez pas de la
musique à un volume élevé pendant longtemps.
Paraprevenir possíveis danosauditivos,não escuteemvolumes muito
altosporlongosperíodosdetempo.
To prevent possible hearing damage, do not listen at high volume levels
for long periods.
NEW ONE S.A.S
10, Rue de la Mission, 25480 Ecole Valentin, France
NEW ONE S.A.S
10, Rue de la Mission, 25480 Ecole Valentin, France
NEW ONE S.A.S
10, Rue de la Mission, 25480 Ecole Valentin, France
La plaque signalétique se trouve située sous cet appareil.
AVERTISSEMENT: POUR PRÉVENIR TOUT RISQUE D’INCENDIE OU DE CHOC
ÉLECTRIQUE, N’EXPOSEZ PAS CET APPAREIL À LA PLUIE OU À L’HUMIDITÉ.
ATTENTION: Radiations laser invisibles lorsque les dispositifs de sécurité sont ouverts
ou défectueux.
Ce lecteur de disque compact est classié comme un produit laser de CATEGORIE 1,
la marque PRODUIT LASER DE CATEGORIE 1 est située sur le cabinet en dessous de
l'appareil.
A placa de características situa-se na parte inferiordeste aparelho.
ADVERTÊNCIA: PARA PREVENIR O RISCO DE INCÊNDIO OU DE CHOQUE
ELÉCTRICO, NÃO EXPONHA ESTE APARELHO A CHUVA OU HUMIDADE.
ATENÇÃO: São emitidas radiações invisíveis quando os dispositivos de segurança são
abertos ou defeituosos. Evite qualquer tipo de exposição aos raios laser. Aparelho com
laser de classe 1.
The caution mark is located on bottom of the device.
WARNING: TO PREVENT FIRE OR SHOCK HAZARD, DO NOT EXPOSE THIS
APPLIANCE TO RAIN OR MOISTURE.
CAUTION: Invisible laser radiation when open and interlocks defeated. Avoid exposure
to beam.
This compact disc player is classied as a CLASS 1 LASER product. The CLASS 1 LASER
PRODUCT marking is located on the back cabinet.

M-50DBT/IB/V0
Wenn Sie das Radio zum ersten Mal verwenden oder wenn die Senderliste leer ist, führt
das Radio automatisch einen vollständigen Scan durch, um festzustellen, welche Sender
verfügbar sind. Während der Suche erscheint die Anzeige „Suchlauf...“. Ein Fortschrittsbalken
weist auf den Suchfortschritt hin; außerdem wird die Anzahl der gefundenen Sender
angezeigt.
Möglicherweise müssen Sie auch einen Scan manuell starten, um die Liste der Stationen
aus einem der folgenden Gründe zu aktualisieren:
- Von Zeit zu Zeit werden neue Stationen verfügbar.
- Stationen schließen oder können nicht mehr empfangen werden (In der Senderliste werden
ungültige Stationen mit einem Fragezeichen vor ihrem Namen gekennzeichnet).
- Wenn der Empfang für den ursprünglichen Scan nicht gut war (z.B. die Antenne war nicht
errichtet), kann dies zu einer leeren oder unvollständigen Liste der verfügbaren Sender
führen.
- Wenn Sie einen schlechten Empfang einiger Sender haben, der dazu führt, dass das Audio
unterbrochen wird, können Sie nur Sender mit guter Signalstärke auisten.
Um einen vollständigen Scan durchzuführen, drücken Sie die MENU-Taste, um in die
Menüeinstellung zu kommen, wählen Sie " Vollständiger Suchlauf" mit / und
drücken Sie ENTER, um einen Scan zu starten.
Nach Abschluss des Scans kehrt das Radio zur Wiedergabe des zuvor ausgewählten
Senders oder des ersten Senders in der Senderliste zurück.
Wählen Sie einen Sender mit / , drücken Sie dann zur Bestätigung ENTER.
Hinweis:
- Falls während der DAB/DAB+ Suche keine Sender gefunden werden, erscheint im Display
die Anzeige „Kein DAB-Sender “.
- Im Hinblick auf einen besseren Empfang sollten Sie die antenne vollständig ausziehen oder
die Sendersuche an einem anderen Ort wiederholen.
- Während der Suche ist der Ton automatisch ausgeschaltet.
FM RADIOSENDER ANHÖREN
Drücken Sie im UKW-Radiomodus oder für die manuelle Sendersuche. halten Sie
die Taste / gedrückt um die automatische Suche zu starten.
Hinweis: Ziehen Sie die Antenne für einen besseren Empfang aus.
SENDER SPEICHERN
Dieses Gerät kann bis zu 30 UKW- und 30 DAB/DAB+-Sender speichern.
1. Schalten Sie im UKW- oder DAB-Modus einen gewünschten Radiosender ein.
2. Drücken Sie die AMS -Taste, um in den Speichermodus zu gelangen.
3. Drehen Sie die oder um einen voreingestellten Kanal auszuwählen, und drücken
Sie dann zur Bestätigung ENTER. “Progr. X speichern.” wird angezeigt (X steht für
voreingestellte Nummer).
Hinweis: Wenn Sie einen Sender, der nicht zugewiesen worden ist, wählen, wird "Leer"
angezeigt. Wenn der Sender bereits zugewiesen wurde, wird die FM-Frequenz oder der
DAB-Sendername angezeigt.
4. Wiederholen Sie die Schritte 1 bis 3, um weitere Sender zu speichern.
Aufrufen gespeicherter Sender
Betätigen Sie die SOURCE -Taste, um das UKW- oder DAB/DAB+-Band zu wählen.
Drücken Sie PRE+ um den gewünschten Sender auszuwählen. Drücken Sie dann VOL+ /
VOL- um die Lautstärke entsprechend einzustellen.
SETUP-MENÜ
Navigation durch das Setup-Menü.
Drücken Sie im UKW oder DAB Modus die Taste MENU, um das Setup-Menü zu önen.
Drücken Sie auf die Taste oder um eine Option auszuwählen und die Einstellungen
zu kongurieren. Drücken Sie die Taste ENTER, zum Bestätigen.
Hinweis: Wenn Sie die Einstellungen im Menü vornehmen, drücken Sie die Taste MENU, um
zum vorherigen Schritt zurückzukehren.
FM Einstellungsmenü
Suchlauf-Einstellung
Alle Sender: Die automatische Suche listet alle verfügbaren Sender auf.
Nur starke Sender: Die automatische Suche listet nur Sender mit starkem Signal auf.
Audio-Einstellung
Wählen Sie für die UKW-Übertragung zwischen „Stereo möglich“ und „Nur Mono“.
Hauptmenü
Systemeinstellungen kongurieren: Uhrzeit, Sprache, Werkseinstellung, SW-version.
• Uhrzeit
** Zeit / Datum einstellen
Einstellung von Datum (TT/MM/JJJJ) und Uhrzeit. Siehe Abschnitt “EINSTELLEN DER
UHRZEIT UND DES DATUMS”.
** Autom. Update
Update alle: Uhrzeit wird entweder über UKW oder DAB/DAB+ aktualisiert.
Update von DAB: Uhrzeit wird über DAB/DAB+ aktualisiert.
Update von FM: Uhrzeit wird über UKW aktualisiert.
Kein Update (Keine Aktualisierung): Die über die Systemeinstellung eingestellte Uhrzeit wird
angezeigt.
** 12/24 Std. einstellen
Uhrzeitformat einstellen: 12-/24-Stundenforma.
** Datumsformat einst.
Datumsformat: TT-MM-JJJJ oder MM-TT-JJJJ.
• Sprache
Wählen Sie eine Sprache für die Menüanzeige aus: Français, English, German und Dutch.
• Werkseinstellung
Gerät auf die Werkseinstellungen zurücksetzen.
• SW-version (Software-Version)
Aktuelle Software-Version anzeigen.
DAB Einstellungsmenü
Vollständiger Suchlauf
Mit dieser Funktion können Sie automatisch eine Liste mit verfügbaren DAB-Sendern
erstellen.
Manuell einstellen
Verwenden Sie diese Funktion für die Positionierung der Antenne und des Geräts, um die
Empfangsqualität eines bestimmten Senders oder einer Frequenz zu verbessern.
Wählen Sie mit / die “ Manuell einstellen ” im Einstellungsmenü und drücken Sie
ENTER zum Bestätigen. Wählen Sie mit / die gewünschte Frequenz aus und
drücken Sie ENTER, um den Sender für die ausgewählte Frequenz einzustellen.
DRC (Dynamikbereich-Komprimierung)
Falls das Gerät in einer lauten Umgebung verwendet wird, können leise Töne mit der DRC-
Funktion hörbar gemacht werden.
Drücken Sie auf die Taste oder , um den gewünschten DRC-Pegel zu wählen: DRC
aus, DRC hoch, DRC tief. Drücken Sie ENTER zum Bestätigen.
DRC aus – keine Komprimierung. Dies ist die Standardeinstellung.
DRC hoch – maximale Komprimierung.
DRC tief – mittlere Komprimierung.
Hinweis: Die DRC-Funktion ist nur für Sender mit verkleinertem Dynamikbereich verfügbar.
inaktive Sender
Löschen Sie Sender, die angezeigt, jedoch nicht mehr empfangen werden.
Mit dieser Funktion können alle Sender, die in der Senderliste vor ihrem Namen mit einem „?“
gekennzeichnet sind, gelöscht werden.
Drücken Sie oder zur Auswahl von „Nein“ oder „Ja“. Drücken Sie dann ENTER, um
die Speicherung der ungültigen Sender abzubrechen oder zu bestätigen.
System
Siehe Anleitungen unter „UKW-Einstellungsmenü“.
GEBRAUCH EINES KOPFHÖRERS / OHRHÖRERS
UTILIZACIÓN DE AURICULARES O CASCOS
COLLEGAMENTO DI CUFFIE O AURICOLARI
GEBRUIK VAN EEN HOOFDTELEFOON
INFORMATION ZU JETZT ABGESPIELT
INFORMACIÓN DURANTE LA REPRODUCCIÓN
INFORMAZIONI DELLA STAZIONE CORRENTE
INFORMATIE OVER HUIDIGE ZENDER/MUZIEK
FEHLERMELDUNGEN
MENSAJES DE ERROR
MESSAGGI DI ERRORE
FOUTMELDINGEN
TECHNISCHE EIGENSCHAFTEN
CARACTERÍSTICAS TÉCNICAS
SPECIFICHE TECNICHE
TECHNISCHE KENMERKEN
FEHLERBEHEBUNG
GUÍA DE RESOLUCIÓN DE PROBLEMAS
GUIDA ALLA RISOLUZIONE DEI PROBLEMI
PROBLEMEN OPLOSSEN
WARTUNG
MANTENIMIENTO
MANUTENZIONE
ONDERHOUD
SICHERHEITSANWEISUNGEN
INSTRUCCIONES DE SEGURIDAD
AVVERTENZE DI SICUREZZA
VEILIGHEIDSINSTRUCTIES
ACHTUNG: Um Elektroschockgefahr zu vermeiden, dürfen
Sie dieses Gerät nicht demontieren. Das Gerät enthält keine
Teile, die der Benutzer selbst reparieren kann. Vertrauen Sie die
Instandhaltung des Geräts einem Fachmann an.
ATENCIÓN: Para reducir el riesgo de descarga eléctrica, no
desmonte el aparato. En el interior de este aparato no existe
ninguna pieza que pueda ser reparada por el usuario. Para
cualquier operación de mantenimiento y reparación, póngase
en contacto con personal técnico cualicado.
ATTENZIONE: Per ridurre il rischio di scossa elettrica, non
smontate l’apparecchio. Questo apparecchio non contiene
pezzi riparabili dall’utente. Per ogni riparazione rivolgetevi
esclusivamente a tecnici qualicati.
OPGEPAST: Om het risico op elektrische schokken te vermijden,
mag u het toestel niet demonteren. Het toestel bevat geen enkel
onderdeel dat door de gebruiker zelf kan gerepareerd worden.
Contacteer altijd een gekwaliceerde technieker indien een
reparatie nodig is.
Das in einem Pfeil endende Blitzsymbol innerhalb eines Dreiecks weist den
Benutzer auf die Gegenwart einer „gefährlichen Spannung“ im Gerät hin.
El símbolo del rayo con una echa dentro de un triángulo equilátero advierte al
usuario de la presencia de voltaje peligroso en el interior del aparato.
Il simbolo del fulmine con una freccia all’estremità all’interno di un triangolo equilatero
avverte l’utente della presenza di una “tensione pericolosa” nell’apparecchio.
Het symbool van een zwarte driehoek met daarin een witte bliksemschicht eindigend
in een driehoek, waarschuwt de gebruiker dat er een gevaarlijke spanning aanwezig
is in het toestel.
Das Ausrufezeichen im Inneren eines Dreiecks weist den Benutzer auf wichtige
Anweisungen hin, die sich in dem das Gerät begleitenden Handbuch benden.
El signo de exclamación dentro de un triángulo equilátero advierte al usuario de la
presencia de importantes instrucciones de funcionamiento y mantenimiento en el
manual que acompaña al producto.
Il punto esclamativo inscritto nel triangolo equilatero indica all'utente che nel
manuale di istruzioni si trovano importanti avvertenze per l'uso e la manutenzione
dell'apparecchio.
Het bovenstaande symbool (zwarte driehoek met daarin een wit uitroepingsteken)
waarschuwt de gebruiker dat er belangrijke gebruiksaanwijzingen in verband met
het gebruik en het onderhoud ter beschikking zijn in de bijgeleverde handleiding.
Max.Ausgangsleistung≤150mV
CharakteristischeBreitbandspannung≥75mV
WARNUNG IN ZUSAMMENHANG MIT DER LAUTSTÄRKE BEIM GEBRAUCH DES
KOPFHÖRERS
Vor dem Anstecken eines Kopfhörers zuerst die Lautstärke verringern; sie kann danach
bei Bedarf wieder erhöht werden. Das längere Hören mit einem Kopfhörer bei großer
Lautstärke kann Ihr Gehör unwiderruich schädigen. Wenn ein Kopf- oder Ohrhörer an das
Gerät angeschlossen wird, deaktiviert das die Lautsprecher des Players.
Achtung: Vermeiden Sie große Lautstärken, sie schädigen Ihr Gehör.
Voltajemáximodesalida≤150mV
Voltajecaracterísticodebandaancha≥75mV
VADVERTENCIA SOBRE EL NIVEL DE VOLUMEN DE LOS CASCOS
Disminuya el volumen antes de conectar unos cascos y auméntelo a continuación en caso
de que sea necesario. El uso prolongado de auriculares o cascos a un volumen elevado
puede dañar su sistema auditivo. Cuando se conectan unos cascos o unos auriculares al
aparato, se desactiva la salida de audio de los altavoces.
Atención: Evite los niveles sonoros elevados; pueden dañar su sistema auditivo.
Tensionemassimadiuscita≤150mV
Caratteristichevoltaggiobandalarga≥75mV
AVVERTENZA SUL VOLUME DELLE CUFFIE
Diminuite il volume prima di collegare le cue e aumentatelo successivamente se necessario.
L’uso prolungato delle cue ad alto volume può danneggiare l’udito. Se le cue/ auricolari
sono collegati all’apparecchio, gli altoparlanti del lettore si disattivano automaticamente.
Attenzione: evitate di utilizzare l’apparecchio ad un volume troppo elevato per non
danneggiare il vostro udito.
Maximaleuitgangsspanning≤150mV
Breedband-karakteristiekespanning≥75mV
WAARSCHUWING MET BETREKKING TOT HET VOLUME VAN DE HOOFDTELEFOON
Verminder het geluidsvolume vooraleer u een hoofdtelefoon aansluit. Vervolgens kunt u het
geluid naar wens luider zetten. Langdurig luisteren naar het toestel op hoog volume kan
het oor van de gebruiker beschadigen. Het geluid wordt niet langer door de luidsprekers
gestuurd, van zodra u een hoofdtelefoon aansluit.
OPGEPAST: Vermijd het luisteren naar het toestel op hoge volumes die het oor van de
gebruiker kunnen beschadigen.
Während der Wiedergabe eines Senders werden auf dem Display der Name und die vom
Radiosender übertragenen DLS-Informationen (Dynamisches Labelsegment) angezeigt,
z. B. Programmname, Titel und Kontaktdaten. Lange DLS-Informationen mit mehr als 16
Zeichen rollen über das Display. Wenn Sie jeweils kurz auf INFO drücken, werden die
folgenden Informationen angezeigt:
DAB-Modus
DLS-Text (Standard), Signalfehlerrate/ Signalstärke, PTY (Programmtyp), Ensemblename,
Frequenz, Bitrate/ Codec/ Stereo oder Mono, Datum.
UKW-Modus
Radiotext, PTY (Programmtyp), Name , Stereo oder Mono, Datum
Cuando se esté reproduciendo una emisora, la pantalla mostrará su nombre y la
información DLS (transmisión digital de audio, por sus siglas en inglés) transmitida por la
emisora de radio, como por ejemplo, el nombre del programa, el título de la pista y detalles
de contacto. Cada vez que pulse INFO, se mostrará la siguiente información alternable
de la siguiente manera:
Modo DAB:
Texto de radio, tasa de error de señal/ intensidad de la señal, PTY (Tipo de programa),
nombre de banda, frecuencia del canal, tasa de bits, Estéreo y Mono, fecha
Modo FM:
Texto de radio / PTY(Tipo de programa), Nombre, Estéreo y Mono, Fecha
Durante l’ascolto di una stazione, il quadrante ne mostrerà il nome e le informazioni DLS
(Dynamic Label Segment), come il nome del programma, il titolo del brano e i dettagli
dei contatti. Premi più volte INFO per visualizzare in sequenza ciclica le informazioni
disponibili:
Modalità DAB:
Radio testo, tasso di errore del segnale/ intensità del segnale, PTY(Tipo di programma),
nome dell’ensemble, frequenza del canale, bit rate/ variante codec/ Stereo o Mono, data
Modalità FM:
Radio testo / PTY(Tipo di programma), Nome , Stereo o Mono, Data
Tijdens het afspelen van een zender toont het display de naam van de zender en DLS-
informatie (Dynamic Label Segment) die door de radiozender wordt uitgezonden, zoals de
programmanaam, de naam van de track en contactgegevens. Elke keer wanneer u kort
op INFO drukt, wordt de volgende reeks informatie weergegeven. De informatie wordt
weergegeven in de volgende cyclus:
DAB modus
Radiotekst, signaalfout/ signaalsterkte, PTY (Programmatype), ensemble-naam, frequentie,
bitrate/ codec/ Stereo of Mono, datum
FM modus:
Radiotekst/ PTY (Programmatype), Naam, Stereo of Mono, Datum
‘Kein DAB-Sender’:
’Dienst nicht verfügbar’:
(Kein Name):
‘Keine Sender gefunden’:
‘Kein Radiotext’:
‘Kein PTY’:
'No DAB station':
'Service not available':
(No name) (sin nombre):
'No stations found' (no se encontraron
emisoras):
'No Radio Text' (no hay texto de radio):
'No PTY' (no hay PTY):
‘No DAB station’:
‘Service not available’:
(Nessun nome):
‘No stations found’:
‘No Radio Text’:
‘No PTY’:
‘Geen DAB-station’:
‘Niet beschikbaar’:
(Geen naam):
‘Geen zenders gevonden’:
‘Geen Radiotekst’:
‘Geen PTY’:
Kein DAB-Empfang
Die aufgelistete Station kann nicht gefunden werden.
Der aktuelle Sender sendet keinen identizierenden Namen.
Keine DAB-Sender verfügbar, bitte Antenne prüfen / bewegen.
Auf diesem Sender sind keine RDS-Textinformationen verfügbar.
Es sind keine Informationen zum RDS-Programmtyp verfügbar.
No hay recepción de señal DAB
No se puede encontrar la lista de emisoras.
La emisora actual no tiene un nombre de emisión
identicativo.
No hay ninguna emisora DAB disponible, compruebe/
mueva la antena
No hay texto RDS de información disponible en esta
emisora.
No hay información de tipo de programa RDS
disponible.
Nessuna ricezione DAB.
La stazione elencata non è rilevabile.
La stazione corrente non trasmette un nome identicativo.
Nessuna stazione DAB disponibile, controlla/sposta l’antenna.
Non sono disponibili informazioni di testo RDS su questa stazione.
Non sono disponibili informazioni sul tipo di programma RDS.
Geen DAB-ontvangst
De weergegeven zender kan niet worden gevonden.
De huidige zender zendt geen identicatienaam uit.
Er zijn geen DAB-zenders beschikbaar, controleer/verplaats de
antenne.
Er is geen RDS-tekstinformatie beschikbaar voor deze zender.
Er is geen informatie over het RDS-programmatype beschikbaar.
Netzstromversorgung: AC 230V 50Hz
Verbrauch: 14W
Lautsprecher: 4 ohms
RADIO
FM: 87.5-108MHz
DAB/DAB+: 174.928 -239.200 MHz
BLUETOOTH
Bluetooth-Version: V5.0
Bluetooth: 2.402-2.48GHz
RF-Ausgangsleistung (Radiofrequenz-Augangsleistung): 3.69 dBm
Reichweite: bis zu 10 Meter in oenen Räumen (Wände und Hindernisse können die
Reichweite des Gerätes beeinträchtigen)
Gestaltung und Ausführung bleiben Änderungen vorbehalten.
Alimentación: CA 230V 50Hz
Consumo: 14W
Altavoz: 4 ohms
RADIO
FM: 87.5-108MHz
DAB/DAB+: 174.928 -239.200 MHz
BLUETOOTH
Versión Bluetooth: V5.0
Bluetooth: 2,402-2,48GHz
Salida de corriente RF (radiofrecuencia): 3.69 dBm
Distancia de rendimiento: Hasta 10m medidos en espacio abierto (la pared y las estructuras
pueden afectar el rango del dispositivo)
Las especicaciones están sujetas a cambios sin previo aviso.
Alimentazione: CA 230V 50Hz
Consumo: 14W
Altoparlante: 4 ohms
RADIO
FM: 87.5-108MHz
DAB/DAB+: 174.928 -239.200 MHz
BLUETOOTH
Versione del Bluetooth: V5.0
Bluetooth: 2.402-2.48GHz
Potenza RF (radiofrequenza) irradiata: 3.69 dBm
Raggio d’azione: no a 10 metri in spazi aperti (pareti e altre strutture possono inuire sul
raggio d’azione del dispositivo).
Il modello e le caratteristiche tecniche possono subire variazioni senza preavviso.
Netstroom: AC 230V 50Hz
Verbruik: 14W
Luidspreker: 4 ohms
RADIO
FM: 87.5-108MHz
DAB/DAB+: 174.928 -239.200 MHz
BLUETOOTH
Bluetooth-versie: V5.0
Bluetooth: 2.402-2.48GHz
RF-vermogen (radiofrequentievermogen): 3.69 dBm
Werkafstand: Tot 10 meter gemeten in een open ruimte (muren en bouwwerken kunnen
invloed hebben op het bereik van de luidspreker)
Ontwerp en specicaties zijn onderhevig aan verandering zonder kennisgeving.
Wenn das Gerät ein Problem aufweist, überprüfen Sie die folgenden Punkte, bevor Sie
sich an den Kundendienst wenden:
Gerät kann nicht eingeschaltet werden
• Stellen Sie sicher, dass das Gerät am Stromnetz angeschlossen ist.
Kein Ton - Allgemein
• Die Lautstärke des externen Geräts ist auf das Minimum eingestellt. Erhöhen Sie die
Lautstärke.
• Die Lautstärke des M-50 DBT ist auf das Minimum eingestellt. Erhöhen Sie die Lautstärke.
Das Bluetooth-Gerät kann nicht verbunden werden.
• Sie haben die Bluetooth-Funktion des Geräts nicht aktiviert. Bitte lesen Sie die
Bedienungsanleitung Ihres Geräts, um dessen Bluetooth-Funktion zu aktivieren.
• Das Gerät bendet sich nicht im Verbindungsmodus. Drücken Sie die Taste AMS/MODE
gedrückt, bis die Bluetooth-Anzeige anfängt schnell zu blinken.
• Das Gerät ist bereits mit einem anderen Bluetooth-Gerät verbunden. Trennen Sie diese
Verbindung und versuchen Sie es erneut.
Si esta unidad presentara un problema, lea el siguiente cuadro antes de llamar al servicio
técnico:
Nohayenergía
• Asegúrese de que la unidad esté conectada a la alimentación de CA.
No hay sonido (General)
• El volumen del dispositivo externo está jado en mínimo; suba el volumen.
• El volumen del M-50 DBT está jado en mínimo; suba el volumen.
El dispositivo Bluetooth no puede emparejarse o conectarse con la unidad.
• No activó la función Bluetooth de su dispositivo. Consulte el manual de usuario de su
dispositivo para activar la función Bluetooth
• La unidad no está en modo de emparejamiento. Pulse el botón AMS/MODE hasta que el
indicador de Bluetooth parpadee rápidamente.
• La unidad ya está conectada con otro dispositivo Bluetooth; desconecte dicho dispositivo
y luego inténtelo nuevamente.
Nel caso in cui si notino problemi con l’unità, prima di richiedere assistenza vericare i
seguenti punti.
Assenza di alimentazione
• Assicurarsi che l’unità sia collegata a una presa CA.
Audio assente
• Il volume del dispositivo esterno è al minimo; aumentare il volume.
• Il volume dell’altoparlante è impostato sul minimo; aumentare il volume.
Impossibile associare o connettere il dispositivo Bluetooth all’unità
• La funzione Bluetooth sul dispositivo non è stata attivata. Consultare il manuale di
istruzioni del proprio dispositivo per dettagli su come attivare la funzione Bluetooth.
• L’unità non è in modalità di associazione. Premere il tasto AMS/MODE no a quando
l’indicatore del Bluetooth non lampeggia rapido.
• L’unità è già connessa a un altro dispositivo Bluetooth; disconnettere il dispositivo, quindi
riprovare.
Mocht het apparaat een probleem vertonen, probeer dan de volgende stappen uit te
voeren voordat u contact opneemt met de klantenservice:
Geen stroom
• Zorg ervoor dat de luidspreker is aangesloten op het lichtnet.
Geen geluid – Algemeen
• Het volume van het extern apparaat is ingesteld op het minimale niveau; verhoog het
volume.
• Het volume van de M-50 DBT is ingesteld op het minimale niveau; verhoog het volume.
Het Bluetooth-apparaat kan niet koppelen of kan geen verbinding maken met de
luidspreker.
• U heeft de Bluetooth-functie van uw apparaat niet ingeschakeld. Raadpleeg de
handleiding van uw apparaat om de Bluetooth-functie te activeren.
• Het apparaat staat niet in de koppelmodus. Druk op AMS/MODE tot de Bluetooth-
indicator snel knippert.
• Het apparaat is al verbonden met een ander Bluetooth-apparaat; verbreek de verbinding
met dat apparaat en probeer het nogmaals.
Reinigung
ACHTUNG: Entfernen Sie alle Geräte von den vorhandenen Stromquellen, bevor Sie
das Gerät reinigen.
• Verwenden Sie ein weiches, trockenes und sauberes Tuch. Entfernen Sie regelmäßig den
Staub von den Lüftungsönungen hinten und an den Seiten.
• Die Verwendung von Lösungsmitteln, scharfen Reinigungsmitteln oder alkoholhaltigen
Reinigungsmitteln kann das Gerät beschädigen.
• Wenn ein Gegenstand oder eine Flüssigkeit in das Gerät gelangt, ziehen Sie sofort den
Netzstecker und lassen Sie das Gerät von einem zugelassenen Fachmann prüfen.
HINWEISE ZU DEN DISKS
• Verwenden Sie keine CDs mit speziellen Formen (achteckige, herzförmige CDs...), die
Störungen des Gerätes hervorrufen könnten.
• Legen Sie nicht mehr als eine Disk in das CD-Fach ein.
• Versuchen Sie nicht, das CD-Fach während der Wiedergabe zu önen.
• Berühren Sie nicht die Linse, denn dadurch könnten Störungen des Gerätes hervorgerufen
werden.
• Eine CD, die Kratzer, Staub oder Fingerspuren aufweist, kann Störungen verursachen. Nach
dem Abspielen, reinigen Sie die CD mit einem Tuch. Reinigen Sie die CD immer von innen
nach außen. Räumen Sie CDs nicht an zu heißen oder nassen Stellen auf, damit sie nicht
verformt werden. Räumen Sie Ihre CDs nach dem Abspielen in der zugehörigen Hülle auf.
• Die Wiedergabekompatibilität von CD-Rs oder CD-RWs ist abhängig von der Qualität des
Mediums, dem CD-Brenner, der Brenngeschwindigkeit und der verwendeten Software.
Wichtiger Hinweis
• Vor dem Transport des Geräts die eventuell vorhandene Disc herausnehmen.
Limpieza
ATENCIÓN: Desconecte este aparato de toda fuente de alimentación antes de limpiarlo.
• Utilice un paño suave, limpio y seco. Limpie regularmente los oricios de ventilación de la
parte trasera del aparato y de los laterales.
• El uso de disolventes o productos abrasivos o a base de alcohol puede dañar el aparato.
• Si un objeto o un líquido penetra en el aparato, desenchúfelo inmediatamente y póngase en
contacto con personal técnico cualicado.
Notas relativas a los disco
• No utilice discos con formas especiales (octogonales, en forma de corazón, etc.), ya que
podrían ocasionar un fallo en el funcionamiento del aparato.
• No introduzca más de un disco en el compartimento.
• No intente abrir el compartimento del disco durante la reproducción.
• No toque la lente del reproductor; si lo hace, podría producirse un fallo en el funcionamiento
del aparato.
• Un disco cuya supercie esté rayada, contenga polvo o huellas puede ocasionar fallos en el
funcionamiento del aparato. Antes de comenzar la reproducción, limpie el disco con un paño
limpio. Para ello, frótelo desde el centro hacia los bordes. No guarde los discos en lugares
con temperaturas elevadas o una humedad considerable; podrían deformarse. Una vez que
haya escuchado el disco, guárdelo en su estuche.
• La capacidad de reproducción de los CD-Rs o CD-RWs en este reproductor podría variar
dependiendo de la calidad multimedia, copiador de CDs. velocidad de copia y software a
aplicación.
Nota importante
• Retire el disco del compartimento cuando transporte el aparato.
Pulizia
ATTENZIONE: Scollegare l’apparecchio dalla fonte di alimentazione prima di pulirlo.
• Servitevi di un panno morbido e asciutto. Spolverate regolarmente le aperture di
ventilazione poste sul retro o ai lati dell’apparecchio.
• Il ricorso a solventi oppure a prodotti abrasivi o a base d’alcool rischia di danneggiare
l’apparecchio.
• Se un oggetto o un liquido entra nell’apparecchio, scollegate immediatamente
l’apparecchio dalla corrente e adatelo ad un tecnico autorizzato.
Osservazioni sui dischi
• Non utilizzate dischi di forma irregolare (ad esempio ottagonali o a forma di cuore).
L’apparecchio potrebbe non funzionare correttamente.
• Non inserite più di un disco nello scomparto.
• Non cercate di aprire il compartimento CD mentre la riproduzione è in corso.
• Non toccate la lente per non provocare un malfunzionamento.
• Se il disco è rigato, sporco o presenta impronte digitali, è possibile che l'apparecchio
non funzioni. Prima della riproduzione, pulite il disco con un panno. Pulite delicatamente
dal centro verso l'esterno. Non riponete i dischi in luoghi soggetti a temperature elevate
o a forte umidità. Potrebbero deformarsi. Terminato l’ascolto, riponete il disco nella sua
custodia.
• La capacità dell'unità di riprodurre CD-R o CD-RW può variare in base alla qualità del
supporto, al masterizzatore, alla velocità di masterizzazione e al software applicativo.
Nota importante
• Estraete il disco dal compartimento se l’apparecchio deve essere trasportato.
OPGEPAST: Koppel het toestel los van elke voedingsbron vooraleer het schoon te
maken.
• Gebruik een propere, zachte, droge doek. Stof de verluchtingsopeningen aan de
achterzijde of zijkanten van het toestel regelmatig af.
• Het gebruik van solventen of bijtende middelen op basis van alcohol kan het toestel
beschadigen.
• Als een object of een vloeistof in het toestel loopt, koppel het dan meteen los en laat het
nakijken door een gekwaliceerd technieker.
Opmerkingen ivm disks
• Gebruik geen disks met een speciale vorm (achthoek, hartvorm, enz.) die het toestel
slecht zou doen werken.
• Plaats maar 1 disk in het compartiment.
• Open het compartiment niet tijdens de weergave.
• Raak de lens niet aan om disfunctie van het toestel te vermijden.
• Een disk met krassen, stof of vingerafdrukken kan slecht werken. Gebruik een zachte,
droge doek om de disk schoon te maken, vooraleer de disk weer te geven. Doe dit van
het midden uit naar de zijkanten toe. Plaats de disks nooit bloot aan vochtigheid of
extreme temperaturen om ze niet te vervormen. Plaats uw disks na de weergave opnieuw
in hun doosjes.
• De radio kan mogelijk niet alle CD-R’s en CD-RW’s afspelen, afhankelijk van de kwaliteit
van de gebruikte discs, cd-brander, brandsnelheid en software.
Belangrijke opmerking
• Haal de disk uit het compartiment als het toestel vervoerd moet worden.
Um mögliche Gehörschäden zu vermeiden, sollten Sie nicht über längere
Zeit bei hohen Lautstärken Musik hören.
Paraevitarposiblesdañoseneloído,noescucheaunvolumenelevado
durante largos periodos.
Per prevenire possibili danni all’apparato uditivo, non ascoltare la radio
con il volume alto per un lungo periodo.
Luister niet voor lange perioden op hoog volume om mogelijke gehoorschade
te voorkomen.
Wenn Sie dieses Gerät entsorgen möchten, denken Sie daran, es bei einer
Sammelstelle für elektrische Haushaltsgeräte zu entsorgen. Erkundigen Sie sich
nach Ihrer nächstgelegenen Wertstosammelstelle. Für detaillierte Informationen
wenden Sie sich an die örtlichen Behörden oder an Ihren Händler. (Richtlinie über
elektrische und elektronische Abfallgeräte).
Si desea deshacerse de este aparato, recuerde que ha de depositarlo en un
lugar destinado al reciclado de electrodomésticos. Infórmese acerca del centro
de reciclaje más cercano. Consulte a las autoridades locales o a su proveedor
para obtener más información al respecto. (Directiva de Residuos de Aparatos
Eléctricos y Electrónicos)
Se in futuro volete sbarazzarvi di questo apparecchio, ricordate che le
apparecchiature elettroniche non devono essere gettate insieme ai riuti
domestici. Informatevi per sapere dove si trova il centro di riciclaggio più vicino.
Per ulteriori dettagli, rivolgetevi alle autorità locali o al vostro rivenditore. (Direttiva
sui riuti delle apparecchiature elettriche ed elettroniche).
Indien u dit toestel in de toekomst wilt weggooien, denk er dan aan om het te
recycleren via een inzamelpunt voor elektrische huishoudapparaten. Informeer
naar het dichtstbijzijnde recyclagecentrum. Voor meer informatie wendt u zich tot
de lokale overheden of uw verdeler (richtlijn met betrekking tot Afval afkomstig
van elektrische en elektronische apparaten).
Bemerkung: Gestaltung und Ausführung bleiben Änderungen vorbehalten.
Nota: Los diseños y especicaciones están sujetos a cambio sin previo aviso.
Nota: Il modello e le caratteristiche tecniche possono subire variazioni senza preavviso.
Opmerking: Ontwerp en specicaties zijn onderhevig aan verandering zonder kennisgeving.
ACHTUNG
- Verwenden Sie dieses Gerät in klimatisch gemäßigter Umgebung.
- Das Typenschild bendet sich auf der Rückseite des Geräts.
- Achten Sie auf einen Mindestabstand von 5 cm zu Ihrem Gerät, um eine ausreichende
Belüftung zu gewährleisten.
- Stellen Sie eine ausreichende Belüftung des Geräts sicher und behindern Sie die
Belüftungsönungen nicht mit Gegenständen wie z. B. Zeitungen, Tischdecken,
Vorhängen, usw.
- Stellen Sie keine Wärmequelle wie eine angezündete Kerze auf oder in der Nähe des
Geräts ab.
- Setzen Sie das Gerät niemals Wasserspritzern oder Feuchtigkeit aus.
- Stellen Sie kein mit Wasser gefülltes Gefäß, wie z. B. Vasen, in der Nähe des Geräts ab.
- Werfen Sie Batterien nicht ins Feuer! Entsorgen Sie leere Batterien umweltgerecht.
- Batterien dürfen keiner übermäßigen Hitze ausgesetzt werden (wie zum Beispiel praller
Sonne, Feuer oder anderen ähnlichen Hitzequellen).
- Mit dem Netzstecker kann das Gerät vom Netz getrennt werden, er muss daher leicht
zugänglich sein. Um das Gerät vollständig vom Netz zu trennen, trennen Sie den
Netzstecker komplett von der Netzsteckdose. Der Netzstecker darf nicht behindert
werden und muss während der Verwendung leicht zugänglich sein.
- Unter der Einwirkung von elektrostatischen und/oder elektrischen Phänomen kann das
Produkt Fehlfunktionen aufweisen. Ein Zurücksetzen auf die Werkseinstellungen kann
sich als notwendig erweisen.
ATENCIÓN
- Utilice este aparato en lugares con climas templados.
- La placa de identicación se encuentra en la parte posterior del aparato.
- Deje libre alrededor del aparato una distancia mínima de 5 cm para garantizar una correcta
ventilación del mismo.
- Para asegurar una ventilación correcta del aparato, no cubra los oricios de ventilación con
objetos tales como periódicos, manteles, cortinas, etc.
- No coloque ninguna fuente de calor, como por ejemplo una vela encendida, sobre el
aparato o cerca de él.
- No exponga el aparato a salpicaduras o a la humedad.
- No coloque objetos que contengan líquido, como un jarrón, encima del aparato.
- No tire las pilas al fuego. Respete el medio ambiente cuando se deshaga de las pilas
usadas.
- No exponga las pilas a temperaturas demasiado altas, como las producidas por la
exposición directa a los rayos del sol, al fuego o a otras fuentes de calor.
- El acceso al enchufe ha de permanecer despejado. Para cortar por completo la alimentación
del aparato, desenchúfelo de la toma de corriente. Se ha de poder acceder fácilmente al
enchufe durante el uso del aparato; procure que el acceso al mismo esté despejado.
- Como resultado de fenómenos electroestáticos y/o eléctricos transitorios, pueden
producirse fallos en el funcionamiento del producto. En estos casos, el usuario deberá
reiniciar el aparato desenchufándolo y volviéndolo a enchufar.
ATTENZIONE
- Utilizzate l’apparecchio in ambienti temperati.
- La targhetta segnaletica si trova nella parte posteriore dell'apparecchio.
- Lasciate uno spazio minimo di 5 cm intorno all’apparecchio per permettere una
ventilazione suciente.
- Garantite sempre una ventilazione corretta dell’apparecchio e non coprite le aperture di
ventilazione con oggetti come giornali, tovaglie, tende, ecc.
- Non collocate nessuna fonte di calore, come una candela accesa, sopra o nei pressi
dell’apparecchio.
- Non esponete l’apparecchio all'acqua o all’umidità.
- Non collocate nessun recipiente contenente liquidi, come ad esempio un vaso, nelle
vicinanze dell’apparecchio.
- Non gettate le pile nel fuoco! Abbiate cura di rispettare l’ambiente quando gettate le pile.
- Non esponete le pile ad un calore eccessivo, come raggi solari, fuoco o fonti di calore
analoghe.
- La presa di alimentazione permette di scollegare l’apparecchio dalla corrente elettrica
e deve quindi restare facilmente accessibile. Per interrompere completamente
l’alimentazione dell’apparecchio, scollegate la spina di alimentazione dalla presa di
corrente. La presa di alimentazione deve restare facilmente accessibile durante l’uso,
accertatevi che l’accesso alla presa sia libero.
- Per eetto di fenomeni transitori elettrostatici e/o elettrici, è possibile che il prodotto non
funzioni correttamente. In tal caso è opportuno inizializzare l’apparecchio.
OPGELET
- Gebruik dit toestel bij een gematigd klimaat.
- Het kenmerkenplaatje bevindt zich aan de achterkant van het toestel.
- Zorg voor een afstand van minimum 5 cm rondom uw toestel voor voldoende ventilatie.
- Zorg voor een juiste ventilatie van het toestel en bedek de ventilatie-openingen niet met
voorwerpen zoals dagbladen, tafellakens, gordijnen, enz.
- Plaats geen warmtebron, zoals een brandende kaars, op of in de buurt van het toestel.
- Stel het toestel niet bloot aan waterspatten of vochtigheid.
- Plaats geen voorwerpen met vloeistof, zoals een vaas, op of in de buurt van het toestel.
- Gooi de batterijen niet in het vuur. Respecteer het milieu als u gebruikte batterijen wegwerpt.
- Stel de batterijen niet bloot aan overdreven hitte zoals zonnestralen, vuur of gelijkaardige
warmtebronnen.
- Met de netspanningsstekker kan het toestel uitgetrokken worden, deze moet dus
gemakkelijk toegankelijk blijven. Om de voeding van het toestel volledig te onderbreken
dient u de voedingsstekker helemaal uit het stopcontact te trekken. De netspanningsstekker
mag niet verhinderd worden en moet gemakkelijk toegankelijk zijn tijdens gebruik.
- Onder invloed van tijdelijke elektrostatische en/of elektrische verschijnselen kan het product
storingen ondervinden en kan een heropstart nodig blijken.
NEW ONE S.A.S
10, Rue de la Mission, 25480 Ecole Valentin, France
NEW ONE S.A.S
10, Rue de la Mission, 25480 Ecole Valentin, France
NEW ONE S.A.S
10, Rue de la Mission, 25480 Ecole Valentin, France
NEW ONE S.A.S
10, Rue de la Mission, 25480 Ecole Valentin, France
Das Typenschild bendet sich an der Unterseite des Geräts.
WARNUNG: UM BRAND- UND ELEKTROSCHOCKGEFAHR VORZUBEUGEN, DÜRFEN
SIE DIESES GERÄT WEDER REGEN NOCH FEUCHTIGKEIT AUSSETZEN.
ACHTUNG: Beim Umgehen der Sicherheitsvorrichtungen oder wenn diese defekt sind, kann
aus dem Gerät unsichtbare Laserstrahlung austreten.
Dieser CD-Player wurde als Klasse I Laserprodukt eingestuft. Der Hinweis KLASSE 1
LASER PRODUKT bendet sich auf der Unterseite des Gehäuses.
La placa de identicación se encuentra en la parte inferior del dispositivo.
ADVERTENCIA: PARA PREVENIR EL RIESGO DE INCENDIO O DE DESCARGA
ELÉCTRICA, NO EXPONGA ESTE APARATO A LA LLUVIA O A LA HUMEDAD.
ATENCIÓN: Radiación láser invisible en caso de apertura o fallo de los cierres de seguridad.
Evite la exposición al láser. Producto láser de clase 1
La targhetta segnaletica si trova nella parte inferiore dell'apparecchio.
AVVERTENZA: PER EVITARE IL RISCHIO DI INCENDIO O SCOSSA ELETTRICA, NON
ESPONETE L’APPARECCHIO ALLA PIOGGIA O ALL’UMIDITÀ.
ATTENZIONE: Emissione di radiazioni laser invisibili quando i dispositivi di sicurezza sono
aperti o difettosi. Evitate l’esposizione diretta al fascio laser. Apparecchio laser di classe 1.
Het kenmerkenplaatje bevindt zich aan de onderkant van het toestel.
WAARSCHUWING STEL HET TOESTEL NIET BLOOT AAN VOCHT OF REGEN OM
HET RISICO OP BRAND OF ELEKTRISCHE SCHOKKEN TE VERMIJDEN.
OPGEPAST: Onzichtbare laserstralen wanneer het veiligheidsmechanisme open of stuk is.
Vermijd blootstelling aan stralen product van laserklasse 1
ALIMENTACIÓN
ALIMENTAZIONE
VOEDING
TEMPORIZADOR
TIMER
TIMER
AJUSTE DE LA FECHA Y LA HORA
IMPOSTAZIONE ORA E DATA
INSTELLEN TIJD EN DATUM
AJUSTE DE LAS ALARMAS Y DE LOS MODOS DE DESPERTADOR
REGOLAZIONE DELL’ALLARME E MODALITÀ DI SVEGLIA
HET ALARM EN DE ALARMMODUS INSTELLEN
Mando a distancia
Telecomando
Afstandsbediening
El mando a distancia funciona con una pila de litio “CR2025” (incluida). Para introducir la
pila en el mando a distancia,quitar el precinto aislante de la parta posterior de la unidad.
SUSTITUCIÓN DE LA PILA DEL MANDO A DISTANCIA
1. Presione el botón hacia la derecha.
2. Extraiga la pila del mando a distancia.
3. Inserte una pila del tipo "CR2025" con la cara
positiva (+) hacia arriba.
4. Vuelva a colocar la tapa.
Il telecomando funziona con una batteria al litio di tipo “CR2025” (fornita). Per attivare il
telecomando, togliere la linguetta isolante posta sul retro.
SOSTITUZIONE DELLA BATTERIA DEL TELECOMANDO
1. Spingere il pulsante verso destra.
2. Estrarre il supporto della pila.
3. Inserire una pila “CR2025” con la polarità positiva
(+) rivolta verso l’alto.
4. Ricollocare il supporto.
De afstandsbediening werkt op 1x “CR2025”-lithiumbatterij (meegeleverd). Om de
afstandsbediening gebruiksklaar te maken, moet u de isolatietape die zich op de achterkant
van de bediening bevindt, verwijderen.
VERVANGING VAN DE BATTERIJ VAN DE AFSTANDSBEDIENING
1. Duw de toets naar rechts.
2. Trek de batterijlader uit.
3. Plaats een “CR2025” batterij met de positieve kant
(+) naar boven.
4. Plaats het lid terug.
NOTAS:
- Antes de tirar las pilas, consulte a su proveedor: puede entregárselas para reciclarlas.
- Si no va a utilizar el mando a distancia durante un periodo de tiempo prolongado, retire
las pilas para evitar que se produzcan daños causados por la corrosión debida a una
pérdida de líquido.
- Respete el medio ambiente cuando se deshaga de las pilas usadas.
- No tire las pilas al fuego.
- No exponga las pilas a temperaturas demasiado altas, como las producidas por la
exposición directa a los rayos del sol, al fuego o a otras fuentes de calor.
ATENCIÓN:
Puede producirse una explosión si la pila no se ha introducido correctamente. Cámbiela
únicamente por otra del mismo tipo o uno equivalente.
NOTA BENE:
- Prima di gettare le pile, rivolgersi al proprio rivenditore di ducia qualora metta a
disposizione un servizio di raccolta e riciclaggio di pile usate.
- In caso di un prolungato periodo di inutilizzo del telecomando, rimuovere la pila per
evitare eventuali danni dovuti a fuoriuscite di liquido corrosivo.
- Gettare le pile nel rispetto dell'ambiente.
- Non gettare le pile nel fuoco.
- Non esporre le pile a fonti di calore eccessivo, come raggi solari, fuoco o fonti di calore
analoghe.
ATTENZIONE:
Se la pila non è correttamente inserita c’è il rischio di esplosione. Sostituirla unicamente
con una pila identica o di tipo equivalente.
OPMERKINGEN:
- Raadpleeg uw dealer alvorens de batterijen weg te werpen omdat hij ze zou kunnen
terugnemen om te recycleren.
- Als de afstandsbediening lange tijd niet gebruikt wordt, haalt u de batterijen beter uit het
toestel om aantasting door uitlopen van de batterijen te vermijden.
- Respecteer het milieu als u gebruikte batterijen wegwerpt.
- Gooi de batterijen niet in het vuur.
- Stel de batterijen niet bloot aan overdreven hitte zoals zonnestralen, vuur of gelijkaardige
warmtebronnen.
OPGEPAST:
Ontplongsgevaar als de batterij niet juist ingevoegd wordt. Vervang de batterij enkel door
een identieke batterij of door een batterij van hetzelfde type.
CONEXIÓN DE LOS ALTAVOCES
COLLEGAMENTO DEGLI ALTOPARLANTI
LUIDSPREKERAANSLUITING
Enchufe el cable de los altavoces DERECHO / IZQUIERDO en las tomas de entrada del
altavoz en la parte posterior de la unidad.
Collegare I cavi degli altoparlanti DESTRA / SINISTRA nelle prese di ingresso per
altoparlanti presenti nel retro del dispositivo.
Steek het snoer van de RECHTER / LINKER luidsprekers in de luidsprekeringangen op de
achterkant van het apparaat.
Conecte el cable de alimentación a una fuente de suministro eléctrico AC 230V 50Hz.
Conecte el cable de alimentación AC a una toma de pared AC estándar.
Collegare il cavo di alimentazione a una presa elettrica da AC 230V 50Hz.
Collegare il cavo AC a una vicina presa elettrica AC standard.
Sluit het netsnoer aan op een AC 230V 50Hz stroombron.
Sluit het AC-netsnoer aan op een standaard stopcontact.
1. En el modo en reposo, mantenga pulsado el botón TIMER en el mando a distancia
durante unos segundos, los dígitos de la hora parpadearán.
2. Pulse y / o para congurar el tiempo de activación del temporizador.
3. Pulse el botón TIMER, después pulse o para seleccionar la fuente del modo de
temporizador: FM, DAB; CD, USB.
4. Pulse el botón TIMER, después pulse y / o para congurar el tiempo de
desactivación del temporizador:
5. Pulse de nuevo el botón TIMER para conrmar. La unidad se apagará. Se encenderá y
reproducirá automáticamente en el intervalo de tiempo que haya congurado.
1. In modalità standby, tenere premuto il tasto TIMER sul telecomando per alcuni secondi,
le cifre dell’ora lampeggeranno.
2. Premere e/ o per impostare l’ora del timer.
3. Premere il tasto TIMER quindi premere o per selezionare la sorgente della
modalità: FM, DAB, CD, USB.
4. Premere il tasto TIMER quindi premere e/ o per impostare per impostare su
o l’ora del timer.
5. Premere di nuovo il tasto TIMER per confermare. L’unità si spegnerà. Verrà riprodotto
automaticamente nell'intervallo impostato.
1. Houd in de standbymodus TIMER op de afstandsbediening een paar seconden
ingedrukt, de uurcijfers knipperen.
2. Druk op en / of om de inschakeltijd van de timer in te stellen.
3. Druk op TIMER en druk vervolgens op of om de bron van de timermodus te
selecteren: FM, DAB, CD, USB.
4. Druk op TIMER en druk vervolgens op en / of om de uitschakeltijd van de
timer in te stellen.
5. Druk ter bevestiging nogmaals op TIMER. Het apparaat schakelt nu uit en speelt
automatisch af binnen het ingestelde tijdsbereik.
La primera vez que escuche la radio DAB/DAB+, la fecha y la hora de su producto se
sincronizarán automáticamente con la emitida por el servicio DAB en modo 24 horas, que se
ajusta automáticamente al horario de verano.
Si desea congurar la fecha y la hora manualmente, siga los pasos descritos a continuación:
1. Mantenga presionado CLOCK para entrar al modo de ajustes de fecha y hora. Los dígitos
del formato de la hora (24 horas o 12 horas) parpadearán.
2. Pulse / para seleccionar "24H" o "12H", después pulse CLOCK para conrmar
el formato del reloj.
3. Pulse / para congurar la hora (HH:MM) y la fecha (DD/MM/AAAA). Pulse de
nuevo CLOCK para acceder a esa opción.
4. Se mostrará "Time saved" (hora guardada) en la pantalla después de congurar el año.
NOTA: Cuando use el formato de reloj de 12 horas, asegúrese de prestar atención al
indicador A.M. o P.M.
Al primo utilizzo della radio DAB/DAB+, l'apparecchio si sincronizza in automatico sull'ora
e la data del servizio DAB, nel formato a 24 ore e in linea con l'ora legale, pertanto non è
necessario impostare la data e l'ora manualmente.
Se desiderate impostare l'ora manualmente, eseguite i seguenti passaggi:
1. Tenere premuto per alcuni secondi CLOCK per entrare nell’interfaccia di modica data
e ora. Le cifre del formato dell’ora (visualizzazione a 24 H o 12 H ore) lampeggeranno.
2. Premere / per selezionare una tra i formati “24 H” o “12 H”, quindi premi
CLOCK per confermare.
3. Premere / per regolare l’ora (HH:MM) e la data (GG/MM/AAAA), quindi premi
CLOCK per confermare.
4. Dopo aver regolato l’anno sul quadrante si leggerà “Time saved” (Ora salvata).
Nota: Con il formato dell’ora a 12 ore, controllare la presenza dell’indicatore AM o PM per
impostare l’ora correttamente.
De eerste keer dat u naar DAB/ DAB+-radio luistert, zullen de tijd en datum van uw product
automatisch worden gesynchroniseerd met de tijd en datum die worden uitgezonden door
de DAB-dienst. Dit gebeurt in de 24-uursmodus in lijn met de zomertijd en het is dus niet
nodig om de tijd en datum handmatig in te stellen.
Als u de tijd en datum handmatig wilt instellen, volg de onderstaande stappen:
1. Houd CLOCK ingedrukt om de modus voor het instellen van de datum en tijd te openen.
De cijfers van het tijdformaat (24- of 12-uursweergave) knipperen.
2. Druk op / om ‘24H’ of ‘12H’ te selecteren en druk vervolgens op CLOCK om
de tijdnotatie te bevestigen.
3. Druk op / om de tijd (UU:MM) en de datum (DD/MM/JJJJ) in te stellen. Druk
vervolgens op CLOCK om te bevestigen.
4. Nadat het jaar is ingesteld, wordt de melding “Tijd opgeslagen” weergegeven.
OPMERKING: Als er wordt gekozen voor 12-uurs tijdnotatie, let dan ook op de AM- of PM-
indicator om de juiste tijd in te stellen.
1. Mantenga pulsado el botón ALARM 1 en el mando a distancia para acceder al modo de
conguración de alarmas 1. Pulse ALARM 1 para conrmar.
2. Presione o para seleccionar una opción y/o realizar el ajuste, después, pulse
ALARM 1 para conrmar.
- Alarm 1 Wizard: Establece la hora de la alarma
- Duration (Duración): 15> 30> 45> 60> 90
- Source (Fuente): Establece la fuente de sonido del despertador: Buzzer (zumbido), DAB,
FM, CD o USB.
- Preset (Memoria): Selecciona la última emisora de radio escuchada o la que desee. Esta
opción solo está disponible cuando el modo despertador esté establecido en DAB o FM.
- Cycle (Ciclo): Daily (Diaria), Once (Una vez), Weekends (Fin de semana), Weekdays
(Días de semana)
** Daily (Diaria): La alarma sonará cada día.
** Once (Una vez): La alarma solo sonará una vez.
** Weekends (Fin de semana): La alarma sonará solo los nes de semana (sábados y
domingos).
** Weekdays (Días de semana): La alarma solo sonará en días de entresemana (de
lunes a viernes).
- Volume (Volumen): Establece el volumen de la alarma
Nota: el volumen mínimo de la alarma está limitado a 8.
- Alarm On/ O (Encender/ apagar): pulse repetidamente el botón ALARM 1 para
encender o apagar el modo de alarma 1.
3. Pulse de ALARM 1 para guardar el ajuste de alarm. El indicador correspondiente se
encenderá. Se mostrará "Alarm Saved" (guardado) durante unos segundos. Luego se
mostrarán el indicador de alarma 1 “ ” y la hora de la alarma.
Nota:
- El mismo procedimiento se aplica para la Alarma 2 con el botón de ALARM 2. Luego se
mostrarán el indicador de alarma 2 “ ” y la hora de la alarma.
- En el formato de reloj de 12 horas, asegúrese de tener en cuenta el indicador AM/PM
para un ajuste correcto.
- Algunos CD o dispositivos USB puede ser incompatibles con la función de alarma.
Congure la alarma a zumbador, FM o DAB si su CD o dispositivo USB es incompatible.
Desactivación de la alarma
1-Detenciónmomentáneadelaalarma
Pulse SNOOZE para detener la alarma temporalmente. La unidad entrará en modo en
espera. La pantalla mostrará "Snooze" y el tiempo restante hasta la repetición. La alarma
se detendrá y volverá a sonar pasados 9 minutos.
2 - Apagado de la alarma
Pulse ALARM 1 o para detener la alarma.
Nota:
- Cuando esté congurado "Daily" (Diaria), la alarma sonará de nuevo al día siguiente a
la misma hora.
- Cuando esté congurado "Once" (Una vez), la alarma no volverá a sonar. El indicador
de la alarma se apagará.
- Cuando esté congurado "Weekends" (Fin de semana), la alarma sonará de nuevo el
próximo sábado o domingo a la misma hora.
- Cuando esté congurado "Weekdays" (Días de semana), la alarma sonará de nuevo el
próximo día de entresemana (de lunes a viernes) a la misma hora.
3 - Desactivación de la alarma
En el modo en reposo, pulse repetidamente el botón ALARM 1 hasta seleccionar “ O”
para desactivar permanentemente la alarma 1.
Nota: El mismo procedimiento se aplica para la Alarma 2 con el botón de ALARM 2.
1. Tenere premuto il tasto ALARM 1 sul telecomando per accedere alle impostazioni della
sveglia. Premere il tasto ALARM1 per confermare.
2. Premere e/o a selezionare un'opzione e/o per regolarne il valore, quindi premi
ALARM 1 per confermare.
- Alarm 1 Wizard: imposta l’ora della sveglia
- Duration (Durata): 15 > 30 > 45 > 60 > 90
- Source (Tipo Suoneria): seleziona la suoneria della sveglia: Buzzer (Cicalino), DAB, FM,
CD o USB.
- Preset (Preselezione): seleziona l’ultima stazione radio ascoltata o la stazione radio
preselezionata desiderata. Questa opzione è disponibile solo se è stata selezionata la
suoneria con DAB o FM.
- Frequency (Frequenza): Daily, Once, Weekends, Weekdays
** Daily (giornaliera): la sveglia suonerà ogni giorno.
** Once (una volta): la sveglia suonerà una sola volta.
** Weekends (ne settimana): la sveglia suonerà solo nei ne settimana (sabato e
domenica).
** Weekdays (feriali): la sveglia suonerà solo nei giorni feriali (da lunedì a venerdì).
- Volume: imposta il volume della suoneria.
Nota: il livello minimo del volume della suoneria è 8.
- AlarmOn/O (Attiva/ Disattiva): premi più volte il tasto ALARM 1 per attivare o disattivare
la sveglia.
3. Premere ALARM 1 per confermare l'impostazione di allarme. Sul quadrante apparirà per
alcuni secondi il messaggio “Alarm Saved” (Salvato). Poi il display visualizza l'indicatore
di allarme 1 “ ” insieme al tempo di allarme.
Nota:
- La stessa procedura si applica per l'allarme 2 con il tasto ALARM 2. Poi il display visualizza
l'indicatore di allarme 2 “ ” insieme al tempo di allarme.
- Nel formato a 12 ore, assicurarsi di impostare correttamente l’indicatore AM/PM (mattino/
pomeriggio).
- Alcuni lettori CD o dispositivi USB potrebbero essere incompatibili con la funzione
di sveglia. Imposta la suoneria della sveglia su cicalino, FM o DAB se il lettore CD o il
dispositivo USB non fossero compatibile.
Arresto della sveglia
1 - Ripetizione dell’allarme
Premere il pulsante SNOOZE per spegnere temporaneamente la suoneria. L’apparecchio
entrerà in standby. Sul quadrante apparirà “Snooze” (Ripeti) insieme al periodo di ripetizione
della suoneria. La suoneria si interromperà, per riprendere nuovamente una volta trascorso
il periodo programmato.
2 - Arresto dell’allarme
Premere ALARM 1 o per spegnere la sveglia.
Nota:
- Selezionando “Daily” (giornaliera): la sveglia suonerà nuovamente il giorno successivo
alla stessa ora.
- Selezionando “Once” (una volta): la sveglia non suonerà ancora, e l’indicatore si spegnerà.
- Selezionando “Weekends” (ne settimana): la sveglia suonerà nuovamente il prossimo
sabato o domenica alla stessa ora.
- Selezionando “Weekdays” (feriali): la sveglia suonerà solo nuovamente il prossimo giorno
feriale (da lunedì a venerdì) alla stessa ora.
3 - Eliminazione dell’allarme
In modalità standby, premere il tasto ALARM 1 ripetutamente no a che apparirà la scritta
“ O” per annullare la sveglia 1 permanentemente. L’indicatore alarm1 si spegnerà.
Nota: la stessa procedura si applica per l'allarme 2, con il tasto ALARM 2.
1. Houd de toets ALARM 1 op de afstandsbediening om de instelmodus voor het alarm 1
te openen. Druk vervolgens ter bevestiging op ALARM 1.
2. Druk op en / of om een optie te selecteren en/of een instelling aan te passen en
druk vervolgens ter bevestiging op ALARM 1.
- Wekker 1 Wizard: Om de alarmtijd in te stellen
- Duur: 15> 30> 45> 60> 90
- Bron: Om de wekbron in te stellen: zoemer, DAB, FM, CD of USB.
- Station: Selecteer de laatst beluisterde radiozender of gewenste voorkeurszender. Deze
optie is alleen beschikbaar wanneer de wekmodus is ingesteld op DAB of FM.
- Fiets: Dagelijks, Eenmalig, Weekends, Weekdagen
** Dagelijks: het alarm gaat elke dag af.
** Eenmalig: het alarm gaat één keer af.
** Weekends: het alarm gaat alleen in de weekenden af (zaterdag en zondag).
** Weekdagen: het alarm gaat alleen op weekdagen af (maandag tot en met vrijdag).
- Volume: Om het alarmvolume in te stellen.
Opmerking: Het minimale alarmvolume is beperkt tot 8.
- Wekker Aan/ Uit: druk herhaaldelijk op ALARM 1 om de alarmmodus in/uit te schakelen.
3. Druk op de ALARM 1 -toets om de instelling van alarm 1 te slaan. "Alarm Saved"
(Opgeslagen) geproduceerde enkele seconden. Vervolgens worden de alarm1-indicator
" " en de alarmtijd op het display weergegeven.
Opmerking:
- Dezelfde procedure geldt voor Alarm 2 met ALARM 2 -knop. Vervolgens worden de
alarm2-indicator " " en de alarmtijd op het display weergegeven.
- Als er gebruik wordt gemaakt van het 12-uursformaat, zorg dan dat u ook de AM/PM-
indicator juist instelt.
- Sommige CD's of USB-apparaten zijn mogelijk niet compatibel met de alarmfunctie. Stel
de alarmbron in op zoemer, FM of DAB als uw CD of USB-apparaat niet compatibel is.
Uitschakelen van het alarm
1 - Korte onderbreking van het alarm
Druk op SNOOZE om het alarm tijdelijk te onderbreken. Het apparaat schakelt over naar
de stand-bymodus. Het display toont de melding ‘Sluimeren’ en de resterende sluimertijd.
Het alarm stopt en gaat 9 minuten later opnieuw af.
2 - Stoppen van het alarm
Druk op ALARM 1 of om het alarm te stoppen.
Opmerking:
- Wanneer “Dagelijks” is ingesteld, gaat het alarm de volgende dag opnieuw af op dezelfde
tijd.
- Wanneer “Eenmalig” is ingesteld, gaat het alarm niet opnieuw af. De alarmindicator
brandt niet langer.
- Wanneer “Weekends” is ingesteld, gaat het alarm op de volgende zaterdag of zondag
opnieuw af op dezelfde tijd.
- Wanneer “Weekdagen” is ingesteld, gaat het alarm op de volgende weekdag (maandag
tot en met vrijdag) opnieuw af op dezelfde tijd.
3 - Uitschakelen van het alarm
Druk in de standbymodus herhaaldelijk op ALARM 1 tot “ Uit” wordt weergegeven om
alarm1 permanent te annuleren.
Opmerking: Dezelfde procedure geldt voor Alarm 2 met ALARM 2 -knop.
DESCRIPCIÓN DEL APARATO
DESCRIZIONE DEL PRODOTTO
BESCHRIJVING VAN HET TOESTEL
SISTEMA BLUETOOTH CON RADIO DAB+/FM,
CD Y PUERTO USB
MICRO-IMPIANTO BLUETOOTH CON
RADIO DAB+/ FM, CD E PORTA USB
BLUETOOTH MICROSYSTEEM MET
DAB+/ FM-RADIO, CD EN USB-POORT
ES
IT
NL
1. Pantalla a TFT
2. Indicador de Bluetooth
3. Sensor de infrarrojos del mando a distancia
4. / SOURCE: Para encender/ apagar la
unidad; Para seleccionar el modo de función:
FM, DAB, CD, USB, Bluetooth o AUX IN.
5. Puerto USB para la reproducción MP3
6. Botón / ENTER/ CLOCK: Reproducción/
Pausa; conrmar la selección/ ajustes; para
establecer la fecha y la hora
7. Botón / MENU: Detener la reproducción;
Accede al modo de menú principal; Regresar
al ajuste anterior
8. VOLUME controlar: subir volumen/ bajar
volumen
9. Botón PRE+/ ALBUM: Avanzar a la siguiente
emisora de radio programada; Para
seleccionar la carpeta deseada
10. Botón EQ/ INFO: Para seleccionar los
efectos de sonido deseados: FLAT/ ROCK/
POP/ JAZZ/ CLASSIC (CLÁSICO)/ BASS
(GRAVES); Para ver la información emitida
por la emisora de radio
1. Schermo TFT
2. Indicatore del Bluetooth
3. Sensore a infrarossi per il telecomando
4. / SOURCE: Attivazione e disattivazione
dell’apparecchio; selezione dell'origine: FM,
DAB, CD, USB, Bluetooth, AUX IN.
5. Porta USB per la riproduzione di le MP3
6. Tasto / ENTER/ CLOCK: riproduzione/
pausa; conferma della selezione/
impostazioni; impostare la data e l’ora
7. Tasto / MENU: arresto della riproduzione;
accesso al menu principale; Torna alle
impostazioni precedenti
8. VOLUME: aumento volume/ riduzione volume
9. Tasto PRE+/ ALBUM: ricerca preselezioni;
per selezionare la cartella desiderata; per
aggiustare l’eetto sonoro
10. Tasto EQ/ INFO: consente di selezionare
l'eetto audio desiderato tra FLAT/ ROCK/
POP/ JAZZ/ CLASSIC/ BASS; Accesso alle
informazioni trasmesse dall’emittente radio
1. TFT-kleurendisplay
2. Bluetooth-indicator
3. Infraroodontvanger voor de afstandsbediening
4. / SOURCE: Om het apparaat aan/ uit te
zetten; Voor het selecteren van de modus: FM,
DAB, CD, USB, Bluetooth, AUX IN.
5. USB-poort voor afspelen MP3’s
6. Toets / ENTER/ CLOCK: Spelen/ pauze;
bevestig selectie/ instellingen; om de datum en
tijd in te stellen
7. Toets / MENU: Afspelen stoppen; Om het
hoofdmenu te openen; Om terug te keren naar
de vorige instelling
8. VOLUME controle: volume verhogen/ verlagen
9. Toets PRE+/ ALBUM: Voorkeurszender
omhoog; om de gewenste map te selecteren;
om het geluidseect aan te passen.
10. Toets EQ/ INFO: Voor het selecteren van het
gewenste geluidseect: VLAK/ ROTS/ POP/
JAZZ/ KLASSIEK/ BASS; Om de informatie
te bekijken die wordt uitgezonden door de
radiozender te bekijken
R1. Botón : Para encender/ apagar la unidad
R2. Botón SOURCE: Para seleccionar el modo de función: FM, DAB, CD, USB, Bluetooth
o AUX IN.
R3. Botón EQ: Para seleccionar los efectos de sonido deseados: FLAT/ ROCK/ POP/
JAZZ/ CLASSIC (CLÁSICO)/ BASS (GRAVES)
R4. Botón CLOCK: para establecer la fecha y la hora
R5. Botón TIMER: Para congurar la función del temporizador
R6. Botón SLEEP: para dormirse con la radio
R7. Botón ALARM 1: alarma 1
R8. Botón ALARM 2 alarma 2
R9. Botón SNOOZE: Intervalo de repetición de la alarma
R10. Botón MENU: Accede al modo de menú principal; Regresar al ajuste anterior
R11. Botón INFO: Para ver la información emitida por la emisora de radio
R12. Botón ENTER: conrmar la selección / ajustes
R13. Botón : Detener la reproducción
R14. Botón : Reproducción/ Pausa
R15. VOL+ /-: Ajuste del volumen
R16. , : Salto/ Búsqueda/ Sintonización
R17. AMS/ MODE: escanea automáticamente la emisora en el modo de radio. Para
programar secuencias de reproducción/ ajustar el modo de reproducción en el modo
CD/ USB. Emparejamiento en el modo Bluetooth.
R18. Botón MUTE: Supresión del sonido
R19. Botón PRE+/ ALBUM: Avanzar a la siguiente emisora de radio programada; Para
seleccionar la carpeta deseada
R1. Tasto : Attivazione e disattivazione dell’apparecchio
R2. Tasto SOURCE: selezione dell'origine: FM, DAB, CD, USB, Bluetooth, AUX IN.
R3. Tasto EQ: consente di selezionare l'eetto audio desiderato tra FLAT/ ROCK/ POP/
JAZZ/ CLASSIC/ BASS
R4. Tasto CLOCK: impostare la data e l’ora
R5. Tasto TIMER: Imposta la funzione del timer
R6. Tasto SLEEP: Ripetizione dell’allarme; impostare l'intervallo si sospensione
R7. Tasto ALARM 1: Allarme 1
R8. Tasto ALARM 2: Allarme 2
R9. Tasto SNOOZE: Ripetizione dell’allarme
R10. Tasto MENU: Accesso al menu principale; Torna alle impostazioni precedenti
R11. Tasto INFO: Accesso alle informazioni trasmesse dall’emittente radio
R12. Tasto ENTER: conferma della selezione/impostazioni
R13. Tasto : arresto della riproduzione
R14. Tasto : riproduzione/ pausa
R15. VOL+ /-: regolazione del volume
R16. , : consente di saltare, avviare la ricerca o sintonizzare
R17. AMS/ MODE: scansione automatica delle stazioni in modalità radio; programma
la sequenza di riproduzione e la modalità di riproduzione in modalità CD/ USB;
accoppiamento in modalità Bluetooth.
R18. Tasto MUTE: attivazione e disattivazione dell’audio
R19. Tasto PRE+/ ALBUM: ricerca preselezioni; per selezionare la cartella desiderata; per
aggiustare l’eetto sonoro
R1. Toets : Om het apparaat aan/ uit te zetten
R2. Toets SOURCE: Voor het selecteren van de modus: FM, DAB, CD, USB, Bluetooth,
AUX IN
R3. Toets EQ: Voor het selecteren van het gewenste geluidseect: VLAK/ ROTS/ POP/
JAZZ/ KLASSIEK/ BASS
R4. Toets CLOCK: om de datum en tijd in te stellen
R5. Toets TIMER: Om de timerfunctie in te stellen
R6. Toets SLEEP: Om de slaaptijd te selecteren
R7. Toets ALARM 1: alarm 1
R8. Toets ALARM 2: alarm 2
R9. Toets SNOOZE: Alarm tijdelijk uitschak elen
R10. Toets MENU: Om het hoofdmenu te openen; Om terug te keren naar de vorige
instelling
R11. Toets INFO: Om de informatie te bekijken die wordt uitgezonden door de radiozender
te bekijken
R12. Toets ENTER: bevestig selectie / instellingen
R13. Toets : Afspelen stoppen
R14. Toets : Spelen/ pauze
R15. Toetsen VOL+ /-: Volumeregeling
R16. Toetsen , : Overslaan/ Zoeken/ Afstemmen
R17. AMS/ MODE: automatisch scannen naar zender in radiomodus; Voor programmeren
afspeelvolgorde/ instellen afspeelmodus in CD/ USB-modus; koppelen in Bluetooth-
modus
R18. Toets MUTE: Activeren/ deactiveren van het geluid
R19. Toets PRE+/ ALBUM: Voorkeurszender omhoog; om de gewenste map te selecteren;
om het geluidseect aan te passen.
ADVERTENCIA
No ingiera la pila, hay peligro de quemaduras químicas.
(El mando a distancia suministrado con) Este producto contiene una pila de
botón. Si la pila de botón es tragada, podría causar quemaduras internas graves
en solo 2 horas y llevar a la muerte.
Mantenga las pilas nuevas y las usadas lejos del alcance de los niños.
Si el compartimiento de la pila no cierra de forma segura, deje de usar el producto y
manténgalo alejado del alcance de los niños.
Si cree que la pila ha sido tragada o colocada dentro de cualquier parte del cuerpo, busque
ayuda médica de inmediato.
AVVERTIMENTO
Non ingerire la batteria, pericolo di ustione chimica
(Il telecomando fornito con) Questo prodotto contiene una batteria a bottone/
pulsante. Se la batteria a bottone / pulsante viene ingerita, può causare gravi
ustioni interne in appena 2 ore e può portare alla morte.
Tenere le batterie nuove e usate lontano dai bambini.
Se il vano batteria non si chiude in modo sicuro, smettere di usare il prodotto e tenerlo
lontano dalla portata dei bambini.
Se si pensa che le batterie potrebbero essere state inghiottite o collocate all'interno di
qualsiasi parte del corpo, consultare immediatamente un medico.
WAARSCHUWING
Neem de batterij niet in, gevaar voor chemische brandwonden
(De afstandsbediening die wordt meegeleverd met) Dit product bevat een
knoopcelbatterij. Als de knoopcelbatterij wordt ingeslikt, kan dit ernstige
inwendige brandwonden veroorzaken die in slechts 2 uur tot de dood kunnen leiden.
Houd nieuwe en gebruikte batterijen buiten bereik van kinderen.
Als het batterijvak niet goed sluit, stop dan met het gebruik van het product en houd het
buiten bereik van kinderen.
Als u denkt dat er mogelijk batterijen zijn ingeslikt of batterijen in een lichaamsdeel terecht
zijn gekomen, schakel dan onmiddellijk medische hulp in.
11. AMS/ MODE: escanea
automáticamente la emisora
en el modo de radio. Para
programar secuencias de
reproducción/ ajustar el modo de
reproducción en el modo CD /
USB. Emparejamiento en el modo
Bluetooth.
12. , : Salto/ Búsqueda/
Sintonización
13. Altavoces
14. Salida para altavoz derecho
15. Antena FM/ DAB
16. Salida para altavoz izquierdo
17. Auriculares jack
18. Entrada auxiliar (3.5mm)
19. Cable de alimentación
20. Cable del altavoz
21. Botón SNOOZE/ SLEEP: Intervalo
de repetición de la alarma; Para
seleccionar el tiempo para el
apagado automático
22. Compartimento del disco
11. AMS/ MODE: scansione
automatica delle stazioni in
modalità radio; programma la
sequenza di riproduzione e
la modalità di riproduzione in
modalità CD/ USB; accoppiamento
in modalità Bluetooth.
12. , : consente di saltare,
avviare la ricerca o sintonizzare
13. Altoparlanti
14. Uscita per altoparlante destra
15. Antenna FM/ DAB
16. Uscita per altoparlante sinistra
17. Auricolari Jack
18. Ingresso ausiliario (3,5 mm)
19. Cavo di alimentazione elettrica
20. Cavo altoparlanti
21. Tasto SNOOZE/ SLEEP:
Ripetizione dell’allarme; impostare
l'intervallo si sospensione
22. Compartimento disco
11. AMS/ MODE: automatisch
scannen naar zenders in
radiomodus; Voor programmeren
afspeelvolgorde/ instellen
afspeelmodus in CD/ USB-modus;
koppelen in Bluetooth-modus
12. , : Overslaan/ Zoeken/
Afstemmen
13. Luidsprekers
14. Aansluiting voor de rechter
luidspreker
15. FM/ DAB-antenne
16. Aansluiting voor de linker
luidspreker
17. Aansluiting voor de hoofdtelefoon
18. Aux in-stekkerbus (3.5mm)
19. Stroomkabel
20. Luidsprekerkabel
21. Toets SNOOZE/ SLEEP: Alarm
tijdelijk uitschak elen; Om de
slaaptijd te selecteren
22. Diskcompartiment
RADIO
RADIO
RADIO
PARA ESCUCHAR DE UNA FUENTE AUXILIAR
ASCOLTO DA UNA FONTE ESTERNA
NAAR EEN HULPBRON LUISTEREN
FUNCIÓN DE TEMPORIZADOR DE APAGADO AUTOMÁTICO (SLEEP)
FUNZIONE SLEEP
SLAAPFUNCTIE (AUTOMATISCH UITSCHAKELEN)
CONTROLES DE AUDIO
CONTROLLI AUDIO
MODUS EN VOLUMEREGELING
REPRODUCCIÓN DE DISCOS
RIPRODUZIONE DI UN DISCO
WEERGAVE VAN DISKS
FUNCIONAMIENTO DE USB
MODOS DE REPRODUCCIÓN (CD/ MP3)
MODALITÀ DI RIPRODUZIONE (CD/MP3)
WEERGAVEMODI (CD/MP3)
FUNCIÓN BLUETOOTH
FUNZIONALITÀ BLUETOOTH
BLUETOOTH-FUNCTIE
PARA ESCUCHAR LA RADIO DAB/ DAB+
Cuando la unidad esté encendida, pulse repetidamente el botón SOURCE para seleccionar
el icono DAB.
La radio realizará automáticamente una búsqueda completa para encontrar todas las emisoras
disponibles la primera vez que utilice la radio o cuando la lista de emisoras esté vacía. La
pantalla cambiará a “Scanning……”. Una barra de progreso mostrará el progreso de la
búsqueda y también el número de emisoras encontradas.
También podría necesitar iniciar una búsqueda manual para actualizar la lista de emisoras por
alguno de los siguientes motivos:
- De vez en cuando podrían existir nuevas emisoras disponibles.
- Es posible que haya emisoras que cesen su emisión o de las que ya no se reciba señal (en
la lista de emisoras, las emisoras no válidas se indican mostrando un signo de interrogación
delante de sus nombres).
- La lista de emisoras disponibles podría quedarse vacía o incompleta si la recepción no fuera
buena durante la búsqueda inicial (por ejemplo, si la antena no estuviera correctamente
extendida).
- En el caso de experimentar una mala recepción en algunas emisoras que causara
interrupciones en la emisión, podría convenirle memorizar únicamente aquellas de las que
reciba una señal fuerte.
Para realizar una búsqueda completa, pulse el botón MENU para acceder al menú de
conguración, pulse o para seleccionar <Full Scan> (Búsqueda completa) y pulse
ENTER para iniciarlo.
Una vez la búsqueda se haya completado, la radio volverá a reproducir la emisora seleccionada
previamente o la primera en la lista de emisoras.
Seleccione una emisora con / , y pulse ENTER para conrmar.
Nota:
- Si no se hubiera ninguna retransmisión con la búsqueda DAB/DAB+, “No DAB station”
aparecerá en el display.
- Para una mejor recepción, extienda la antena o realice de nuevo una búsqueda completa
desde otra posición.
- Durante la operación de búsqueda, el nivel de sonido quedará interrumpido automáticamente.
Escuchar la Radio
En el modo de radio FM, pulse el botón o para sintonización manual. Mantenga
pulsado / para búsqueda automática.
Nota: Para una mejor recepción, extienda la antena en espiral.
ESTACIONES PRESINTONÍAS
Esta unidad podrá memorizar hasta 30 emisoras FM y 30 DAB/DAB+.
1. En los modos FM o DAB, sintonice la emisora de radio deseada.
2. Pulse el botón AMS para entrar en el modo de memorización de emisoras.
3. Pulse el botón o para seleccionar una emisora en memoria, después, pulse
ENTER para conrmar. Aparecerá "Preset X saved" en pantalla durante unos segundos (X
= nº del espacio en memoria).
Nota: Si elige una emisora que no ha sido asignada, “Empty” (Vacío) se mostrará en el display.
Si la emisora ya hubiera sido encontrada anteriormente, se mostrará la frecuencia FM o el
nombre de la emisora DAB.
4. Repite los pasos 1-3 para memorizar otras emisoras.
Escucha de las emisoras memorizadas
Pulse el botón SOURCE para seleccionar la banda FM o DAB/DAB+. Después pulse PRE+
y repita la operación tantas veces como sea necesario para seleccionar su emisora. Utilice el
botón VOL+ o VOL- para ajustar el nivel del volumen que desee.
MENÚ DE CONFIGURACIÓN
Navegación por el menú de conguración.
En el modo FM o DAB/DAB+, pulse el botón MENU para entrar en el menú de conguración.
Pulse / para seleccionar una opción y ajustar la conguración, después, pulse
ENTER para conrmar.
Nota: Cuando realice ajustes en el menú, pulse el botón MENU para regresar al paso anterior.
Menú de ajuste de FM
Scansetting(Congurarbúsqueda)
All stations (Todas las emisoras): la búsqueda automática e detendrá en cualquier emisora
disponible.
Strong station only (Solo las emisoras con buena señal): la búsqueda automática solo se
detendrá cuando encuentre emisoras con una buena señal.
Audiosetting(Conguraraudio)
Para seleccionar entre “Stereo allowed”(Habilitar estéreo) y “Forced mono”(Forzar mono) para
la radio FM.
System (Sistema)
Para seleccionar las opciones de ajuste del sistema: Time (hora), Language (Idioma), Factory
Reset (Conguración de fábrica), SW version (Versión de software).
• Time (Hora)
** Set Time/ Date (congurar fecha/ hora)
Congura la fecha (DD/MM/AAAA) y la hora. Consulte los pasos en la sección "AJUSTE DE
LA FECHA Y LA HORA".
** Auto update (Actualización automática)
Update from Any (Actualización de cualquiera de las opciones): actualización de FM o DAB/
DAB+.
Update from DAB (Actualización de DAB): actualización de la hora de DAB/DAB+
Update from FM (Actualización de FM): actualización de la hora de FM.
No update (Sin actualización): muestra la hora de los ajustes del sistema.
** Set 12/24 hour (Selección del formato de 12/24 horas)
Congurar el formato de la Hora: reloj 12/24 horas;
** Set date format (Selección del formato de fecha)
Congurar el formato de la fecha: DD-MM-AAAA o MM-DD-AAAA.
• Language (Idioma)
Para seleccionar el idioma deseado para el menú de la unidad: Français, English, German,
Dutch
• Factory Reset (Conguración de fábrica)
Para restablecer la conguración de fábrica por defecto.
• SW version (Versión de software)
Para revisar la versión de software actual.
Menú de ajustes DAB/ DAB+
Full Scan (Búsqueda completa)
Esta función le permite buscar automáticamente y crear una lista de programas DAB/DAB+
recibidos.
Manual Tune (Sintonización manual)
Esta función puede utilizarse para facilitar el posicionamiento de la antena o la unidad, con el
n de mejorar la recepción de un canal especíco o la frecuencia de recepción.
Pulse / para seleccione "Manual tune" (sintonización manual) en el menú de
conguración y pulse ENTER para conrmar. Pulse / para seleccionar la frecuencia
deseada y pulse ENTER para sintonizar la emisora en esa frecuencia.
DRC(CompresiónDinámica)
DRC puede hacer que los sonidos más suaves sean audibles más fácilmente cuando la
unidad se use en entorno ruidoso.
Pulse o para seleccionar el nivel DRC que desee: o (apagado), high (alto), low ( bajo).
Pulse el botón ENTER para conrmar.
DRC o (apagado) – sin compresión. Esta es la conguración por defecto.
DRC high (alto) – compresión máxima.
DRC low (bajo) – compresión media.
Nota: DRC será efectivo solo con retransmisiones de compresión de rango dinámico.
Prune (Limpiar)
Elimine emisoras que estén listadas pero no disponibles. Esta función puede eliminar todas
las emisoras no válidas de la lista de emisoras, que tengan el carácter “?” delante del nombre
de la emisora.
Pulse o para seleccionar “No” o “Yes” (Sí), a continuación pulse el botón ENTER para
conrmar o cancelar la eliminación de todas las emisoras no válidas.
System (Sistema)
Véase utilización en “Menú de conguración FM”.
ASCOLTO DELLA RADIO DAB/DAB+
Con l’apparecchio attivo, premi più volte il tasto SOURCE no ad accendere l’icona DAB.
La prima volta che si usa la radio, o se l’elenco delle stazioni è vuoto, la radio eseguirà una
ricerca automatica per rilevare tutte le stazioni disponibili. Sul display viene visualizzata
la dicitura “Scanning…” (Ricerca). Una barra di stato indica l'avanzamento della ricerca
insieme al numero di stazioni trovate.
Potrebbe inoltre essere necessario eseguire una ricerca manuale per aggiornare l'elenco
delle stazioni nei seguenti casi:
- Di tanto in tanto potrebbero essere disponibili nuove stazioni.
- Le stazioni cessano le trasmissioni o non possono più essere ricevute (tali stazioni sono
indicate nell’elenco con un punto interrogativo davanti al loro nome).
- Nel caso di scarsa ricezione durante la ricerca originale (ad esempio se l’antenna non era
estesa), l’elenco delle stazioni disponibili potrebbe essere vuoto o incompleto.
- Se la ricezione di alcune stazioni è scarsa e l’audio si interrompe, è possibile elencare solo
le stazioni con una segnale potente.
Per eseguire una ricerca completa, premi il tasto MENU per accedere al menu delle
impostazioni, premere / per selezionare <Full Scan> (Ricerca completa) e premi
ENTER per avviare la ricerca.
A ricerca ultimata, la radio riprodurrà l’ultima stazione sintonizzata o la prima stazione
nell’elenco delle stazioni.
Selezionare una stazione con / , quindi premi ENTER per confermare.
Note
- Se durante la ricerca non viene trovata nessuna stazione, sul display compare la dicitura
“No DAB Station”.
- Per una migliore ricezione, estendete l’antenna o eseguite di nuovo la ricerca da una
dierente posizione.
- Durante la ricerca l’audio viene disattivato.
ASCOLTO DELLA RADIO FM
In modalità radio FM, premere il tasto oppure il tasto per eettuare la
sintonizzazione manuale delle stazioni. Tenere premuti i tasti / per avviare la
ricerca automatica delle stazioni.
Nota: Per una ricezione migliore, allungare l’antenna.
STAZIONI PREIMPOSTATE
Questo apparecchio consente di memorizzare no a 30 stazioni FM e 30 stazioni DAB/
DAB+.
1. Sintonizzati sulla stazione radio desiderata in modalità FM o DAB.
2. Premere il tasto AMS per accedere alla modalità di memorizzazione delle preselezioni.
3. Premere o per selezionare un canale. Premete ENTER per confermare
l’impostazione. Sul quadrante si leggerà “Preset X saved” (Preselezione Salvata). (X sta
per il numero della preselezione).
Nota: se si seleziona una stazione non memorizzata, sul display viene visualizzata la
dicitura “Empty”. Se la stazione è stata assegnata in precedenza, verranno visualizzati la
frequenza FM o il nome della stazione DAB.
4. Per memorizzare altre stazioni ripetere i passaggi 1-3.
ASCOLTO DELLE RADIO PREIMPOSTATE
Premere il tasto SOURCE per selezionare una banda tra FM e DAB/DAB+. Premere il tasto
PRE+ per selezionare la stazione desiderata. Regolare il volume sul livello desiderato con
i tasti VOL+ e VOL-.
MENU DI IMPOSTAZIONE
Navigazione nel menu di impostazione
In modalità FM o DAB/DAB+, tenete premuto il tasto MENU per accedere al menu di
impostazione.
Premere il tasto o per selezionare un’opzione e regolare le impostazioni, quindi
premere ENTER per confermare.
Nota: Durante l'impostazione, premete il tasto MENU per tornare all'interfaccia precedente.
Menu di impostazione FM
Scan setting (impostazione di ricerca)
All stations (Tutte le stazioni): la ricerca automatica localizza qualsiasi stazione disponibile.
Strong station only (Solo stazioni forti): la ricerca automatica localizza solo stazioni con
segnale forte.
Audio setting (impostazione audio)
Consente di selezionare un'opzione tra “Stereo allowed” (Stereo consentito) e “Forced
mono” (Mono forzato) pe la radio FM.
System (Sistema)
Consente di accedere alle opzioni di impostazione del sistema: Time (ora), Language
(Lingua), Factory Reset (Ripristino valori di default), SW version (Versione del software).
• Time (Ora)
** Set Time/ Date (Imposta data e ora)
Imposta data e ora (GG/MM/AAAA). Consulta la procedura descritta nella sezione
“IMPOSTAZIONE ORA E DATA”.
** Auto update (Aggiornamento automatico)
Update from Any (Aggiornamento da qualsiasi): aggiornamento dell’ora in base del
ricevitore radio FM o al DAB/DAB+.
Update from DAB (Aggiornamento da DAB): aggiornamento dell’ora in base al DAB/DAB+.
Update from FM (Aggiornamento da FM): aggiornamento dell’ora in base del ricevitore radio
FM.
No update (Nessun aggiornamento): consente di visualizzare l’ora in base all’impostazione
di sistema.
** Set 12 /24 hour (Impostazione del formato orario 12/24)
Imposta formato ora: 12 o 24 ore
* Set date format (Impostazione del formato data)
Imposta formato data: GG-MM-AAAA o MM-GG-AAAA
• Language (Lingua)
Consente di selezionare la lingua dei menu: Français, English, German, Dutch.
• Factory Reset (Ripristino valori di default)
Consente di ripristinare l'apparecchio alle impostazioni di fabbrica.
• SW version (Versione del software)
Consente di visualizzare la versione corrente del software.
Menu di impostazione DAB
Full Scan (Ricerca completa)
Questa funzione consente la ricerca e la creazione di un elenco delle stazioni DAB
disponibili in automatico.
Manual Tune (Sintonizzazione manuale)
Questa funzione può essere utilizzata come aiuto durante lo spostamento dell'antenna o
dell'apparecchio volto a migliorare la ricezione di un canale o una frequenza specici.
Premere il tasto o no a selezionare <Manual Tune> (Sintonia manuale) e premi
ENTER per confermare. Premere il tasto o per selezionare la frequenza desiderata
e premi ENTER per sintonizzare le stazioni nella frequenza selezionata.
DRC (Compressione del livello audio)
La funzione DRC aiuta a rendere i suoni deboli più facili da udire quando l’apparecchio è
utilizzato in un ambiente rumoroso.
Premere il tasto o per selezionare il livello DRC desiderato: o (disattivo), high
(alto), low (basso). Premere il tasto ENTER per confermare.
DRC o (disattivo): nessuna compressione (impostazione predenita).
DRC high (alto): compressione massima.
DRC low (basso): compressione media.
Nota: La funzione DRC funziona solo con stazioni radio con compressione del livello audio.
Prune (Elimina)
Consente di rimuovere le stazioni non disponibili contenute nell'elenco. Le stazioni non
valide che possono essere eliminate sono contrassegnate dall'icona “?”.
Premere il tasto oppure il tasto per selezionare “No” o “Yes” (Sì), quindi premere il
tasto ENTER per annullare o confermare l'eliminazione delle stazioni non valide.
Sistema
Consultare le istruzioni fornite nella sezione “Menu di impostazione FM”.
Opmerking:
- Als er geen uitzendingen worden gevonden met de DAB/DAB+ scan, dan zal de melding
“Geen DAB-station “ op het display verschijnen.
- Voor betere ontvangst wordt aanbevolen de antenne volledig uit te strekken of de
volledige scan nogmaals uit te voeren op een andere plaats.
- Het geluid wordt tijdens het scannen naar zenders automatisch uitgeschakeld.
LUISTEREN NAAR FM RADIO
Druk in de FM-radiomodus op of om handmatig af te stemmen. Houd /
ingedrukt om automatisch te scannen.
Opmerking: Strek de draadantenne uit voor betere ontvangst.
VOORKEURSZENDER INSTELLEN
Deze radio kan 30 FM- en 30 DAB/DAB+ zenders opslaan als voorkeurszenders.
1. Stem in de FM- of DAB-modus af op de gewenste radiozender.
2. Druk op AMS om de opslagmodus voor voorkeurszenders te openen.
3. Druk op of om een kanaal te selecteren. Druk op ENTER om de zender
op te slaan. “Station X opslaan” wordt weergegeven op het display (X is het
voorkeurszendernummer).
Opmerking: Als u een voorkeurszender selecteert die nog niet is geprogrammeerd, dan zal
de tekst “Leeg” op het display worden getoond. Als de zender al eerder is geprogrammeerd,
wordt de FM-frequentie of DAB-zendernaam weergegeven.
4. Herhaal stap 1-3 om andere zenders op te slaan.
LUISTEREN NAAR VOORKEURSZENDERS
Druk op SOURCE om de FM- of DAB/DAB+ band te selecteren. Druk op PRE+ de
gewenste zender te selecteren. Stel het volume naar wens in met behulp van VOL+ en
VOL-.
INSTELLINGENMENU
Druk in de FM- of DAB/DAB+ modus MENU om het instellingenmenu te openen. Druk op
of om een optie te selecteren en de instellingen aan te passen, druk vervolgens
ter bevestiging ENTER.
Opmerking: Als u instellingen maakt in het menu, druk dan op MENU om terug te keren
naar de voorgaande stap.
Instellingenmenu FM
Scaninstelling
Alle stations: de automatisch scanfunctie zoekt naar alle beschikbare zenders.
Alleen sterke stations: de automatische scanfunctie zoekt alleen naar zenders met een
sterk signaal.
Audio-instelling
Om een keuze te maken uit “Stereo toegestaan” en “Alleen mono” voor FM-radio.
Systeem
Om systeemopties te selecteren: Tijd, Talen, Fabrieksreset, SW-versie (softwareversie).
• Tijd
** Tijd/datum instellen:
Hiermee kunt u de datum (DD/MM/JJ) en tijd instellen. Raadpleeg voor het instellen van de
datum en tijd de instructies in de paragraaf ‘INSTELLEN TIJD EN DATUM’.
** Autom. bijwerken (Automatisch bijwerken)
Update alles: tijd bijwerken met behulp van FM of DAB/DAB+.
Update van DAB: tijd bijwerken met behulp van DAB/DAB+
Update van FM: tijd bijwerken met behulp van FM.
Geen update: toon de tijd die is ingesteld in de systeeminstellingen.
** 12/24 uur instellen
Tijdnotatie instellen:12/24-uursweergave voor klok
** Datumnotatie instellen
De datumnotatie instellen op DD-MM-JJJJ of MM-DD-JJJJ
• Talen
Om de taal waarin de menu’s worden weergegeven te selecteren: Français, English,
German en Dutch.
• Fabrieksreset
Om de fabrieksinstellingen te herstellen.
• SW-versie (softwareversie)
Om de huidige softwareversie te bekijken.
Instellingenmenu DAB
Volledige scan
Door gebruik te maken van deze functie kunt u een automatische scan uitvoeren en een
lijst maken van DAB/ DAB+-zenders die ontvangen kunnen worden.
Handm. afstmmn. (Handmatig afstemmen)
Deze functie kan worden gebruikt om te assisteren bij het positioneren van de antenne
van de radio, of om nauwkeurig af te stemmen op een speciek kanaal of een specieke
frequentie.
Druk op of om <Handm. afstmmn.> te selecteren en druk ter bevestiging op
ENTER. Druk op of om de gewenste frequentie te selecteren en druk op ENTER
om op de geselecteerde frequentie af te stemmen.
DRC (Dynamic range compression)
DRC kan zachte geluiden eenvoudiger hoorbaar maken wanneer het apparaat wordt
gebruikt in een lawaaiige omgeving.
Druk op of om het gewenste DRC-niveau te selecteren: DRC uit, DRC hoog, DRC
laag. Druk ter bevestiging op ENTER.
DRC uit - geen compressie. Dit is de standaardinstelling.
DRC hoog - maximale compressie
DRC laag - gemiddelde compressie.
Opmerking: DRC wordt alleen gebruikt bij DRC-uitzendingen.
Inkorten (Niet-beschikbare zenders verwijderen)
Verwijder zenders die in de lijst voorkomen maar niet langer beschikbaar zijn. Deze functie
kan alle ongeldige zenders, deze worden in de zenderlijst weergegeven met een “?” voor
de zendernaam, verwijderen.
Druk op of om “Nee” of “Ja” te selecteren en druk daarna op ENTER om het
verwijderen van alle niet-beschikbare zenders te bevestigen of annuleren.
Systeem
Zie handelingen in het gedeelte “Instellingenmenu DAB”.
LUISTEREN NAAR DAB/DAB+ RADIO
Druk wanneer het apparaat is ingeschakeld herhaaldelijk op SOURCE om het DAB-
pictogram te selecteren.
De eerste keer dat u de radio gebruikt, of wanneer de zenderlijst leeg is, voert de radio
automatisch een volledige scan uit om te zien welke zenders beschikbaar zijn. Het display
toont de melding “Scannen……” en er wordt een voortgangsbalk getoond die de voortgang
van de scan weergeeft. Daarnaast wordt het aantal zenders dat is gevonden tijdens de
scan getoond.
Het is ook mogelijk dat u om een van de volgende redenen handmatig een scan moet
starten om de lijst met zenders bij te werken:
- Er kunnen van tijd tot tijd nieuwe zenders beschikbaar komen.
- Zenders in de buurt kunnen niet langer worden ontvangen (ongeldige zenders worden in
de zenderlijst met een vraagteken voor hun naam aangegeven).
- Als de ontvangst bij het uitvoeren van de oorspronkelijke scan niet goed was (bijvoorbeeld
omdat de antenne niet was uitgestrekt), kan dit resulteren in een lege of onvolledige lijst
met beschikbare zenders.
- Als de ontvangst voor sommige zenders slecht is en het geluid regelmatig wordt
onderbroken, is het mogelijk alleen zenders met een goede signaalsterkte op te nemen
in de lijst.
U kunt een volledige scan uitvoeren door op MENU te drukken om het instellingenmenu te
openen, druk op of om <Volledige scan> te selecteren en vervolgens op ENTER
te drukken om de scan uit te voeren.
Zodra de scan is voltooid, keert de radio terug naar de eerder geselecteerde zender of de
eerste zender uit de zenderlijst.
Selecteer een zender met / , en druk vervolgens ter bevestiging op ENTER op
het apparaat.
1. Conecte su fuente auxiliar (p. ej. reproductor mp3) a la entrada AUX IN (cable no
incluido).
2. Pulse SOURCE repetidamente para seleccionar el modo Aux in. En el display se
mostrará “AUX”.
3. Empiece la reproducción de su fuente auxiliar.
4. Ajuste el volumen al nivel deseado.
5. Desconecte su fuente auxiliar de la entrada AUX IN.
1. Collegare la sorgente ausiliaria (ad es. lettore mp3) al jack AUX IN (cavo non fornito).
2. Premere più volte il tasto SOURCE per selezionare la modalità AUX in. Sul display viene
visualizzata la dicitura “AUX”.
3. Iniziare la riproduzione dalla fonte esterna.
4. Regolare il volume sul livello desiderato.
5. Per arrestare la riproduzione, scollegare la sorgente ausiliaria dal jack AUX IN.
1. Sluit uw hulpapparaat (bijv. mp3-speler) aan op de AUX IN (kabel niet meegeleverd).
2. Druk herhaaldelijk op SOURCE om de Aux in-modus te selecteren. Het display toont
de melding “AUX”.
3. Start het afspelen van uw hulpbron.
4. Stel het geluidsvolume in op het gewenste niveau.
5. Om het afspelen te stoppen, trekt u de externe audiobron uit de AUX IN aansluiting.
Cuando la unidad esté encendida. para quedarse dormido escuchando música, pulse
repetidamente SLEEP para seleccionar 120-110-100-90-80-70-60-50-40-30-20-10-05
minutos de escucha. La unidad se apagará automáticamente una vez haya transcurrido el
tiempo especicado. Para cancelar la función de apagado automático, pulse repetidamente
el botón SLEEP, El icono del temporizador de apagado automático desaparecerá.
Con l’apparecchio in funzione, per addormentarsi ascoltando la musica, premere più volte
il tasto SLEEP per selezionare un intervallo di ascolto tra 120-110-100-90-80-70-60-50-40-
30-20-10-05 minuti. L’unità si spegne in automatico all’intervallo specicato. Per disattivare
la funzione Sleep, premere più volte il tasto SLEEP no a quando non viene l’icona
si spegnerà.
Als het apparaat is ingeschakeld. Om in slaap te vallen met de muziek, herhaaldelijk op
SLEEP om de resterende luistertijd in te stellen op 120-110-100-90-80-70-60-50-40-30-
20-10-05 minuten. Het apparaat zal automatisch uitschakelen nadat de geselecteerde
tijd is verstreken. Druk om de slaapfunctie te annuleren herhaaldelijk op SLEEP tot het
slaappictogram wordt niet langer weergegeven.
1. Pulse el botón para encender el aparato.
2. Mantenga pulsado el botón de la unidad o pulse brevemente el botón del mando a
distancia para apagar la unidad.
3. La función (FM/ DAB/ CD/ USB/ BLUETOOTH/ AUX IN) se puede seleccionar pulsando el
botón SOURCE repetidamente.
Con el objetivo de ahorrar energía, cuando la reproducción haya alcanzado el nal o el
volumen se encuentre a un nivel muy bajo y no se use ningún control en el dispositivo por un
periodo de 15 minutos, la unidad pasará al modo de espera automáticamente.
VOLUME
Gire la manecilla del volumen en la unidad o pulse los botones VOL+/- en el mando a distancia
para ajustar el sonido a un nivel agradable. El nivel de volumen se mostrará unos segundos.
STUMMSCHALTEN DER TONAUSGABE
Wenn das Gerät eingeschaltet ist, betätigen Sie die MUTE -Taste, um die Tonausgabe
auszuschalten. Betätigen Sie die Taste erneut, um die Tonausgabe wieder zu zu aktivieren.
ECUALIZADOR
Mantenga pulsado el botón EQ en la unidad o pulse repetidamente el botón EQ en el mando a
distancia para saltar entre los distintos efectos de sonido: FLAT, ROCK, POP, JAZZ, CLASSIC
(CLÁSICO), BASS (GRAVES). La selección se mostrará en el display durante unos segundos.
1. Premete il tasto per accendere l’apparecchio.
2. Tenere premuto il tasto sull'apparecchio o premere brevemente il tasto sul
telecomando per spegnere l'apparecchio.
3. Per selezionare una modalità (FM/ DAB/ CD/ USB/ BLUETOOTH/ AUX IN), premere
più volte il tasto SOURCE.
Per risparmiare energia, al termine della riproduzione oppure quando il volume è impostato
al minimo e nell'arco di 15 minuti non viene eseguita nessuna operazione, l'apparecchio
passa in automatico alla modalità di Standby.
VOLUME
Ruotare la manopola del volume sull’unità o premere i tasti VOL+/- sul telecomando per
regolare l’audio secondo le proprie preferenze. Il livello del volume verrà mostrato per
alcuni secondi.
DISATTIVAZIONE DELL’AUDIO
Per disattivare l’audio premere il tasto MUTE quando l’apparecchio è acceso. Premere il
tasto di nuovo per riattivare l’audio.
EQUALIZZATORE
Tenere premuto il tasto EQ sull’unità o premere ripetutamente il tasto EQ sul telecomando
ripetutamente per passare tra i diversi eetti sonori FLAT, ROCK, POP, JAZZ, CLASSIC o
BASS. La selezione verrà mostrata per qualche secondo sul display.
1. Druk op de toets om het toestel in werking te zetten.
2. Druk lang op op het apparaat of druk kort op op de afstandsbediening om het
apparaat uit te schakelen.
3. De functie (FM/ DAB/ CD/ USB/ BLUETOOTH/ AUX IN) kan worden geselecteerd door
herhaaldelijk op SOURCE te drukken.
Om energie te besparen zal het apparaat automatisch naar de standbymodus schakelen
wanneer het afspelen het eindpunt heeft bereikt of het volume is ingesteld op een zeer laag
niveau en het apparaat niet wordt gebruikt voor een periode van 15 minuten.
VOLUMEREGELING
Draai aan de volumeknop op het apparaat of druk op VOL+/- op de afstandsbediening om
het volume op een comfortabel niveau in te stellen. Het volumeniveau wordt een aantal
seconden weergegeven.
HET GELUID DEMPEN
Druk als het apparaat is ingeschakeld kort op de toets MUTE om het geluid te dempen.
Druk nogmaals op de toets om de geluidsweergave te hervatten.
Equalizermodi
Houd EQ op het apparaat ingedrukt of druk herhaaldelijk op EQ op de afstandsbediening
om tussen de verschillende geluidseecten te schakelen VLAK, ROTS, POP, JAZZ,
KLASSIEK en BASS. De selectie wordt voor een paar seconde op het display getoond.
1. Pulse el botón para encender el aparato.
2. Pulse el botón SOURCE para seleccionar la función CD.
3. Levante la bandeja del disco.
4. Introduzca el disco en el compartimento, con la cara impresa orientada hacia arriba y
cierre la tapa.
5. La reproducción comenzará automáticamente pasados unos segundos.
Reproducción normal
Reproducción/ Pausa
Para detener la reproducción temporalmente, pulse el botón . Para reanudar la
reproducción, pulse de nuevo este botón.
DETENCIÓN
Pulse ligeramente el botón para dejar de reproducir. El número total de pistas se
mostrará en el display.
Selección de un archivo
1. Pulse una vez el botón para pasar al a pista siguiente o pulse varias veces para
saltar varias pistas.
2. Pulse una vez el botón para retroceder al comienzo de la pista que se esté
reproduciendo o pulse varias veces para retroceder a las pistas anteriores.
Búsquedarápidahaciadelante/atrás
Mantenga pulsado el botón / . El disco/ USB buscará hacia delante o hacia atrás a
alta velocidad. La reproducción a velocidad normal se recuperará cuando suelte el botón.
SELECCIONAR UNA CARPETA (SÓLO MP3)
Pulse el botón ALBUM para seleccionar la primera pista de la siguiente carpeta de su
disco o USB actual.
Nota: El icono de MP3 se encenderá durante la reproducción de archivos mp3.
1. Premete il tasto per accendere l’apparecchio.
2. Premere il tasto SOURCE per selezionare la funzione CD.
3. Sollevare l’alloggiamento del disco.
4. Inserite un disco nello scomparto, con il lato stampato rivolto verso l’alto, Richiudere
lo sportello.
5. La riproduzione inizia automaticamente dopo alcuni secondi.
Operazioni di riproduzione di base
Riproduzione/ pausa
Per sospendere temporaneamente la riproduzione, premete il tasto . Per riprendere la
riproduzione, premete di nuovo il tasto .
ARRESTO
Premere il tasto per fermare la riproduzione. Sul display viene visualizzato il numero
totale delle tracce.
Selezionediunle
1. Premere una volta il tasto per passare alla traccia successiva oppure premete
ripetutamente per saltare più tracce.
2. Premere una volta il tasto per tornare all’inizio della traccia in corso o premete
ripetutamente per tornare alle tracce precedenti.
Riavvolgimento/ Avanzamento rapido
Tenere premuto il tasto Precedente/ Successivo ( / ). L'apparecchio avvia il
riavvolgimento o l'avanzamento rapido delle tracce contenute nel CD/ nella periferica USB.
Rilasciare il tasto per riprendere la normale riproduzione.
Selezionare una cartella (solo per MP3)
Premere il tasto ALBUM per selezionare il primo brano della cartella successiva del
dispositivo USB o del disco corrente.
Osservazione: L’icona MP3 si accende durante la riproduzione di un le mp3.
1. Druk op de toets om het toestel in werking te zetten.
2. Druk op de knop SOURCE op de afstandsbediening om de CD-functie te selecteren.
3. Til de disclade op.
4. Breng de disk in het diskcompartiment met de bedrukte zijde langs boven, en sluit de
CD-deur
5. Het afspelen start automatisch na een paar seconden.
Normale weergave
Afspelen/ Pauzeren
Druk om het afspelen tijdelijk te stoppen op . Druk om het afspelen te hervatten
nogmaals op de knop.
STOPPEN
Druk kort op om het afspelen te stoppen. Het totaal aantal tracks wordt getoond op
het display.
Selectie van een bestand
1. Druk eenmaal op de toets om naar de volgende track te gaan of druk meermaals
om verschillende tracks verder tegaan.
2. Druk eenmaal op de toets om terug te keren naar het begin van de huidigetrack of
druk meermaals om terug te keren naar de vorige tracks.
Vooruit-/ terugspoelen
Houd de toets / ingedrukt om vooruit/ terug te spoelen. Het afspelen met normale
snelheid zal worden hervat wanneer u de knop loslaat.
EEN MAP SELECTEREN (ALLEEN MP3)
Druk op de toets ALBUM om de eerste track van de volgende map op uw huidige disc of
USB-stick te selecteren.
Opmerking: Het MP3-pictogram licht op tijdens het afspelen van MP3-bestanden.
1. Pulse el botón para encender el aparato.
2. Introduzca un dispositivo USB en el puerto USB del aparato.
3. Pulse el botón SOURCE para seleccionar el modo USB. La reproducción iniciará
automáticamente.
Notas:
- El número total de archivos MP3 en el dispositivo USB no deberá exceder los 999.
- El dispositivo USB no podrá contener más de 99 directorios.
- El tiempo de lectura llevará unos segundos o más, dependiendo de la cantidad de archivos
MP3 y carpetas en el dispositivo USB.
- Introduzca sólo dispositivos USB en el puerto USB. En caso contrario, podría dañar el aparato.
- No conecte el puerto USB directamente a un ordenador: podría dañar el aparato.
- En el mercado pueden encontrarse numerosos modelos de dispositivos USB y de
reproductores MP3. No podemos garantizarle que este aparato sea compatible con todos los
formatos. En caso de que su dispositivo USB no funcione, utilice otro.
Pulse el botón MODE repetidamente para seleccionar distintos tipos de modo de reproducción
con la secuencia siguiente:
Para CDs de audio: Repetir una Repetir todas Aleatorio Normal
Para archivos MP3: Repetir una Repetir todas Repetir carpeta Aleatorio Normal
Repeat one (Repetir una) – Para repetir la pista en reproducción.
Repeat All (Repetir todas) – Para repetir todas las pistas.
Repeat Album (Repetir álbum) – Para repetir todas las pistas de un álbum/carpeta.
Random (Aleatorio) – todas las pistas se reproducirán en orden aleatorio.
Normal – reproducción de las pistas secuencialmente.
Reproducción programada (solo modo CD/ MP3)
1. En modo de parada, pulse el botón AMS. El display mostrará “ 01”.
2. Presione el botón ALBUM (álbum) para seleccionar la carpeta deseada y presione /
para seleccionar la pista deseada.
3. Pulse el botón AMS para conrmar.
4. Repita los pasos anteriores para programar hasta un total de 20 pistas para un CD y 99
para MP3.
5. Pulse el botón para iniciar la reproducción programada.
6. Presione el botón una vez para detener la reproducción programada.
7. Para cancelar la reproducción programada, presione el botón dos veces. El indicador
“ ” se apagará.
Premere più volte il tasto MODE per selezionare una modalità di riproduzione nell'ordine
indicato a continuazione.
Per CD audio: Ripeti una Ripeti tutte Casuale Normale
Per le MP3: Ripeti una Ripeti tutte Ripeti cartella Casuale Normale
Repeat one (Ripeti una): consente di ripetere la traccia corrente.
Repeat All (Ripeti tutte): consente di ripetere tutte le tracce.
Repeat Album (Ripeti album): consente di ripetere tutte le tracce di un album/ una cartella.
Random (Casuale): consente la riproduzione casuale di tutte le tracce.
Normal (Normale): consente la riproduzione delle tracce secondo la normale sequenza.
Riproduzione programmata (solo in modalità CD/ MP3)
1. In modalità STOP, premere il tasto AMS. Il display mostrerà “ 01”.
2. Premere il tasto ALBUM per selezionare la cartella desiderata e premere / per
selezionare il brano desiderato.
3. Premete il tasto AMS per confermare.
4. Ripetere gli stessi passaggi per programmare no a un massimo di 20 tracce per i CD
e 99 tracce per i lettori MP3.
5. Premete il tasto per avviare la riproduzione.
6. Premere una volta il tasto per fermare la riproduzione programmata.
7. Per cancellare la riproduzione programmata, premere due volte il tasto . Si accende
l’indicatore “ ”.
Druk herhaaldelijk op de toets MODE om een van de verschillende afspeelmodi in de
volgende volgorde te selecteren.
Voor Audio CD’s: Herhaal één Herhaal alle Willekeurige volgorde Normaal
Voor MP3-bestanden: Herhaal één Herhaal alle Herhaal map Willekeurige
volgorde Normaal
Repeat one (Herhaal één) – Herhaal de track die wordt afgespeeld.
Repeat All (Herhaal alle) – Herhaal alle tracks.
Repeat Album (Herhaal Album) – Herhaal alle tracks op het gehele album/ in de gehele
map.
Random (Willekeurige volgorde) – alle tracks worden in willekeurige volgorde afgespeeld.
Normal (Normaal) – de tracks worden in de normale volgorde afgespeeld.
Geprogrammeerde weergave (alleen in CD-modus)
1. Druk als het afspelen gestopt is op de AMS toets op. Het display toont “ 01”.
2. Druk op ALBUM om de gewenste map te selecteren en druk op / om de
gewenste track te selecteren.
3. Druk ter bevestiging op AMS.
4. Herhaal de bovenstaande stappen om tot 20 tracks voor CD’s en tot 99 tracks voor
MP3’s te programmeren.
5. Druk op de toets om het geprogrammeerd afspelen te starten.
6. Druk één keer op om het afspelen van het programma te stoppen.
7. Als u het geprogrammeerd afspelen wilt annuleren, druk twee keer op . De “ ”
indicator zal nu uitschakelen.
• En algunos dispositivos como computadoras, una vez realizado el emparejamiento,
debe seleccionar la unidad del menú Bluetooth y elegir "Use as Audio Device (stereo) or
similar" (utilizar como dispositivo de audio (estéreo) o similar).
• El emparejamiento permanece intacto cuando la unidad y/o su dispositivo Bluetooth sale
del rango de comunicación. Se restablecerá una conexión activa cuando su dispositivo
Bluetooth vuelva dentro del rango.
• Cuando vuelva a encender la unidad, se intentará la reconexión automática con el
dispositivo Bluetooth al que se haya emparejado más recientemente.
Utilizar un dispositivo Bluetooth
1. Con alguna unidad emparejada (ver la sección anterior), haga funcionar su dispositivo
Bluetooth. El sonido se escuchará a través de los altavoces M-50 DBT.
2. Oprima el botón para pausar la reproducción. Presione nuevamente para retomar
la reproducción.
3. Seleccione la pista que desee con / .
4. Ajuste el volumen con los botones de VOL+ / VOL-. También puede ajustar el volumen
en el dispositivo con el cual está emparejado.
Por la presente, NEW ONE S.A.S declara que el «MUSE M-50 DBT» cumple con los
requerimientos esenciales y otras provisiones aplicables de la Directiva 2014/53/EU. La
declaración de conformidad podrá consultarse en www.muse-europe.com.
Los logos y nombres Bluetooth® son marcas registradas que pertenecen a Bluetooth SIG, Inc.
y cualquier uso de dichas marcas por parte de New One S.A.S tiene sus respectivas licencias.
Otras marcas comerciales y registradas son propiedad de sus respectivos propietarios.
1. Cuando la unidad esté encendida, pulse el botón SOURCE de la unidad repetidamente para
seleccionar el modo Bluetooth. El display mostrará “Bluetooth”. El indicador de Bluetooth
comenzará a parpadear rápidamente.
2. En el dispositivo Bluetooth, habilite Bluetooth y seleccione “M-50 DBT” de la lista de
dispositivos. (Para obtener el detalle de operaciones para conectarse, consulte el manual de
usuario del dispositivo). Si el dispositivo Bluetooth le solicita una contraseña de acceso, utilice
“0000”. Algunos dispositivos Bluetooth le indicarán que acepte la conexión. Parada indicador
de Bluetooth a parpadear cuando el emparejamiento se haya realizado exitosamente.
Sugerencia: si desea conectar su altavoz Bluetooth a otro dispositivo de audio Bluetooth, debe
desconectar el dispositivo actual primero y seguir los pasos descritos anteriormente para hacer
una conexión nueva.
Si el emparejamiento falla, realice lo siguiente:
Pulse el botón AMS/ MODE, hasta que el indicador de Bluetooth parpadee rápidamente
para ingresar al modo de emparejamiento. En el dispositivo Bluetooth, habilite Bluetooth y
seleccione“M-50 DBT” de la lista dedispositivos (ver el paso 2 más arriba).
Il marchio denominativo Bluetooth® e i relativi loghi sono marchi registrati di Bluetooth
SIG, Inc., utilizzati da New One S.A.S su licenza. Altri marchi e nomi commerciali sono di
proprietà dei rispettivi titolari.
1. Da apparecchio acceso, per selezionare la modalità Bluetooth premere più volte il
tasto SOURCE sull'apparecchio. Sul display viene visualizzata la dicitura “Bluetooth”.
L'indicatore del Bluetooth inizia a lampeggiare rapidamente.
2. Attivare la funzione Bluetooth sul proprio dispositivo Bluetooth e selezionare “M-50 DBT”
dall’elenco dei dispositivi rilevati (consultare il manuale di istruzioni del dispositivo per
informazioni dettagliate su come connettere il dispositivo). Se il dispositivo Bluetooth
richiede la digitazione di una password, inserire “0000”. Alcuni dispositivi Bluetooth
richiedono di accettare la connessione. La scritta smette di lampeggiare una volta
stabilita la connessione.
Nota: se si desidera connettere l’altoparlante Bluetooth a un altro dispositivo Bluetooth
è necessario prima disconnettere il dispositivo corrente, quindi seguire i passaggi sopra
indicati per stabilire una nuova connessione.
Se l’associazione non riesce:
Per accedere alla modalità di associazione premuto il tasto AMS/ MODE no a quando
l’indicatore Bluetooth non lampeggia rapidamente. Attivare la funzione Bluetooth sul
proprio dispositivo Bluetooth e selezionare “M-50 DBT” dall’elenco dei dispositivi rilevati
(vedi punto 2).
• Su alcuni dispositivi, come ad esempio computer, una volta associato il dispositivo è
necessario selezionare l’unità dal menu Bluetooth, quindi selezionare l’opzione “Utilizza
come dispositivo audio (stereo)” o similare.
• L’associazione rimane attiva quando l’unità e/o il dispositivo Bluetooth escono dal raggio
d’azione del Bluetooth. Una connessione attiva viene ristabilita quando il dispositivo
rientra nel raggio d’azione del Bluetooth.
• Una volta riaccesa, l’unità tenta in automatico di riconnettersi all’ultimo dispositivo
Bluetooth associato.
Utilizzo di un dispositivo Bluetooth
1. Una volta associata l’unità a un dispositivo (vedi sezione precedente) l’audio del
dispositivo Bluetooth viene riprodotto mediante l’altoparlante.
2. Premere il tasto per sospendere la riproduzione. Premerlo di nuovo per riprendere
la riproduzione.
3. Utilizzare i tasti / per selezionare la traccia desiderata.
4. Regolare il volume utilizzando i tasti VOL+ / VOL-. È possibile regolare il volume anche
dal dispositivo a cui l’unità è associata.
Con la presente, NEW ONE S.A.S dichiara che «MUSE M-50 DBT» è conforme ai requisiti
essenziali e alle altre disposizioni fondamentali della direttiva 2014/53/EU. La dichiarazione
di conformità è consultabile alla pagina www.muse-europe.com.
De Bluetooth® markering en de logo’s zijn geregistreerde handelsmerken die eigendom zijn
van Bluetooth SIG, Inc. en het gebruik van deze markeringen door New One S.A.S is onder
licentie. Andere handelsmerken en handelsnemen zijn van hun respectieve eigenaars.
1. Druk wanneer het apparaat is ingeschakeld, druk herhaaldelijk op SOURCE op
het apparaat om de Bluetooth-modus te selecteren. Het display zal “Bluetooth”. De
Bluetooth-indicator zal snel beginnen te knipperen.
2. Schakel Bluetooth in op het Bluetooth-apparaat en selecteer “M-50 DBT” uit de lijst met
apparaten. (Kijk in de handleiding van het apparaat waarmee u verbinding wilt maken
voor gedetailleerde instructies.) Als het Bluetooth-apparaat vraagt om een wachtwoord,
voer dan “0000” in. Sommige Bluetooth-apparaten zullen u vragen de verbinding te
accepteren. Bluetooth-indicator stopt met knipperen als er succesvol is gekoppeld.
Tip: Als u uw Bluetooth-luidspreker wilt verbinden met een andere Bluetooth-audioapparaat,
dan moet u de verbinding met het huidige apparaat verbreken en de bovenstaande stappen
volgen om een nieuwe verbinding op te zetten.
Als het koppelen mislukt, volg dan de volgende stap:
Druk één keer op AMS/ MODE tot de Bluetooth-indicator snel knippert om naar de
koppelmodus te schakelen. Schakel Bluetooth in op het Bluetooth-apparaat en selecteer
“M-50 DBT” uit de lijst met apparaten (zie stap 2 hierboven).
• Op bepaalde apparaten, zoals computers, moet u, zodra er is gekoppeld, het apparaat
selecteren in het Bluetooth-menu en de optie “Gebruik als audioapparaat (stereo)” (of een
soortgelijke optie) gebruiken.
• De verbinding blijft intact wanneer de luidspreker en/of uw Bluetooth-apparaat buiten het
communicatiebereik wordt verplaatst. Er wordt opnieuw een actieve verbinding gemaakt
wanneer uw Bluetooth-apparaat terugkeert binnen het bereik.
• Als het apparaat weer wordt ingeschakeld, dan zal het automatisch proberen opnieuw
verbinding te maken met het Bluetooth-apparaat waarmee het laatst werd gekoppeld.
Een Bluetooth-apparaat gebruiken
1. Als u verbinding heeft gemaakt met een apparaat (zie voorgaande paragraaf), gebruik
dan de bediening op uw Bluetooth-apparaat en wanneer het afspelen wordt gestart, dan
zal het geluid uit de luidsprekers van de M-50 DBT klinken.
2. Druk op om het afspelen te pauzeren. Druk nogmaals om het afspelen te hervatten.
3. Selecteer de gewenste track met / .
4. Stel het volume in met behulp van de volumetoetsen. U kunt het volume ook instellen op
het apparaat dat is verbonden met de luidspreker.
Hierbij verklaart NEW ONE S.A.S dat deze “MUSE M-50 DBT” voldoet aan de essentiële
eisen en andere relevante bepalingen uit richtlijn 2014/53/EU. De verklaring van conformiteit
kan worden geraadpleegd op www.muse-europe.com
PORTA USB
AFSPELEN VANAF USB
Nota:
- Il numero totale di le MP3 contenuti nel dispositivo USB non deve essere superiore a 999.
- Il numero di directory contenute nel dispositivo USB non deve essere superiore a 99.
- Il tempo di lettura può variare a seconda del numero di le MP3 o di cartelle contenuti nel
dispositivo USB.
- Inserite esclusivamente periferiche USB nello slot corrispondente. Inserire altri oggetti
rischia di danneggiare l’apparecchio.
- La porta USB non deve essere direttamente collegata ad un PC, in quanto ciò potrebbe
danneggiare l’apparecchio.
- Sul mercato esistono numerosi modelli di periferiche USB e di lettori MP3. Non è possibile
garantire la compatibilità con tutti i formati. Qualora un modello di periferica USB non sia
compatibile, provate con un altro.
1. Premete il tasto per accendere l’apparecchio.
2. Collegate la periferica USB alla porta USB dell’apparecchio.
3. Premere il tasto SOURCE sul telecomando per selezionare la funzione USB. La
riproduzione si attiverà automaticamente.
1. Druk op de toets om het toestel in werking te zetten.
2. Sluit de USB-randapparatuur aan op de USB-poort van het toestel.
3. Druk op de toets SOURCE op om de USB-modus te selecteren. Na een paar seconden,
Het afspelen start automatisch.
Opmerkingen:
- Het totaal aantal MP3-bestanden op het USB-apparaat mag niet groter zijn dan 999.
- Het USB-apparaat mag niet meer dan 99 mappen bevatten.
- Het inlezen van de bestanden duurt een paar seconden of langer, afhankelijk van het
aantal MP3-bestanden en mappen op het USB-apparaat.
- Teek niets anders dan USB-randapparatuur in de hiertoe voorziene poort. U riskeert het
toestel te beschadigen.
- De USB-poort mag niet rechtstreeks aangesloten worden op een computer: dit kan het
toestel beschadigen.
- Er bestaan verschillende USB-sleutels en MP3-spelers op de markt. Wij kunnen niet
garanderen dat het toestel compatibel is met alle formaten. Gebruik daarom een andere
USB-drager indien uw USB-drager niet werkt.
-
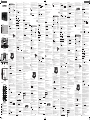 1
1
-
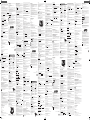 2
2


in altre lingue
- français: Muse M-50 DBT Manuel utilisateur
- español: Muse M-50 DBT Manual de usuario
- Deutsch: Muse M-50 DBT Benutzerhandbuch
- Nederlands: Muse M-50 DBT Handleiding
- português: Muse M-50 DBT Manual do usuário
Documenti correlati
-
Muse M-70 DBT Manuale utente
-
-
-
-
Muse M-695 DBT Manuale utente
-
Muse M-1380 DBT Manuale utente
-
-
Muse M-80 DJ Manuale utente
-
-
Muse M-38 BT Manuale utente