
www.roadstar.com
RU-275
Portable Audio System
User manual
Bedienungsanleitung
Manuel d’instructions
Manuale d’istruzioni
Manual de instrucciones
Manual de instruҫões
Gebruiksaanwijzing
Návod k použití
Návod na použitie
Εγχειρίδιο χρήσης

INDEX
English Page 1
Deutsch Seite 5
Français Page 9
Italiano Pagina 13
Español Página 17
Portugues Pagina 21
Nederlands Pagina 25
Čeština Strana 29
Slovenský Strana 33
Greek σελίδα 37
Your new unit was manufactured and assem-
bled under strict ROADSTAR quality control.
Thank you for purchasing our product for your
music enjoyment. Before operating the unit,
please read this instruction manual carefully.
Keep it also handy for further future referen-
ces.
Votre nouvel appareil a été fabriqué et monté
en étant soumis aux nombreaux tests ROAD-
STAR. Nous espérons que cet appareil vous
donnera entière satisfaction. Avant de vous
adonner à ces activités, veuillez lire attentive-
ment ce manuel d’instructions. Conservez-le à
portée de main à fin de référence ultérieure.
Vuestro nuevo sistema ha sido construido
según las normas estrictas de control de cali-
dad ROADSTAR. Le felicitamos y le damos
las gracias por su elección de este aparado.
Por favor leer el manual antes de poner en
funcionamiento el equipo y guardar esta docu-
mentación en case de que se necesite nueva-
mente.
Ihr neues Gerät wurde unter Beachtung der
strengen ROADSTAR Qualitätsvorschriften ge-
fertigt. Wir danken Ihnen für den Kauf unseres
Produktes und wünschen Ihnen optimalen Hör-
genuss. Bitte lesen Sie diese Bedienungsanlei-
tung durch, und heben Sie sie auf, um jederzeit
darin nachschlagen zu können.
Il vostro nuovo apparecchio é stato prodotto ed
assemblato sotto lo stretto controllo di qualità
ROADSTAR. Vi ringraziamo di aver acquistato
un nostro prodotto per il vostro piacere d’ascol-
to. Prima di procedere all'utilizzo dell'apparec-
chio, leggete attentamente il manuale d’istruzio-
ni e tenetelo sempre a portata di mano per futuri
riferimenti.
Seu novo aparelho foi construido e montado sob
o estrito controle de qualidade da ROADSTAR.
Agradecemos por ter comprado nosso produto
para a sua diversão. Antes de usar esta unidade
é necessário ler com atençâo este manual de
instruções pare que possa ser usada apropria-
damente; mantenha o manual ao seu alcance
para outras informações.

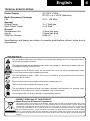
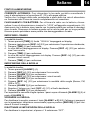
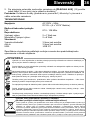
RU-275
TOP
REAR

1 English
LOCATION OF CONTROLS
1. POWER / SOURCE BUTTON
2. SKIP - / TUNE -
3. SKIP + / TUNE +
4. VOLUME - / ALARM 1
5. VOLUME + / ALARM 2
6. TIME / MEM / PLAY MODE
7. PLAY-PAUSE
8. STOP
9. SNOOZE
10. USB PORT
11. SD CARD SOCKET
12. AUX-IN SOCKET
13. HEADPHONES OUT
14. ANTENNA
15. AC PLUG
16. BATTERY COMPARTMENT
PRECAUTION
INSTRUCTIONS - All the safety and operating instructions should be read before the
radio is operated. The manual should be retained for future reference.
HEED WARNINGS - All warnings on the appliance and in the operating instructions
should be adhered to.
WATER AND MOISTURE - The appliance should not be used near liquids or in rooms
with a high level of humidity.
VENTILATION - The appliance should be situated so that its location or position does
not interfere with its proper ventilation.
HEAT - The appliance should be situated away from heat sources such as radiators,
stoves or other appliances that produce heat.
POWER SOURCE - The radio should be connected to power supply only of the type
described in the operating instructions or as marked on the appliance.
POWER CORD PROTECTION - Power supply cords should be routed so that they are
not likely to be walked on or pinched by items placed upon/against them.
OBJECT AND LIQUID ENTRY - Care should be taken so that objects do not fall and
liquids are not spilled into the enclosure through openings.
DAMAGE REQUIRING SERVICE
The appliance should be serviced by qualified service personnel when:
- The power supply cord or plug has been damaged;
- Objects have fallen into or liquids has been spilled into the radio;
- The appliance has been exposed to rain;
- The appliance has been dropped or the enclosure damaged;
- The appliance does not appear to operate normally.
SERVICING - The user should not attempt to service the appliance beyond that descri-
ve in the user operating instructions. All the servicing should be referred to qualified
service personnel
Note: If the display does not function properly or no reaction to operation of any con-
trol may due to the electrostatic discharge. Switch off and disconnect the AC cord and remo-
ve all the batteries, then turn the power back on after a few seconds.

2 English
POWER SOURCES
AC POWER: You can power your portable stereo system by plugging the AC po-
wer cord into the AC plug (15) at the back of the unit and into a wall AC power outlet.
Check that the rated voltage of your appliance matches your local voltage.
Make sure that the AC power cord is fully inserted into the appliance.
BATTERY POWER: To use the radio with batteries, disconnect the AC power cord
and insert 6 × “LR14” batteries into the compartment (16).
Be sure that the batteries are inserted correctly to avoid damage to the appliance.
Remove the batteries when the radio will not be used for a long period of time, as this
will cause leakage to the batteries and subsequently damage to your radio.
CLOCK SETTING
In stand-by mode:
1. Press and hold the [TIME] button (6) until the display shows "12/24 Hr";
2. Press the [SKIP -/+] buttons (2/3) to choose 12 or 24 hour format;
3. Confirm with the [TIME] button (6);
4. Press the [SKIP -/+] buttons (2/3) to adjust the hour;
5. Confirm with the [TIME] button (6);
6. Press the [SKIP -/+] buttons (2/3) to adjust the minutes;
7. Confirm with the [TIME] button (6).
ALARM SETTING
In stand-by mode:
1. Press and hold the [ALARM 1] button (4) to enter into the Alarm setting.
2. Press the [SKIP -/+] buttons (2/3) to adjust the hour;
3. Confirm with the [ALARM 1] button (4);
4. Press the [SKIP -/+] buttons (2/3) to adjust the minutes;
5. Confirm with the [ALARM 1] button (4);
6. Press the [SKIP -/+] buttons (2/3) to choose the alarm mode (Buzzer, FM, USB
or OFF);
7. Confirm with the [ALARM 1] button (4);
8. Press the [SKIP -/+] buttons (2/3) to adjust the volume;
9. Confirm with the [ALARM 1] button (4).
To set the second Alarm, repeat all steps with [ALARM 2] (5) instead of [ALARM 1].
ALARM OFF:
During Alarm on, press [ALARM 1 or 2] button (4/5) to deactivate the alarm sound
(the Alarm setting remains) or press [SNOOZE] button (9) to postpone the alarm for 9
minutes.
DEACTIVATE ALARM SETTINGS:
To remove alarm settings, at step n° 6 select “OFF”.
SLEEP TIMER
The sleep timer switches the radio off automatically after an adjustable time.
When the radio is ON:
1. Press and hold [SLEEP] (8) to access to the “SLEEP TIMER” menu;

3 English
2. Press the [SLEEP] button (8) repeatedly to set the desired timer.
Note: To remove the sleep timer repeat above steps and select “ Sleep OFF” .
TO USE THE RADIO
1. Press the [POWER] button (1) to power on the unit;
2. Select the desired audio source by pressing the [SOURCE] button (1) repeatedly;
3. (Please see detailed instructions for each Source in the following chapters);
4. Adjust the volume with the [VOLUME -/+] buttons (4/5) to the desired level;
5. Press & hold the [POWER] button (1) to turn OFF the unit.
FM RADIO OPERATION
1. Select “FM” mode by pressing the [SOURCE] button (1) repeatedly ;
2. Use the [SKIP -/+] buttons (2/3) to fine tune your desired station in a step of 0.05
MHz or press and hold the [SKIP -/+] buttons (2/3) to scan the next/previous avail-
able station.
Note: For a better reception, reorient the antenna (14).
PRESET
You can program a maximum of 30 preset radio stations.
1. Select your favourite station as explained before;
2. Press and hold [MEM] button (6). “P_ _” will appear on display;
3. Press [SKIP -/+] (2/3) to select the preset number;
4. Press [MEM] (6) to confirm.
RECALL A PRESET STATION:
1. Press the [MEM] button (6);
2. Press [SKIP -/+] (2/3) to select the preset number.
USB/SD OPERATION
1. Plug an USB stick (max. 64 GB) or an SD card into the [USB/SD PORT] (10/11);
2. The radio will automatically switch to “USB or SD” mode and playback will start
automatically from the first track.
Notes:
Some mp3 player may not be able to play via the usb socket. this is not a mal-
function of the system.
To avoid damage to USB memory, remove it only when the radio is turned off.
The USB port is not designed for charging smartphones or other devices.
REPEAT - RANDOM
Press repeatedly [PLAY MODE] button (6) to select the desired playback mode
AUX IN OPERATION
1. Select “AUX” mode by pressing the [SOURCE] button (1) repeatedly;
2. Use one male to male 3.5mm jack cable (not included) to connect any external
audio device to the [AUX-IN SOCKET] (12).
Note: Music control (play, pause, etc) must be done from your external device.

4 English
TECNICAL SPECIFICATIONS
Power Supply: AC 230V ~ 50Hz.
DC 9V = (6 x “LR14” Batteries).
Radio Frequency Coverage
FM: 87.5 - 108 MHz.
Speaker
Output Power: 2 x 1 Watt rms.
Max. Output Power: 2 x 8 Watt.
General
Headphones Out: 3.5mm jack plug.
Aux-In: 3.5mm jack plug.
USB Port Version: USB 2.0.
Specifications and design are subject to possible modifications without notice due to
improvement.
This marking shown on the product or its literature, indicates that it should not be disposed with other house-
hold wastes at the end of its working life. To prevent possible harm to the environment or human health from
uncontrolled waste disposal, please separate this from other types of wastes and recycle it responsibly to
promote the sustainable reuse of material resources. Household users should contact the retailer where
they purchased this product, or their local government office, for details of where and how they can take this
item for environmentally safe recycling. Business users should contact their supplier and check the terms
and conditions of the purchase contract. This product should not be mixed with other commercial wastes for
disposal.
CORRECT DISPOSAL OF THIS PRODUCT
(Waste Electrical & Electronic Equipment)
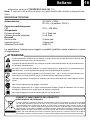
WARNINGS
The exclamation point within the triangle is a warning sign alerting the user of important instruc-
tions accompanying the product.
The lightening flash with arrowhead symbol within the triangle is a warning sign alerting the user
of “dangerous voltage” inside the unit.
To reduce the risk of electric shock, do not remove the cover. No user serviceable parts inside
the unit. Refer all servicing to qualified personnel.
This unit operates on 230V ~ 50Hz. If the unit is not used for a long period of time, remove the
plug from the AC mains.
Ensure all connections are properly made before operating the unit.
This unit must not be exposed to moisture or rain.
This unit should be positioned so that it is properly ventilated. Avoid placing it, for example, close
to curtains, on the carpet or in a built-in installation such as a bookcase.
Do not expose this unit to direct sunlight or heat radiating sources.

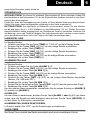
5 Deutsch
ORT DER BEDIENELEMENTE
1. POWER / SOURCE (EIN-AUS / QUELLEN-TASTE)
2. SKIP - / TUNE - (SKIP - / FREQUENZ -)
3. SKIP + / TUNE + (SKIP + / FREQUENZ +)
4. VOLUME - / ALARM 1 (LAUTSTÄRKE - / ALARM 1)
5. VOLUME + / ALARM 2 (LAUTSTÄRKE + / ALARM 2)
6. TIME / MEM / PLAY MODE (UHR / VOREINSTELLUNGEN)
7. PLAY-PAUSE
8. STOP
9. SNOOZE
10. USB-BUCHSE
11. SD-BUCHSE
12. AUX-IN-BUCHSE
13. KOPFHÖRER AUSGANG
14. ANTENNE
15. NETZSTECKER
16. BATTERIEFACH
SICHERHEITSHINWEISE
ANWEISUNGEN - Alle Sicherheits- und Betriebshinweise sollten sorgfältig durchge-
lesen werden, bevor Sie das Radio in Betrieb nehmen.
WARNHINWEISE BEACHTEN - Alle Warnhinweise am Gerät und in den Betriebs-
hinweisen sollten befolgt werden.
WASSER UND FEUCHTIGKEIT - Das Gerät sollte nicht in der Nähe von Flüssigkei-
ten oder in Räumen mit hoher Luftfeuchtigkeit benutzt werden.
BELÜFTUNG - Das Gerät sollte so aufgestellt werden, dass die Luftzirkulation nicht
beeinträchtigt wird.
WÄRME - Das Gerät darf nicht in der Nähe von Wärmequellen, wie Heizkörpern,
Öfen oder anderen Geräten platziert werden, die Wärme erzeugen.
STROMQUELLE - Das Gerät sollte nur an die Stromversorgung angeschlossen
werden, die in der Bedienungsanleitung oder auf dem Gerät angegeben ist.
NETZKABELSCHUTZ - Netzkabel sollten so verlegt werden, dass man nicht auf sie
tritt und so, dass sie nicht durch Gegenstände eingeklemmt werden.
EINTRITT VON FREMDKÖRPERN UND FLÜSSIGKEIT - Es ist darauf zu achten,
dass keine Objekte auf das Gerät fallen und dass keine Flüssigkeiten durch Öffnun-
gen in das Gehäuse dringen.
BESCHÄDIGUNGEN, BEI DENEN WARTUNG ERFORDERLICH IST
Das Gerät sollte von qualifiziertem Wartungspersonal gewartet werden, wenn:
- Das Netzkabel oder der Netzstecker beschädigt wurde;
- Gegenstände auf das Radio gefallen oder Flüssigkeiten eingedrungen sind;
- Das Gerät Regen ausgesetzt worden ist;
- Das Gerät heruntergefallen oder das Gehäuse beschädigt ist;
- Das Gerät scheinbar nicht normal funktioniert.
WARTUNG - Der Benutzer sollte nicht versuchen, das Gerät anders, als in der Be-
dienungsanleitung beschrieben, zu benutzen. Alle Wartungsarbeiten müssen von
qualifizierten Servicemitarbeitern durchgeführt werden
Hinweis: Wenn das Display funktioniert nicht ordnungsgemäß oder reagiert nicht
auf die Betätigung der Kontrolle, aufgrund einer elektrostatischen Entladung. Ziehen Sie
das Netzkabel und entfernen Sie die Batterien, dann und schließen Sie die Stromversor-

6 Deutsch
gung einige Sekunden später wieder an.
STROMQUELLEN
WECHSELSTROM: Sie können Ihr tragbares Stereosystem mit Strom versorgen, indem Sie
das Netzkabel in den Netzstecker (15) an der Rückseite des Gerätes und dann in die Steck-
dose an der Wand stecken.
Prüfen Sie, dass die Nennspannung des Geräts mit Ihrer lokalen Spannung übereinstimmt.
Stellen Sie sicher, dass das Netzkabel vollständig in das Gerät eingesetzt ist.
BATTERIESTROM: Um das Radio mit Batterien zu verwenden, ziehen Sie das Netzka-
bel ab und legen Sie 6 × „LR14“-Batterien in das Batteriefach (16) ein. Stellen Sie sicher,
dass die Batterien richtig eingelegt sind, um Schäden am Gerät zu vermeiden. Entfernen Sie
die Batterien, wenn das Gerät für längere Zeit nicht verwendet wird, da dies zu einer Lecka-
ge an den Batterien führen und in der Folge zu Ihr Radio beschädigen kann.
UHREINSTELLUNG
Im Standby-Modus:
1. Drücken und halten Sie die Taste [TIME] (6) "12/24 Hr" auf dem Display blinde;
2. Drücken Sie die Tasten [SKIP -/+] (2/3), um die richtige Stunde einzustellen;
3. Bestätigen Sie mit der Taste [TIME] (6);
4. Drücken Sie die Tasten [SKIP -/+] (2/3), um die richtige Stunde einzustellen;
5. Bestätigen Sie mit der Taste [TIME] (6);
6. Drücken Sie die Tasten [SKIP -/+] (2/3) um die richtige Minute einzustellen;
7. Bestätigen Sie mit der Taste [TIME] (6).
ALARMEINSTELLUNG
Im Standby-Modus:
1. Drücken und halten Sie die Taste [ALARM 1] (4);
2. Drücken Sie die Tasten [SKIP -/+] (2/3), um die richtige Stunde einzustellen;
3. Bestätigen Sie mit der Taste [ALARM 1] (4);
4. Drücken Sie die Tasten [SKIP -/+] (2/3) um die richtige Minute einzustellen;
5. Bestätigen Sie mit der Taste [ALARM 1] (4);
6. Drücken Sie die Tasten [SKIP -/+] (2/3), um die richtige Alarm-Modus einzustellen
(Buzzer, FM, USB oder OFF);
7. Bestätigen Sie mit der Taste [ALARM 1] (4);
8. Ändern Sie die Lautstarke mit die Tasten [SKIP -/+] (2/3) auf die gewünschte Pegel;
9. Bestätigen Sie mit der Taste [ALARM 1] (4).
Um den zweiten Alarm einzustellen, wiederholen Sie die obigen Schritte mit [ALARM 2]
(5) anstelle von [ALARM 1].
ALARM AUS
Um den Alarm zu deaktivieren, drücken Sie die Taste [ALARM 1 oder 2] (4/5) (der Alarm
stoppt, aber die Einstellung bleibt bestehen) oder drücken Sie die Taste [SNOOZE] (9)
um den Alarm für 9 Minuten zu verschieben.
ALARMEINSTELLUNGEN DEAKTIVIEREN:
In Schritt 6 wählen Sie "OFF", um die Einstellungen zu deaktivieren.
SLEEP-TIMER
Der Sleep-Timer schaltet das Radio automatisch nach einer einstellbaren Zeit ab.

7 Deutsch
Wenn das Radio eingeschaltet ist:
1. Halten Sie die [SLEEP] Taste (8) gedrückt;
2. Drücken Sie wiederholt die Taste [SLEEP] (8), um den Timer zu wählen.
RADIO BENUTZEN
1. Drücken Sie die Taste [POWER] (1) um das Gerät Ein zu schalten;
2. Wählen Sie die gewünschte Audioquelle durch wiederholtes Drücken der
[QUELLEN] (1) aus;
3. (Detailierte Anweisungen für die verschiedenen Quellen finden Sie in den folgenden
Kapiteln);
4. Verändern Sie die Lautstärke mit dem [LAUTSTÄRKE -/+] (4/5) um die Lautstärke
an Ihr hörempfinden an zu passen;
5. Halten Sie die [POWER] Taste (1) gedrückt, um das Gerät aus zu schalten.
FM RADIOBETRIEB
1. Wählen Sie den "FM"-Modus durch wiederholtes Drücken der Taste [QUELLEN](1)
aus;
2. Verwenden Sie die Tasten [SKIP -/+] (2/3), um den gewünschten Sender in Schrit-
ten von 0,05 MHz abzustimmen, oder halten Sie die Tasten [SKIP -/+] (2/3)
gedrückt, um den nächsten / vorherigen Funkstation.
Hinweis: Richten Sie die Antenne (14) für einen besseren Empfang aus.
PRESET
Sie können maximal 30 Radiosender als Preset programmieren.
1. Wählen Sie Ihre Lieblings-Radiosender im manuellen oder automatischen Modus.
2. Drücken und Halten Sie die Taste [MEM] (6) bis “P _ _” auf dem Display erscheint.
3. Drücken Sie die Taste [SKIP -/+] (2/3), um die Speichernummer zu wählen;
4. Bestätigen Sie mit der Taste [MEM] (6).
Um einen voreingestellten Sender abzurufen, drüken Sie die Taste [MEM] (6), dann
drücken Sie wiederholt die Taste [SKIP -/+] (2/3), um die Speichernummer zu wählen.
USB/SD MODUS
1. Stecken Sie eine USB/SD-Stick (max. 64 GB) in die [USB/SD BUCHSE] (10/11);
2. Das Radio wechselt automatisch in den "USB oder SD" -Modus und die Wiedergabe
beginnt automatisch mit dem ersten Titel.
Hinweis:
Einige MP3-Player können möglicherweise nicht über den USB-Anschluss wieder-
gegeben werden.
Um Schäden am USB-stick zu vermeiden, entfernen Sie ihn nur, wenn das Radio
ausgeschaltet ist.
Die USB Buchse ist nicht zum laden von Smartphones oder anderen Geräten ge-
dacht.
WIEDERHOLEN - ZUFALLSWIEDERGABE
Drücken Sie wiederholt die Taste [PLAY MODE] (6), um den gewünschten Wiedergabe-
modus auszwählen.
AUX-IN-BETRIEB
1. Wählen Sie den "AUX" -Modus durch Drücken die Taste [QUELLEN] (1);

8 Deutsch
2. Verwenden Sie ein männliches 3,5-mm-Klinkenkabel (nicht im Lieferumfang enthal-
ten), um ein externes Audiogerät an die [AUX-IN-BUCHSE] (12) anzuschließen.
Hinweis: Die Musikbedienung (Wiedergabe, Pause usw.) muss von Ihrem externen
Gerät aus durchgeführt werden.
TECHNISCHE DATEN
Stromversorgung: AC 230V ~ 50Hz.
DC 9V = (6 x “LR14” Batterie).
Radiofrequenzabdeckung
FM: 87.5 - 108 MHz.
Lautsprecher
Musikleistung: 2 x 1 Watt rms.
Max. Musikleistung: 2 x 8 Watt.
Sonstiges
Kopfhörer: 3.5mm jack buchse.
Aux-In: 3.5mm jack buchse.
USB Buchse USB 2.0.
Spezifikationen und Design unterliegen möglichen Änderungen ohne vorherige Ankündi-
gung aufgrund von Verbesserungen.
Die Kennzeichnung auf dem Produkt bzw. auf der dazugehörigen Literatur gibt an, dass es nach seiner Leben-
sdauer nicht zusammen mit dem normalen HaushaltsmüIl entsorgt werden darf. Entsorgen Sie dieses Gerat
bitte getrennt von anderen Abfallen, um der Umwelt bzw. der menschl i chen Gesundhei t ni cht durch unkon-
trol l i erte Mül l besei ti gung zu schaden. Recycel n Si e das Gerät, um di e nachhaltige Wiederverwertung
von stofflichen Ressourcen zu fördern. Private Nutzer sollten den Händler, bei dem das Produkt gekauft wur-
de, oder die zuständigen Behörden kontaktieren, um in Erfahrung zu bringen, wie sie das Gerät auf umwe-
ltfreundliche Weise recyceln können. Gewerbliche Nutzer sollten sich an Ihren Lieferanten wenden und die
Bedingungen des Verkaufsvertrags konsultieren. Dieses Produkt darf nicht zusammen mit anderem Gewer-
bemüll entsorgt werden.
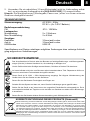
KORREKTE ENTSORGUNG DIESES PRODUKTS (Elektromüll)
SICHERHEITSHINWEISE
Das Ausrufszeichen im Dreieck weist den Benutzer auf wichtige Bedienungs- und Wartungsanwei-
sungen (Service) in diesem Handbuch hin, die unbedingt zu befolgen sind.
Um die Gefahr elektrischer Schläge auszuschliessen, Gehäuse auf keinen Fall abnehmen.
Im Innem befinden sich keine vom Benutzer selbst instandsetz-baren Teile. Reparaturen dürfen nur
von einer autorisierten Fachwerkstatt durchgeführt werden.
Dieses Gerät ist für 230V ~ 50Hz Netzspannung ausgelegt. Bei längerer Nichtbenutzung des
Geräts ziehen Sie den Stecker aus der Steckdose.
Setzen Sie das Gerät weder Feuchtigkeit noch Regen aus.
Schalten Sie das System erst dann ein, wenn Sie alle Verbindungen genau geprüft haben.
Stellen Sie das Gerät so auf, dass immer eine ungestörte Frischluftzufuhr sichergestellt ist. Es ist
zum beispiel keinesfalls auf Teppiche und in der Nähe von Gardinen zu stellen oder in Bücherrega-
le einzubauen.
Setzen Sie das Gerät weder direkter Sonneneinstrahlung noch Wärmequellen aus.

9 Français
L'EMPLACEMENT DES COMMANDES
1. POWER / FUNCTION (MARCHE - ARRÊT / SÉLECTEUR DE FONCTION)
2. SKIP - / TUNE - (SKIP - / SYNTONISATION -)
3. SKIP + / TUNE + (SKIP + / SYNTONISATION +)
4. VOLUME - / ALARM 1
5. VOLUME + / ALARM 2
6. TIME / MEM / PLAY MODE (HORLOGE / PRÉRÉGLAGES)
7. PLAY-PAUSE
8. STOP
9. SNOOZE
10. PRISE USB
11. PRISE SD CARD
12. PRISE D'ENTRÉE AUXILIAIRE
13. SORTIE CASQUE
14. ANTENNE
15. FICHE AC
16. COMPARTIMENT DES PILES
INSTRUCTIONS DE SÉCURITÉ
INSTRUCTIONS - Toutes les instructions de sécurité et d'utilisation doivent être lues
avant de mettre la radio en marche. Il faudrait conserver le manuel pour consultation
ultérieure.
AVERTISSEMENTS - Tous les avertissements apposés sur l'appareil et dans le mode
d'emploi doivent être respectés.
EAU ET HUMIDITÉ - L'appareil ne doit pas être utilisé à proximité de liquides ou dans
des pièces présentant un taux d'humidité élevé.
VENTILATION - L'appareil doit être disposé de manière à ce que son emplace-
ment ou sa position n'interfère pas avec sa ventilation adéquate.
CHALEUR - L'appareil doit être placé à l'écart de sources de chaleur telles que radia-
teurs, poêles ou autres appareils produisant de la chaleur.
SOURCE D’ALIMENTATION - Le raccordement de la radio à l'alimentation électrique
ne doit se faire que selon le modèle décrit dans le mode d'emploi.
PROTECTION DU CORDON D'ALIMENTATION - Les cordons d'alimentation doivent
être acheminés de telle sorte qu'ils ne risquent pas d'être écrasés ou pincés par des
objets placés dessus ou contre eux.
PÉNÉTRATION DES OBJETS ET DES LIQUIDES - Veillez à ce que les objets ne
tombent pas et à ce que les liquides ne soient pas déversés dans l'enceinte par le biais
des orifices.
DÉGÂTS NÉCESSITANT RÉPARATION
L'appareil ne doit être réparé que par un technicien qualifié lorsque :
- L'alimentation électrique ou le cordon est endommagé;
- Des objets sont tombés ou des liquides ont été renversés sur la radio;
- l'appareil a été exposé à la pluie;
- l'appareil est tombé ou le boîtier est endommagé;
- l'appareil ne semble pas fonctionner normalement.
RÉPARATION - L'utilisateur ne doit pas tenter de réparer l'appareil au-delà de ce qui
est décrit dans le mode d'emploi. Toute réparation doit être confiée à un technicien
qualifié.

10 Français
Remarque: Si L'affichage ne fonctionne pas correctement ou aucune réaction au
fonctionnement d'une commande quelconque pourrait être due à une décharge électros-
tatique, éteindre, débrancher le cordon d'alimentation CA et retirer toutes les piles, puis
remettre l'appareil sous tension après quelques secondes.
SOURCES D'ALIMENTATION
ALIMENTATION CA : Pour alimenter la chaîne stéréo portative, il suffit de brancher
le cordon d'alimentation CA dans la prise CA (15) située à l'arrière de l'appareil et dans
une prise de courant CA murale. Vérifier que la tension nominale de l`appareil corres-
pond à la tension locale. Vérifier que le cordon d'alimentation est complètement inséré
dans l'appareil.
PILES ÉLECTRIQUE : Pour faire fonctionner la radio avec des piles, débrancher le
cordon d'alimentation CA et insérer 6 piles "LR14" dans le compartiment (16).
S'assurer que les piles sont correctem. insérées pour éviter d'endommager l'appareil.
Retirer les piles lorsque la radio ne sera pas utilisée pendant une longue période de
temps, car cela causera des fuites dans les piles et endommagera la radio.
RÉGLAGE DE L'HORLOGE
En mode standby:
1. Appuyez et maintenez [TIME] (6) jusqu’à ce que "12/24 Hr" clignote sur l'écran;
2. Appuyez sur [SKIP -/+] (2/3) pour sélectionner le format;
3. Appuyez sur [CLOCK/ENTER] (6) pour confirmer;
4. Appuyez sur [SKIP -/+] (2/3) pour sélectionner l’heure;
5. Appuyez sur [CLOCK/ENTER] (6) pour confirmer;
6. Appuyez sur [SKIP -/+] (2/3) pour sélectionner les minutes;
7. Appuyez sur [CLOCK/ENTER] (6) pour confirmer.
RÉGLAGE DE L’ALARME
En mode standby:
1. Appuyez et maintenez [ALARME 1] (4);
2. Appuyez sur [SKIP -/+] (2/3) pour sélectionner l’heure;
3. Appuyez sur [ALARME 1] (4) pour confirmer;
4. Appuyez sur [SKIP -/+] (2/3) pour sélectionner les minutes;
5. Appuyez sur [ALARME 1] (4) pour confirmer;
6. Appuyez sur [SKIP -/+] (2/3) pour sélectionner le mode d’alarm (Buzzer, FM, USB
ou OFF);
7. Appuyez sur [ALARME 1] (4) pour confirmer;
8. Réglez le volume avec les boutons [SKIP -/+] (2/3) au niveau souhaité;
9. Appuyez sur [ALARME 1] (4) pour confirmer;
Pour régler la seconde alarme, répétez les étapes ci-dessus avec [ALARME 2] (5) au
lieu de [ALARME 1].
ALARME ÊTEINTE
Pour désactiver l'alarme, appuyez sur la touche [ALARM 1 ou 2] (4/5) (l'alarme
s'arrêtera, et le réglage sera conservé) ou appuyez sur la touche [SNOOZE] (9) pour
reporter l’alarme pendant 9 minutes.
DÉSACTIVER LES RÉGLAGES DE L’ALARME
Pour désactiver les réglages, à l'étape n ° 6 sélectionnez "OFF".

11 Français
MINUTEUR DE MISE EN VEILLE
Le minuteur de mise en veille éteint automatiq. la radio après un temps réglable.
Quand la radio est allumée:
1. Appuyer et maintenir enfoncé le bouton [SLEEP] (8);
2. Appuyer à plusieurs reprises sur le bouton [SLEEP] (8) pour choisir le minuteur.
UTILISER LA RADIO
1. Appuyer sur le bouton [POWER] (1) pour la mise sous tension;
2. Appuyer à plusieurs reprises sur le bouton [FONCTION] (1) pour sélectionner la
source audio désirée;
3. (Veuillez consulter les instructions détaillées pour chaque source dans les cha-
pitres suivants);
4. Réglez le volume avec les boutons [VOLUME -/+] (4/5) au niveau souhaité;
5. Pour éteindre la radio, tenez enfoncé le bouton [POWER] (1).
FONCTIONNEMENT DE LA RADIO FM
1. Sélectionnez le mode “FM” en utilisant le bouton [FONCTION] (1);
2. Appuyez sur [SKIP -/+] (2/3) pour changer la fréquence jusqu'à ce que vous
trouviez la station souhaitée ou appuyez et maintenez [SKIP -/+] (2/3), la fré-
quence défile automatiquement vers le haut / bas jusqu'à une station se trouve.
Remarque: Pour une meilleure réception, réorienter l'antenne (14).
PRESET
Vous pouvez programmer jusqu'à un maximum de 30 stations préréglées.
1. Sélectionnez la station désirée en utilisant les méthodes décrites ci-dessus;
2. Appuyez et maintenez [MEM] (6), “P_ _” apparaissent sur la écran;
3. Appuyez sur [SKIP -/+] (2/3) pour sélectionner le numéro de présélection;
4. Appuyez sur [MEM] (6) pour confirmer.
Appuyez sur [MEM] (6) puis [SKIP -/+] (2/3) pour naviguer dans les stations pré-
réglées.
FONCTIONNEMENT DE L'USB
1. Brancher un périphérique USB/SD (max. 64GB) dans la [PRISE USB/SD] (10/11);
2. La radio passera automatiquement en mode "USB ou SD" et la lecture démarre
automatiquement à partir de la première piste.
Remarque:
Certains lecteurs mp3 peuvent ne pas être en mesure de jouer via la prise USB.
ce n'est pas une défaut du système.
Pour éviter d'endommager la clé USB, retirez-la uniquement lorsque la radio est
éteinte.
La prise USB n'est pas conçue pour charger smartphones ou autres appareils.
REPEAT - RANDOM
Appuyez plusieurs fois sur le bouton [PLAY MODE] (6) pour sélectionner le mode de
lecture souhaité.
FONCTIONNEMENT AUX-IN
1. Sélectionnez le mode “AUX” en utilisant le bouton [FONCTION] (1);

12 Français
2. Utiliser un câble mâle vers un câble jack mâle de 3,5 mm (non fourni) pour con-
necter un périphérique audio externe à la [PRISE AUX-IN] (12).
Remarque: La commande de la musique (lecture, pause, etc.) doit être effectué
à partir de cet appareil externe.
CARACTERISTIQUES TECHNIQUES
Source d’énergie: AC 230V ~ 50Hz.
DC 9V = (6 x “LR14” Batterie).
Couverture de radiofréquence
FM: 87.5 - 108 MHz.
Haut-parleur
Puissance: 2 x 1 Watt rms.
Puissance Maximale: 2 x 8 Watt.
Général
Sortie écouteur: prise 3.5mm jack.
Aux-In: prise 3.5mm jack.
Version Prise USB: USB 2.0.
Les spécifications peuvent êtres modifiées sans avis préalable.
Ce symbole sur le produit ou sa documentation indique qu'il ne doit pas être éliminé en fin de vie avec
les autres déchets ménagers. L' élimination incontrôlée des déchetspouvant porter préjudice a l'environ-
nement ou a la santé humaine, veuillez le séparer des autres types de déchets et le recycler defaçon
responsable. Vous favoriserez ainsi la réutilisation durable desressources matérielles. Les particuliers
sont invites a contacter le distributeur leur ayant vendu le produit ou a se renseigner auprès de leur mai-
rie pour savoir ou et comment ils peuvent se débarrasser de ce produit afin qu'il soit recycle en respec-
tant l'environnement. Les entreprises sont invitées a contacter leurs fournisseurs et aconsulter les condi-
tions de leur contrat de vente. Ce produit ne doit pas être éliminé avec les autres déchets commerciaux.
COMMENT ÉLIMINER CE PRODUIT
(déchets d'équipements électriques et électroniques)
Le symbole “point d’exclamation” à l’intérieur d’un triangle avertit l’utilisateur que d’importantes instruc-
tions d’utilisation et de maintenance sont contenues dans le mode d’emploi.
Le symbole “éclair” à l’intérieur d’un triangle sert à avertir l’utilisateur de la présence du courant à l’inté-
rieur du l’appareil qui pourrait constituer un risque.
Afin de minimiser les risques, ne pas ouvrir le boîtier ni ôter le dos de l’appareil. En case de panne, faites
appel aux techniciens qualifiés pour les réparations. L’appareil ne renferme aucune pièce reparable par
l’utilisateur.
Cet appareil a été conçu pour une tension d’alimentation de 230V ~ 50Hz. Débranchez la prise de courant
quand on prévoit de ne pas utiliser l’appareil pendant un certain temps.
Mettez l’appareil sous tension seulement après avoir vérifié que tous les raccordements soient corrects.
L’unité ne doit pas être exposée à l’humidité ou à la pluie.
L’appareil doit être gardé dans un endroit suffisamment ventilé. Ne le gardez jamais par exemple près des
rideaux, sur un tapis ou dans des meubles, tels qu’une bibliothèque.
L’unité ne doit pas être exposée à la lumière directe du soleil ou à des sources de chaleur.
ATTENTION

13 Italiano
POSIZIONE DEI CONTROLLI
1. POWER / SOURCE (TASTO ACCENSIONE / SELETTORE FUNZIONI)
2. SKIP - / TUNE - (SKIP - / SINTONIA -)
3. SKIP + / TUNE + (SKIP + / SINTONIA +)
4. VOLUME - / ALARM 1 (VOLUME - / SVEGLIA 1)
5. VOLUME + / ALARM 2 (VOLUME + / SVEGLIA 2)
6. TIME / MEM / PLAY MODE (OROLOGIO / PRESET)
7. PLAY-PAUSE
8. STOP
9. SNOOZE
10. PRESA USB
11. LETTORE SCHEDE SD
12. INGRESSO AUX
13. USCITA CUFFIE
14. ANTENNA
15. CONNETTORE CAVO ALIMENTAZIONE
16. COMPARTIMENTO BATTERIE
PRECAUZIONI
ISTRUZIONI - Tutte le istruzioni di sicurezza e funzionamento devono essere lette pri-
ma di usare la radio. Il manuale deve essere mantenuto per futuri utilizzi.
AVVERTIMENTI - Tutti gli avvertimenti sul prodotto e nel manuale d’istruzioni devono
essere letti e rispettati.
ACQUA E UMIDITÀ - L’apparecchio non deve essere usato vicino a liquidi o in locali
con alta percentuale di umidità.
VENTILAZIONE - L’apparecchio deve essere situato in modo che non si interferisca
con la propria ventilazione.
CALORE - L’apparecchio deve essere situato lontano da fonti di calore come radiatori,
stufe o altri prodotti che producono calore.
ALIMENTAZIONE - La radio deve essere collegata ad una fonte di alimentazione con
le specifiche descritte nel manuale d’istruzioni o sul prodotto.
PROTEZIONE DEL CAVO D’ALIMENTAZIONE - Il cavo d’alimentazione deve essere
posizionato in modo da non venir danneggiato (schiacciato, tagliato, ...).
ENTRATA DI OGGETTI E LIQUIDI - Fare attenzione a non fare entrare liquidi o ogget-
ti dalle fessure della radio.
DANNI CHE RICHIEDONO ASSISTENZA
La radio deve essere controllata da personale qualificato in caso di:
- Il cavo d’alimentazione o il connettre è stato danneggiato;
- Oggetti o liquidi sono entrati all’interno della radio;
- La radio è stata esposta alla pioggia;
- L’apparecchio è caduto o l’involucro è stato danneggiato; - La
radio non funziona correttamente.
REVISIONE - L’utente non deve cercare di riparare la radio oltre a quanto descritto nel
manuale. Tutte le riparazioni devono essere eseguite da personale qualificato.
Nota: Se il display non funziona correttamente o non reagisce ai controlli, questo può
essere dovuto a scariche elettrostatiche. Spegnere la radio, disconnetterla dalla presa, ri-
muovere tutte le batterie e riconnettere dopo qualche secondo.

14 Italiano
FONTI DI ALIMENTAZIONE
CORRENTE ALTERNATA: Puoi alimentare la tua radio portatile connettendo il
cavo di alimentazione nel connettore AC (15) e alla presa elettrica.
Verifica che il voltaggio della radio corrisponda a quello della tua rete di alimentazio-
ne. Assicurarsi che il cavo sia inserito completamente nel connettore.
FUNZIONAMENTO CON BATTERIE: Per utilizzare la radio con le batterie, discon-
nettere il cavo di alimentazione e inserire 6 x “LR14” nell’apposito compartimento (16).
Assicurarsi che le batterie siano inserite con la giusta polarità per evitare di dannegg-
giare la radio. Rimuovere le batterie quando non si usa la radio per un lungo periodo,
siccome queste potrebbero avere perdite che danneggerebbero la radio.
IMPOSTARE L'ORARIO
In modalità standby:
1. Tenere premuto [TIME] (6) finché “12/24 Hr” lampeggerà sul display;
2. Premere ripetutamente [SKIP -/+] (2/3) per selezionare l’impostazione desiderata;
3. Premere [TIME] (6) per confermare;
4. Le cifre dell'ora lampeggeranno sul display. Premere [SKIP -/+] (2/3) per selezio-
nare l'ora corretta;
5. Premere [TIME] (6) per confermare;
6. Le cifre dei minuti lampeggeranno sul display. Premere [SKIP -/+] (2/3) per sele-
zionare i minuti corretti;
7. Premere [TIME] (6) per confermare.
IMPOSTAZIONE DELLA SVEGLIA
In modalità standby:
1. Tenere premuto [ALARM 1] (4);
2. Premere [SKIP -/+] (2/3) per selezionare l'ora corretta;
3. Premere [ALARM 1] (4) per confermare;
4. Premere [SKIP -/+] (2/3) per selezionare i minuti corretti;
5. Premere [ALARM 1] (4) per confermare.
6. Premere [SKIP -/+] (2/3) per selezionare la modalità della sveglia (Buzzer, FM,
USB o OFF);
7. Premere [ALARM 1] (4) per confermare;
8. Regolare il Volume con i tasti [SKIP -/+] (2/3) al livello desiderato;
9. Premere [ALARM 1] (4) per confermare;
Per impostare la seconda sveglia ripetere I passi sopra utilizzando [ALARM 2] (5) al
posto di [ALARM 1].
SPEGNERE LA SVEGLIA
Per disattivare la sveglia, premere il tasto [ALARM 1 o 2] (4/5) (l’allarme si spegnerà,
ma le impostazioni rimarranno memorizzate) oppure premere [SNOOZE] (9) per ritar-
dare di 9 minuti la sveglia.
DISATTIVARE LE IMPOSTAZIONI DELLA SVEGLIA
Per disattivare le impostazioni, al passo n° 6 selezionare “OFF”.

15 Italiano
SLEEP TIMER
Il timer sleep consente di spegnere automaticamente la radio dopo un determinate
periodo di tempo. Quando la radio é accesa:
1. Tenere premuto il tasto [SLEEP] (8);
2. Premere ripetutamente il tasto [SLEEP] (8) per selezionare il timer desiderato.
UTILIZZO DELLA RADIO
1. Premere il tasto [POWER] (1) per accendere l’apparecchio;
2. Selezionare la modalità premendo ripetutamente il tasto [FUNZIONE] (1);
3. (Vedi istruzioni dettagliate per ogni sorgente nei prossimi capitoli);
4. Regolare il Volume con i tasti [VOLUME -/+] (4/5) al livello desiderato;
5. Premere e tenere premuto il tasto [POWER] (1) per spegnere la radio.
ASCOLTO DELLA RADIO FM
1. Selezionare la modalità “FM” usando il tasto [FUNZIONE] (1);
2. Premere ripetutamente [SKIP -/+] (2/3) per cambiare la frequenza a passi di
0.05MHz fino a trovare la stazione desiderata oppure tenere premuto [SKIP -/+]
(2/3) per più di 2 secondi, la frequenza scorre automaticamente avanti o indietro
fino a che non viene trovata una stazione.
Nota: Per una miglior ricezione orientare l’antenna (14).
PRESET
Si possono programmare fino a un massimo di 30 stazioni preimpostate.
1. Selezionare la stazione desiderata usando le modalità sopra descritte;
2. Tenere premuto il tasto [MEM] (6). Sullo schermo comparirà “P _ _”;
3. Premere [SKIP -/+] (2/3) per selezionare il numero di preselezione;
4. Premere [MEM] (6) per confermare.
Premere [MEM] (6), poi [SKIP -/+] (2/3) per navigare tra le stazioni preselezionate.
ASCOLTO MUSICA DA MEMORIA USB
1. Collegare una memoria USB (max. 64 GB) nell’apposita [PORTA USB/SD] (10/11);
2. La radio passerà automaticamente alla modalità USB/SD e la riproduzione partirà
automaticamente dal primo brano.
Nota:
Alcuni lettori MP3 potrebbero non essere capaci di riprodurre i file tramite la pre-
sa USB. Questo non è dovuto ad un malfunzionamento del sistema.
Per evitare danni alla memoria USB, rimuoverla solo quando la radio è spenta.
La presa USB non è progettata per caricare smartphone o altri dispositivi.
REPEAT - RANDOM
Premere ripetutamente il tasto [PLAY MODE] (6) per selezionare il modo di
riproduzione desiderato.
ASCOLTO MUSICA DA INGRESSO AUX-IN
1. Selezionare la modalità “AUX” usando il tasto [FUNZIONE] (1);
2. Usa un cavo “maschio - maschio” 3.5mm jack (non incluso) per connettere un

16 Italiano
dispositivo esterno all’[INGRESSO AUX-IN] (12).
Note: Il controllo della musica (play, ecc) deve essere fatto tramite il dispositivo es-
terno.
SPECIFICHE TECNICHE
Alimentazione: AC 230V ~ 50Hz.
DC 9V = (6 batterie “LR14”).
Copertura radiofrequenze
FM: 87.5 - 108 MHz.
Altoparlante
Potenza d’uscita: 2 x 1 Watt rms.
Potenza d’uscita massima: 2 x 8 Watt.
Generali
Uscita cuffie: 3.5mm jack.
Ingresso Aux-In 3.5mm jack.
Versione Porta USB: USB 2.0.
Le specifiche e il design sono soggetti a possibili modifiche senza preavviso a causa
di miglioramenti.
II marchio riportato sul prodotto e sulla sua documentazione indica che il prodotto non deve essere smaltito
can altri rifiuti domestici al termine del ciclo di vita. Per evitare eventuali danni all'ambiente o alla salute
causati dall'inopportuno smaltimento dei rifiuti, si invita l'utente a separare questo prodotto da altri tipi di
rifiuti e di riciclarlo in maniera responsabile per favorire il riutilizzo sostenibile delle risorse materiali. Gli
utenti domestici sono invitati a contattare il rivenditore presso il quale e stato acquistato il prodotto a l'ufficio
locale preposto per tutte le informazioni relative alla raccolta differenziata e al riciclaggio per questo tipo di
prodotto. Gli utenti aziendali sono invitati a contattare il proprio fornitore e verificare i termini e le condizioni
del contratto di acquisto. Questo prodotto non deve essere smaltito unitamente ad altri rifiuti commerciali.
CORRETTO SMALTIMENTO DEL PRODOTTO
(rifiuti elettrici ed elettronici)
ATTENZIONE
Il punto esclamativo all’interno di un triangolo avverte l’utente che il libretto d’istruzioni contiene delle
importanti istruzioni per l’uso e la manutenzione.
Il simbolo del fulmine all’interno di un triangolo avverte l’utente della presenza di una pericolosa tensio-
ne all’interno dell’apparecchio.
Per ridurre i rischi di scosse elettriche, non aprire l’apparecchio. L’apparecchio non contiene parti ripa-
rabili dall’utente. In caso di guasto fare appello a tecnici qualificati per le riparazioni.
Questo apparecchio è stato progettato per funzionare a 230V ~ 50Hz. Se non si intende utilizzare l’ap-
parecchio per un lungo periodo di tempo, rimuovere la spina dalla presa di corrente.
Utilizzare l’apparecchio solo dopo aver verificato che tutte le connessioni siano state eseguite corretta-
mente.
Non esporre l’apparecchio alla pioggia o all’umidità.
Posizionare l’apparecchio in un luogo sufficientemente ventilato. Evitare di sistemarlo vicino a tende,
sul tappeto o all’interno di un mobile quale, ad esempio, una libreria.
Non esporre l’apparecchio alla luce diretta del sole o a fonti di calore.

17 Español
LOCALIZACIÓN DE LOS CONTROLES
1. POWER / SOURCE (BOTÓN DE ENCENDIDO / SELECTOR DE FUNCIÓN)
2. SKIP - / TUNE - (SKIP - / SINTONIZACIÓN -)
3. SKIP + / TUNE + (SKIP + / SINTONIZACIÓN +)
4. VOLUME - / ALARM 1 (VOLUMEN - / ALARMA 1)
5. VOLUME + / ALARM 2 (VOLUMEN + / ALARMA 2)
6. TIME / MEM / PLAY MODE (HORA / PREAJUSTE)
7. PLAY-PAUSE
8. STOP
9. SNOOZE
10. TOMA USB
11. TOMA SD CARD
12. ENTRADA AUX
13. SALIDA DE AURICULARES
14. ANTENA
15. ENCHUFE DE CORRIENTE ALTERNA (CA)
16. COMPARTIMENTO DE LAS PILAS
INSTRUCCIONES DE SEGURIDAD
INSTRUCCIONES: Debe leer las instrucciones de seguridad y de funcionamiento
antes de utilizar la radio. Guarde el manual para futuras consultas.
ADVERTENCIAS: Debe respetar todas las advertencias sobre el aparato y las
instrucciones de funcionamiento.
AGUA Y HUMEDAD: El aparato no debe usarse cerca de líquidos o en estancias
donde haya mucha humedad.
VENTILACIÓN: El aparato debe colocarse de manera que su ubicación o
posición no impidan su propia ventilación.
CALOR: El aparato debe mantenerse alejado de fuentes de calor como
radiadores, estufas u otros electrodomésticos que desprendan calor.
FUENTE DE ALIMENTACIÓN: La radio solamente debe conectarse a una fuente
de suministro eléctrico del tipo descrito en las instrucciones de funcionamiento o según
se indique en el aparato.
PROTECCIÓN DEL CABLE DE SUMINISTRO ELÉCTRICO: Los cables de
suministro eléctrico deben colocarse de manera que no puedan ser pisados o
aplastados por objetos colocados sobre/contra ellos.
ENTRADA DE OBJETOS Y LÍQUIDOS: Debe tener mucho cuidado de que no
caigan objetos y de que no entren salpicaduras de líquidos dentro del aparato a través
de las aberturas.
DAÑOS QUE REQUIEREN REPARACIÓN:
El aparato debe ser reparado solo por personal técnico cualificado cuando:
- El cable de suministro eléctrico o el enchufe hayan sufrido daños;
- Hayan caído objetos o se hayan derramado líquidos dentro de la radio;
- El aparato haya estado bajo la lluvia;
- El aparato haya caído al suelo o la carcasa se haya dañado;
- El aparato no funcione normalmente.
REPARACIÓN: El usuario no debe intentar reparar el aparato más allá de lo
descrito en el manual de instrucciones de funcionamiento. Cualquier reparación debe
ser realizada por personal técnico cualificado.
La pagina si sta caricando...
La pagina si sta caricando...
La pagina si sta caricando...
La pagina si sta caricando...
La pagina si sta caricando...
La pagina si sta caricando...
La pagina si sta caricando...
La pagina si sta caricando...
La pagina si sta caricando...
La pagina si sta caricando...
La pagina si sta caricando...
La pagina si sta caricando...
La pagina si sta caricando...
La pagina si sta caricando...
La pagina si sta caricando...
La pagina si sta caricando...
La pagina si sta caricando...
La pagina si sta caricando...
La pagina si sta caricando...
La pagina si sta caricando...
La pagina si sta caricando...
La pagina si sta caricando...
La pagina si sta caricando...
La pagina si sta caricando...
La pagina si sta caricando...
La pagina si sta caricando...
-
 1
1
-
 2
2
-
 3
3
-
 4
4
-
 5
5
-
 6
6
-
 7
7
-
 8
8
-
 9
9
-
 10
10
-
 11
11
-
 12
12
-
 13
13
-
 14
14
-
 15
15
-
 16
16
-
 17
17
-
 18
18
-
 19
19
-
 20
20
-
 21
21
-
 22
22
-
 23
23
-
 24
24
-
 25
25
-
 26
26
-
 27
27
-
 28
28
-
 29
29
-
 30
30
-
 31
31
-
 32
32
-
 33
33
-
 34
34
-
 35
35
-
 36
36
-
 37
37
-
 38
38
-
 39
39
-
 40
40
-
 41
41
-
 42
42
-
 43
43
-
 44
44
-
 45
45
-
 46
46


in altre lingue
- français: Roadstar RU-275 Manuel utilisateur
- español: Roadstar RU-275 Manual de usuario
- Deutsch: Roadstar RU-275 Benutzerhandbuch
- Nederlands: Roadstar RU-275 Handleiding
- português: Roadstar RU-275 Manual do usuário
- slovenčina: Roadstar RU-275 Používateľská príručka
Documenti correlati
-
Roadstar RCR-777UD+ Manuale utente
-
Roadstar HIF-8892D+BT Manuale utente
-
Roadstar TRA-2235 Manuale utente
-
Roadstar HRA-1782ND+BK Manuale utente
-
Roadstar HIF-8892EBT Manuale utente
-
Roadstar HRA-500IP Manuale del proprietario
-
Roadstar RCR-4625NU Manuale utente
-
Roadstar HIF-8899BT Manuale utente
-
Roadstar HRA-250IP/WH Manuale utente
-
Roadstar HRA-1345NUSWD Manuale utente
