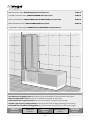
Artweger SHOWER SCREEN Assembly Instructions
- Tipo
- Assembly Instructions

ITALIANO
Traduzione
Vor Gebrauch sorgfältig Lesen! Zum Nachschlagen und Aufbewahren dem Endkunden übergeben!
Read carefully before use! Hand over to the customer for looking up and storage!
Avant emploi lire soigneusement! Remettez le au client pour la recherche et le stockage!
Voordien gebruik zorgvuldig lezend! Overhandig de klant voor het kijken omhooggaand en opslag!
Prima dell‘uso con attenzione leggendo! cosegni il cliente per lo sguardo in su e l‘immagazzinaggio!
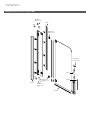
MONTAGEANLEITUNG DUSCHAUFSATZ mit Seitenwand
ASSEMBLY INSTRUCTIONS SHOWER SCREEN with side screen
NOTICE DE MONTAGE COMPLÉMENT PORTE DE DOUCHE avec paroi fixe
MONTAGEVOORSCHRIFT DOUCHEWANDEN met zijwand
ISTRUZIONI DI MONTAGGIO PARETE VASCA GIREVOLE con laterale fisso
T2G8.82
T2G8.88
ALG8.82
ALG8.88
NEDERLANDS
Vertaling
FRANCAIS
Traduction
ENGLISH
Translation
DEUTSCH
Originalsprache
1 / 361 / 36 MA_TL2_DuAuf_TSW_110163_01_23

OVERVIEWINHALTSVERZEICHNIS
OVERVIEW ................................................................................2
SAFETY INSTRUCTIONS ..............................................................4
NECESSARY
TOOLS .......................................................................................6
ASSEMBLY KIT ...........................................................................6
INSTALLATION ...........................................................................7
»OF IMMOVABLE ELEMENT .............................................14
»ADJUST .......................................................................16
»SWINGING DOOR .........................................................18
»SEAL ...........................................................................20
»DOOR HANDLE ............................................................. 22
»SEALING WITH SANITARY SILICONE ...............................26
»PLINTH-PANELS ...........................................................29
»SEALING WITH SANITARY SILICONE ...............................32
SPARE-PARTS ..........................................................................33
Assembly instructions for installation LEFT -
for installation RIGHT - assemble in mirror image.
INHALTSVERZEICHNIS ................................................................2
SICHERHEITSHINWEISE ..............................................................4
BENÖTIGTES
WERKZEUG ...............................................................................6
MONTAGESET ............................................................................6
MONTAGE .................................................................................7
»FIXTEIL .......................................................................14
»JUSTIEREN ..................................................................16
»PENDELTÜR ................................................................. 18
»DICHTPROFIL ..............................................................20
»TÜRGRIFF....................................................................22
»ABDICHTEN MIT SANITÄRSILIKON .................................26
»UNTERTRITTBLENDEN .................................................. 29
»ABDICHTEN MIT SANITÄRSILIKON .................................32
ERSATZTEILE ...........................................................................33
Montageanleitung für Einbau LINKS -
bei Einbau RECHTS - spiegelgleicher Aufbau.
2 / 362 / 36 MA_TL2_DuAuf_TSW_110163_01_23

OVERZICHTVUE D’ENSEMBLE SOMMARIO
SOMMARIO .............................................3
AVVISO DI SICUREZZA ..............................4
ATTREZZATURE
NECESSARIA ............................................6
CORREDO DELL‘ASSEMBLEA ......................6
MONTAGGIO ...........................................7
»PARETE FISSA ............................14
»AGGIUSTARE .............................16
»PORTA DOCCIA BASCULANTE ......18
»PROFILIO DI GUARNIZIONE .........20
»MANIGLIA .................................22
»SILICONARE ..............................26
»RIVESTIMENTO INFERIORE DELLA
VASCA .............................................29
»SILICONARE ..............................32
PEZZI DI RICAMBIO ................................33
OVERZICHT .............................................3
VEILIGHEIDS VOORSCHRIFTEN ...................4
BENODIGD
GEREEDSCHAP.........................................6
MONTAGESET ..........................................6
MONTAGE ...............................................7
»VAST DEEL ................................. 14
»GOED AFSTELLEN .......................16
»PENDELDEUR ............................18
»AFDICHTPROFIEL .......................20
»DEURGREEP ..............................22
»AFDICHTEN MET
SANITAIR-SILICONEN ........................26
»ONDERSTE PANELEN ..................29
»AFDICHTEN MET
SANITAIR-SILICONEN ........................32
ONDERDELEN ........................................33
Montagevoorschrift voor
inbouw LINKS -
bij inbouw RECHTS -
montage in spiegelbeeld.
Istruzioni di montaggio
per la versione SINISTRA-
all‘inverso per montaggio
versione destra
VUE D’ENSEMBLE ....................................3
INSTRUCTIONS- SÉCURIT ..........................4
OUTILLAGE
NECESSAIRE ............................................6
SET DE MONTAGE .....................................6
MONTAGE ...............................................7
»PARTIE FIXE ...............................14
»AJUSTER ...................................16
»PORTE BATTANTE ....................... 18
»PROFILÉ D‘ÉTANCHÉITÉ ..............20
»POIGNÉE DE PORTE ....................22
»ETANCHER AVEC DU
SILICONE SANITAIRE .........................26
»POSEZ LES BANDEAUX ................29
»ETANCHER AVEC DU
SILICONE SANITAIRE .........................32
PIÈCES DE RECHANGE ............................33
C’est prévue pour une
installation à GAUCHE –
en cas d’une installation à DROITE -
A inverser pour partie fixe en GAUCHE.
3 / 363 / 36 MA_TL2_DuAuf_TSW_110163_01_23

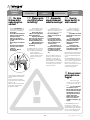
DE Vor dem
Einbau bitte
unbedingt be-
achten!
• Produkt vor dem Einbau, auf
Richtigkeit, Beschädigungen und
das Zubehör auf Vollständigkeit
überprüfen.
• Bei sichtbarem Schaden Pro-
dukt keinesfalls einbauen!
• Beachten Sie beim
Hantieren das teilweise
hohe Gewicht und/oder die
großen
Abmessungen von Einzeltei-
len
• Beachten Sie beim Bohren
der Löcher, dass Sie keine
Leitungen
Elektro, Gas, Wasser)
beschädigen.
Unsere Haftung beschränkt sich alleine
auf unsere Produkte und kann daher
nicht auf
den Ein- und Ausbau ausgedehnt
werden. Die Kosten für einen nachträg-
lichen Aus- und
Einbau eines Produkts und die damit
verursachten Schäden sind kein
Bestandteil der Garantie.
EN Please note
carefully before
installing!
• Before installing, check for
correctness and damage and the
accessories for completeness.
• Do not under any cir-
cumstances install product
with visible damage!
• Take the great weight
and/or the large dimensions
into consideration when
handling individual parts!
• When drilling holes do
not damage hidden pipes
and wiring.
Our liability is limited to our products
alone and therefore cannot be exten-
ded to installation and dismantling.
Costs for subsequent
dismantling and installation of
a product and damage caused
thereby are not part of the
guarantee.
FR A respecter
impérativement
avant le montage!
• Avant le montage de
vérifi er qu’il s’agit du bon modèle,
qu’elle n’est pas endommagée et
que les accessoires sont complets.
• En cas de dommages
visibles, ne pas monter le
produit!
• Lors de la manutention,
merci de prêter attention
au poids parfois très élevé
et/ou aux dimensions de
certaines pièces!
• Faites attention en
percant les trous de ne pas
endommager les tuyaute-
ries (cables électriques,
canalisations de gaz, d´eau,
etc).
Notre responsabilité se limite à nos
produits et ne peut être étendue sur
l’installation et le démontage. Les
coûts générés lors d’un démontage
après installation et d’une ré-installa-
tion d’un produit et les dommages qui
en résultent ne pourront être pris en
charge par la garantie.
NL Voor in-
bouw beslist in
acht nemen!
• Bad voor het inbouwen
op juistheid, beschadigingen
en toebehoren op volledigheid
controleren.
• Bij zichtbare beschadi-
ging product in geen geval
inbouwen!
• Let u bij het gebruik
om het gedeeltelijk grote
gewicht en/of de grote
afmetingen van enkele
onderdelen!
• bij het boren van
gaten er op letten, dat U
geen leidingen (elektro, gas
of water) beschadigt!
Wanneer het bad betegeld wordt, bes-
list de inbouwmaten van de badkuip
en van de doucheafscheidingin acht
nemen.
Onze aansprakelijkheid is beperkt tot
onze producten en kan daarom niet op
de in- en uitbouw uitgebreid worden.
De kosten voor een latere uit- en
inbouw van een product en de daaruit
voortvloeiende schade zijn geen
onderdeel van de garantie.
IT Osservazioni
prima del mon-
taggio!
• Prima del montaggio
controllare, se è la versione giusta,
se ci sono difetti o se mancano
pezzi.
• Se ci sono dei difetti
non montare la vasca.
• Durante la fase di maneggio
prestare attenzione al peso
relativamente elevato e/o
alle ampie dimensioni dei
singoli componenti!
• Mentre forate fate atten-
zione a non rovinare le
condutture (elettriche, gas,
acqua).
La ditta ARTWEGER garantisce per
il prodotto stesso e declina ogni
responsabilità per il montaggio. Costi
derivanti da smontaggio e montaggio
postumo ed eventuali danni causati
non sono compresi nella garanzia.
4 / 364 / 36 MA_TL2_DuAuf_TSW_110163_01_23
VEILIGHEIDS
VOORSCHRIFTEN
INSTRUCTIONS
SÉCURIT
AVVISO DI
SICUREZZA
SAFETY
INSTRUCTIONS
SICHERHEITS
HINWEISE

DE
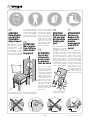
ACHTUNG!
Beim Hantie-
ren mit Glas
Schutzklei-
dung tragen!
Bitte untersuchen Sie nach
dem Auspacken das Einschei-
ben-Sicherheitsglas (ESG)
unverzüglich auf mögliche
Transport schäden, wie abge-
sprungene Kanten oder Ecken.
Wird ein Schaden festgestellt
bitte umgehend Schadensmel-
dung machen und die Scheibe
nicht einbauen, da dieser Feh-
ler auch später zu einem Bruch
führen kann! Alle Gläser werden
vor dem Verpacken sorgfältigst
kontrolliert. Spätere Reklamati-
onen, auch bei Bruch, können
daher nicht anerkannt werden.
EN
ATTENTION!
Wear protec-
tive clothing
when hand-
ling glass!
Please examine the single-pane
safety glass for possible trans-
port damage such as chipped
edges or corners immediately
after unpacking. If damage is
detected do not install the pane
because a defect can lead to
breakage later! Please make a
damage report without delay!
All glass panes are controlled
with utmost care before pa-
cking.Therefore later complaints
cannot be acknowledged,
even in case of breakage.
FR
ATTENTION !
Portez des
vêtements
protecteurs
en manipu-
lant du verre.
Merci de vérifi er immédia-
tement le verre de sécurité
monofeuille au déballage sur
d’éventuels dommages surve-
nus au transport, tels que chants
et angles écaillés. Si toutefois un
défaut a été constaté, merci d’en
faire la déclaration au plus vite
et ne pas monter la vitre, car ce
défaut peut être, par la suite, à
l’origine d’une casse! Tous les
verres sont contrôlés minutieu-
sement avant le conditionne-
ment. Pour cette raison, aucune
réclamation ultérieure, même
en cas de casse, ne pourra être
prise en compte.
NL
ATTENTIE !
Bij het hante-
ren van glas
beschermde
kleding dra-
gen!
Na het uitpakken het enkel vei-
ligheidsglas (ESG) onmiddellijk
op mogelijke transport- be-
schadigingen, zoals afgespron-
gen kanten of hoeken, contro-
leren. Wordt een beschadiging
vastgesteld, dan mag het glas
niet worden ingebouwd, om-
dat deze schade ook later tot
een breuk kan leiden !Bij een
vastgestelde schade, meldt dit
onmiddellijk! Al het glas wordt
voor het verpakken zorgvuldig
gecontroleerd. Latere reclames,
ook bij breuk, kunnen daarom
niet geaccepteerd worden.
IT
ATTENZIONE!
Portare in-
dumenti di
protezione
mentre
maneggiate
prodotti di
vetro!
Dopo aver sballato la merce
perfavore esaminate subito il
cristallo di sicurezza (ESG) su
possibili danni di trasporto,
quali bordi o angoli fratturati.
Se accertate un danno, si prega
di comunicarlo immediata-
mente e non montate la porta
di cristallo, inquanto questo
difetto può causare una rottura
del vetro anche in un secondo
momento. Tutti i vetri vengo-
no controllati accuratamente
prima dell‘imballo. Percui non
vengono riconosciuti posteriori
reclami, anche in caso di rottura.
5 / 365 / 36 MA_TL2_DuAuf_TSW_110163_01_23

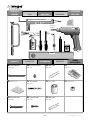
6× 4,8×60 mm
MatNr: 24466
10× 125A-5,3-A2
MatNr: 2430
6× Ø 8 mm
MatNr: 24409
4×
MatNr: 705722
2× MatNr: 705723 1× Ø 3,8 mm
MatNr: 18603
1× MatNr: 80GBD 1× MatNr: 706542
1× 4,2×38 mm
MatNr: 24467
4× 4,2×19 mm
MatNr: 24265
1× Ø 6 mm
MatNr: 24410
ø 6mm
ø 8mm
PH2
TX25
TX20
SW 4
T
X25
MONTAGESET
BENODIGD
GEREEDSCHAP
SET DE MONTAGE
OUTILLAGE
NECESSAIRE
ATTREZZATURE
NECESSARIA
CORREDO
DELL‘ASSEMBLEA
ASSEMBLY KIT
NECESSARY
TOOLS
MONTAGESET
BENÖTIGTES
WERKZEUG
6 / 366 / 36 MA_TL2_DuAuf_TSW_110163_01_23

34
1
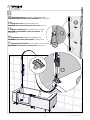
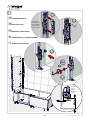
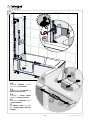
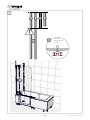
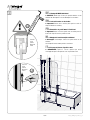
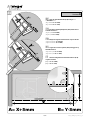
DESeitenwand montieren. Wandprofil auf Abdeckkappe stecken.
WICHTIG! Richtiges Positionieren der Seitenwand. Siehe dazu Punkt 4!
ENInstall side screen. Insert wall bracket onto cap.
IMPORTANT! Correct positioning of the side screen. See fig. 4!
FRMonter le panneau fixe.Poser le profilé mural sur le cache.
IMPORTANT! Positionnement correct du panneau. Voir
illustration Nº 4!
NL Zijwand monteren. Wandprofiel op afdekkap plaatsen.
BELANGRIJK! Juist stellen van de zijwand. Zie daarfoe afb. 4!
IT Montaggio del laterale fisso. Inserire il profilo a muro nel supporto.
IMPORTANTE! Posizionare bene il laterale fisso. Vedi punto 4! SW 4
2
1
7 / 367 / 36 MA_TL2_DuAuf_TSW_110163_01_23
1

8 / 368 / 36 MA_TL2_DuAuf_TSW_110163_01_23
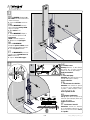
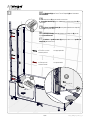
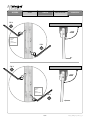
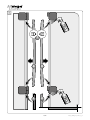
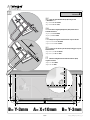
DE1. WICHTIG! Wandprofil ge-
nau 14mm vom Wannenrand entfernt
senkrecht einrichten.
2. Insgesamt 6 Löcher anzeichnen.
EN1. IMPORTANT! Vertically
adjust wall bracket exactly 14mm
away from tub edge.
2. Mark 6 holes in all.
FR1. IMPORTANT ! Régler le
niveau vertical du profilé mural à
exactement
14mm du bord de la baignoire.
2. Marquer en tout 6 perçages.
NL 1. BELANGRIJK !
Wandprofiel precies 14mm vanaf de
rand van de kuip loodrecht uitrichten.
2. In totaal 6 gaten aftekenen.
IT 1. IMPORTANTE! posizionare
il profilo a muro esattamente a 14
mm dal bordo vasca
2. segnare i 6 fori di fissaggio.
DEDübel setzen.
Achtung: Beachten Sie beim Bohren
der Löcher, dass Sie keine Leitungen
(Elektro, Gas, Wasser) beschädigen.
Profil anschrauben.
ENSet wall plugs.
Attention: When drilling holes do not
damage hidden pipes and wiring.
Screw on bracket.
FRPositionner les chevilles.
Attention: faites attention en percant
les trous de ne pas endommager les
tuyauteries (cables électriques, canali-
sations de gaz, d´eau, etc).
Fixer le profilé au mur.
NL Pluggen aanbrengen.
Let op: bij het boren van gaten er op
letten, dat U geen leidingen (elektro, gas
of water) beschadigt!
Profiel vastschroeven.
IT Posizionare i tasselli.
Attenzione: forando fare attenzione
di non danneggiare tubazioni ecc. che
possono essere nella muratura. Fissa-
re il profilo.
6x
2 4
13
*
6x
TX25
ø 8 mm
4,8 x 60 mm
*
14 mm
14 mm
2
3

9 / 369 / 36 MA_TL2_DuAuf_TSW_110163_01_23
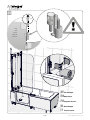
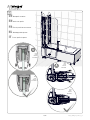
3DEWICHTIG! Seitenwand-Positi-
onshilfe auf die Wanne montieren!
ENIMPORTANT! Mount side-
screen posi-tioning aid on the tub!
FRIMPORTANT! Monter l’aide au
positionnement de la paroi fixe sur la
baignoire!
NL BELANGRIJK! Zijwand-positie-
hulp op het bad monteren!
IT IMPORTANTE! Fissare la guida
di posizionamento del fisso laterale
sulla vasca!
4,2x19 mm
PH2
ø 3,8 mm
23mm
48mm

DE Seitenwand einsetzen.
EN Insert side screen.
FR Introduisez la paroi latérale.
NL Zijwand plaatsen en voorlopig vastzetten.
IT Posizionare il laterale fisso
9mm
33mm
1
2
3
SW 4
3x
4
Innenseite
Inside
Interiéur
Binnenkant
Interno
Außenansicht!
View from outside!
Vue de I‘exterieur!
Van buiten gezien!
Vista dall‘ esterno!
10 / 3610 / 36 MA_TL2_DuAuf_TSW_110163_01_23
5

11 / 3611 / 36 MA_TL2_DuAuf_TSW_110163_01_23
6
1
2
3x
4,2 x 38 mm
Ø 6 mm Ø 6 mm
3
4
5
6

12 / 3612 / 36 MA_TL2_DuAuf_TSW_110163_01_23
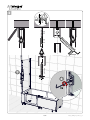
7
Für dargestellten Artikel! For article shown!
Pour l‘article présenté! Voor getoond artikel!
Per l‘articolo mostrato!
Für gespiegelten Artikel! For mirrored article!
Pour les articles en miroir! Voor gespiegeld artikel!
Per l‘articolo speculare!
P
3x
ø 3,8 mm
SW 4
2
1
A
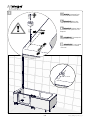
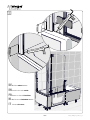
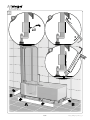
DE2. Deckenstütze mit Eckprofil (A) 3x
verbohren. Lochpositionen (P) sind durch Sen-
kungen vorgegeben.
EN2. Drill 3 holes through ceiling support
and corner frame piece (A).
Hole positions (P) are preset with countersinks.
FR2. Percer et visser le support plafond
avec le profile d’angle (A) en 3 points. Les
positions des perçages (P) sont indiquées par des
creux.
NL 2. Plafondsteun met hoekprofiel (A) 3x
vastboren. Gatenposities (P) zijn door verlagingen
aangeduid.
IT 2. Dopo aver regolato l‘altezza dello
stabilizzatore fissarlo sul profilo ad angolo
(A) 3x nella posizione P.

13 / 3613 / 36 MA_TL2_DuAuf_TSW_110163_01_23
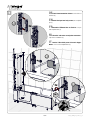
8
Für dargestellten Artikel! For article shown!
Pour l‘article présenté! Voor getoond artikel!
Per l‘articolo mostrato!
Für gespiegeltn Artikel! For mirrored article!
Pour les articles en miroir! Voor gespiegeld artikel!
Per l‘articolo speculare!
1
1
4,2 x 19 mm
PH2
2
B
DE2. Wandprofil (B) der Dusch-Tür mit Eckprofil (A) der Seitenwand
verschrauben.
ENHole positions (P) are preset with countersinks.
2. Screw wall bracket (B) of the shower door to corner frame piece (A) of
side screen.
FR2. Visser le profilé mural (B) de la porte de douche avec le profilé
d’angle (A) de la paroi latérale.
NL 2. Wandprofiel (B) van de douchedeur aan hoekprofiel (A) van de
zijwand vastschroeven.
IT 2. Avvitare il profilo a muro (B) della porta doccia con il profilo ad
angolo (A) del laterale fisso.
3x
A

14 / 3614 / 36 MA_TL2_DuAuf_TSW_110163_01_23
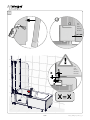
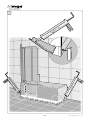
9DEFixteil einsetzen und nur sichern - noch nicht fest
anziehen (3).
ENInsert fixed part and only secure; do not tighten
yet (3).
FRIntroduire l‘élément fixer et sécuriser – ne pas
fixer complètement (3).
NL Vaste del erin zetten en enigszins vastzetten –
nog niet vast aandraaien (3).
IT Inserire il fisso della porta e bloccarlo legger-
mente - non fissarlo completamente (3).
SW 4
3x
13x
2
3

653 mm
1
X = XX = X
2
SW 4
3x 3
15 / 3615 / 36 MA_TL2_DuAuf_TSW_110163_01_23
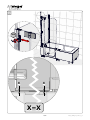
DEFixteil senkrecht einrichten
und Schrauben fest anziehen.
ENAdjust fixed part vertically and
tighten screws securely.
FRRégler le niveau vertical
l‘élément fixe et bien serrer la vis.
NL Vaste deel loodrecht uitrichten
en vast aandraaien.
IT Mettere a bolla il fisso della
porta e stringere bene le viti di bl-
occaggio.
10

GOED AFSTELLENAJUSTER AGGIUSTARE
ADJUSTJUSTIEREN
16 / 3616 / 36 MA_TL2_DuAuf_TSW_110163_01_23
>90°
justieren
adjust
ajuster
goed afstellen
justieren
adjust
ajuster
goed afstellen
<90°
SW 4
SW 4
SW 4
SW 4
Oberseite
top
partie supérieure
boven
innen
inside
intérieur
binnenkant
lato interno

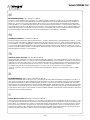
DE Tür einhängen.
EN Hang in door.
FR Suspendre la porte.
NL Deur inhangen.
IT Inserire la porta.
17 / 3617 / 36 MA_TL2_DuAuf_TSW_110163_01_23
11
Oberseite
top
partie supérieure
boven
innen
inside
intérieur
binnenkant
lato interno

innen, inside, intérieur
binnenkant, lato interno
innen, inside, intérieur
binnenkant, lato interno
18 / 3618 / 36 MA_TL2_DuAuf_TSW_110163_01_23
14

XXXX
X=XX=X
SW 4
19 / 3619 / 36 MA_TL2_DuAuf_TSW_110163_01_23
15

A B C D E
11innen, inside
intérieur, binnenkant
lato interno
1
20 / 3620 / 36 MA_TL2_DuAuf_TSW_110163_01_23
16
La pagina si sta caricando...
La pagina si sta caricando...
La pagina si sta caricando...
La pagina si sta caricando...
La pagina si sta caricando...
La pagina si sta caricando...
La pagina si sta caricando...
La pagina si sta caricando...
La pagina si sta caricando...
La pagina si sta caricando...
La pagina si sta caricando...
La pagina si sta caricando...
La pagina si sta caricando...
La pagina si sta caricando...
La pagina si sta caricando...
La pagina si sta caricando...
-
 1
1
-
 2
2
-
 3
3
-
 4
4
-
 5
5
-
 6
6
-
 7
7
-
 8
8
-
 9
9
-
 10
10
-
 11
11
-
 12
12
-
 13
13
-
 14
14
-
 15
15
-
 16
16
-
 17
17
-
 18
18
-
 19
19
-
 20
20
-
 21
21
-
 22
22
-
 23
23
-
 24
24
-
 25
25
-
 26
26
-
 27
27
-
 28
28
-
 29
29
-
 30
30
-
 31
31
-
 32
32
-
 33
33
-
 34
34
-
 35
35
-
 36
36


Artweger SHOWER SCREEN Assembly Instructions
- Tipo
- Assembly Instructions
in altre lingue
- français: Artweger SHOWER SCREEN
- Deutsch: Artweger SHOWER SCREEN
- Nederlands: Artweger SHOWER SCREEN
Documenti correlati
-
Artweger Shower door and sidescreen, plinth-panels Assembly Instructions
-
-
-
-
-
-
-
-
-