claber Multipla AC 230/24 V LCD Guida utente
- Tipo
- Guida utente

MULTIPLA AC 230/24 V LCD 1
Guida all’utilizzo
User manual
Guide d’utilisation
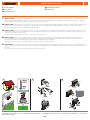
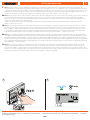
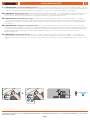
INSTALLAZIONE. Fissare a parete il programmatore in un locale non umido, riparato da agenti atmosferici e schizzi d’acqua e con temperature dai 0 ai 50
°C. Non installare il programmatore all’aperto o all’interno di pozzetti interrati. Multipla può essere installata con staa (2) o direttamente a parete (3).
N.B. prima di interrare l’impianto vericare il corretto funzionamento dello stesso.
INSTALLATION. Fasten the timer on the wall in a non-humid room, protected from weathering and splashes of water at a temperature of between 0°C
and 50°C. Do not install the timer outdoors or in underground valve boxes. Multipla can be installed with a bracket (2) or directly on the wall (3).
N.B. before burying the system, check that it is working properly.
INSTALLATION. Fixez au mur le programmateur dans un local non humide, à l'abri des agents atmosphériques et des éclaboussures d'eau, et avec des
températures allant de 0° à 50°C. N'installez pas le programmateur à l'extérieur ou à l'intérieur de regards enterrés. Multipla peut être installée avec un
étrier (2) ou directement sur le mur (3).
N.B. avant d'enterrer l'installation, vériez le correct fonctionnement de celle-ci.
INSTALLATION. Befestigen Sie den Bewässerungscomputer in einem trockenen Raum an der Wand, geschützt vor Witterungseinüssen und
Wasserspritzern sowie bei Temperaturen zwischen 0° und 50°. Installieren Sie den Bewässerungscomputer nicht im Freien oder in unterirdischen
Schächten. Multipla kann mit einem Bügel (2) oder direkt an der Wand (3) installiert werden.
Hinweis: Bevor Sie die Anlage unterirdisch installieren, prüfen Sie, dass sie korrekt funktioniert.
INSTALACIÓN. Fije el programador a la pared en un local sin humedad, protegido de la intemperie y de salpicaduras de agua y con temperaturas de
entre 0 °C y 50 °C. No instale el programador al aire libre ni dentro de arquetas enterradas. Multipla puede instalarse con soporte (2) o directamente en la
pared (3).
Nota: antes de enterrar el sistema, compruebe que funcione correctamente.
Per Multipla AC 230/24V LCD (codice): - For Multipla AC 230/24V LCD (code): - Pour Multipla AC 230/24V LCD (code): - Für Multipla AC 230/24V LCD (Art.): - Para Multipla
AC 230/24V LCD (código):
IT
UK
FR
DE
ES
IT
UK
FR
Benuttzzerrhandbucch
Guía de uso
DE
ES
8058
MULTIPLA AC 230/24V LCD
0
5
10
15
30
20
0
5
10
15
30
20
0
5
10
15
30
20
0
5
10
15
30
20
0
5
10
15
30
20
TEST/MANUAL START + ...HOURS
RESET
7d
FREQUENCY
12h
8h
24h 2d
4d
3d
0
5
10 30
20
0
5
10 15
30
20
0
5
10
15
30
20
5 0
10
15
30
20
0
5
10
15
30
20
0
5
10 15
30
20
0
5
10 30
20
TEST/MANUAL START + ...HOURS
RESET
7d
FREQUENCY
12h
8h
24h 2d
4d
3d
0
5
10 15
30
20
0
5
10
15
30
20
5 0
10
15
30
20
0
5
10
15
30
20
0
5
10 15
30
20
0
5
10 30
20
TEST/MANUAL START + ...HOURS
RESET
7d
FREQUENCY
12h
8h
24h 2d
4d
3d
MULTIPLA AC 230/24V LCD
0
5
10
15
30
20
0
5
10
15
30
20
0
5
10
15
30
20
0
5
10
15
30
20
0
5
10
15
30
20
TEST/MANUAL START + ...HOURS
RESET
7d
FREQUENCY
12h
8h
24h 2d
4d
3d
0
5
10 30
20
min.
0°C
max.
50°C
MULTIPLA AC 230/24V LCD
0
5
10
15
30
20
0
5
10
15
30
20
0
5
10
15
30
20
0
5
10
15
30
20
0
5
10
15
30
20
TEST/MANUAL START + ...HOURS
RESET
7d
FREQUENCY
12h
8h
24h 2d
4d
3d
0
5
10 30
20
MULTIPLA AC 230/24V LCD
0
5
10
15
30
20
0
5
10
15
30
20
0
5
10
15
30
20
0
5
10
15
30
20
0
5
10
15
30
20
TEST/MANUAL START + ...HOURS
RESET
7d
FREQUENCY
12h
8h
24h 2d
4d
3d
0
5
10 30
20
MULTIPLA AC 230/24V LCD
0
5
10
15
30
20
0
5
10
15
30
20
0
5
10
15
30
20
0
5
10
15
30
20
0
5
10
15
30
20
TEST/MANUAL START + ...HOURS
RESET
7d
FREQUENCY
12h
8h
24h 2d
4d
3d
0
5
10 30
20
6mm
TSP
4x30
6mm
TSP
4x30
1 2 3

MULTIPLA AC 230/24 V LCD 2
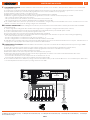
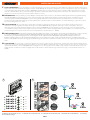
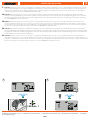
COLLEGAMENTI ELETTRICI. Durante l’installazione delle elettrovalvole rispettare il verso del usso dell’acqua indicato dalla freccia e la scritta “FLOW”
stampigliate sul corpo.
1. Congiungere i singoli li provenienti da un terminale qualsiasi di ciascuna valvola con un lo proveniente dal programmatore (comune valvole).
2. Posare un tubo protettivo per i cavi elettrici dal programmatore verso le valvole ed il Rain Sensor (se previsto).
3. Passare attraverso il tubo protettivo i cavi elettrici necessari.
4. Eettuare il collegamento dei cavi alle rispettive valvole (compresa la Master Valve se utilizzata).
5. Eettuare i seguenti collegamenti alla morsettiera del programmatore, inserendo e serrando le estremità spelate per 5-6 mm:
- il lo comune proveniente dalle valvole, al morsetto C;
- il lo proveniente dal secondo terminale di ciascuna valvola di linea ai morsetti da 1 a 6,
- il lo proveniente dal secondo terminale della Master Valve (se utilizzata) al morsetto MV.
6. Se si utilizza il Rain Sensor, rimuovere il ponticello tra i morsetti SENS e collegarvi i li provenienti dal Rain Sensor stesso. Se il Rain Sensor non viene
utilizzato, é necessario che il ponticello rimanga collegato tra i morsetti SENS.
ELECTRICAL CONNECTIONS.
When installing the solenoid valves, observe the direction of ow of the water as shown by the arrow and the word “FLOW”
printed on the body.
1. Join the single wires coming from either terminal of the single valves to a single wire coming from the timer (valves common).
2. The wires running from the timer to the valves and the Rain Sensor (if installed) must be protected with plastic conduit.
3. Lay the conduit, and route the necessary wires through from end to end.
4. Connect the ends to the respective valves (including the Master Valve, if installed).
5. Make the following connections to the terminal box of the timer, stripping the ends of the wires to expose 5-6 mm, inserting and tightening:
- the common wire from the valves, to terminal C,
- the wire coming from the second terminal of each valve, to terminals 1 … 6,
- the wire coming from the second terminal of the Master Valve (if installed) to terminal MV.
6. If the Rain Sensor is installed, remove the jumper from the SENS terminals and connect the wires from the Rain Sensor in its place. If the Rain Sensor is
not going to be used, the jumper must remain in place between the SENS terminals.
BRANCHEMENTS ÉLECTRIQUES.
Pendant l'installation des électrovannes, respectez le sens du ux de l'eau indiqué par la èche et par le message «FLOW»
présent sur le corps.
1. Reliez chacun des ls provenant d'une borne quelconque de chaque vanne à un l venant du programmateur (commun vannes).
2. faites passer dans un fourreau les câbles électriques reliant le programmateur aux vannes et au "Rain Sensor" (si prévu).
3. Faites passer dans le fourreau les câbles électriques nécessaires.
4. Branchez les câbles à leurs vannes respectives (à la vanne maîtresse aussi si prévue).
5. Eectuez les branchements suivants à la boîte à bornes du programmateur, en insérant et en serrant les extrémités dénudées de 5-6 mm :
- le l commun venant des vannes à la borne C,
- le l venant de la deuxième borne de chaque vanne de circuit aux bornes de 1 à 6,
- le l venant de la deuxième borne de la vanne maîtresse (si prévue) à la borne MV.
6. Si vous utilisez le "Rain Sensor", défaites le pontage entre les bornes SENS et reliez-y les ls venant du "Rain Sensor". Si vous n'utilisez pas le "Rain Sensor",
vous devez impérativement laisser en place le pontage entre les bornes SENS.
Per Multipla AC 230/24V LCD (codice): - For Multipla AC 230/24V LCD (code): - Pour Multipla AC 230/24V LCD (code): - Für Multipla AC 230/24V LCD (Art.): - Para Multipla
AC 230/24V LCD (código):
IT
UK
FR
8058
9V
ALKALINE
MULTIPLA AC 230/24V
Comune
MV
1
2
3
4
5
6
RS
24AC
Valve
Rain
Sensor
(optional)
1MV 2 3 4 5 6
MAX 350m (Ø 1,5 mm²)

MULTIPLA AC 230/24 V LCD 2
ELEKTRISCHE VERBINDUNG. Beachten Sie bei der Installation der Magnetventile die Richtung des Wasserusses, die durch den Pfeil und die
Beschriftung „FLOW“ am Körper angezeigt wird.
1. Verbinden Sie die einzelnen Drähte, die von einem beliebigen Kabelende (-) jedes Ventils kommen, mit dem vom Programmschalter (Sammelleitung)
kommenden Draht.
2. Verlegen Sie einen Kabelkanal für die vom Programmschalter zu den Ventilen und zum Regenfühler (falls vorhanden) führenden Stromkabel.
3. Führen Sie die notwendigen Stromkabel durch den Kabelkanal.
4. Schließen Sie die Kabel an die jeweiligen Ventile (einschl. des Hauptventils, falls in Gebrauch) an.
5. Nehmen Sie folgende Anschlüsse an das Klemmenbrett des Programmschalters vor, indem Sie die 5-6 mm lang abisolierten Kabelenden einsetzen und
anklemmen:
- den gemeinsamen Draht von den Ventilen an Klemme C,
- den vom zweiten Kabelende jedes Leitungsventils kommenden Draht an die Klemmen von 1 bis 6,
- den vom zweiten Kabelende des Hauptventils (falls in Gebrauch) kommenen Draht an die Klemme MV.
6. Bei Verwendung des Regenfühlers die Brücke zwischen den Klemmen SENS entfernen und die vom Regenfühler kommenden Drähte daran anschließen.
Wird der Regenfühler nicht verwendet, muss die Brücke zwischen den Klemmen SENS angeschlossen bleiben. Der Regenfühler lässt sich nicht zum
Unterbrechen des gemeinsamen Drahts der bistabilen Ventile verwenden.
CONEXIONES ELÉCTRICAS. Durante la instalación de las electroválvulas, respete la dirección del ujo de agua indicado por la echa y el rótulo “FLOW”
estampados en el cuerpo.
1. Una los hilos procedentes de un terminal de cualquier válvula con el hilo procedente del programador (común de las válvulas).
2. Instale un tubo de protección para los cables eléctricos desde el programador hasta las válvulas y el sensor de lluvia (si se ha instalado).
3. Haga pasar los cables eléctricos necesarios por el interior del tubo de protección.
4. Conecte los cables a las válvulas correspondientes (incluida la válvula master si se utiliza).
5. Efectúe las siguientes conexiones en la regleta de conexiones del
programador; para ello, introduzca y apriete los extremos pelados unos 5-6 mm:
- el hilo común , procedente de las válvulas, al borne C;
- el hilo procedente del segundo terminal de cada válvula de línea a los bornes del 1 a 6,
- el hilo procedente del segundo terminal de la válvula master (si se utiliza) al borne MV.
6. Si desea instalar el sensor de lluvia, quite el puente entre los bornes SENS y conecte los hilos procedentes del sensor de lluvia. Si no utiliza el sensor de
lluvia, este puente ha de estar conectado entre los bornes SENS.
Per Multipla AC 230/24V LCD (codice): - For Multipla AC 230/24V LCD (code): - Pour Multipla AC 230/24V LCD (code): - Für Multipla AC 230/24V LCD (Art.): - Para Multipla
AC 230/24V LCD (código):
DE
ES
8058
9V
ALKALINE
MULTIPLA AC 230/24V
Comune
MV
1
2
3
4
5
6
RS
24AC
Valve
Rain
Sensor
(optional)
1MV 2 3 4 5 6
MAX 350m (Ø 1,5 mm²)

MULTIPLA AC 230/24 V LCD 3
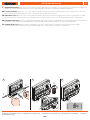
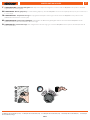
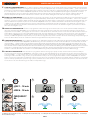
INSERIMENTO BATTERIA. Rimuovere il coperchio del vano batteria dalla sede, inserire la batteria con una leggera pressione nell’apposito alloggiamento.
Utilizzare esclusivamente batterie alcaline nuove da 9 V di tipo IEC 6LR61. All’inserimento della batteria il display visualizza OFF.
FITTING THE BATTERY. Remove the cover on the battery compartment, insert the battery by pushing it gently into the casing. Use only a new 9 volt
alkaline battery, type IEC 6LR61. When the battery is inserted, the message OFF will be displayed.
REMPLACER LA PILE. Retirez le couvercle du compartiment de la pile, insérez la pile à l'aide d'une légère pression dans le logement prévu à cet eet.
Utilisez exclusivement des piles alcalines de 9V de type IEC 6LR61. À la mise en place de la pile, vous verrez apparaître sur l'écran l'indication OFF.
EINLEGEN DIE BATTERIE. Entfernen Sie den Deckel des Batteriefachs vom Sitz und setzen Sie die Batterie mit einem leichten Druck in ihre Aufnahme ein.
Verwenden Sie ausschließlich neue 9V Alkalibatterien vom Typ IEC 6LR61. Beim Einsetzen der Batterie erscheint auf dem Display OFF.
COLOCACIÓN DE LA PILA. Quite la tapa del compartimento de la pila y coloque la pila en su alojamiento presionando ligeramente. Utilice
exclusivamente una batería alcalina nueva de 9 V de tipo IEC 6LR61. Al conectar la batería, en el display se visualiza OFF.
Per Multipla AC 230/24V LCD (codice): - For Multipla AC 230/24V LCD (code): - Pour Multipla AC 230/24V LCD (code): - Für Multipla AC 230/24V LCD (Art.): - Para Multipla
AC 230/24V LCD (código):
IT
UK
FR
DE
ES
8058
0
5
10 15
30
20
0
5
10
15
30
20
5 0
10
15
30
20
0
5
10
15
30
20
0
5
10 15
30
20
0
5
10 30
20
TEST/MANUAL START + ...HOURS
RESET
7d
FREQUENCY
12h
8h
24h 2d
4d
3d
9 V
Alcaline
1
MULTIPLA AC 230/24V LCD
0
5
10
15
30
20
0
5
10
15
30
20
0
5
10
15
30
20
0
5
10
15
30
20
0
5
10
15
30
20
TEST/MANUAL START + ...HOURS
RESET
7d
FREQUENCY
12h
8h
24h 2d
4d
3d
0
5
10 30
20
0
5
10 15
30
20
0
5
10
15
30
20
5 0
10
15
30
20
0
5
10
15
30
20
0
5
10 15
30
20
0
5
10 30
20
TEST/MANUAL START + ...HOURS
RESET
7d
FREQUENCY
12h
8h
24h 2d
4d
3d
0
5
10 15
30
20
0
5
10
15
30
20
5 0
10
15
30
20
0
5
10
15
30
20
0
5
10 15
30
20
0
5
10 30
20
TEST/MANUAL START + ...HOURS
RESET
7d
FREQUENCY
12h
8h
24h 2d
4d
3d
1
2
1
2
click!
123

MULTIPLA AC 230/24 V LCD 4
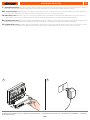
INSERIMENTO BATTERIA. Reinserire il coperchio del vano batteria. Inserire il trasformatore di alimentazione esterno in una presa di corrente a 230 AC. La
batteria ha esclusivamente la funzione di mantenere l’orario di avvio impostato, in caso di interruzione dell’alimentazione elettrica.
FITTING THE BATTERY. Ret the battery cover. Plug the voltage transformer into a 230 V AC mains power socket. The battery serves purely to maintain
the clock function, and therefore the timing of the selected programme, in the event of a mains power failure.
REMPLACER LA PILE. Remettez en place le couvercle du compartiment de la pile. Branchez le transformateur d'alimentation externe dans la prise de
courant 230 AC. La pile a pour rôle unique de maintenir l'horaire de démarrage programmé, en cas d'arrêt de l'alimentation électrique.
EINLEGEN DIE BATTERIE. Setzen Sie den Deckel des Batteriefachs wieder ein. Schließen Sie den externen Transformator für die Stromversorgung an eine
230-AC-Steckdose an. Die Batterie hat ausschließlich die Funktion, im Falle eines Stromausfalls die eingestellte Startzeit beizubehalten.
COLOCACIÓN DE LA PILA. Coloque la tapa del compartimiento de la batería. Conecte el transformador de alimentación externo a la toma de corriente
de 230 Vca. La función de la batería es mantener la hora de inicio del programa congurado cuando se produce un corte de tensión de red.
Per Multipla AC 230/24V LCD (codice): - For Multipla AC 230/24V LCD (code): - Pour Multipla AC 230/24V LCD (code): - Für Multipla AC 230/24V LCD (Art.): - Para Multipla
AC 230/24V LCD (código):
IT
UK
FR
DE
ES
8058
0
5
10 15
30
20
0
5
10
15
30
20
5 0
10
15
30
20
0
5
10
15
30
20
0
5
10 15
30
20
0
5
10 30
20
TEST/MANUAL START + ...HOURS
RESET
7d
FREQUENCY
12h
8h
24h 2d
4d
3d
1 2

MULTIPLA AC 230/24 V LCD 5
TEST. La funzione di test consente di eettuare rapidamente una verica del corretto funzionamento dell’impianto, attivando manualmente una
determinata valvola, per una durata pressata di 5 minuti. Qualora vi sia una irrigazione in corso, per eettuare il test, è possibile interromperla premendo
contemporaneamente i tasti TEST e START+…Premere ripetutamente il tasto TEST no a selezionare la linea che si intende attivare; dopo pochi secondi la
relativa valvola si aprirà per 5 minuti. Il display indica la modalità di funzionamento TEST, la linea selezionata ed il tempo di irrigazione rimanente. Per
anticipare la chiusura di una valvola in prova, premere contemporaneamente i tasti TEST e START+… per un secondo.
TEST. The test function can be used to perform a quick check on the system that will ensure its correct operation, by activating a given valve manually for
a preset duration of 5 minutes. If there is an irrigation cycle running, you can pause the cycle to perform the test by pressing the TEST and START+…
buttons at the same time. Press the TEST button repeatedly to select and activate one of the lines; after a few seconds, the relative valve will open for 5
minutes. The display indicates the operating mode
- “TEST” - the line selected, and the time remaining. To close the valve being tested before the end of the 5 minutes, press and hold the TEST and
START+… buttons for a second.
TEST. La fonction "TEST" permet un contrôle rapide du fonctionnement de l'installation, en activant manuellement une vanne donnée pour une durée
prédénie de 5 minutes. Si un arrosage est en cours, pour eectuer le test, il est possible de l'interrompre en appuyant simultanément sur les touches
TEST et START+…. Appuyez plusieurs fois sur la touche TEST jusqu'à sélectionner le circuit que vous voulez activer ; quelques secondes après la vanne
correspondante s'ouvre pendant 5 minutes. L'acheur indique le mode de fonctionnement TEST, le circuit sélectionné et le temps d'arrosage restant.
Pour anticiper la fermeture d'une vanne testée, appuyez simultanément sur les touches TEST et START+… pendant une seconde.
TEST. Diese Testfunktion gestattet das schnelle Prüfen der Funktionsweise der Anlage, indem manuell ein bestimmtes Ventil für eine festgelegte Dauer
von 5Minuten aktiviert wird. Wenn der Test während einer laufenden Bewässerung durchgeführt werden soll, können Sie diese unterbrechen, indem Sie
gleichzeitig die Tasten TEST und START+… drücken. Drücken Sie dann wiederholt die Taste TEST, bis Sie den Kreis ausgewählt haben, den Sie aktivieren
möchten; nach wenigen Sekunden wird das zugehörige Ventil für 5Minuten geönet. Auf dem Display werden der Betriebsmodus TEST, der ausgewählte
Kreis und die restliche Bewässerungsdauer angezeigt. Wenn Sie ein Ventil im Testmodus vorzeitig schließen möchten, drücken Sie gleichzeitig die Tasten
TEST und START+… für eine Sekunde.
TEST. La función de test permite controlar rápidamente que una válvula funcione de forma correcta activándola manualmente durante un plazo de
tiempo predeterminado de 5 minutos. Cuando haya un riego en curso, para realizar la prueba, se puede interrumpirlo pulsando al mismo tiempo los
botones TEST y START+…. Pulse varias veces la tecla TEST hasta seleccionar la línea que se desea activar; transcurridos unos segundos, la válvula se abre
durante cinco minutos. El display indica el modo de funcionamiento TEST, la línea seleccionada y el tiempo de riego que queda. Para anticipar el cierre de
una válvula en prueba, pulse al mismo tiempo los botones TEST y START+… durante un segundo.
Per Multipla AC 230/24V LCD (codice): - For Multipla AC 230/24V LCD (code): - Pour Multipla AC 230/24V LCD (code): - Für Multipla AC 230/24V LCD (Art.): - Para Multipla
AC 230/24V LCD (código):
IT
UK
FR
DE
ES
8058
MULTIPLA AC 230/24V LCD
0
5
10
15
30
20
0
5
10
15
30
20
0
5
10
15
30
20
0
5
10
15
30
20
0
5
10
15
30
20
TEST/MANUAL START + ...HOURS
RESET
7d
FREQUENCY
12h
8h
24h 2d
4d
3d
0
5
10 30
20
MULTIPLA AC 230/24V LCD
0
10
15
30
20
0
5
10
15
30
20
0
5
10
15
30
20
0
5
10
15
30
20
0
5
10
15
30
20
TEST/MANUAL START + ...HOURS
RESET
7d
FREQUENCY
12h
8h
24h 2d
4d
3d
0
5
10 30
20
LINE
MIN
TEST
TEST!
5 min
1...6
x3
1 2

MULTIPLA AC 230/24 V LCD 6
CICLO DI IRRIGAZIONE. Un ciclo di irrigazione consiste nell’apertura in successione ed ordine crescente, dalla linea 1 alla linea 6, di tutte le valvole per le
quali è stata selezionata una durata di irrigazione tramite i SELETTORI LINE. Un programma di irrigazione consiste nella ripetizione di un ciclo di irrigazione
con una frequenza impostata tramite il selettore FREQUENCY. Per impostare un ciclo di irrigazione, ruotare il selettore LINE corrispondente a ciascuna
linea che si intende attivare, no a selezionare il tempo desiderato. La durata impostabile è compresa fra 5 e 60 minuti. Se si desidera invece escludere
l’irrigazione su una linea, posizionare il corrispondente selettore su • (zero).
WATERING CYCLE. During a watering cycle, the Multipla activates all the valves on lines 1 to 6 for which a watering time has been programmed using
the LINE SELECTORS, opening them in succession and in ascending order. A watering programme consists in the repetition of a watering cycle at
intervals programmed with the FREQUENCY selector. Having decided which lines are to be activated, turn the LINE selector for each one until it is
positioned on the required time. Watering can be programmed for a duration between 5 and 60 minutes. To exclude watering on a given line, position
the corresponding selector on • (zero).
CYCLE D’ARROSAGE. Un cycle d'arrosage consiste dans l'ouverture en séquence progressive, du circuit 1 au circuit 6, de toutes les vannes pour
lesquelles vous avez programmé une durée d'arrosage avec les SÉLECTEURS LINE. Un programme d'arrosage consiste en la répétition d'un cycle
d'arrosage dont vous avez programmé la fréquence avec le sélecteur FREQUENCY. Pour programmer un cycle d'arrosage, tournez le sélecteur LINE
correspondant à chaque circuit à activer jusqu'à sélectionner le temps voulu. La durée est programmable de 5 à 60 minutes. Si vous désirez par contre
exclure l'arrosage sur un circuit, tournez le sélecteur correspondant en le positionnant sur "• " (ZÉRO).
BEWÄSSERUNGSZYKLUS. Ein Bewässerungszyklus besteht im Önen aller Ventile – nacheinander und in aufsteigender Reihenfolge von Kreis 1 bis Kreis
6 –, für die eine Bewässerungsdauer mithilfe der DREHSCHALTER LINE ausgewählt wird. Ein Bewässerungsprogramm hingegen besteht in der
Wiederholung eines Bewässerungszyklus mit einer Häugkeit, die mit dem Drehschalter FREQUENCY ausgewählt wird. Zum Einstellen eines
Bewässerungszyklus drehen Sie die Drehschalter LINE aller Kreise, die Sie aktivieren möchten, auf die gewünschte Dauer. Die einstellbare Dauer liegt
zwischen 5und 60Minuten. Wenn Sie hingegen die Bewässerung an einem Kreis ausschließen möchten, stellen Sie den zugehörigen Drehschaltern auf •
(null).
CICLO DE RIEGO. Un ciclo de riego consiste en la apertura en secuencia y orden creciente, desde la línea 1 hasta la línea 6, de todas las válvulas para las
cuales se ha seleccionado la duración del riego mediante los selectores LINE. Un programa de riego consiste en repetir un ciclo de riego con la frecuencia
determinada mediante el selector FREQUENCY. Para congurar un ciclo de riego, gire el selector LINE correspondiente a la línea que desea activar, en el
tiempo deseado. La duración se puede congurar entre 5 y 60 minutos. Si desea excluir el riego en una línea, ponga el correspondiente selector en "•"
(CERO).
Per Multipla AC 230/24V LCD (codice): - For Multipla AC 230/24V LCD (code): - Pour Multipla AC 230/24V LCD (code): - Für Multipla AC 230/24V LCD (Art.): - Para Multipla
AC 230/24V LCD (código):
IT
UK
FR
DE
ES
8058
MULTIPLA AC 230/24V LCD
0
5
10
15
30
20
0
5
10
15
30
20
0
5
10
15
30
20
0
5
10
15
30
20
0
5
10
15
30
20
TEST/MANUAL START + ...HOURS
RESET
7d
FREQUENCY
12h
8h
24h 2d
4d
3d
0
5
10 30
20
MULTIPLA AC 230/24V LCD
0
5
10
15
30
20
0
5
10
15
30
20
0
5
10
15
30
20
0
5
10
15
30
20
0
5
10
15
30
20
TEST/MANUAL START + ...HOURS
RESET
FREQUENCY
12h
8h
24h
0
5
10 30
20
MULTIPLA AC 230/24V LCD
0
5
10
15
30
20
0
5
10
15
30
20
0
5
10
15
30
20
0
5
10
15
30
20
0
5
10
15
30
20
TEST/MANUAL START + ...HOURS
RESET
7d
FREQUENCY
12h
8h
24h 2d
4d
3d
0
5
10 30
20
MULTIPLA AC 230/24V LCD
0
5
10
15
30
20
0
5
10
15
30
20
0
5
10
15
30
20
0
5
10
15
30
20
0
5
10
15
30
20
TEST/MANUAL START + ...HOURS
RESET
7d
FREQUENCY
12h
8h
24h 2d
4d
3d
0
5
10 30
20
LINE 1LINE 2LINE 3
20 min
5
10 15 20 30
60
510 15 20 30
60
5
10 15 20 30
60
5 min
0 min
led valv. 1 ... ...
led valv. 2 ... ...
led valv. 3 ... ...
led valv. 4 ... ...
led valv. 5 ... ...
led valv. 6 ... ...
1 2

MULTIPLA AC 230/24 V LCD 7
PROGRAMMAZIONE - Frequenza d’irrigazione. Per impostare la frequenza di irrigazione, ruotare il selettore FREQUENCY sulla posizione desiderata
(ogni 8-12-24 ore o 2-3-4-7 giorni).
PROGRAMMING - Watering frequency. To set the watering frequency, turn the FREQUENCY selector to the required position (every 8, 12 or 24 hours, or
2, 3, 4 or 7 days).
PROGRAMMATION - Fréquence d'arrosage. Pour programmer la fréquence d'arrosage, tournez le sélecteur FREQUENCY sur la position voulue
(TOUTES LES 8-12-24 heures ou 2-3-4-7 jours).
PROGRAMMIERUNG - Bewässerungshäugkeit. Zum Einstellen der Bewässerungshäugkeit stellen Sie den Drehschalter FREQUENCY auf die
gewünschte Position (alle 8-12-24 Stunden oder 2-3-4-7 Tage).
PROGRAMACIÓN - Frecuencia de riego. Para congurar la frecuencia de riego, gire el selector FREQUENCY hasta la posición deseada (cada 8-12-24
horas o 2-3-4-7 días).
Per Multipla AC 230/24V LCD (codice): - For Multipla AC 230/24V LCD (code): - Pour Multipla AC 230/24V LCD (code): - Für Multipla AC 230/24V LCD (Art.): - Para Multipla
AC 230/24V LCD (código):
IT
UK
FR
DE
ES
8058
MULTIPLA AC 230/24V LCD
0
5
10
15
30
20
0
5
10
15
30
20
0
5
10
15
30
20
0
5
10
15
30
20
0
5
10
15
30
20
TEST/MANUAL START + ...HOURS
RESET
7d
FREQUENCY
12h
8h
24h 2d
4d
3d
0
5
10 30
20
lun
mer
mar
12 12
3
4
5
6
7
8
9
10
11
10
FREQUENCY

MULTIPLA AC 230/24 V LCD 8
PROGRAMMAZIONE - Partenza immediata dell’irrigazione. Per l’avvio immediato del programma, premere una sola volta il pulsante START+….
L’irrigazione successiva avverrà secondo quanto impostato con il selettore FREQUENCY. Il programmatore prende l’orario relativo all’avvio (START) del
primo programma di irrigazione. Esempio: alle ore 20:00 ho avviato l’irrigazione premendo il tasto START+…, il selettore FREQUENCY è impostato su 8 ore,
l’irrigazione successiva ripartirà alle 4:00 di notte.
PROGRAMMING - Immediate irrigation start. To start the programme immediately, press START+…once. The next watering cycle will begin after the
time period set with the FREQUENCY selector has elapsed. Timer scheduling is based on when the rst irrigation programme starts (START). Example:
pressing the START+... button at 20:00 to activate the programme, with the FREQUENCY set at 8 hours, the next watering cycle will start at 04:00.
PROGRAMMATION - Départ immédiat de l’arrosage. Pour le démarrage immédiat du programme, appuyez une seule fois la touche START+….
L'arrosage suivant démarrera en fonction de la programmation faite avec le sélecteur FREQUENCY. Le programmateur prend l'heure relative au démarrage
(START) du premier programme d'arrosage. Ex. : si vous avez démarré l'arrosage à 20:00 en appuyant sur la touche START+..., le sélecteur FREQUENCY
étant programmé sur 8 heures, l'arrosage suivant démarrera à 4:00 du matin.
PROGRAMMIERUNG - Sofortiger start der Bewässerung. Wenn Sie das Programm sofort starten möchten, drücken Sie einmal die Taste START+…. Die
nächste Bewässerung erfolgt nach dem Intervall, das sie mit dem Drehschalter FREQUENCY ausgewählt habe. Der Bewässerungscomputer nimmt die
Uhrzeit des Starts (START) des ersten Bewässerungsprogramms. Beispiel: Um 20:00Uhr habe ich die Bewässerung durch Drücken der Taste START+…
gestartet, der Drehschalter FREQUENCY ist auf 8 Stunden eingestellt; die nächste Bewässerung startet um 04:00Uhr morgens.
PROGRAMACIÓN - Inicio inmediato del riego. Para activar inmediatamente el programa, pulse una vez la tecla START+… El riego siguiente iniciará
según lo programado mediante el selector FREQUENCY. El programador toma la hora correspondiente al inicio (START) del primer programa de riego. Por
ejemplo, si se ha activado el riego pulsando la tecla START+... a las 20:00 y el selector FREQUENCY se encuentra en 8 horas, el siguiente riego iniciará a las
4:00 de la madrugada.
Per Multipla AC 230/24V LCD (codice): - For Multipla AC 230/24V LCD (code): - Pour Multipla AC 230/24V LCD (code): - Für Multipla AC 230/24V LCD (Art.): - Para Multipla
AC 230/24V LCD (código):
IT
UK
FR
DE
ES
8058
LINE
MIN
0
30
20
0
5
10
15
30
20
0
5
10
15
30
20
0
5
10
15
30
20
TEST/MANUAL START + ...HOURS
RESET
7d
FREQUENCY
12h
8h
24h 2d
4d
3d
0
5
10 30
20
0
5
10
15
30
20
5
10
15
12 12
3
4
5
6
7
8
9
10
11 12 12
3
4
5
6
7
8
9
10
11
x1
1 2

MULTIPLA AC 230/24 V LCD 9
PROGRAMMAZIONE - Partenza ritardata dell’irrigazione. Per l’avvio ritardato del programma, premere una prima volta il pulsante START+… ed entro
5 secondi premerlo nuovamente, tante volte quante sono le ore di ritardo che si vogliono impostare (da 1 a 23 ore)(es. 7 ore). Il display indica inizialmente
il numero di ore di ritardo selezionate, poi il simbolo di attesa irrigazione e il tempo mancante per l’avvio del primo ciclo di irrigazione.
PROGRAMMING - Delayed irrigation start. To delay the start of the programme, press START+… a second time before 5 seconds have elapsed, to set a
delay of one hour, a third time for two hours, and so on up to 23 hours (e.g. 7 hours). The display temporarily indicates the number of hours delay
selected, then the watering standby signal appears, along with the time remaining until the start of the rst cycle.
PROGRAMMATION - Départ diéré de l’arrosage. Pour le démarrage retardé du programme, appuyez une fois la touche START+…...et dans les 5
secondes appuyez de nouveau, autant de fois qu'il y a d'heures de retard à programmer (de 1 à 23 heures)(ex. 7 heures). Sur l'écran apparaît d'abord le
nombre d'heures de retardement sélectionné, puis le symbole d'attente arrosage et le temps devant encore s'écouler avant le démarrage du premier
cycle d'arrosage.
PROGRAMMIERUNG - Verzögerter start der Bewässerung. Wenn Sie das Programm zeitverzögert starten möchten, drücken Sie die Taste START+…
erst einmal und dann innerhalb von 5Sekunden erneut; diese zweite Betätigung innerhalb von fünf Sekunden können Sie mehrmals wiederholen, wobei
die Anzahl den Stunden entspricht, um die der Start verzögert werden soll (1 bis 23 Sunden)(Bsp. 7Stunden). Das Display zeigt anfänglich die gewählte
Anzahl der Stunden der Verzögerung, dann das Warte-Symbol der Bewässerung und die noch verbleibende Zeit bis zum Start des ersten
Bewässerungszyklus an.
PROGRAMACIÓN - Inicio aplazado del riego. Para el inicio retrasado del programa, pulse una primera vez la tecla START+… y en un plazo de 5
segundos vuélvala a pulsar tantas veces como sean las horas de retraso que desea congurar (de 1 a 23 horas) (por ejemplo 7 horas). El display indica
inicialmente el número de horas de retraso seleccionadas y, luego, el símbolo de espera de riego y el tiempo que falta para que inicie el primer ciclo de
riego.
Per Multipla AC 230/24V LCD (codice): - For Multipla AC 230/24V LCD (code): - Pour Multipla AC 230/24V LCD (code): - Für Multipla AC 230/24V LCD (Art.): - Para Multipla
AC 230/24V LCD (código):
IT
UK
FR
DE
ES
8058
MIN
HOUR
MULTIPLA AC 230/24V LCD
0
30
0
5
10
15
30
20
0
5
10
15
30
20
0
5
10
15
30
20
TEST/MANUAL START + ...HOURS
RESET
7d
FREQUENCY
12h
8h
24h 2d
4d
3d
0
5
10 30
20
MULTIPLA AC 230/24V LCD
0
5
10
15
30
20
0
5
10
15
30
20
0
5
10
15
30
20
0
5
10
15
30
20
0
5
10
15
30
20
TEST/MANUAL START + ...HOURS
RESET
7d
FREQUENCY
12h
8h
24h 2d
4d
3d
0
5
10 30
20
x1 x7
+
1...23

MULTIPLA AC 230/24 V LCD 10
DISPLAY. Durante l’esecuzione di un ciclo di irrigazione, sul display compare il simbolo di irrigazione in corso, oltre all’indicazione della linea al momento
attiva e di quanti minuti mancano alla ne dell’irrigazione per tale linea. La valvola al momento aperta è indicata anche dall’accensione del relativo led.
Terminato il ciclo di irrigazione, sul display ricompare il simbolo di attesa irrigazione ed il tempo mancante per l’avvio del prossimo ciclo di irrigazione.
(esempio di irrigazione con selettore FREQUENCY impostato su 8h).
DISPLAY. When a watering cycle is in progress, the display shows the ongoing symbol, the number of the line currently active and the number of
minutes remaining until watering is due to nish on that line. The valve that is open is also shown by the relevant LED ashing green. Once completed
the watering cycle, the standby signal reappears in the display, with the time remaining until the start of the next watering cycle (example of watering
cycle with FREQUENCY selector set to 8h).
ÉCRAN. Pendant l'exécution d'un cycle d'arrosage, sur l'écran apparaît le symbole de l'arrosage en cours, ainsi que l'indication du circuit activé à ce
moment et la durée restante du cycle en cours pour ce circuit. La vanne qui est ouverte est également indiquée par le clignotement vert de la relative
led. Au terme du cycle d'arrosage, sur l'écran se réachera le symbole d'attente d'arrosage et le temps qui doit encore s'écouler avant le démarrage du
prochain cycle d'arrosage (exemple d'arrosage avec le sélecteur FREQUENCY programmé sur 8h).
DISPLAY. Während der Ausführung eines Bewässerungszyklus erscheinen auf dem Display das Symbol der laufenden Bewässerung, der aktuell aktive
Kreis sowie die Restdauer der Bewässerung für diesen Kreis in Minuten. Das aktuell oene Ventil wird auch durch das grüne Blinken der zugehörigen LED
angezeigt. Nach dem Ende des Bewässerungszyklus erscheinen auf dem Display wieder das Warte-Symbol der Bewässerung und die noch verbleibende
Zeit bis zum Start des nächsten Bewässerungszyklus.
DISPLAY. Durante la ejecución de un ciclo de riego, en el display se visualiza el símbolo de riego en curso, además de la indicación de la línea que se
encuentra activada así como los minutos que faltan para que termine el riego en dicha línea. La válvula abierta en ese momento se indica también con el
parpadeo en verde del led correspondiente. Terminado el ciclo de riego, en el display se visualiza el símbolo de espera del riego y el tiempo que falta para
que inicie el siguiente ciclo de riego. (ejemplo de riego con selector FREQUENCY programado en 8 h).
Per Multipla AC 230/24V LCD (codice): - For Multipla AC 230/24V LCD (code): - Pour Multipla AC 230/24V LCD (code): - Für Multipla AC 230/24V LCD (Art.): - Para Multipla
AC 230/24V LCD (código):
IT
UK
FR
DE
ES
8058
LINE
MIN
LINE
MIN
MIN
HOUR
0
5
10
15
30
20
0
5
10
15
30
20
5
10
15
TEST/MANUAL
MULTIPLA AC 230/24V LCD
0
5
10
15
30
20
0
5
10
15
30
20
0
5
10
15
30
20
0
5
10
15
30
20
0
5
10
15
30
20
TEST/MANUAL START + ...HOURS
RESET
7d
FREQUENCY
12h
8h
24h 2d
4d
3d
0
5
10 30
20
LED valv. 1
1 2

MULTIPLA AC 230/24 V LCD 11
ESEMPIO DI PROGRAMMAZIONE. Alle ore 16.30 programmo la durata dell’irrigazione (es. 10 minuti) di tutte le linee (selettori LINE) e la frequenza di 8h
(selettore FREQUENCY). Desidero che l’irrigazione non parta subito, ma alle 22.30 (quindi dopo 6 ore). Premo il pulsante START+…, premo nuovamente il
pulsante per 6 volte nché il display visualizza 6:00. Il tempo a display comincerà a scalare no a raggiungere 00:00 alle ore 22.30; l’irrigazione partirà ogni
8 ore come impostato con il selettore FREQUENCY (quindi alle ore 22.30; 6.30 ed alle 14.30). Completata la prima irrigazione (quindi alle 11.30 dopo
l’apertura di tutte 6 le valvole per 10 minuti), a display appare il tempo rimanente alla prossima irrigazione (7 ore) calcolato sulla base dell’orario di
partenza della prima linea (8 ore dalle 10.30 alle 6.30, 7 ore dalle 11.30 orario di ne dell’irrigazione alle 6.30 orario della prossima irrigazione).
EXAMPLE OF PROGRAMMING. At 16:30, the duration is selected (e.g. 10 minutes) for all of the watering lines (LINE selectors) and the frequency is set at
8h (FREQUENCY selector). Suppose that watering is not required immediately, but at 22:30 (i.e. after 6 hours): press the START+… button once, and then
six times in succession, so that the display shows 6:00. The time indicated in the display begins counting down, reaching 0:00 at 22:30; the watering cycle
starts, and will then be repeated every 8 hours as set with the FREQUENCY selector (i.e. at 22.30, at 06:30 and at 14:30). Once the rst irrigation cycle is
complete (i.e. at 11.30 after all 6 valves have been open for 10 minutes), the remaining time until the next irrigation cycle will show on the display (7
hours), calculated based on the start time of the rst line (8 hours from 10.30 to 6.30, 7 hours from 11.30, when the irrigation cycle nishes, to 6.30, the
time of the next irrigation cycle.).
EXEMPLE DE PROGRAMMATION. À 16:30 vous programmez la durée d'arrosage (ex. 10 minutes) de tous les circuits (sélecteurs LINE) et la fréquence
d'arrosage de 8h (sélecteur FREQUENCY). Vous souhaitez que l'arrosage ne démarre pas tout de suite, mais seulement à 22:30 (donc 6 heures après) :
appuyez sur la touche START+..., puis appuyez de nouveau 6 fois consécutivement sur cette même touche. L'écran devra alors acher 6:00. En résumé, le
temps aché commencera à s'écouler jusqu'à indiquer 0:00 à 22:30 ; l'arrosage démarrera et se répétera alors toutes les 8 heures comme programmé
avec le sélecteur FREQUENCY (donc à 22:30 ; 6:30 et à 14:30). Une fois l'arrosage complété (donc à 11h30 après l’ouverture des 6 vannes pendant 10
minutes), sur l'acheur apparaît le temps restant pour le prochain arrosage (7 heures) calculé en fonction de l'heure de démarrage de la première ligne (8
heures de 10h30 à 6h30, 7 heures de 11h30 heure de n d'arrosage à 6h30 heure du prochain arrosage).
PROGRAMMIERUNGSBEISPIEL. Um 16:30Uhr programmiere ich die Bewässerungsdauer (z.B. 10Minuten) aller Kreise (Drehschalter LINE) und wähle ein
Intervall von 8h aus (Drehschalter FREQUENCY). Die Bewässerung soll nicht sofort starten, sondern erst um 22:30Uhr (d.h. nach 6 Stunden). Ich drücke
die Taste START+… einmal und dann erneut 6Mal, bis auf dem Display 6:00 angezeigt wird. Die auf dem Display angezeigte Zeit nimmt ab, bis sie um
22:30Uhr schließlich 00:00 erreicht; die Bewässerung startet daraufhin alle 8Stunden, wie mit dem Drehschalter FREQUENCY eingestellt (d.h. um 22:30
Uhr; um 06:30 und um 14:30Uhr). Nach Abschluss der ersten Bewässerung (d.h. 23:30Uhr nach Önung aller 6 Ventile für 10Minuten) erscheint auf dem
Display die noch verbleibende Dauer bis zur nächsten Bewässerung (7 Stunden), die basierend auf der Startzeit des ersten Kreises berechnet wird (8
Stunden von 22:30 bis 06:30Uhr und 7 Stunden von 23:30 Uhr [Bewässerungsende] bis 06:30Uhr [Startzeit der nächsten Bewässerung]).
EJEMPLO DE PROGRAMACIÓN. A las 16:30 horas se programa la duración del riego (por ejemplo 10 min) de todas las líneas (selectores LINE) y la
frecuencia de riego de 8 h (selector FREQUENCY). Si desea que el riego no inicie inmediatamente sino a las 22:30 horas (es decir, tras 6 horas). Pulse una
vez la tecla START+… y, luego, púlsela otras seis veces, hasta que en el display se visualice 6:00. Al cabo de algunos segundos, inicia una cuenta regresiva
hasta llegar a 0:00 a las 22:30 h; el riego iniciará y se repetirá cada 8 horas tal y como se ha programado mediante el selector FREQUENCY (es decir a las
22.30 h ; 6.30 h y a las 14.30 h). Una vez terminado el primer riego (es decir, a las 11:30 después de abrirse las 6 válvulas durante 10 minutos), en la pantalla
aparece el tiempo que falta para el próximo riego (7 horas), calculado sobre la base de la hora de inicio de la primera línea (8 horas, de las 10:30 a las 6:30;
7 horas, de las 11:30, hora de n del riego, a las 6:30, hora del próximo riego).
Per Multipla AC 230/24V LCD (codice): - For Multipla AC 230/24V LCD (code): - Pour Multipla AC 230/24V LCD (code): - Für Multipla AC 230/24V LCD (Art.): - Para Multipla
AC 230/24V LCD (código):
IT
UK
FR
DE
ES
8058
MIN
HOUR
MIN
HOUR
MULTIPLA AC 230/24V LCD
0
30
20
0
5
10
15
30
20
START + ...HOURS
7d
FREQUENCY
12h
8h
24h 2d
4d
3d
0
5
10 30
20
MULTIPLA AC 230/24V LCD
0
5
10
15
30
20
0
5
10
15
30
20
0
5
10
15
30
20
0
5
10
15
30
20
0
5
10
15
30
20
TEST/MANUAL START + ...HOURS
RESET
7d
FREQUENCY
12h
8h
24h 2d
4d
3d
0
5
10 30
20
0
10
15
30
20
0
5
10
15
30
20
0
5
10
15
30
20
TEST/MANUAL START + ...HOURS
RESET
7d
FREQUENCY
12h
8h
24h 2d
4d
3d
0
5
10 30
20
12 12
3
4
5
6
7
8
9
10
11 12 12
3
4
5
6
7
8
9
10
11
12 12
3
4
5
6
7
8
9
10
11
12 12
3
4
5
6
7
8
9
10
11
12 12
3
4
5
6
7
8
9
10
11
0
10
15
30
20
0
5
10
15
30
20
0
5
10
15
30
20
TEST/MANUAL START + ...HOURS
RESET
7d
FREQUENCY
12h
8h
24h 2d
4d
3d
0
5
10 30
20
LINE 1 - 10 min
LINE 6 - 10 min
...
FREQUENCY
8h
x1 x6
+
1 2 4
3 5

MULTIPLA AC 230/24 V LCD 12
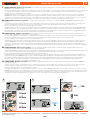
PROGRAMMAZIONE - Modicare un programma. Per modicare un programma di irrigazione in esecuzione, cambiare le impostazioni del selettori LINE e
FREQUENCY come desiderato. Esempi:
- durante un’irrigazione, mentre è attiva la linea 2, cambio la posizione dei selettori LINE 2 e 3 (es. da 10 min a 20 min): la durata dell’irrigazione in corso sulla linea 2
non subirà nessun cambiamento, mentre la nuova impostazione di 20 minuti avrà eetto a partire dall’irrigazione sulla linea 3. Nella successiva irrigazione
entrambe le linee 2 e 3 irrigheranno per 20 minuti.
- Multipla irriga ogni 8 ore, su due linee per 5 minuti ciascuna. Sono le 8.10 (Multipla ha già irrrigato su entrambe le linee) modico la posizione del selettore
FREQUENCY (es. da 8 a 12 ore). Multipla irrigherà alle 16.00 (rispettando l’intervallo di 8 ore precedentemente in memoria) e successivamente modicherà la
frequenza in 12 ore (irrigherà nuovamente alle 4.00). Se le modiche interessano frequenze più lunghe (es. 2 giorni), si consiglia di eseguire un reset, cambiare la
frequenza e reimpostare l’orario di avvio del programmatore. Questo per rendere eettive da subito le nuove impostazioni di frequenza.
PROGRAMMING - Modifying a programme. To change a watering programme currently in use, enter the new LINE and FREQUENCY settings as required.
Examples:
- with watering in progress and line 2 active, the position of the LINE 2 and 3 selectors is changed (e.g., from 10 min to 20 min): there will be no change on the
duration of the watering step already in progress on line 2, whereas the new setting of 20 minutes will be eective with the activation of line 3.
For the next irrigation cycle, both lines 2 and 3 will irrigate for 20 minutes.
-Multipla irrigates every 8 hours on 2 lines, for 5 minutes each. If it is 8.10 (Multipla has already irrigated on both lines) and the position of the FREQUENCY dial is
changed (e.g. from 8 to 12 hours), Multipla will irrigate at 4 pm (observing the 8-hour interval saved previously) and then the frequency will change to 12 hours
(the next irrigation cycle will run at 4 am). If the changes apply to longer frequencies (e.g. 2 days), we recommend resetting the device, changing the frequency
and resetting the start time. This will ensure the new frequency settings take eect immediately.
PROGRAMMATION - Modier un programme. Pour modier un programme d'arrosage en cours d'exécution, vous devez changer les présélections des
sélecteurs LINE et FREQUENCY comme vous le souhaitez. Exemples :
- en cours d'arrosage, avec le circuit 2 activé, vous changez la position des sélecteurs LINE 2 et 3 (ex. : de 10 min à 20 min) : le temps d'arrosage programmé sur le
circuit 2 ne sera pas modié, alors que la nouvelle durée d'arrosage de 20 minutes s'appliquera au prochain cycle d'arrosage du circuit 3.
Lors du prochain arrosage, les lignes 2 et 3 arroseront pendant 20 minutes.
- Multipla arrose toutes les 8 heures, sur deux lignes pendant 5 minutes chacune. Il est 8h10 (Multipla a déjà arrosé sur les deux lignes) je modie la position du
sélecteur FREQUENCY (ex. de 8 à 12 heures). Multipla arrosera à 16h00 (en respectant l'intervalle de 8 heures précédemment en mémoire), puis modiera la
fréquence en 12 heures (il arrosera de nouveau à 4h00). Si les modications intéressent des fréquences plus longues (ex. 2 jours), il est conseillé d'eectuer un
reset, de changer la fréquence et de recongurer l'heure de démarrage du programmateur. Cela an de rendre tout de suite eectives les nouvelles congurations
de fréquence.
PROGRAMMIERUNG - Ändern eines Programms. Wenn Sie ein Bewässerungsprogramm ändern möchten, das gerade ausgeführt wird, ändern Sie die
Einstellungen der Drehschalter LINE und FREQUENCY wie gewünscht. Beispiel:
- während einer Bewässerung am Kreis 2 ändere ich die Position der Drehschalter LINE 2 und 3 (z.B. von 10 min auf 20 min): Die Dauer der laufenden Bewässerung
am Kreis2 bleibt unverändert, während die neuen Einstellung von 20Minuten ab der Bewässerung am Kreis3 greift.
Bei der nächsten Bewässerung bewässern die beiden Kreise 2 und 3 für 20 Minuten.
- Multipla bewässert alle 8Stunden an beiden Kreisen für je 5Minuten. Es ist 08:10Uhr (Multipla hat bereits an beiden Kreisen bewässert) und ich ändere die
Position des Drehschalters FREQUENCY (z.B. von 8 auf 12 Stunden). Multipla wird daraufhin um 16:00Uhr bewässern (gemäß dem Intervall von 8Stunden, das
zuvor gespeichert war) und ändert anschließend die Häugkeit auf 12Stunden (und bewässert dann wieder um 04:00Uhr). Wenn die Änderungen längere
Intervalle betreen (z.B. 2Tage) wird empfohlen, ein Reset vorzunehmen, die Häugkeit zu ändern und die Startzeit des Bewässerungscomputers neu
einzustellen. Dadurch greift die neue Einstellung der Häugkeit sofort.
PROGRAMACIÓN - Modicar un programa. Para modicar un programa de riego en ejecución, cambie las posiciones de los selectores LINE y FREQUENCY
según desee. Ejemplos:
- Durante un riego en el que está activada la línea 2, se cambia la posición de los selectores LINE 2 y 3 (por ejemplo, de 10 min a 20 min): la duración del riego
actual en la línea 2 no sufrirá ningún cambio mientras que la nueva programación de 20 minutos se efectuará cuando inicie el riego en la línea 3.
En el siguiente riego, las líneas 2 y 3 regarán durante 20 minutos.
- Multipla riega cada 8 horas, en dos líneas durante 5 minutos cada una. Son las 8:10 (Multipla ya ha regado en las dos líneas), cambiamos de posición el selector
FREQUENCY (por ej., de 8 a 12 horas). Multipla regará a las 16:00 (respetando el intervalo de 8 horas memorizado previamente) y después cambiará la frecuencia a
12 horas (volverá a regar a las 4:00). Si las modicaciones afectan a frecuencias más largas (por ej., 2 días), se recomienda efectuar un reset, cambiar la frecuencia y
reajustar la hora de inicio del programador. De esta manera, los nuevos valores de frecuencia tendrán efecto inmediatamente.
Per Multipla AC 230/24V LCD (codice): - For Multipla AC 230/24V LCD (code): - Pour Multipla AC 230/24V LCD (code): - Für Multipla AC 230/24V LCD (Art.): - Para Multipla
AC 230/24V LCD (código):
IT
UK
FR
DE
ES
8058
LINE
MIN
LINE
MIN
LINE
MIN
MULTIPLA AC 230/24V LCD
0
5
10
15
30
20
0
5
10
15
30
20
0
5
10
15
30
20
0
5
10
15
30
20
0
5
10
15
30
20
TEST/MANUAL START + ...HOURS
RESET
7d
FREQUENCY
12h
8h
24h 2d
4d
3d
0
5
10 30
20
MULTIPLA AC 230/24V LCD
0
10
15
30
20
0
5
10
15
30
20
0
5
10
15
30
20
0
5
10
15
30
20
0
5
10
15
30
20
TEST/MANUAL START + ...HOURS
RESET
7d
FREQUENCY
12h
8h
24h 2d
4d
3d
0
5
10 30
20
MULTIPLA AC 230/24V LCD
0
5
10
15
30
20
0
5
10
15
30
20
0
5
10
15
30
20
0
5
10
15
30
20
0
5
10
15
30
20
TEST/MANUAL START + ...HOURS
RESET
7d
FREQUENCY
12h
8h
24h 2d
4d
3d
0
5
10 30
20
MIN
HOUR
LINE 2LINE 3
10 min
20 min
8h
24h
12h
10 min
20 min
1 2 3

MULTIPLA AC 230/24 V LCD 13
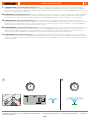
STOP. La funzione STOP (pressione contemporanea di TEST e START+. . . per 1 secondo) interrompe l’esecuzione di un ciclo di irrigazione in corso.
L’irrigazione riparte regolarmente con il ciclo successivo in base alla frequenza impostata. La funzione STOP consente inoltre di anticipare la chiusura della
valvola attivata in modalità TEST.
STOP. The STOP function (press and hold TEST and START+... together for 1 second) interrupts the watering cycle currently in progress. Irrigation will start
again normally with the next cycle, according to the set frequency. The STOP function can also be used to close a valve manually, when activated in TEST
mode.
STOP. La fonction "STOP" (pression simultanée de TEST et START+. . . pendant 1 seconde) interrompt l'exécution d'un cycle d'arrosage en cours. L'arrosage
repart régulièrement avec le cycle suivant en fonction de la fréquence congurée. La fonction "STOP" permet d'autre part d'anticiper la fermeture de la
vanne en mode TEST.
STOP. Die Funktion STOP (gleichzeitiges Drücken von TEST und START+. . . für 1Sekunde) unterbricht die Ausführung eines laufenden
Bewässerungszyklus. Die Bewässerung startet daraufhin wieder planmäßig mit dem nächsten Zyklus auf Basis der eingestellten Häugkeit. Die Funktion
STOP gestattet außerdem das vorzeitige Schließen eines oenen Ventils im TEST-Modus.
STOP. La función STOP (pulsando al mismo tiempo TEST y START+. . . durante 1 segundo) interrumpe la ejecución de un ciclo de riego en curso. El riego
se reanuda normalmente con el ciclo siguiente de acuerdo con la frecuencia denida. Además, la función STOP permite anticipar el cierre de la válvula
activada en modo TEST.
Per Multipla AC 230/24V LCD (codice): - For Multipla AC 230/24V LCD (code): - Pour Multipla AC 230/24V LCD (code): - Für Multipla AC 230/24V LCD (Art.): - Para Multipla
AC 230/24V LCD (código):
IT
UK
FR
DE
ES
8058
LINE
MIN
MULTIPLA AC 230/24V LCD
0
5
10
15
30
20
0
5
10
15
30
20
0
5
10
15
30
20
0
5
10
15
30
20
0
5
10
15
30
20
TEST/MANUAL START + ...HOURS
RESET
7d
FREQUENCY
12h
8h
24h 2d
4d
3d
0
5
10 30
20
x1 sec.
1 2

MULTIPLA AC 230/24 V LCD 14
RESET. La funzione RESET chiude la valvola, se aperta, e spegne il programmatore. L’irrigazione sarà interrotta no ad un nuovo comando di START+…,
oppure di TEST. L’orario viene annullato, mentre durata e frequenza rimangono inavariati. Per modicarli, agire manualmente sulle singole manopole. Per
eettuare il RESET premere contemporaneamente i pulsanti TEST e START+… per 10 secondi. Sul display compare la scritta OFF.
RESET. The RESET function closes the valve, if currently open, and switches the timer OFF. Watering will be suspended until the START+... button is
pressed again, or until a TEST is run. The time is deleted while the run time and frequency remain unchanged. To change them, manually adjust the
individual dials. To RESET the timer, press the TEST and START+… buttons simultaneously and hold them for 10 seconds. The message OFF appears in the
display.
RESET. La fonction "RESET" ferme la vanne, si celle-ci est ouverte, et arrête le fonctionnement du programmateur. L’arroseur sera arrêté jusqu'à une
nouvelle commande de START+… ou de TEST. L'horaire est annulé, tandis que durée et fréquence restent inchangées. Pour les modier, agissez
manuellement sur les manettes. Pour activer la réinitialisation (RESET), appuyez simultanément sur les touches TAST et START+ pendant 10 secondes. Sur
l'écran apparaît l'indication OFF.
RESET. Die Funktion RESET schließt das Ventil, wenn es geönet ist, und schaltet den Bewässerungscomputer aus. Die Bewässerung wird unterbrochen
bis zu einem neuen START+…- oder TEST-Befehl. Die Uhrzeit wird zurückgesetzt, während die Dauer und Häugkeit unverändert bleiben. Um sie zu
ändern, betätigen Sie manuell die einzelnen Schalter. Zum Vornehmen des RESET drücken Sie gleichzeitig die Tasten TEST und START+… für 10
Sekunden. Auf dem Display erscheint die Anzeige OFF.
RESET. La función RESET cierra la válvula si se encuentra abierta y apaga el programador. El riego se interrumpe hasta que se pulsa de nuevo la tecla
START+…, o TEST. Se cancela la hora, pero la duración y la frecuencia permanecen inalteradas. Para modicarlas, ajuste manualmente los mandos. Para
efectuar el RESET pulse simultáneamente las teclas TEST y START+… durante 10 segundos. En el display, se visualiza la palabra OFF.
Per Multipla AC 230/24V LCD (codice): - For Multipla AC 230/24V LCD (code): - Pour Multipla AC 230/24V LCD (code): - Für Multipla AC 230/24V LCD (Art.): - Para Multipla
AC 230/24V LCD (código):
IT
UK
FR
DE
ES
8058
MULTIPLA AC 230/24V LCD
0
5
10
15
30
20
0
5
10
15
30
20
0
5
10
15
30
20
0
5
10
15
30
20
0
5
10
15
30
20
TEST/MANUAL START + ...HOURS
RESET
7d
FREQUENCY
12h
8h
24h 2d
4d
3d
0
5
10 30
20
x10 sec.
-
 1
1
-
 2
2
-
 3
3
-
 4
4
-
 5
5
-
 6
6
-
 7
7
-
 8
8
-
 9
9
-
 10
10
-
 11
11
-
 12
12
-
 13
13
-
 14
14
-
 15
15


